
The Mac version of Microsoft Excel has always been slightly behind the Windows version, which may explain why so many users are eager to learn how to recover Excel files on Mac.
But it’s not just the not-exactly-perfect stability of the Mac version of Excel that can cause important spreadsheets to become unavailable. Users sometimes lose focus and delete the wrong file, storage devices can become corrupted, and there’s always the looming threat of physical damage.
Luckily, learning how to recover Excel files on Mac is not difficult, and there are even multiple approaches Mac users can choose from based on their specific circumstances and needs.
Table of Contents
Why Has My Excel File Disappeared?
Before we explain how to recover Excel files that have disappeared, let’s take a closer look at some of the reasons why that might happen, several of which we’ve already mentioned in the introduction to this article:
| Reason | Description |
| 💥 Sudden crash | A sudden Excel crash that occurs before you save your file can make it disappear in the blink of an eye. Fortunately, the spreadsheet software is designed to protect its users against sudden crashes by automatically saving opened files in a special temporary location. |
| 🤦♂️ User error | Users can be their own worst enemies, especially when they are distracted and don’t pay attention. A single mistake can lead to the disappearance of multiple Excel files, and there’s always the risk of it becoming permanent unless you recover them in time. |
| 💾 Storage device corruption | Modern storage devices are truly remarkable because they allow us to store multiple lifetimes’ worth of memories and other data without costing an arm and a leg. Still, they’re not perfect, and corruption remains one of the leading causes of data loss. |
| 🔨 Physical damage | Opening an Excel file stored on a computer that’s been run over by a truck or otherwise physically damaged is usually not possible without some serious rescue work. Professional data recovery centers are best equipped to recover data from physically damaged devices, making their services well worth paying for if your lost Excel files are extremely valuable. |
| 🦠 Malware infection | There are some pretty nasty strains of malware floating in the dangerous waters of the internet. Some of them can cause Excel files to disappear or even become deleted. We recommend using your usual antivirus to clean up any malware on your computer and files before proceeding with the recovery methods below. |
In many of the above-described situations, the recovery of the lost Excel file is still possible—at least if you act quickly and use the right recovery method.
How Do I Find an Excel File that Has Disappeared?
If your Excel file suddenly disappeared on your Mac, try searching for it before attempting recovery methods. It’s possible that it was just moved by accident (either by you, an application, or some rogue process). The most efficient way to look for it is by using Finder’s search tool.
In the top right corner of every Finder window, you’ll find a search bar. There, you can type your file name; if you don’t remember it, you can also filter search results to show all files with the Excel extension. Other filters you can utilize are keywords, last opened date, created date, etc. Finally, you can have the search tool scan your entire Mac or localize the effort to a specific folder. Here’s a quick guide:
Step 1. Launch Finder.
Step 2. Click the magnifier glass icon 🔍 in the top-right corner.
Step 3. Type the name of your file and press Return. If you don’t remember how the file was called, you can search for all files with the .xls or .xlsx extension instead. 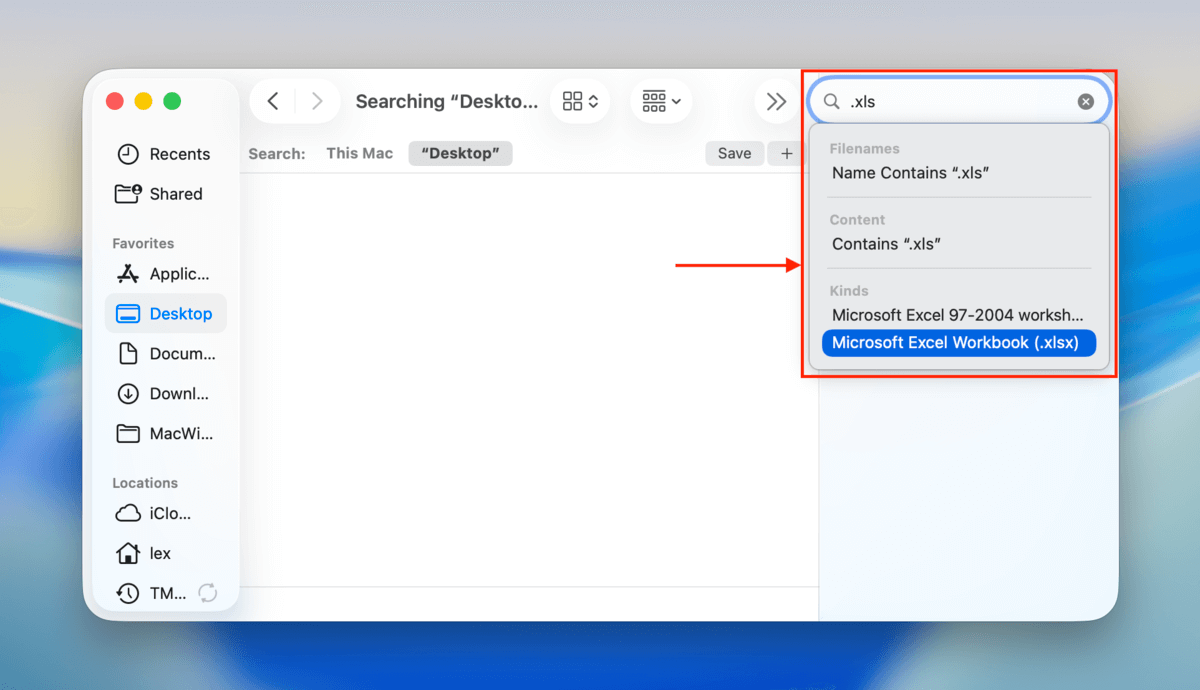
Step 4. Click the “This Mac” search option to search your entire Mac.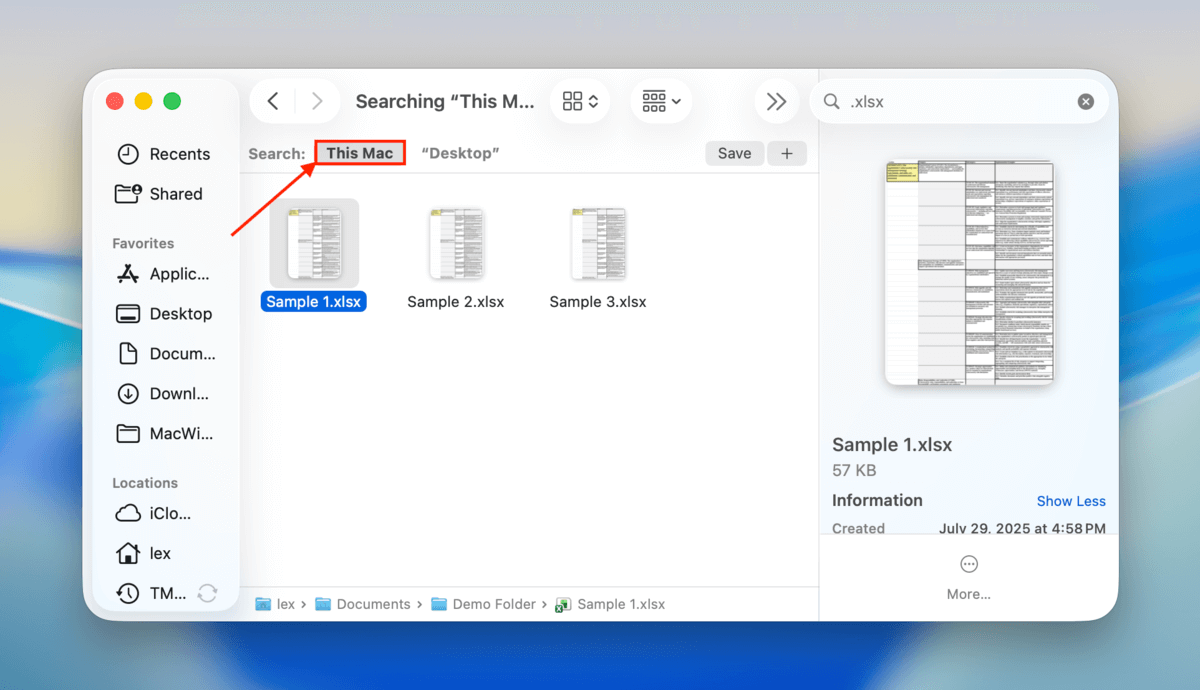
Step 5. Look for the missing Excel file and move it to a safe location.
No luck finding the missing file? Then it’s time to try the recovery methods described in the next section.
How to Recover a Deleted Excel File on Mac
There are several different ways how to recover an Excel file on Mac, and you need to choose the one that best fits your data loss scenario.
Method 1: Recover a Permanently Deleted Excel File with Disk Drill
Best for: Restoring Excel documents that were deleted from a drive, from Finder, and from the Trash folder.
Using a tool called data recovery software, you can potentially restore deleted files without relying on backups or the Trash folder. Data recovery software is capable of finding any leftover data fragments of your Excel file on the storage disk (even without Finder’s help). But time is of the essence for this method, that’s why it’s first on the list.
There are several data recovery apps you can choose from, but for this guide, we’ll be using a software called Disk Drill. It’s very beginner-friendly and compatible with the latest macOS, and most importantly, it’s very good at restoring spreadsheet documents in particular. Not only does it support various Excel file formats, but it also recognizes formats from apps like LibreOffice and Numbers.
Disk Drill also has a great preview feature that actually shows you the contents of your Excel file (you can even view different pages). You can use it as much as you want for free, and you can scan your drives without limits as well. You’ll need to purchase a one-time license to recover anything, but this is a great way to figure out if your files are even recoverable.
Step 1. Download and install Disk Drill, preferably somewhere other than the storage disk where your Excel files were last stored (to avoid overwriting their data fragments). For example, if your files are saved locally on your Mac, install Disk Drill on an external storage device.
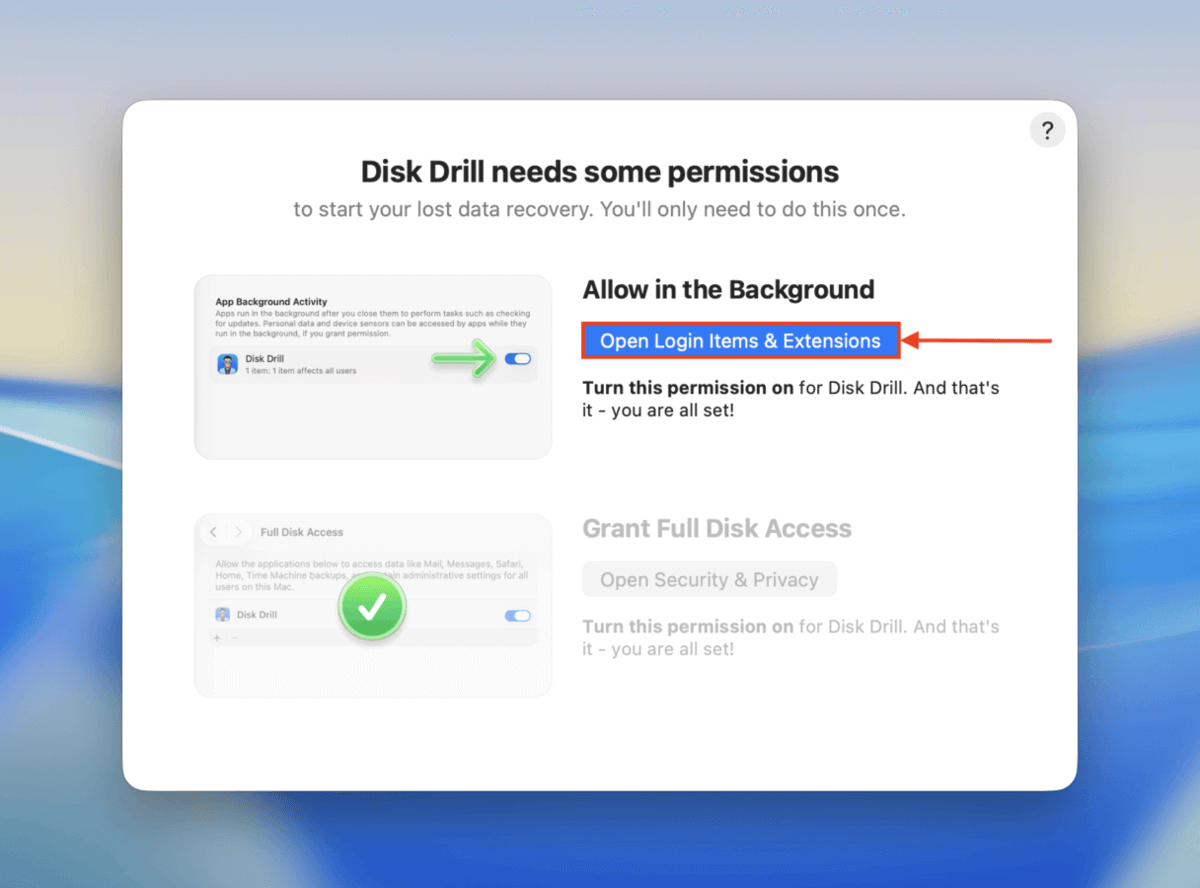
Step 2. Open Disk Drill and grant the necessary permissions (don’t worry, it’s safe!). You’ll only need to do this once.
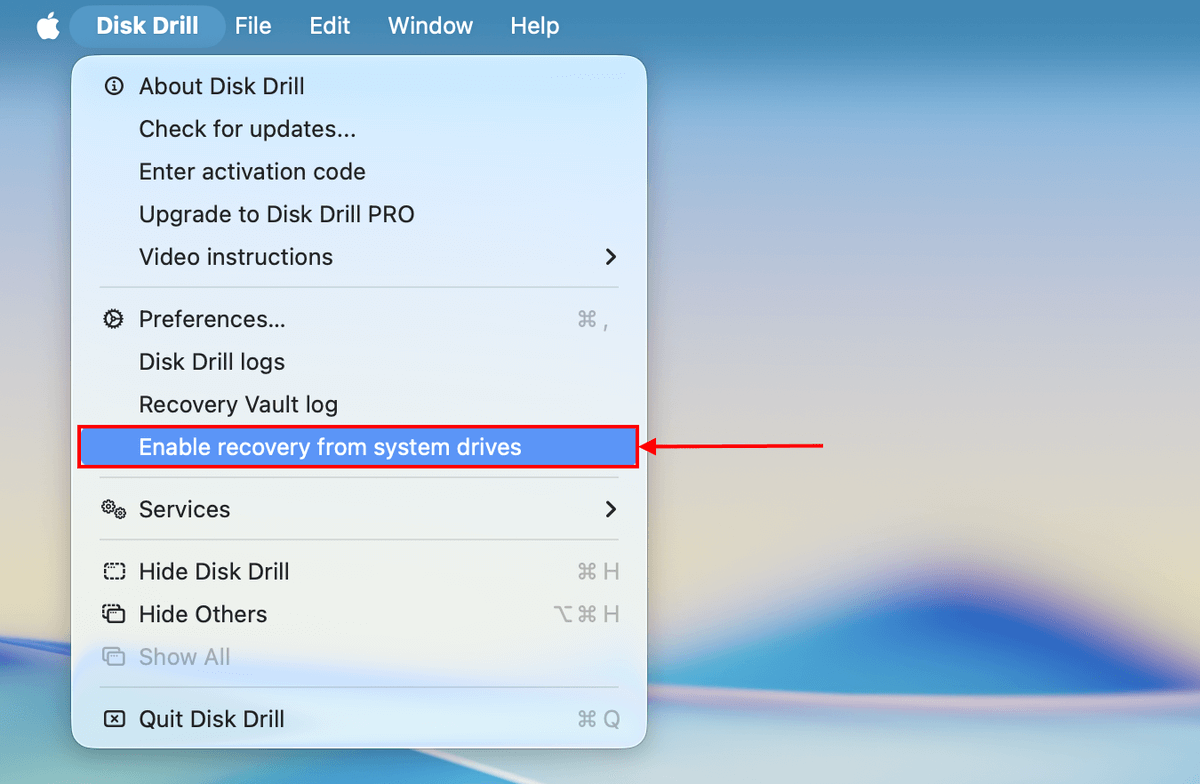
Step 3. Are you scanning your system drive? After launching Disk Drill, click Disk Drill on the menu bar. Then, in the context menu, select Enable recovery from system drives. Follow the wizard to continue. If you’re scanning an external storage device, skip this step and move on to step 4.
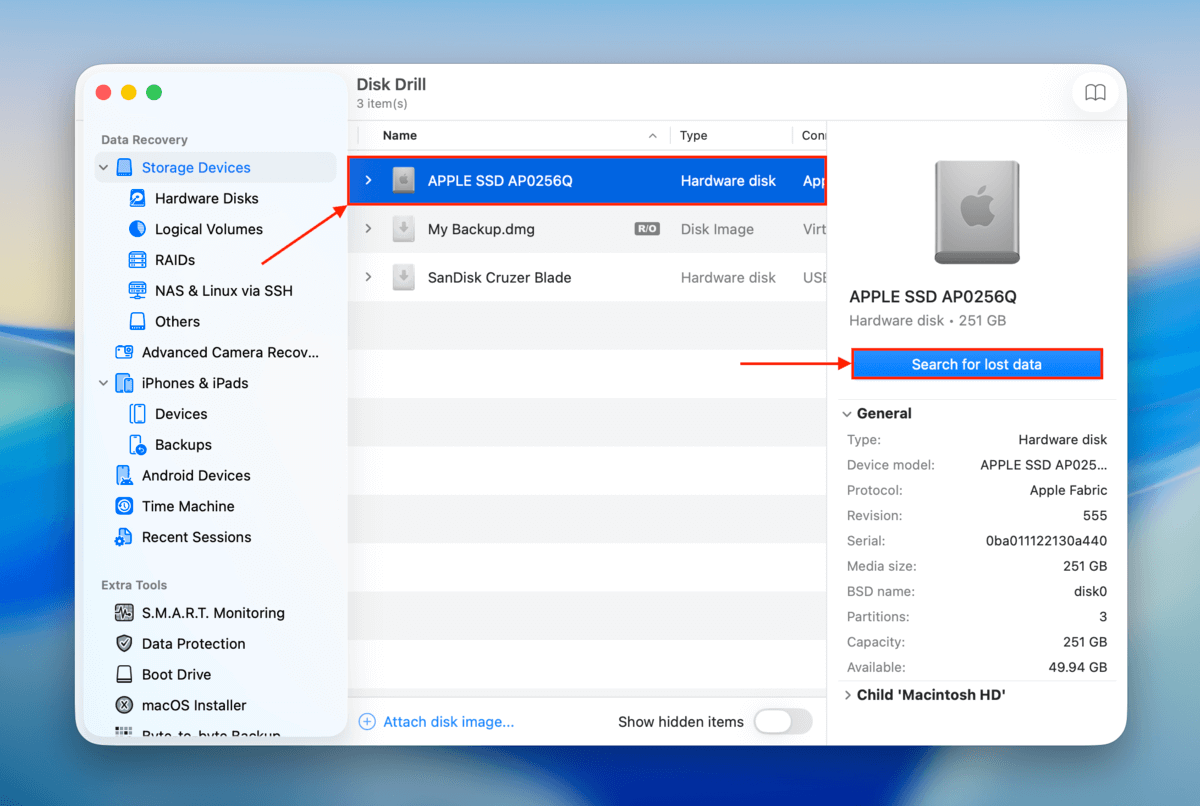
Step 4. Once you get to Disk Drill’s main menu, select the drive where your Excel files were stored and click Search for lost data. If you’re prompted to choose a scan type, select Universal scan.
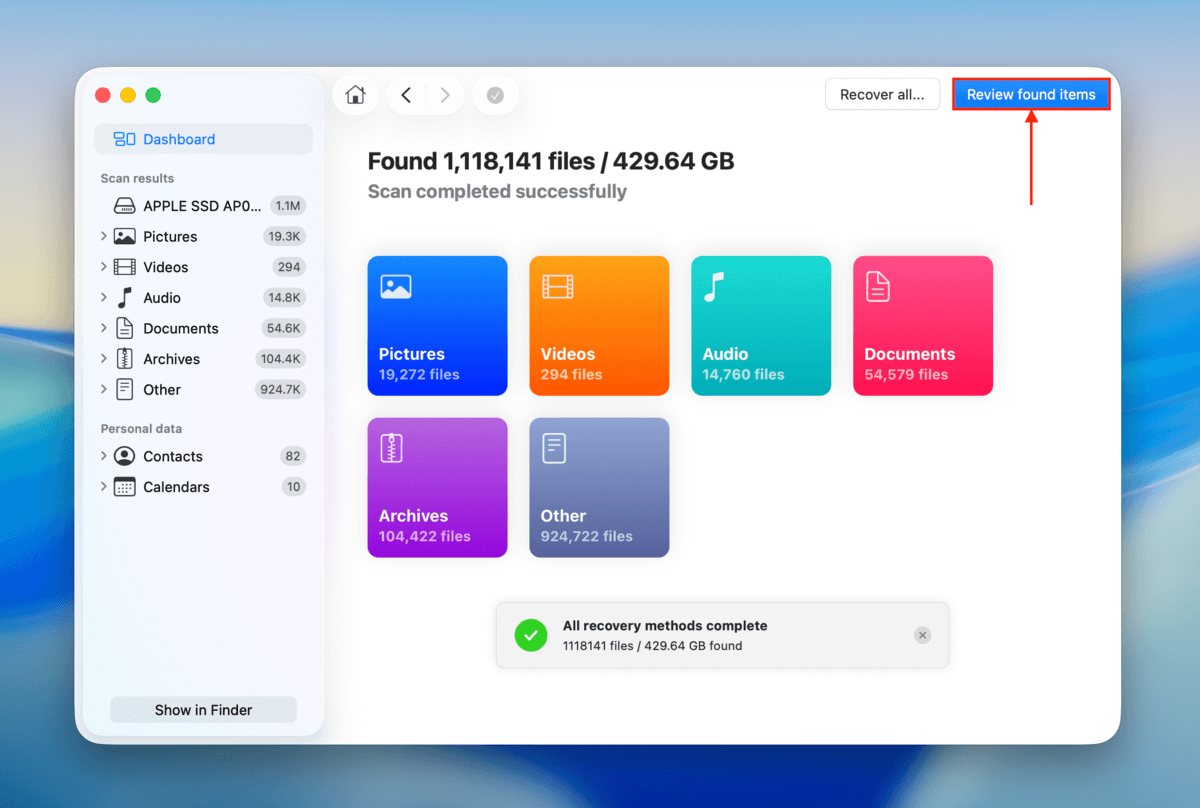
Step 5. Disk Drill will let you know once it’s done scanning your drive. Click Review found items.
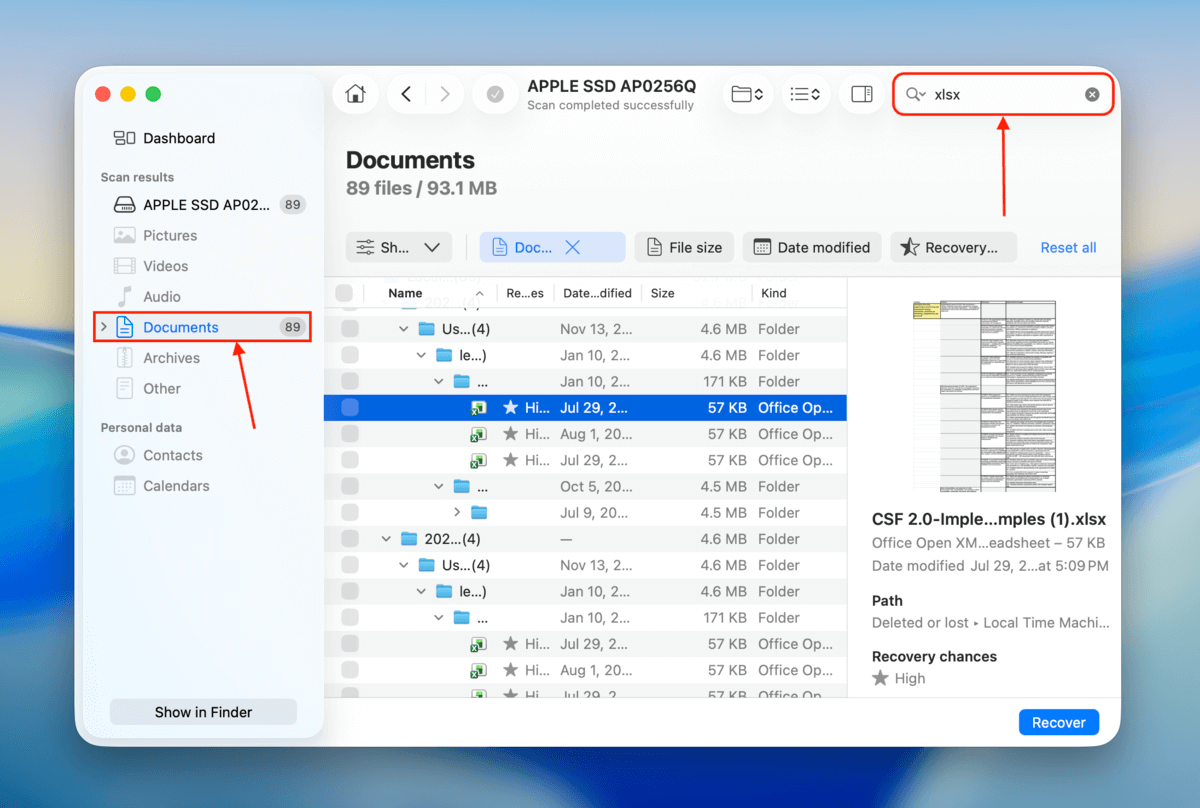
Step 6. Let’s narrow down the scan results. In the filters section in the left sidebar, select Documents. Then, use the search tool (in the top right corner) to specify your Excel document’s file name or extension. Once you find your files, click each of them once to display its preview in the right sidebar.
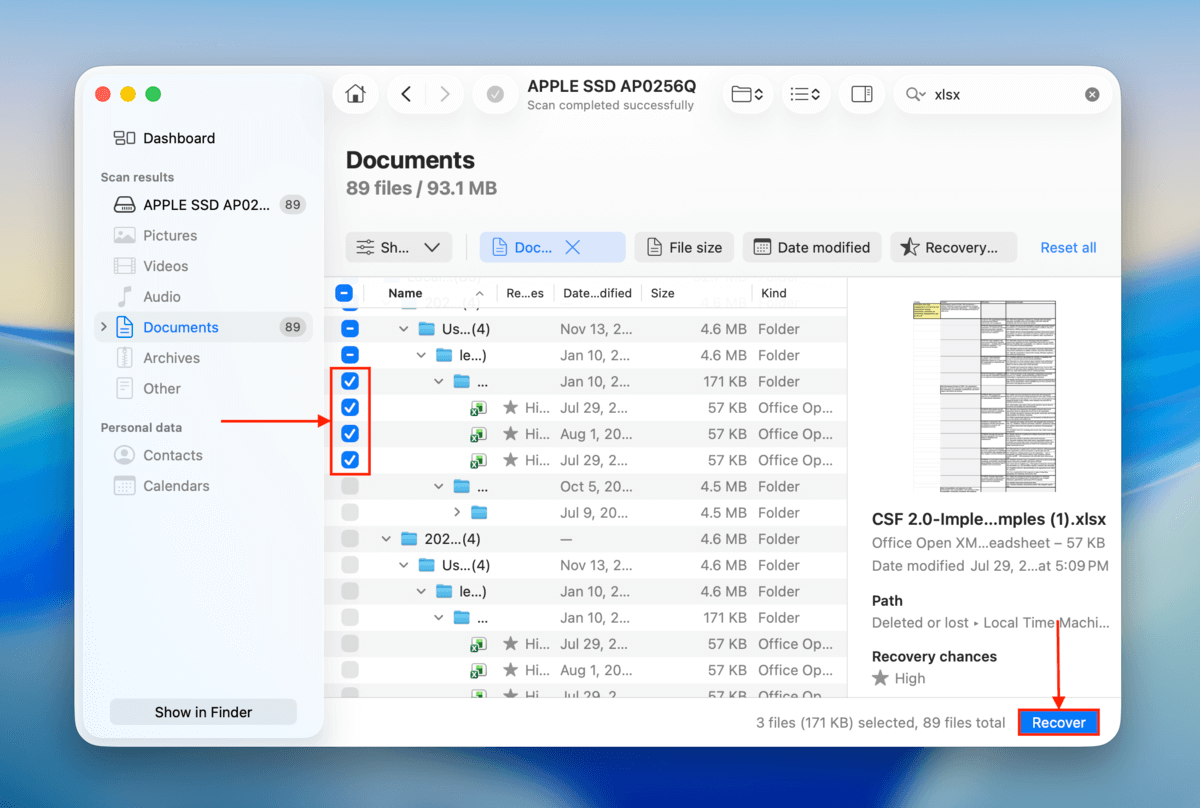
Step 7. Mark the boxes beside the files you want to restore. Then, click the Recover button.
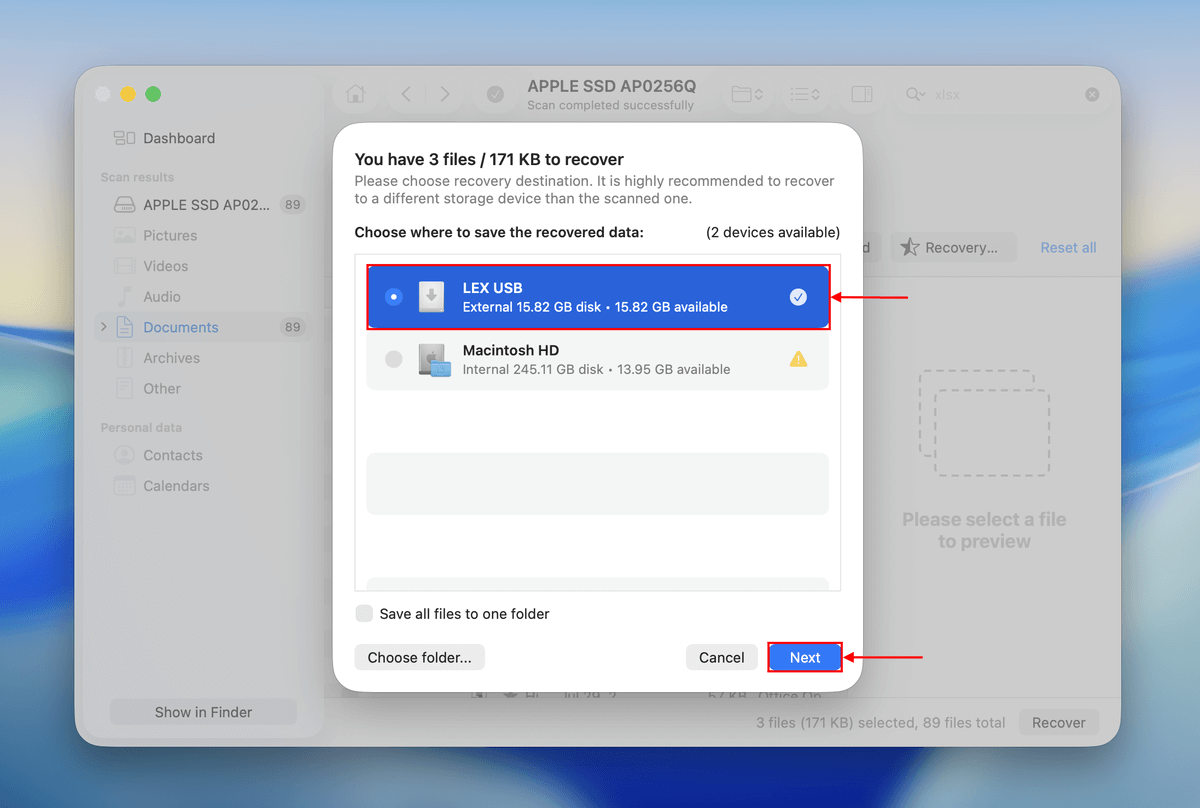
Step 8. Select a save location for your recovered Excel files–make sure it’s not on the same drive you’re recovering them from. Finally, click the Next button.
After recovering your Excel files, try opening them with Microsoft Office. Make sure you can open, modify, and save them before closing Disk Drill.
Method 2: Undelete the Excel File from Trash Bin
Best for: Recovering accidentally deleted Excel files that are still present in the Trash folder.
The Trash bin or Trash folder is a special folder on your Mac that temporarily stores all the files and folders you delete. Your Excel file will remain there until you either: (a) delete the file again from the Trash, (b) restore the file from the Trash, or (c) empty the Trash folder. This is the most reliable way to “undelete” an Excel file… But it only works if the file still exists in Trash, making it a highly conditional solution.
To recover a deleted Excel file from Trash Bin:
Step 1. Open Trash by clicking on its icon, located on the right side or bottom of the Dock.

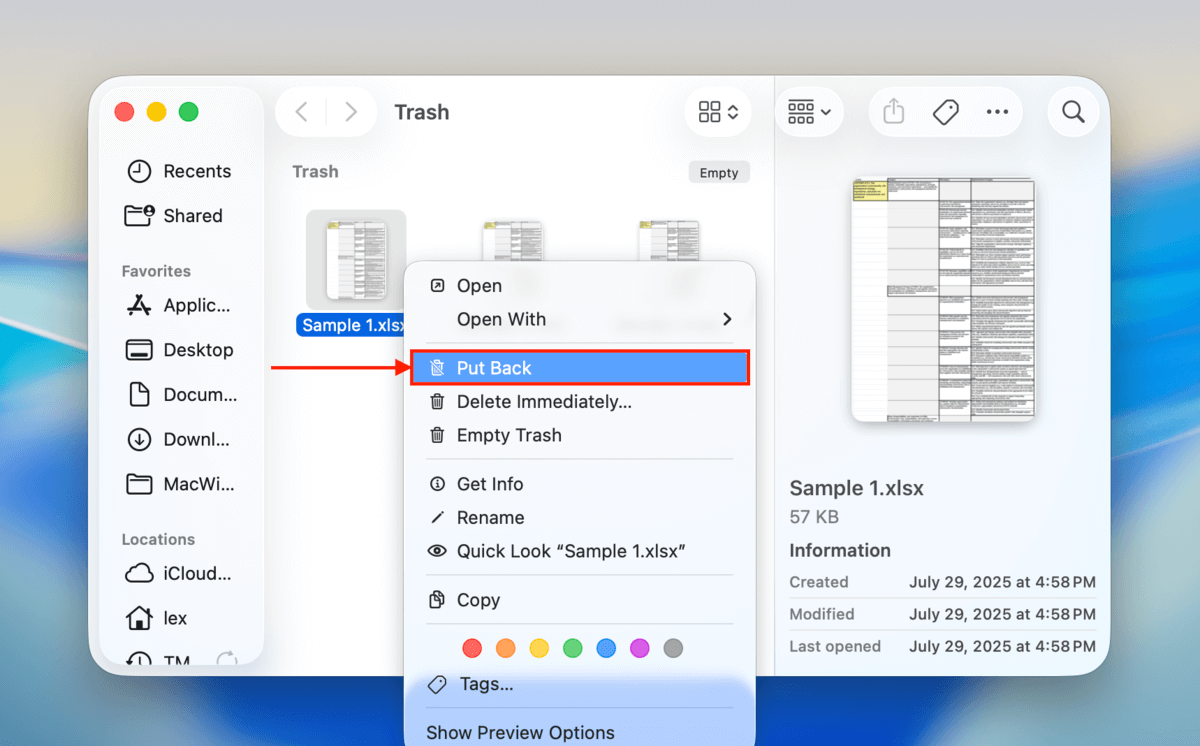
Step 2. Select the Excel file you want to recover.
Step 3. Right-click on any selected XLS file and select the Put Back option.
Method 3: Restore the Excel File Using Time Machine
Best for: Users who set up a Time Machine backup beforehand.
Time Machine is Apple’s data backup and recovery solution, and it’s included in all recent versions of macOS. If you deleted an important Excel file but had activated Time Machine beforehand, you should be able to get the file back with a few clicks even if it’s no longer present in the Trash folder.
To recover a lost Excel file using Time Machine:
Step 1. Connect your Time Machine backup disk if it’s not already connected to your Mac.
Step 2. Open the folder that contained the deleted Excel file. For example, if the files were in your Documents folder, open Finder and select Documents from the sidebar on the left.
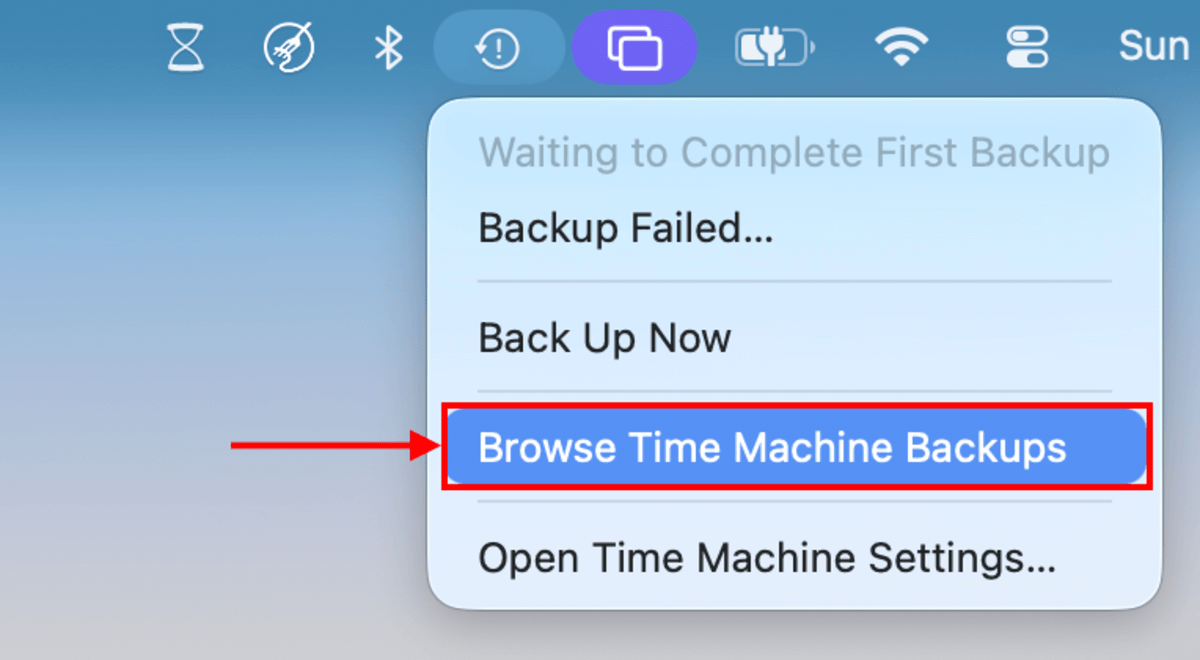
Step 3. Click the Time Machine icon located in the Menu Bar and choose Browse Time Machine Backups…
Step 4. Locate the Excel file you want to recover using the timeline on the right edge of the screen.
Step 5. Click Restore to restore the selected Excel file.

How to Recover an Unsaved Excel File on Mac
The three methods described above can help you recover an Excel file that was accidentally deleted or lost to corruption, but how do you recover an Excel file that was not saved because Excel crashed or a sudden power outage occurred?
The good news is that recovering unsaved Excel files on Mac isn’t any more complicated than the methods for restoring saved but lost Excel files. Let’s take a closer look at three methods that you can use to recover unsaved Excel files.
Method 1: Open the Microsoft Excel App
Before attempting any of the other (more effortful) methods, the first “fix” you should try is simply opening the Microsoft Excel app on your Mac. Without any additional steps or changes to your settings, Microsoft Excel will automatically attempt to recover any unsaved workbooks.
This appears to you as a prompt that says something like “Do you want to continue where you left off?” If you click Yes on the prompt, Excel will automatically try to load your file. If successful, you can manually save it to ensure you keep your progress.
Method 2: Recover the Unsaved Excel File from Temporary Files
Best for: Restoring Excel files that were recently lost due to closing the app without saving.
macOS has a special folder where the operating system and applications can temporarily store files that may or may not be needed at some point in the future. If you act quickly enough and have luck on your side, you may be able to find the unsaved Excel file there and recover it.
To find temporary files on Mac:
Step 1. Open Finder and go to Applications -> Utilities.
Step 2. Launch Terminal.
![]()
Step 3. Type “open $TMPDIR” and hit Enter.

With temporary files open, you need to find autosaved Excel files and copy them to a different folder. Unfortunately, temporary files typically don’t have file extensions, and their names tend to be non-descriptive. Your best bet is to look at file creation dates and manually check all files that were created around the time when the data loss incident took place.
Where are temporary files stored on Mac?
Temporary files on Mac are stored in the Temporary Folder, which is located inside each user’s home directory. Just don’t go looking for it there because you won’t be able to find it. The Temporary Folder is hidden, and you need to unhide it first.
Method 3: Get Back Excel Spreadsheets with AutoSave
Best for: Restoring Excel files that were saved or created using Microsoft 365 tools.
Microsoft 365 subscribers can take advantage of a cloud-based backup feature called AutoSave to save their work in real-time. This feature is available only for documents saved on OneDrive, OneDrive for Business, or SharePoint Online, which is why we haven’t mentioned it until now. However, AutoSave is by far the most reliable way to recover Excel files after a hard drive failure since it doesn’t depend on locally stored files.
To get back an Excel spreadsheet with AutoSave:
Step 1. Go to: https://onedrive.com/
Step 2. Log in with your Microsoft 365 account.

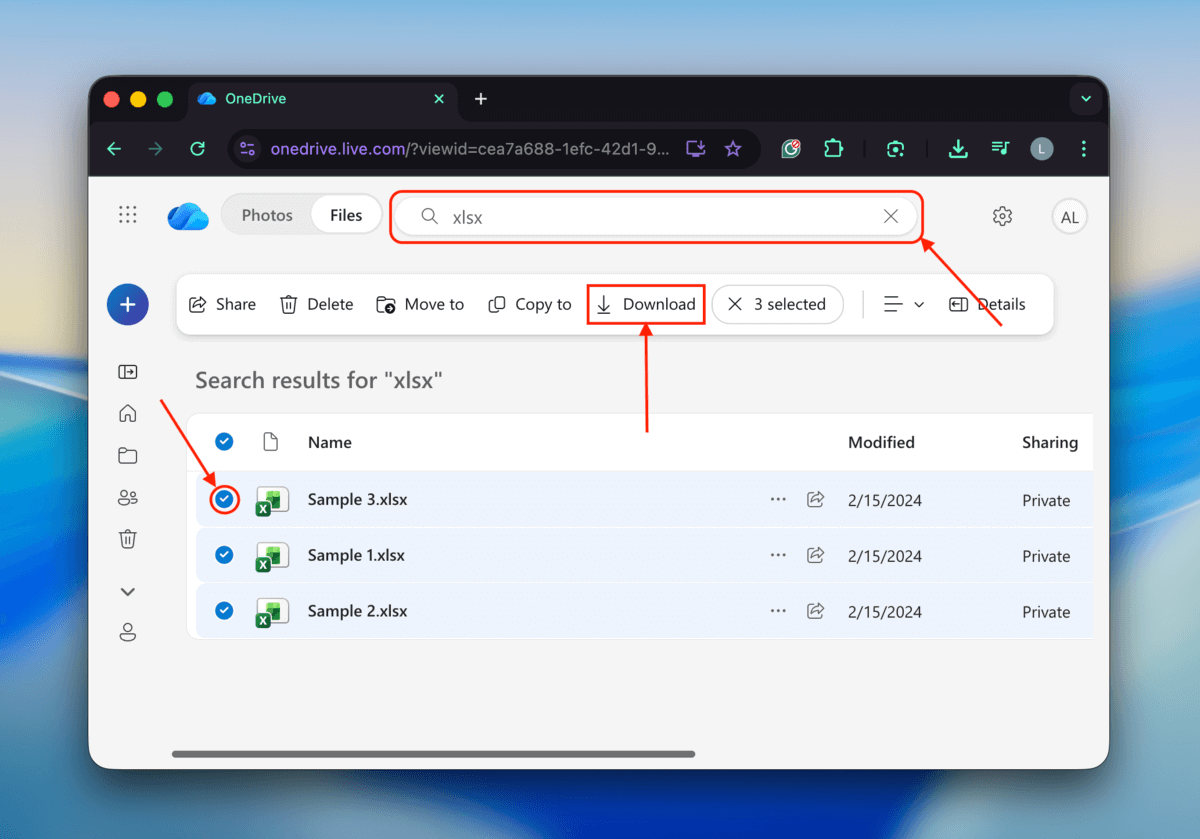
Step 3. Use the search bar to find your Excel files. You can also just type “xlsx” or “xlx” to view all Excel files saved to OneDrive. Then, select the files you want to restore and click Download.
How to Open Corrupted Excel Files
It’s easy for Excel files to become absurdly large, sometimes containing hundreds of thousands of rows across multiple sheets, all automated and interlinked with complex functions and macros. It shouldn’t then come as a surprise that Excel files can become corrupted and impossible to open.
Well, almost impossible because Excel has a built-in repair feature that you can use to open corrupted Excel files. The only problem is that this feature is included only in the Windows version of Excel. Still, there’s nothing stopping you from copying the corrupted file to a Windows computer and repairing it there by following the instructions below:
Step 1. Launch Excel.
Step 2. Click Open on the File tab.
Step 3. Click Browse.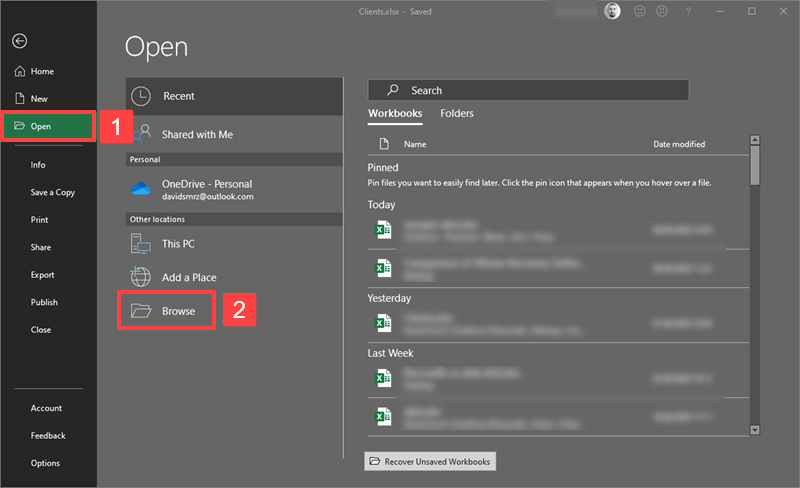
Step 4. Select the corrupted file that you want to open.
Step 5. Click the arrow next to the Open button, and then click Open and Repair.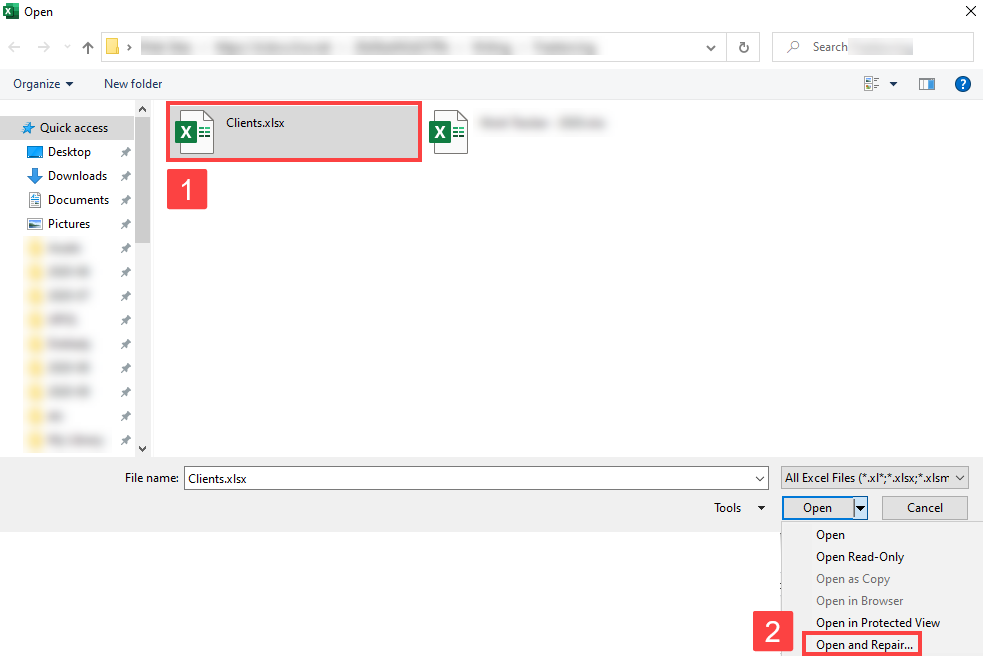
Step 6. Choose either Repair or Extract Data depending on if you want to attempt the file or simply extract data from it.
Alternative Solution:
If your Excel file is still unusable after using the repair tool, an alternative solution exists specifically for XLSX files. You can try converting your XLSX file to an XLS file, which is an older extension that is a lot less complex than its younger cousin. This process may also resolve compatibility issues that may be causing the corruption.
Fortunately, you don’t need any third-party tools to do this. Everything you need is in Finder.
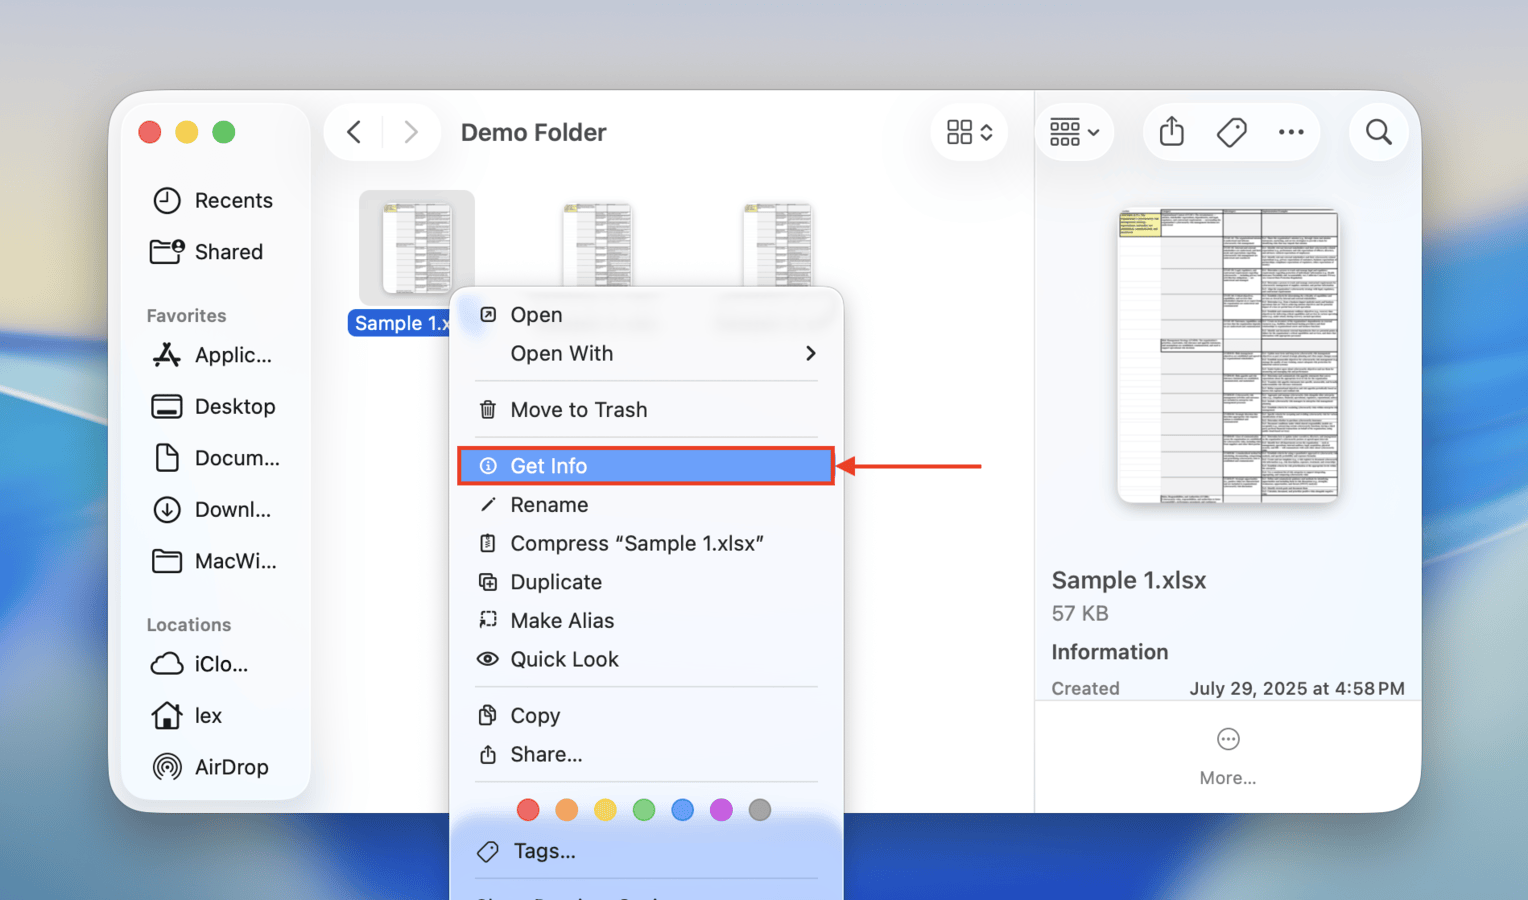
Step 1. Open Finder and locate your corrupted Excel file.
Step 2. Right-click your Excel file > Get Info.
Step 3. Under name & extension, replace xlsx with xls (make sure to keep the period before the extension). Then, hit Return.
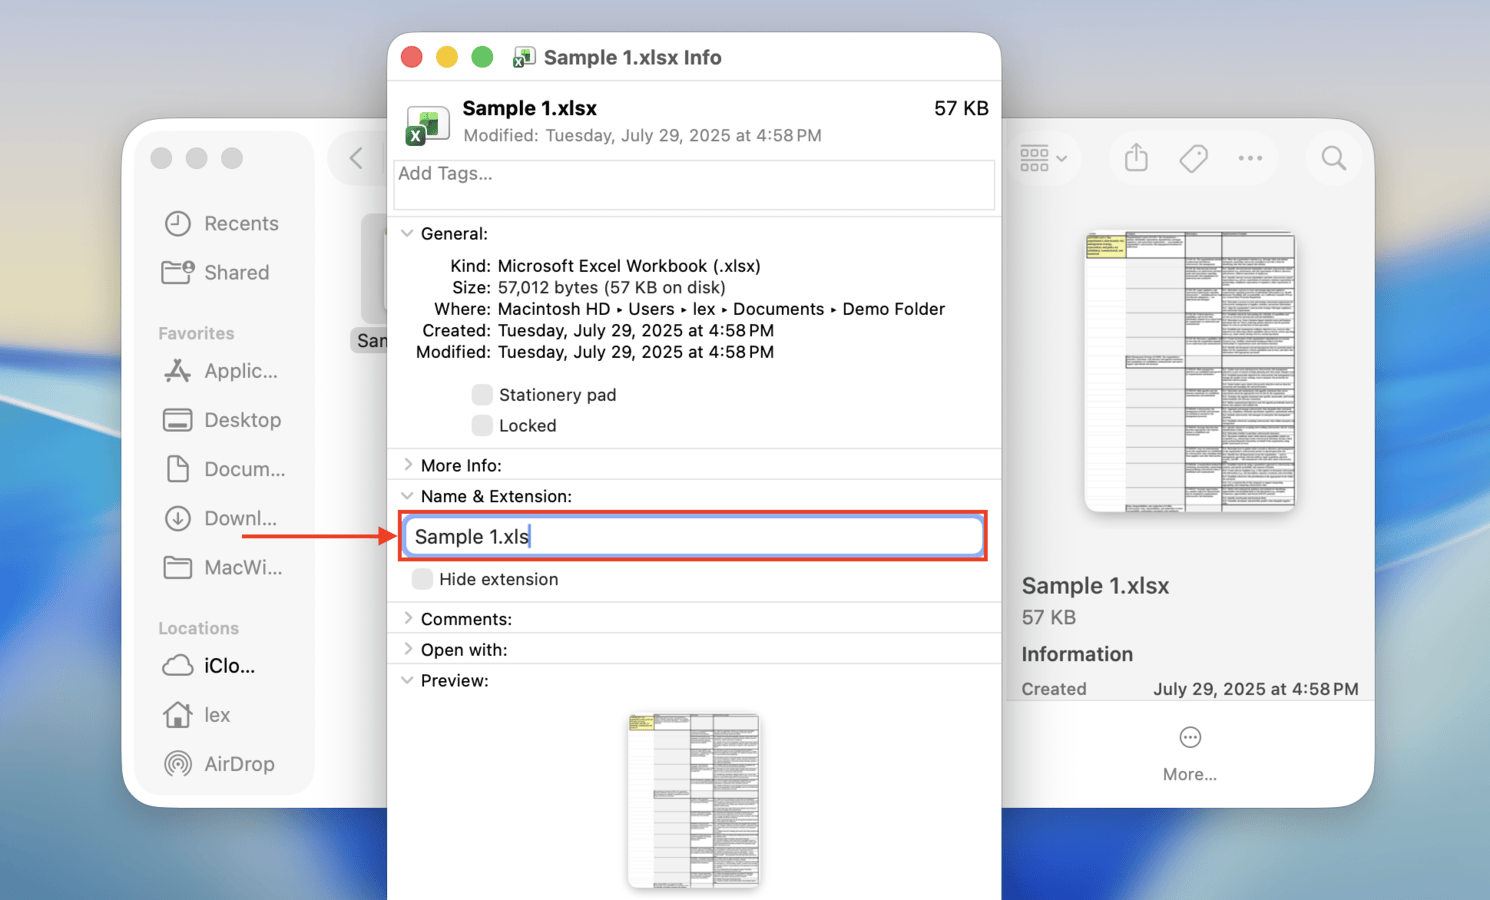
Step 4. Finally, when prompted, click Use .xls to confirm the action.
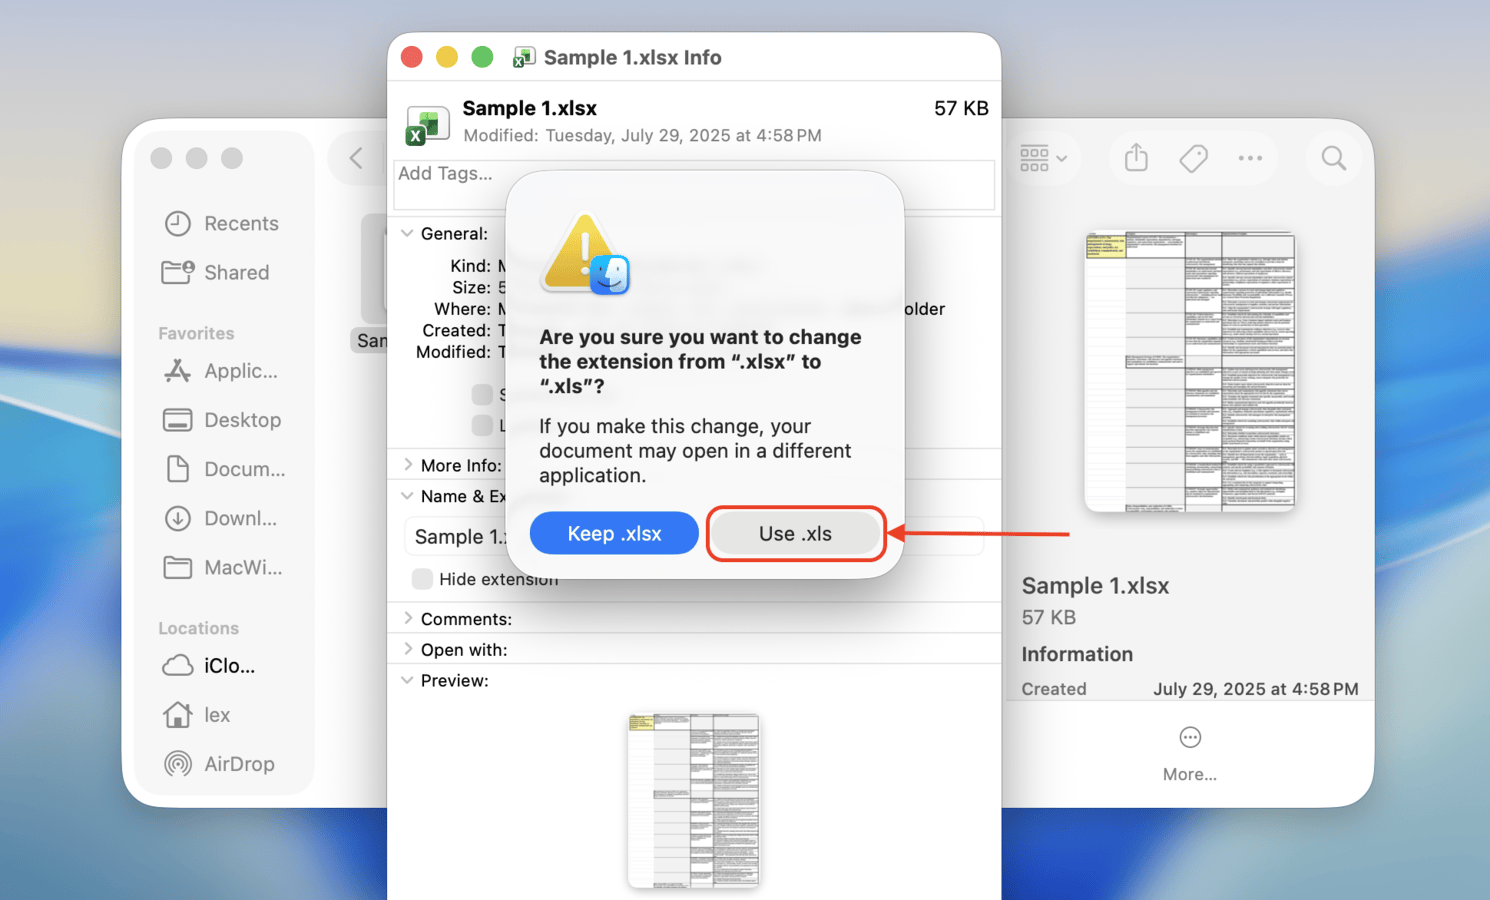
Your XLSX file should now be an XLS file – try opening it to see if it works. It still fails to open, or it causes errors, try opening the file with the Numbers app. If you can open it successfully, you can use Numbers’ export feature to make it work for Excel again.
Conclusion
While data loss is never 100% avoidable, there are several ways you can at least make sure that you never permanently delete your spreadsheet documents. First, ensure that autosave is enabled in Excel or any equivalent app that you’re using. Second, run Time Machine regularly, so you always have the latest copy of your most important documents.
Finally, if your Excel files are regularly acting up, consider switching to a spreadsheet app better optimized for macOS. Some examples we often use here at Macgasm are Numbers (from Apple), Google Sheets, and LibreOffice Calc. Google Sheets (and other cloud-based services) have the added bonus of automatically saving your documents every time you modify them.
FAQ
You can recover a previous version of an Excel file on Mac using the following steps.
- Open the Excel file.
- Click on the File menu then Restore > Restore to Last Saved.
- Locate the spreadsheet version you want to recover from the displayed list.
- Click Restore to overwrite the current version of the file. Use the Restore a Copy option to save a new version without overwriting the open file.
Once an Excel file has been overwritten on your Mac, the recovery options are limited. You will not be able to use data recovery software to retrieve files that have been overwritten by new data. Use the following procedure to restore the file from a Time Machine backup.
- Connect the storage device with the Time Machine backups to your Mac.
- Open a Finder window in the folder that held the Excel files.
- Click the Time Machine icon on the Mac menu bar to open Time Machine.
- Scroll through the snapshots and backups to find the Excel file you want to restore.
- Select the file to be recovered and click the Restore button. The Excel file will be restored to its original location.
You can find the Excel AutoRecovery folder in the following location on your Mac:
/Users/<username>/Library/Containers/com.microsoft.Excel/Data/Library/Application Support/Microsoft
Use Microsoft Word for Mac’s AutoRecovery feature to recover an unsaved Word document with the following procedure.
- Open a Finder Window on your Mac.
- Choose the entire computer as the search location.
- Search for AutoRecovery.
- A list of files will be displayed. Look for a filename that starts with AutoRecovery save of and has the name of the file you want to recover.
- Double-click on the file to open it in Word.
- Select File > Save As and save it to a new location.


