
從許多資料恢復軟體應用程式聲稱可以幫助您從Mac的內建硬碟以及所有連接的外部儲存設備中找回永久刪除的檔案來看,發現這些承諾並不需要花費太多研究。但您真的需要使用它們嗎?或許不需要!
在本文中,我們說明如何在不使用軟體的情況下恢復 Mac 上刪除的檔案,這些軟體如你所知,視選擇的應用程式而定,可能會花費不少錢。本文介紹的每種方法都完全安全,你可以在不到 30 分鐘內完成所有步驟。
如果他們未能恢復您的刪除檔案,那麼您可以查看所有方法 在 Mac 上恢復刪除檔案的方法。
目錄
方法#1: 資源回收筒
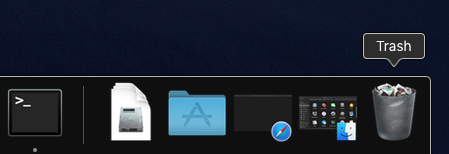
垃圾桶 資料夾,通常簡稱為垃圾桶,應該是您在 Mac 上查找已刪除檔案的第一個地方。這是因為已刪除的檔案首先會被移動到垃圾桶,在那裡它們會保留 30 天,然後才會被自動刪除。只要您沒有花太多時間注意到您的檔案遺失,您可以不費吹灰之力且無需任何軟體即可將它們找回。
步驟 1. 開啟垃圾桶資料夾,您只需點擊 Dock 上的垃圾桶圖示(應該在右側)。
rm ~/Library/Preferences/com.apple.dock.plist
當您重新登入後,Dock 將會恢復到預設狀態,您應該會看到資源回收筒圖示。或者,您可以使用以下 Terminal 指令直接開啟資源回收筒: 打開 .trash
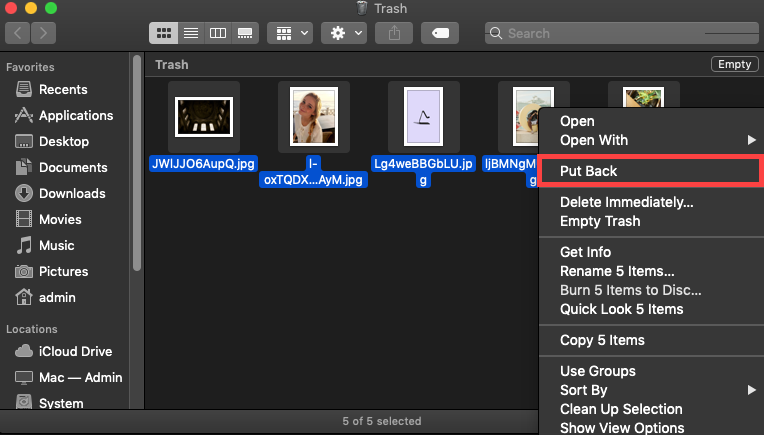
第 2 步。 檢視垃圾筒資料夾並選擇您想要還原的檔案。您可以手動查看資料夾內檔案的名稱,也可以使用搜尋功能找到特定檔案或具有特定檔案副檔名的所有檔案。
無論您選擇哪種方法,您需要透過按住 `command` 鍵並點擊檔案來選取每個檔案。
第 3 步。 Finally, right-click on any of the selected files and select the Put Back option. The files will be moved back to their original locations. If you want to move them to a specific directory, you can simply drag and drop them to another Finder window.
方法 #2: 透過終端機的垃圾桶
不是很多 Mac 用戶知道也可以透過 Terminal 應用程式,從垃圾桶資料夾中還原檔案。為什麼你會想這麼做呢?因為有時候使用單一終端機命令命令比執行多個圖形界面操作更簡單,或者因為你在使用 Finder 時遇到了問題,讓你無法用滑鼠從垃圾桶中恢復已刪除的檔案。
步驟 1. Launch Terminal – to do so simply bring up Spotlight by pressing the Command key and Space bar at the same time, type “terminal,” and hit Return. Alternatively, open Finder and navigate to Applications and Utilities, which is where the Terminal app can be found.

第 2 步。 Then navigate to the Trash folder by entering the following command:
cd .Trash
如果您也想顯示垃圾桶資料夾的內容,請輸入此命令:
ls -al ~/.Trash
第 3 步。 To restore a file from Trash via Terminal, you need to use the mv command and provide the exact name of the file you want to restore and the recovery location as arguments, like this:
mv image.jpg ../
上述指令將名為 image.jpg 的檔案移動到主目錄。
您也可以使用以下命令同時移動垃圾桶資料夾中的所有檔案:
mv * ../
星號 (*) 被稱為萬用字元,它在文字值中充當一種未知字元的佔位符。在上述指令中,它用來恢復所有檔案,不管它們的檔名為何,但你也可以更有創意一些,使用它來恢復具有特定檔案副檔名的所有檔案:
mv *.jpg ../
這裡使用星號來恢復所有 .jpg 副檔名的文件。很有用吧?這就是為什麼有時在終端應用程式中執行某些操作會更有效率。
方法 #3: 使用 Time Machine 復原檔案
您是否使用 Time Machine,蘋果的備份軟體應用程式,自動備份您的 Mac 到外部儲存設備?如果是這樣,您很幸運,因為很有可能您能夠在不使用任何第三方資料復原軟體的情況下,復原您的檔案。
步驟 1. Open the folder where your deleted files were last located in Finder. Then, click the Time Machine icon located in the Menu Bar and choose Enter Time Machine. By opening Time Machine this way, you’ll have instant access to older versions of the folder.
![]()
第 2 步。 Time Machine will first display the most recent version of the folder, and your job is to use the two buttons and the timeline on the right find an older version of the folder, one that contains the deleted files. When you find it, select the files you want to recover just like you would normally.
![]()
第 3 步。 Now all you need to do to retrieve your files from the Time Machine backup is to click the Restore button at the bottom. You’ll be able to find the restored files in their original locations.
![]()
方法 #4: 應用程式專用的恢復功能
許多 Mac 應用程式都有自己的還原功能,幫助用戶避免災難性的資料遺失並在沒有第三方軟體的情況下還原已刪除的檔案。一個內建資料還原功能的原生 Mac 應用程式的好例子是 Photos 應用程式,這是從 Mac OS X Yosemite 及更新版本就包含的預設照片管理和編輯解決方案。
當你在照片應用程式中刪除相片時,影像檔案會被移至「最近刪除」相簿並停留 30 天。這段寬限期結束後,該相片會自動被刪除,你只能透過專門的第三方資料恢復軟體來復原它。
步驟 1. Open the Photos App and Navigate to the Albums tab. If you don’t mind using keyboard shortcuts and want to save some time, you can also open Spotlight (Command + Space), type “photos,” and hit Return.
![]()
照片應用程式操作簡單,其主視窗分為兩個窗格。右窗格顯示當前選定的資料庫、相簿或專案的內容,而左窗格顯示所有可用的資料庫、相簿和專案。
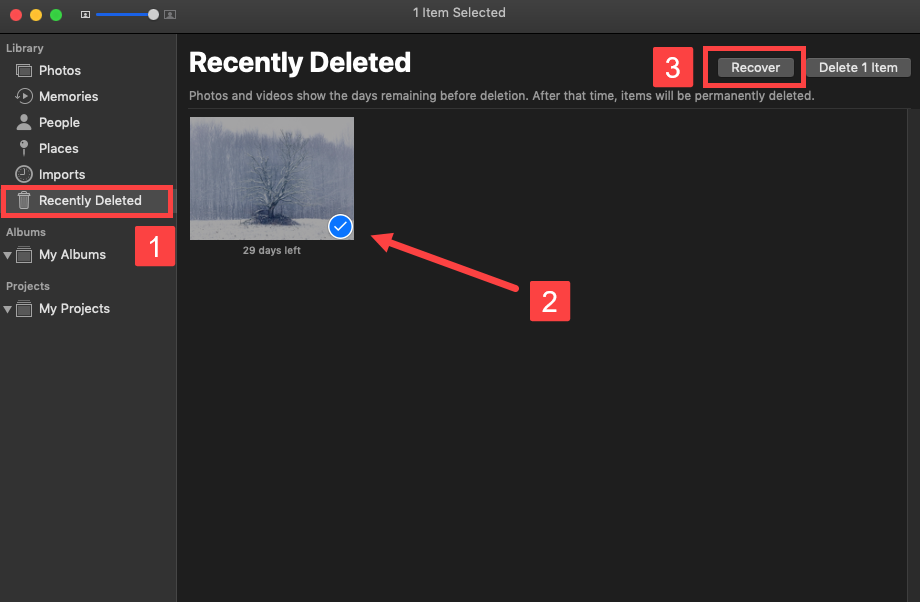
第 2 步。 Navigate to the Recently Deleted Library. Select the Recently Deleted library from the left pane so that you can view its content in the right pane.
第 3 步。 You should see all deleted photos, with the days remaining before deletion displayed under them. To select a photo, just click on it. If you want to select multiple photos, keep clicking until they’re all selected. Finally, click the Recover button in the top-right corner. You can find the recovered photos in the Photos library.
方法 #5: 撤銷命令
你知道你的 Mac 電腦會記錄你的所有操作嗎?Mac 會這樣做是為了讓使用者能夠復原最近對檔案所做的更改。你只需要在用來刪除遺失檔案的應用程式中啟動 復原命令 即可。
假設你不小心在 Finder 中刪除了一個重要的檔案,而且你想要找回它。只需將 Finder 聚焦並選擇編輯 > 復原(從螢幕頂端的編輯選單中),或在鍵盤上按下 Command-Z。
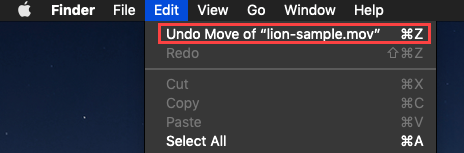
您可以繼續啟動復原命令以回到更早的時間,但請記住,當您重啟您的 Mac 或關閉用於刪除遺失檔案的應用程式時,過去動作的歷史記錄將會被刪除。
方法 #6: 從 iCloud 備份中恢復
有很多方法可以在 Mac 上恢復你刪除的檔案。如果你有 iCloud 備份,你可以輕鬆地從 iCloud 網站檢索這些檔案。以下是具體的操作步驟。
步驟 1. Visit iCloud.com and sign in with your Apple ID.

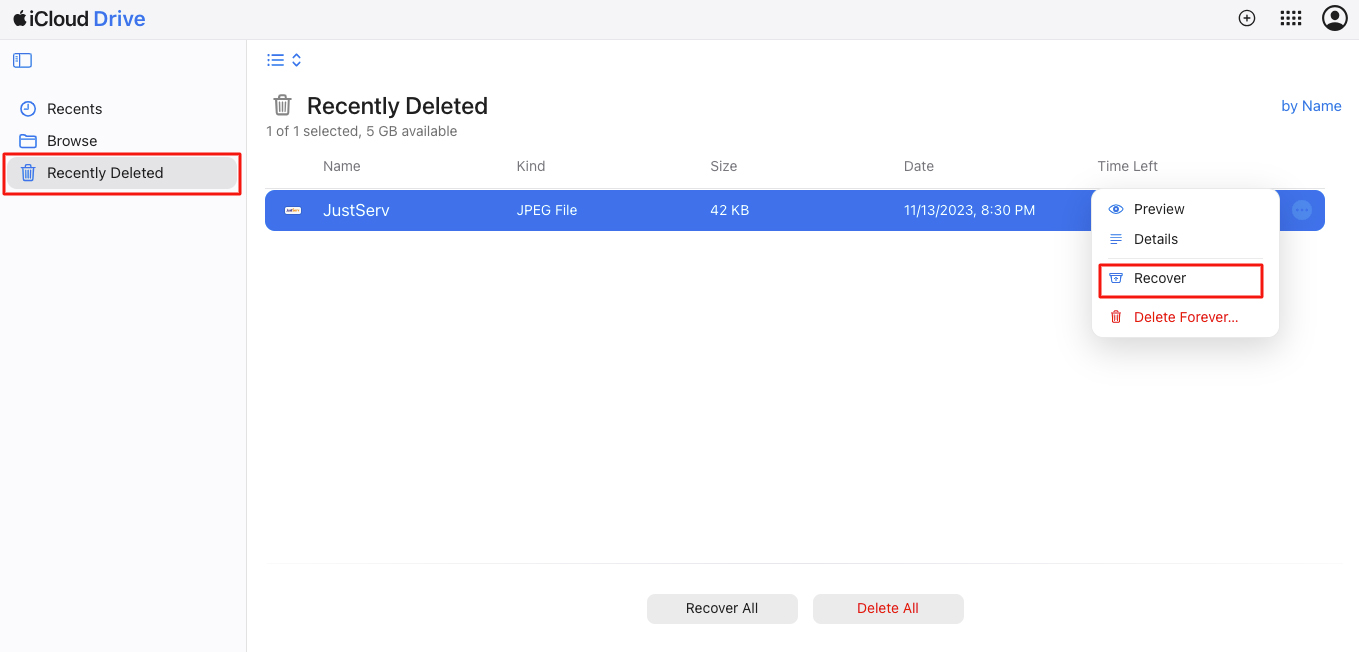
第 2 步。 After logging in, click on the menu button (it looks like a rectangle with white squares) in the top-right corner. From the options that appear, choose Drive to open iCloud Drive.
第 3 步。 To find files you recently deleted, click on 最近刪除 in the left sidebar.
步驟 4. On the 最近刪除 folder, you can restore all deleted files by clicking on 全部復原 at the bottom part of your screen. If you only want specific files, click on the file(s), click the three dot button, and choose 恢復 . Repeat these steps if needed.
結論
雖然不使用任何第三方軟體工具就可以從您的 Mac 上恢復已刪除的文件是有可能的,但大部分時候,您需要一些契機才能使其正常運作,並且依賴備份。
雖然許多數據恢復應用程序聲稱可以恢復永久刪除的檔案,但考慮替代的、具成本效益的方法是很重要的。您只需要找到已經在您的 Mac 上免費提供的合適工具。本文中列出的方法不僅安全,而且可以在 30 分鐘內完成,提供一個快速且高效的解決方案。
常見問題
如果您在垃圾箱文件夾中找不到檔案,最好使用數據恢復應用程式或依靠您的備份。


")


