
A corrupted hard drive is an inevitable part of owning a computer, whether it’s a MacBook or a Windows machine. Aside from having to spend for a new drive, the worst part of a corrupted hard drive is data loss – users commonly lose access to the data on those drives once it gets corrupted.
In this article, we tell you the early warning signs of a failing or corrupt hard drive, a way to recover data from that drive, and finally how to fix the drive by yourself.
Table of Contents
Common Signs of Hard Drive Corruption
In most cases, you’ll get a few warning signs before your corrupted drive fails. And while both Windows and Mac operating systems have features in place to warn you, they don’t always show up in time. Watch out for these signals:
| Symptoms | Description |
| 🐌 Performance Issues | Slowdowns, freezing, unusually slow copy-pasting |
| 👂 Weird Noises | Beeping, loud humming, clicking noises coming from your drive |
| 💻 Bad Sectors | When part of drive becomes damaged and unusable (and is marked by your operating system as such) |
| 🤖 S.M.A.R.T. Errors | S.M.A.R.T. stands for “Self-Monitoring Analysis Reporting Technology” – it’s a tool built into most modern hard drives that is meant to log any potential failures. It doesn’t give warnings by itself, but you can use certain tools to check the reports. We’ll talk about this is in the How to Recover Data From a Corrupted Hard Drive section below |
Can a Corrupted Hard Drive Be Fixed on Mac?
If your hard drive is recognized by the operating system, it means that the corruption is of a logical nature. In such cases, you may be able to repair the hard drive yourself and restore its working condition using DIY methods. To do this, use data recovery software to recover files from the corrupted disk. Once the recovery is complete, you can format the drive to remove any lingering traces of corruption.
How to Recover Data from a Corrupted Hard Drive
We strongly recommend restoring your data from a corrupted hard drive before attempting any repair methods (no matter how harmless they sound). Repairing a corrupted hard drive, by the very nature of the process, will cause at least partial data loss. If you’re completely unable to access the files on your corrupted hard drive, this means using data recovery software.
Data recovery software is a tool that can scan your hard drive directly for data, without having to rely on a fully working file system. There are several data recovery apps you can choose from, but we’ll be using Disk Drill for this guide. We chose it for its beginner-friendly interface (for demo purposes) and because it has a feature called Byte-to-byte backup. This allows you to create a sophisticated backup of your drive, which you can scan during the recovery stage–this is an incredible safety net for a corrupted hard drive, especially if it keeps failing.
Disk Drill is also (nearly) universally compatible with known file system formats, including ExFAT, FAT32, APFS, and HFS+. You can scan your hard drive as much as you want for free, as well as preview your files fully (which is a great way to figure out if they’re even recoverable). You’ll only have to decide if you want to buy the one-time license during the actual recovery.
Step 1. Download and install Disk Drill. If your corrupted hard drive is your Mac’s system drive, we strongly recommend that you download and install it to an external storage device (like a USB drive).
Step 2. Open Disk Drill. If this is your first time using it, you’ll need to grant the necessary permissions as shown by the prompt. Don’t worry, it’s safe!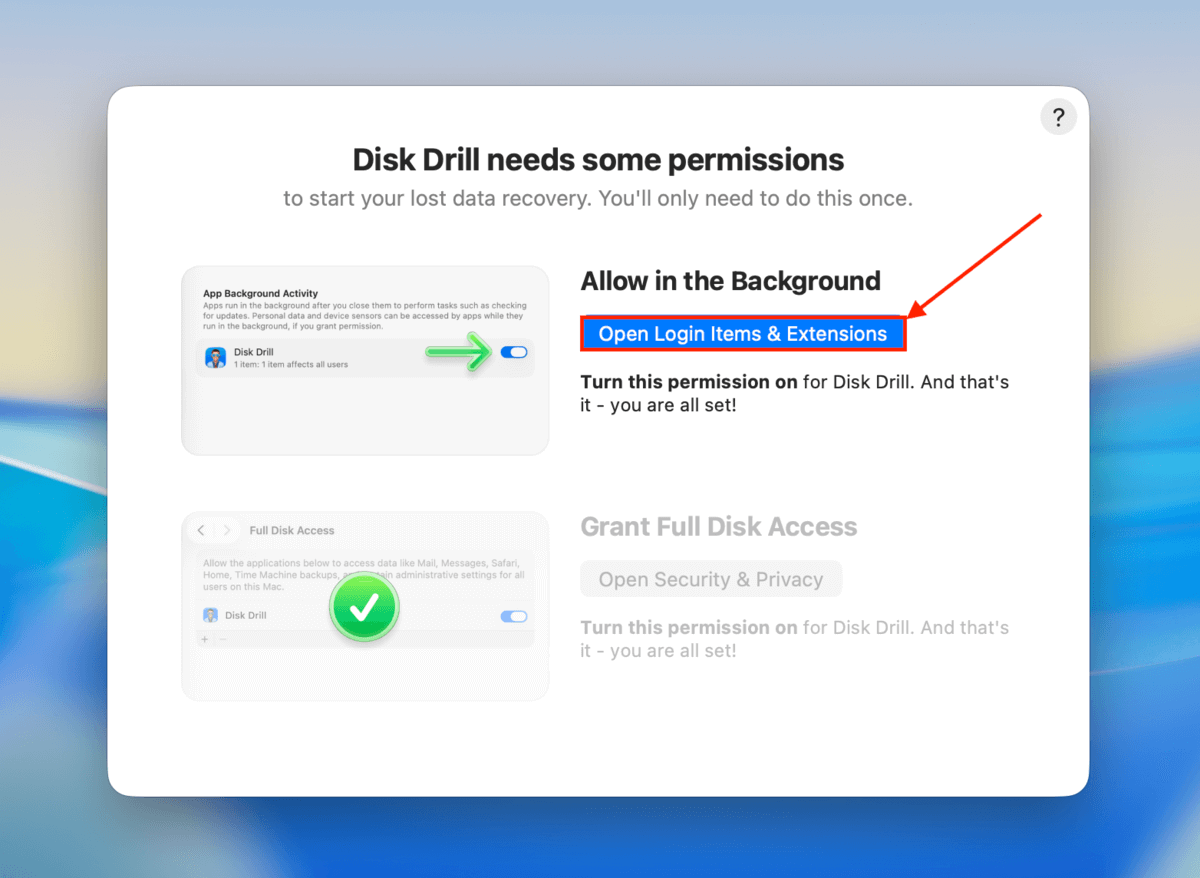
Step 3. Once you get to Disk Drill’s main menu, we recommend checking the S.M.A.R.T. Monitoring dashboard in the Extra Tools section (in the left sidebar). Then, click Turn on and select your hard drive. If the Status column says everything’s OK, you can skip backup creation and move to step 6. If you spot any issues, proceed to the next step.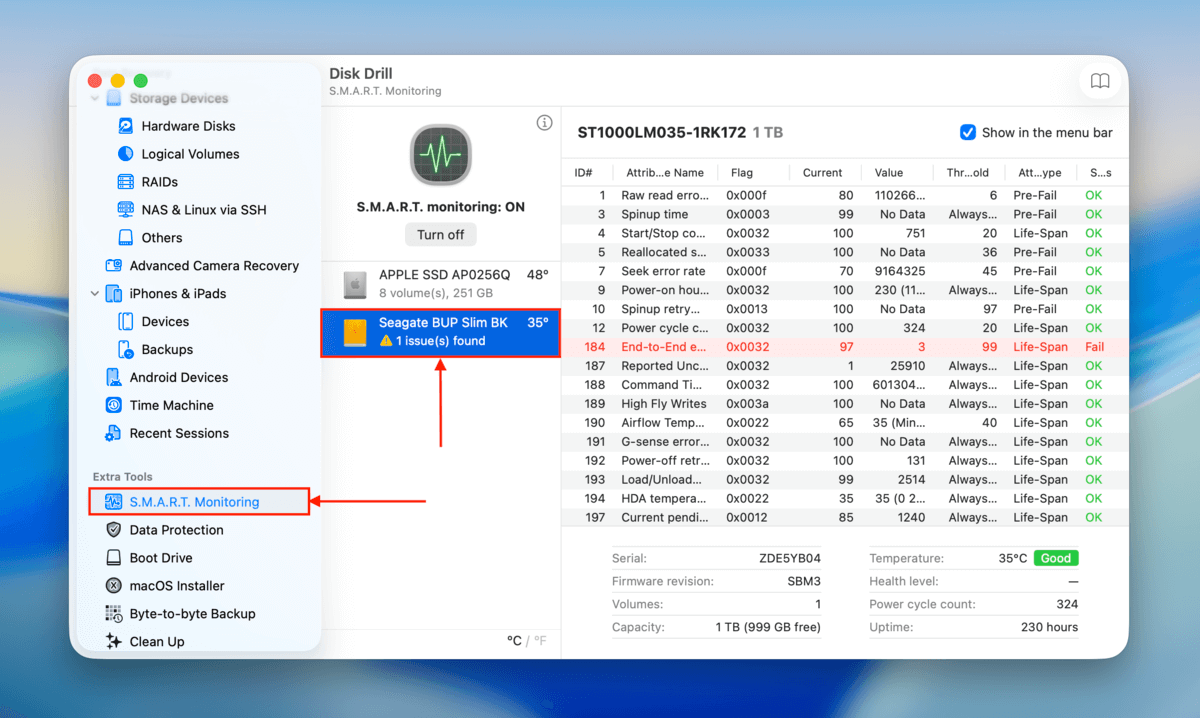
Step 4. If you spot any issues, click Byte-to-byte Backup in the sidebar (also under Extra Tools). Then, select your hard drive and click Create backup.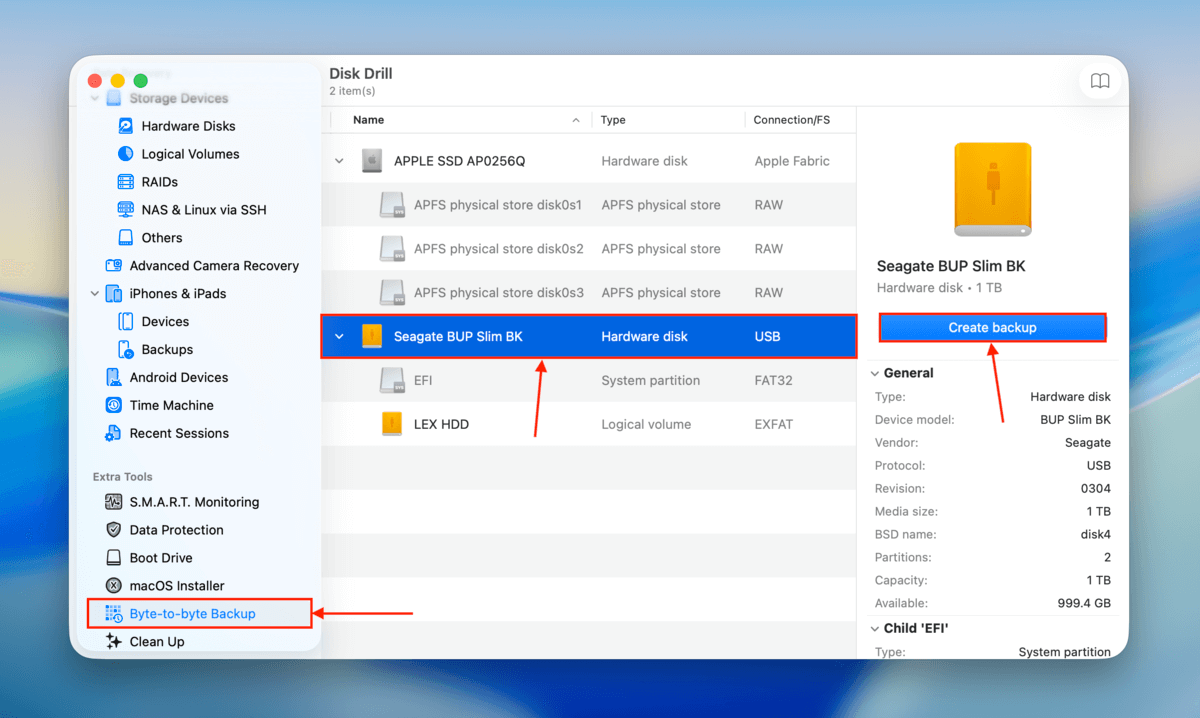
Step 5. Choose a name for the backup file, as well as the location where you want Disk Drill to save it. Then, click Save.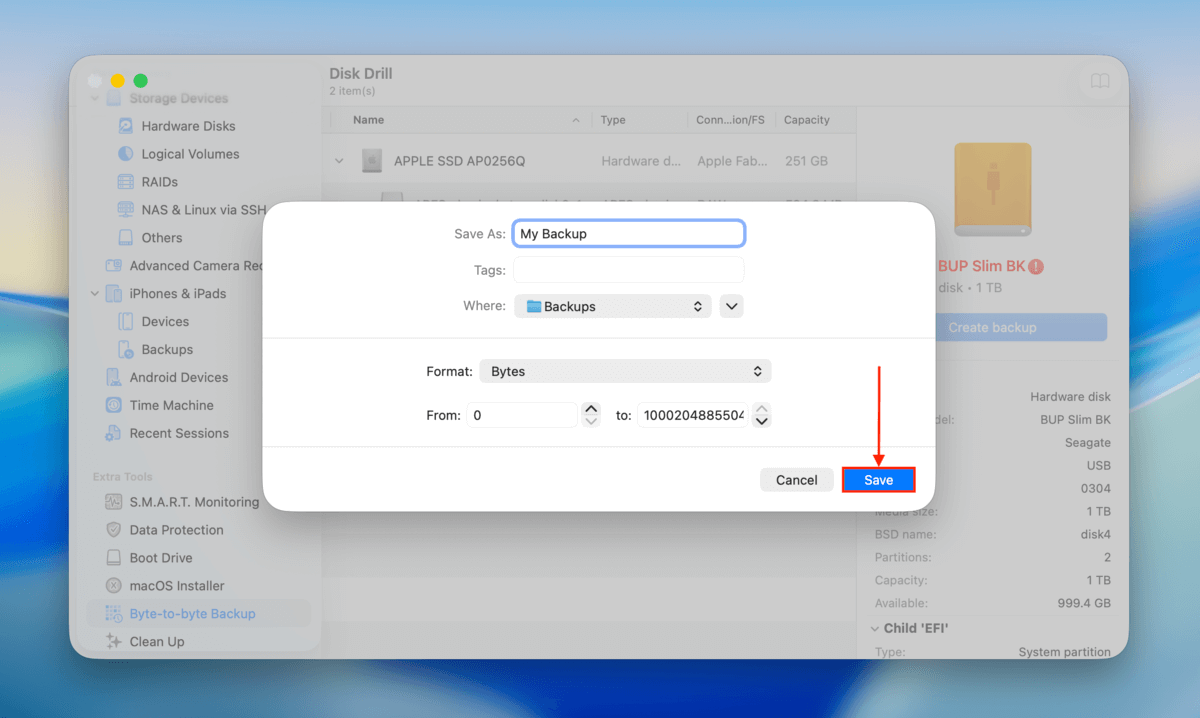
Step 6. Return to Disk Drill’s main menu (by clicking the home button). Then, on the left sidebar under the Data Recovery section, click Storage Devices. Click the Attach disk image… button at the bottom of the window. If you didn’t create a backup, just select your HDD and click Search for lost data (then, jump to step 9).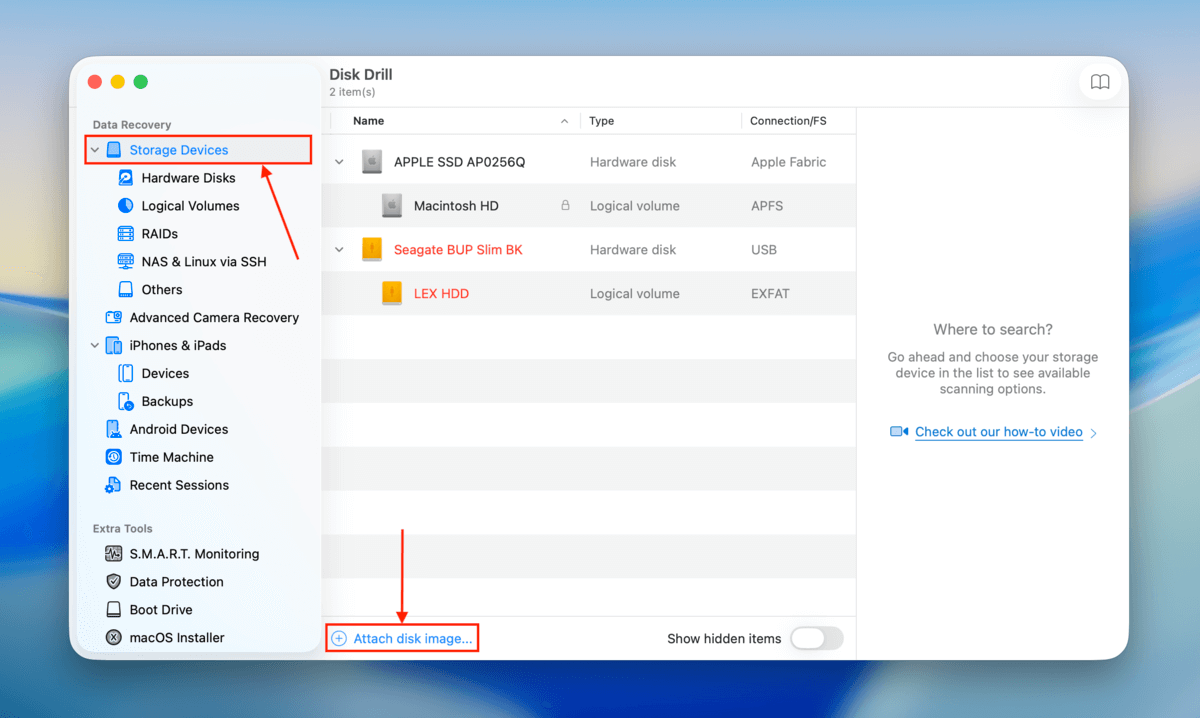
Step 7. Locate the backup file you created and click Attach.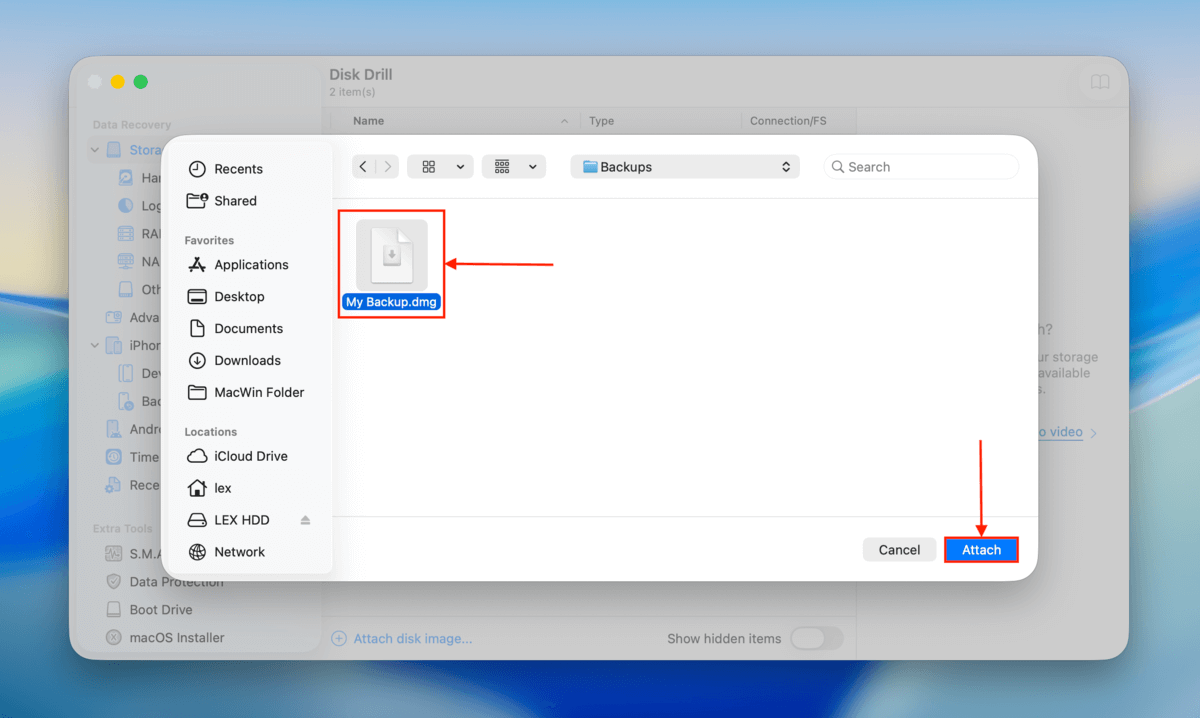
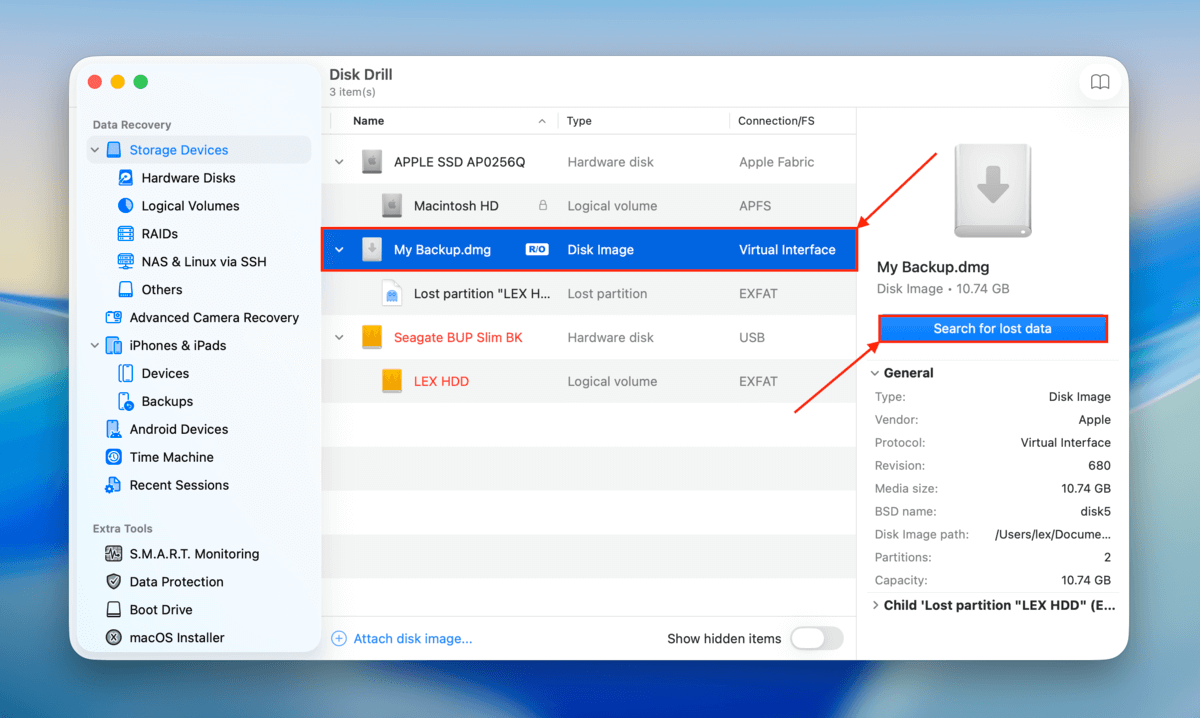
Step 8. Back in the source selection menu, click the backup file you just attached. Then, click Search for lost data.
Step 9. You’ll be prompted to select a scan type. Choose Universal scan. If you end up with unplayable videos after the recovery attempt, you can run the scan again with the Advanced Camera Recovery option.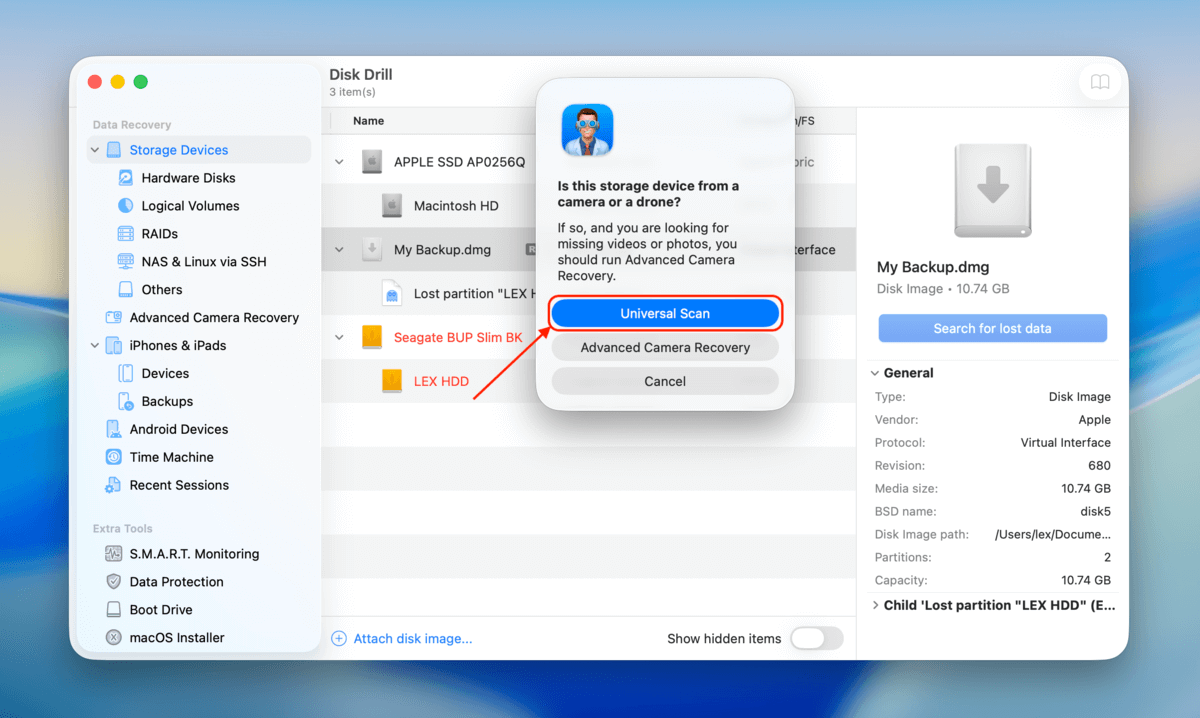
Step 10. Wait for Disk Drill to fully scan your drive. Then, click Review found items.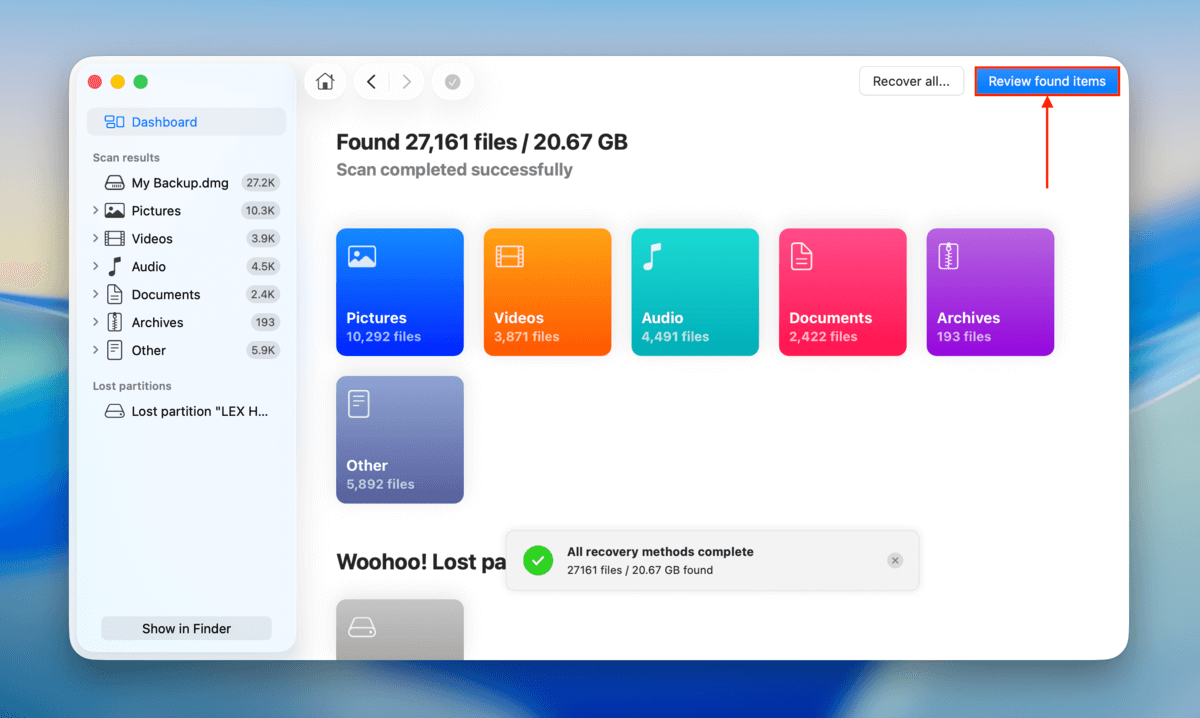
Step 11. You can use the search tool (top right corner) and the various filters in the sidebar if you want to look for specific file names or file types. You’ll also notice that scan results are saved under different recovery categories. If the corruption only made your drive inaccessible, you should find all your data in the Existing category. But if your files and folders were deleted or corrupted, you’ll have better luck with the Deleted or lost and Reconstructed categories.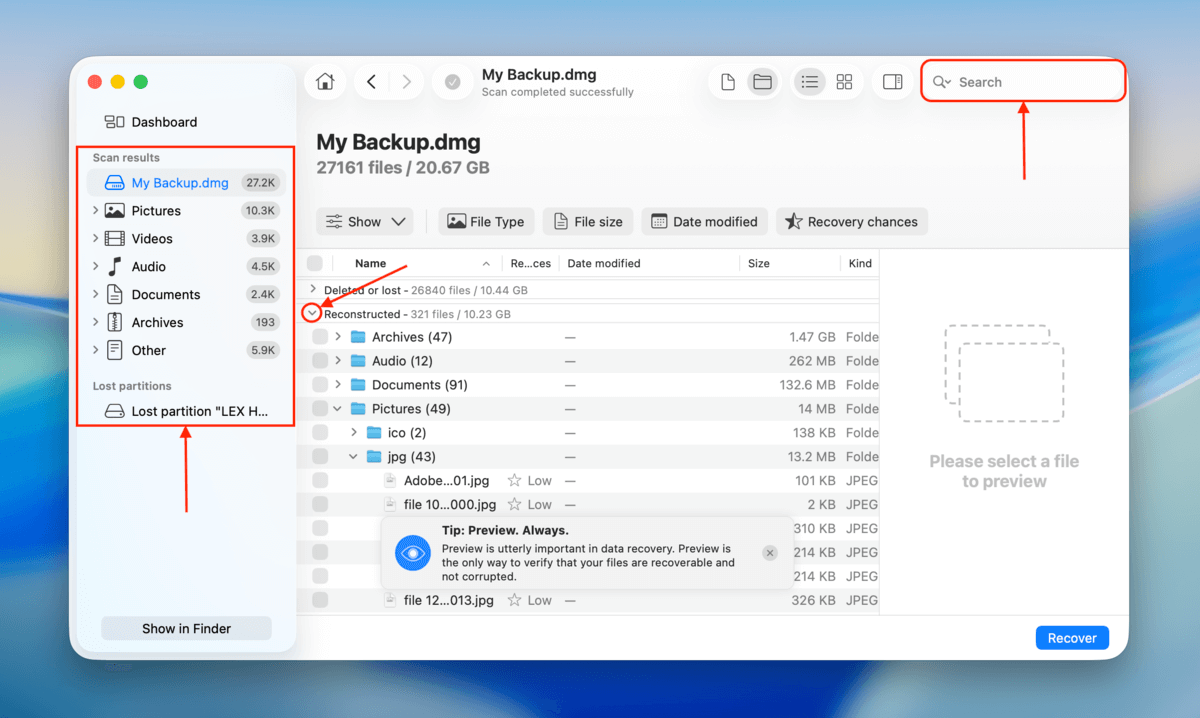
Step 12. We also recommend clicking each file once to display its preview (which appears in the right sidebar). This helps confirm if the file is still recoverable. Then, mark the boxes beside each file you want to restore and click Recover.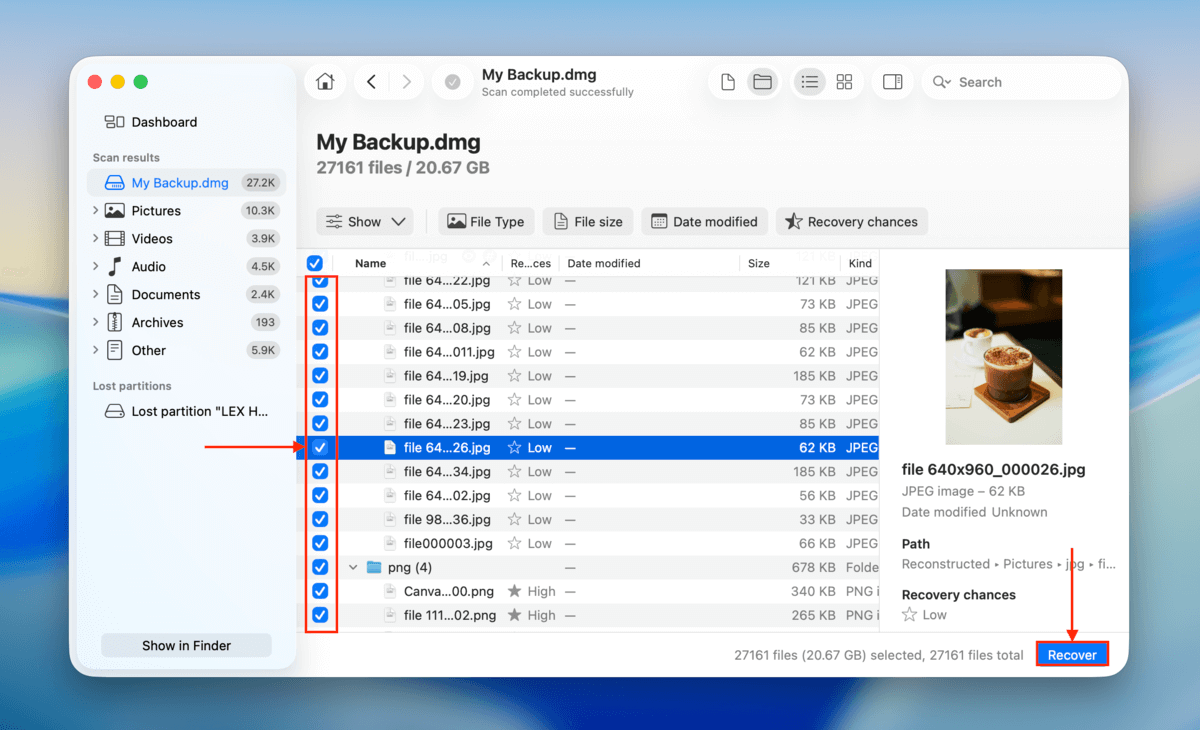
Step 13. Finally, choose a location where you want Disk Drill to save the recovered files. Just make sure that you don’t save it to the same corrupted hard drive (which will cause overwriting). Then, click Next.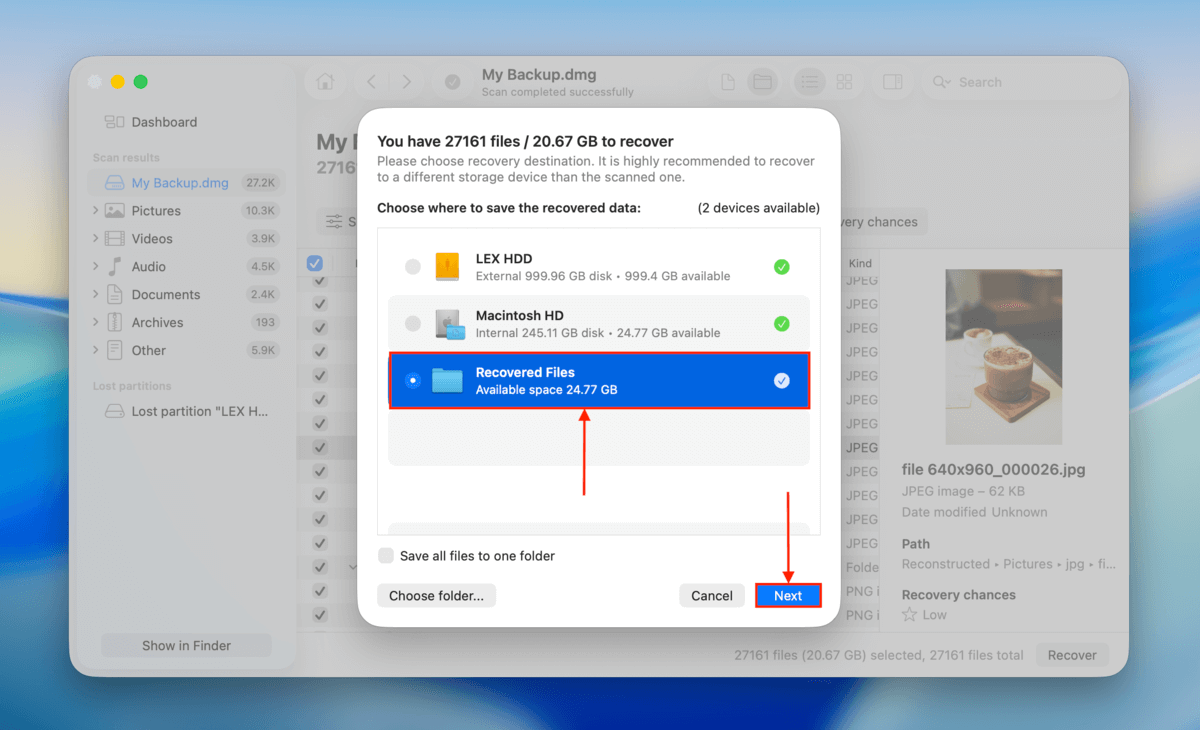
Once your files are fully secured on a safe and reliable drive, you can now attempt to repair your corrupted hard drive without having to worry about data loss.
How to Fix Corrupted Hard Drive on a Mac
Once you’ve completed data recovery or backed up your data (to a storage device other than the corrupt drive), you can safely continue to repair your hard drive on your Mac. We’ve listed 5 different methods – from the easiest to the most complex – along with easy-to-follow, step-by-step guides for each one. Here’s how to fix a corrupted hard drive on your Mac:
Method 1: Try Another Cable or Port (If It’s an External Hard Drive)
In some cases, your actual drive might not be the problem – it could be the peripherals used to connect it to the computer. If you’re using an external hard drive, you can try using another cable or plugging in your drive to another port on your Mac before proceeding with the other methods.
Method 2: Use the First Aid Tool in Disk Utility
First Aid is a powerful feature found in the preinstalled Disk Utility app. It can help fix minor cases of corruption by detecting inconsistencies in your drive’s file system, which are usually caused by software bugs or interruptions to that drive’s read and write processes (e.g., your Mac shut down while transferring files). It can also, in some cases, restore access to a drive that was previously not mounting or opening without errors.
Step 1. Launch Disk Utility by opening Finder > Applications > Utilities > Disk Utility.
![]()
Step 2. On the left sidebar, select the corrupt disk. Then, click the “First Aid” button at the top of the window between “Volume” and “Partition.”

Step 3. On the popup that appears, click “Run.”
Method 3: Run the FSCK Command on Your Corrupted Drive
Like the First Aid tool, the FSCK command checks disks for any file system inconsistencies and repairs them as soon as any are found. However, FSCK can be more effective than First Aid for some users because it runs a full-depth scan every time, even if a drive is flagged as “clean” (which doesn’t always mean it’s completely free of errors).
Running the FSCK command requires the use of the Terminal app, which can be intimidating for some users. Don’t worry–our guide will show you exactly what to do, step by step.
Step 1. Open the Terminal app (Finder > Applications > Utilities).![]()
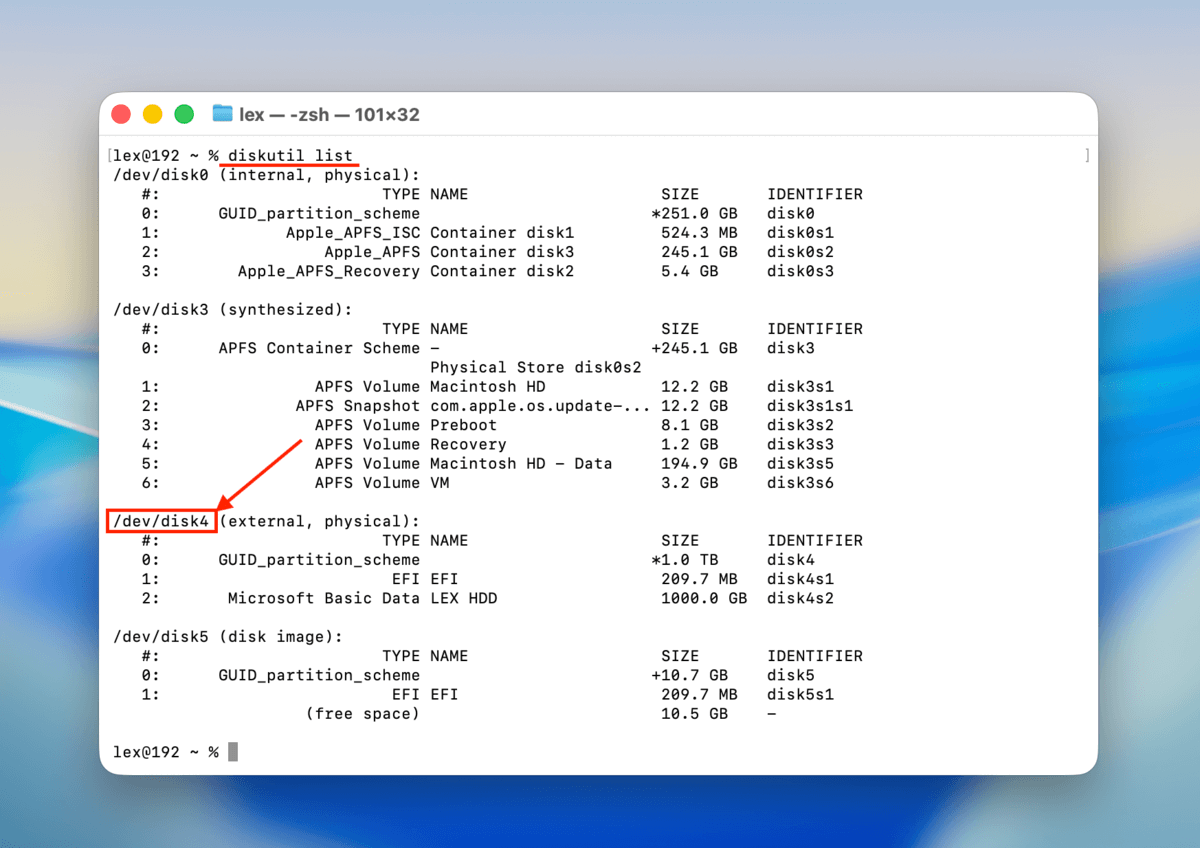
Step 2. Run the following command and note your corrupted drive’s identifier path (for us, it’s /dev/disk4):
diskutil list
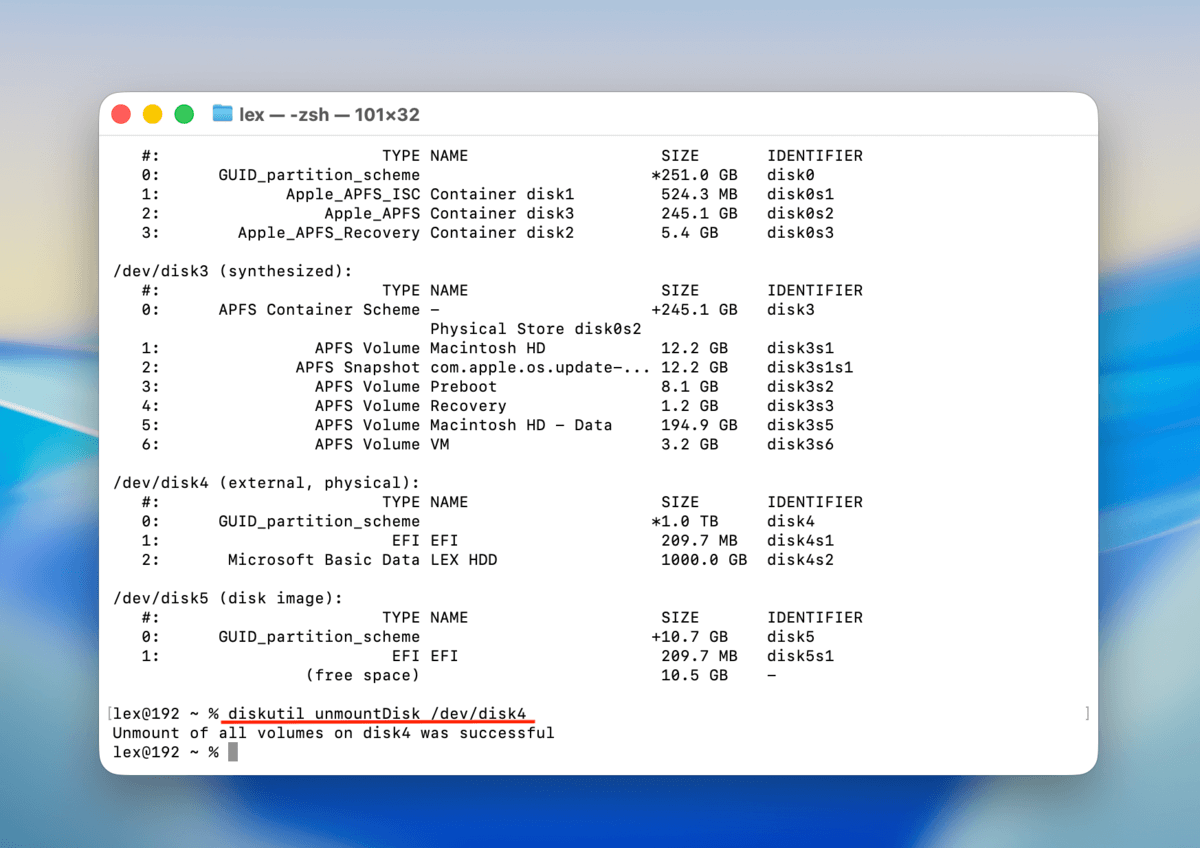
Step 3. Next, unmount your drive with the following command (replace the given identifier with your drive’s identifier):
diskutil unmountDisk /dev/disk4
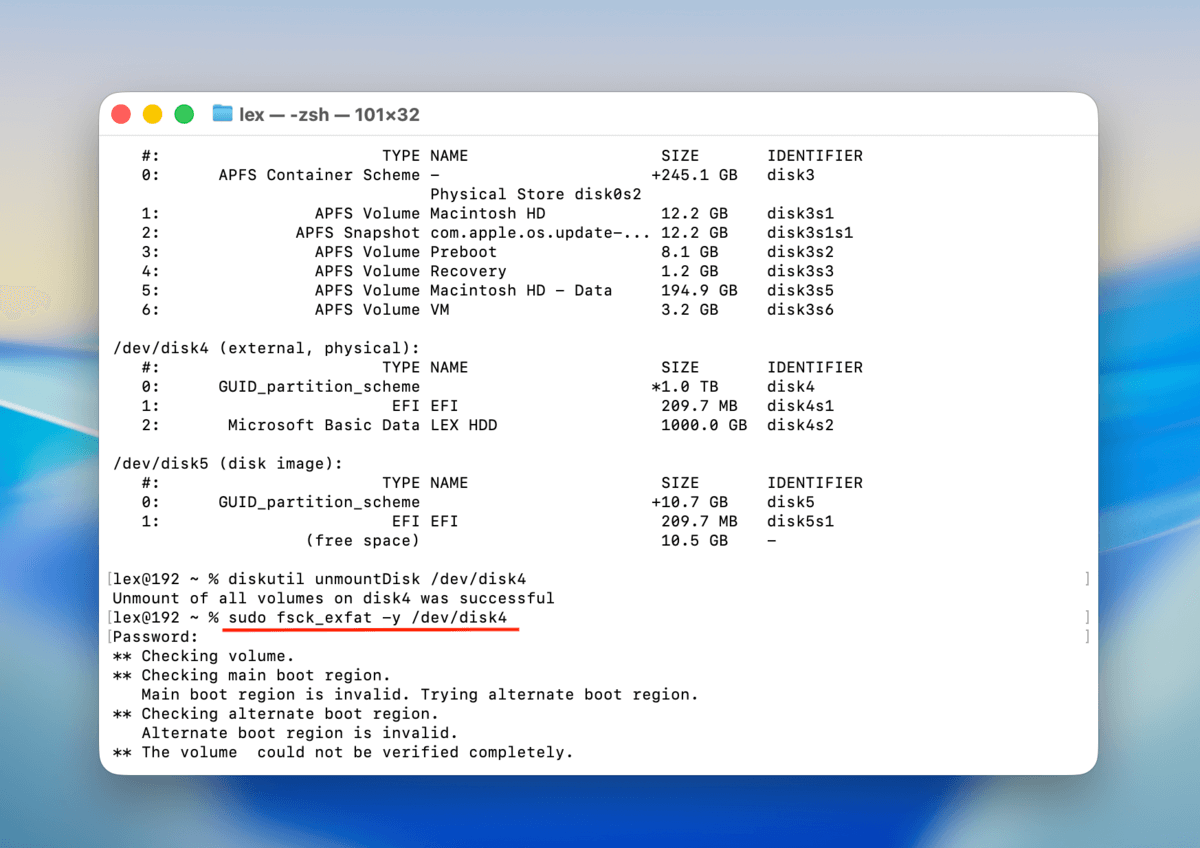
Step 4. Then, run the repair command. Make sure to match the file system format in the command to the one your drive uses, and replace the identifier with yours:
sudo fsck_exfat -y /dev/disk4
If you’re attempting to use FSCK to repair your system drive, you’ll need to perform this method while in Recovery Mode–you can’t unmount and repair a drive currently in use. You can enter Recovery Mode by restarting your Mac and holding CMD + R (Intel) or holding the Power button until “Loading startup options” appears and selecting Options (Apple Silicon). Once in Recovery Mode, you can access the Terminal app from the Utilities menu.
Method 4: Restore Lost Partitions with TestDisk
TestDisk is a completely free and open-source application that can fix corrupted hard drives by restoring lost partitions and repairing boot sector issues. This can help with errors like your drive appearing as “RAW” or “Unknown”, or with greyed-out partitions with completely inaccessible directories.
TestDisk can also be a bit intimidating to use because it lacks a modern graphical interface; you can only navigate using your keyboard. But don’t worry–we’ll demonstrate the exact process of restoring partitions to your disk (which should restore access to its directories).
Step 1. On your Mac, open any browser and open the brew.sh webpage. Click the notepad icon to copy the string beside it.![]()
Step 2. Open the Terminal app. Then, install Homebrew by pasting the string you copied and pressing Return.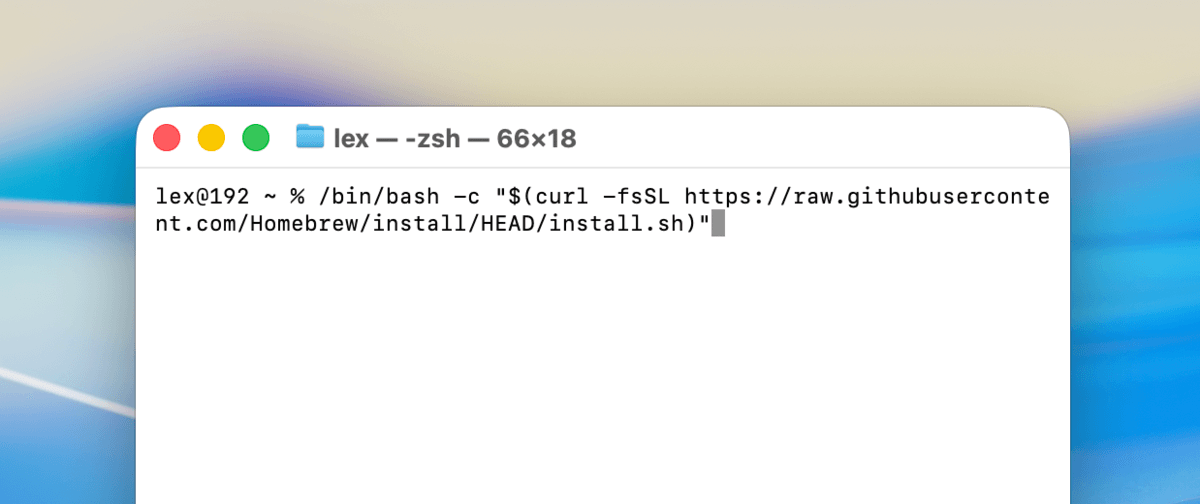
Step 3. Once Homebrew is installed, you can now use brew commands to install TestDisk:
brew install testdisk

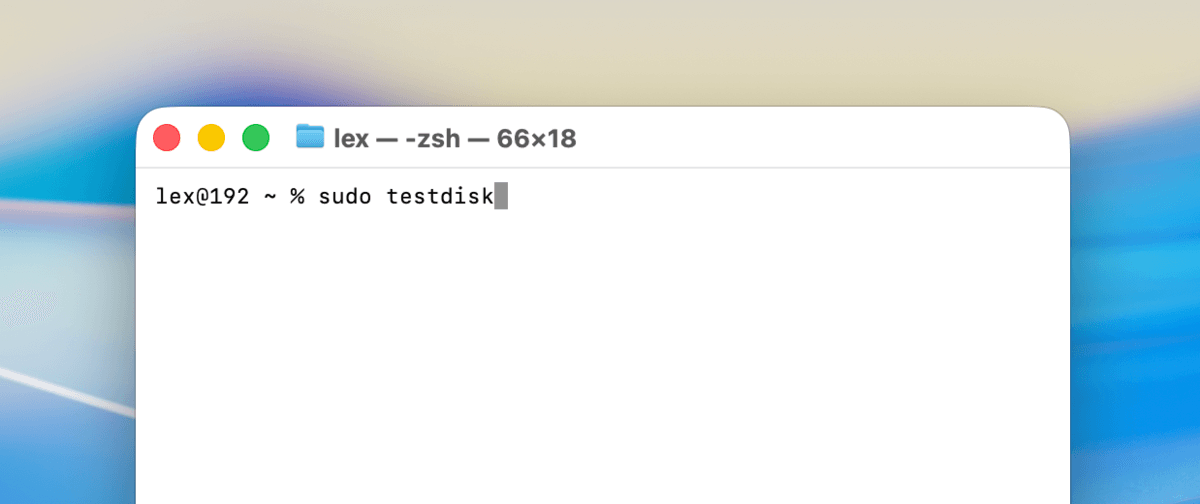
Step 4. After installing TestDisk, run one more command to open the app directly from Terminal:
sudo testdisk
Step 5. When you see TestDisk’s main menu, select the Create option (using your arrow keys) and press Return.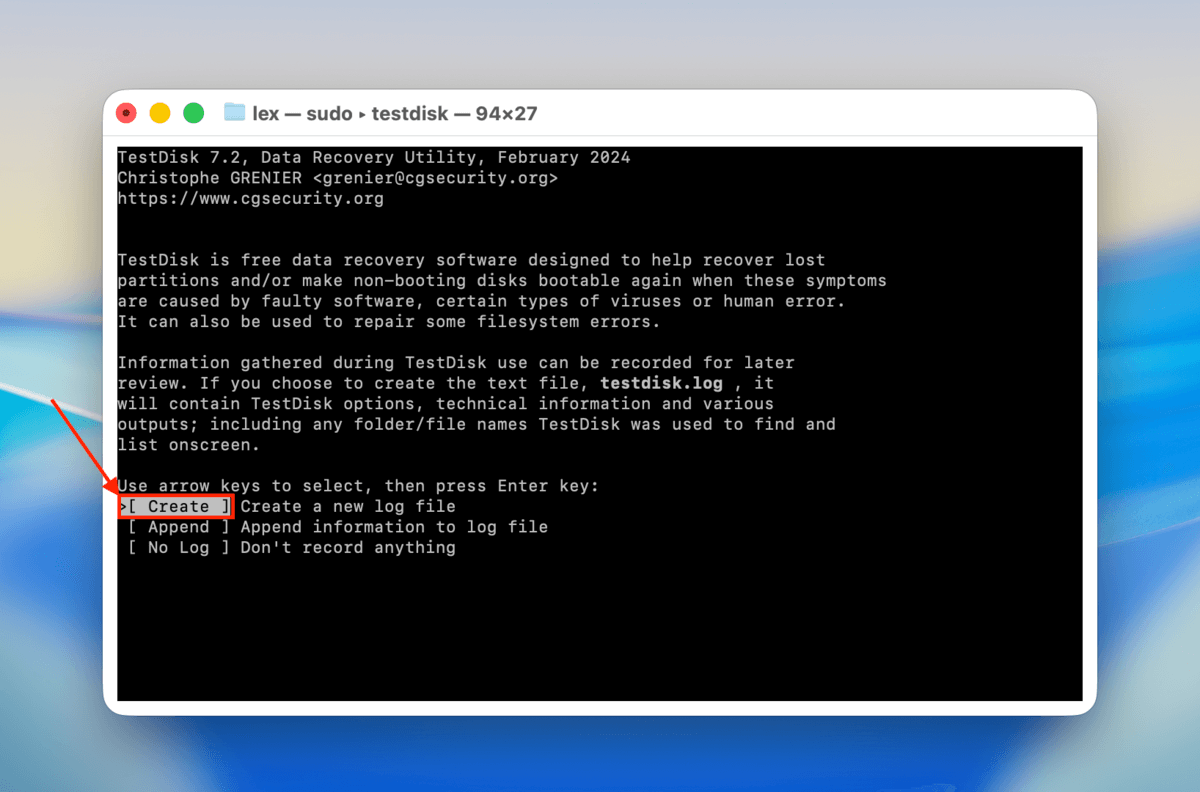
Step 6. Use your arrow keys again to select your corrupted hard drive. Then, select Proceed and press Return.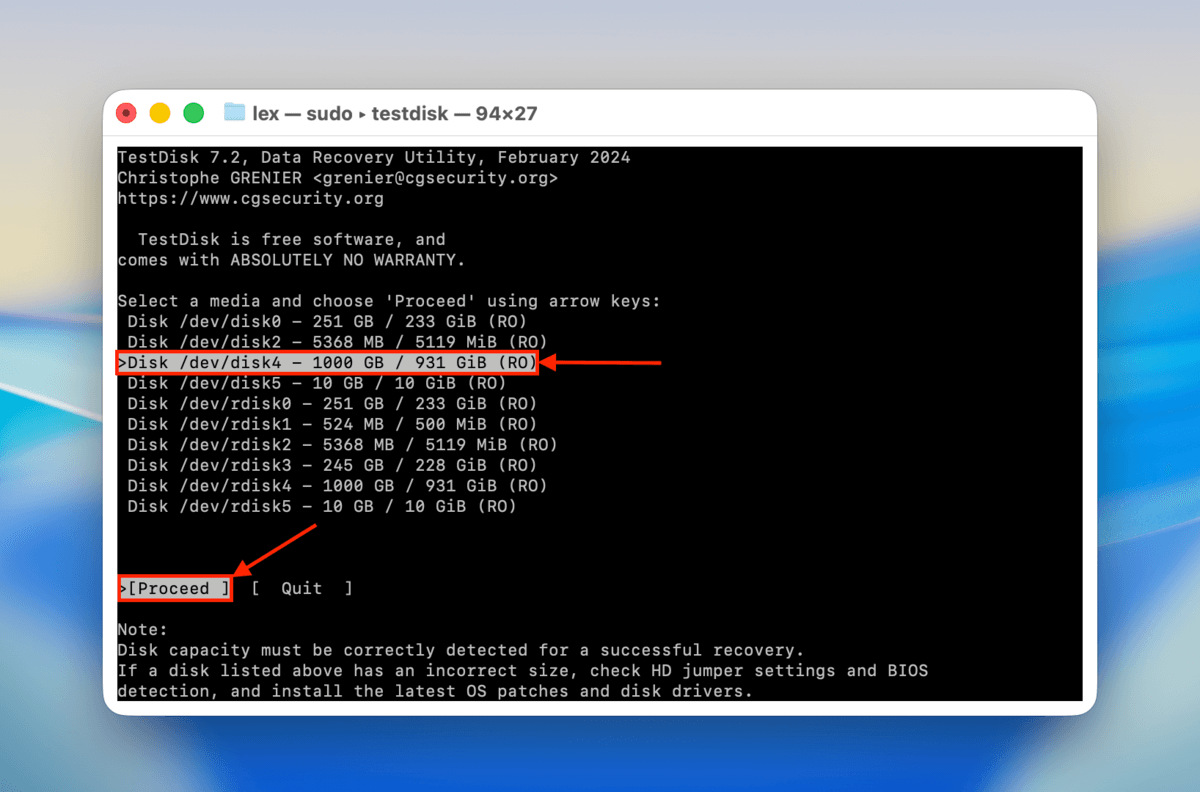
Step 7. Select your corrupted hard drive’s partition table type from the list, then press Return. TestDisk automatically tries to select the correct option for you, and it’s usually reliable.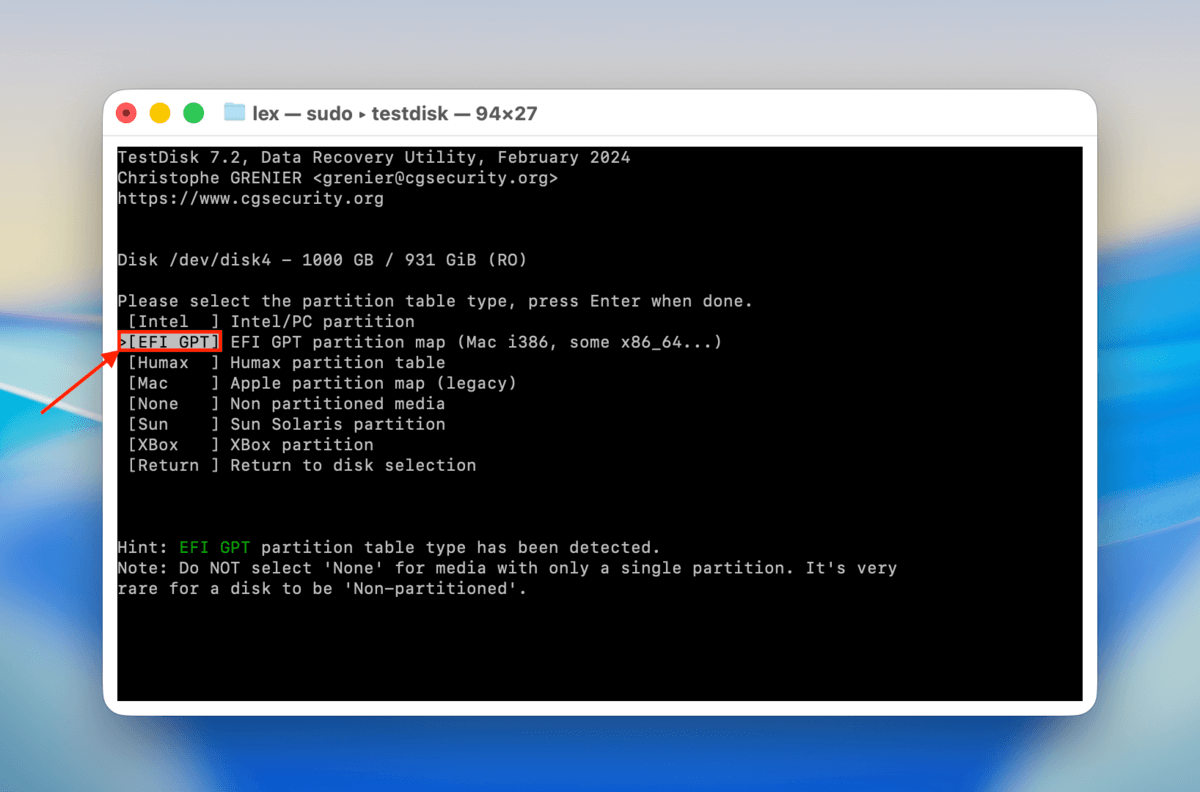
Step 8. Choose Analyse and press Return.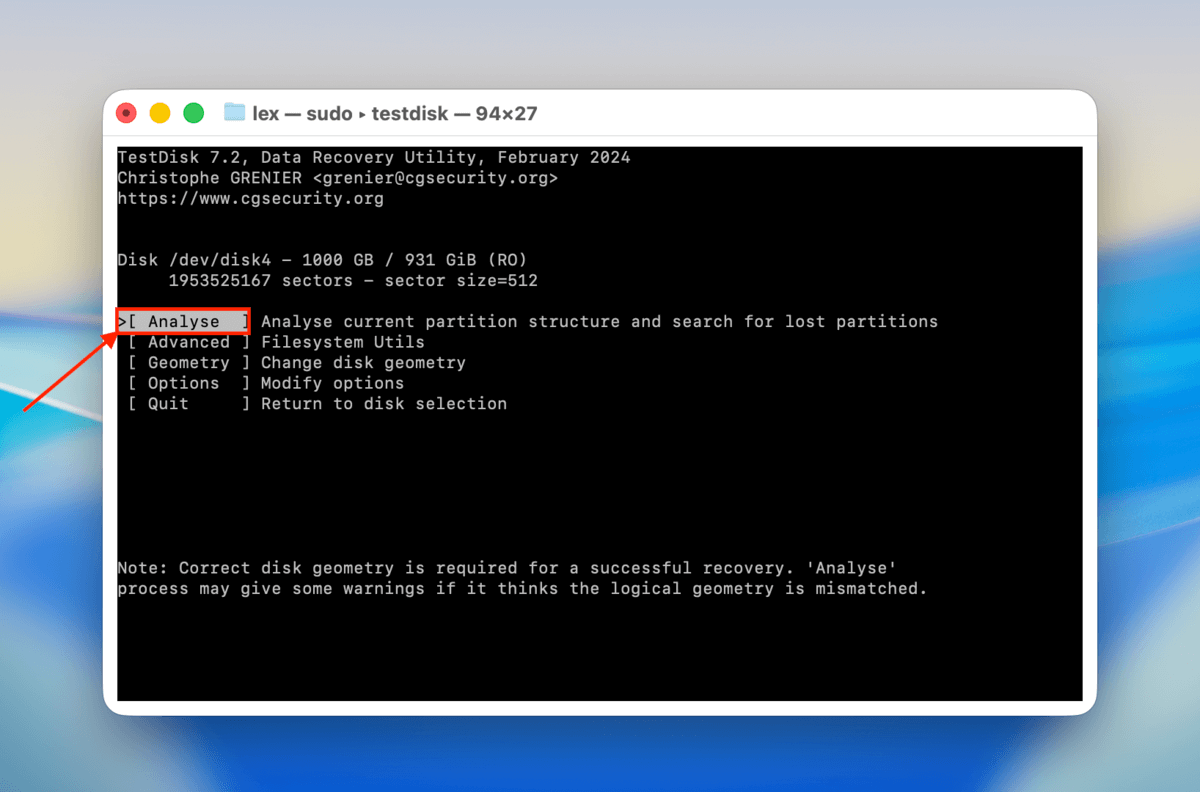
Step 9. Select the Quick Search option and press Return.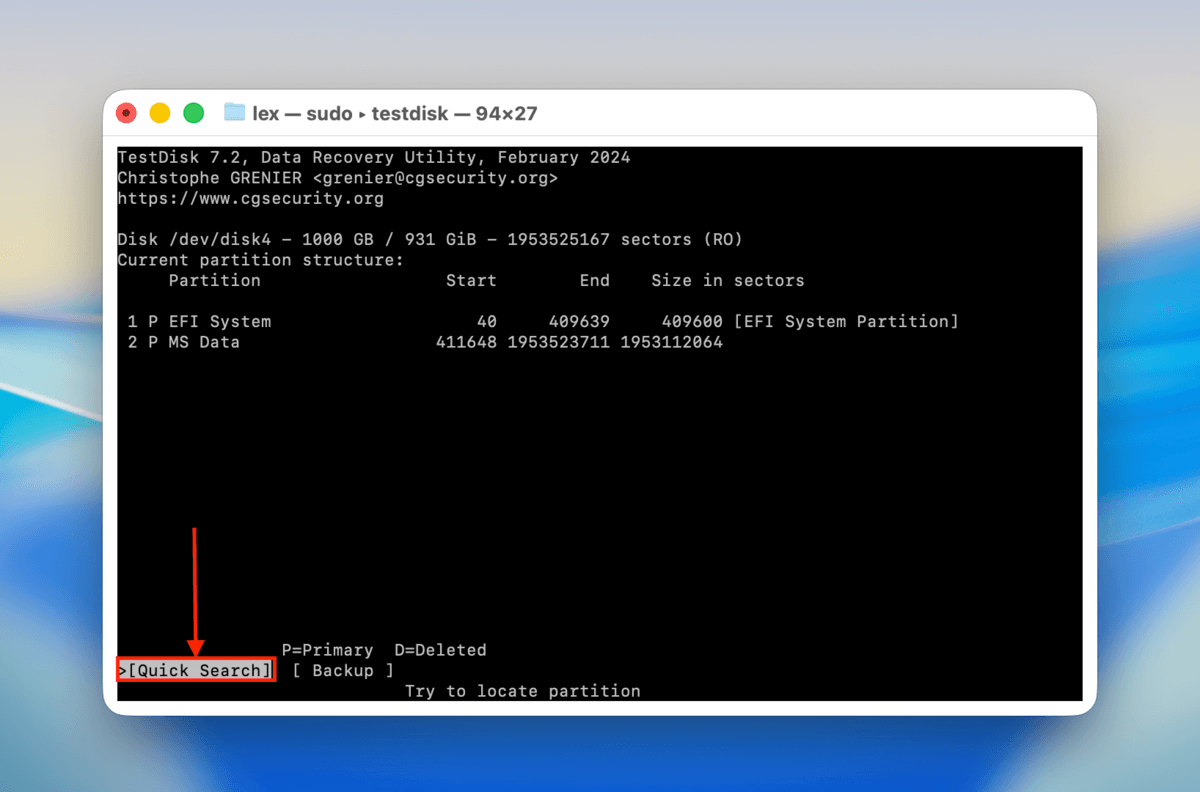
Step 10. TestDisk will show you the partitions it found during the scan. You can highlight each partition and press P to check its file list–this should give you an idea if TestDisk found the right partition. Press Return to continue.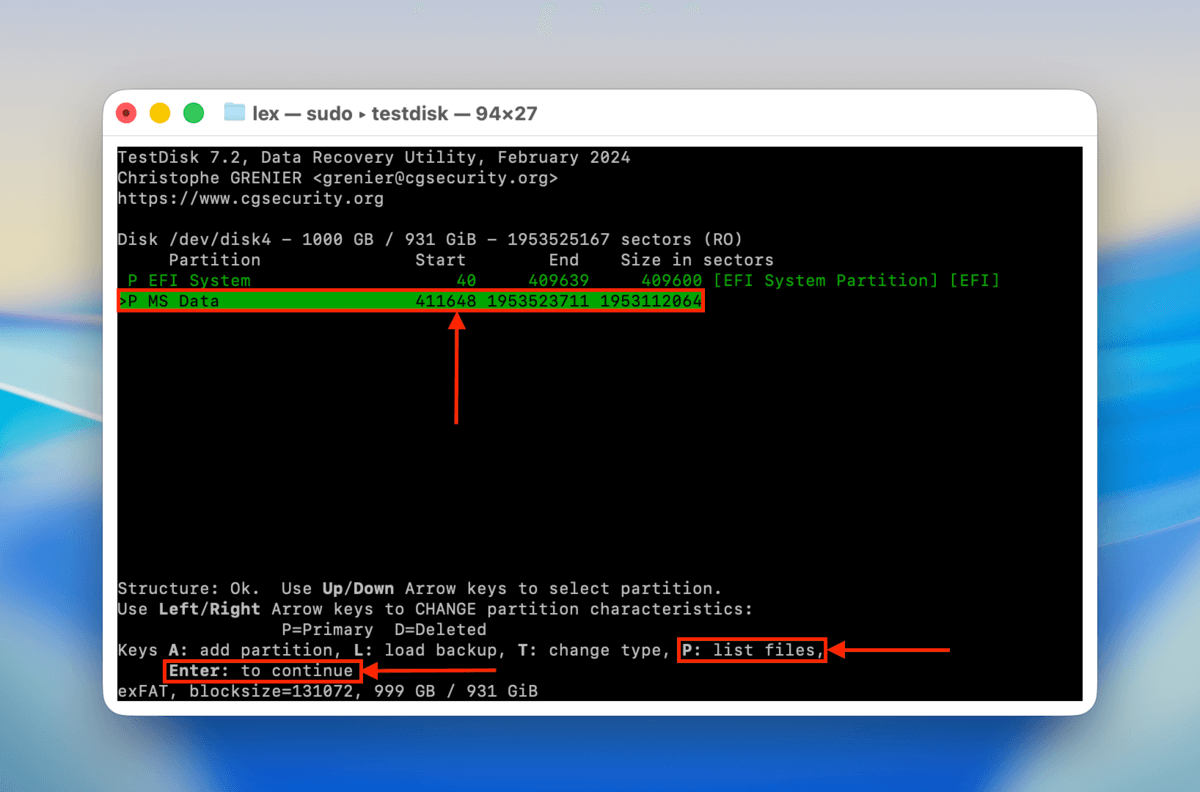
Step 11. Finally, select the Write option and press Return to restore the partition you chose in step 10. If TestDisk hadn’t found the right partition, you can choose the Deeper Search option for a more in-depth scan.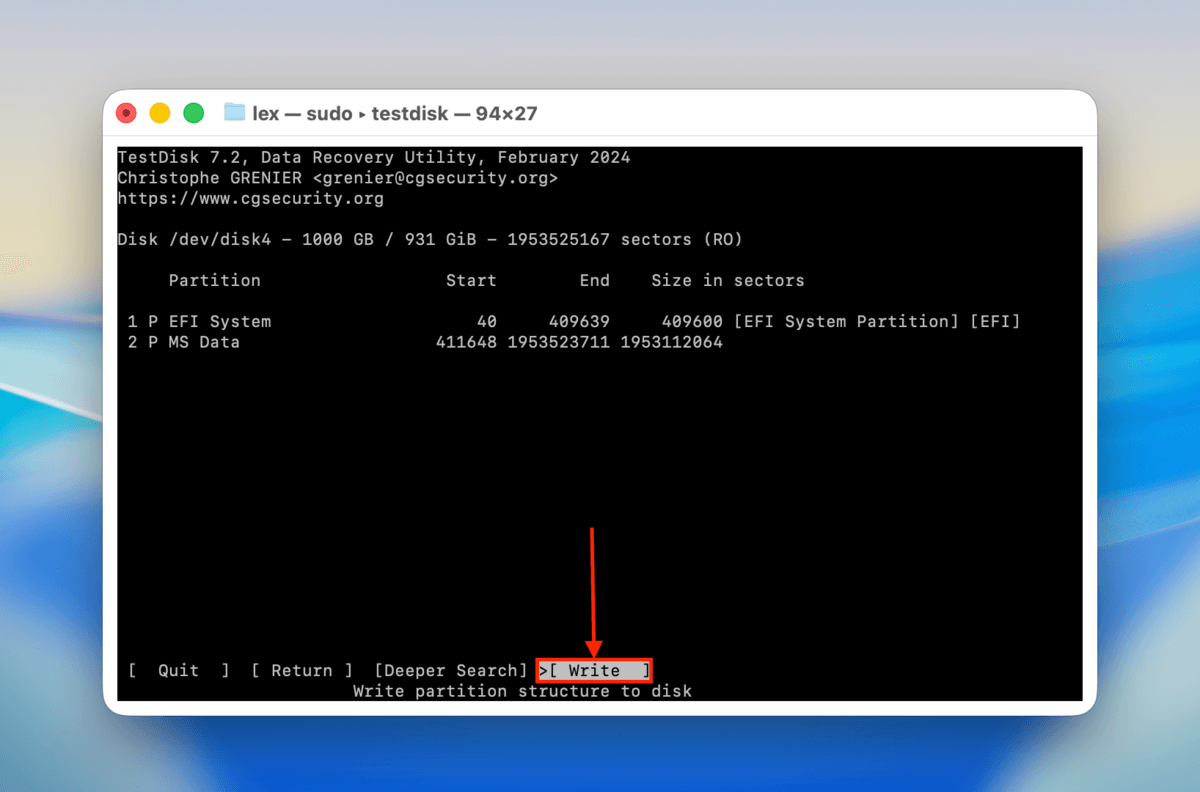
Once TestDisk is done writing the recovered partition to the disk, safely eject your drive and disconnect it. Then, reconnect it to your Mac. This allows macOS to attempt to establish a completely fresh connection.
Method 5: Format Your Corrupted Hard Drive
If all else fails, you can try formatting the disk. The Disk Utility app makes it very easy to do this, but it can again be a bit intimidating for new users. There is also a slight difference in the process depending if you want to fix a corrupted external drive on your Mac or if you’re formatting an internal drive that contains your operating system.
If you’re formatting an external drive:
Step 1. Launch Disk Utility by opening Finder > Applications > Utilities > Disk Utility.![]()
Step 2. At the top of the window, click the “Erase” button to the right of the “Partition” button.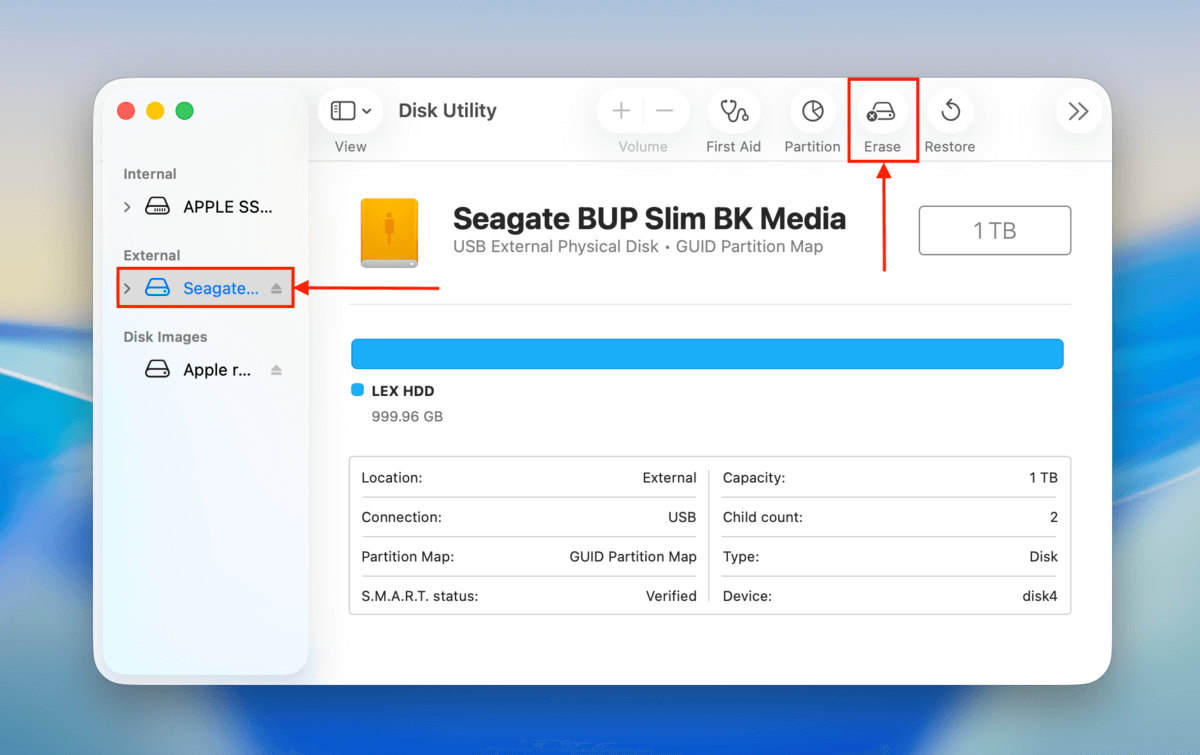
Step 3. On the popup that appears, type in what you want to name your disk, choose the format and partition scheme you want to apply. Once you’re satisfied with the settings, click “Erase.”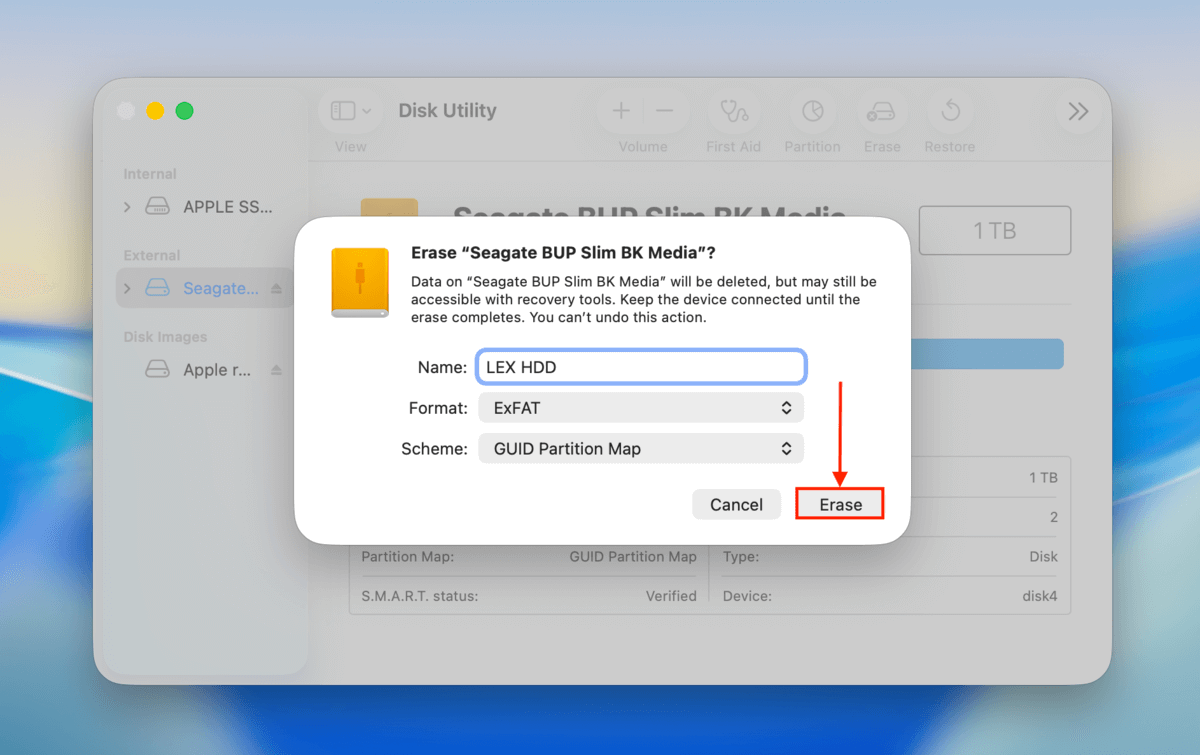
If you’re formatting the drive you’re currently using for your operating system:
Step 1. If you’re using a MacBook with an Intel chip, restart your Mac while holding CMD + R. If you’re using a MacBook with an Apple Silicon chip, shut down your Mac and hold the power button until “Loading startup options” appear on-screen.
Step 2. From the list, select Disk Utility then click “Continue.”
Step 3. Click View > See All Devices and click the dropdown arrow beside your startup disk in the left sidebar. The default name for that disk is usually something like “Macintosh HD.”
Step 4. Select the “Data” volume and click the minus button (-) above “Volume” at the top of the Disk Utility window.
Step 5. Select the “Data” volume and click the minus button (-) above “Volume” at the top of the Disk Utility window.
Step 6. Click “Erase Volume Group” on the popup that appears.
Step 7. On the next popup, name your newly erased disk and choose its format (APFS is usually the best choice), and click “Erase.” Enter your Apple ID if prompted.
How Does a Mac Hard Drive Get Corrupted?
A hard drive can get corrupted on a Mac in multiple ways. Following are the most common reasons a hard drive gets corrupted on your Mac and some ways to help prevent drive corruption.
- Unexpected power failures or spikes. Power issues can damage the device or cause logical damage to files if a process was underway when the spike or failure occurred. Using a surge protector will minimize this issue.
- Malware or a virus. A cyberattack can logically corrupt the drive by overwriting the firmware or corrupting data on the device. Running an updated antivirus tool is highly recommended.
- Sudden crash of OS or app. These processes can damage the file system of the drive and thus corrupt the data. Keeping your OS and applications updated will eliminate most sudden crashes.
- Shutting down your computer while a write operation is ongoing can cause file corruption. Make sure all operations are complete before you turn off your computer.
- Mechanical damage. The read/write heads can become misaligned, making it impossible to use the device. Take care of your drives and don’t drop or shake them.
- Excessive heat or moisture can result in a corrupted hard drive. The electronics inside the drive can be damaged by water or heat and make the device inoperable. Keep drives in a cool, dry palace and out of direct sunlight.
FAQ
First Aid is a powerful drive repair tool that can solve a lot of drive problems, but if it doesn’t work, try the following (in this order):
- Change the cable or try plugging your drive into another port.
- Using the FSCK Command.
- Format the disk.
Watch for the following symptoms and back up your data before they get worse:
- Corrupt or missing data
- Bad sectors
- Weird noises coming from your drive
- Performance issues, such as slowdowns or freezing
- Files and folders taking way too long to copy-paste
To run First Aid from recovery mode, do the following:
- If you’re using a MacBook with an Intel chip, reboot your Mac while holding (CMD + R).
- If you’re using a MacBook with an Apple silicon chip, hold the Power button until Startup Options appear.
- Choose the problematic drive and enter your wifi if prompted to do so.
- In the macOS Utilities window, select Disk Utility and click “Continue.”
- Click the “First Aid” button on the Disk Utility window.
There are several ways to uncorrupt a hard drive on a Mac, depending on what caused the corruption:
- Use the First Aid feature in Disk Utility
- Restore a lost partition using TestDisk
- Format your corrupted hard drive
Note that repair operations can directly or indirectly cause data loss on the device you’re trying to fix. We recommend securing your data first via data recovery or backup creation.
As long as your Mac recognizes the corrupted hard drive, you can try fixing it (without formatting) using one of 2 methods:
- Run First Aid on your hard drive (in Disk Utility)
- Use TestDisk to restore lost partitions
Even though both methods don’t format your drive, they can still cause partial data loss. If you have important files on that drive, create a backup before proceeding.


