
Corrupted M4A files can be a bit tricky to repair. Because of its high-quality capture and complex file system structure, this file type is prone to corruption and indexing issues that can be difficult to fix if you don’t know what you’re doing.
The good news is that there are a myriad of powerful (and free) tools you can use to fix it, but you need to know how to utilize them properly for them to work. This guide will walk you through each tool and tell you everything else you need to know to fix a corrupted M4A file on your Mac.
Table of Contents
What are M4A Files and Why Can They Be Hard to Repair?
MPEG-4 Audio – or M4A for short – is an audio file. It’s usually that simple. But if we’re considering the effects of corruption, you might be dealing with an “uncreated” video. Here’s a useful breakdown so you can understand it better:
- Standalone M4A files. M4A is a high-quality audio-only file type that is very commonly used for Apple media, such as songs, audiobooks, and podcasts.
- M4A files as part of MP4 videos. In some rare circumstances, it’s possible for an MP4 video (which is also an MPEG-4 file but with both audio and video data) stream to be damaged and inaccessible. This may cause certain media tools to only detect the audio stream and output an M4A file.
Although both types of M4A files are created and treated very differently from each other, the solutions to fix them are actually conveniently similar with a few variations in certain steps.
We seamlessly covered both scenarios in the repair guides prepared for you below.
4 Free Ways to Fix a Corrupted M4A File
In this section, we’ll demonstrate 4 different ways to fix a corrupted M4A file, regardless of its source. Before proceeding, we strongly encourage you to create a backup of all the media files related to your M4A file (such as other media you captured on the same day). You can simply duplicate your files (select files > right-click > Duplicate).
Fix 1: Clever Online Video Repair
If your M4A file is under 5 GB, you can use Clever Online Video Repair, which is a free web app that automatically fixes corrupted media files for you. All you have to do is upload your M4A file to the website.
We encourage trying this solution first because it can repair files that have a missing Moov Atom or Moov Box — a severe and common type of corruption that other tools on this list aren’t equipped to handle.
Moov boxes often go missing when a media capture has been prematurely interrupted (e.g. a drone crashing mid-recording, sudden power or battery failure, etc.). If this is the case for you, Clever Online Video Repair will likely be your best solution.
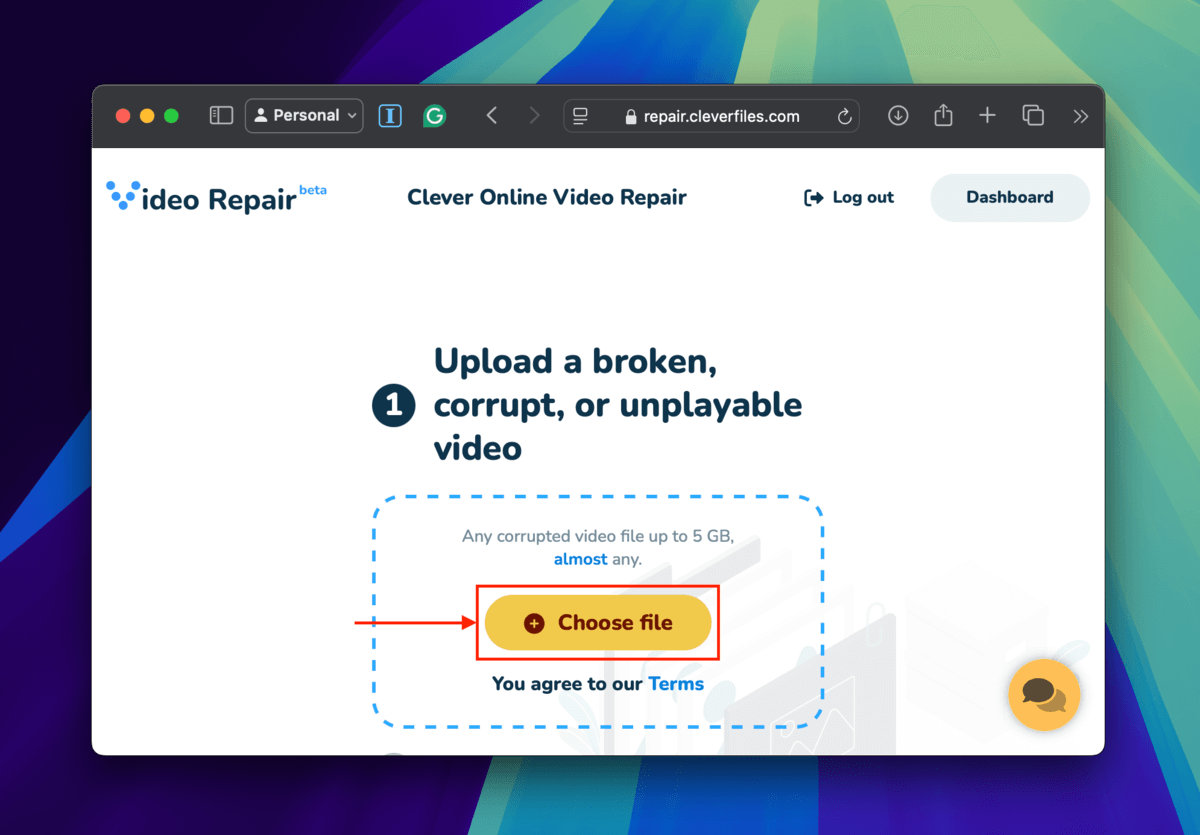
Step 1. Open any browser and open the webpage repair.cleverfiles.com.
Step 2. Click the Choose file to open the file selection window.
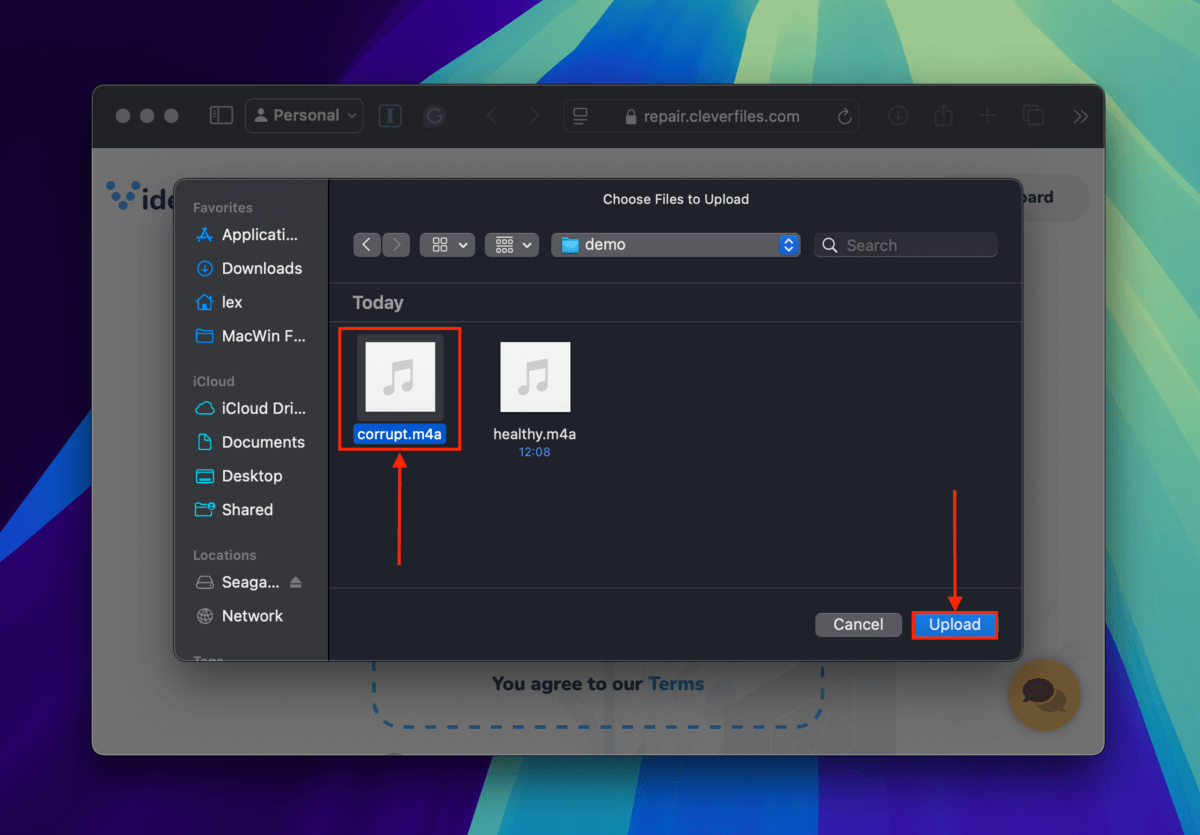
Step 3. Locate and select your corrupted M4A file. Then, click the Upload button in the bottom-right corner of the window.
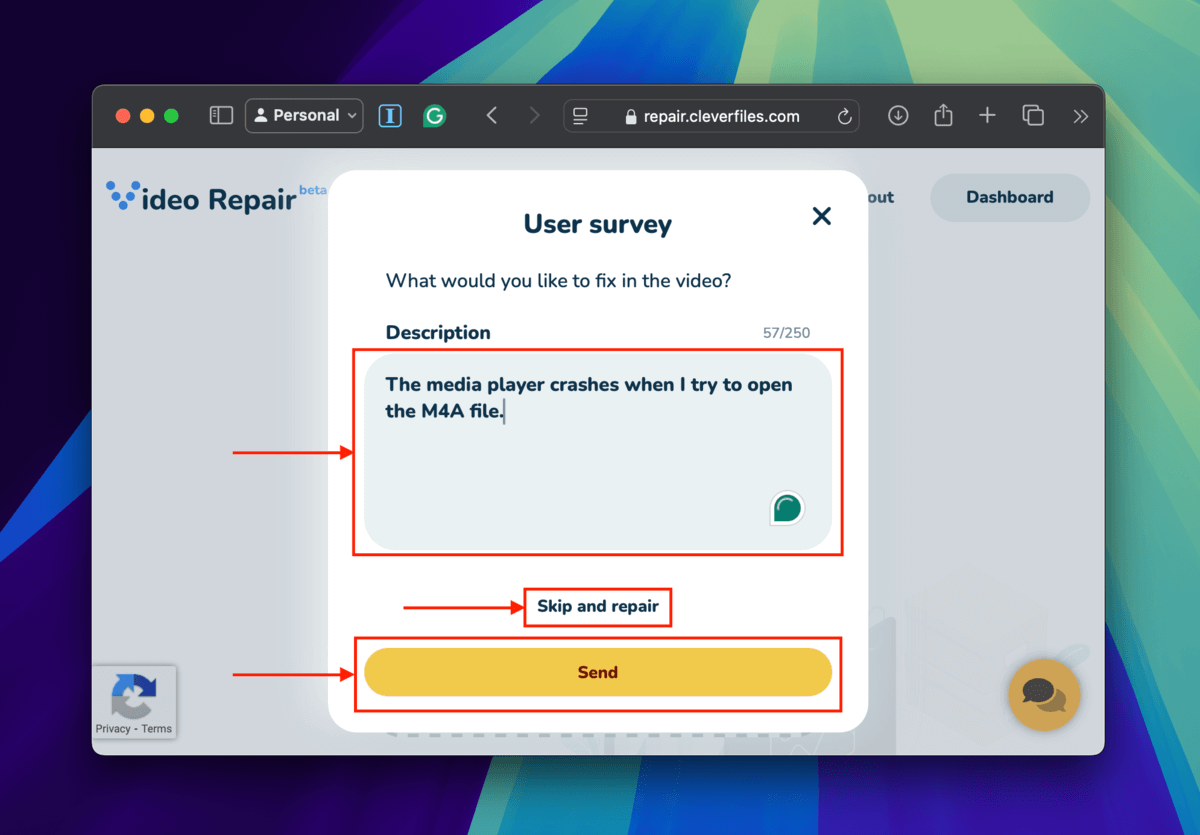
Step 4. Describe what happened leading up to the corruption of the M4A file as well as any other useful details. Then, click Send. You can also click Skip and repair if you prefer not to share.
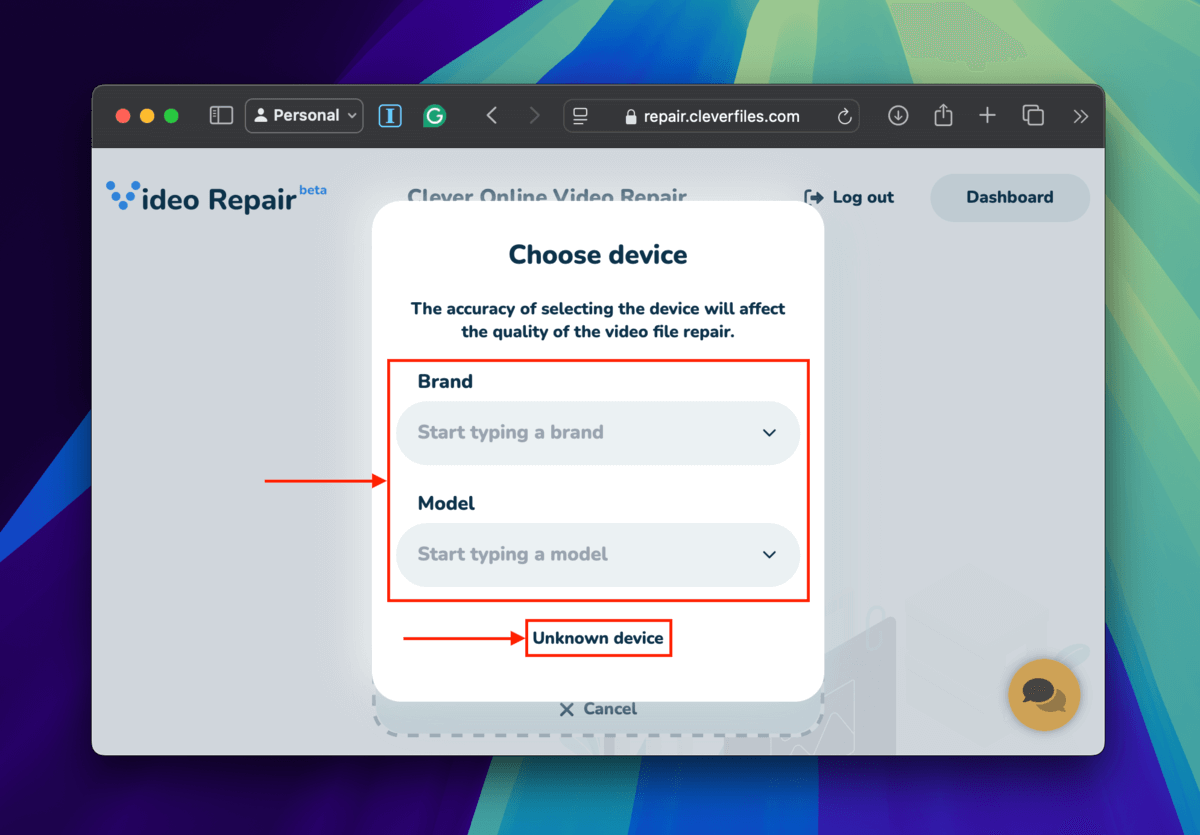
Step 5. Select the brand and model of the device you used to capture the M4A file, then click Repair. If you don’t know or remember, click Unknown device (we recommend that you try your best to recall, though).
Step 6. Once your M4A file has been uploaded to Clever Online Video Repair, click the new Choose file button.
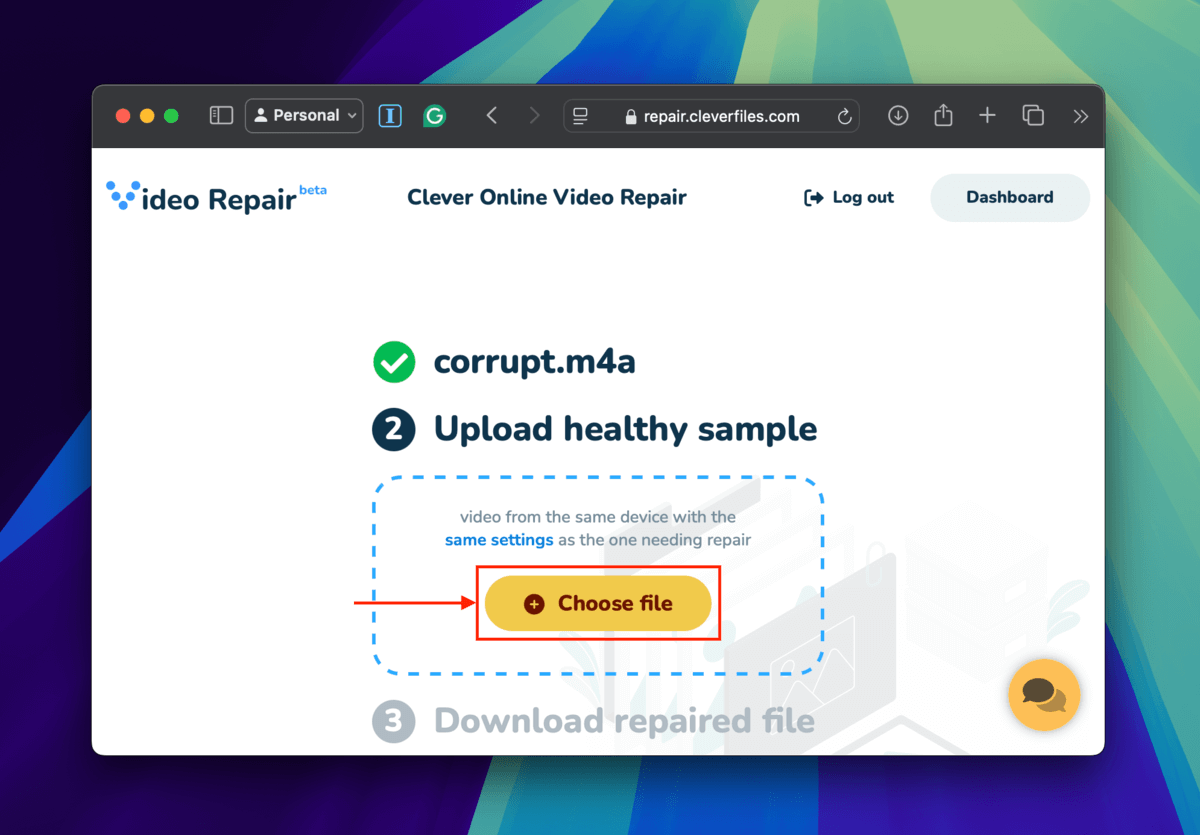
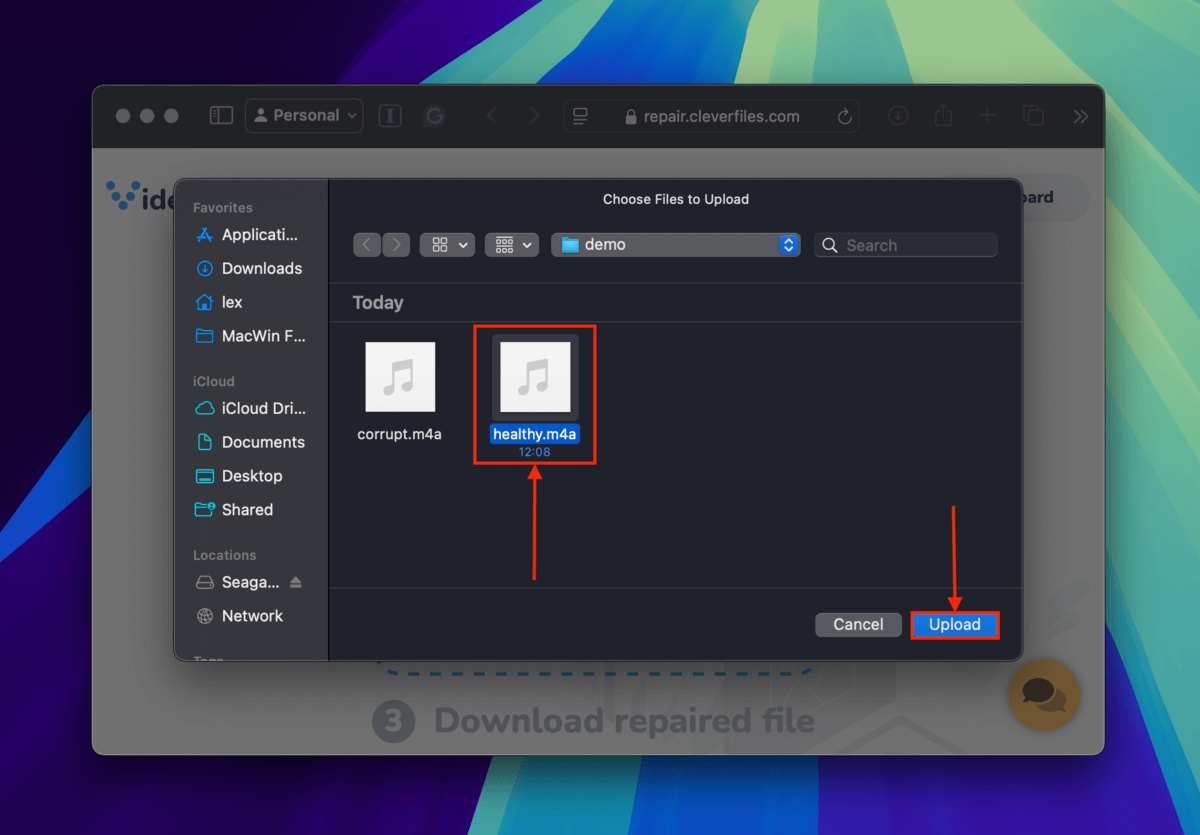
Step 7. Locate and select your healthy file sample. Then, click the Upload button.
If you’re trying to repair a video file, Clever Online Video Repair will provide screenshots that you can view as previews of the repaired video. Click Download to save the repaired file to your Mac. Then, try to open your file in a media player to see if it works.
Fix 2: Utilize Device and Manufacturer Tools
Depending on the device you used to capture your M4A file (or MP4 file that never was), you may have access to simple repair tools created by the manufacturer themselves.
They are usually designed to address device-specific issues and can be more effective than general solutions, especially if the corruption issue is a known problem with that device.
Some examples we covered are:
- GoPro’s SOS feature
- DJI’s drone power cycling feature and the very useful Djifix (the latter was not created by the manufacturer, but by technology consulting company LIVE555)\
- Canon’s auto-scan and repair tool
If you’re trying to repair media captured by one of these devices, we recommend you check out their specific guides (linked above) for other useful niche and unexpected fixes.
Fix 3: Re-encode the M4A File Using FFmpeg
FFmpeg is a free, open-source, and well-respected media manipulation tool that you can use to re-encode your M4A file into an MP3, WAV, or MP4 file (depending on what it was supposed to be originally).
Re-encoding is a process that copies the audio and video streams from a file and creates a brand-new container for them. This can help fix issues related to the container itself, as well as detect and re-index the streams (including any video streams that may have been inaccessible).
Unfortunately, you can only operate FFmpeg via the Unix command line in the Terminal app — but you can simply copy and paste the commands in our guide (and replace strings where appropriate) to follow along.
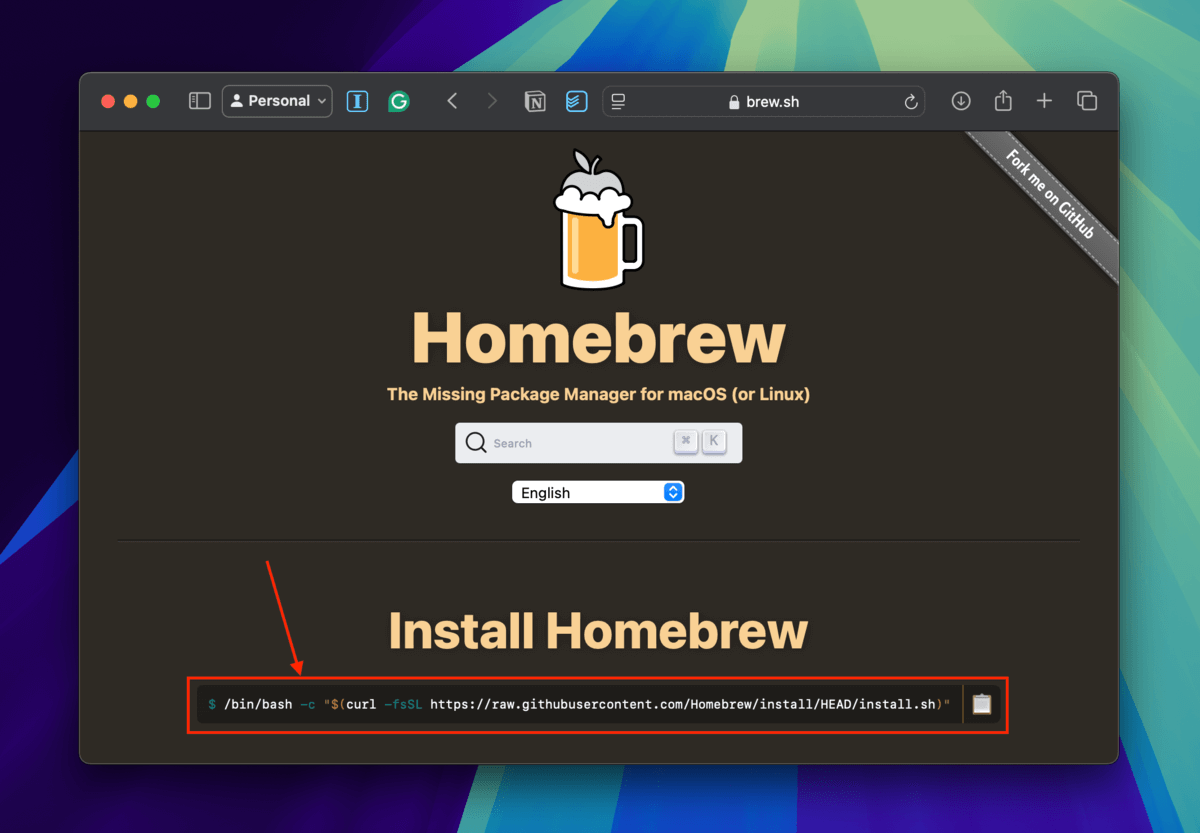
Step 1. Go to Homebrew’s website and copy the code on the page.
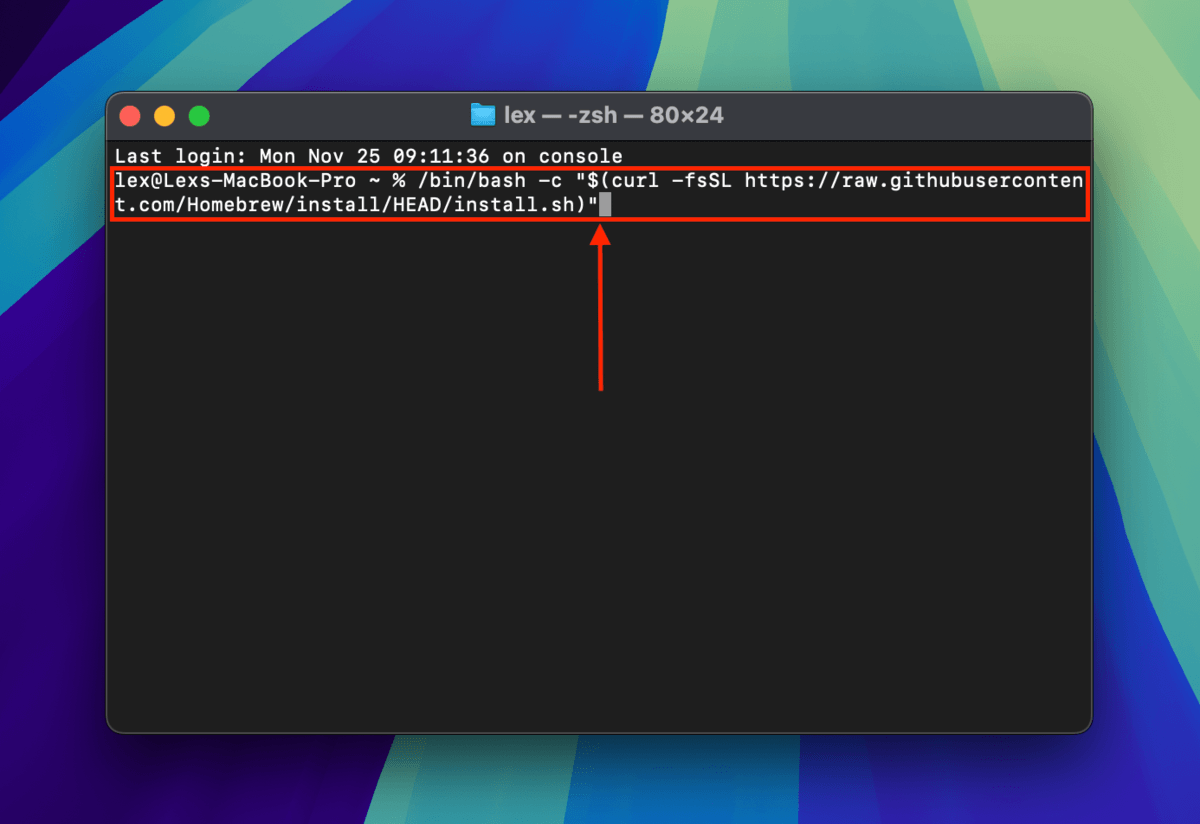
Step 2. Paste the code in your Terminal app and press Return to execute it.
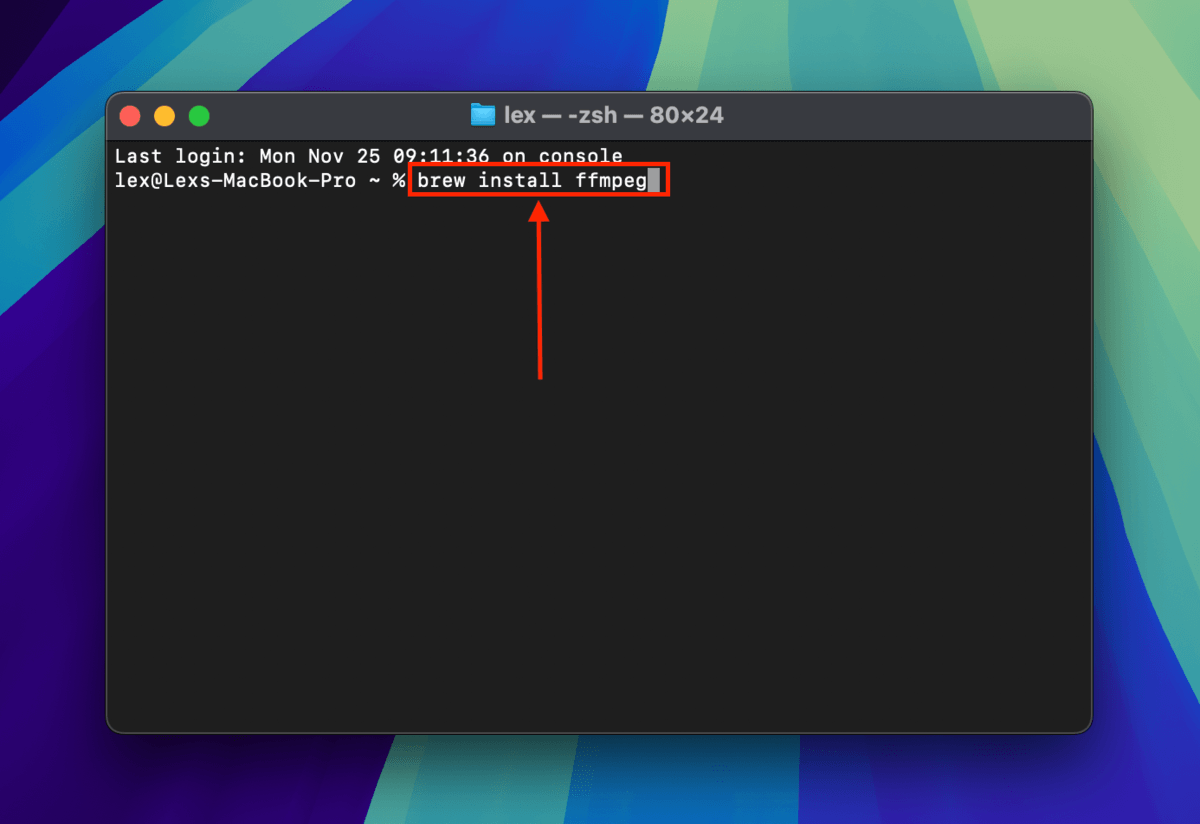
Step 3. Once Homebrew has been fully installed and updated on your Mac, execute the following command to install FFmpeg:
brew install ffmpeg
Step 4. Once you’ve fully installed FFmpeg using Homebrew, execute this command to navigate Terminal to your file’s directory:
cd desktop/demo
Replace desktop/demo with the path name of the folder where your M4A file is stored.

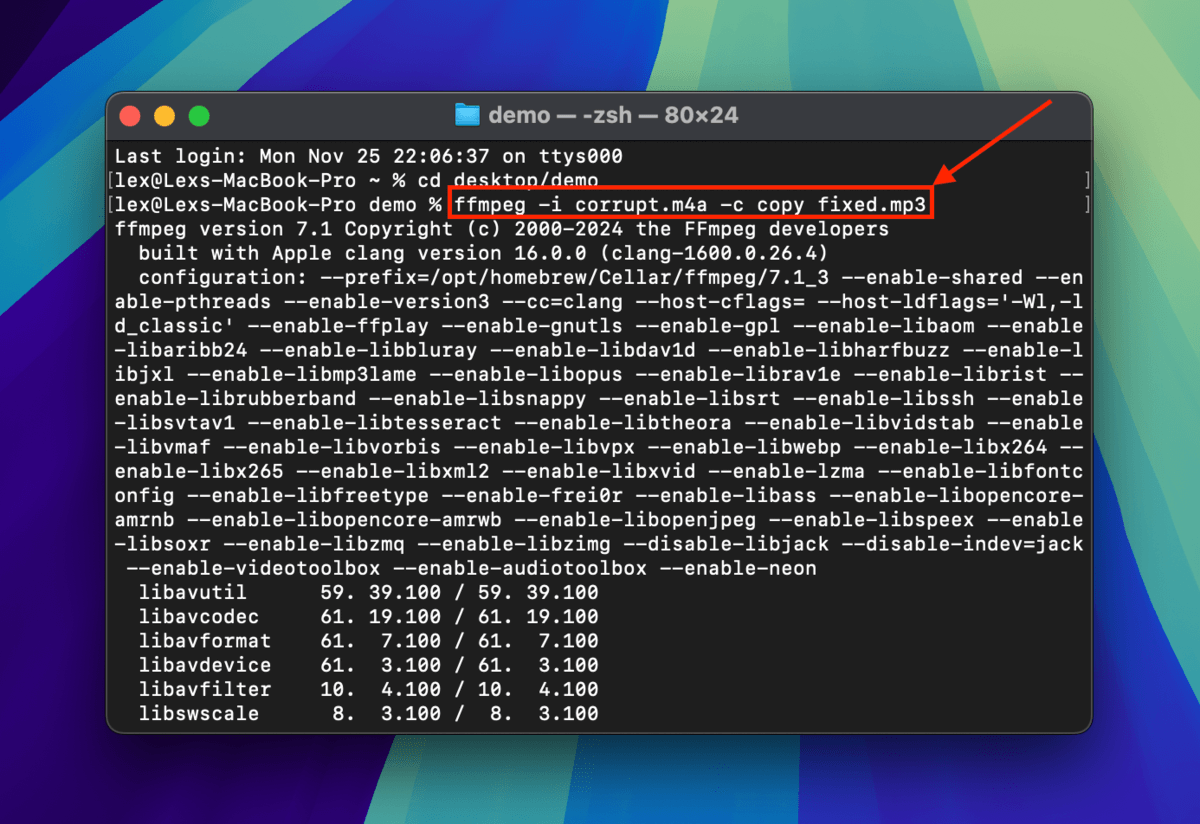
Step 5. Then, you can now invoke FFmpeg’s re-encoding function. Execute the following command to re-encode your corrupted M4A file to an MP3 file or an MP4 file:
ffmpeg -i corrupt.m4a -c copy fixed.mp3
Replace corrupt.m4a and fixed.mp3 with the appropriate file names and file extensions.
Once the re-encoding process is complete, FFmpeg will output fixed.mp3 (or whatever your equivalent is) in the same folder where your corrupted M4a file is. Try opening it with a media player.
Fix 4: Convert Your M4A File Using VLC Media Player
If re-encoding your M4A file with FFmpeg didn’t work, you can try converting it using VLC Media Player. While this method will repair your file using roughly the same logic as re-encoding, VLC Media Player has subtle differences in its repair and indexing modules that might fare better. It won’t hurt to try!
We’ll show you how to use VLC Media Player — which is also free and open-source — to convert your M4A file to another format (which should hopefully fix it).
Step 1. Download and install VLC Media Player on your Mac.
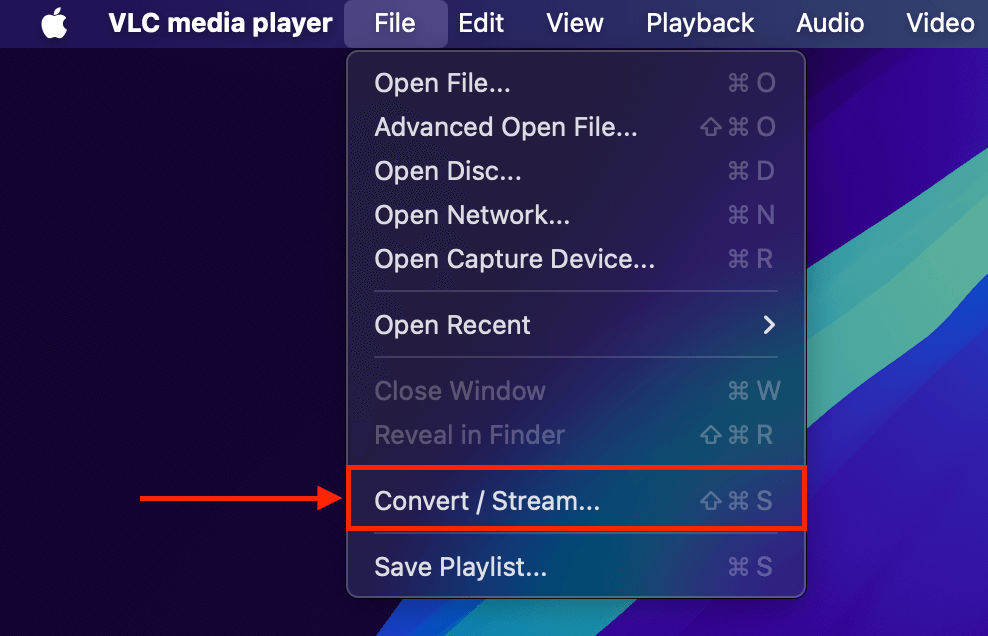
Step 2. Open VLC Media Player. Then, on the Apple menu bar, click File > Convert / Stream.
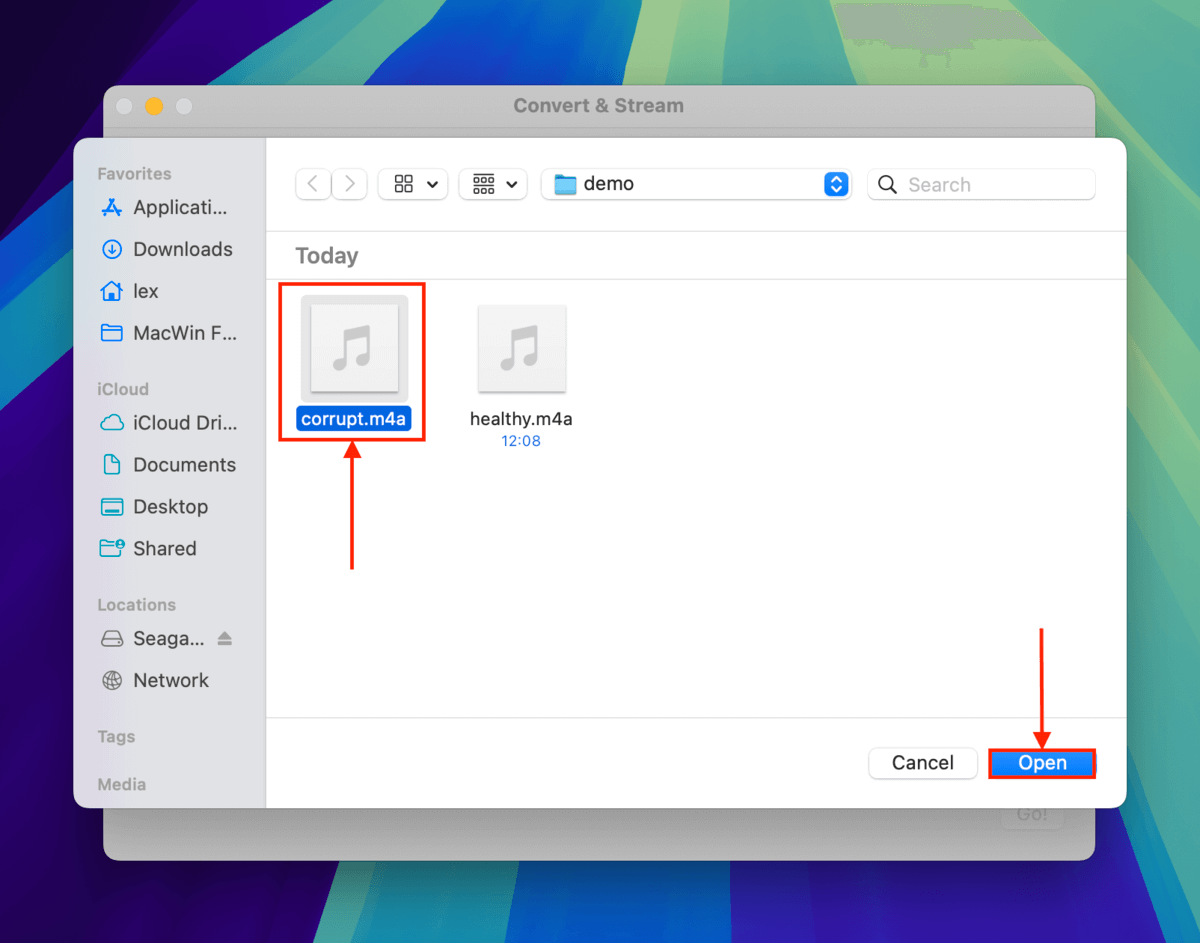
Step 3. Click Open media…
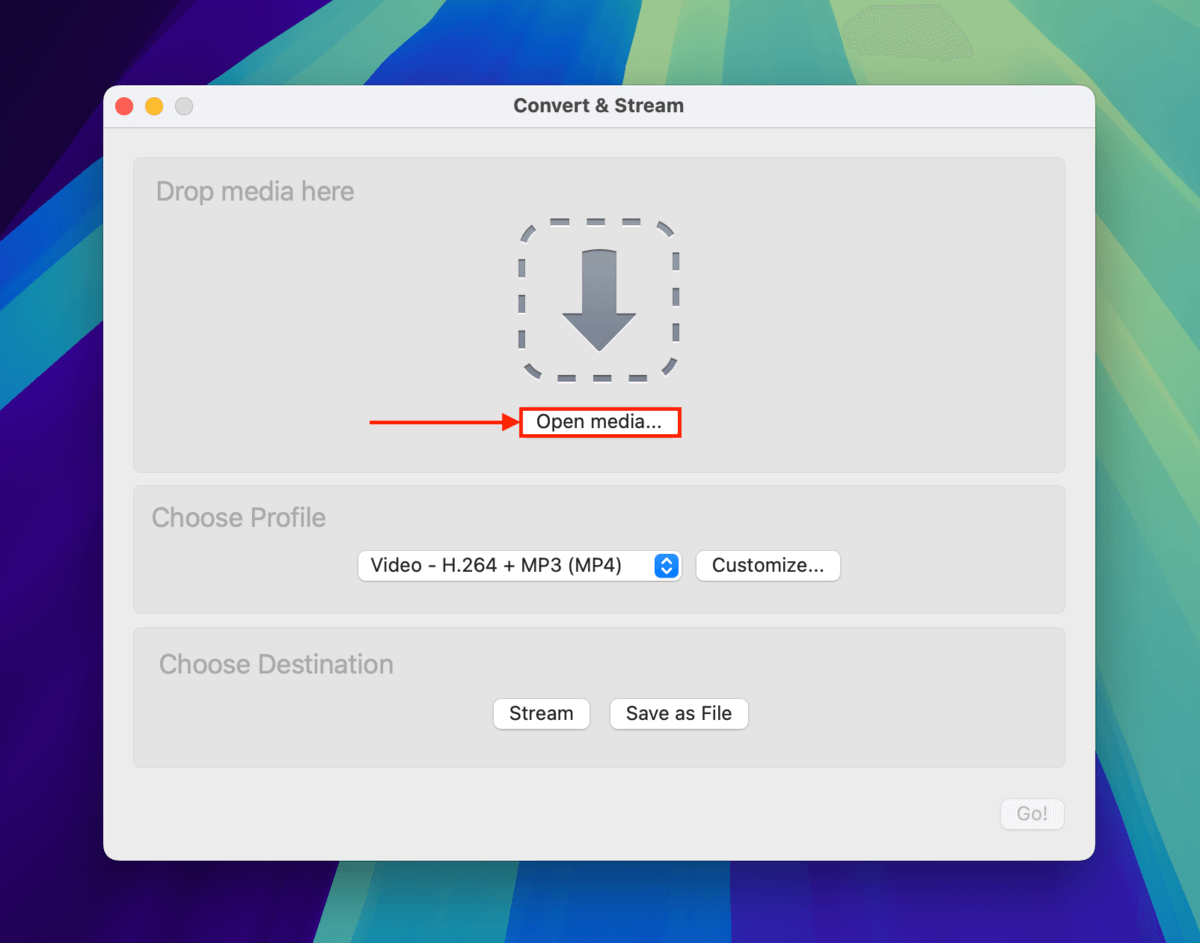
Step 4. Locate and select your corrupted M4A file. Then, click the Open button in the bottom-right corner of the dialogue window.
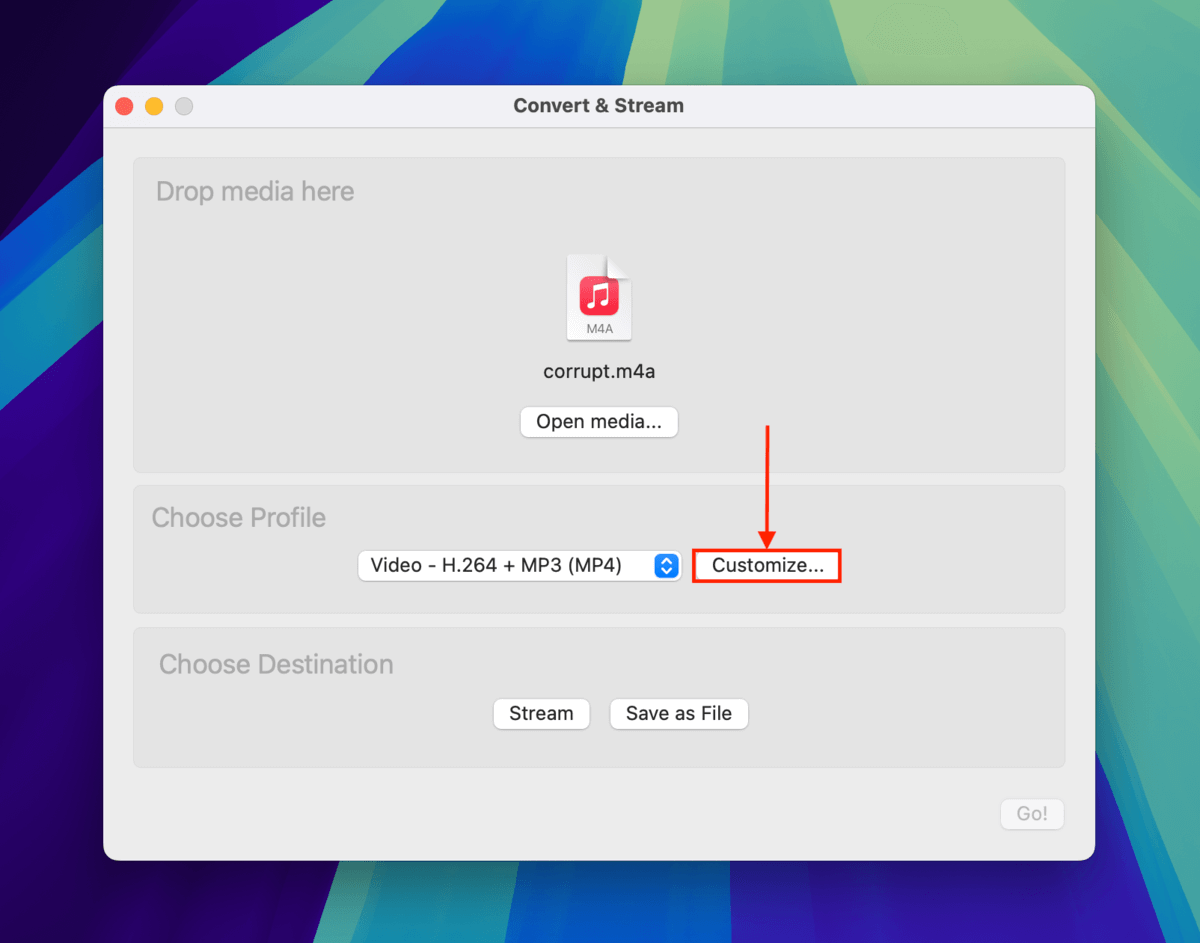
Step 5. Click Customize…
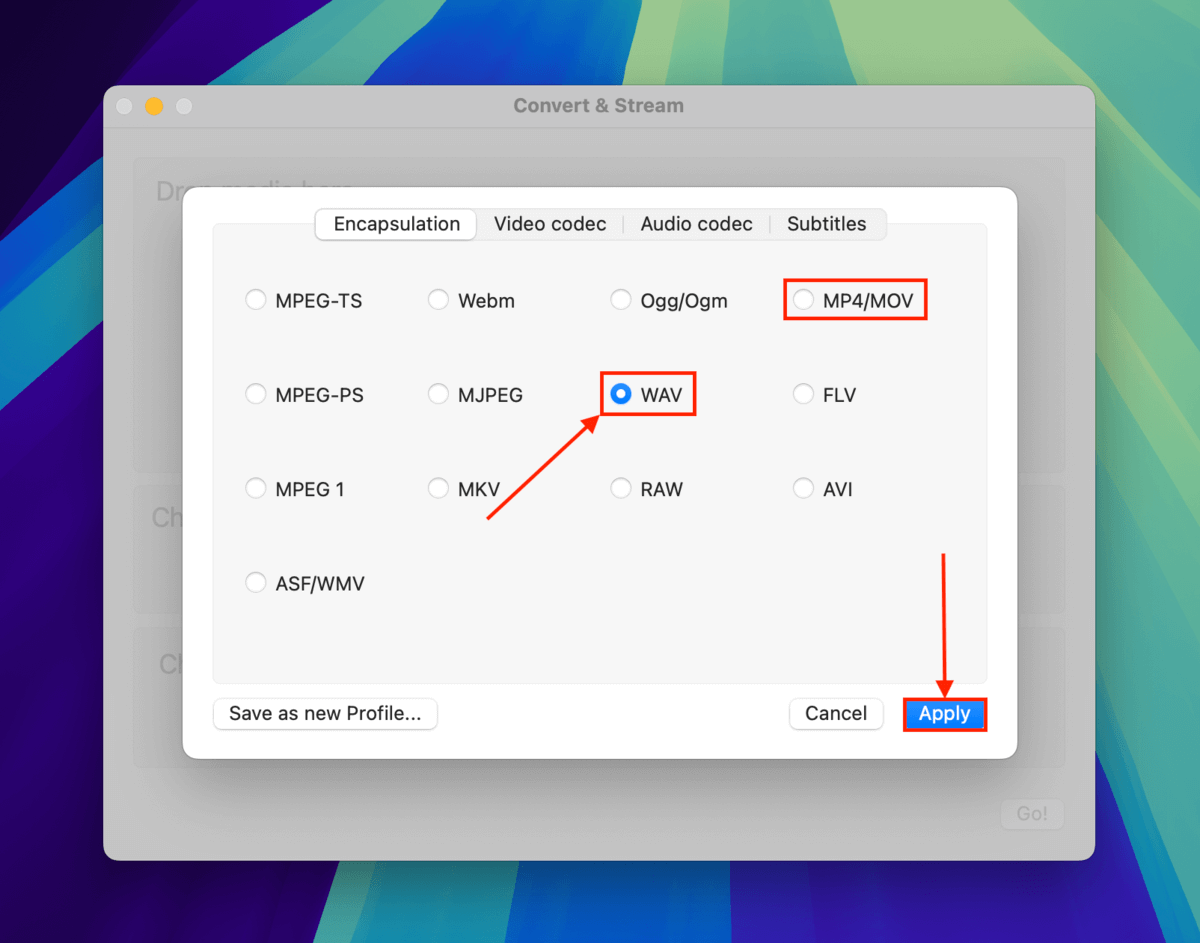
Step 6. Open the Encapsulation menu and choose the WAV (audio-only) or MP4 (video and audio) format. Then, click Apply.
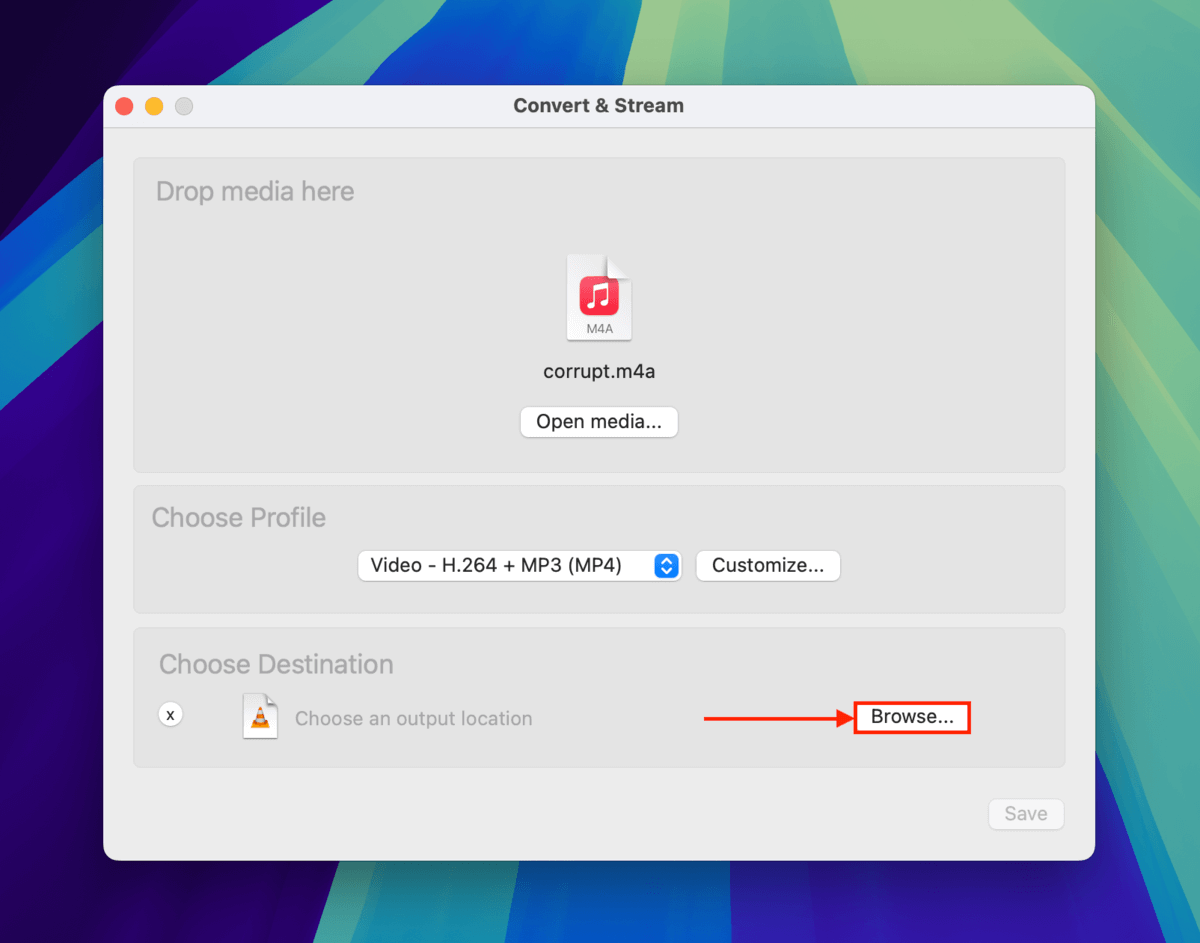
Step 7. Click Save as File.

Step 8. Click Browse…
Step 9. Choose a name for your converted file, the folder where you want to store it, then click Save.
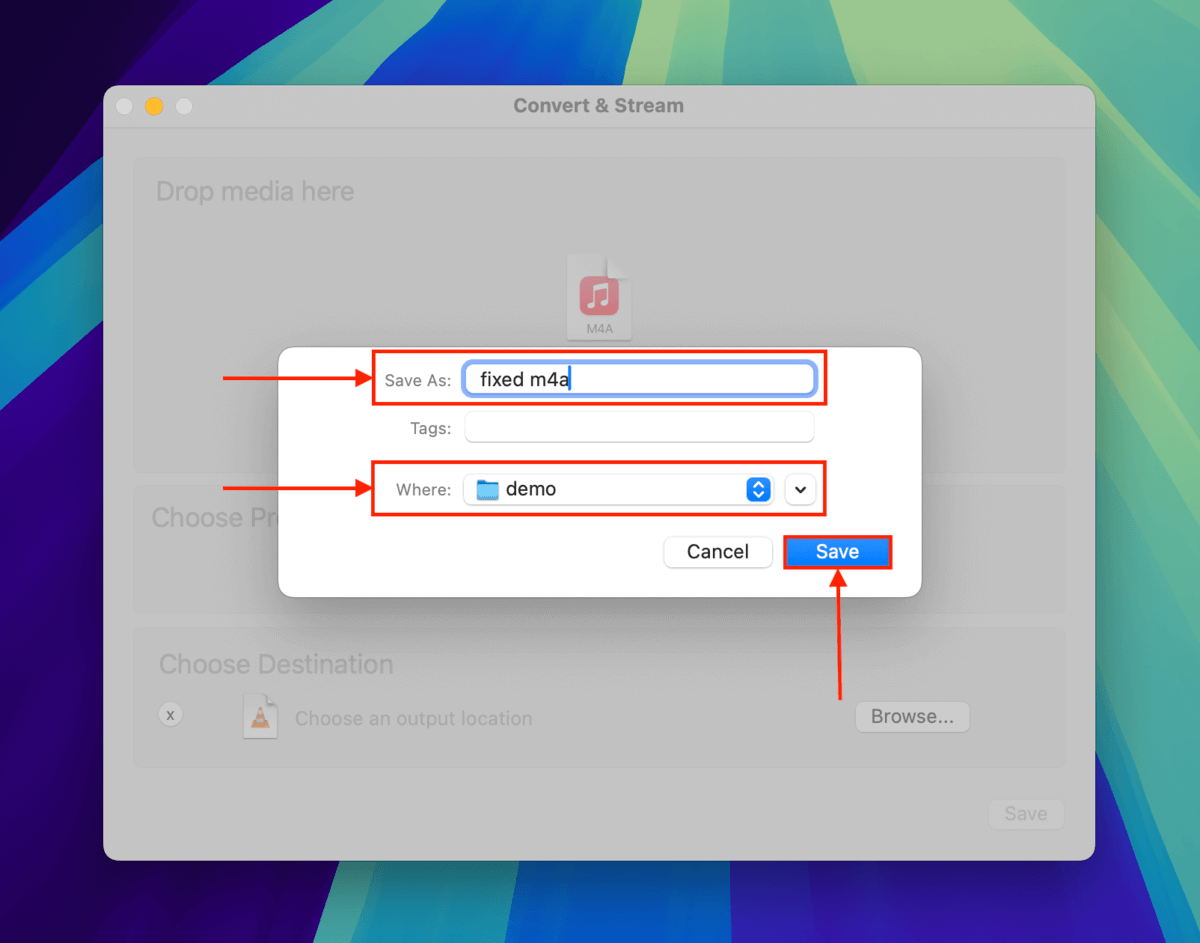
Step 10. In the Convert & Stream window, click Save again.
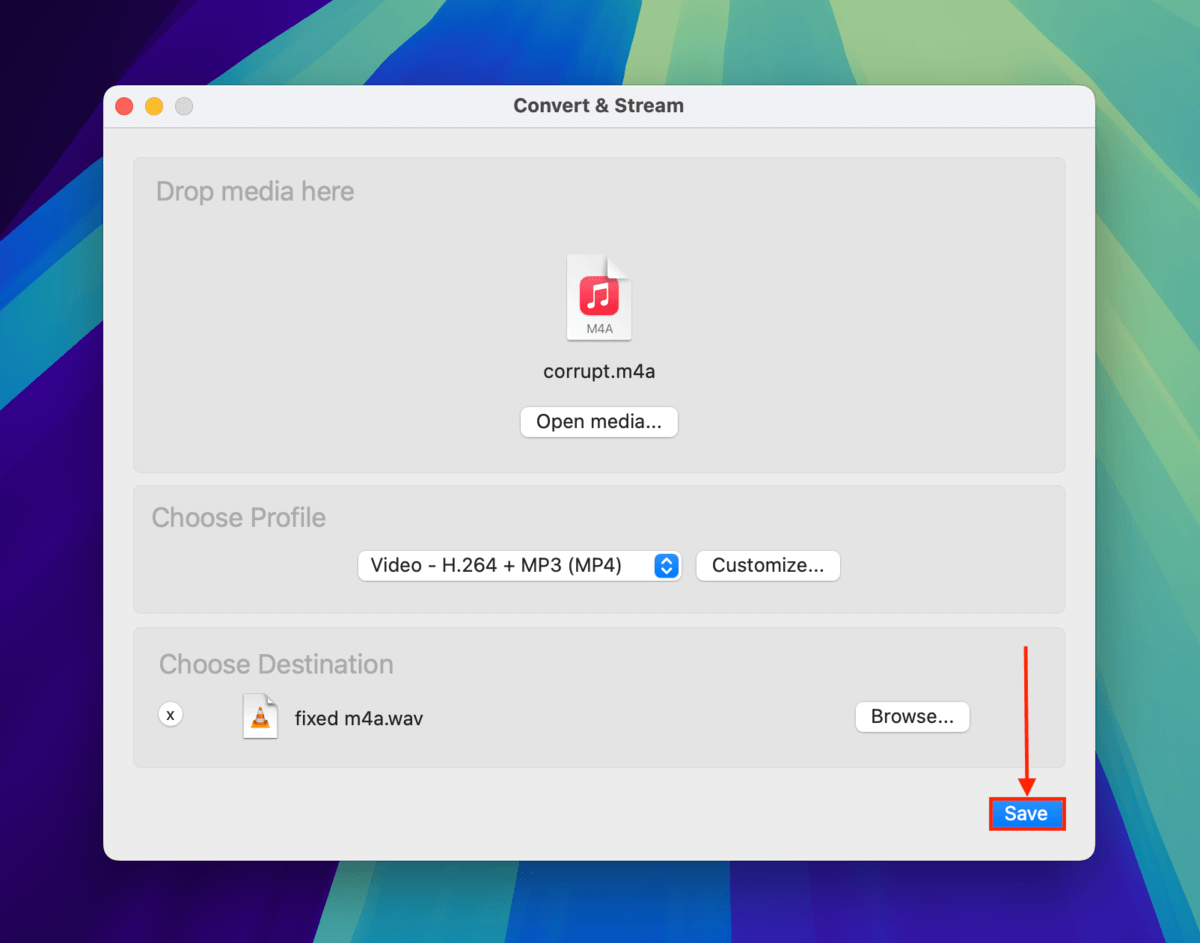
Once VLC Media Player is done converting your M4A video, you’ll find it saved in the folder you select in step 9. Try opening it with VLC (File > Open File…)
Are your M4A files getting repeatedly corrupted?
If this has occurred to your files multiple times, it’s possible that whatever device is storing these files may be corrupted. For example, if you’re capturing audio and video streams using a digital camera, its memory card may be damaged or corrupted. We strongly encourage you to attempt Methods 3-5 in our SD card repair guide.
Once you’ve repaired your SD card, observe whether or not corruption occurs again. If so, your memory card might be physically damaged – it’s time to get a new one.


