")
Recovering files from your Mac’s Trash is straightforward, but retrieving overwritten files—where newer versions have completely replaced the originals—presents a far greater challenge. If you’re facing this more complex data recovery scenario, you’re in the right place. In this guide, I’ll walk you through four proven methods to restore your overwritten files.
Table of Contents
Where Do Overwritten Files Go?
Okay, but what happens when you overwrite an image called Cat.jpg with an image that’s also called Cat.jpg? In that case, the reference to the original file is replaced with the reference to the new file, but the data the original reference pointed to remains on the storage device until new data is written in its place.
Modern operating systems like macOS do this because it’s considerably more efficient than replacing the reference and overwriting the data in one go. For starters, the new file could be considerably smaller than the original one, so it wouldn’t even be possible to overwrite it. More importantly, however, it takes less time to change a simple reference than it does to shuffle a large number of ones and zeros.
The original file’s data then remains physically present on your storage device until that specific space is needed for new data. This creates a window of opportunity for recovery, though its duration can vary significantly. On a frequently used device (or any SSD with TRIM enabled), new data might quickly overwrite these areas within days or even hours. On a less active system, the original data might remain recoverable for weeks or months.
How to Recover Accidentally Replaced Files on Mac
If you need to recover a replaced file on a Mac, then you have several methods to choose from. I recommend you go through them in the order they are presented in this article because that’s how you can achieve the best data recovery results with the least amount of effort.
Method 1: Data Recovery Software
Data recovery software can find files whose references no longer exist because they have been overwritten. That’s because recovery software scans the entire hard drive sector by sector, using advanced algorithms to detect recoverable files in the vast sea of ones and zeros based on their signatures and (if available) file system information.
My top recommendation for Mac data recovery software is Disk Drill because it excels at recovering replaced files for the following reasons:
- Supports over 400 different file formats
- Can recover overwritten data from Mac, Windows, and Linux file systems
- Locates overwritten data based on their signatures and file system information to deliver the best results possible
- Has the ability to recover files from Time Machine backups
What’s also very important is that Disk Drill is one of the most user-friendly tools of its kind thanks to its polished interface, which allows you to recover overwritten files in just five main steps:
- Download and install Disk Drill on your Mac. I recommend you download and install it to a different storage device than where your overwritten files were located as installing to the same drive could overwrite the very data you’re trying to recover.
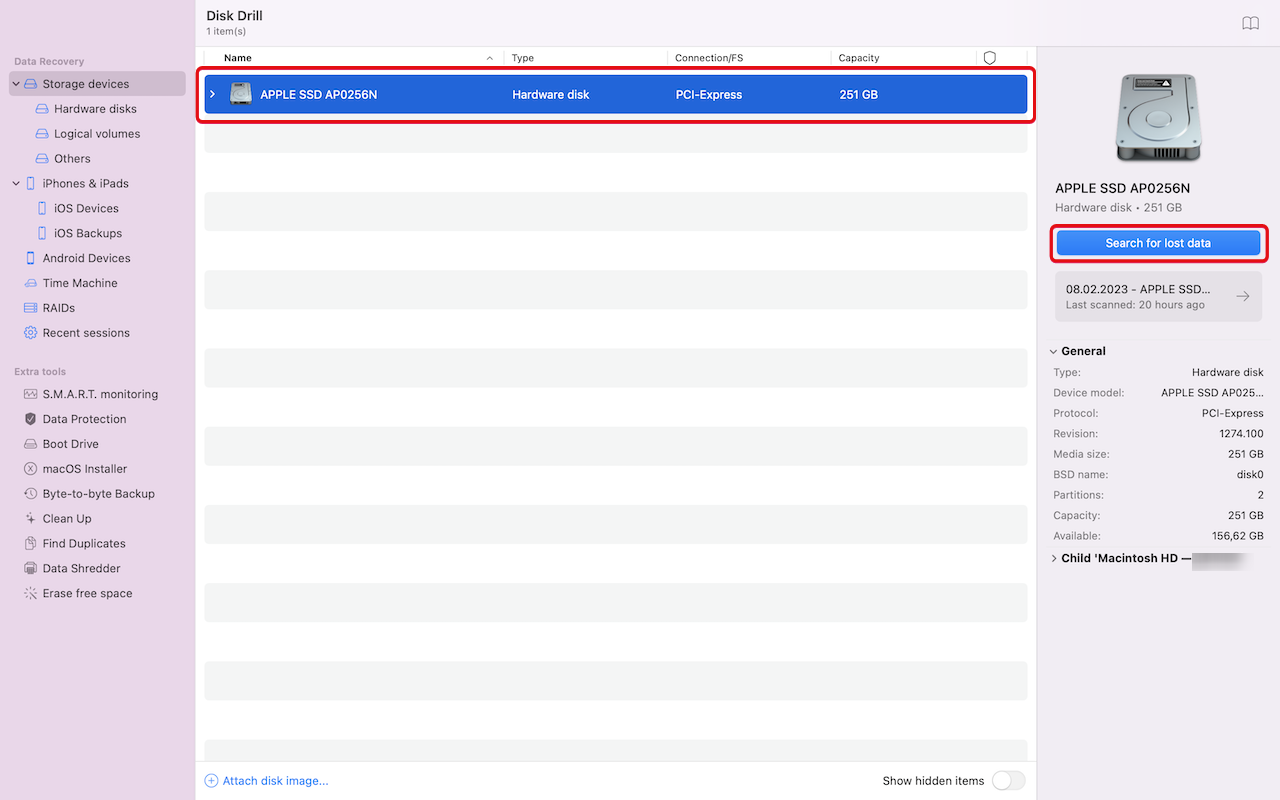
- Launch Disk Drill and select the storage device containing your lost file. You can then click the Search for lost data button to start scanning the selected device.
- Wait while Disk Drill performs its scan or click the Review found files button in the top-right corner to see recoverable files right away.
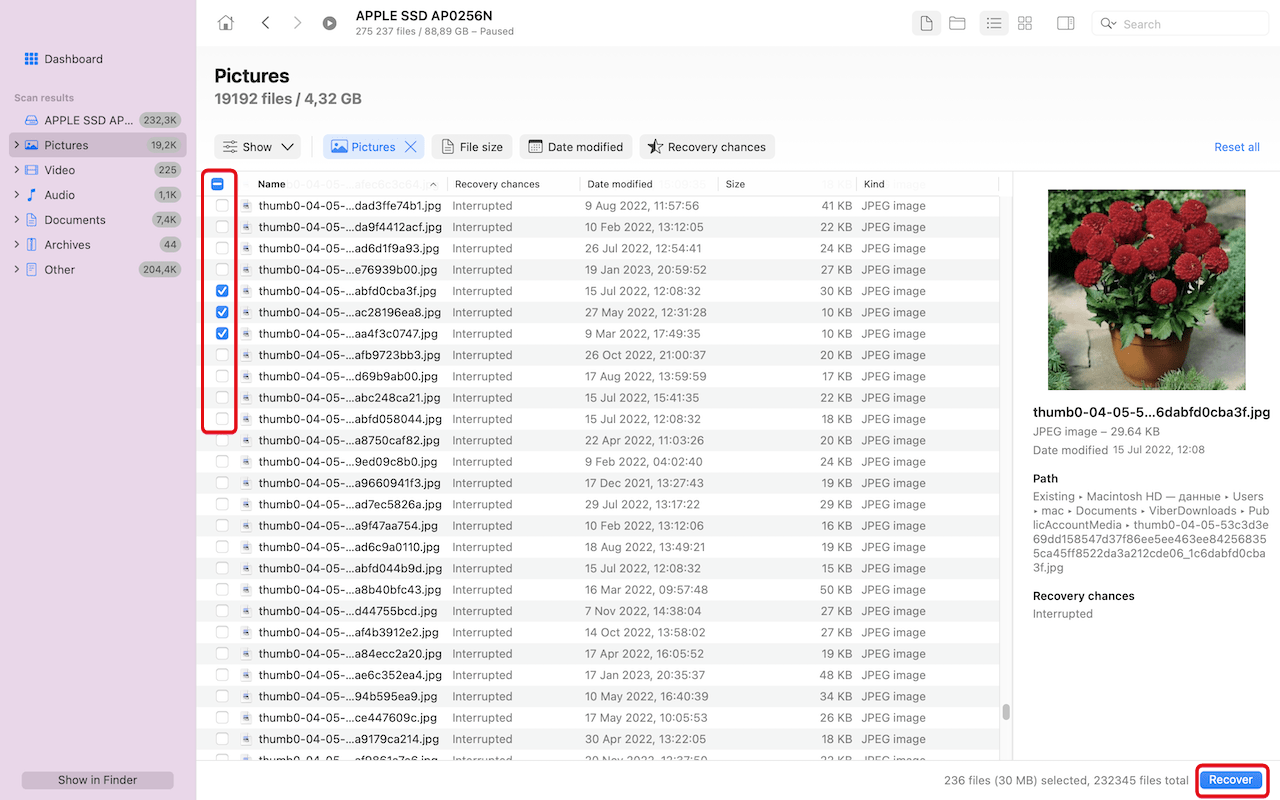
- Look for your overwritten files. You can use various filters in the left sidebar and the top toolbar to narrow down results by file type, date, or size, making it easier to find specific files. Select the overwritten file and click the Recover button.
- When prompted, choose a recovery destination on a different drive than the source location to prevent any potential data overwriting. Once recovered, verify the files work as expected.
While the free version of Disk Drill for Mac allows you to scan your drive and preview recoverable files, you’ll need to upgrade to PRO to actually save recovered files. This gives you a risk-free way to confirm your files are recoverable before purchasing. You can learn more about its capabilities and pricing in my detailed Disk Drill review.
Method 2: Local Backups
To retrieve a file replaced with another file from a local backup, you might be able to just copy it from your backup location using Finder, but most Mac users rely on Time Machine, Apple’s backup software application distributed as part of macOS.
Time Machine creates incremental backups of files on your hard drive and selected locations, and it lets you go back in time and recover any older version with a few simple clicks. Here’s how you can recover overwritten files with it if you have it enabled on your system:
- Open Finder and navigate to the folder containing your overwritten file. You can quickly access Finder using Spotlight (⌘ + Shift) or by clicking its icon in the Dock. If you can’t find the folder, use Spotlight to search for it.
- Click the Time Machine icon in the Menu Bar (it looks like a clock with an arrow around it) and select Enter Time Machine. Time Machine will display the current folder with a timeline of all available backups.
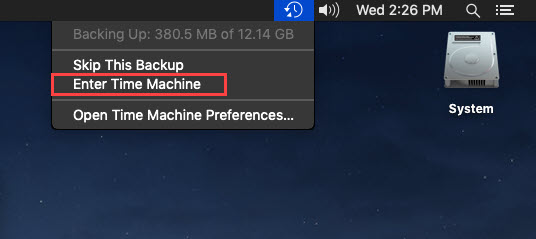
- Browse through the timeline to locate the version of your file from before it was overwritten. You can use the arrows on the right or scroll through the timestamps on the right edge of the screen. Select the file and click Restore.

If you’ve just found out that this method can’t help you because you don’t have Time Machine enabled on your system, then I strongly recommend setting it up to prevent future data loss caused by accidental overwriting, deletion, corruption, and other problems.
Method 3: Cloud Backups
If you don’t have Time Machine enabled, cloud backup services offer another reliable way to recover overwritten files. Apple’s iCloud Drive and many other cloud services maintain version histories of your files and allow you to restore previous versions quickly and easily.
I personally use Dropbox, so that’s what I’ll demonstrate here, but you should know that most cloud services are quite similar:
- Launch your preferred web browser and sign in to your Dropbox account. If you’ve enabled two-factor authentication (which I recommend for security), you’ll need to complete this verification step.

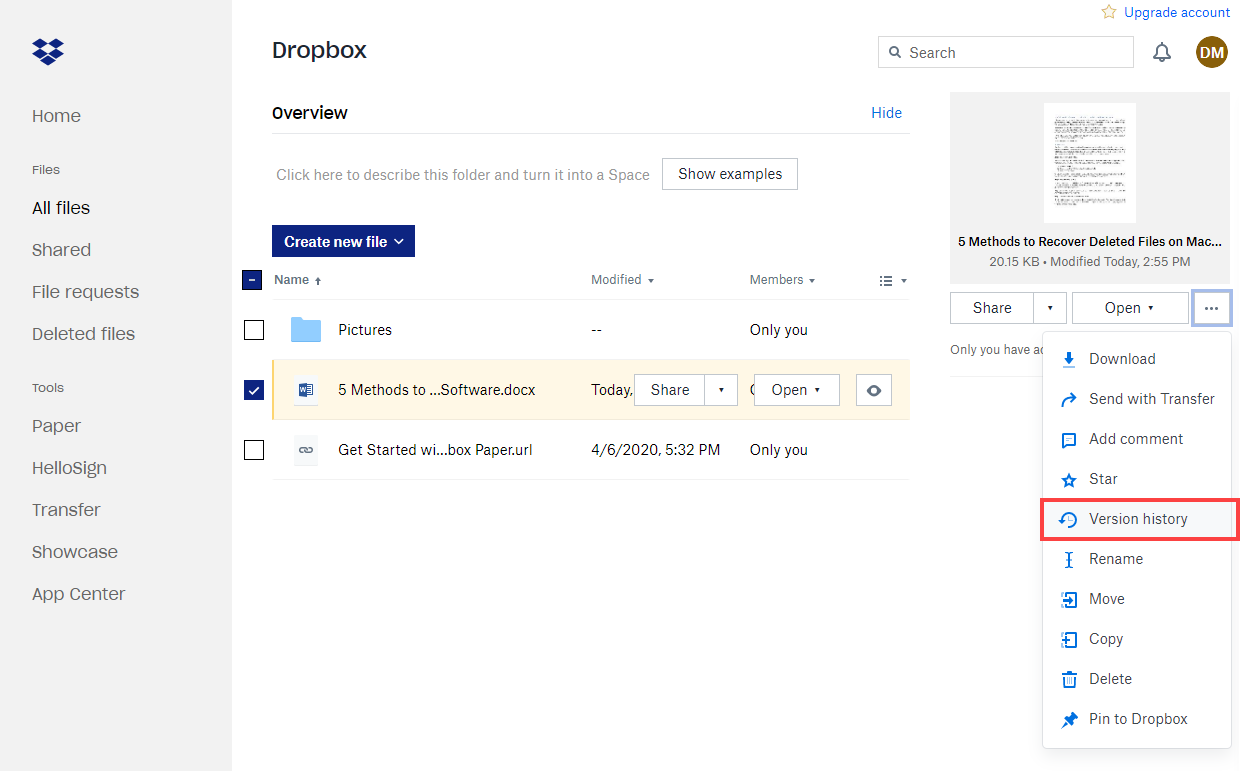
- Navigate to the folder containing your overwritten file and locate the current version. Click the three horizontal dots (⋮) in the right toolbar and select Version history.
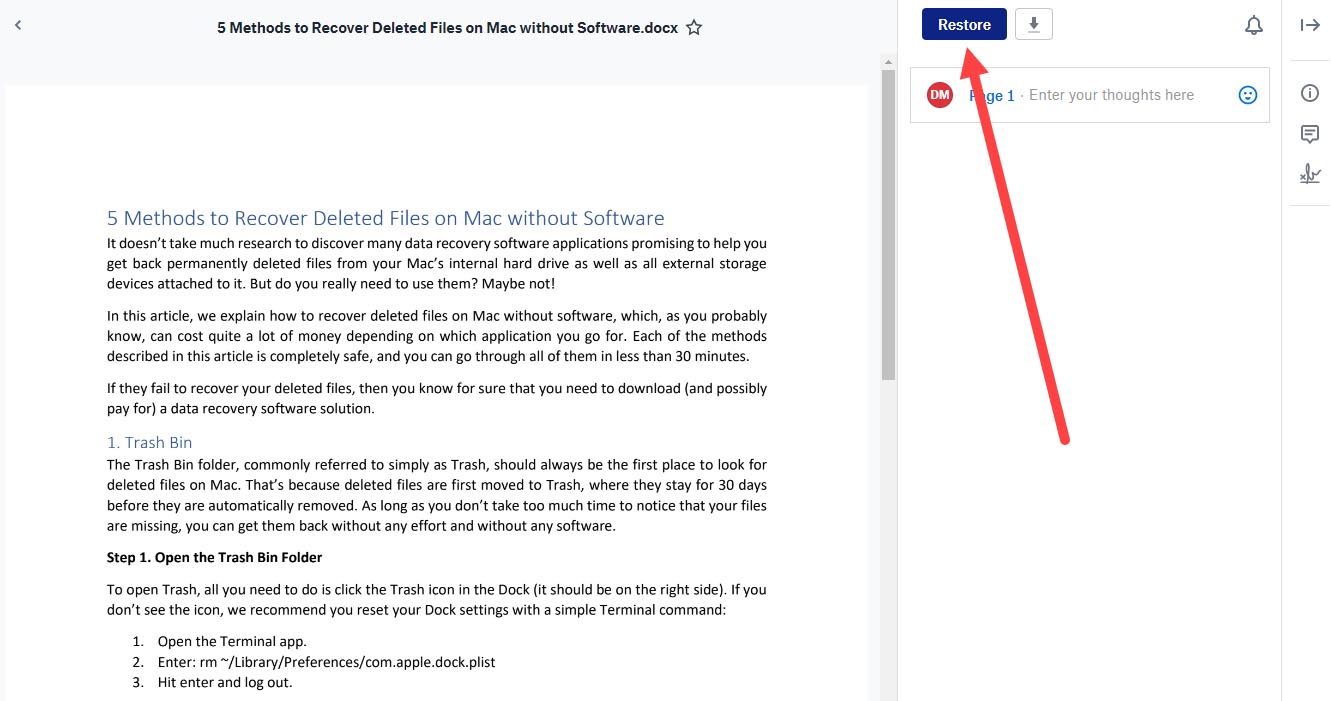
- Click on the version you want to restore. You can preview the file to verify that you’ve selected the right version before clicking Restore.
Method 4: App Specific Options
Many applications on macOS come with built-in version management systems that can save your day if you’ve overwritten a file by mistake. Here are three popular applications I regularly work with that offer this feature:
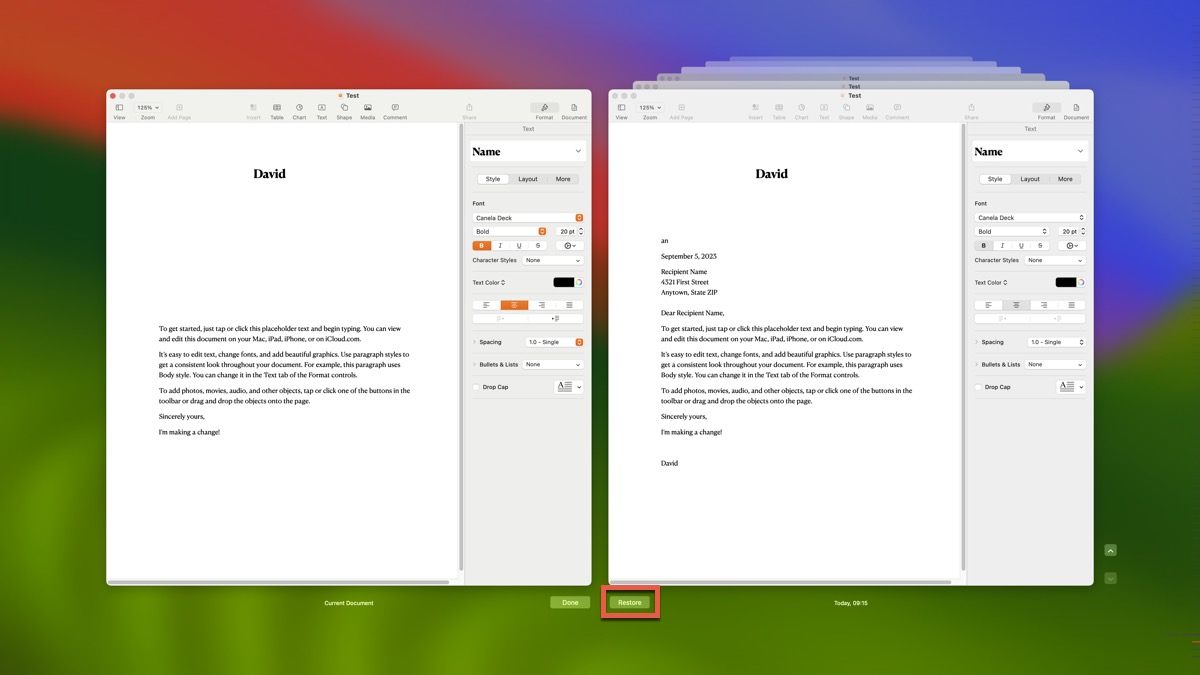
Apple Pages (Revert To):
- Open the overwritten file in Apple Pages.
- Click the File menu, select the Revert To option, and then click on Browse all versions.
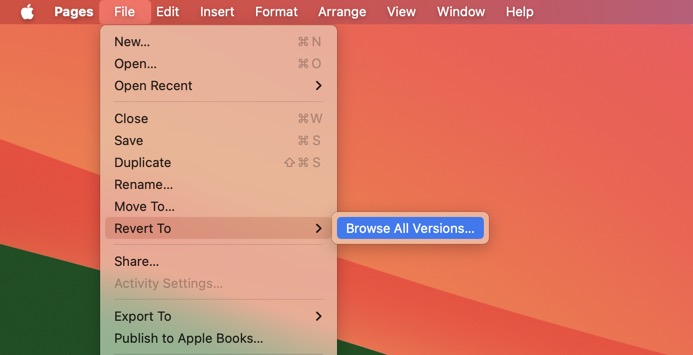
- You’ll be taken to a Time Machine-like interface that shows past versions of the document.
- Browse through the versions until you find the one you wish to recover.
- Click the Restore button to replace the current file with the older version.
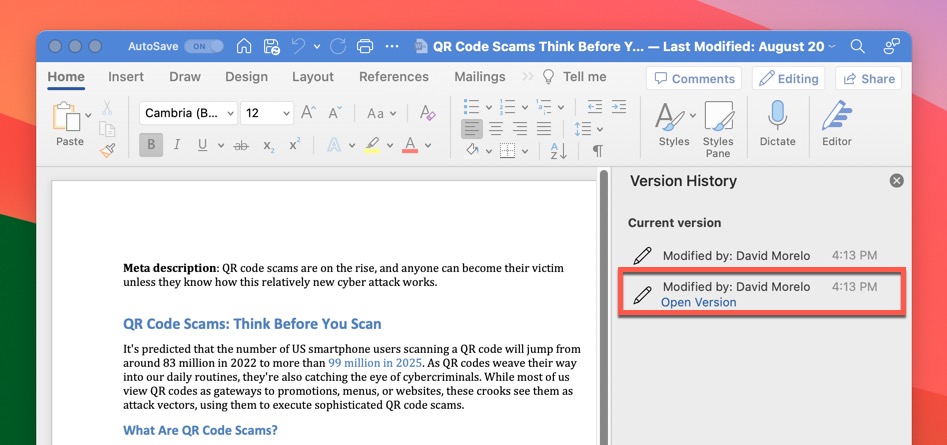
Microsoft Word (Version History):
- Open the overwritten file in Microsoft Word.
- Click the document name in the title bar.
- Select the Browse Version History option.

- Find the version you want to restore in the Version History sidebar.
- Click the Open Version button.
Pixelmator Pro (Revert To):
- Open your Pixelmator Pro document.
- Click the document name at the top of the window, or go to File, then Revert To, and finally Browse All Versions.

- The Versions browser will appear, showing you a timeline of all saved versions (similar to Time Machine’s interface).
- Navigate through different versions using the timeline on the right side of the screen.
- Click Restore to revert to the selected version.

Other popular Mac apps with similar version history features that can save your butt when attempting to recover an overwritten file include Excel and PowerPoint (which work similar to Word), Apple’s Numbers and Keynote (following the same pattern as Pages), Adobe’s Creative Suite apps like Photoshop and Illustrator, Pixelmator Pro, Visual Studio Code (with its Local History extension), and many others.
Conclusion
Overwritten files present a bigger challenge than simply deleted ones, which can usually still be found in the Trash folder. However, as I’ve shown in this guide, there are several reliable methods to recover overwritten files, and they include data recovery software like Disk Drill, Time Machine, cloud backup services, and app-specific recovery features. To take full advantage of them, you need to act quickly because overwritten files won’t remain recoverable forever.
FAQ:
You have several options to recover a replaced file. You can data recovery software like Disk Drill to recover the original data, restore from your Time Machine backup (if enabled), check cloud storage version history (like Dropbox or iCloud), or use your application’s built-in version history.
Microsoft Word has a built-in version history feature that you can use by opening the overwritten file, clicking the document name in the title bar, and then selecting the Browse Version History option. From there, you just need to find the version you want to recover.
You have several alternatives to Time Machine. My top recommendation is to use data recovery software like Disk Drill to scan for recoverable data, including overwritten files. You can also check cloud storage version history if you use services like Dropbox or iCloud or use your application’s built-in version management features (available in Pages, Word, Pixelmator Pro, and many other apps).
When you overwrite a file, the original data isn’t immediately deleted from your storage device. Instead, only the reference to that data is replaced, while the actual content remains until that storage space is needed for new data. This creates a window of opportunity for recovery, though it may be shorter on frequently used devices or SSDs with TRIM enabled.


")
