
Disk Drill is a very well-known data recovery software that has appeared in many articles and review pieces since its release in 2009.
But is it really that good? What are its weaknesses (because no software is perfect)? How does it compare to the competition? And is it suitable for YOU?
This article is the answer. Here’s an info-rich and easy-to-read breakdown of one of the most popular data recovery apps on the market.
Table of Contents
Disk Drill for Mac Brief Overview
Disk Drill is a data recovery software solution developed by CleverFiles for Mac and, later, Windows computers. It was created over 15 years ago, and, for most of its lifetime, has always been one of the leading tools of its category. The app is capable of recovering data in many different scenarios, even those usually reserved for digital forensics software or other expensive specialist tools (while being far more user-friendly).
Aside from recently deleted files, Disk Drill can also reliably and safely handle highly fragmented data and severely corrupted drives—including RAID and network drive setups—far better than many of its direct competitors. It’s also the first consumer-tier recovery software with advanced camera recovery features that directly address video unplayability issues, which often accompany the recovery process.
Main Features
In this section, we break down each of Disk Drill’s core features to give you a detailed picture of what this software has to offer. We also evaluated its pros and cons based on how it honestly matches up to industry standards, and how well it can address the needs of users in various data loss scenarios.
- Top-tier UI and UX: We can confidently say that Disk Drill has the best interface and user experience when compared to most data recovery apps. It’s fast, streamlined, and easier to pick up than most of its competitors (even so-called “beginner” tools).
- Multi-scan data recovery: Thanks to this, Disk Drill can restore files whose file system metadata is still available, preserving original file names and folder structure whenever possible. At the same time, its signature scanner can locate files even when metadata has been lost or severely damaged by identifying data based on known file signatures.
- Advanced camera recovery: This app is the first consumer-grade tool to develop specific recovery algorithms that address video file fragmentation. Many other tools can recover video file data, but can’t “rebuild” them (so they end up recovered but unplayable). Disk Drill can.
- iPhone & Android recovery: You can also use Disk Drill for Mac to restore data from iPhone and Android devices, as long as you have the appropriate cables (Android devices need to be rooted).
- Byte-to-byte backup: Included in the app is an advanced disk imaging feature called Byte-to-byte backup. It can reliably copy entire disks and has fault-tolerant protocols for handling bad sectors, corruption, and other forms of damage.
- Reliable session management: Disk Drill saves the results of the scan in real-time, so you can pause and play the recovery process anytime you want. You can even start a scan on a Mac and finish it on a Windows PC (and vice versa).
- RAID recovery: Disk Drill can restore data from software-based RAID setups, hybrid RAID, and individual disks from hardware arrays. See the specific RAID levels supported on CleverFiles’ RAID recovery page.
- Network recovery: You can also scan remote devices over a network connection, and it even has fault tolerance built in, in case your internet is unstable.
- Hex view: Power users can directly inspect raw disk and partition data in hexadecimal format, enabling a more forensic analysis of storage devices.
| Pros | Cons |
| Disk Drill has one of the best signature scanners in the recovery software category. It recognizes over 400 file signatures (and counting) with a consistent success rate across different types. | No free recovery in the Mac version (but you can backup and scan devices, as well as preview files for free). |
| Disk Drill works for almost all modern storage devices, including HDDs, SSDs, pen drives, memory cards, mobile devices, and more. | Scan customization is limited—for example, you can’t pre-set the scan to only include specific folders or file types. |
| The app has wide system support and is compatible with file systems across Mac (HFS, HFS+, APFS), Windows (NTFS, FAT16/FAT32/exFAT, NTFS5, ReFS), and Linux (ext2/ext3/ext4, BTRFS). | Android data recovery requires root access. |
| Disk Drill’s interface is extremely user-friendly and well-designed, making even complex recovery operations accessible to regular users. | Disk Drill can only restore data from individual disks of a RAID array – it can’t reconstruct the array itself. |
| The Advanced Camera Recovery feature massively improves the playability of recovered video files (a known major issue for video recovery operations). | |
| Disk Drill’s combination of features (as well as the high quality of their implementation) makes it suitable for almost any non-enterprise-level data loss scenario. | |
| The cost of Disk Drill is reasonable for the functionality it provides, and all features are included with the license. |
How to Download Disk Drill for Mac + Pricing
A free version of Disk Drill for Mac can be downloaded directly from its official website:
Step 1. Go to: https://www.cleverfiles.com/
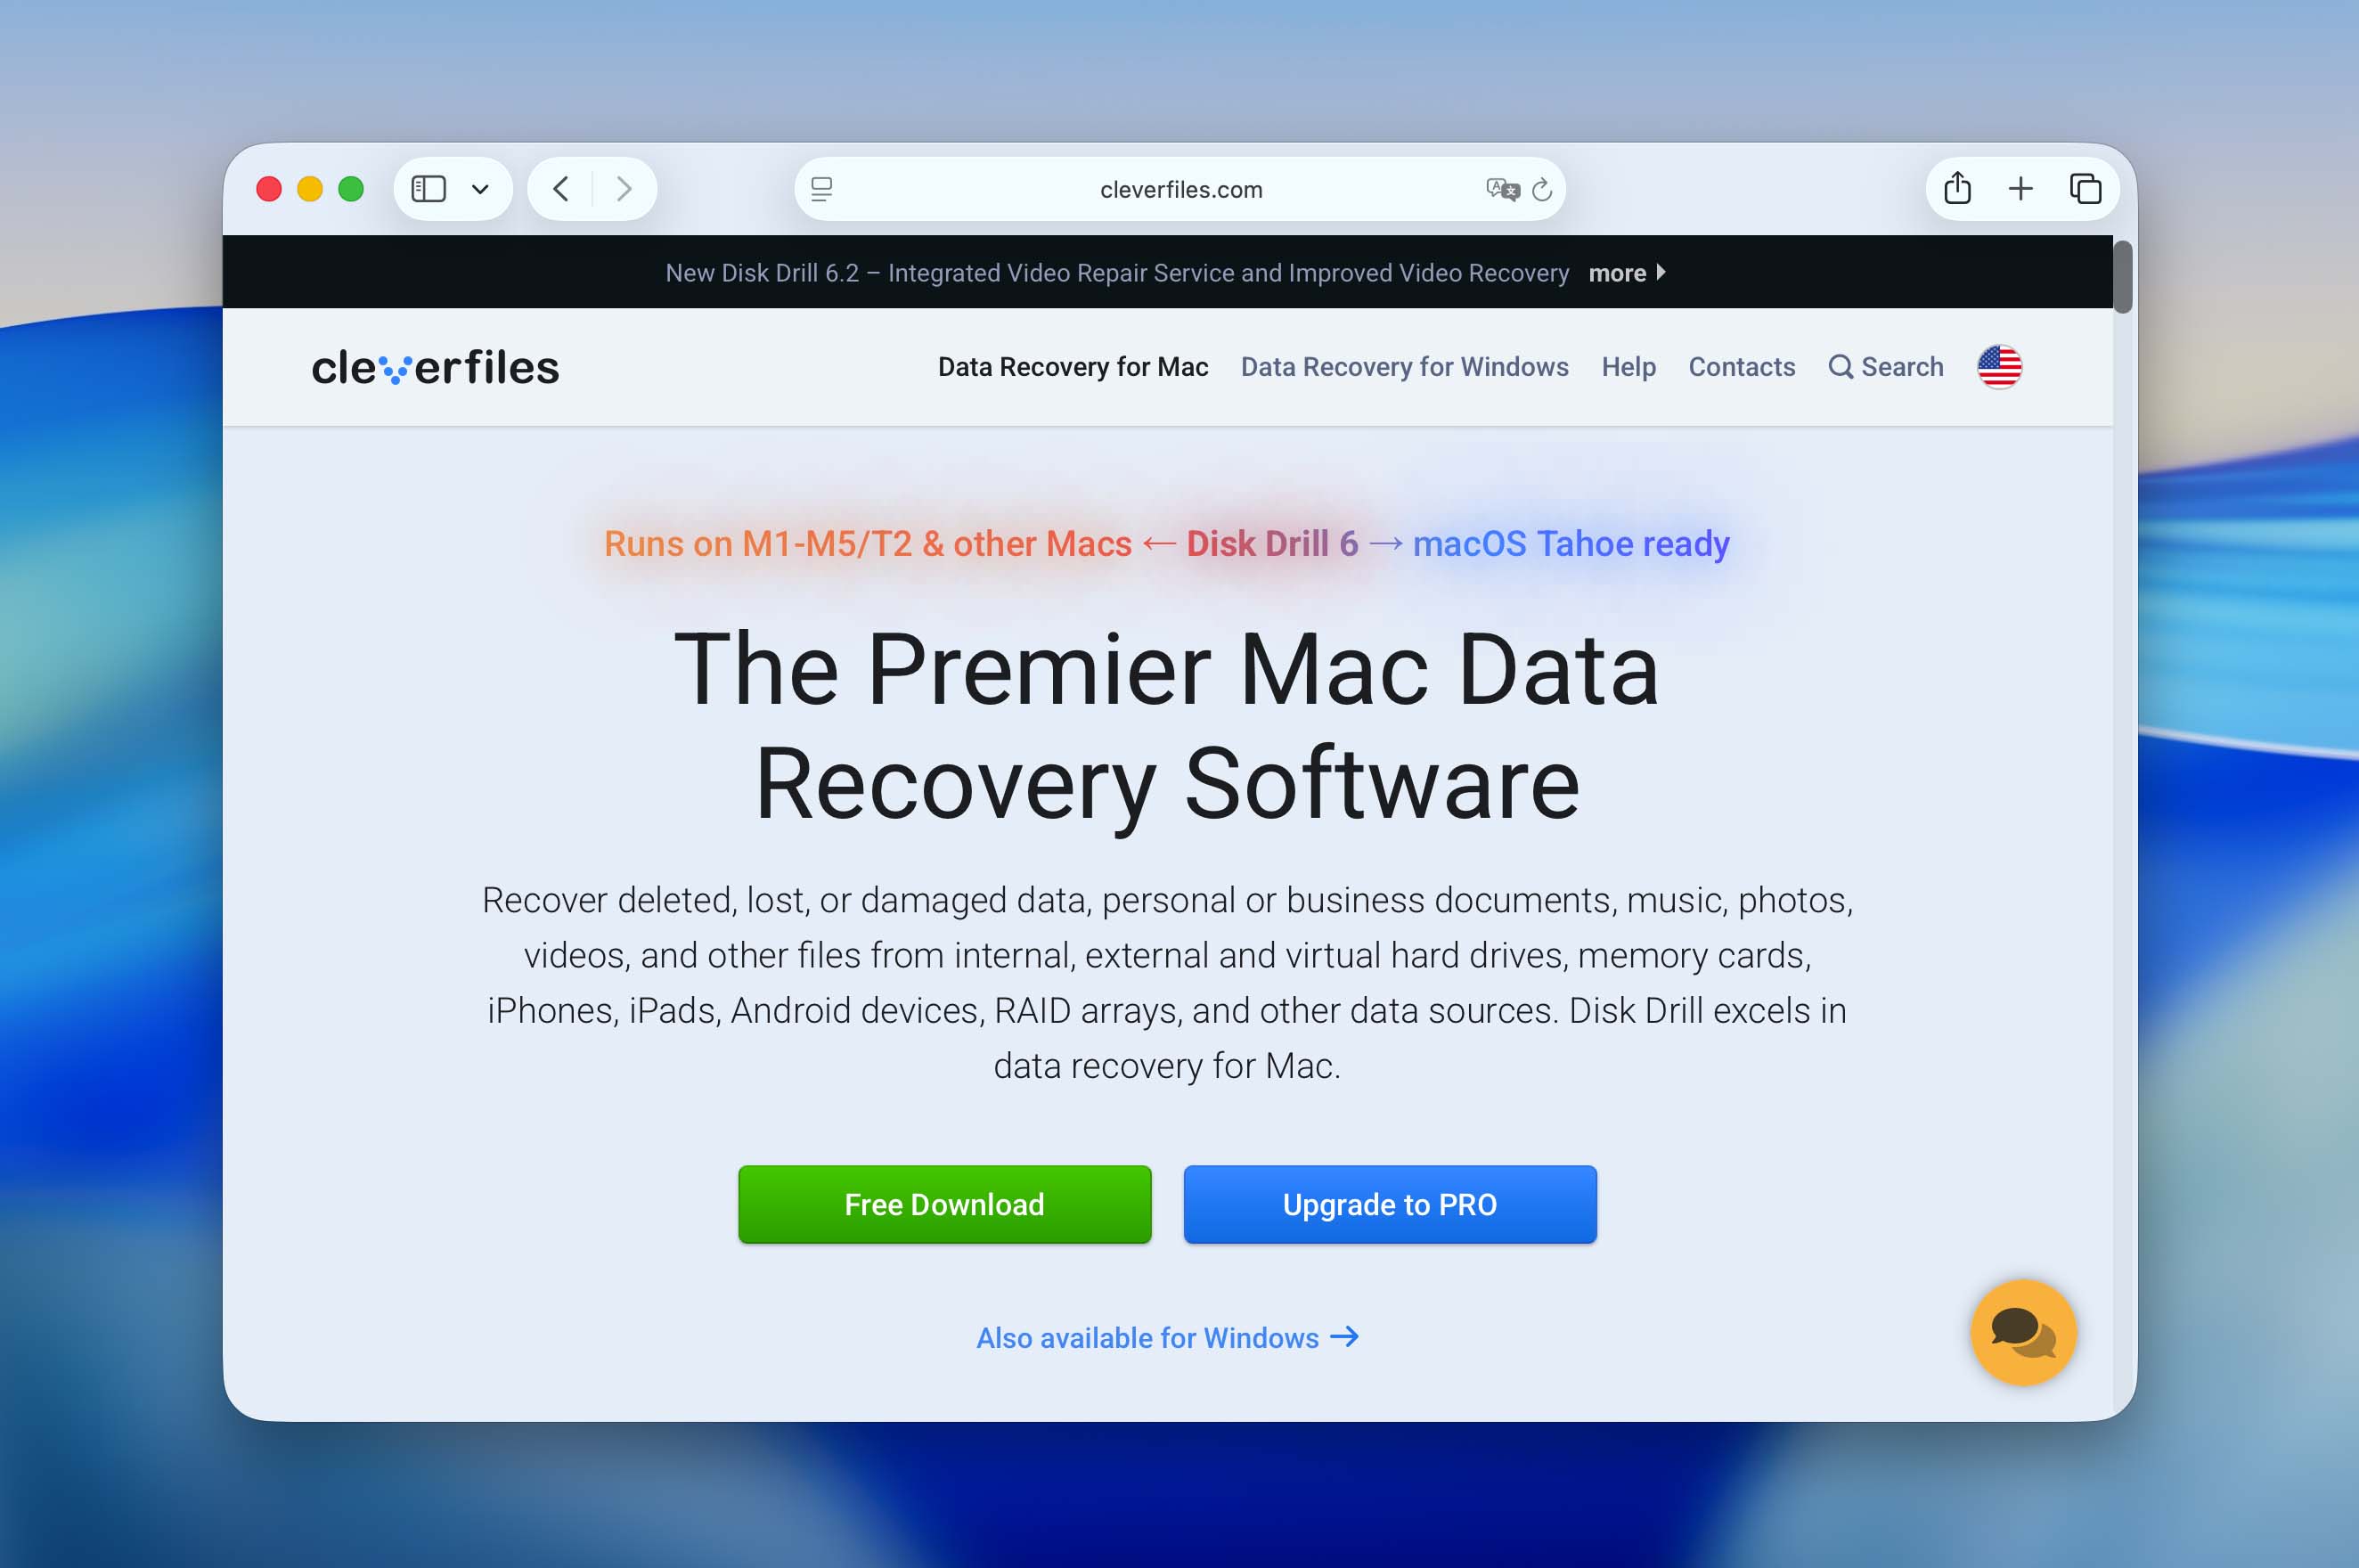
Step 2. Click Free Download.
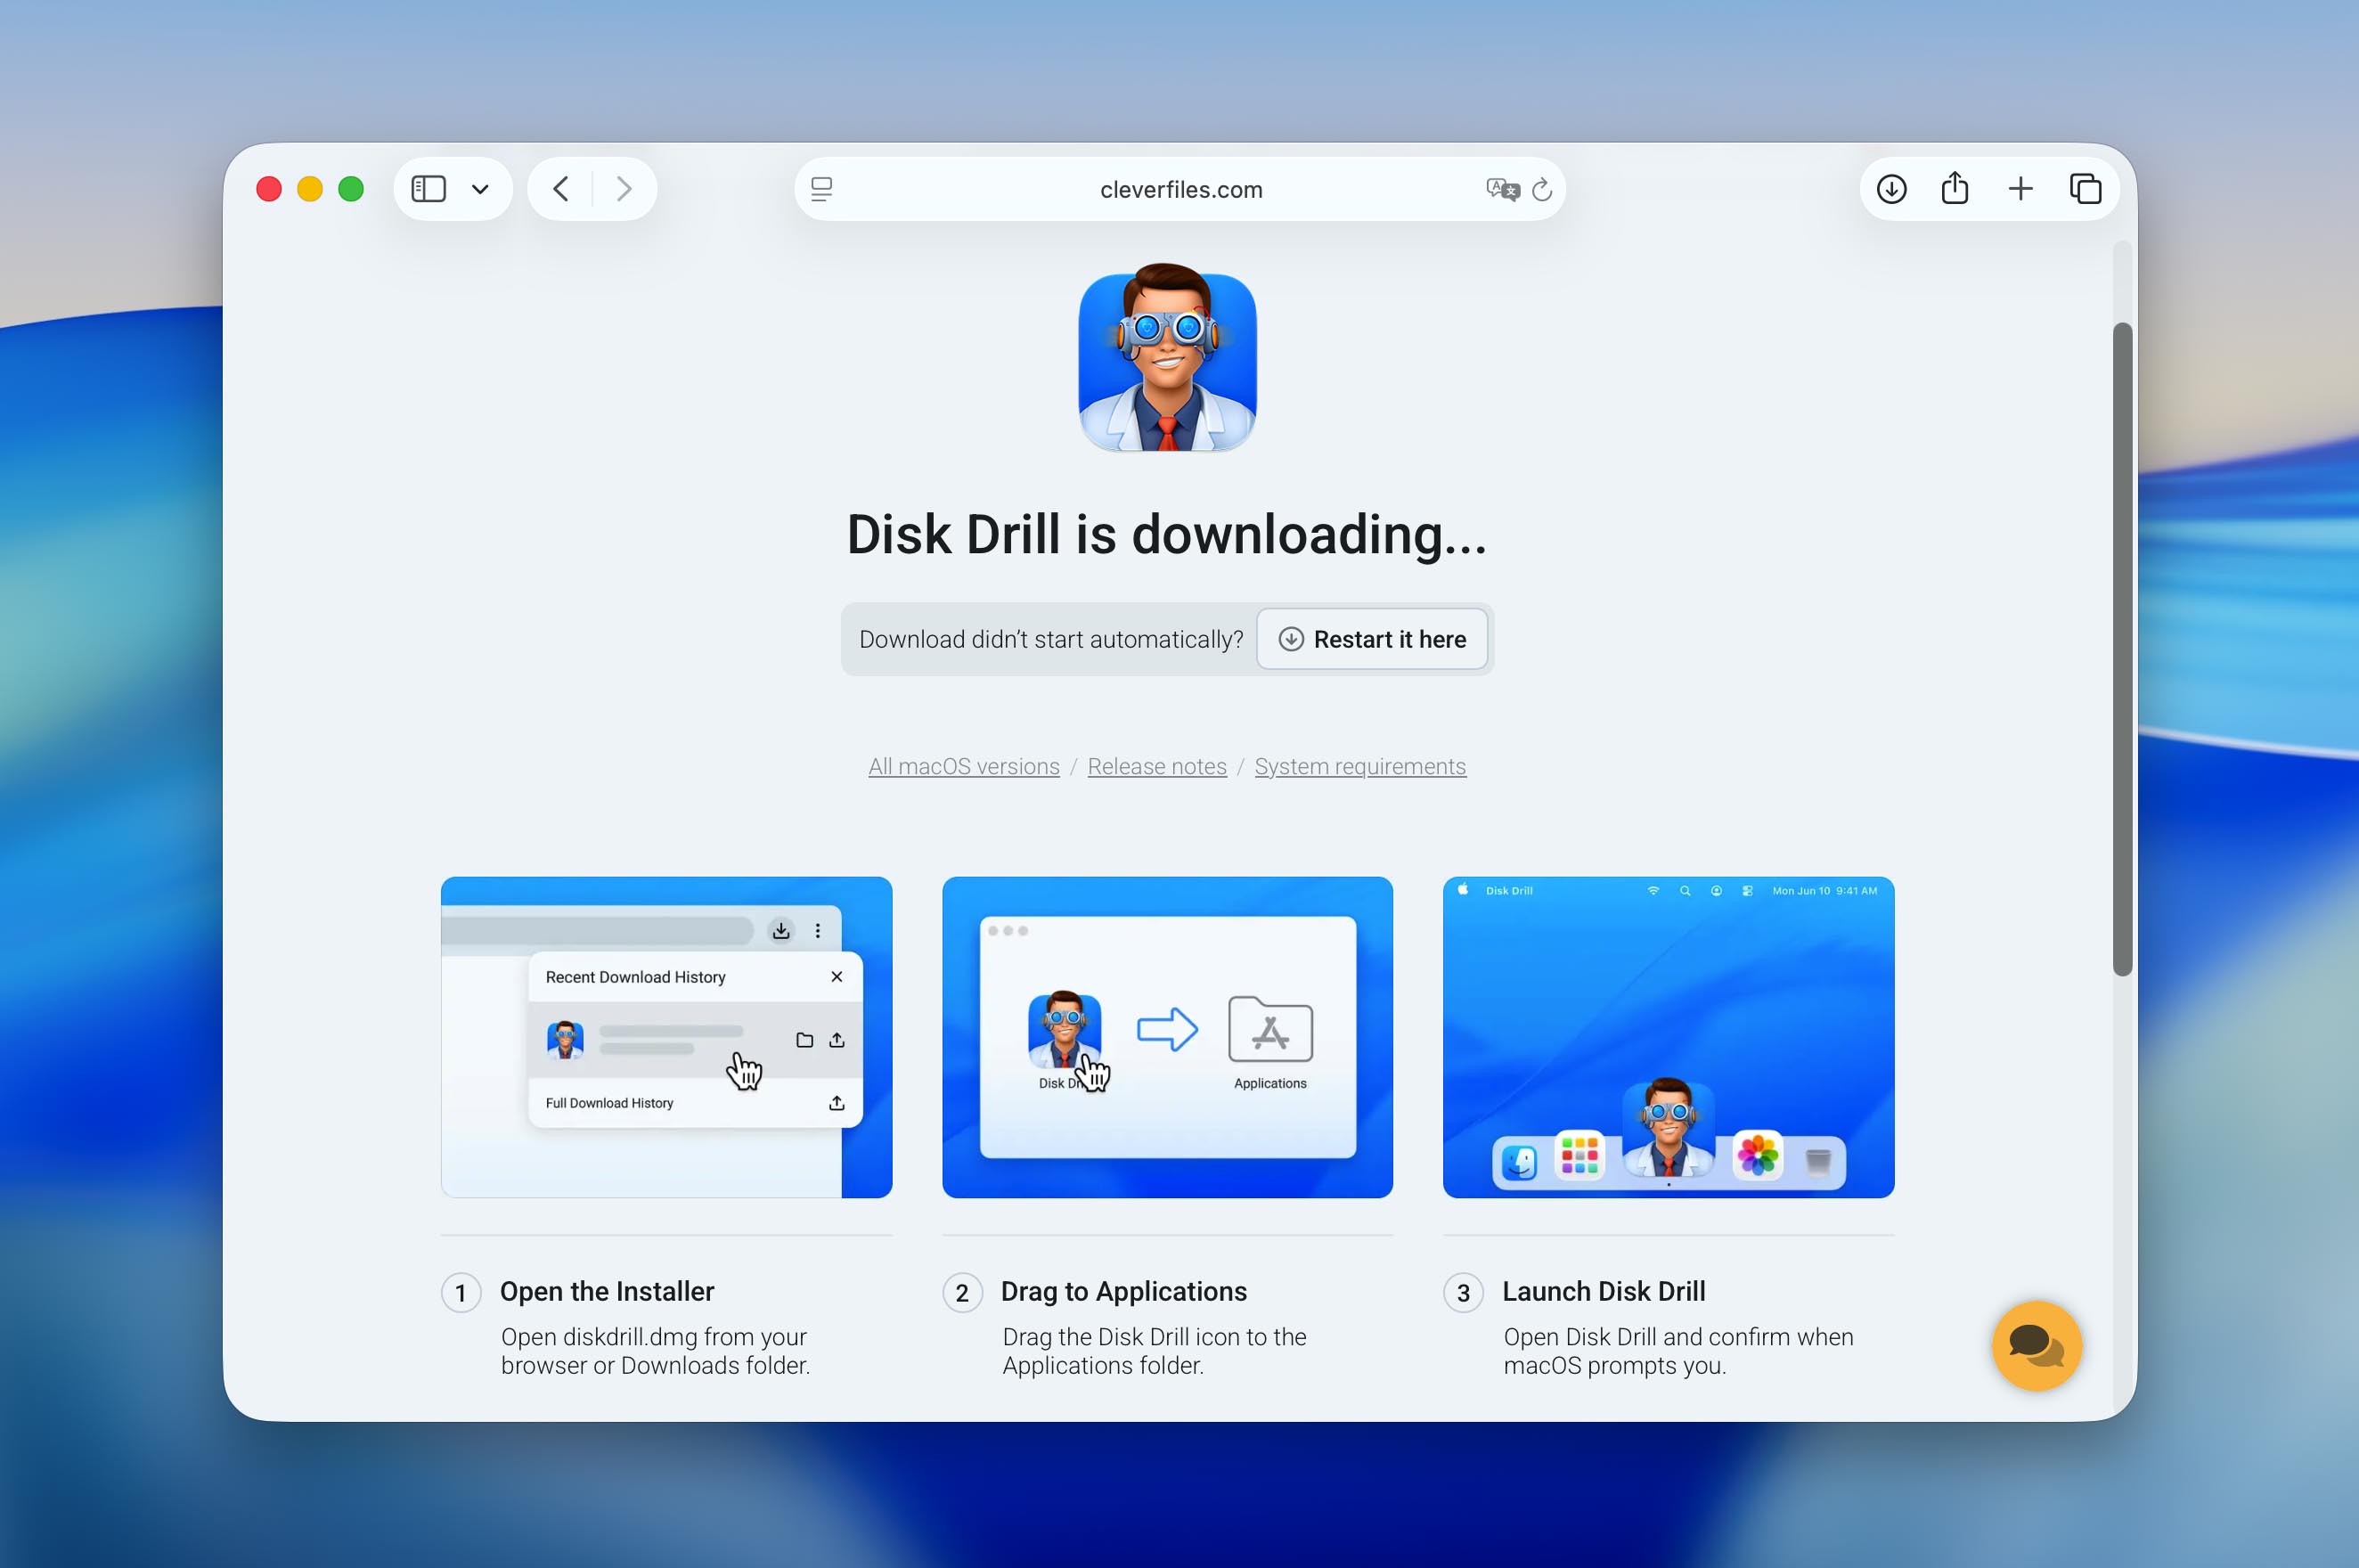
The Basic version of Disk Drill should download to your Mac. You can use this version to scan any storage device using Disk Drill’s advanced recovery algorithms to find all recoverable files. To recover them, you need to purchase a Disk Drill Pro.
The online order process is complexly painless, and it’s possible to buy optional lifetime upgrades and save money in the long run. Attractive discounts are available for those who are upgrading from past versions, educational institutions, non-profits, governments, and even users of other data recovery software who are not satisfied with their purchase.
Here’s an overview of different versions of Disk Drill for Mac and their cost:
| Disk Drill Basic | Disk Drill Pro (1 Month) | Disk Drill Pro (Lifetime) | |
| Price | Free | $89 | $149 |
| Recovery | Preview only | Unlimited recovery for 1 month | Unlimited recovery |
| Users | N/A | 1 user | 1 user |
| Activations | N/A | 3 activations | 3 activations |
| Usage Features | Scan devices, preview recoverable files, and access free extra tools, including Byte-to-byte Backup, Duplicate Finder, and Cleanup. | All Basic features + unlimited data recovery for the duration of the license. | All Basic features + unlimited data recovery with a lifetime license. |
In addition to the Pro license, CleverFiles also offers Disk Drill Enterprise. This version is intended for commercial use, as well as deployment in businesses, government agencies, educational institutions and similar environments. Enterprise pricing is calculated individually based on each organization’s requirements, so if you are interested, you need to request a custom quote through the CleverFiles website.
Getting Started with Disk Drill for Mac
Assuming you’ve downloaded the free version of Disk Drill from its website, you first need to install it just like you would any other third-party app.
Step 1. Open the downloaded .dmg file.
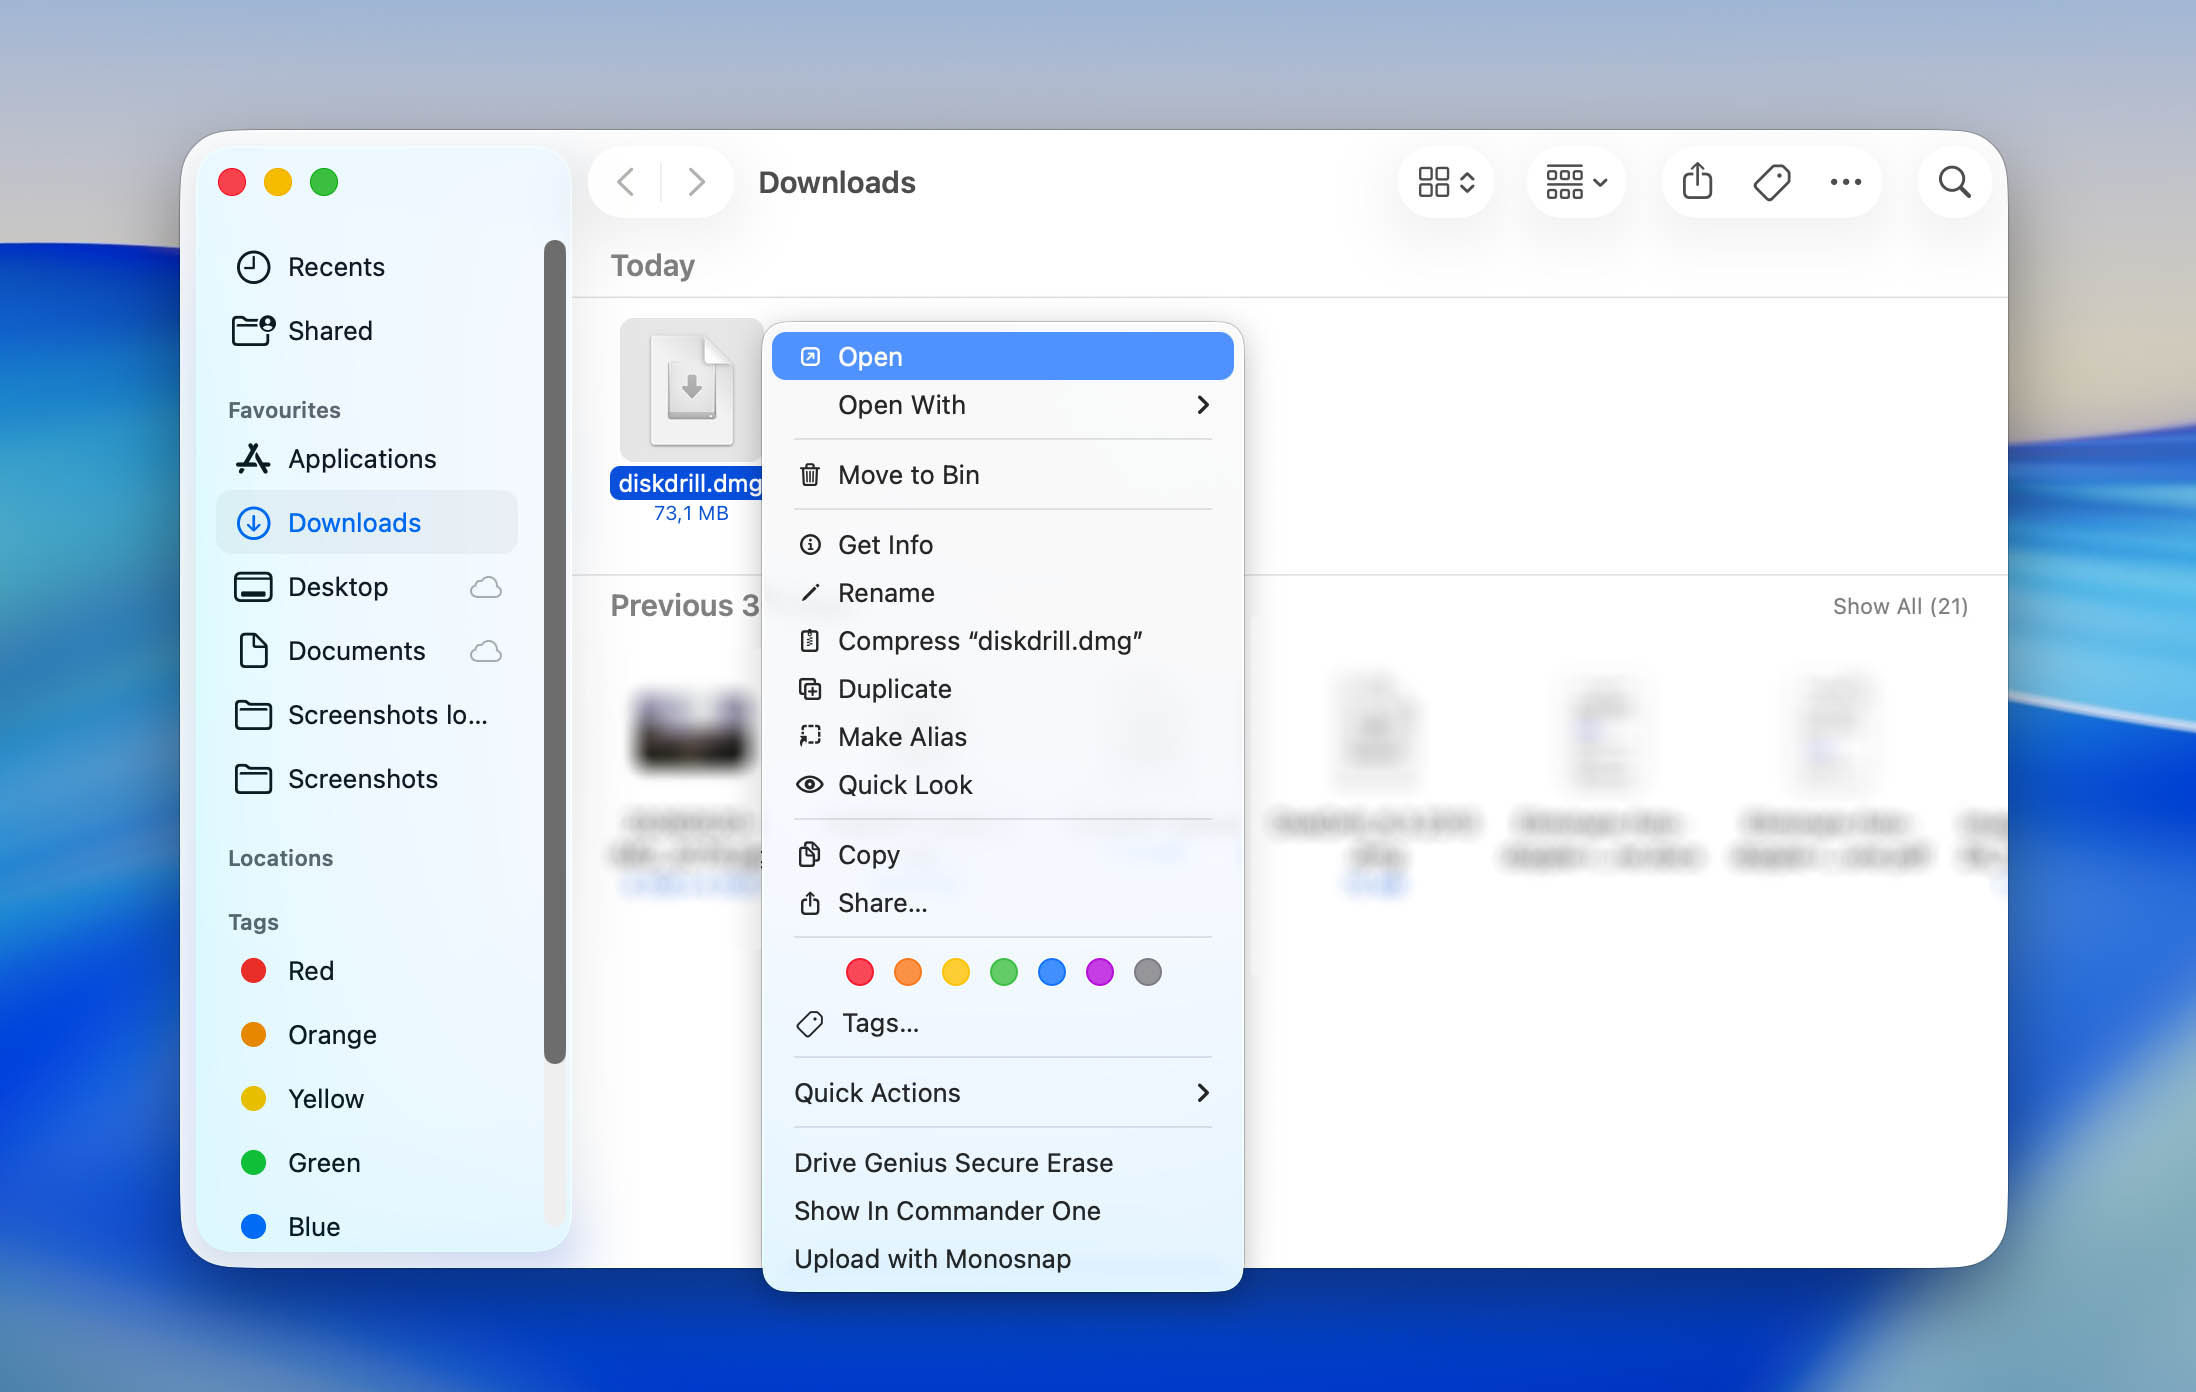
Step 2. Drag the Disk Drill icon into the Applications folder.
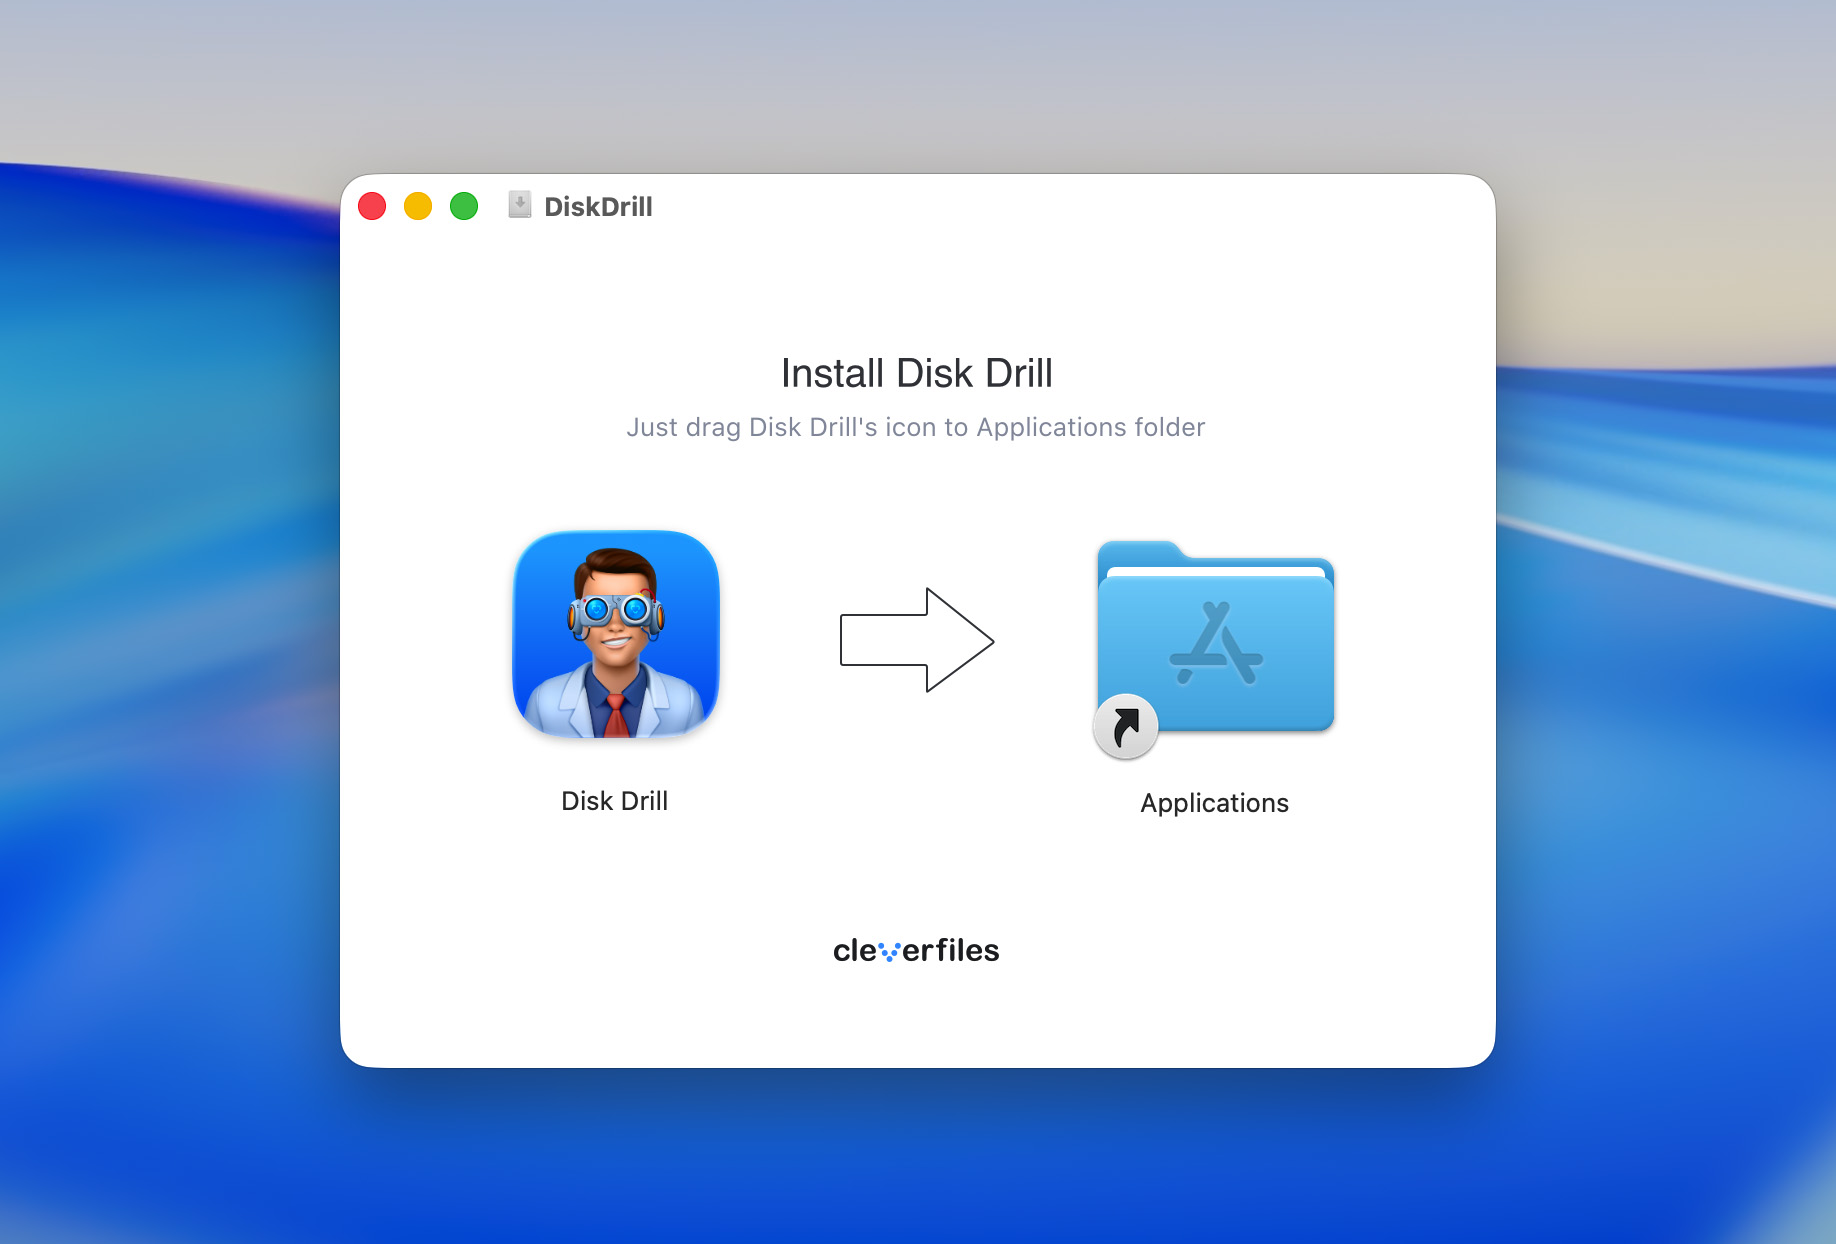
Step 3. Wait until all data is copied.
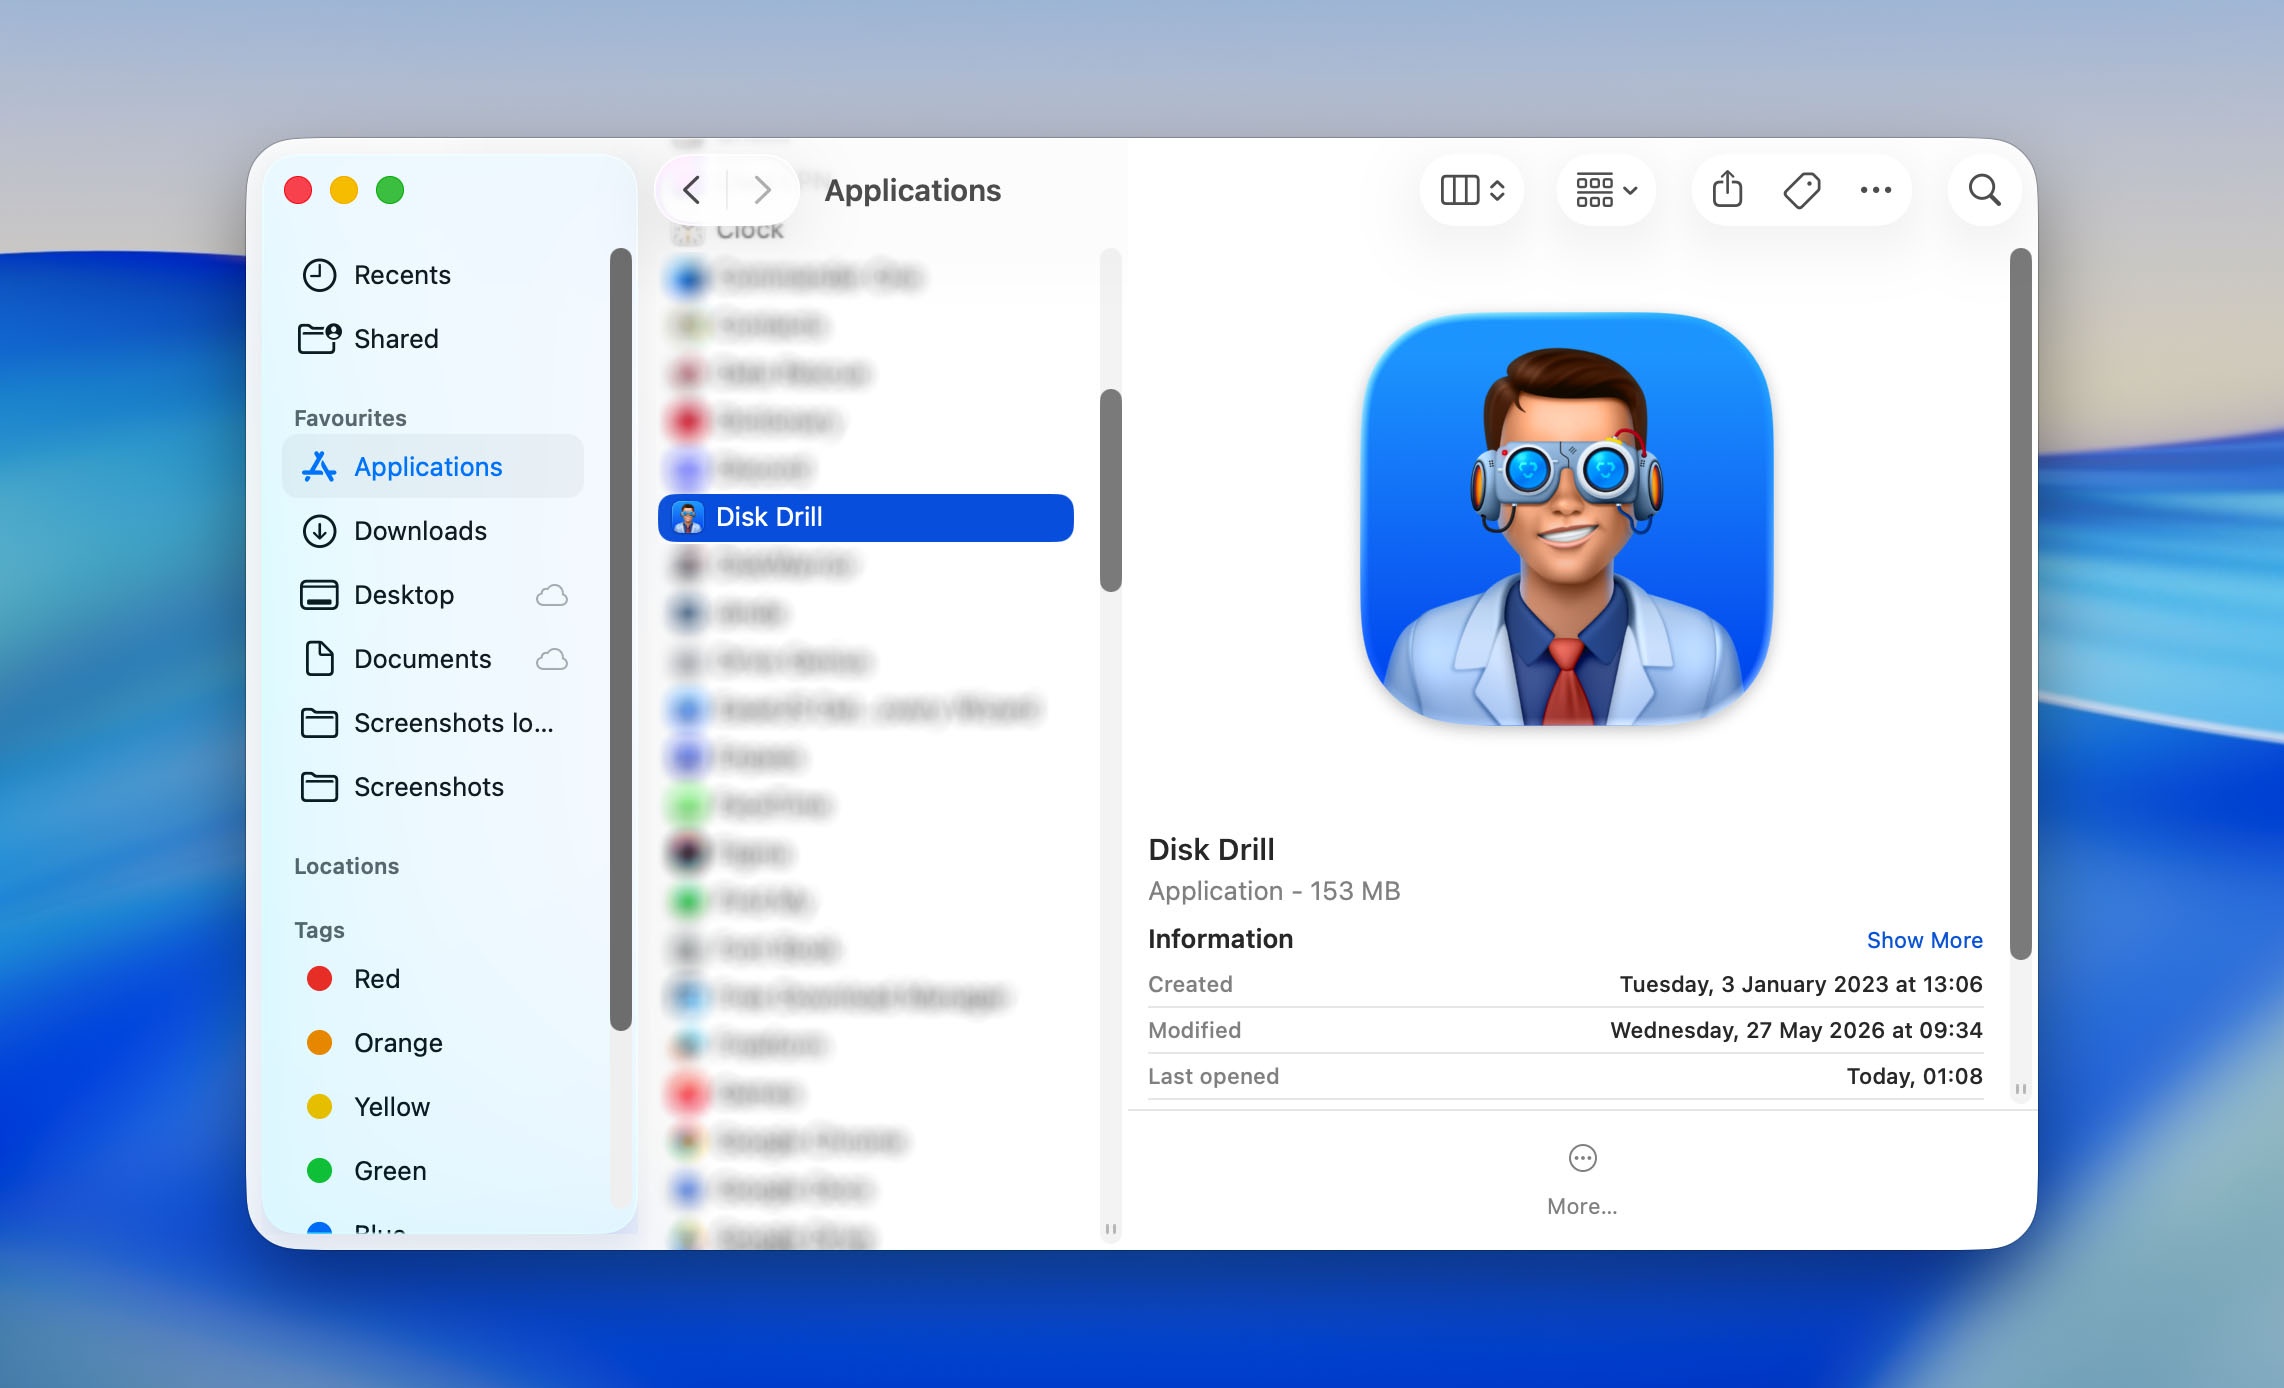
Step 4. You can now open the Applications folder and double-click on Disk Drill to launch it. When you first launch Disk Drill, you will be asked to confirm your decision. This happens with every third-party app, and all you need to do is click Open.
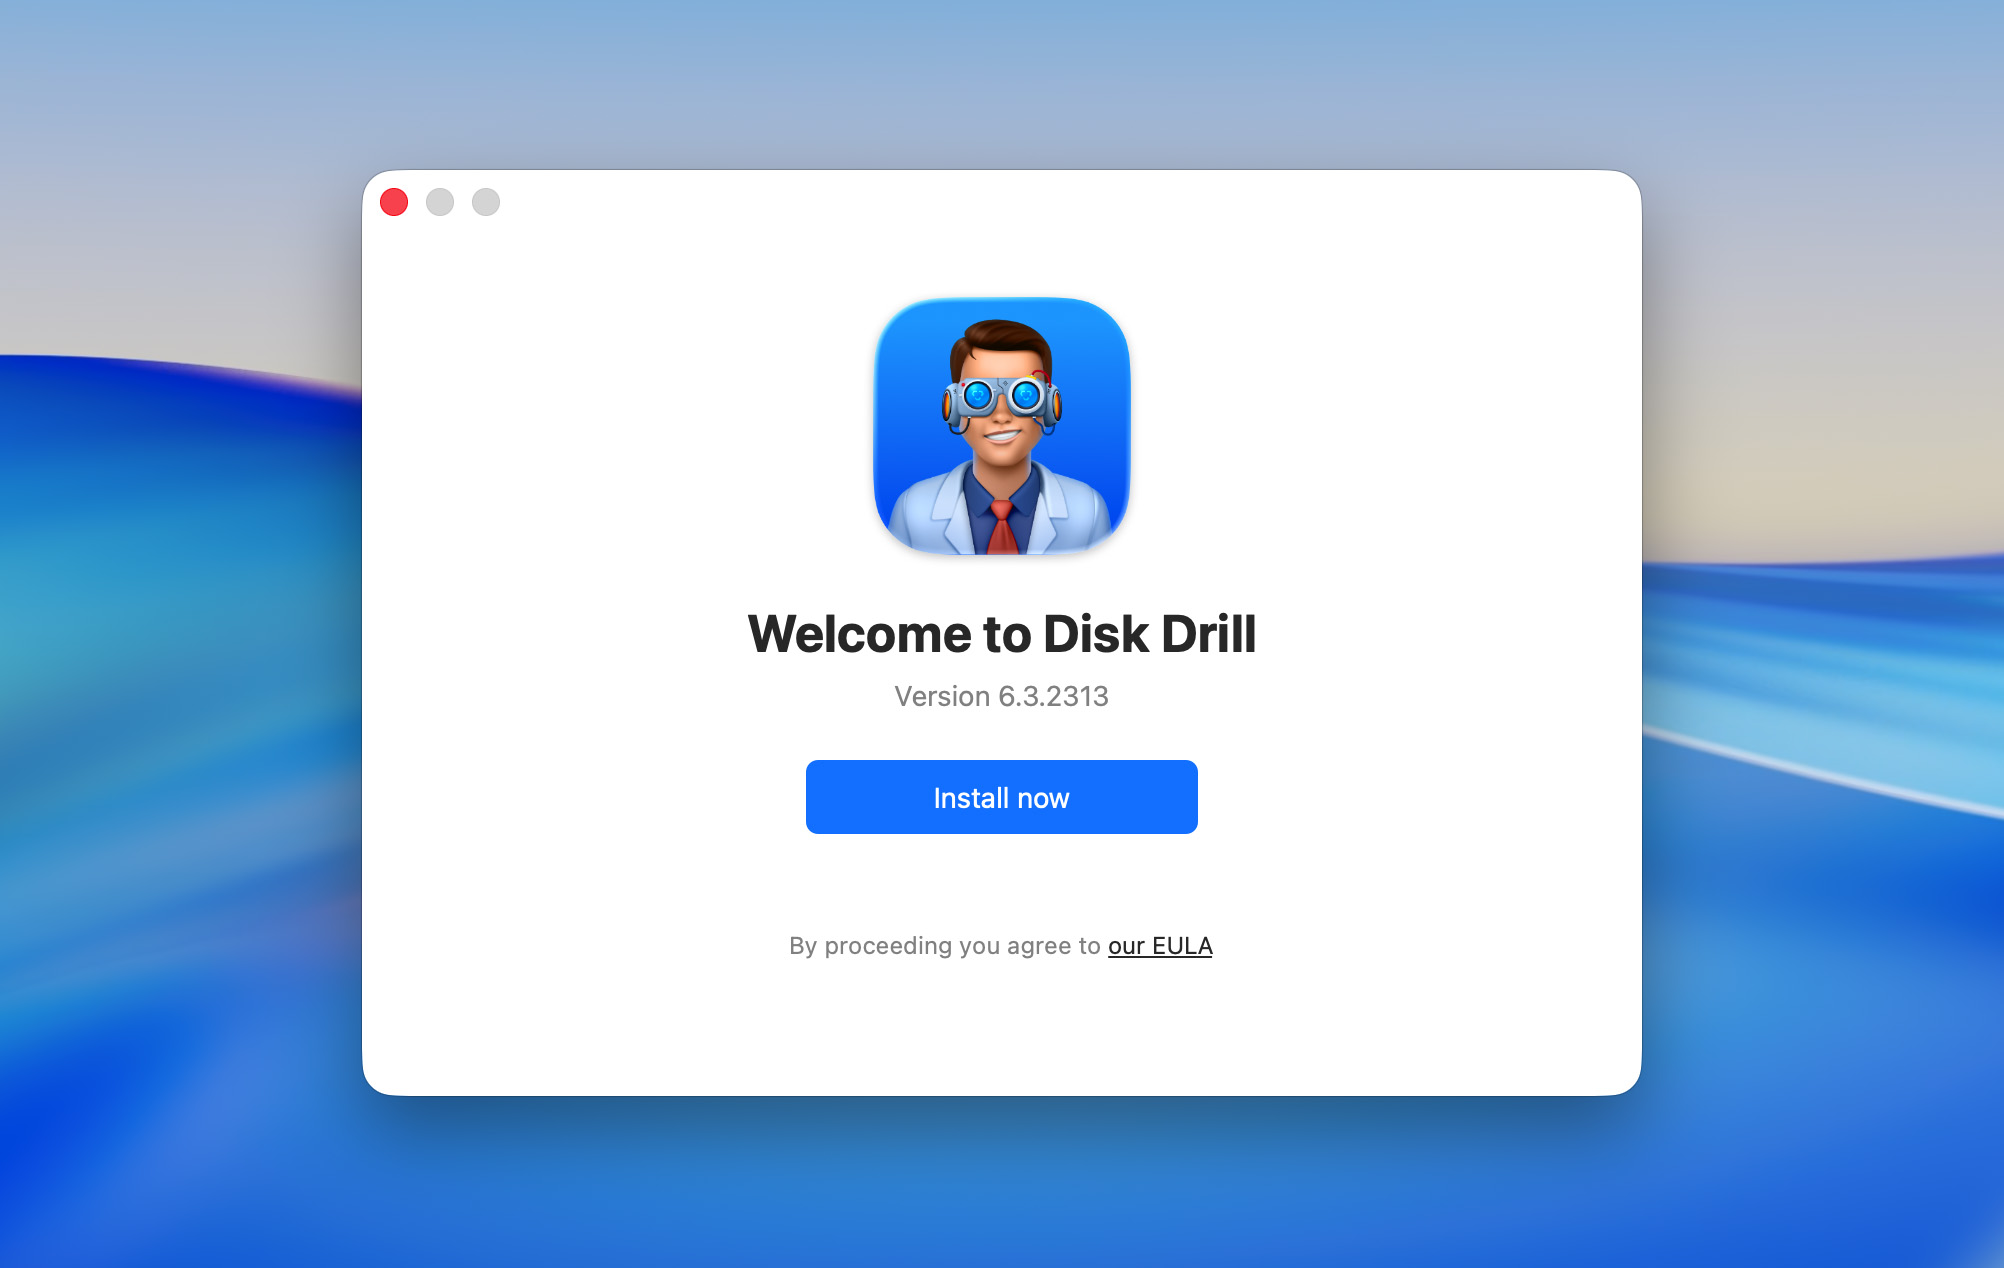
Step 5. You will then be greeted by an install screen. All you need to do is click the Install now button and enter your admin password.
Step 6. Last but not least, you need to grant Full Disk Access to Disk Drill. To do that, open System Settings, navigate to the Privacy & Security tab, select the Full Disk Access category, and enable Disk Drill.
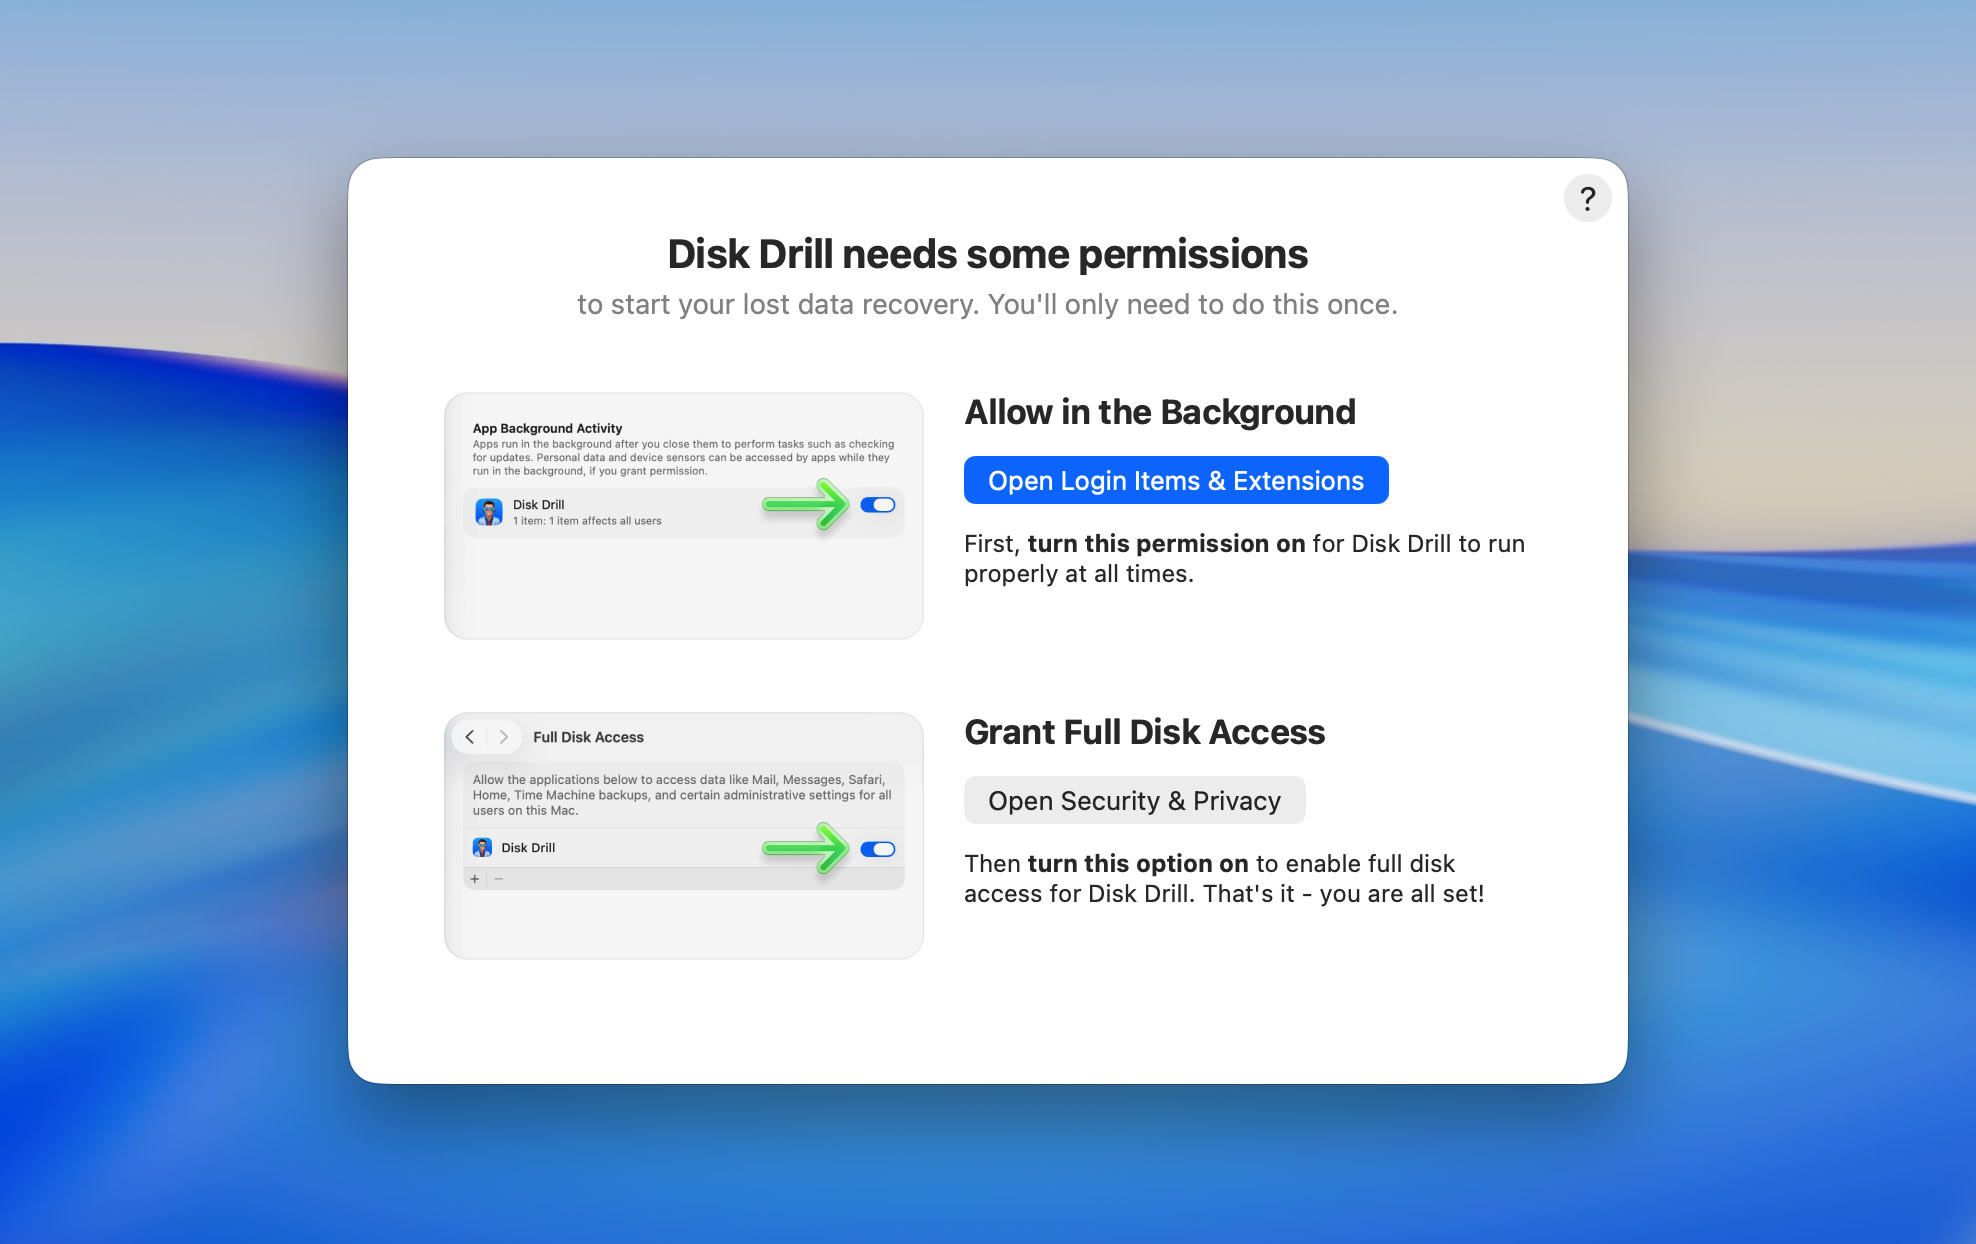
The good news is that you won’t have to complete this initial setup process ever again!
How to Use Disk Drill for Mac?
In this section, we wanted to provide an actual walkthrough of using Disk Drill—from installing the software, to scanning drives, and finally to the actual recovery. Despite the sheer quantity of features packed into this software, the process is highly streamlined and easy to follow.
Step 1. Connect the storage device you wish to recover from
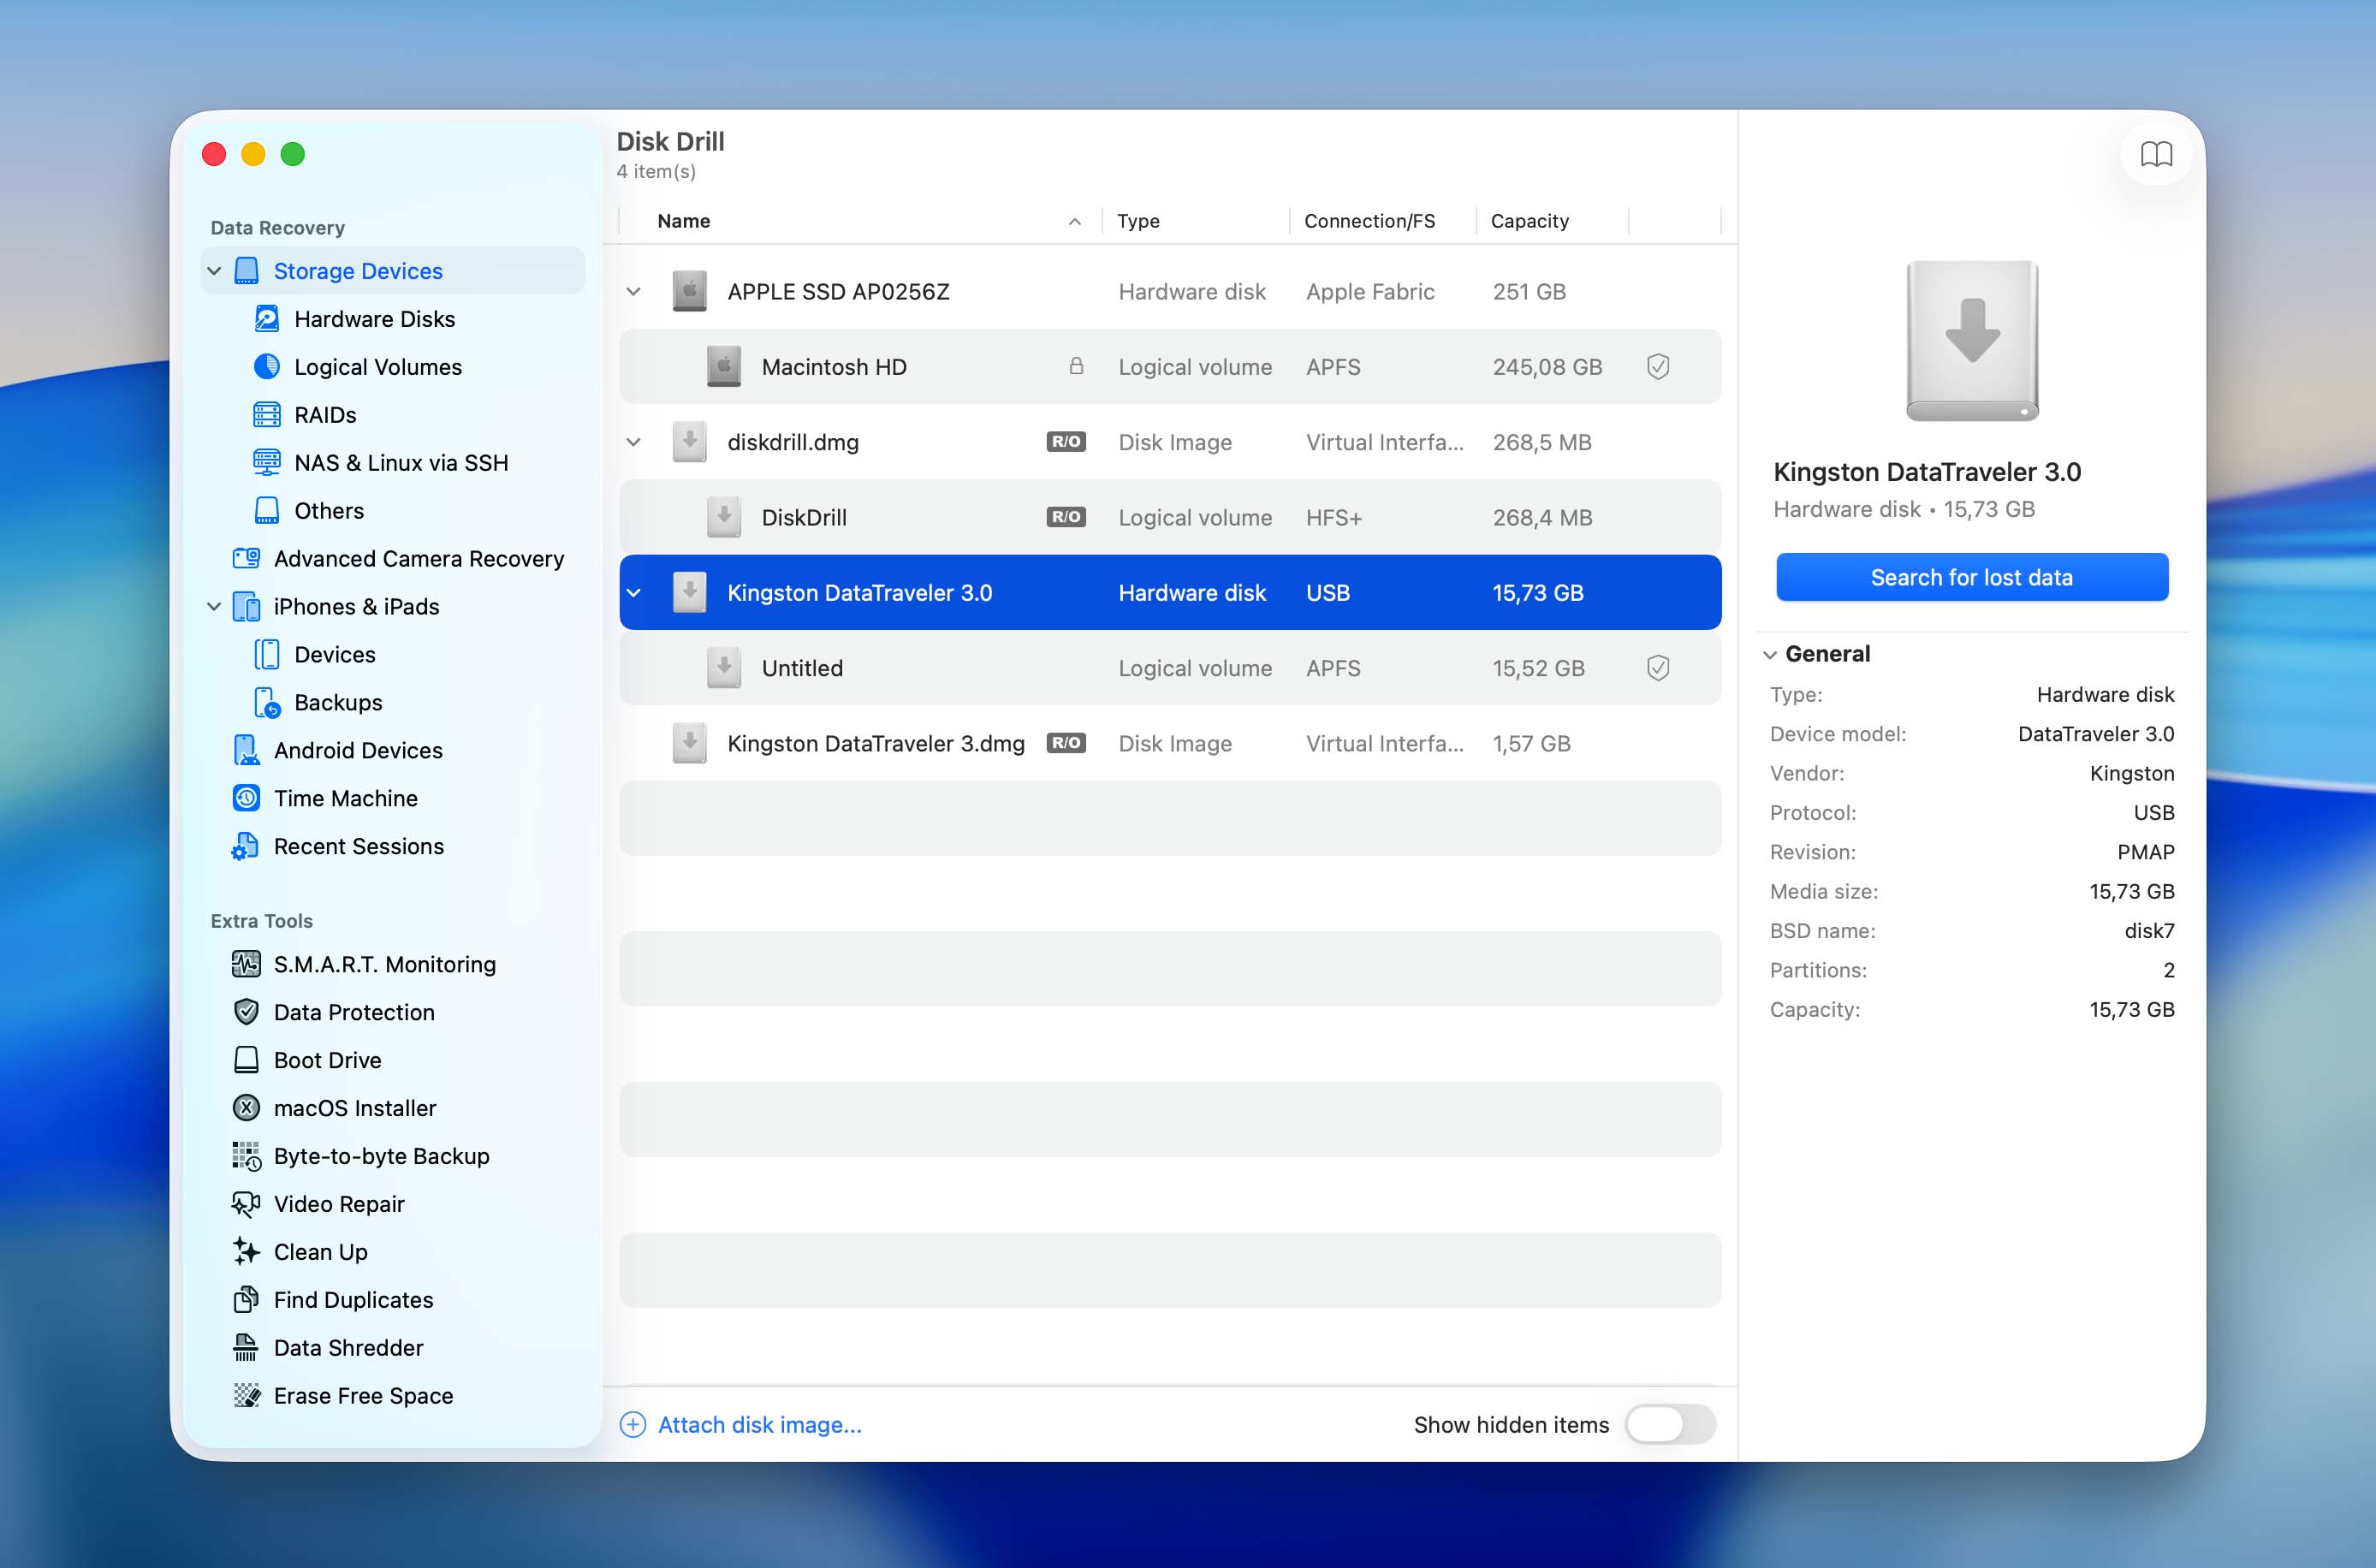
Disk Drill can recover lost data from any storage device recognized by your Mac, such as internal and external hard drives, memory cards, USB flash drives, and more. All major Mac, Windows, and Linux file systems are supported, including NTFS, FAT, FAT32, exFAT, EXT3/EXT4, HFS, and APFS.
Step 2. Create a byte-to-byte backup of your disk
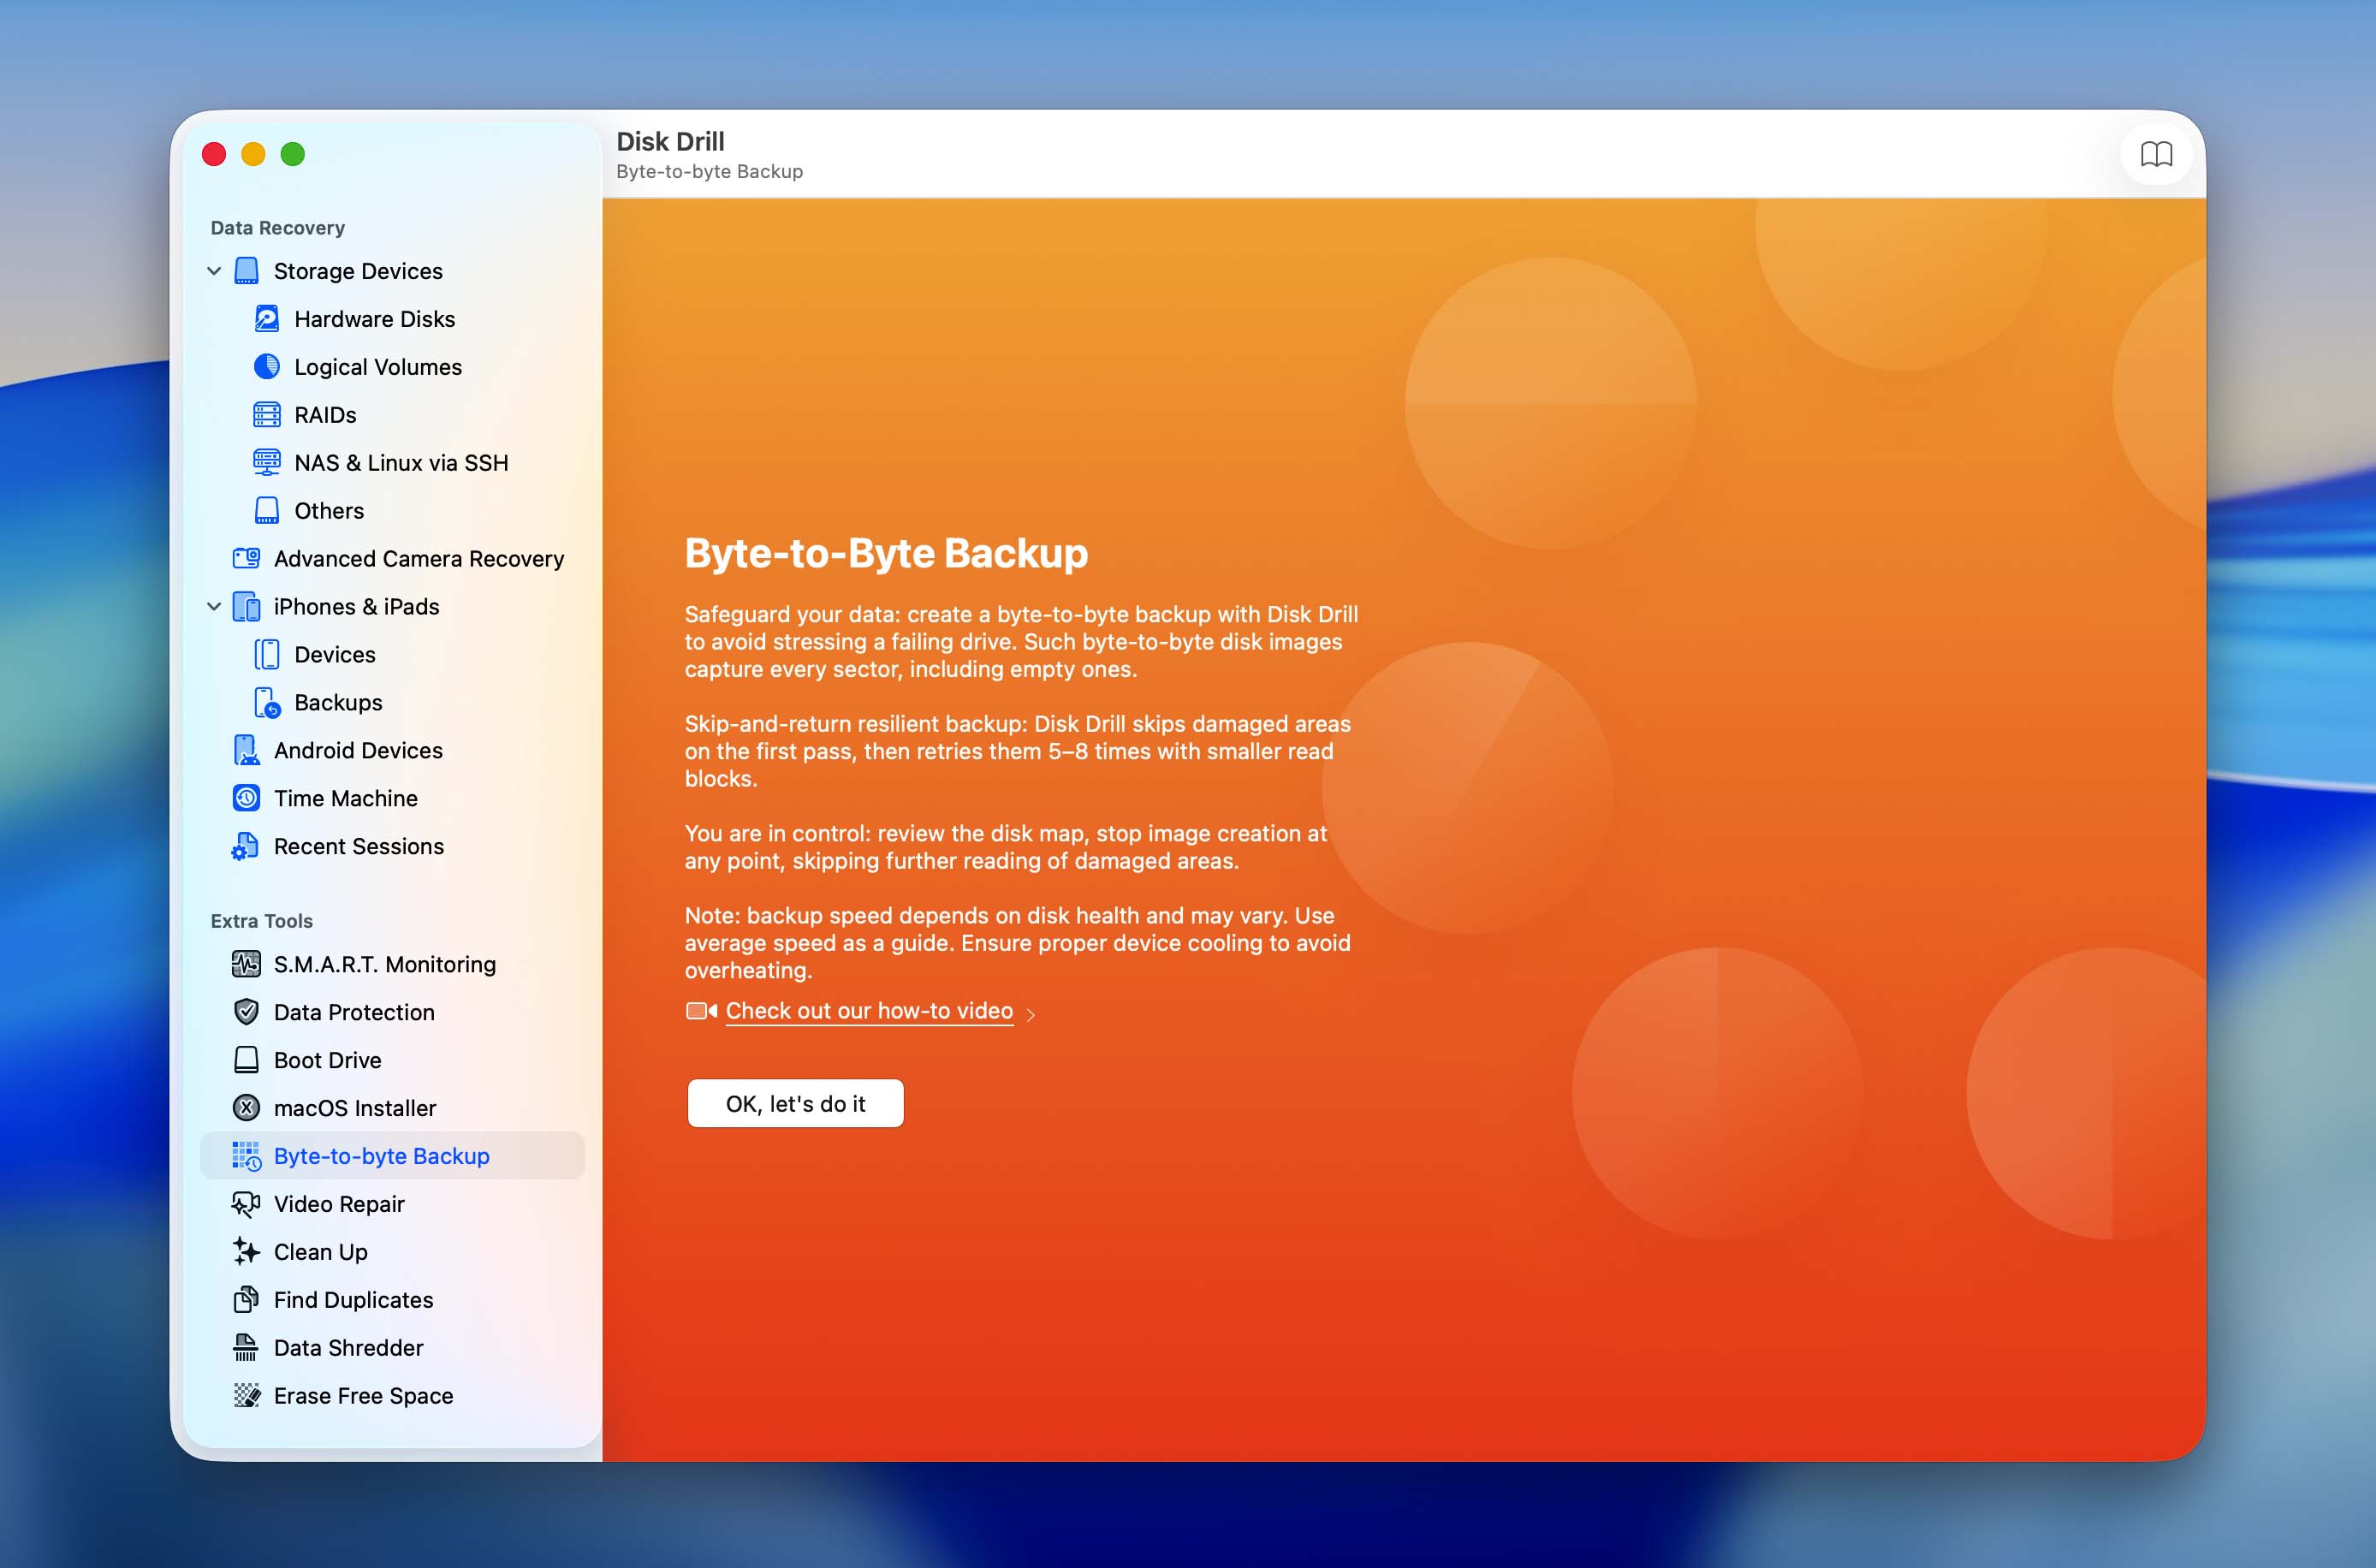
When performing data recovery, especially in case of corruption, it’s better to operate on an image backup copy of the device’s disk (instead of on the device itself). This can prevent further damage and improve the recovery success rate. You can access Disk Drill’s recently supercharged Byte-to-byte backup module in the Extra tools section in the left sidebar.
Step 3. Select your recovery target and start the scan
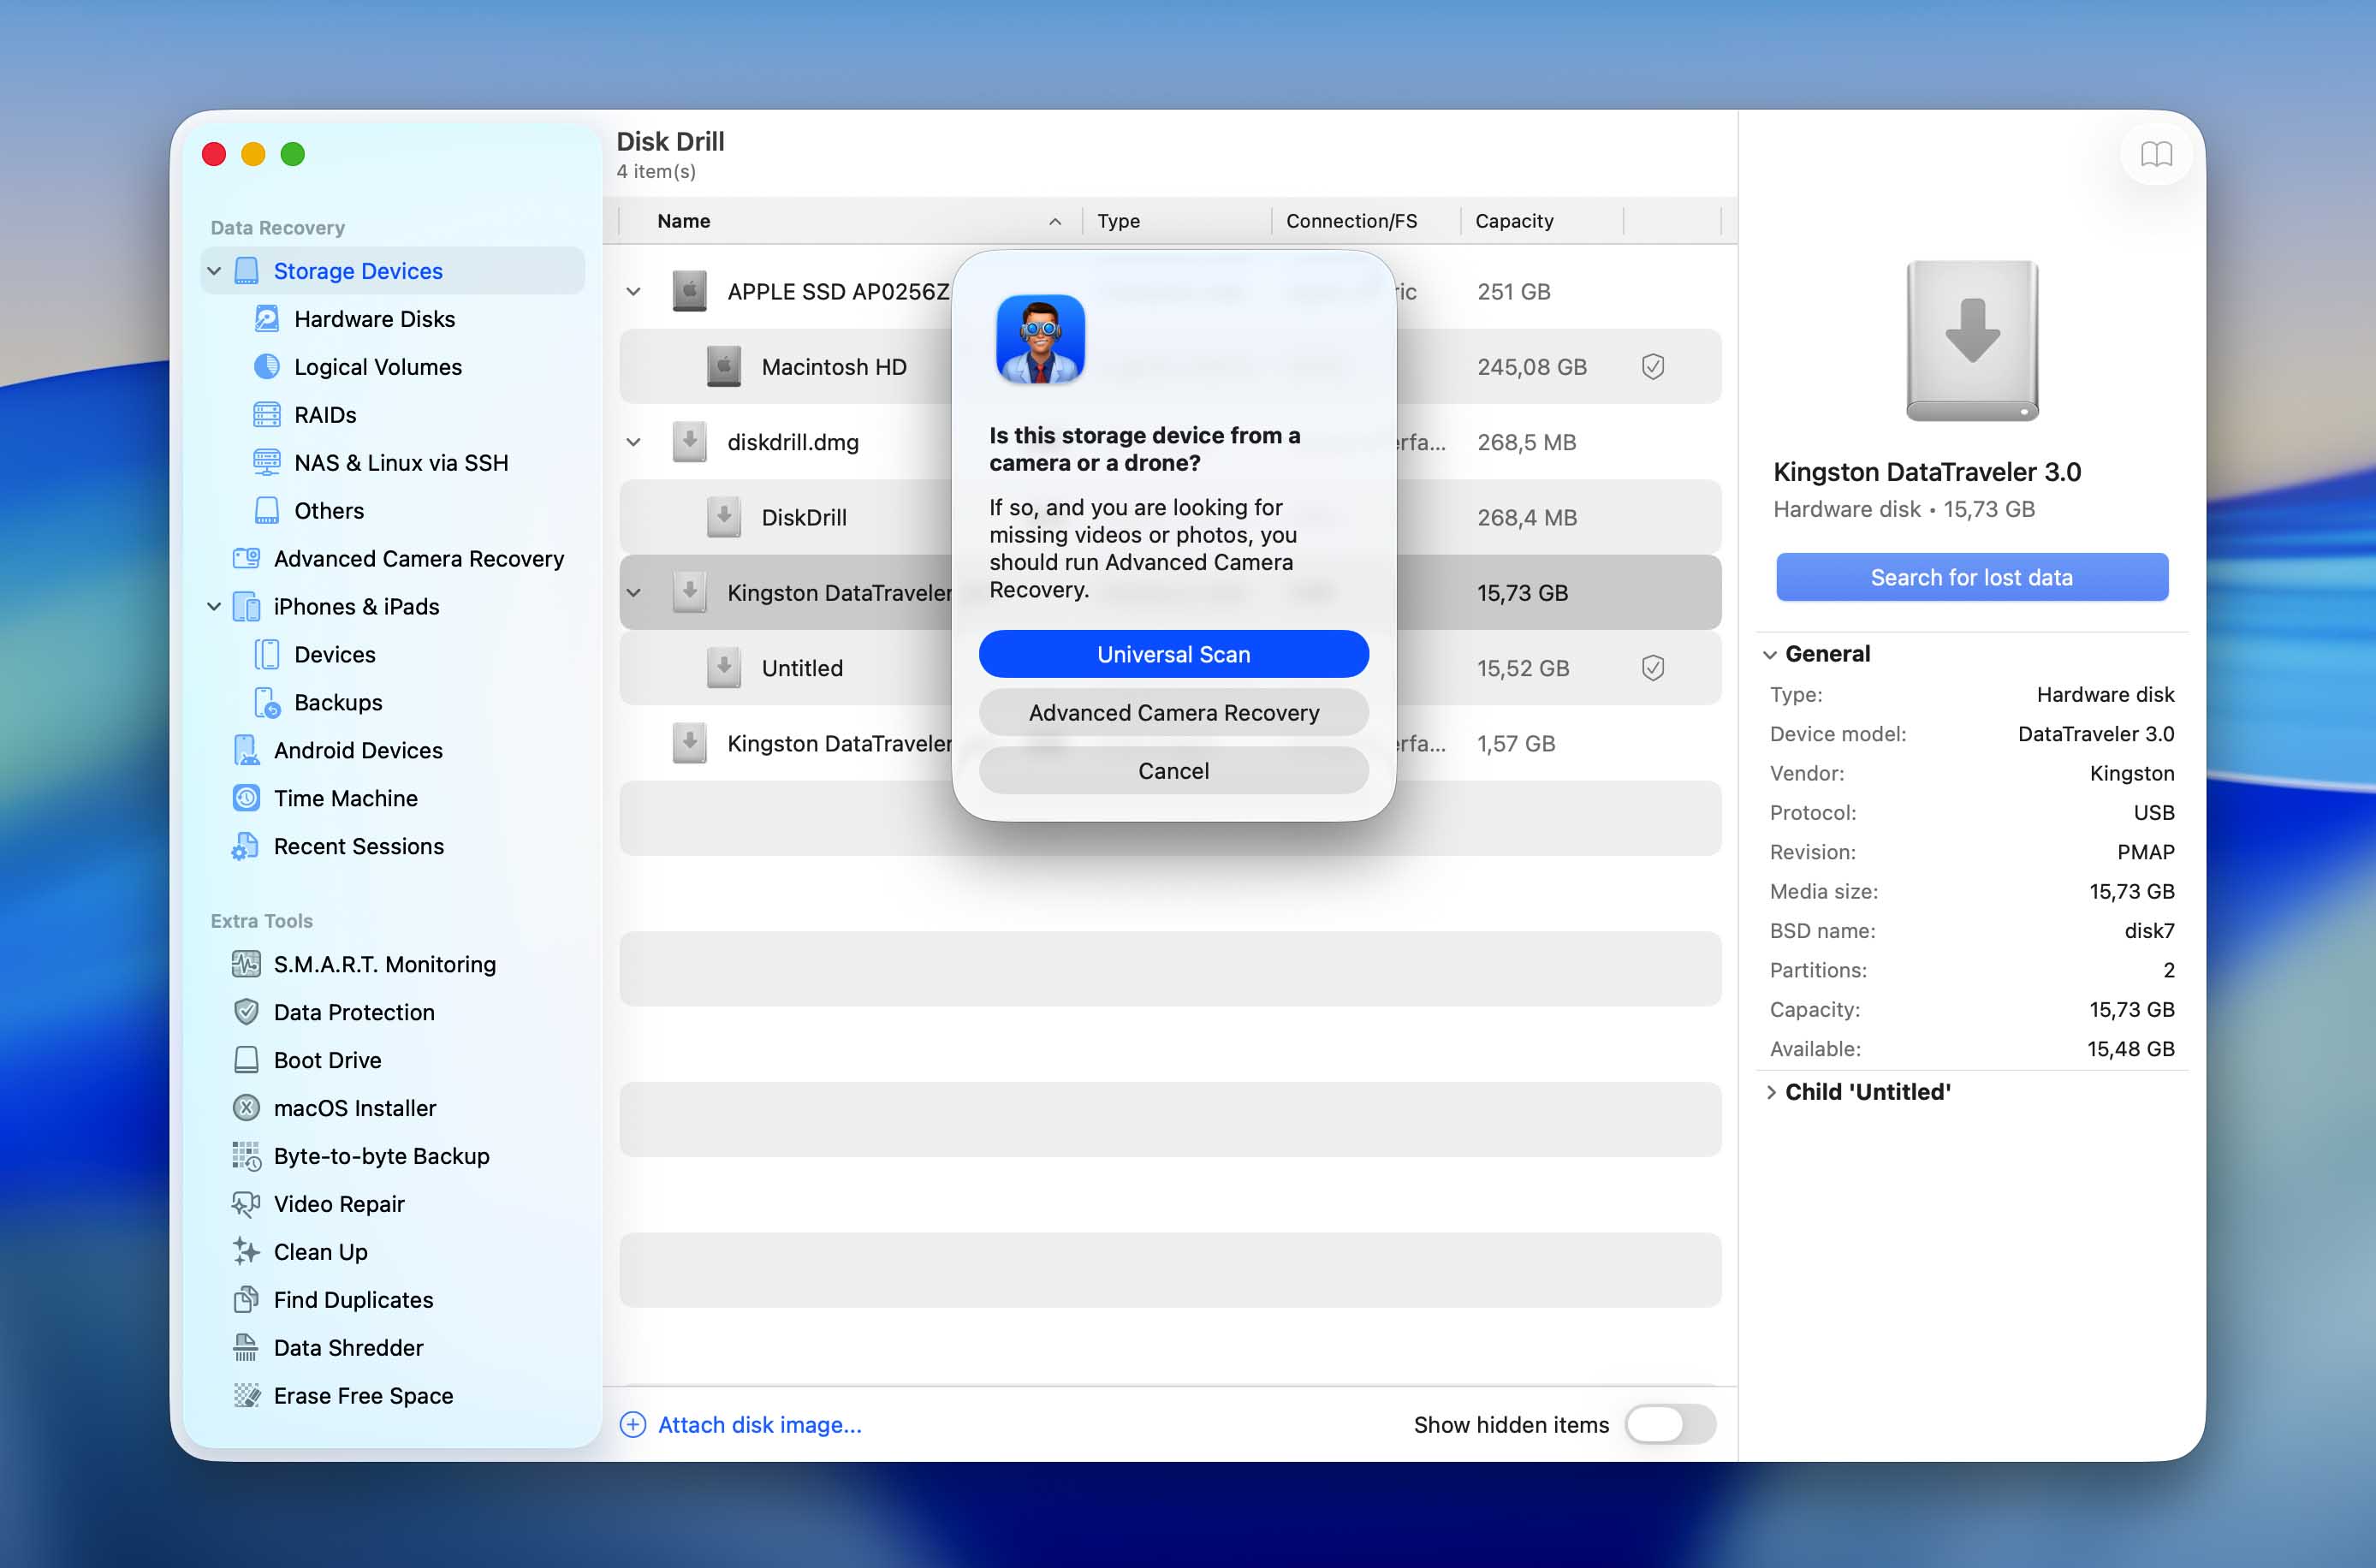
In Disk Drill’s main menu (Storage devices in the left sidebar), you can select your entire drive or specific volumes for scanning. You can also upload the image backup file you created in step 2 and select that for scanning instead. Then, click Search for lost data to begin the scanning process. During the scanning process, Disk Drill utilizes several recovery scan types simultaneously to maximize recovery results. This allows it to recover recently deleted files, restore data from damaged or corrupted file systems, and identify files by their signatures when file system records are no longer available.
If you’re attempting to recover video files from cameras, we recommend utilizing the Advanced Camera Recovery tool. It’s accessible from the Data Recovery section in the sidebar, and the menu is similar to the main recovery interface. Select your recovery target (or upload your image), choose the camera model you used to capture your media, and click Search for lost data to proceed.
Step 4. Wait for Disk Drill to finish scanning your drive
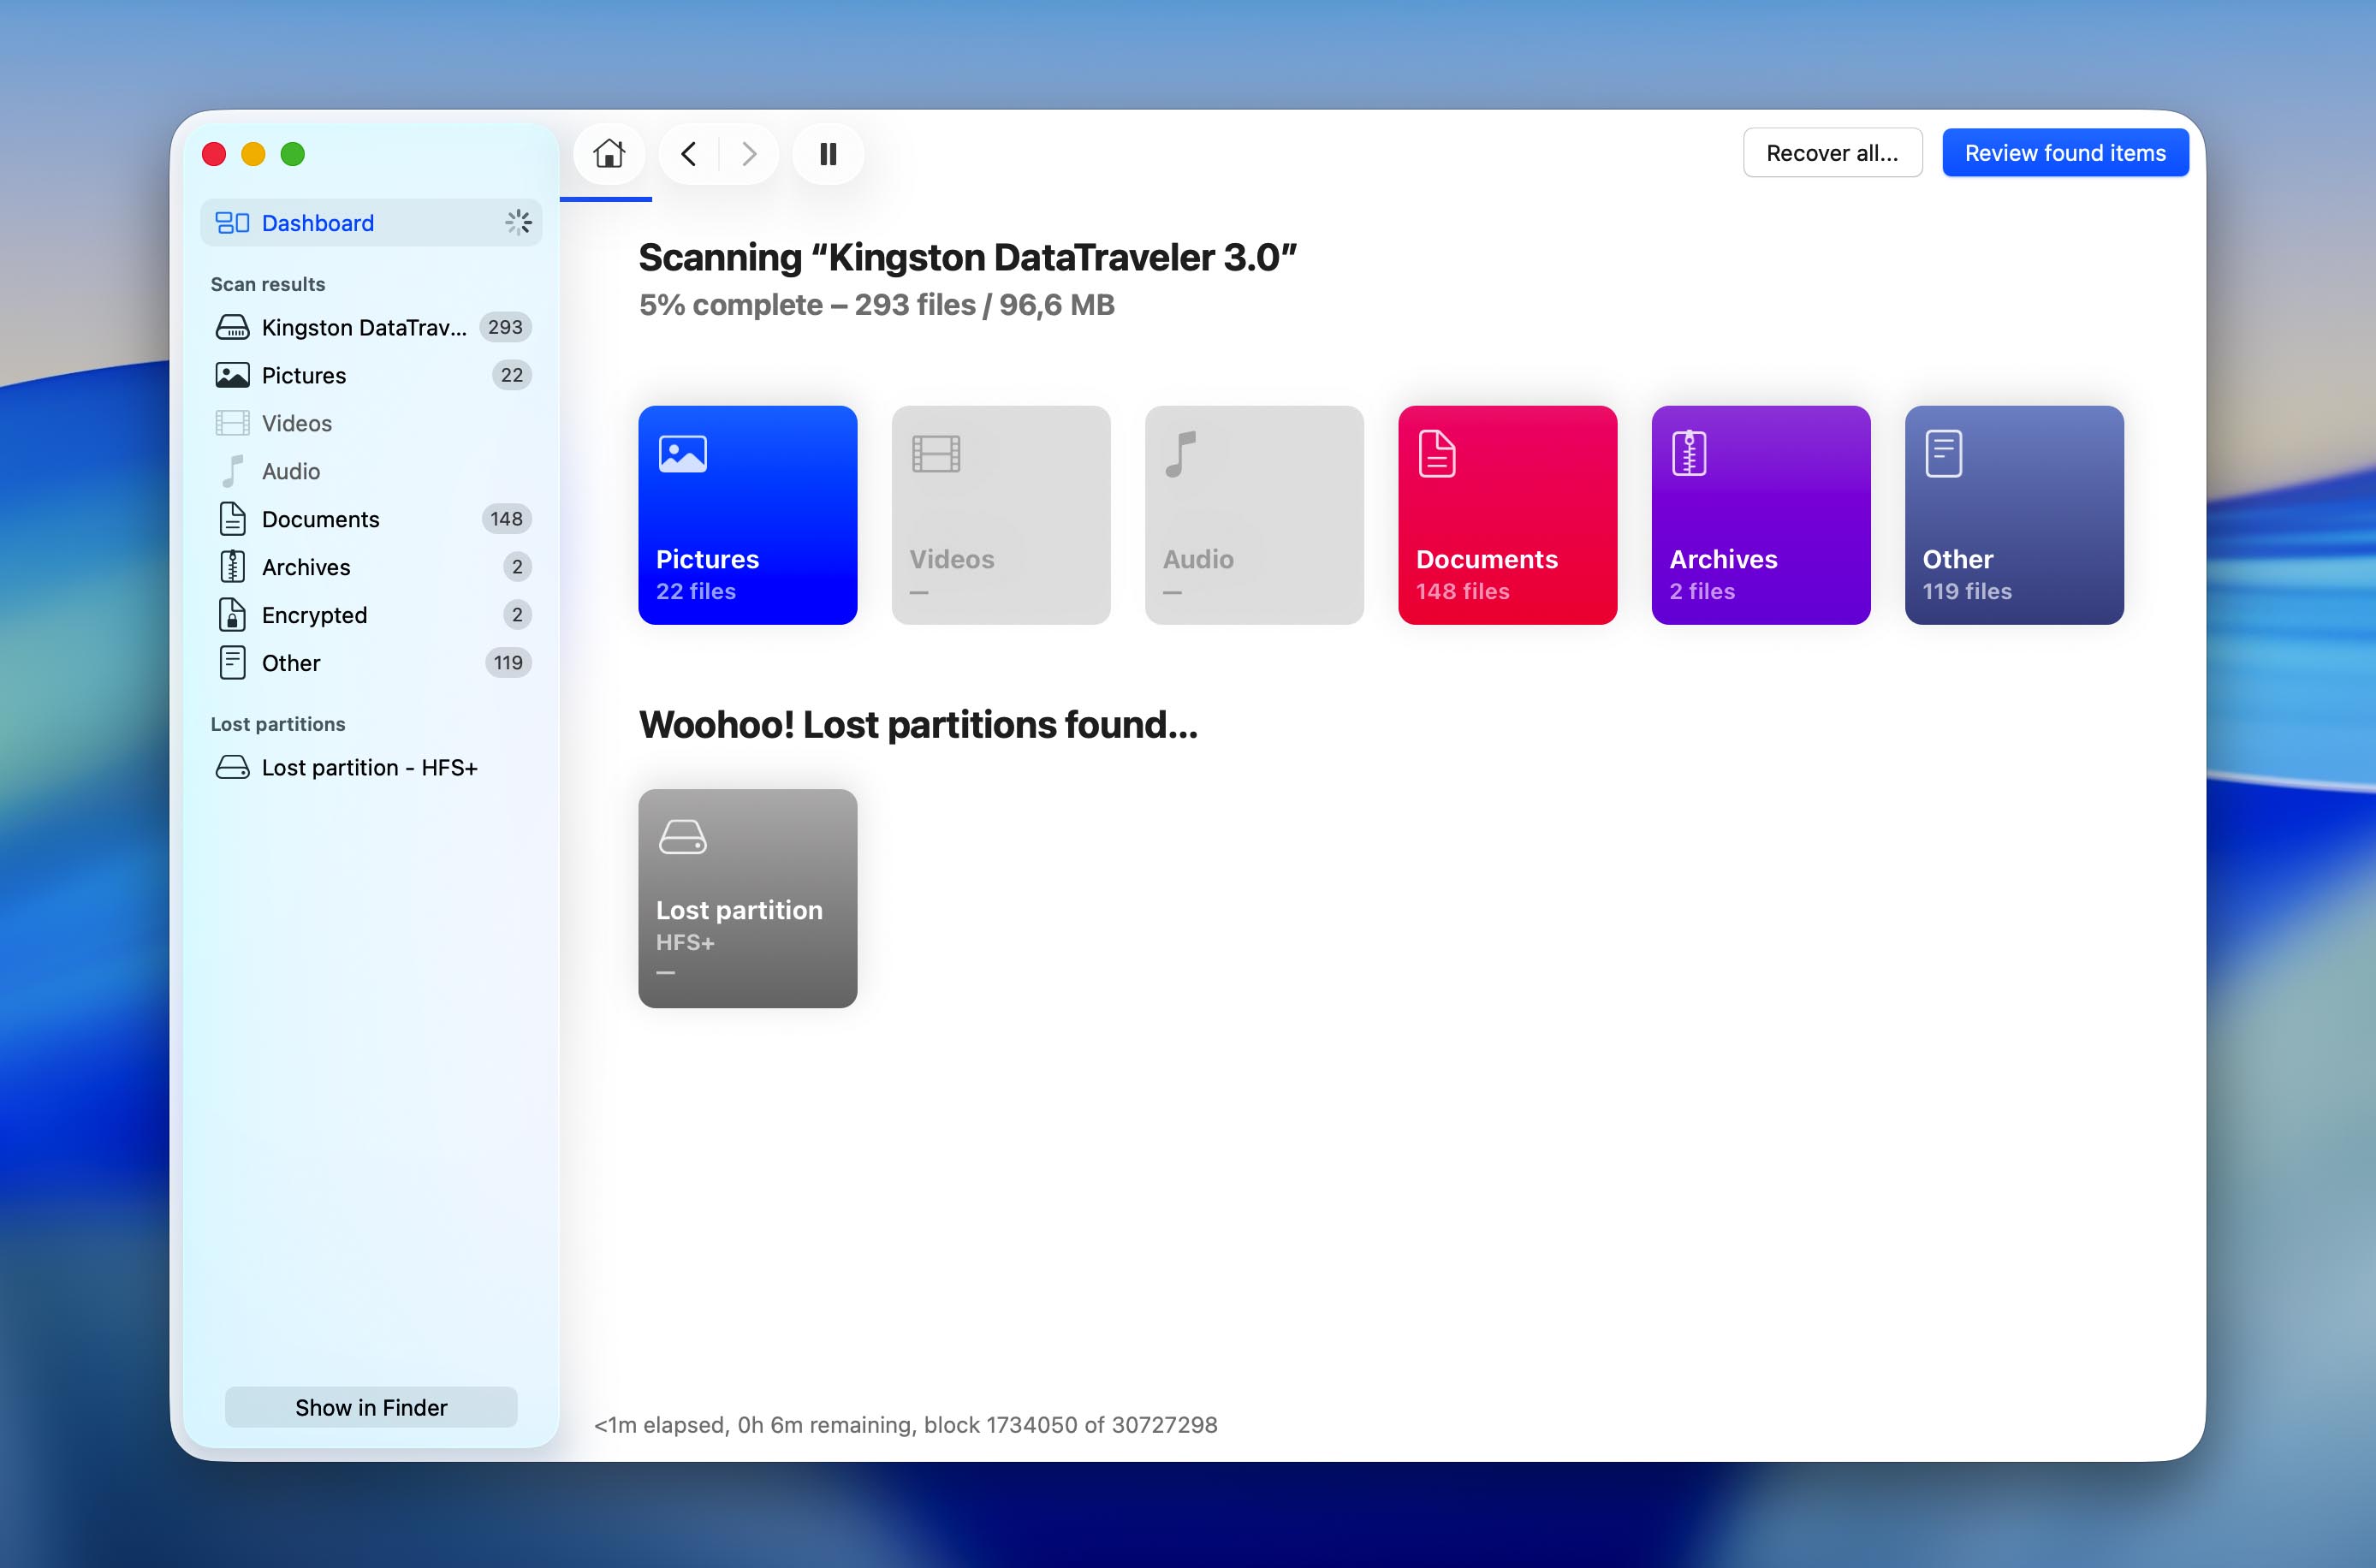
Disk Drill will keep you informed about its scanning progress, telling you exactly how many pictures, videos, audio recordings, documents, archives, other files, and even partitions have been found. You can click the Review found items button at any time, and the application will continue scanning in the background until it’s done.
Step 5. Choose the files you want to restore
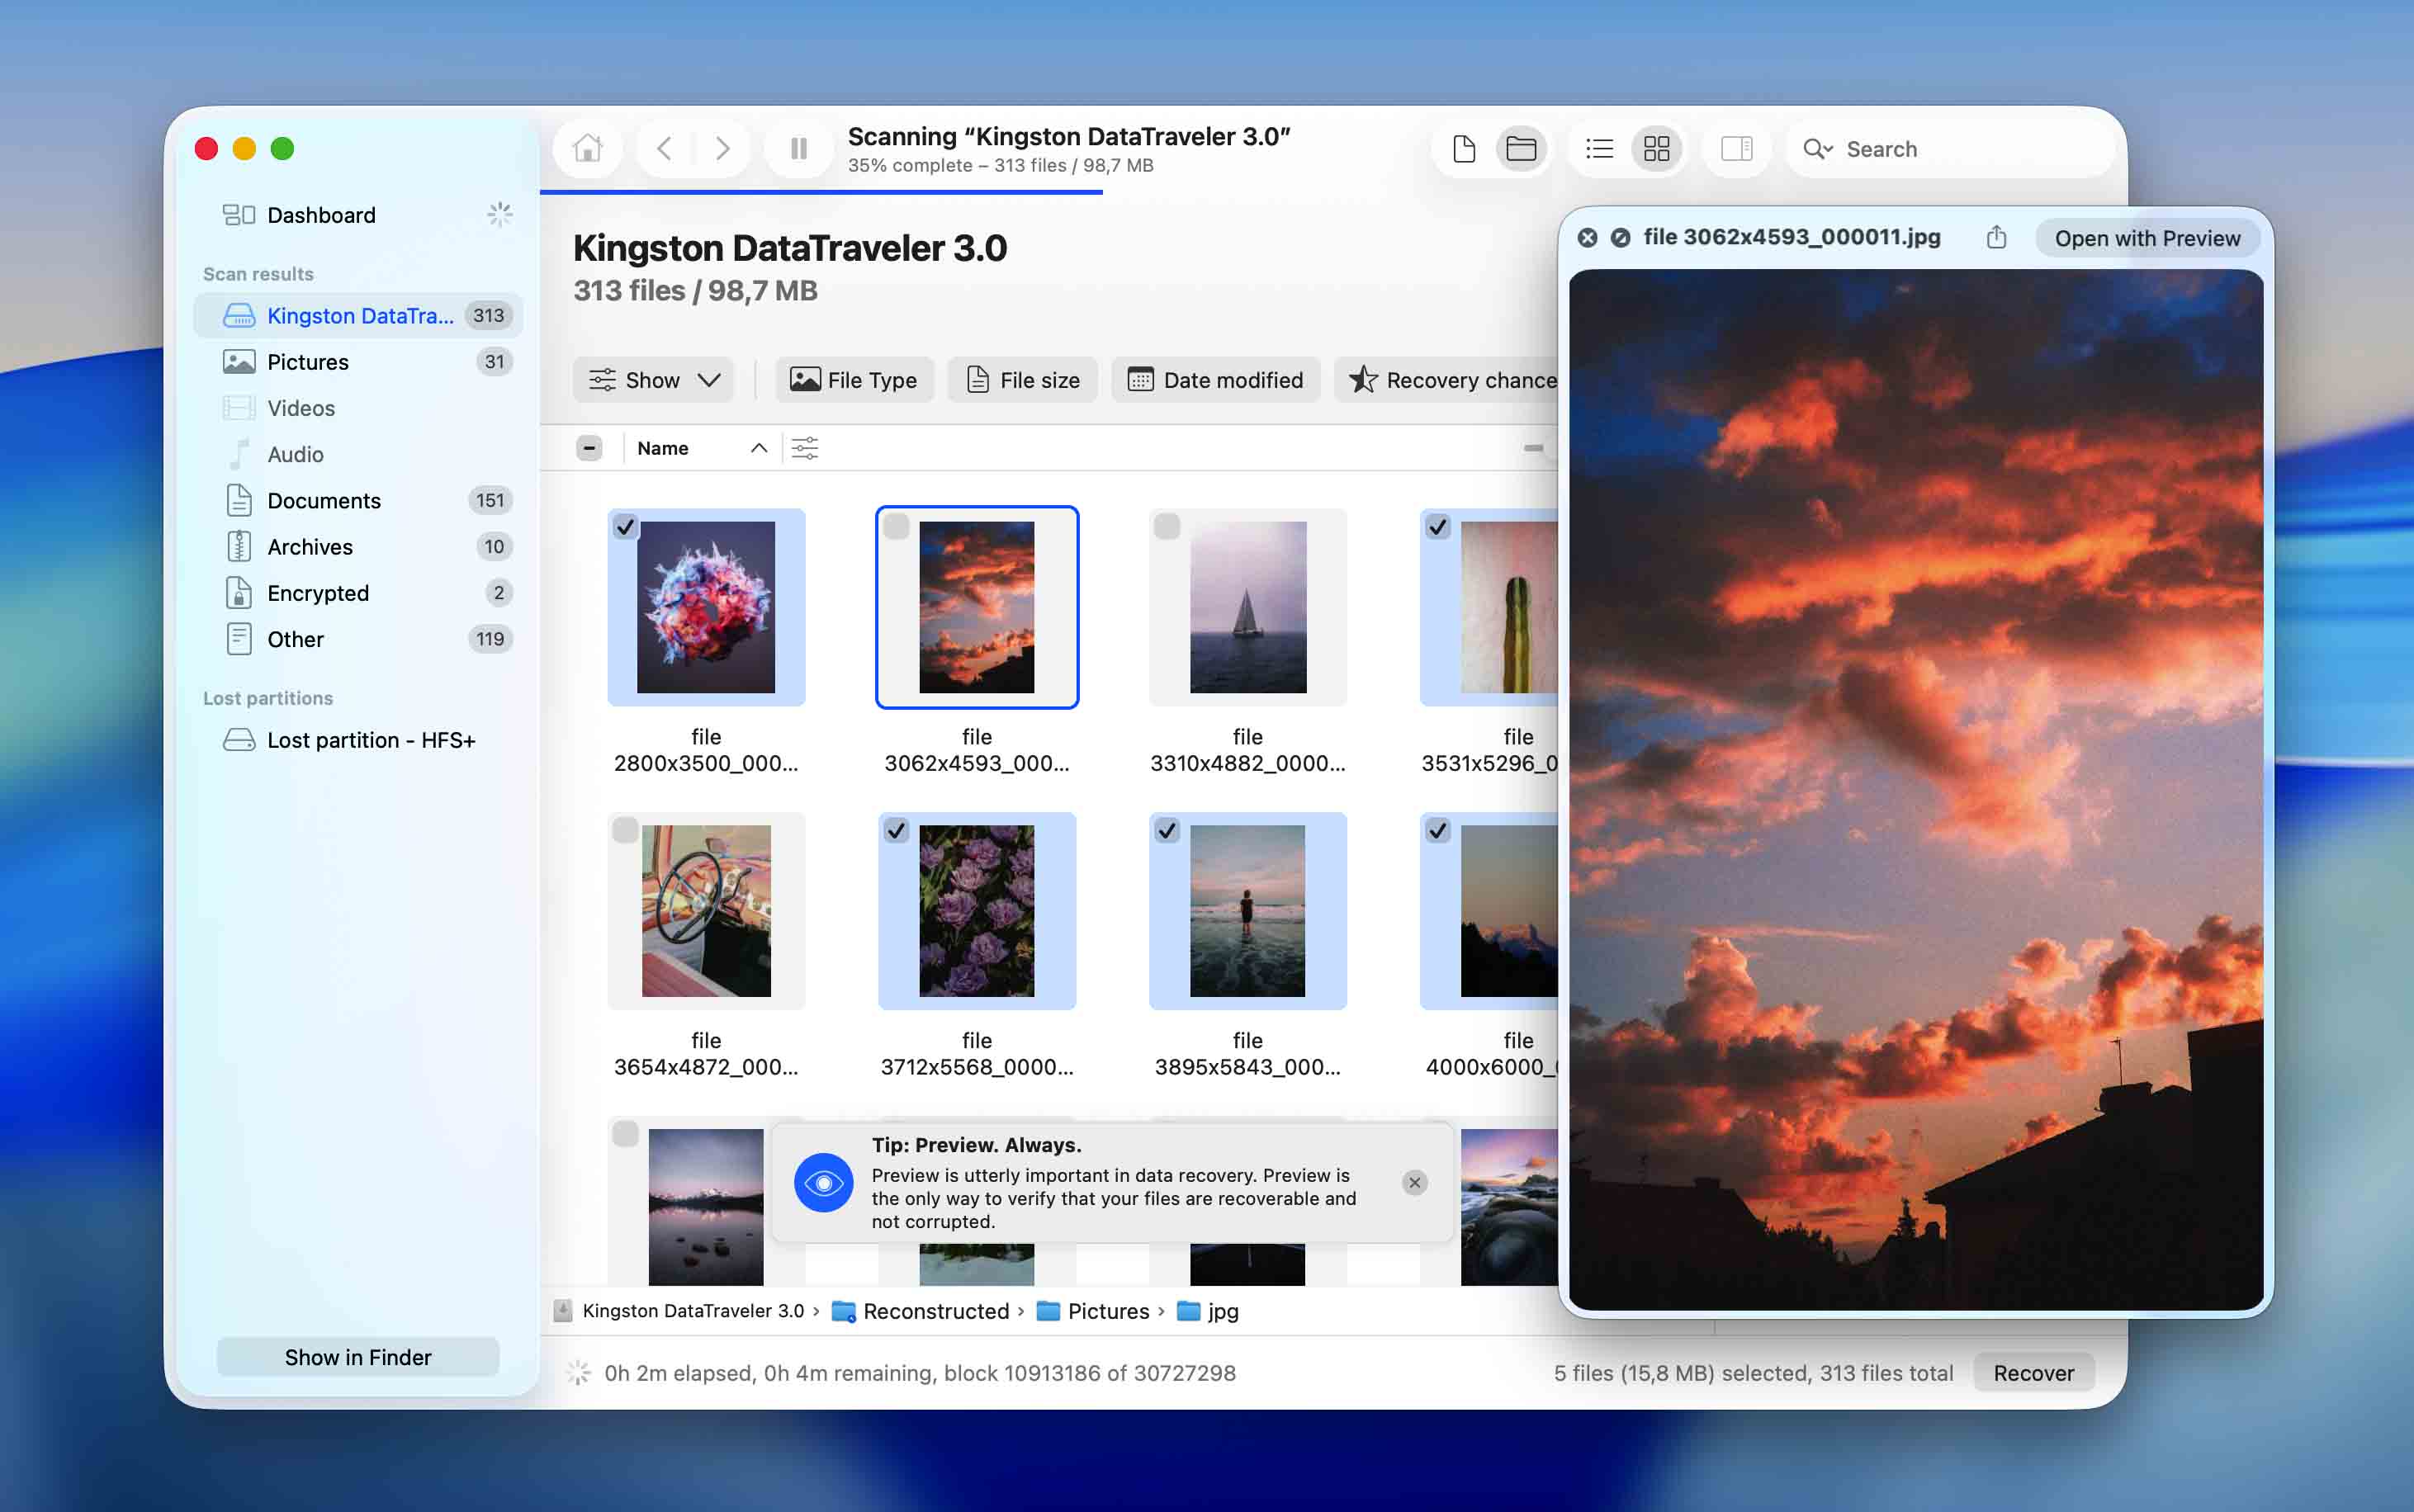
When Disk Drill is done with scanning, it will display a list with all recoverable files. To select a file for recovery, simply click the checkbox next to it. When you select a file, Disk Drill will automatically attempt to display its preview. Previewing files is the only way to verify that they can be recovered, so take advantage of this feature as much as possible.
It’s highly likely that Disk Drill will find thousands of recoverable files. Fortunately, the latest version of the data recovery software provides many different options that can help you find what you’re looking for. The left pane contains file type filters, and additional filters are available above the scan results. You can also search for lost files by name, and Disk Drill will even remember the history of your searches.
Don’t forget to click the Recover button!
Step 6. Choose a recovery destination
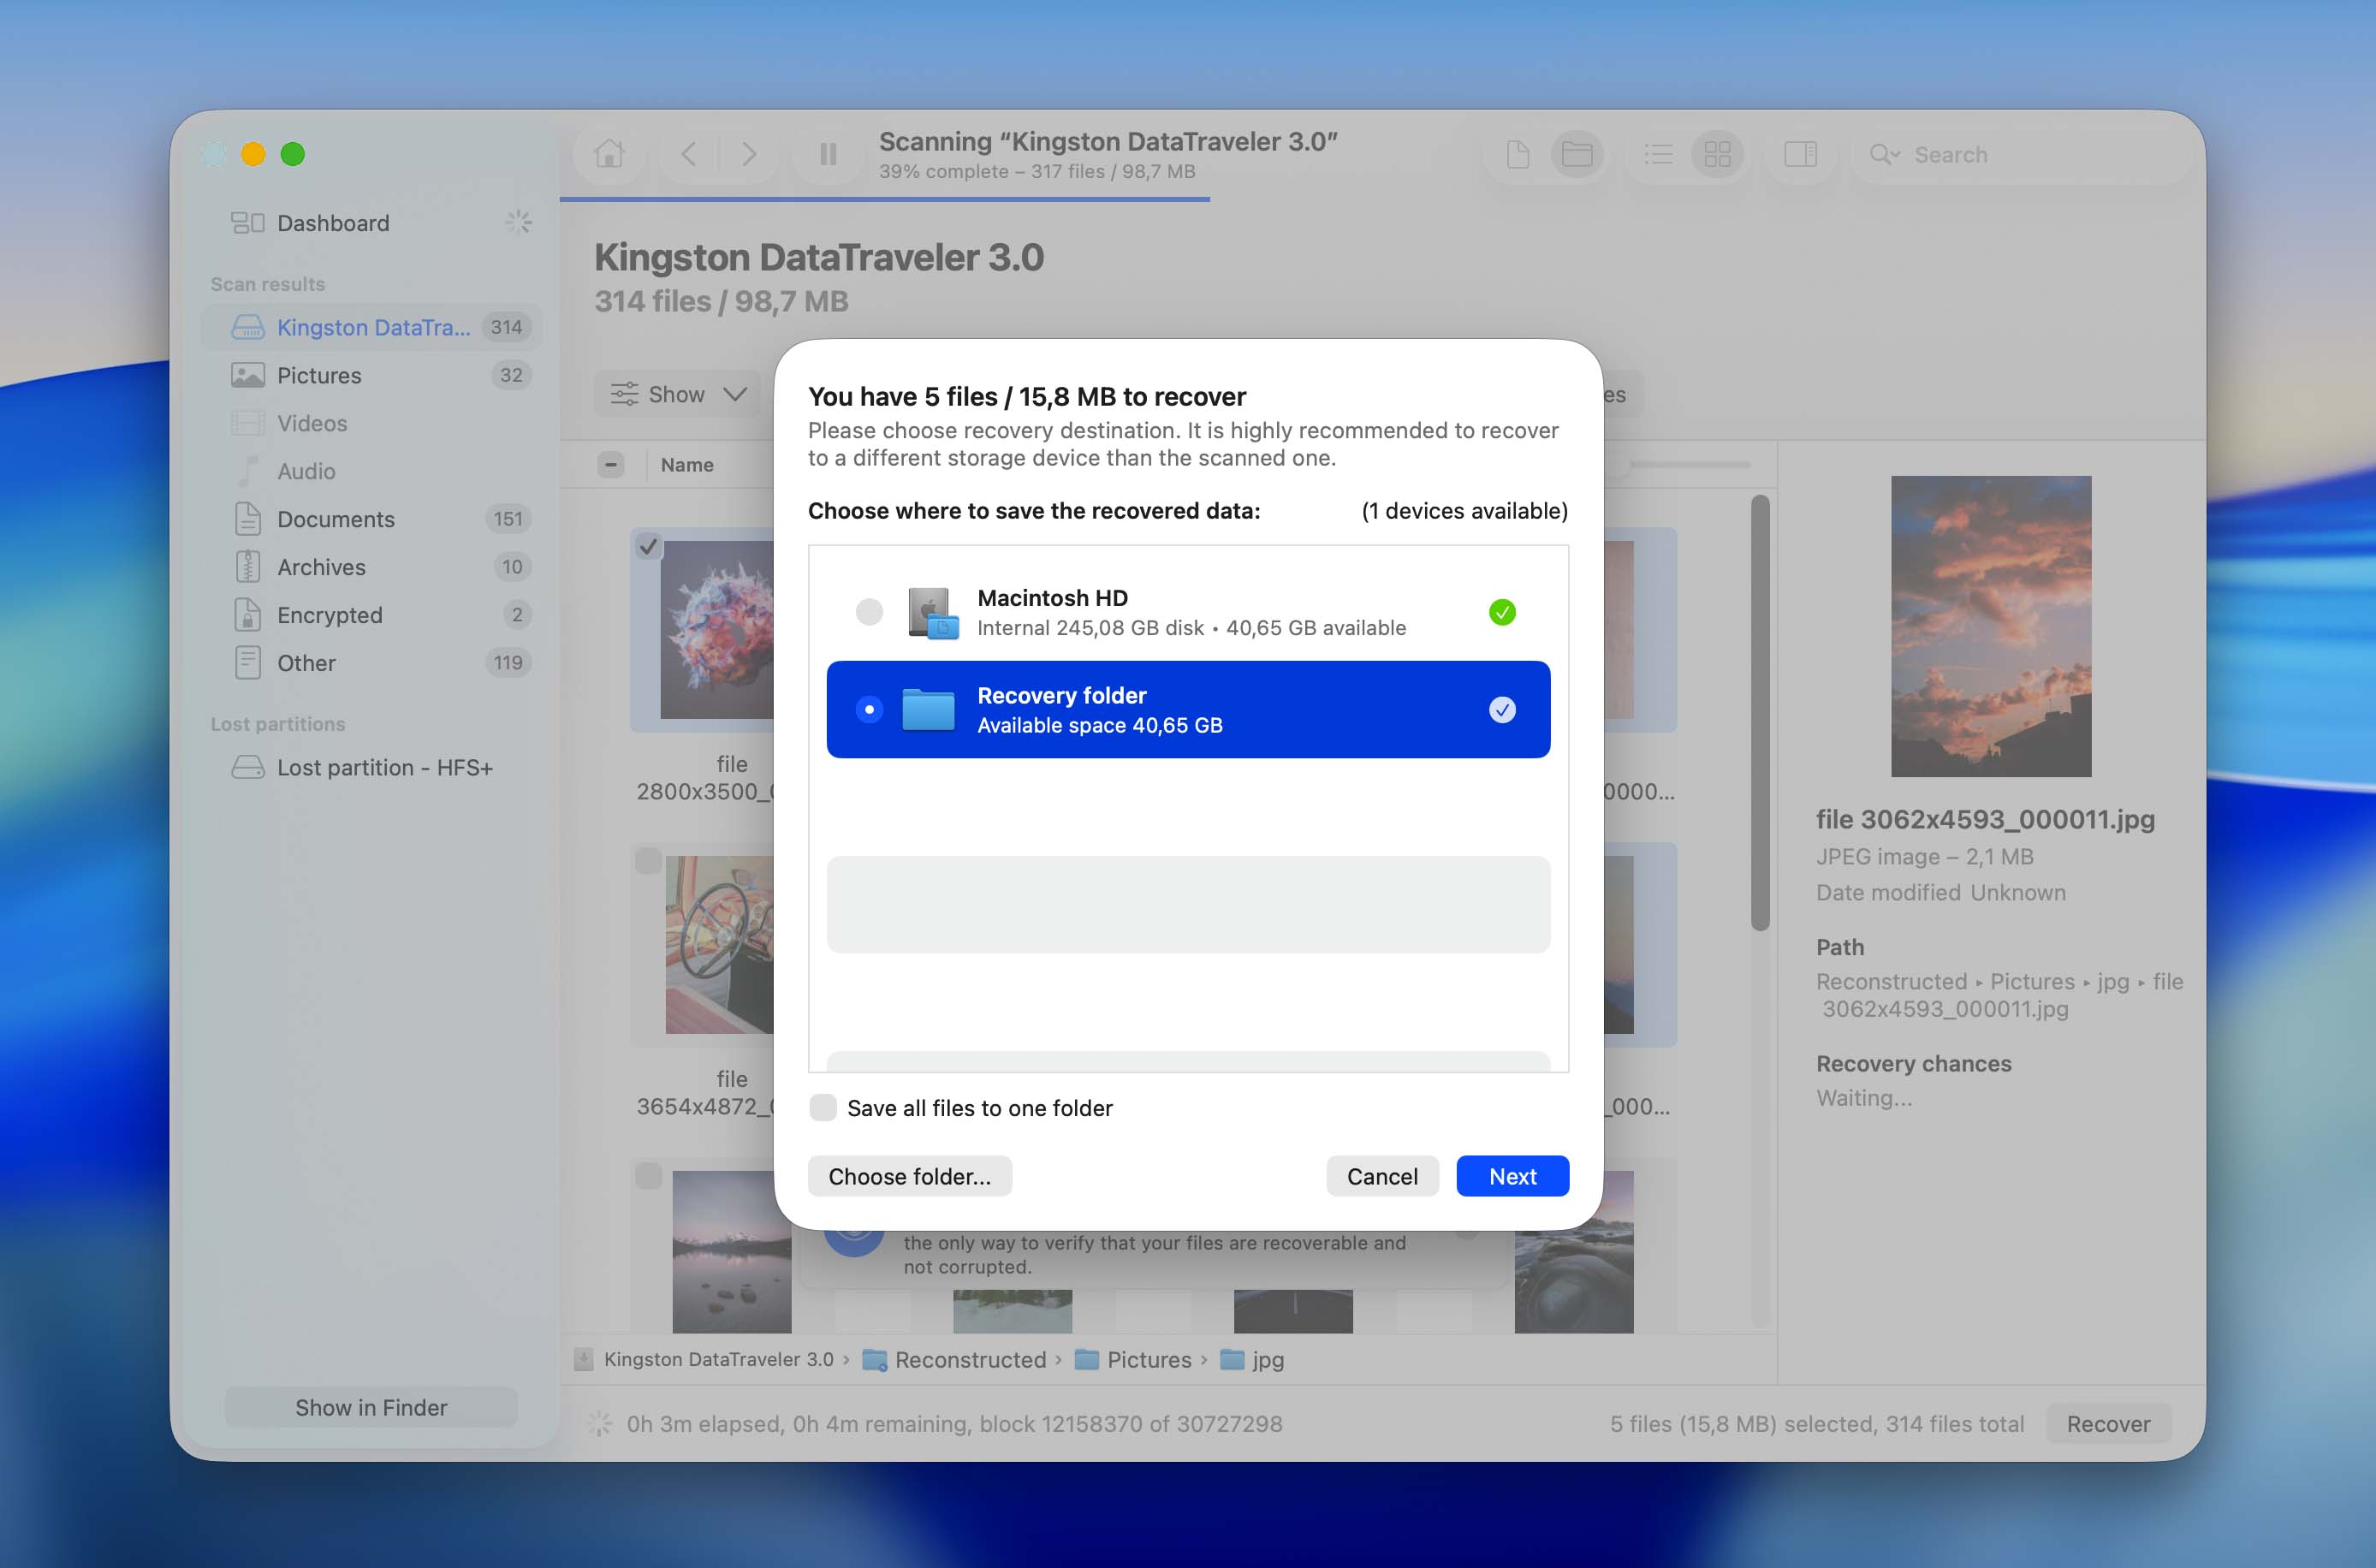
Finally, click the Recover button and specify the recovery directory. Make sure that you don’t select a directory located on the same storage device from which you’re recovering your files because you could overwrite them.
As you can see, recovering deleted and lost files with Disk Drill for Mac is a matter of a few simple steps. Depending on the size of your storage device and the scope of the data recovery task, you should be done in just a couple of minutes.
Extra Free Disk Tools Included with Disk Drill for Mac
The goal of Disk Drill for Mac is to prevent data loss, which is why the software comes with multiple extra free disk tools that you can use to maintain your Mac in good working order and protect important files from accidental deletion.
S.M.A.R.T. Monitoring
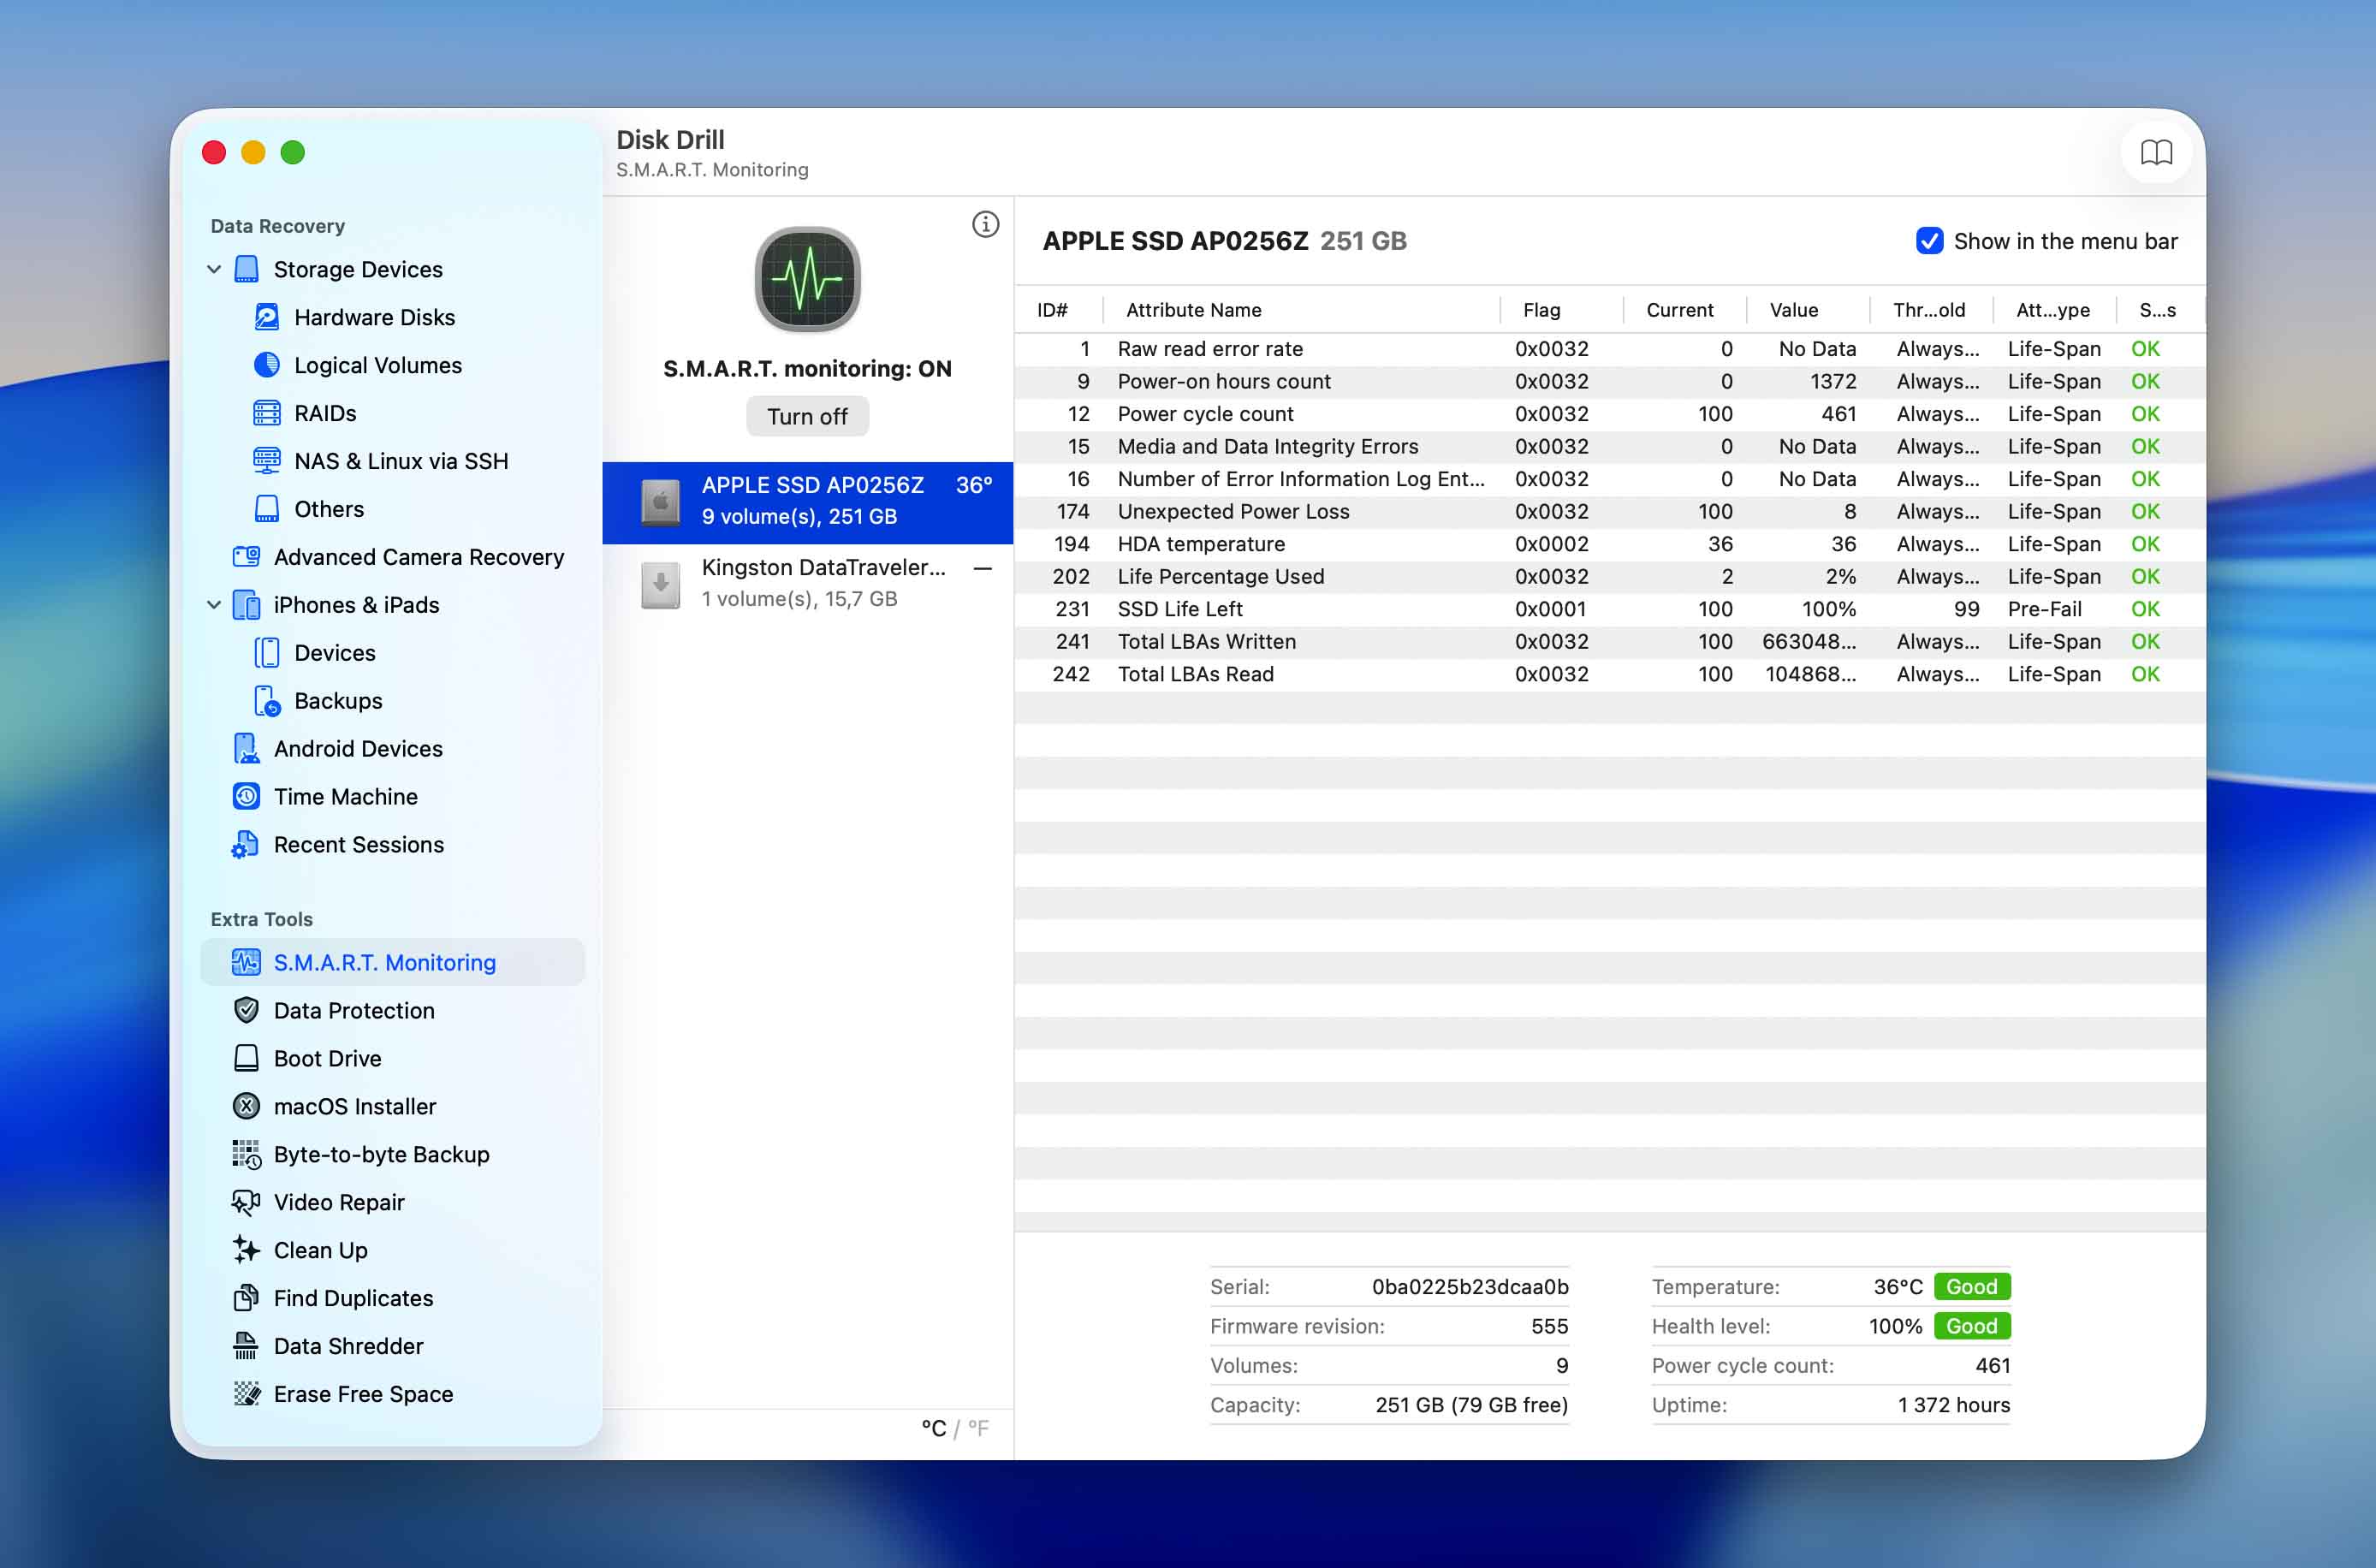
Disk health is a S.M.A.R.T. disk monitoring utility whose purpose is to detect and report various indicators of hard drive reliability so that you can anticipate hardware issues a long time before they have a chance to cause serious data loss. This feature is compatible with virtually all modern HDDs and SSDs, and you can select it in the left pane. In Disk Drill for Mac, the usability of S.M.A.R.T. disk monitoring has been improved with support for keyboard navigation and clipboard integration.
Data Protection
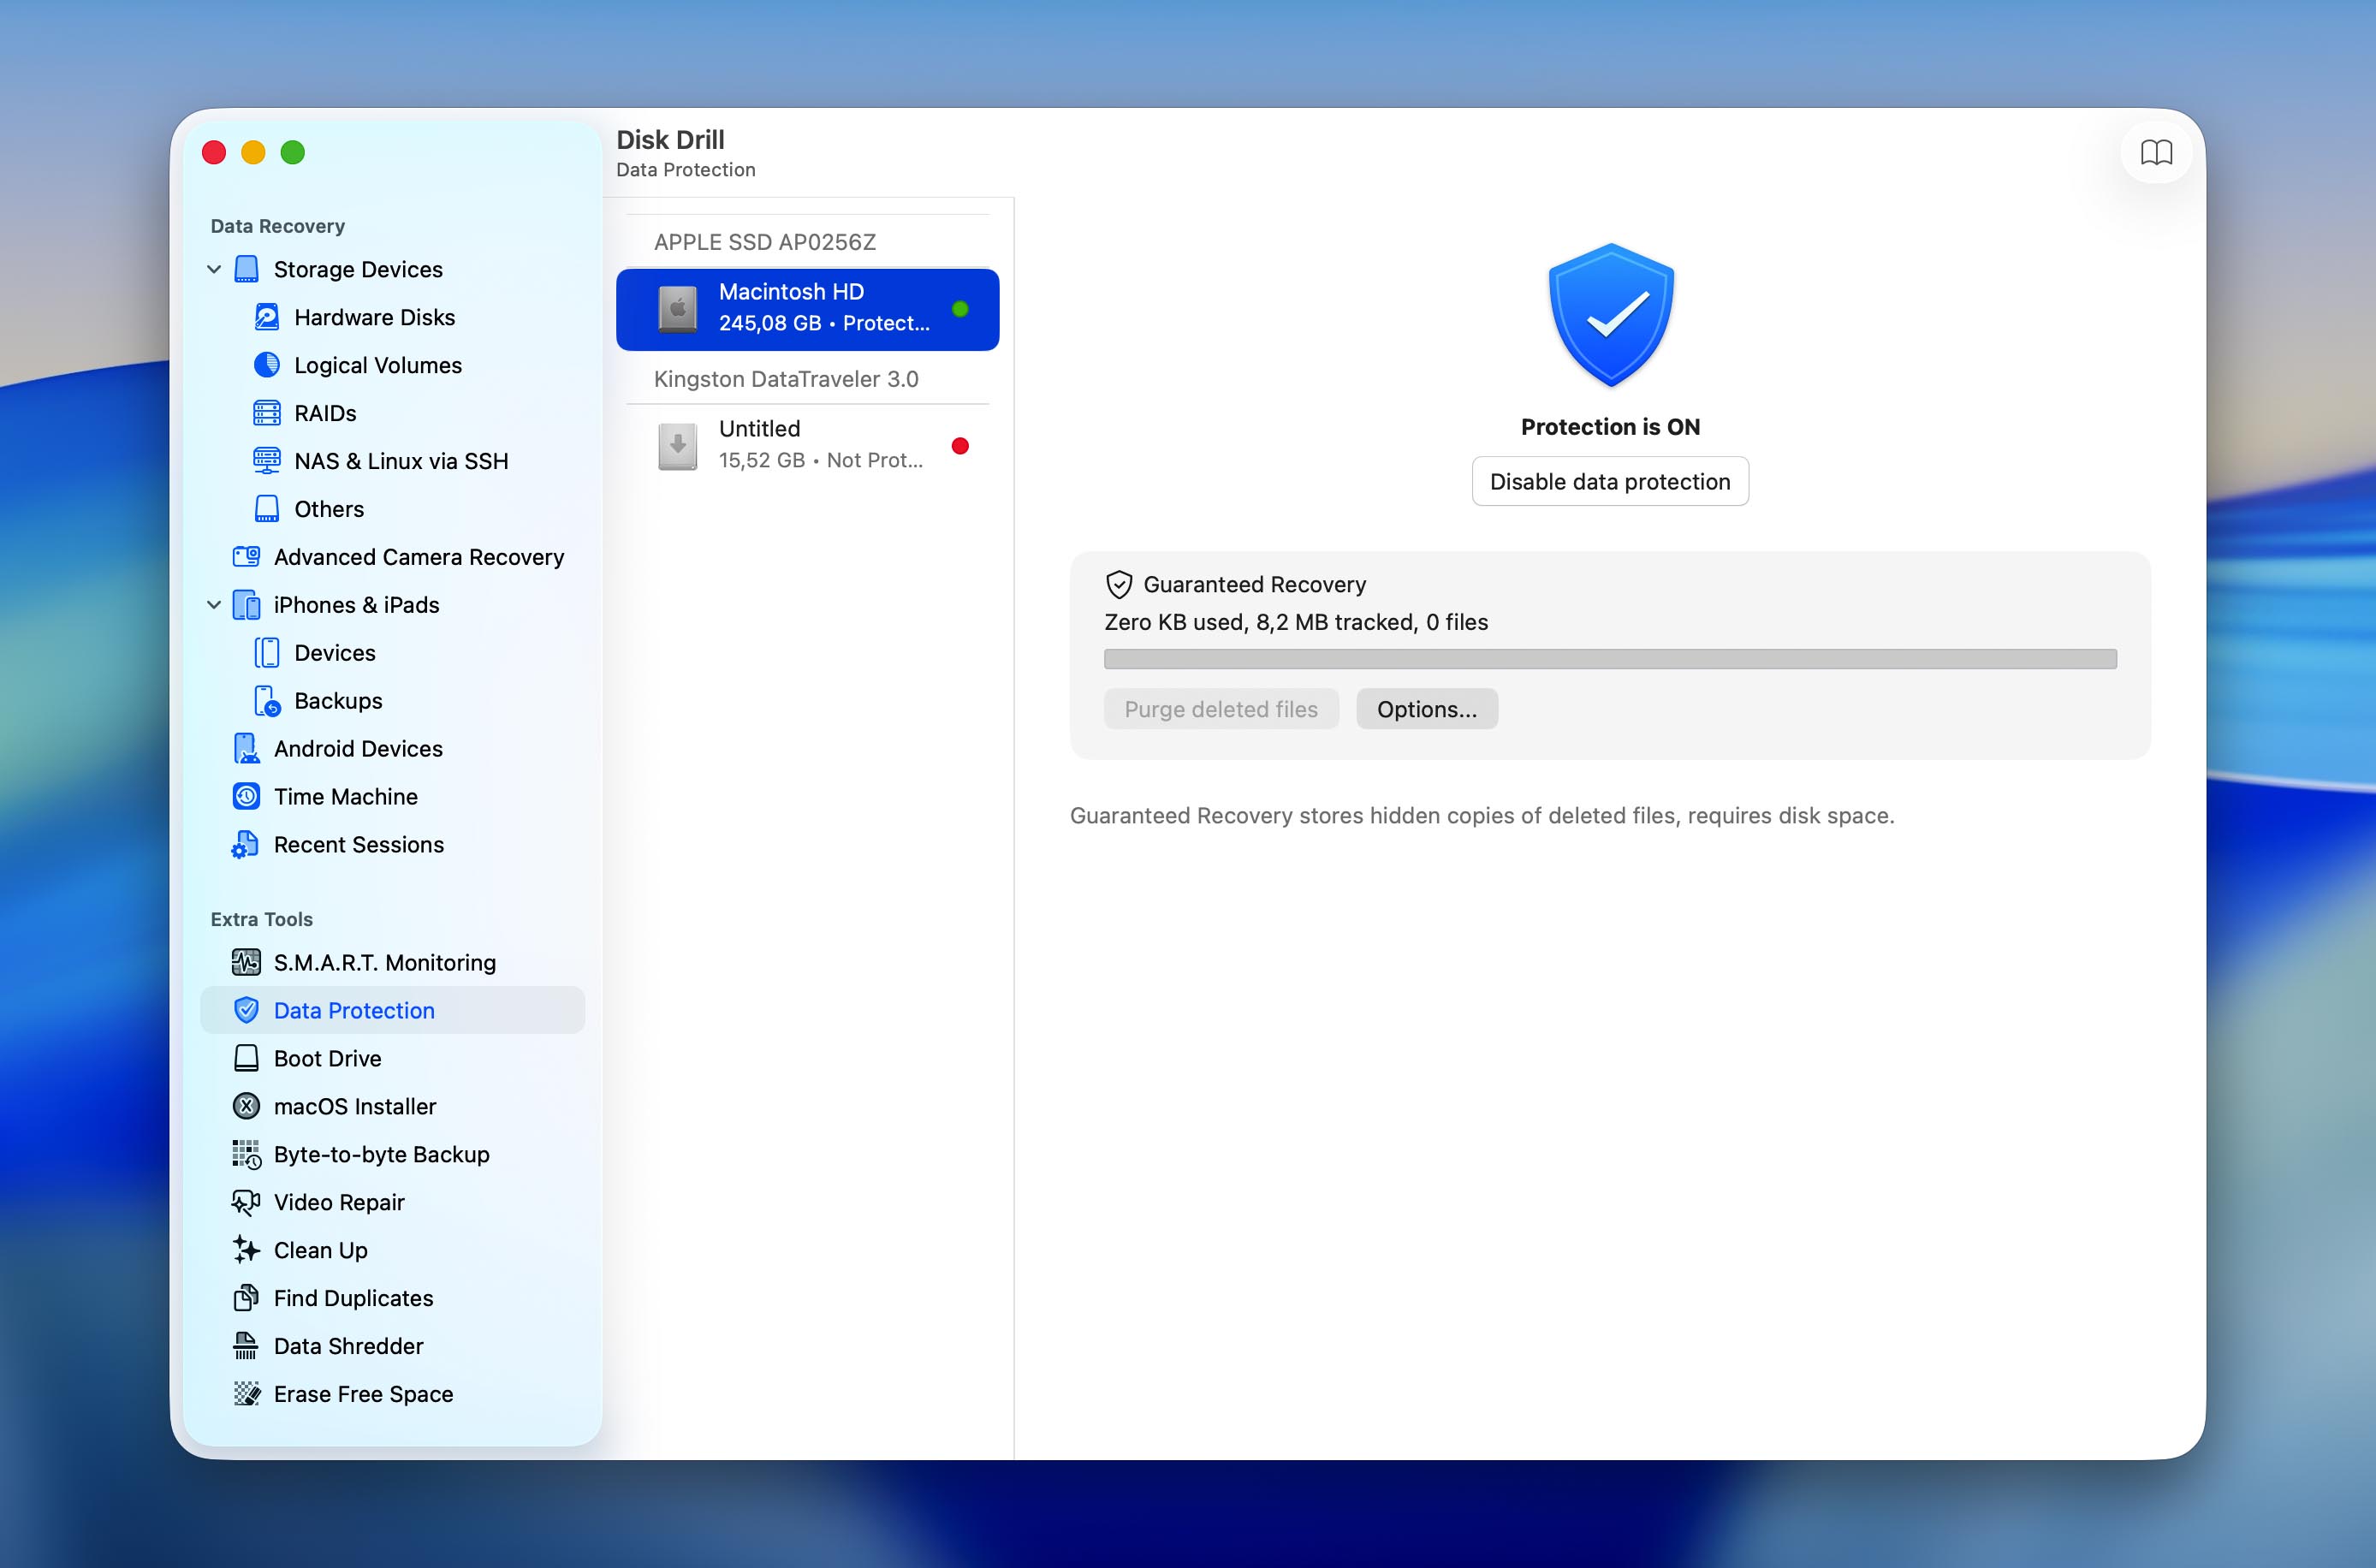
Included with Disk Drill for Mac is a data protection feature called Guaranteed Recovery. It temporarily retains copies of deleted files, making it easier to recover them later and improving recovery chances in accidental deletion scenarios.Its value is particularly noticeable on internal SSDs, where TRIM can quickly make deleted files unrecoverable. But by keeping a temporary copy of deleted files, Guaranteed Recovery provides an additional layer of protection against this limitation.
macOS Installer
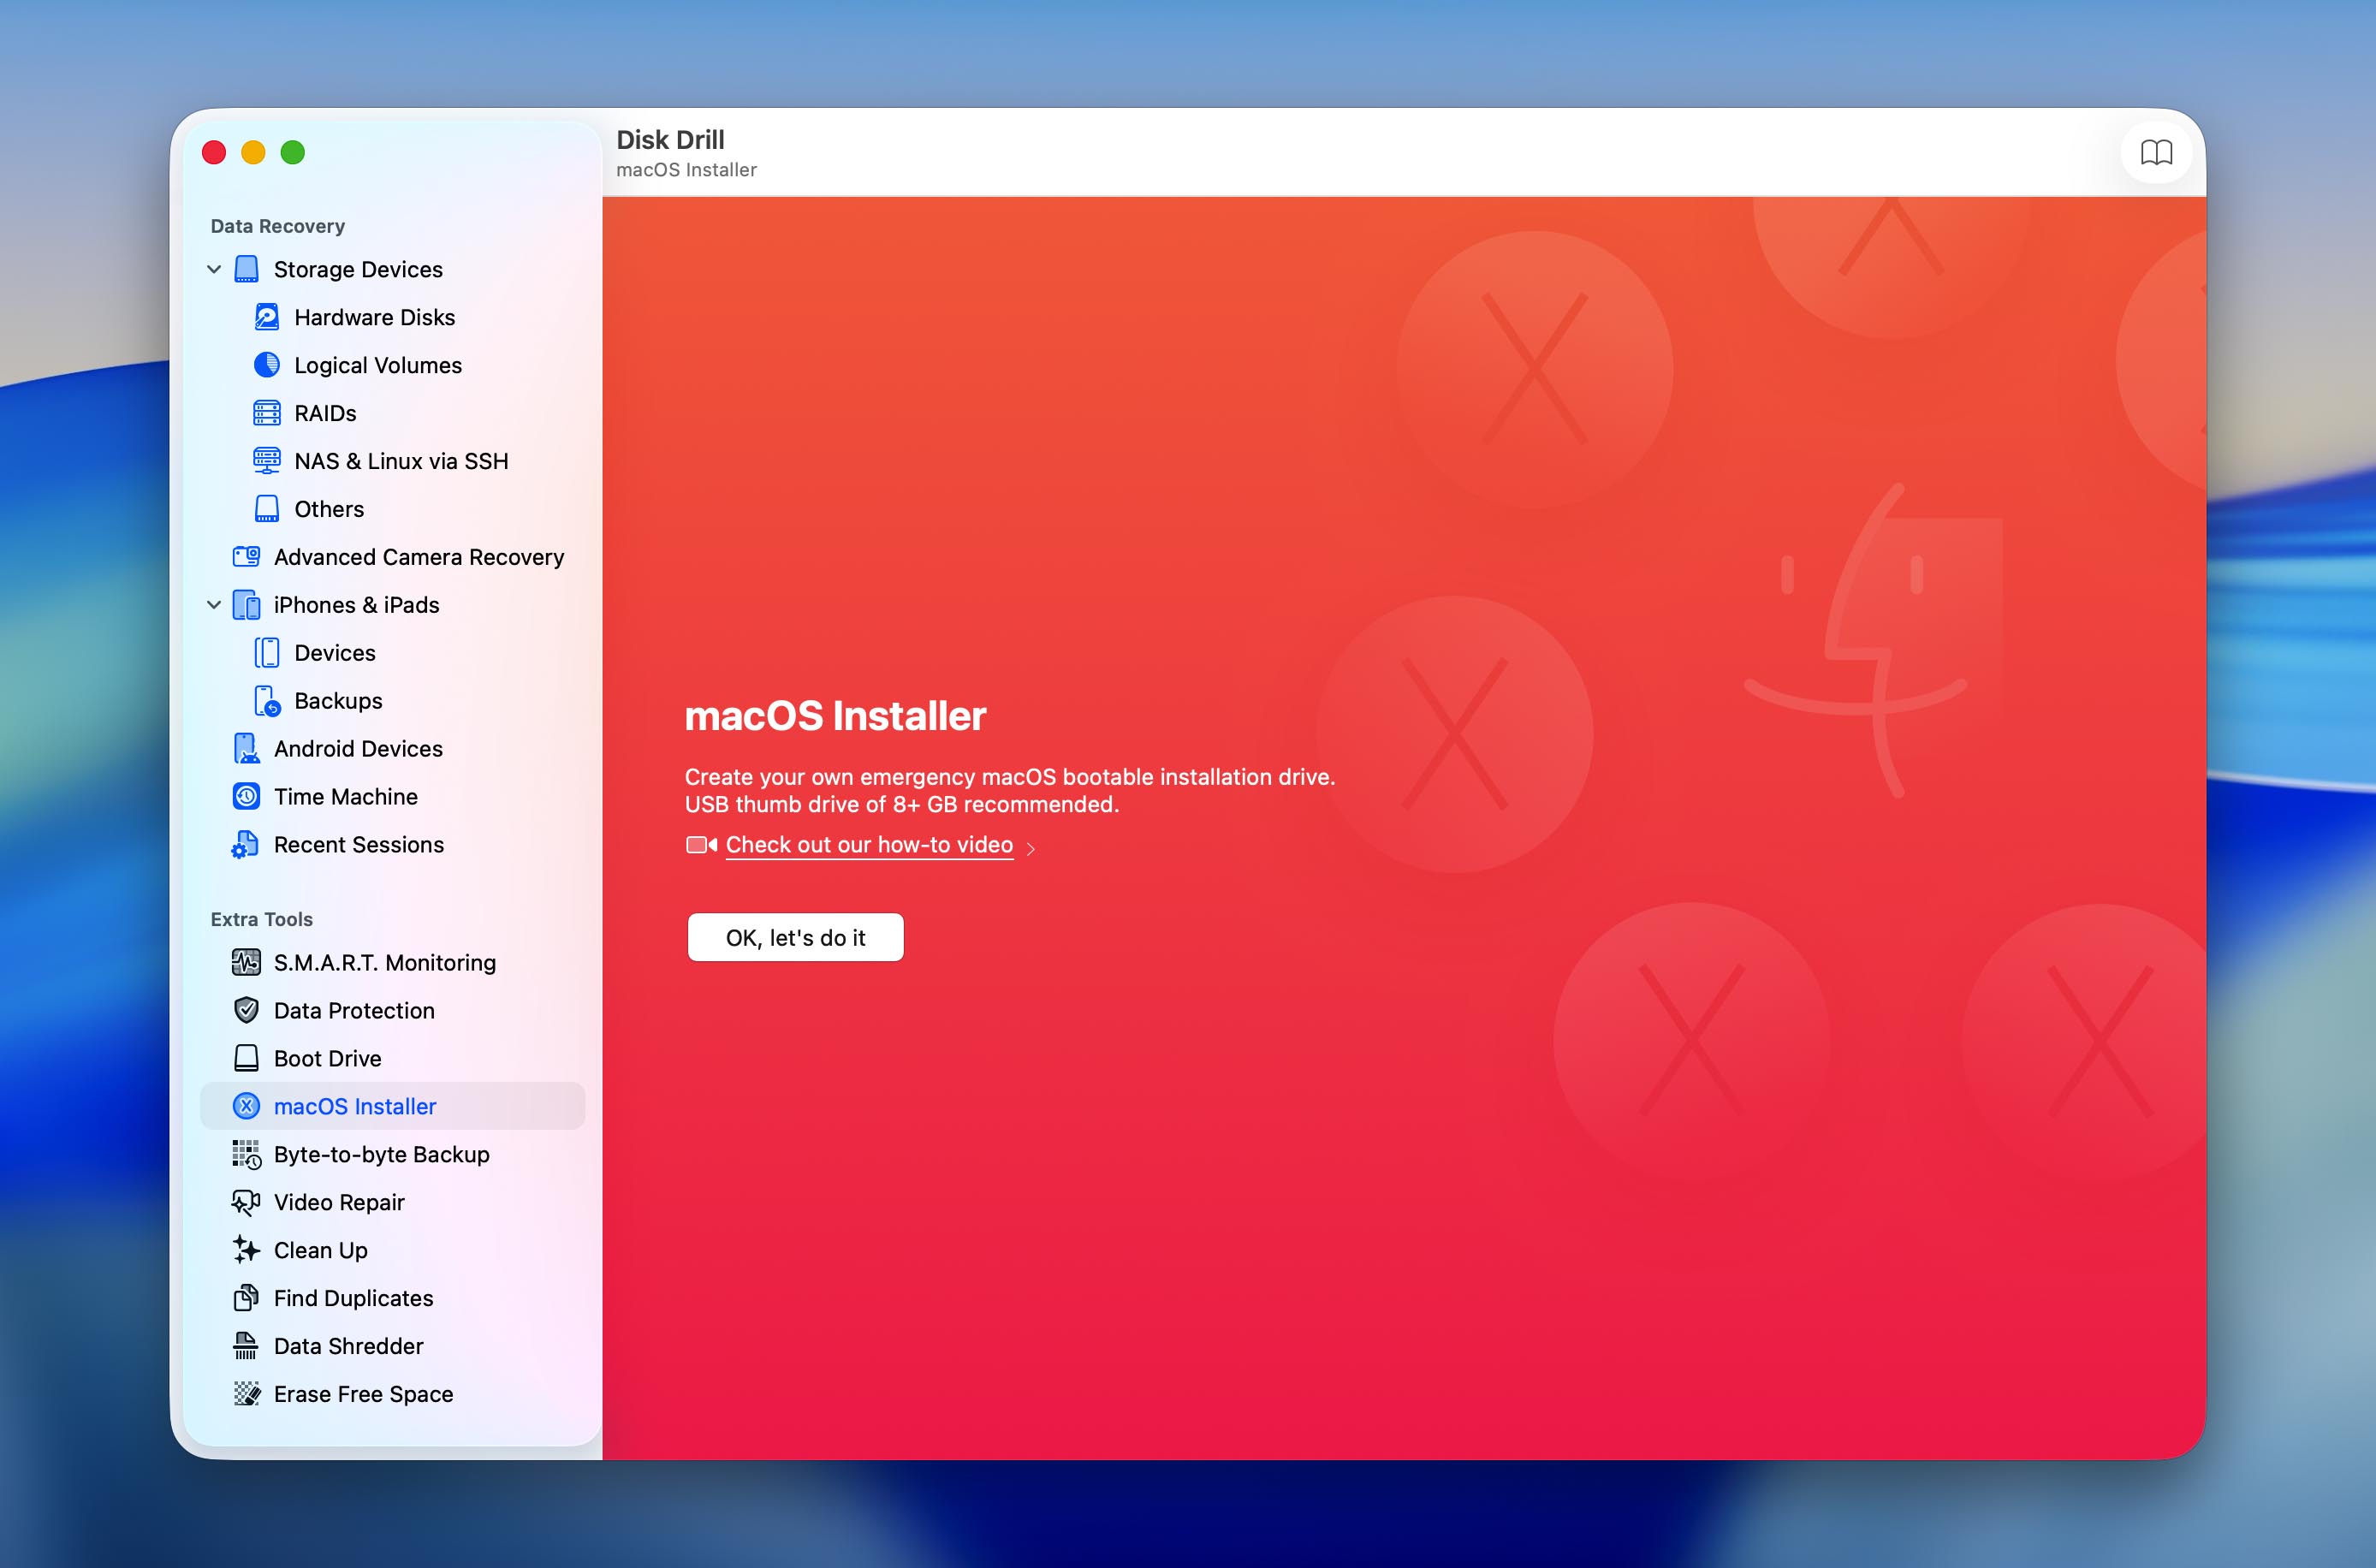
Disk Drill for Mac can create your own emergency macOS bootable installation drive on any USB flash drive that’s larger than 8 GB. You can then use the installation drive to fix issues with your Mac and avoid dealing with Apple’s customer support. New in the latest version is the ability to download both the latest and older versions of macOS directly from Disk Drill for Mac.
Byte-to-Byte Backup
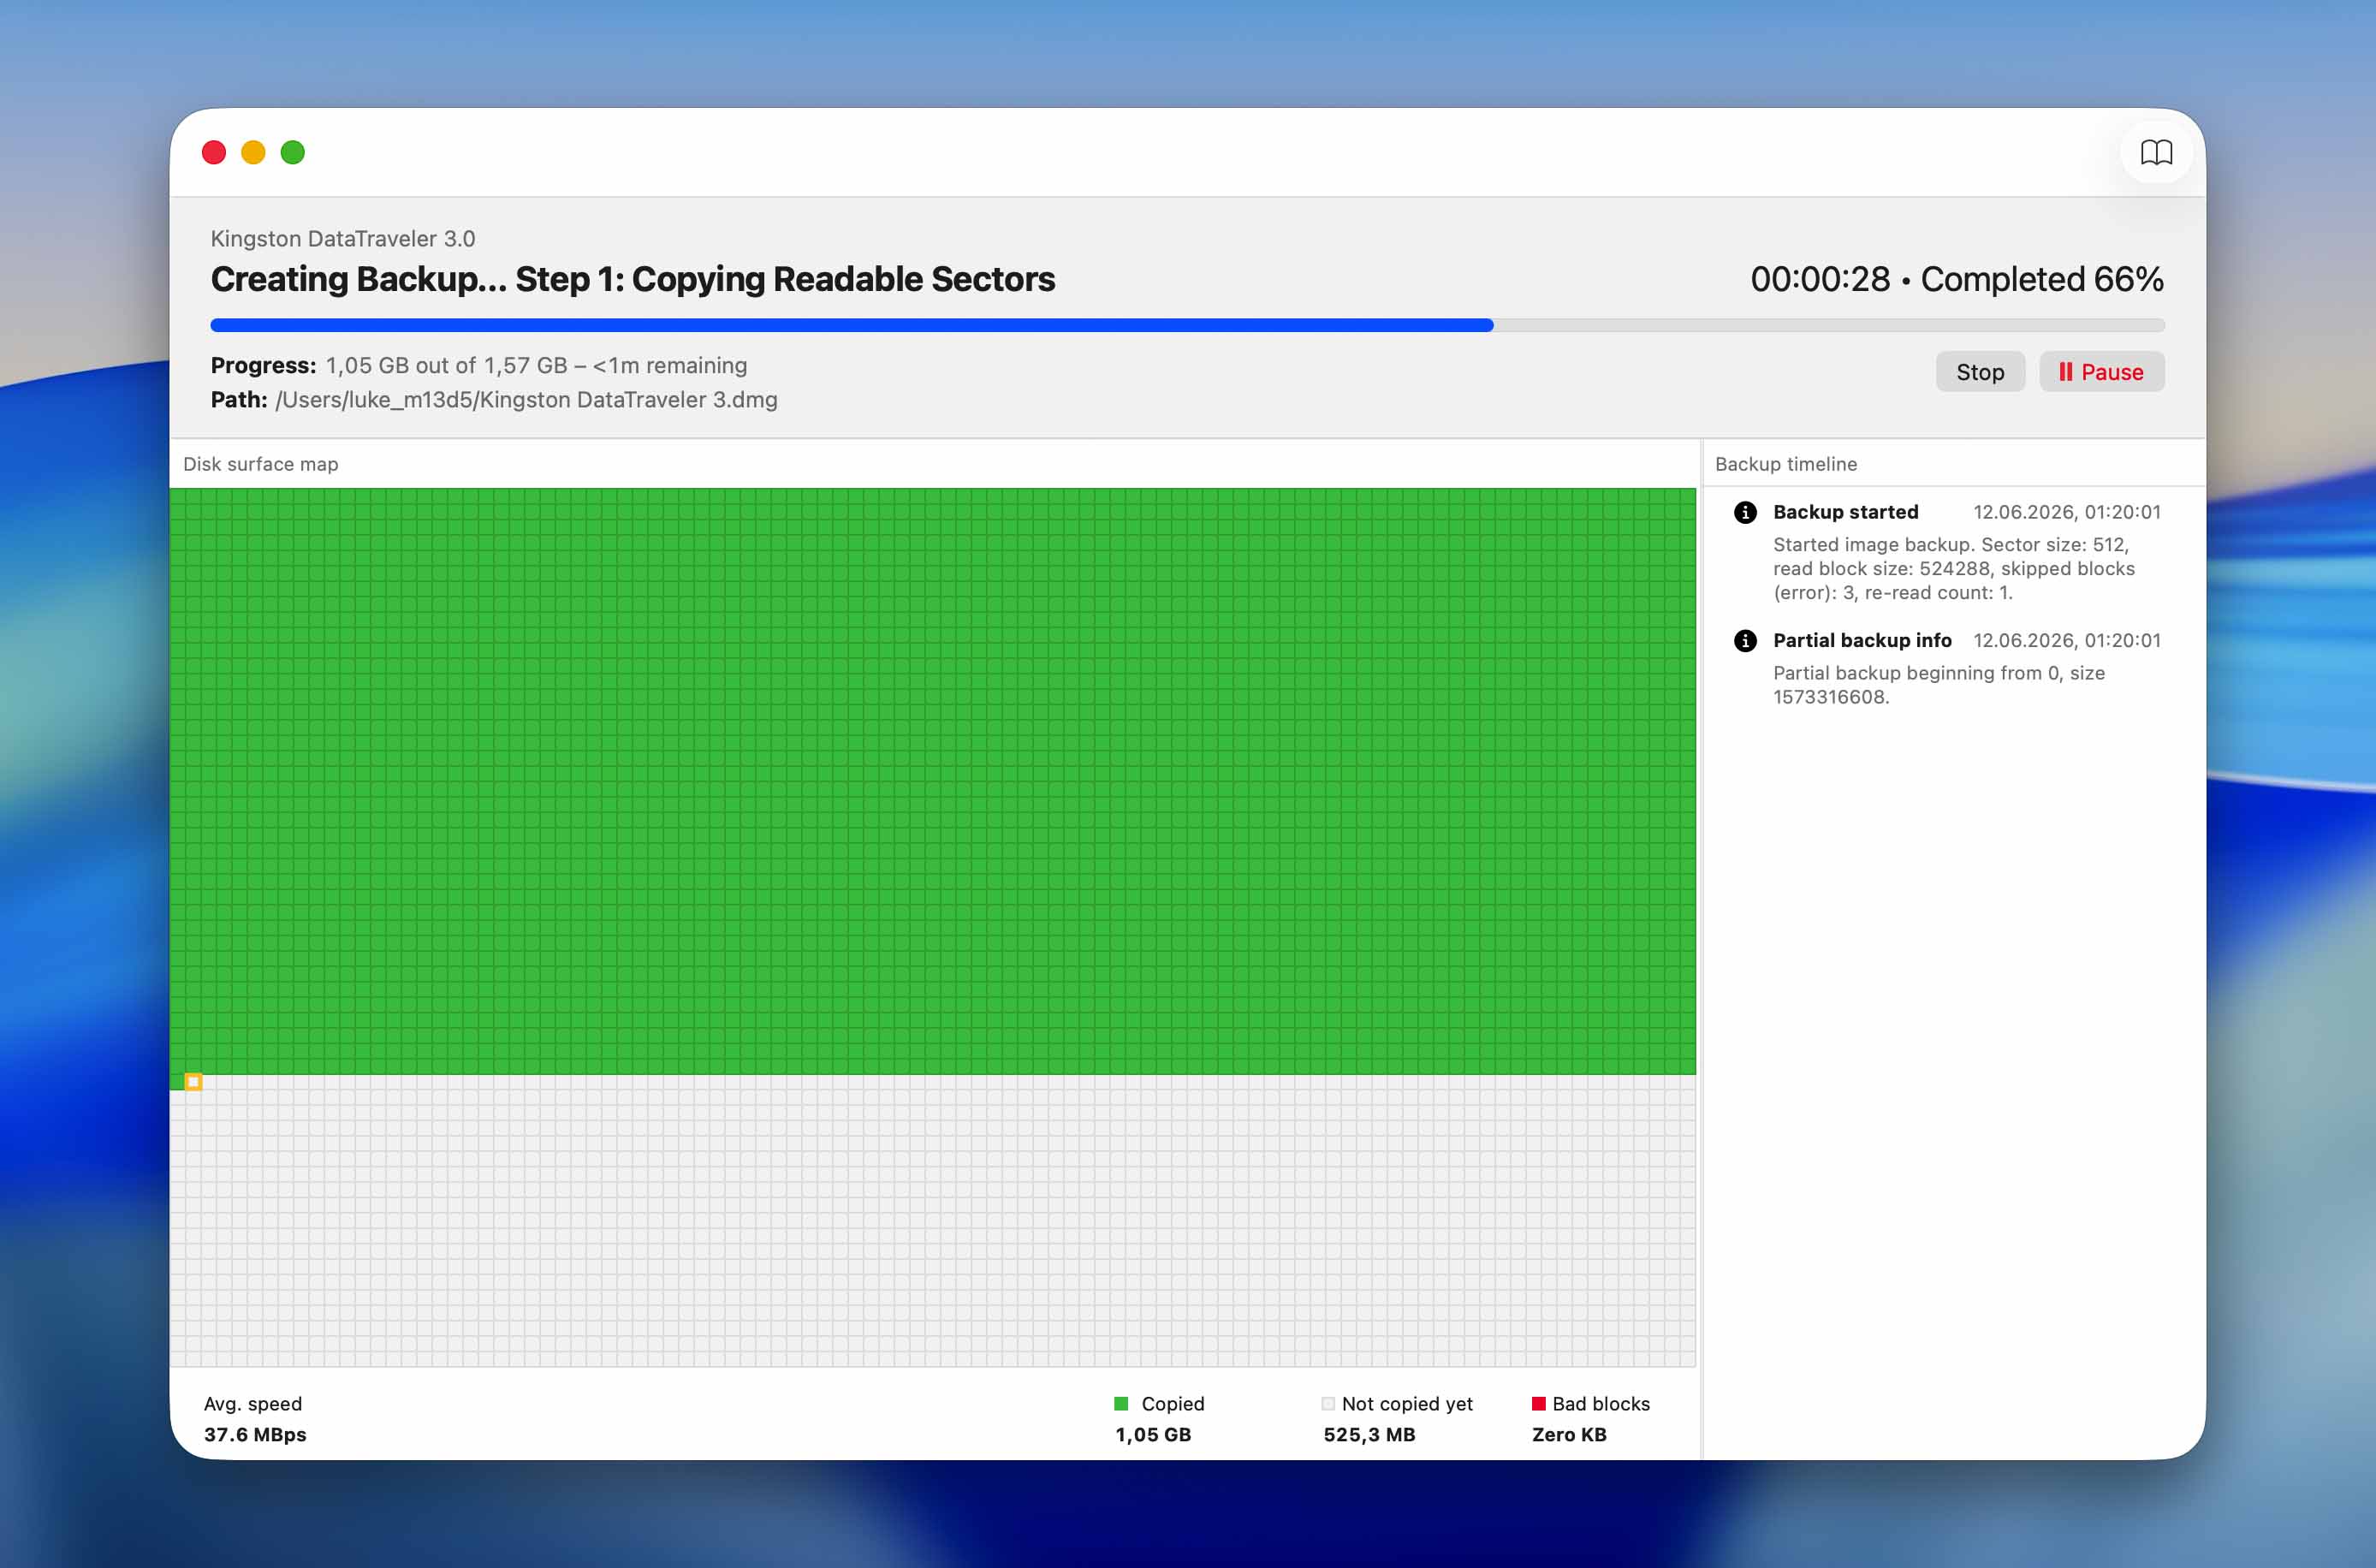
Disk Drill has a backup tool called Byte-to-byte backup, which can create exact image copies of entire disks–down to the last bit. It’s designed to maintain backup integrity even in case of severe disk corruption, multiple bad sectors, and sudden drive disconnection, which means that backup operations will succeed even if your drive is badly damaged and is incapable of sustaining a stable connection.
Byte-to-byte backup outputs an industry-standard backup file that Disk Drill–or any other capable software–can use as a scan target. This enables multiple recovery attempts while preventing further wear on the disks themselves.
Clean Up
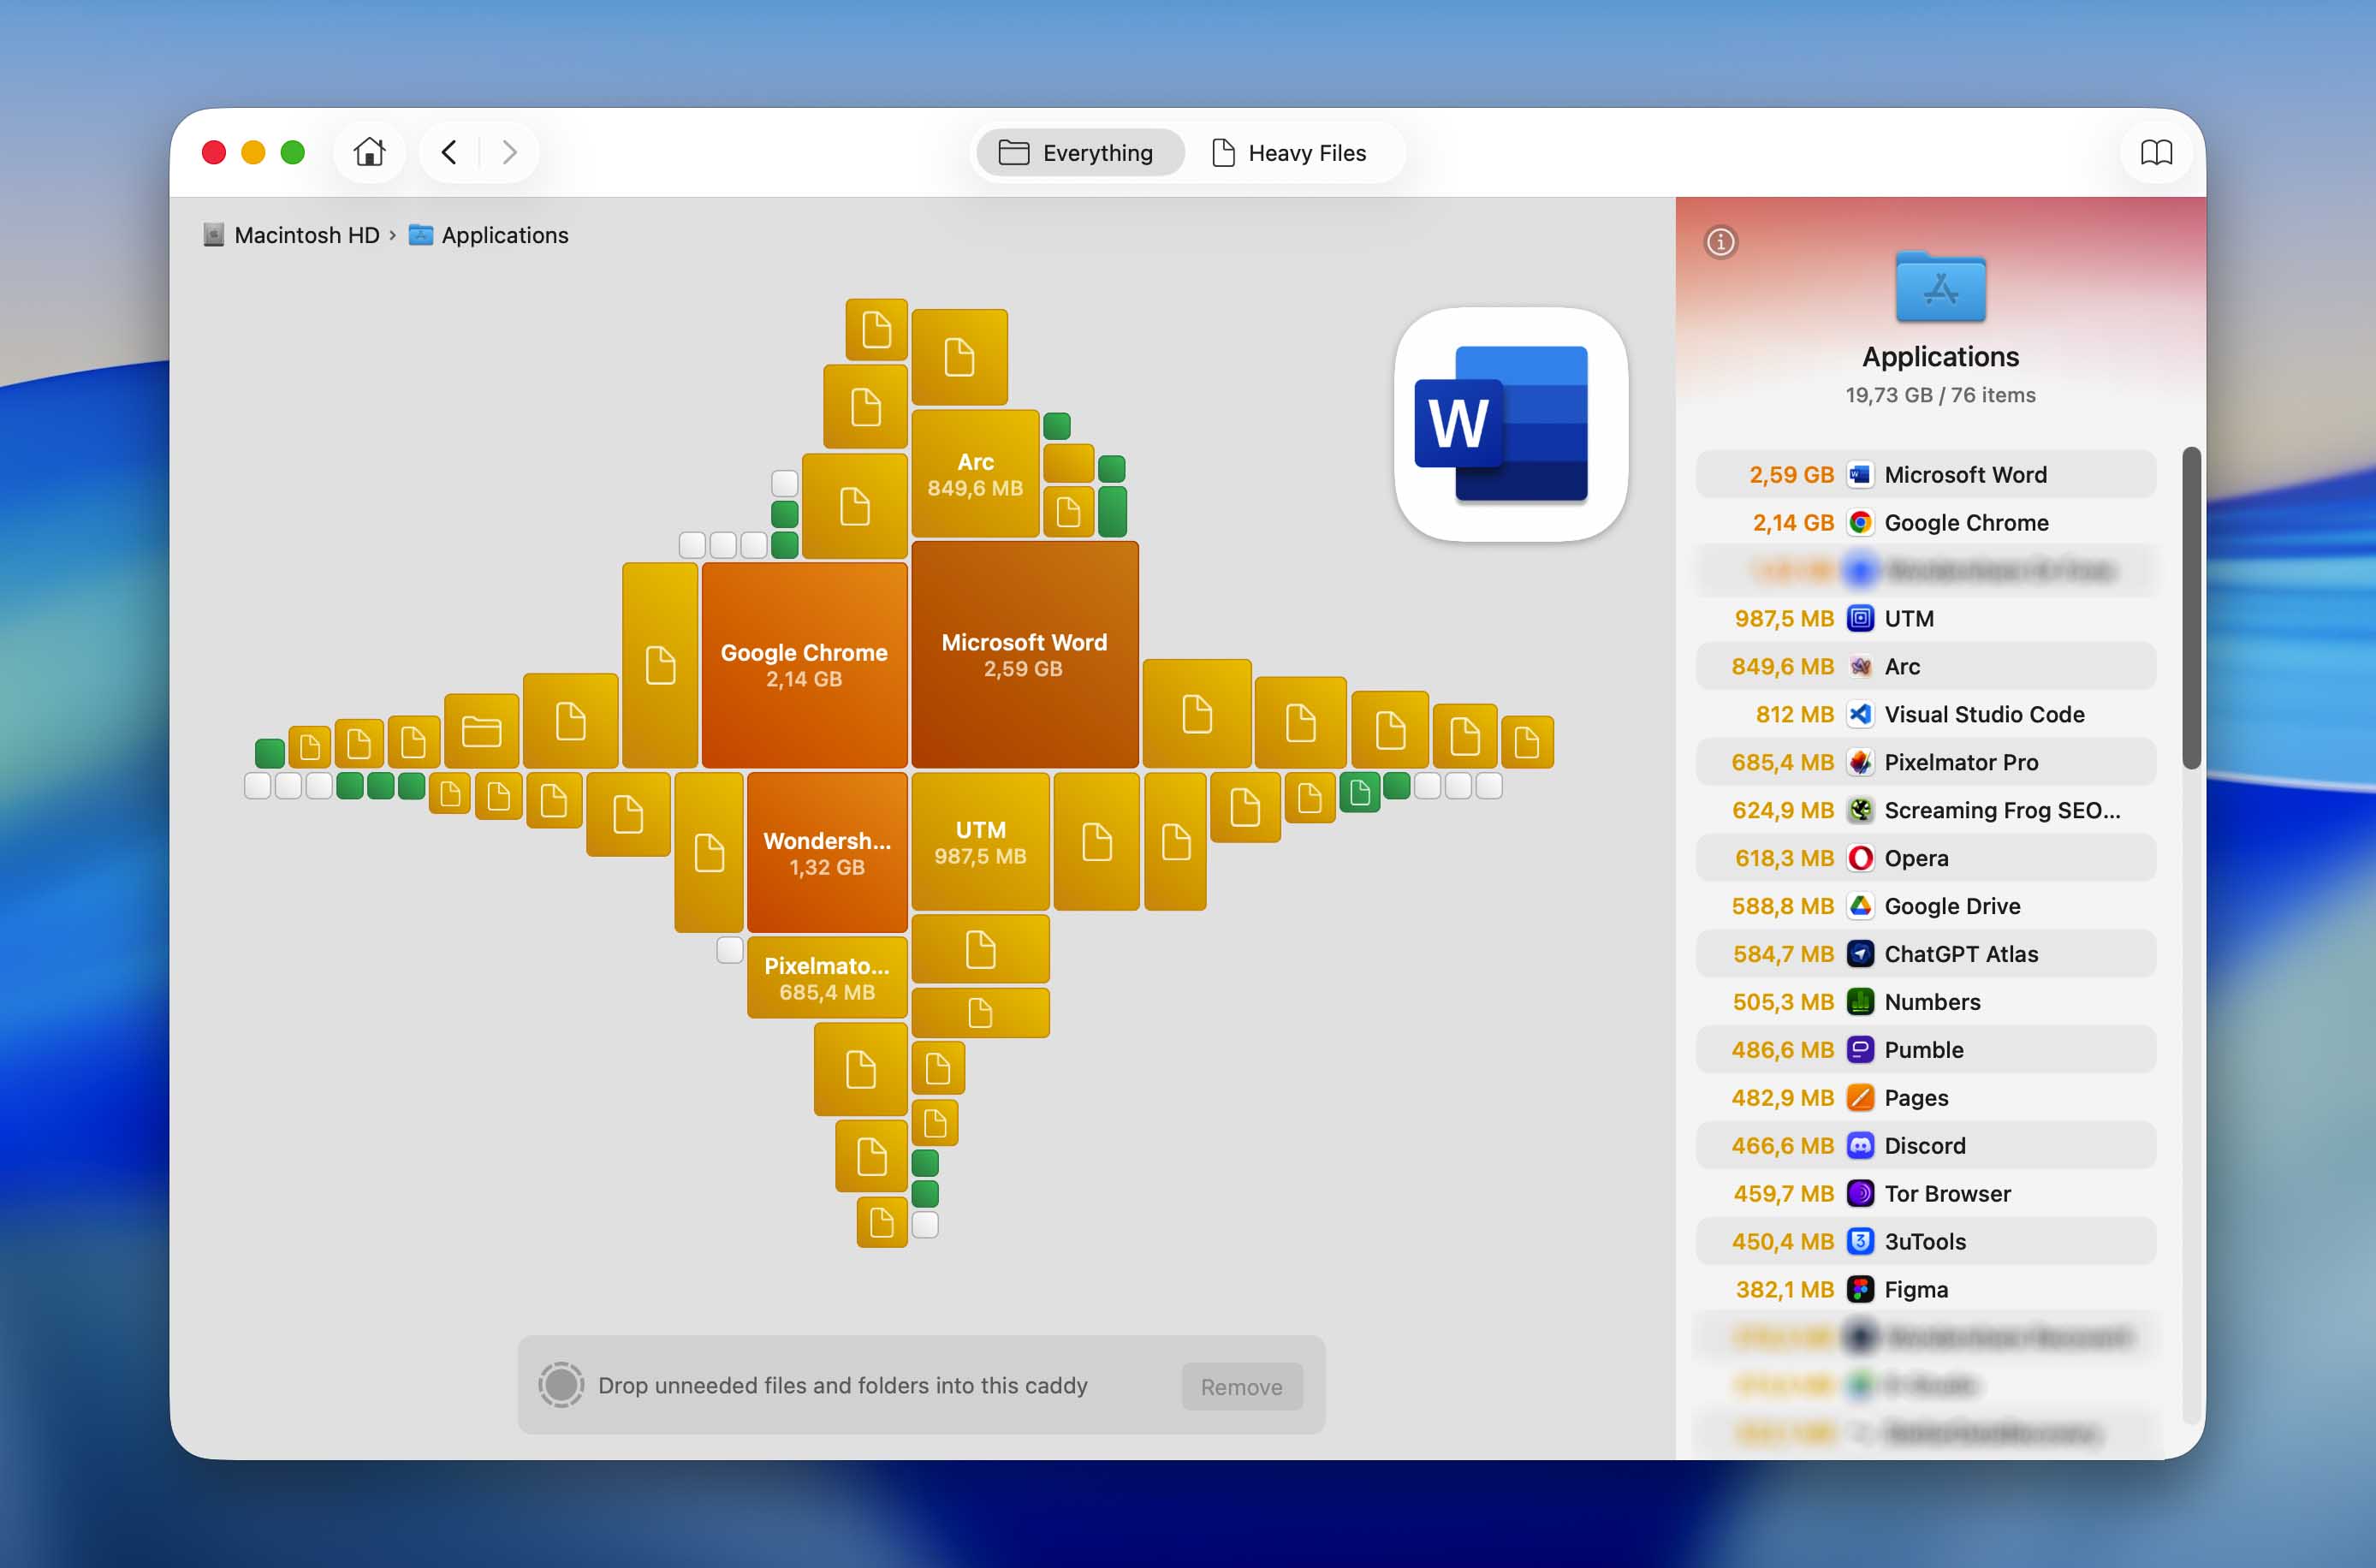
Cleanup provides a visual overview of how storage space is being used on your Mac. You can review files and folders by size and remove unnecessary data directly from the interface, making it useful both for cleaning up application leftovers and for general disk maintenance.
Find Duplicates
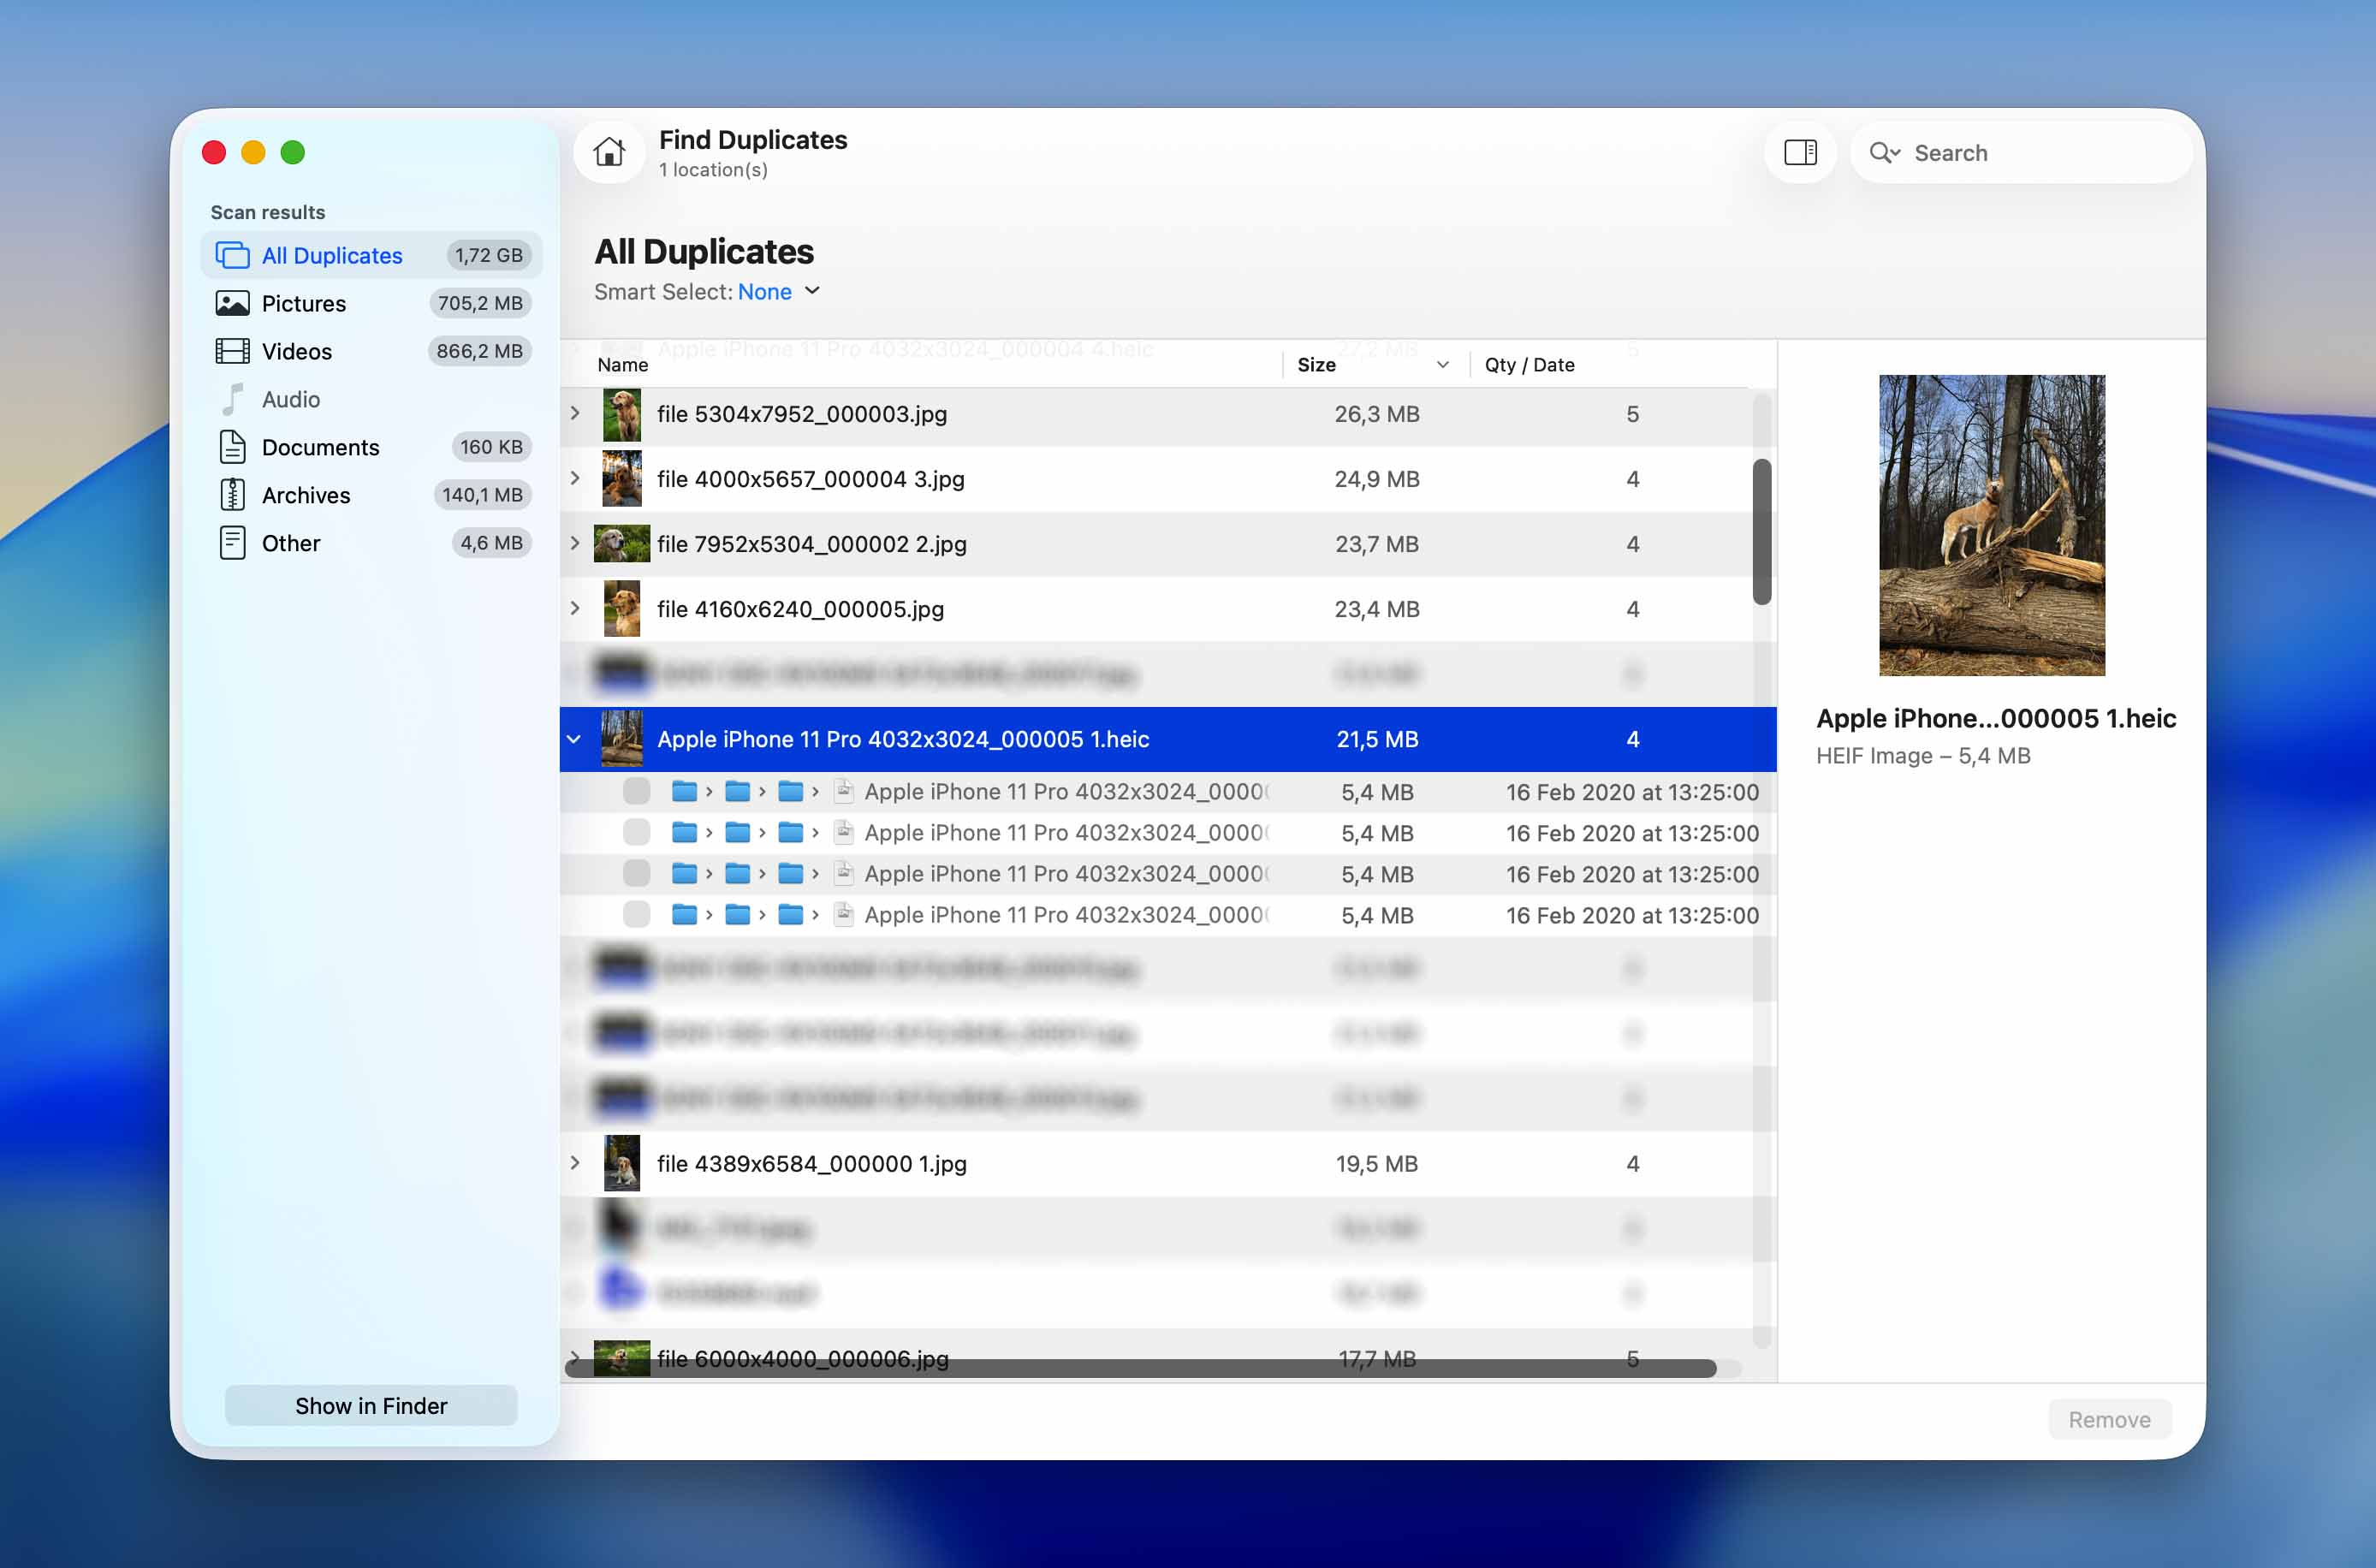
It’s easy to download the same file multiple times or transfer photos and videos from a memory card to two different locations without even realizing it. Duplicate Finder is a handy tool that can detect these duplicate files and remove them.
Data Shredder
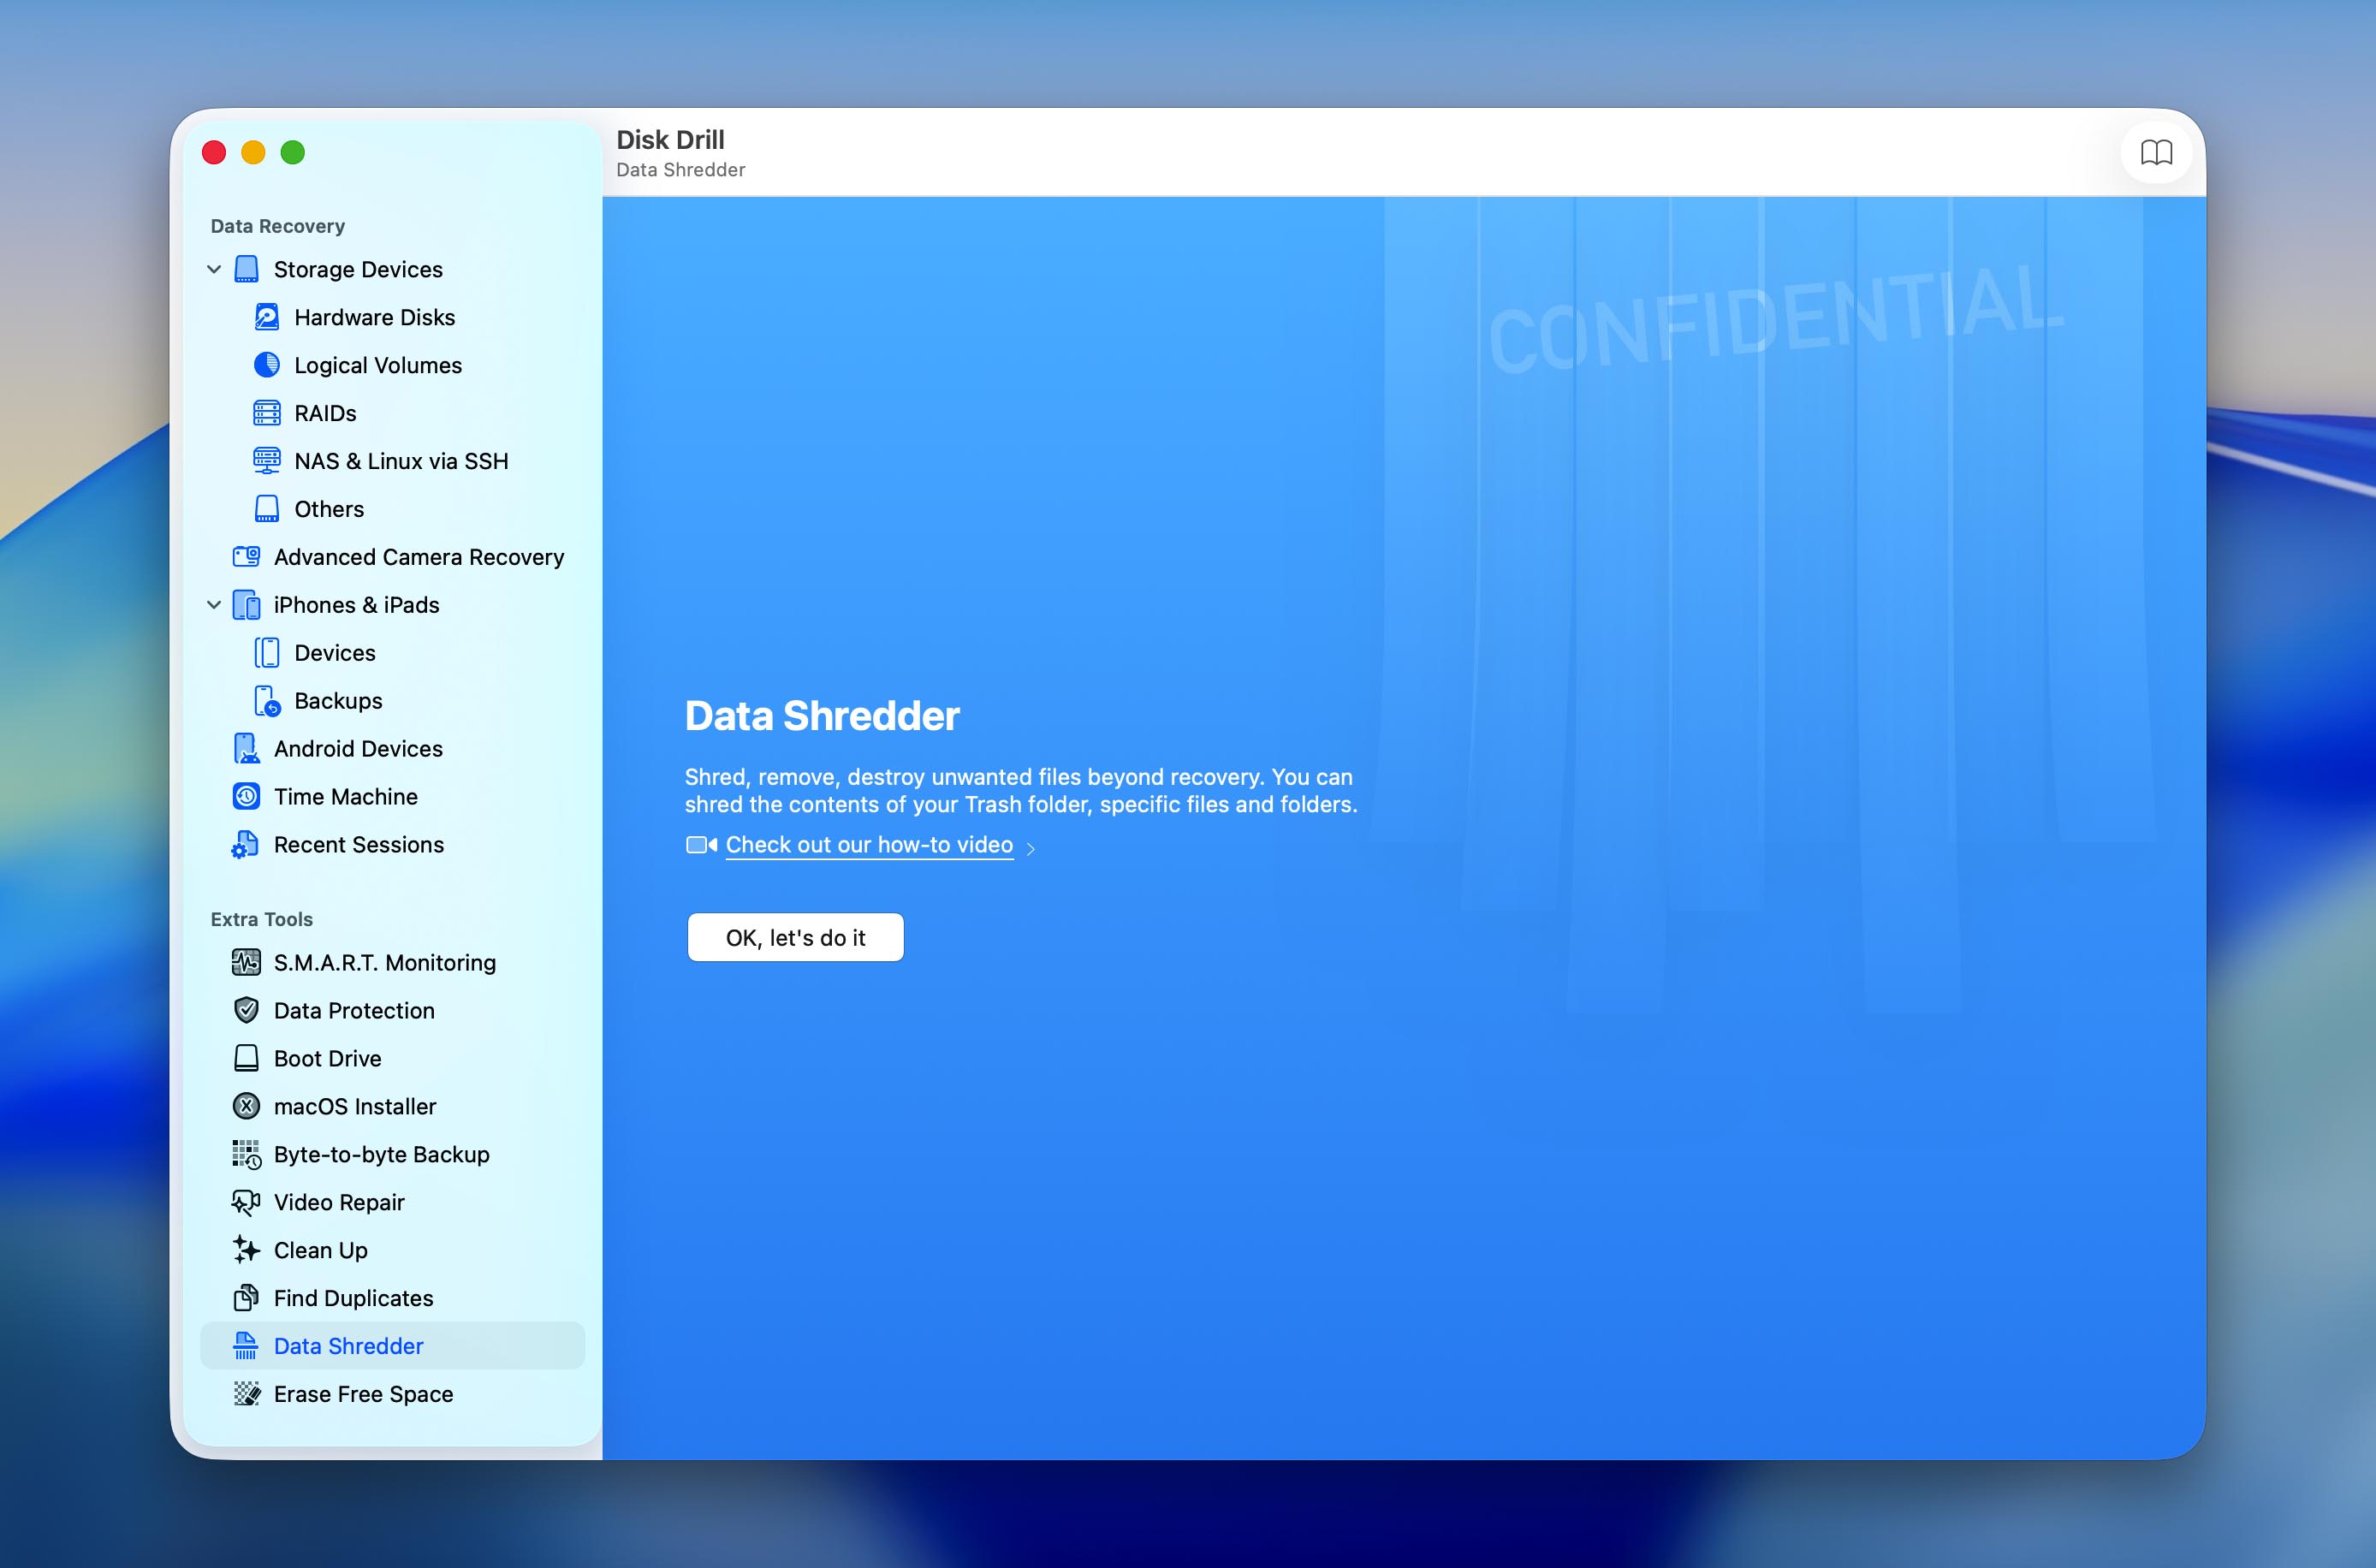
Disk Drill for Mac can not only recover permanently deleted files, but it can also delete files in a way that makes them impossible to recover with any data recovery application. All you need to do is use the Data Shredder tool to shred the contents of your Trash folder or any specific files and folders. You can even choose how many times you want Disk Drill to overwrite your data in order to comply with government standards for secure storage media erasure.
Erase Free Space
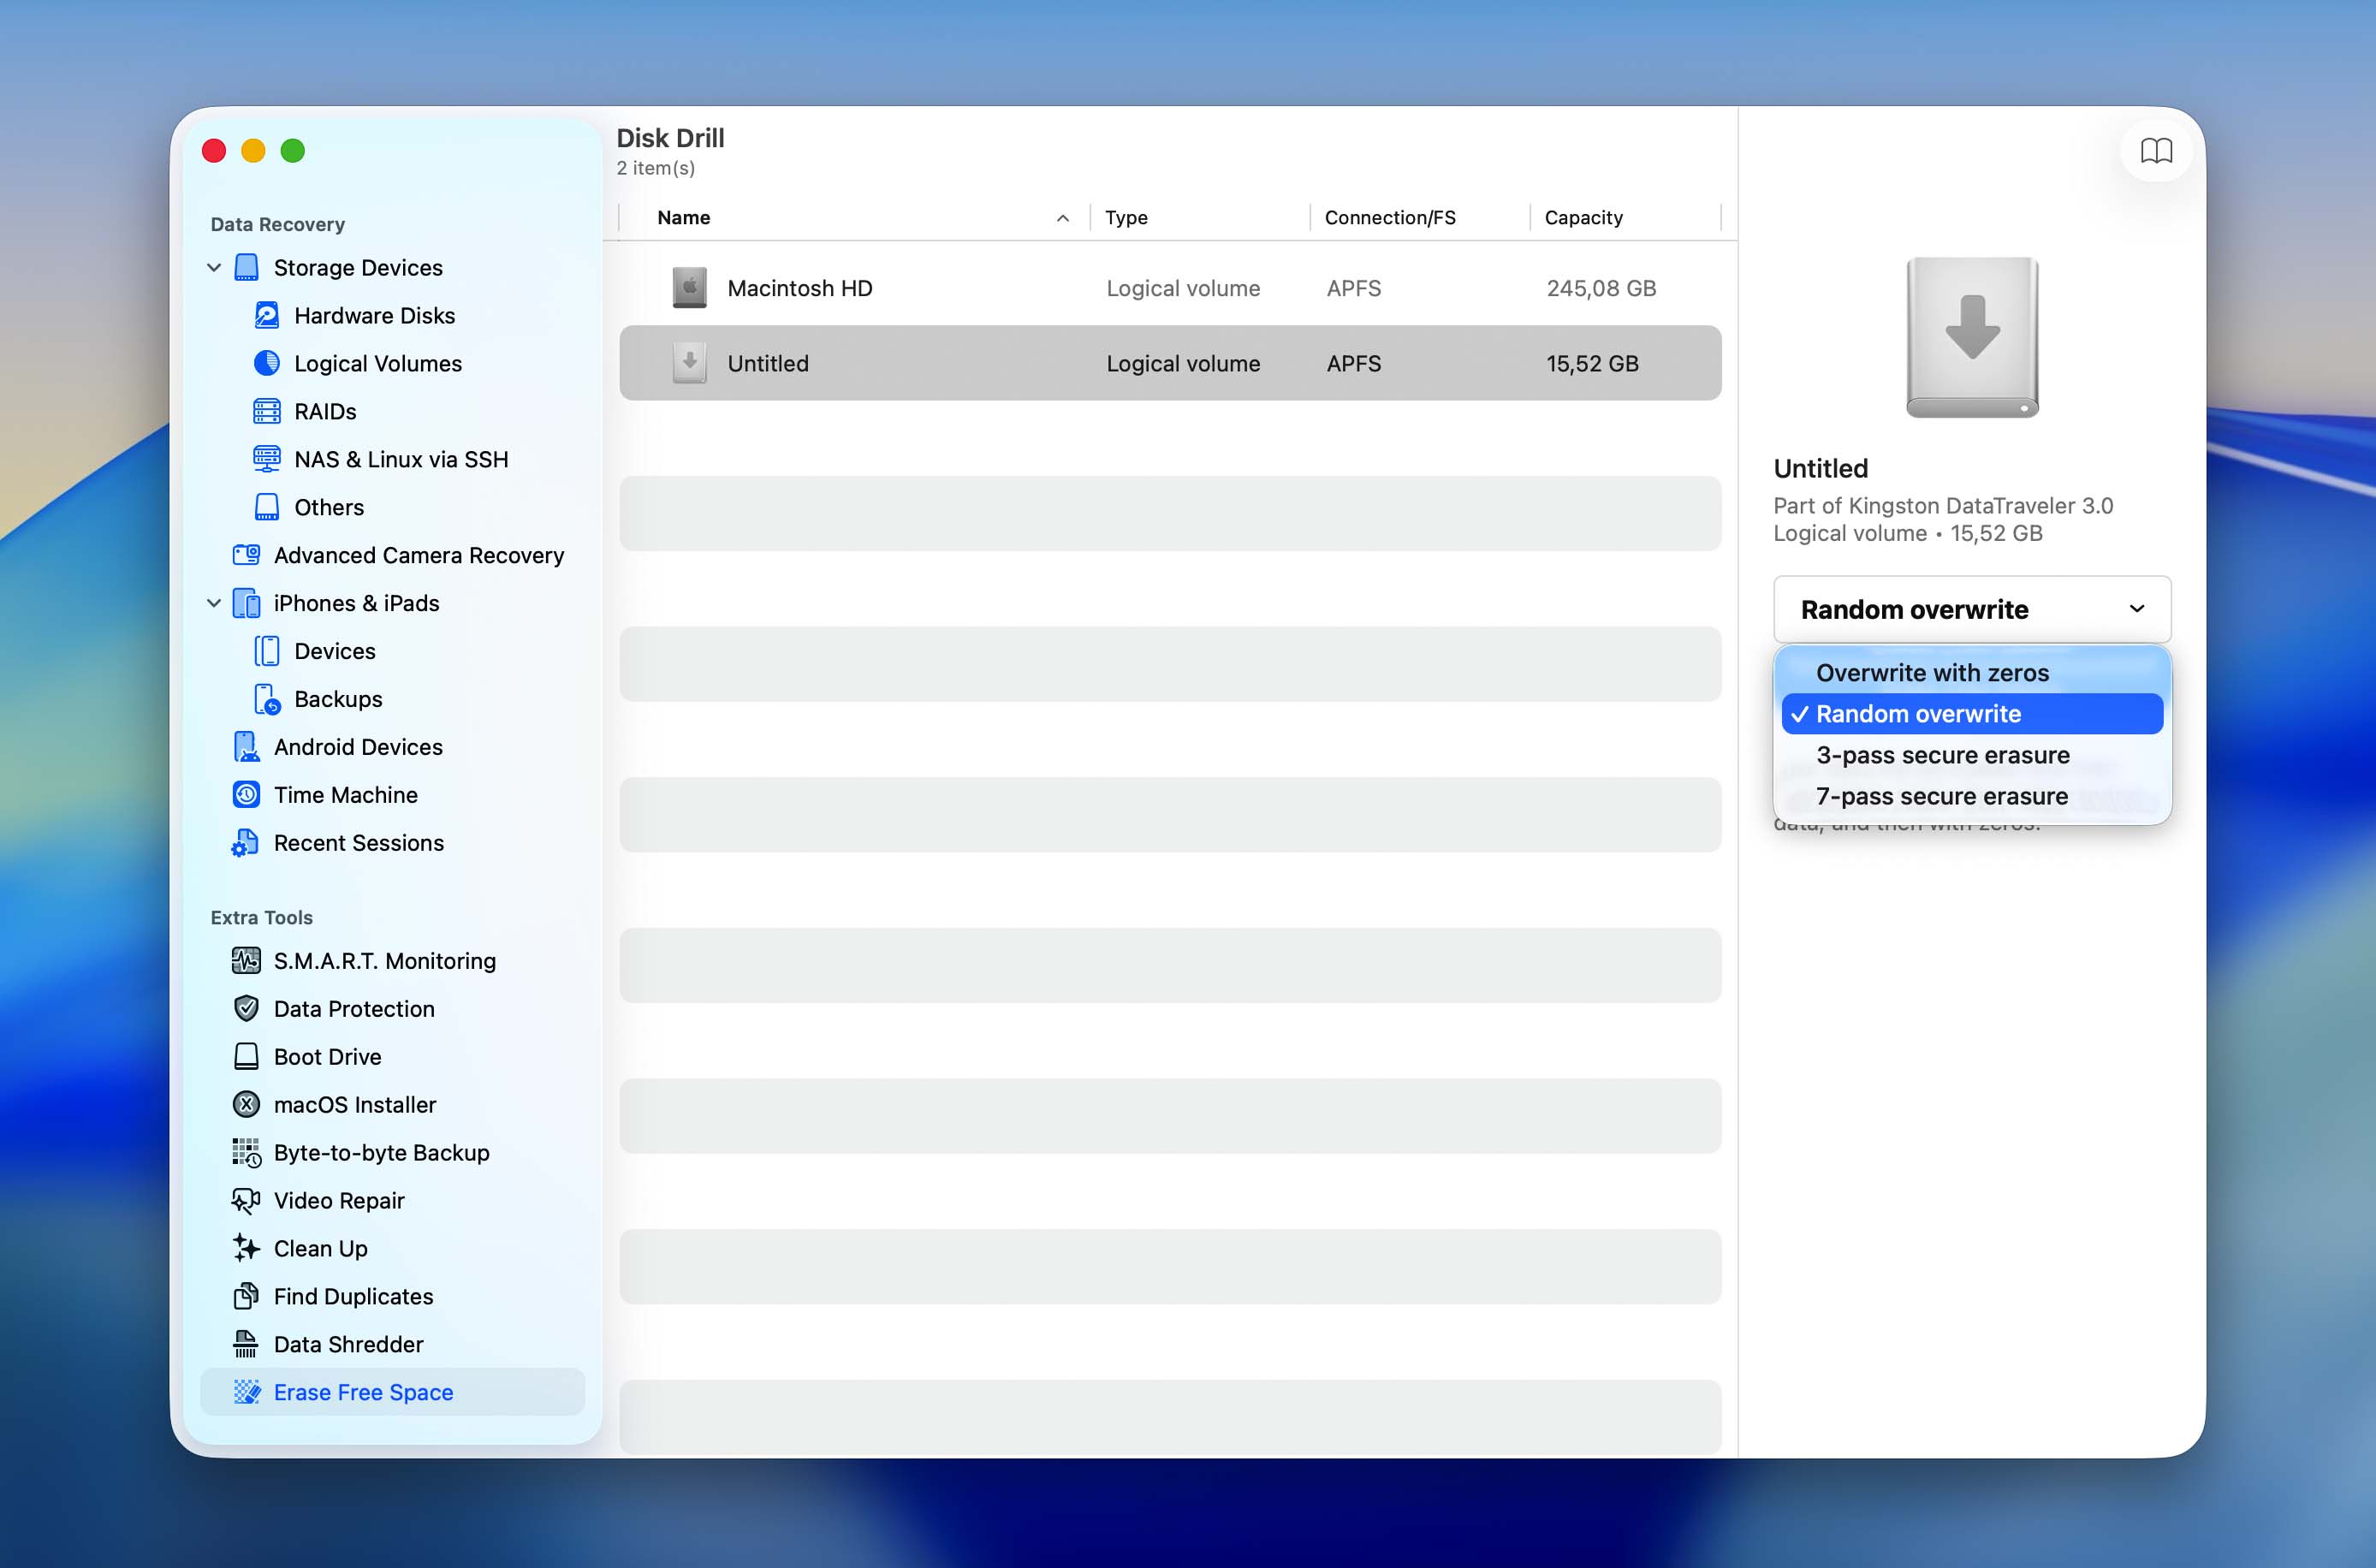
Available space on your storage devices is rarely as empty as it seems to be. Instead, it’s usually full of files that are waiting to be overwritten. Until that happens, they can be recovered using any data recovery tool. If you don’t want that to happen, you can erase free space on your hard drive using Disk Drill for Mac and overwrite it up to 7 times.
Conclusion
Overall, Disk Drill is one of the best data recovery software solutions for Mac that we’ve tested, considering its price and feature set. It feels complete; it has all the core features and additional modules that are usually only present in recovery software as bits and pieces. The app is also well-designed and manages to pack in so many features without feeling cluttered, unlike the majority of the apps in its category. Most importantly, Disk Drill actually performs well, even on damaged drives.
We also appreciate that CleverFiles now offers multiple licensing options, including both monthly and lifetime plans. This makes Disk Drill accessible to users who only need it for a one-time recovery job as well as those who prefer a permanent license. Combined with its broad feature set and regular updates, Disk Drill remains one of the stronger offerings in its category. Finally, CleverFiles has been consistent in updating Disk Drill and focuses on a very small set of high-quality products, which makes us even more optimistic about its future.
FAQ
Until the storage space occupied by a deleted file is overwritten by a new file, the original file is still physically present on the storage device and recoverable with a data recovery application like Disk Drill.
Just be aware that it’s not safe to attempt Disk Drill recovery on a storage device that’s already PHYSICALLY failing. We’re talking about hard drives that are making strange sounds, USB flash drive with broken connectors, and memory cards that are falling apart. Such storage devices may stop working at any moment regardless of if you attempt to recover data from them or not.
Disk Drill Pro licenses can be purchased directly from the CleverFiles website using the Buy button. Users can choose between a monthly subscription or a lifetime license, depending on their needs. Enterprise licensing is handled individually through the Request a Quote form on the CleverFiles website.
As soon as your Disk Drill PRO or Enterprise order is processed, you’ll receive an email with an activation code, and all you need to do is download Disk Drill Basic and unlock it with the received code. All premium features will be instantly unlocked, so you can start recovering your data right away.
For most home users, the Pro license is the right choice because it includes all core recovery features. If you only need Disk Drill for a one-time recovery job, a monthly license may be sufficient. If you expect to use the software again in the future, a lifetime license may provide better long-term value. Enterprise licensing is intended for businesses, government agencies, educational institutions, and other organizations that require commercial use rights or larger-scale deployment.