
From accidental deletion to virus attacks, Seagate hard drives are prone to data loss-causing damage. When you can’t find any of your files or can’t even access your drive at all, what are you supposed to do? Stop using your drive right now and keep reading.
This short and sweet article is all about Seagate file recovery, possible causes of data loss, and what options you have depending on your specific case. By the end, you should have a clear idea of your next step.
Table of Contents
How to Recover Files From a Seagate Hard Drive
In this section, we’ll demonstrate the only 4 reliable and proven methods to recover files from a Seagate hard drive. If you’re unable to restore data from your drive using one of the methods in this guide, your files are likely permanently lost.
Method 1: Restore Your Data From a Backup
Check your Mac for any backup tools! Maybe you or another user setup backup software at an earlier point in time. While unlikely, it’s possible that it may have preserved your Seagate drive’s data somehow.
For example, Dropbox Backup can be set up to automatically save any new files it detects from a newly connected external storage device. Saves files are uploaded to Dropbox’s cloud server, where you can easily download your files using a browser.
Step 1. Open any browser and log in to Dropbox.com.
Step 2. Make sure the sidebar is fully expanded by maximizing your browser window or clicking the hamburger menu. Then, click the More button and select Backup.
Step 3. In the tab that was just opened, mark the boxes beside the files and folders you want to download. Then, click the Download button.
Method 2: Use Seagate Hard Drive Recovery Software
If you don’t have any backups of your Seagate drive’s data, you can try using data recovery software. Data recovery software is a tool you can install on your Mac to scan your Seagate hard drive for missing files.
To demonstrate this method, we’ll be using a tool called Disk Drill. We chose it because it’s easy to use even for our readers without much technical knowledge, but it’s still very powerful. It supports almost all known file system formats and mainstream file signatures from different file types (such as documents, videos, images, etc.). It’s a great choice for recovering general-purpose storage devices like external hard drives.
While you need to purchase a license to actually recover any data, the free version of Disk Drill lets you scan and preview your files as much as you want. This is a great way to find out if your files are recoverable without paying a cent.
Step 1. Download and install Disk Drill on your Mac.
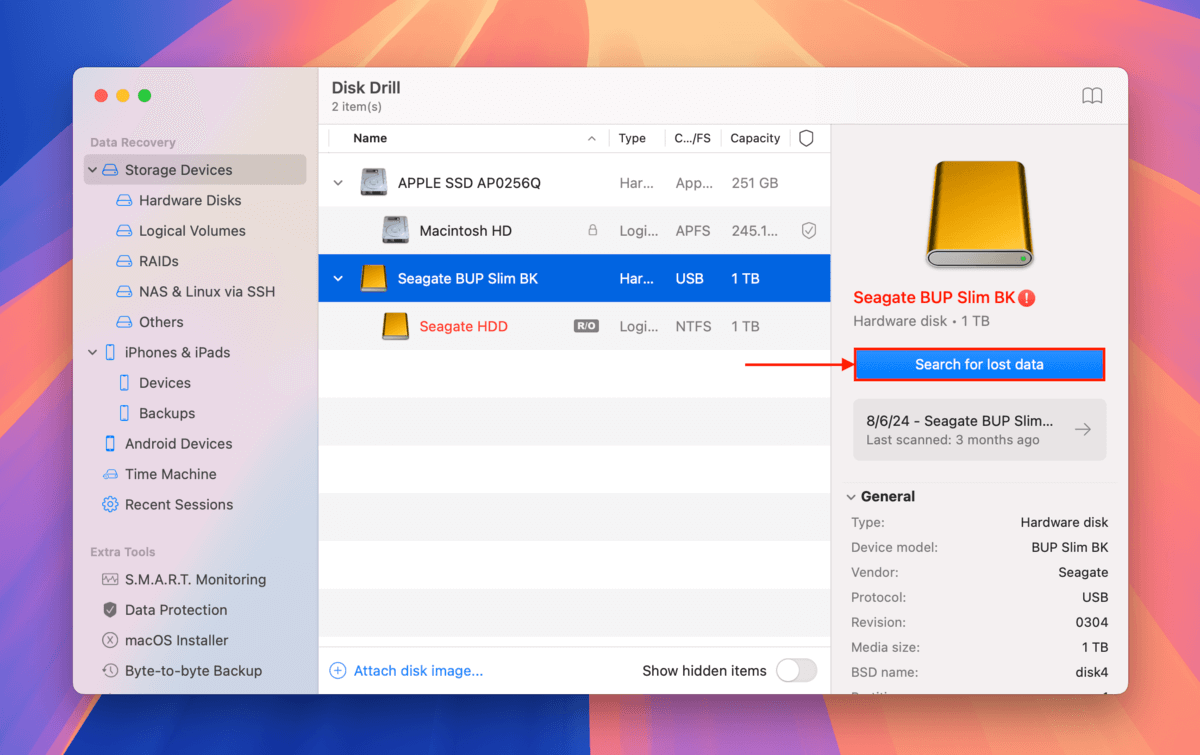
Step 2. Open Disk Drill (Finder > Applications). In the disk selection menu, click your Seagate hard drive and click Search for lost data.
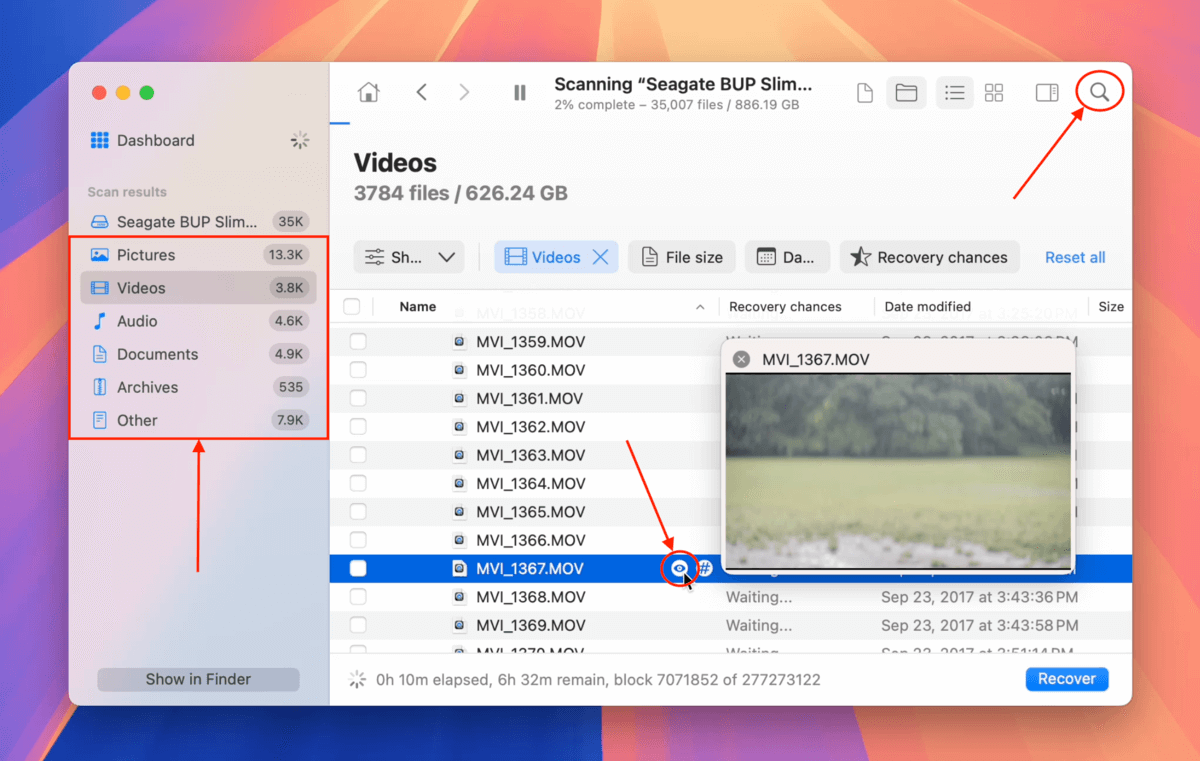
Step 3. Once Disk Drill is done scanning your drive, click Review found items. Use the filters in the left sidebar as well as the search tool in the top-right corner of the window if you only want to recover certain files or file types. You can also preview files to make sure they work and are recoverable — to preview a file, hover your mouse pointer beside it and click the eye button that appears.
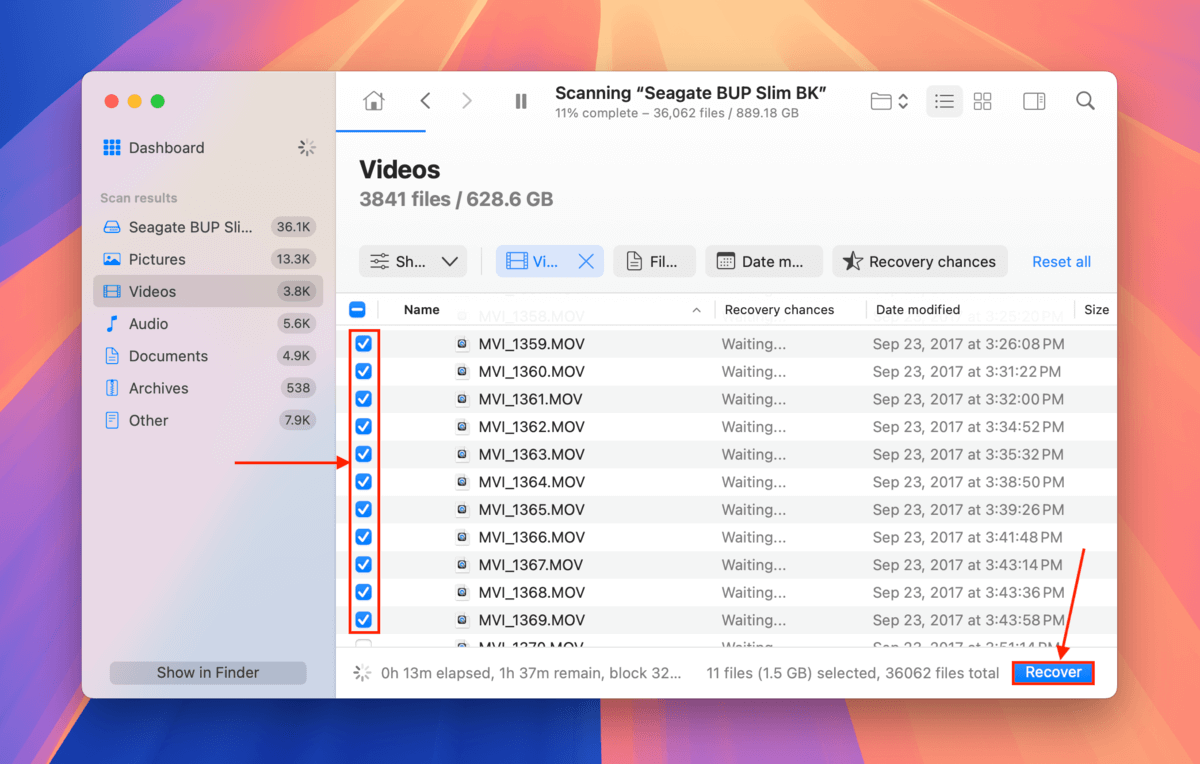
Step 4. Mark the boxes beside the files you want to restore, then click Recover. Alternatively, if you want to restore all files stored on your Seagate drive, leave all boxes blank and click Recover All.
Step 5. Choose a location on your Mac where you want Disk Drill to save the recovered files. Finally, click Next.
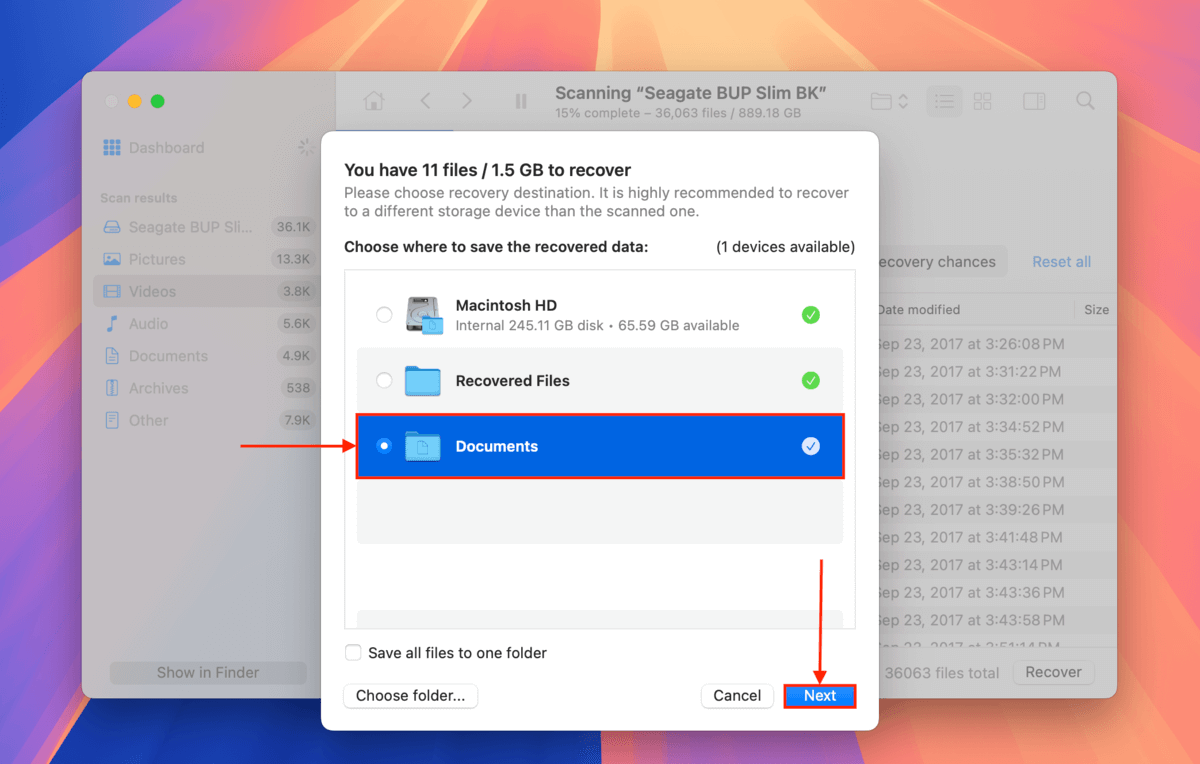
Once Disk Drill is done with the recovery process, you’ll find your restored files in the location you chose in step 5.
Method 3: Utilize Seagate Rescue Data Recovery Services
Rescue Data Recovery Services is Seagate’s own professional data recovery lab. You’re eligible for one in-lab recovery attempt if your drive is one of the following devices (and it’s still under warranty):
- Ultra Touch
- One Touch
- Expansion
- Backup Plus
- Photo Drive
You can also check your specific device’s eligibility on their Warranty and Replacements page. If your drive isn’t eligible, see the next method for a similar alternative.
If your drive is eligible, you can give Seagate customer service a call. They will give you a prepaid shipping label and detailed instructions for the transport of your Seagate hard drive. Once they receive your drive, you’ll have to wait for up to 30 business days to get your data back (if they succeed).
Don’t worry — you’ll get email updates throughout the process. You can also check the aforementioned services centers support page to check the status of your data recovery case.
Method 4: Send Your Drive to a Third-Party Data Recovery Service
If you’re not eligible for Seagate’s Rescue Data Recovery Services, there are other professional data recovery services you can choose from by searching online.
If this is your first time acquiring this type of service, here are a few things to look out for:
- No Data – No Charge. Recovery services that offer a “no data – no charge guarantee” will not charge you a recovery free if they fail to restore the data you specifically asked for. Note that you will still be charged for return shipping.
- Free estimates. Some services will provide a free estimate over the phone or in their lab (again, you may still be charged for shipping). At this stage, make sure to clarify how large the potential gap would be between their estimates and the final quotation.
- Shipping discounts. Discounted or even free inbound shipping is a common offering from known data recovery services. Return shipping is usually NOT free, so make sure you select a service location wisely.
- Up-to-date customer reviews. When choosing a data recovery service, make sure to check their recent reviews on reliable platforms like Trustpilot and Google Reviews. Don’t forget to select the appropriate location when checking reviews.
How to Increase Chances of Successful Data Recovery
While data recovery never has a 100% certainty, there are certain best practices we can do to increase our success rate. Here are a few to keep in mind:
- Stop using your drive. The more you use a problematic drive, the worse it gets. Continuous operation may also cause overwriting.
- Create a backup image of your drive. This way, you can interact with the data on it without actually using the drive itself.
- Don’t defrag your drive. Defragging or “defragmenting” reorganizes data in the file system, which may overwrite your deleted files.
- Save recovered files to a different location. Saving files back to your drive during the recovery process will overwrite the existing files – even those in the recovery queue.
- Make sure to install data recovery software in a local directly – NOT on the problematic drive. This installation may overwrite existing data.
How to Avoid Data Loss on Your Seagate Hard Drive
While all storage devices have a finite lifespan and you can’t really guarantee when yours will fail, there are a few simple ways to prolong your Seagate hard drive’s overall health and performance and protect you from data loss:
- Accidental deletion or formatting. Aside from human errors, certain apps or even system processes may cause file deletion if you’re not careful. For example, macOS itself may ask you if you want to format your drive if it senses any corruption. Make sure to read app and system-generated popups carefully before clicking!
- Download files from trusted sources. Only download files and attachments from known websites, repositories, and email addresses. Viruses are often transmitted under the guise of innocent files – a single file can infect your drive and even your entire Mac.
- Always safely eject your drive. The “safely eject” feature triggers a shutdown process that ensures that all reading and writing processes (such as copying files) are properly concluded. If you don’t allow your drive to go through this process, any data that was being written when you removed your device may have been corrupted.
- Always update your drivers. Make sure that the drivers for your Seagate hard drive AND for your Mac system are always up-to-date to avoid corruption due to incompatibility. For macOS, simply install the updates that appear in System Settings > General > Software Update. For your drive, you can check out the available apps, utilities, plugins, and firmware on Seagate’s download page.
- Keep your drive safe. External hard disk drives specifically are prone to physical damage because of their spinning disks. Make sure it doesn’t get dropped, squished, or placed in an environment with extreme temperatures.
- Use disk monitoring software. Disk monitoring software is a type of tool that was designed to identify and monitor “health indicators” (e.g. wear leveling) on your drive and alert you when those indicators cross a certain threshold. You can learn more about disk monitoring software in our article on how to check drive health on macOS.
- Make backups! Even if you follow all the tips on this list, you can never be completely safe from data loss. Accidents happen, the power can go out, and all storage devices have a definite lifecycle. Try to keep at least 3 backups of your drive using tools like SuperDuper! and Carbon Copy Cloner.
What if your drive doesn’t even show up on your Mac?
In some cases of corruption or incompatibility (or simple mechanical wear and tear), your Mac wouldn’t even be able to detect and recognize your Seagate drive. Without professional help, you can’t recover data from your drive unless it shows up in Disk Utility at least.
You can check out our other guide, where we show you 7 ways to fix an external hard drive that isn’t showing up on your Mac. We’ll also help you diagnose your drive so you know why it happened in the first place and provide useful tips about properly using an external hard drive that the average user may not know.


