
I’ve recently connected an external hard drive to my Mac and was surprised when it didn’t show up and I couldn’t access my files. Fortunately, I was able to solve the problem using a simple solution. To help others with the same problem, I’ve put together this guide, which explains multiple fixes to get your external hard drive showing up on your Mac again.
Table of Contents
How to Find an External Hard Drive on Mac
Normally, when you connect an external hard drive to your Mac, the drive should show up in the following locations:
- On your desktop
- In the Locations section of the Finder sidebar
- In the Disk Utility app
- In the System Report app (Settings -> General -> About -> System Report)
To access the files and folders stored on the drive, you can click the desktop icon or select the drive in Finder. If that’s not possible because the drive isn’t visible in these locations, then you have a problem, but the problem isn’t necessarily serious.
The severity of the issue depends on whether the drive appears in Disk Utility and System Report. If you can see it in these two apps, then your Mac can at least communicate with the drive, which gives you a much better chance of being able to access your data again.
Reasons Why External Hard Drives Aren’t Showing Up on Mac
When your Mac plays hard to get with your external hard drive, various reasons could be behind this seemingly unpredictable behavior. So let’s pull back the curtain and shine a light on what’s really going on:
| Reason | Description |
| 🔌 Connection problems | A broken cable or a faulty connector can make it impossible for your Mac to establish a stable connection to your external drive. That’s why you should always start by checking the connection and fixing it if necessary. |
| ⚙️ System settings | Some system settings in macOS can make it difficult to access an external hard drive because they hide it in Finder and/or your desktop. The good news is that they are easy to modify. |
| 📱 File system incompatibility | Certain file systems aren’t natively supported by macOS. For example, EXT4 drives can’t be read or written unless you install additional file system drivers. |
| 💿 Bad sectors | If your external hard drive has bad sectors or file corruption issues, the problem could be enough to cause macOS to be unable to see it. In this case, you can use the First Aid tool to fix the corruption. |
| ⚡️ Insufficient power | Some external drives require more power than a USB port can provide. This can lead to the drive not spinning up and those not being recognized by your Mac. The solution is to provide external power via a powered USB hub. |
| 🔐 Drive encryption | A drive with hardware-level encryption will not be usable unless decrypted first. The same goes for non-native encryption software solutions, such as VeraCrypt. If decryption isn’t possible because you don’t know the password, then formatting is the only solution how to make the drive usable again. |
| 🔝 Drive damage | Your external hard drive is relatively fragile (even special durable drives can’t withstand much abuse), and a single drop on the floor or encounter with water can render it useless. Professionals can sometimes fix physical damage, but the results are never guaranteed. |
Of course, the list above doesn’t include every possible cause of external hard drive detection issues because then it would be longer than the rest of the article. Even if your exact cause isn’t listed, the solution described in the next section of the article can fix the problem and help you restore access to your drive.
7 Ways to Solve External Hard Drive Detection Issues
If your external hard drive doesn’t mount on Mac operating systems, several potential fixes can get you up and running once again.
This guide takes you through the most common problems users face to the rarest issues that cause Mac not to read external hard drive connections.
Method 1:Check the Connection
If you plugged the external hard drive into your computer’s port and it isn’t showing, it could be the cable or the connection. You’ll want to review these steps to determine if these issues are present when Mac isn’t reading an external hard drive.
- Check to see if you have a secure connection.
- Review the connector for damage.
- Inspect the cable to see if it has wires exposed or fraying components.
- Check to see if you have power going to the cable.
- Try a different cable to see if the problem continues.
- If you have another Mac, try plugging the external drive into that one to see if it works.
- Check the formatting of your external drive.
- Determine if you’re using the right USB connection.
If you have a Windows® PC at home, try plugging your external hard drive into it to see if it works. Should that result be successful, you know that a formatting issue requires correction.
You can allow macOS to correct this situation for you if the external hard drive is new. If you have files on it, send the information to a different location since reformatting the drive usually causes data loss.
Method 2:Edit Your Finder Settings
Whenever an external hard drive is correctly detected by Disk Utility but not accessible via Finder, it makes sense to check if Finder is actually configured to display it on the desktop and in its sidebar. Here’s how:
- Open a Finder window.
- Click on Finder at the menu bar at your screen’s top.
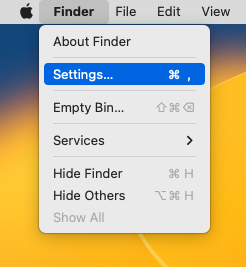
- Select “Settings“, and then choose “General” from the window that appears.
- Review the items that have permission to show on your desktop.
- If “External Disks” isn’t checked, click on the open box to reverse it.
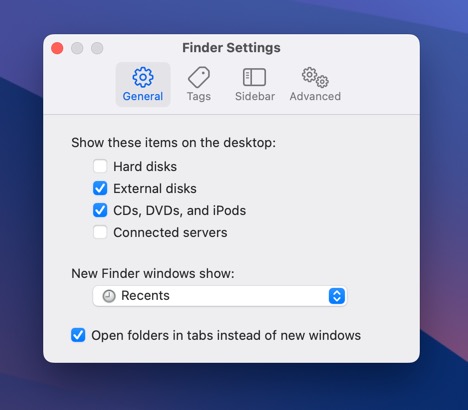
- Then navigate to the “Sidebar” tab and check if “External Disks” is checked under Locations. If not, click on the checkbox.
You should now be able to access your external hard drive without any issues.
Method 3:Install File System Drivers
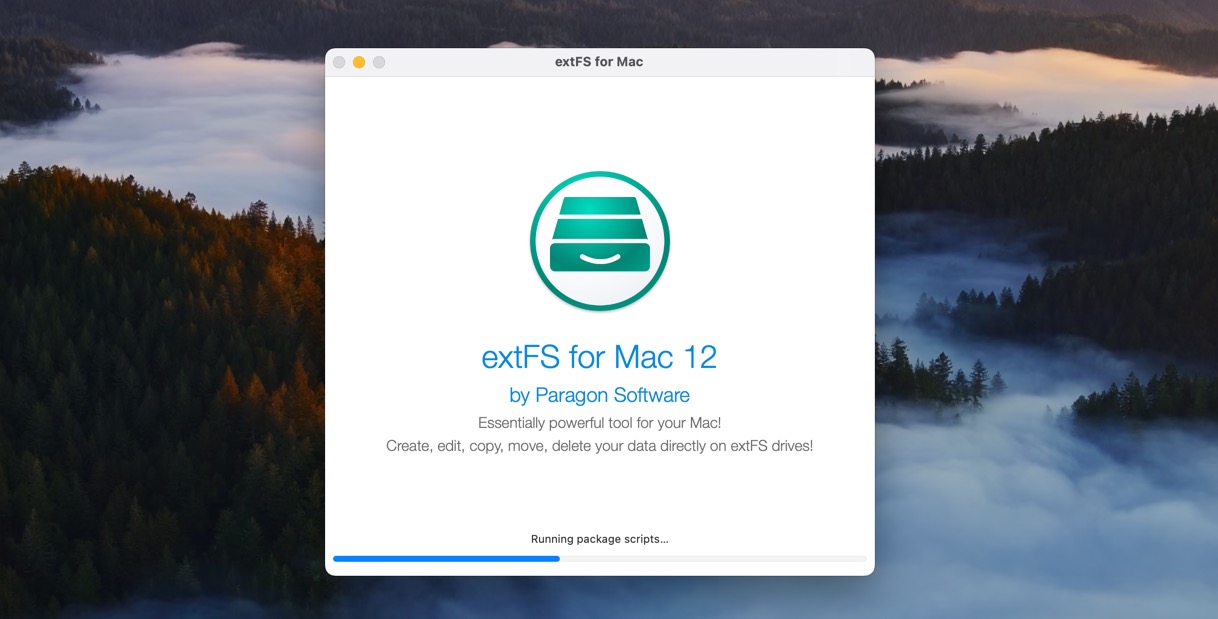
External hard drives formatted in Windows often use the NTFS file system, which macOS can read but not write to by default. The situation is even worse with drives formatted in Linux because they sometimes use the EXT4 file system, which can’t be read by macOS at all.
Fortunately, there are third-party file system drivers that you can install in macOS to add support for these file systems.
- NTFS: We recommend you install Mounty for NTFS, an excellent free solution that’s lightweight, actively developed, and easy to install. Alternatively, you can go with Paragon Software’s Microsoft NTFS for Mac, which is a commercial product that does the same thing as Mounty.
- EXT4: The best free solution for adding support for the EXT4 file system is ext4fuse, but it only lets you read EXT4-formatted drives—not write data to them. If you need write support, then extFS for Mac by Paragon Software is your best bet.
With the proper file system drivers installed, you should be able to read (and possibly write) even external hard drives that use file systems that are not natively supported by macOS.
Method 4:Use First Aid on the External Hard Drive
The First Aid tool helps more than your computer’s internal drive. It can also see the hard drive on Mac connections from external sources.
If you aren’t getting a proper mount with your external HDD or SSD storage, activate First Aid to see if it can help.
- Navigate to your System Settings through the Apple menu screen.
- Select the Disk Utility option.
- Highlight the external hard drive and choose “First Aid“.
- You’ll get asked if you want to run it on the media. Click the “Run” button.
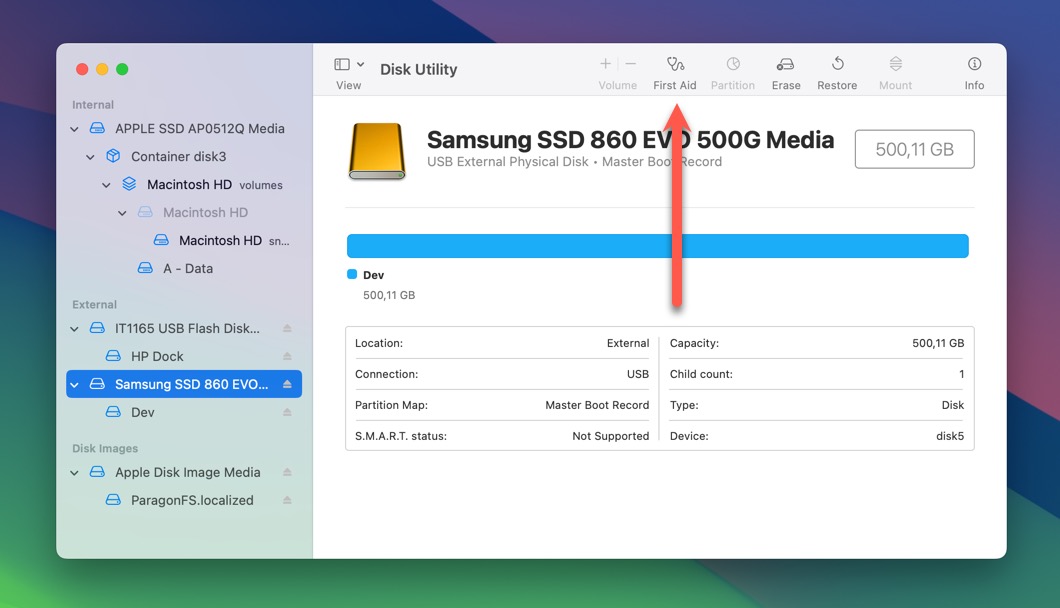
You can also try to force the connection to your Mac by selecting your external hard drive in Disk Utility and clicking the “Mount” option (located in the same toolbar as the “First Aid” option).
Method 5:Connect the Drive to a Powered Hub
Some external hard drives require more power than a single USB port on your Mac can provide. Without sufficient power supplied to such drives, you may experience issues with connection stability and drive detection. The solution is straightforward: you need to purchase a powered USB hub.
Many powered USB hubs are available, and they can cost you as little as $10 or as much as $100, depending on which one you choose. We recommend you go with a reputable brand like TP-Link or Anker instead of some no-name brand. I personally use the TP-Link UH720 (see the picture above) and can highly recommend it.
Once you have a powered USB hub ready, you can simply plug it into a power outlet and then connect it to your Mac. You can then plug our external hard drive into one of the ports on the powered hub, and your Mac should recognize it.
Method 6:Reformat Your Drive
Reformatting completely wipes the drive and recreates the file system, so it can help when dealing with corruption or messy permissions. It can also save the day if your drive is encrypted, either through hardware-level encryption or software solutions like VeraCrypt, and you don’t know the password. In such cases, reformatting becomes the only option to make the drive usable again.
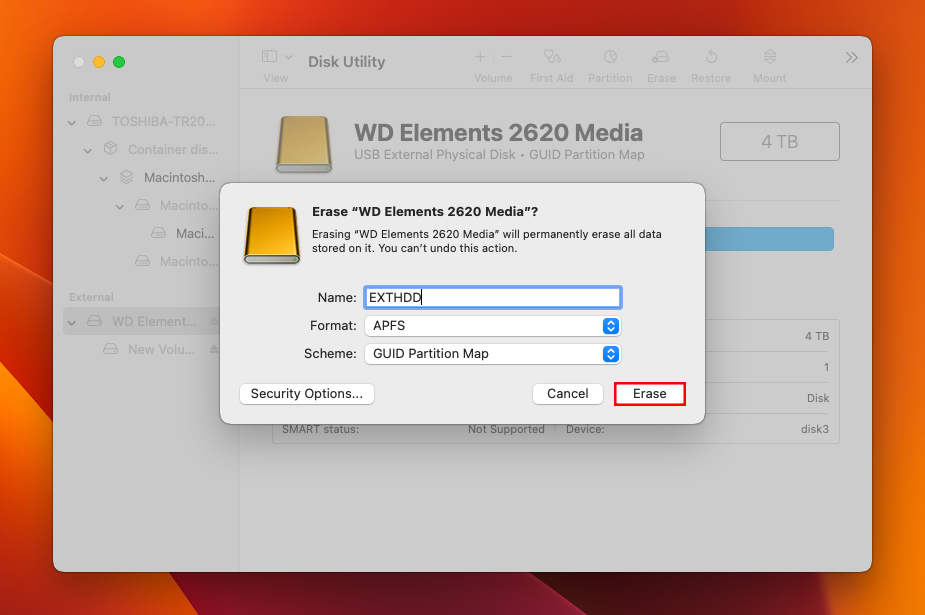
To format a drive in macOS, you need to:
- Launch Disk Utility. You can find it in the Utilities folder within Applications.
- Once Disk Utility is open, you’ll see a list of drives on the left. Find your external hard drive in this list and select it.
- With the drive selected, click the “Erase” button at the top of the Disk Utility window.

- Now, you’ll see some options for formatting your drive. For the “Format” option, choose APFS (Apple File System) if your drive will only be used with Macs running macOS High Sierra or later. If you need it to work with Windows PCs, choose ExFAT instead.
- You can also rename your drive in the “Name” field. This is optional but can help you identify the drive later.
- Once you’re ready, click on “Erase” at the bottom. Disk Utility will now reformat your drive, making it fresh and readable by your Mac.
If you’ve formatted a drive that hasn’t been encrypted, you might be able to recover the data that was stored on it even after formatting. This is because formatting typically only removes the file system structure, not the actual data itself. The next section of this article explains how.
Method 7:Send the Drive to Professionals for Repair
When dealing with a potentially physically damaged drive, it’s best to use professional data recovery services with tools, expertise, and clean room environments necessary to safely open and repair damaged drives.
Professional data recovery services can be expensive, but the value of your data may easily justify the cost. After all, what’s a few hundred dollars compared to irreplaceable family photos, crucial business documents, or years of creative work?
Just keep in mind that while professionals can sometimes work miracles, the success of data recovery is never guaranteed, especially in cases of severe physical damage.
What to Do If You Lost Data from Your Hard Drive
We hope that one of the methods above has helped you restore access to your external hard drive. But what if the drive that’s now showing up as it should is missing some data (or all data if you had to format it)? That’s when data recovery software becomes necessary.
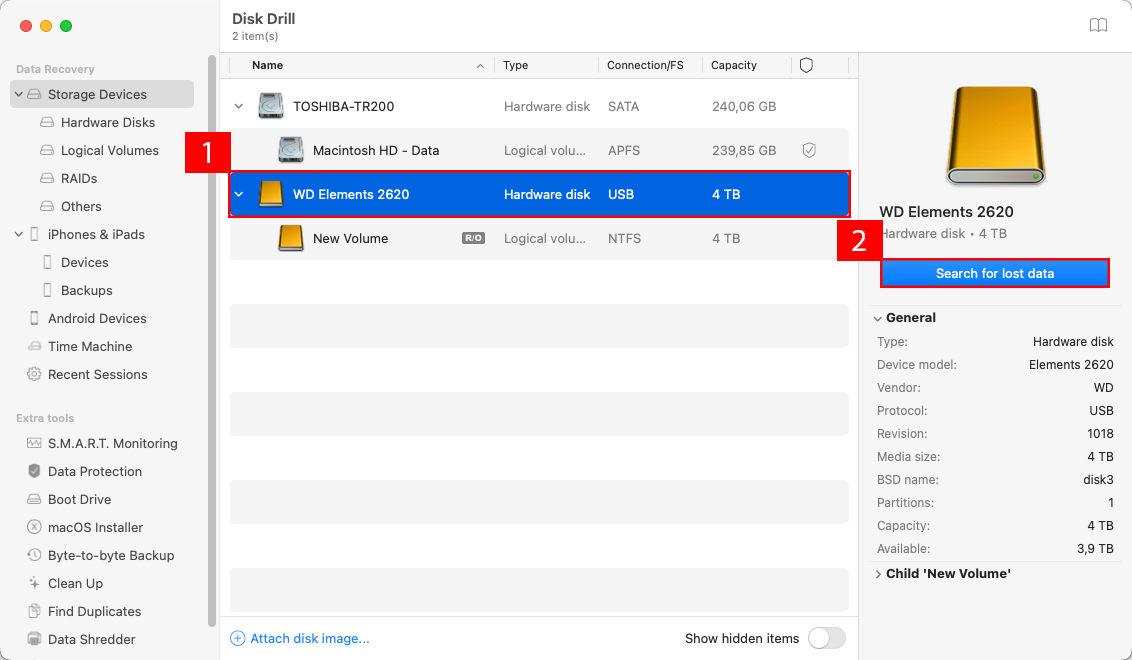
Tools like Disk Drill for Mac can recover lost data that is still physically present on the external hard drive (it hasn’t been overwritten by new data). We mention Disk Drill specifically because it offers an intuitive interface that makes data recovery accessible to users of all skill levels, supports all file systems commonly found on external hard drives, and can recognize around 400 files based on their signatures.
Follow these steps to recover lost data from your external hard drive with Disk Drill:
- Download and install the Mac version of Disk Drill on your computer.
- Choose the external hard drive you want the tool to analyze and click the “Search for lost data” button to initiate the process.
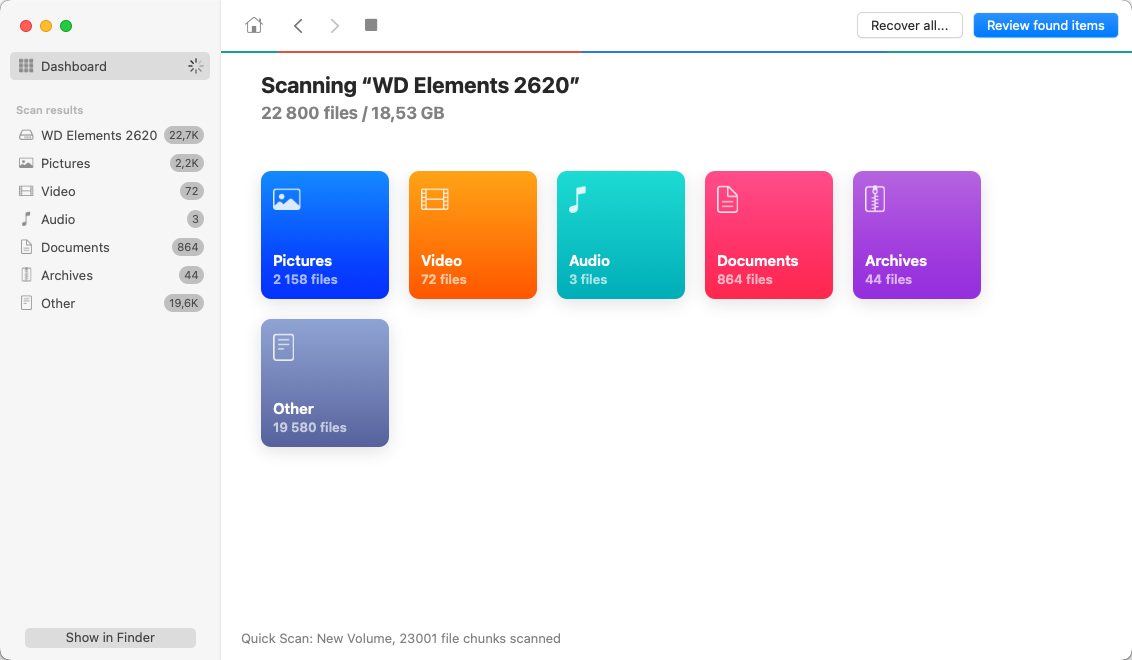
- The software will scan your external hard drive. The process may take a while depending on the size and speed of your external hard drive, but you don’t have to wait until it finishes to see the results. You can click the Review found items button to see recoverable files with scanning continuing in the background.
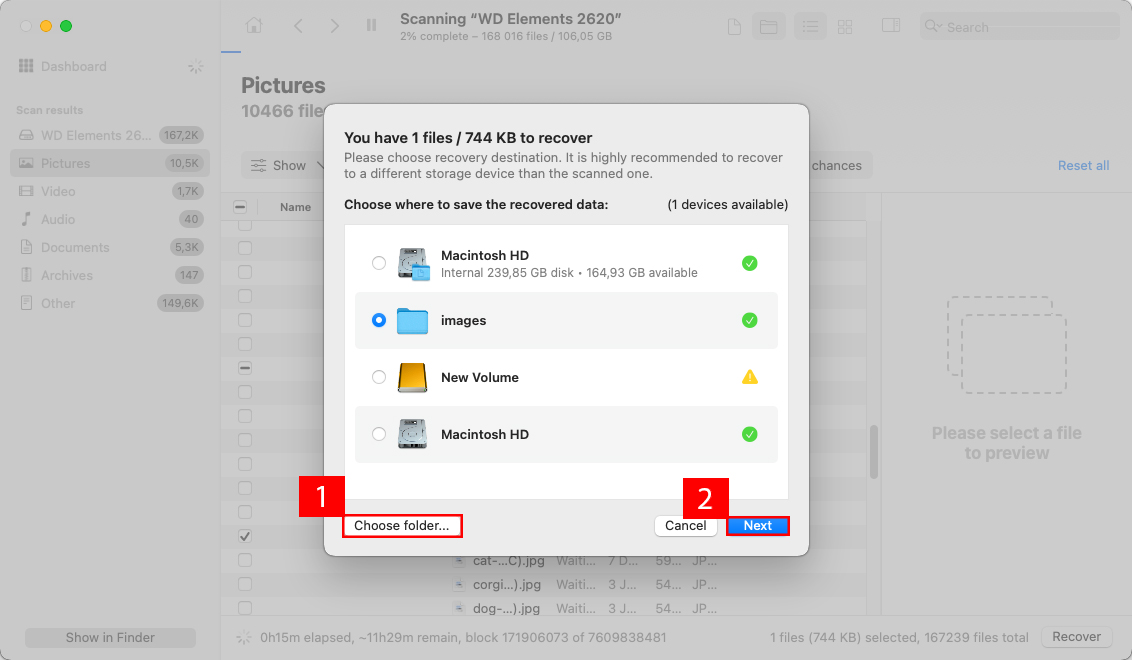
- Next, you need to select all missing files. Disk Drill’s preview feature and file type filters can help you quickly find all important data. Once that’s done, you can click “Recover“.
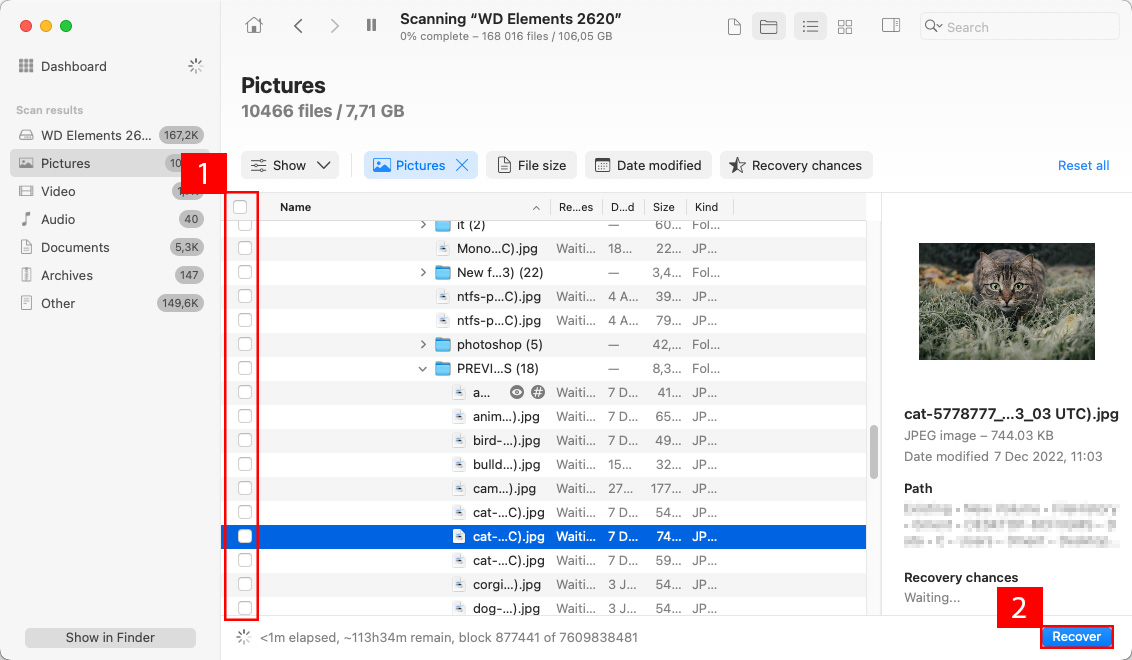
- Finally, specify the recovery location (you should never save recovered files to the same external drive safely) to keep your data safe and click “Next“.
You can also use Disk Drill to back up your Mac drives, clean up unneeded files, and enable data protection. It is a comprehensive solution that helps you manage file storage in numerous ways.
How to Use an External Hard Drive on a Mac Properly
It helps to connect and disconnect your external hard drive properly to maintain its health. When you unplug it from the port without using the ejection process, the risk of bad sector development rises with each incident.
This problem isn’t always a user-related issue. If you operate an iMac with external storage and the power goes out, the instant shutdown could cause this problem.
That’s why knowing how to connect your external hard drive correctly can resolve many of these issues.
- Use the cable that came with your external hard drive to connect it to your Mac. That includes the manufacturer’s FireWire or Thunderbolt cable.
- Check for the drive to appear on your desktop. If you don’t see it, open a Finder window to review the list shown in the left frame.
- Open the disk utility if you need to format the drive. This step is usually only necessary during the first connection to your Mac.
- If you still can’t show hard drive on Mac support, it may not have enough power. Some products require a separate connection. That means a dual-cable switch might be necessary.
- Restart your computer with the connection remaining if your external hard drive isn’t working on Mac. This action clears the cache and temporary files that could be preventing your access.
- Once you see it and know how to open an external hard drive on Mac, you can transfer files from your internal storage to this media.
When you purchase a Mac external hard drive, it’s likely formatted with the FAT32 file system. It comes that way because it has the most support across all operating systems.
This support is primarily for temporary storage, such as a USB flash drive. If you can’t mount an external hard drive on Mac, you likely need to take the reformatting step.
Before saving data to the drive, swap its format to Apple’s HFS+ instead to ensure optimal performance.
Conclusion
Troubleshooting a missing external hard drive on your Mac can be a headache, but it’s usually fixable. The fixes range from simple connection checks to total reformatting. If you’ve ruled out all other possibilities and the drive is still not cooperating, it’s likely that the hardware itself is faulty. This could be due to wear and tear, accidental drops, or manufacturing defects. At this point, consider professional repair or throwing the hard drive away. But remember: never ditch a hard drive without first ensuring any sensitive data is destroyed.
FAQ
NTFS, or New Technology File System, is a file system used by Windows. While Mac Ventura can read NTFS-formatted drives, it cannot write to them out of the box. This can create problems when you’re trying to save or modify files on an NTFS drive from a Mac. If you need to write to an NTFS drive, there are third-party software options available, such as Microsoft NTFS for Mac by Paragon Software.
If your external hard drive isn’t showing up on your Mac desktop, you can adjust your Finder preferences. Here’s how:
- Open Finder.
- Click on “Finder” in the menu bar and then select “Settings.”
- Navigate to the “General” tab.
- Click the checkbox next to the “External disks”option in the “Show these items on the desktop” area.
- Close the Settings window.
If your external hard drive isn’t showing up in Mac Disk Utility, there could be several reasons, including connection problems, file system incompatibility, and hardware damage, just to give some examples.


