
Is your MOV video corrupted and unplayable? It’s a common enough issue for this file format, so there are multiple ways to fix most instances of corruption. However, the majority of the guides we’ve found online are either messy or link you to expensive repair web apps.
Don’t bother reading them. In THIS guide, we’ll walk you step by step through the 4 most well-known and reliable methods to repair a MOV file on a Mac – for free!
Table of Contents
How Do MOV Files Get Corrupted?
The MOV file format is powerful, efficient, and produces high-quality playback. This makes MOV a likely choice for professionals and users who care about video quality (nature documentarians, sports journalists, bloggers, outdoorsmen, etvloggers, outdoorsmen, sports journalists, nature documentarians, etc.).
MOV files use a complex container structure, which is responsible for its compression capabilities and high-quality output. Unfortunately, its complexity also means that this video format is highly susceptible to corruption.
In general, it’s easy to corrupt a video when you’re not paying attention. So it’s important to know common scenarios that lead to this outcome so you can fix the underlying issues ASAP (and avoid them in the future).
- 📹 Interruption during recording. If your device was interrupted while you were recording a video, both the video itself and its file information (or “metadata”) may be incomplete, which prevents it from being partially or entirely playable. For example, your device ran out of battery or crashed in the middle of recording.
- 📥 Improper data transfer. Similar to the above point, read/write interruptions can cause gaps in the video data and its file information. For example, you didn’t properly eject your SD card reader from your Mac before connecting it.
- 💢 Physical damage to the device. Let’s say your drone crashed during a recording flight. There are two potential causes for corruption: (a) sudden interruption causes gaps in data and (b) the memory card itself may be damaged. In the case of scenario b, we recommend sending your SD card to a professional data recovery service to get your MOV file back. If it was recovered in a corrupted state, proceed with this guide. You’ll have to invest in a new memory card, though.
- ❌ Disk corruption. Your memory card’s disk might have been corrupted for its own set of reasons, such as transfer interruptions, software bugs, file system issues, and more. Data loss is a strong possibility. We strongly recommend that you follow our guide on how to recover data from a corrupted SD card. Once your data is secured, format your memory card (but buy a new one soon).
- 👾 Virus infection. Malware can affect entire disks, specific directories, or even individual files. For example, a virus can modify your memory card’s file system structure. It could potentially modify your MOV video’s file information and make it unplayable. We suggest running a deep scan of your drive with anti-malware tools like Malwarebytes or Avast before proceeding with the rest of this guide.
4 Free Methods to Repair Corrupted MOV Files on Mac
In this section, we’ll go over 4 different ways to fix a corrupted MOV file. Each method addresses video corruption in different ways, but it’s almost impossible for the average user to produce an exact diagnosis without studying the file data.
It’s likely that some users will have to use different methods until they find the right one. As such, we strongly recommend that you duplicate your MOV file multiple times and utilize the copies when attempting the methods below. Methods that don’t work might make the problem worse.
Method 1: Utilize Advanced Online MOV Repair Tools
The fastest and easiest way to repair a MOV file is to use online video repair tools. There are a few you can choose from, but we’ll be demonstrating this process using a web app called Clever Online Video Repair Tool. Aside from the fact that you can use it to repair MOV files online for free, we chose this tool for this guide because it’s one of the few repair apps that can fix MOV files with missing moov boxes.
Missing moov boxes are a super common reason for corruption because they are often written last during the recording process. In other words, if your recording was interrupted, the moov box likely wasn’t written at all, which makes MOV repair too difficult for simpler solutions.
To repair your .mov file with Clever Video Repair Tool:
Step 1. Open any browser and navigate to the repair.cleverfiles.com website.
Step 2. Click Choose file.
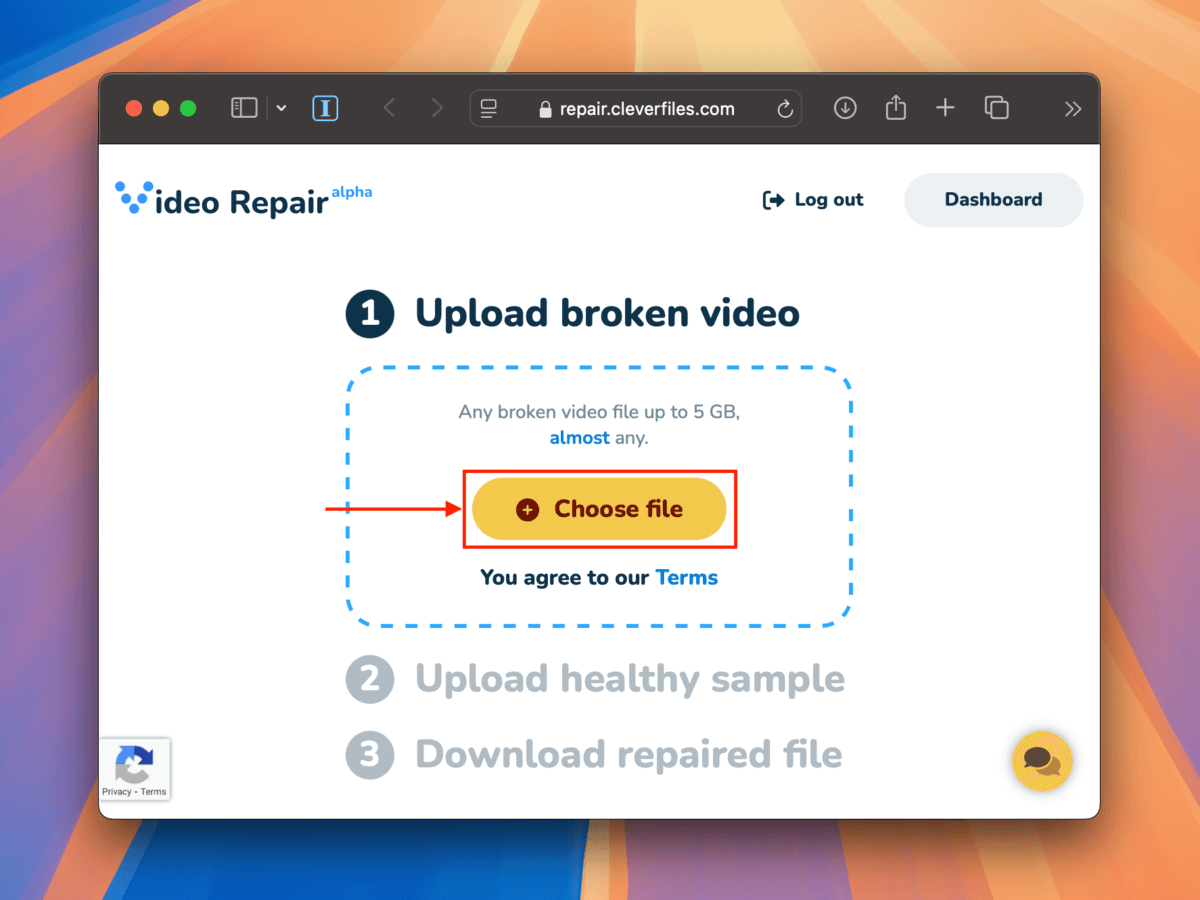
Step 3. In the window that appears, select and open your corrupted MOV file.

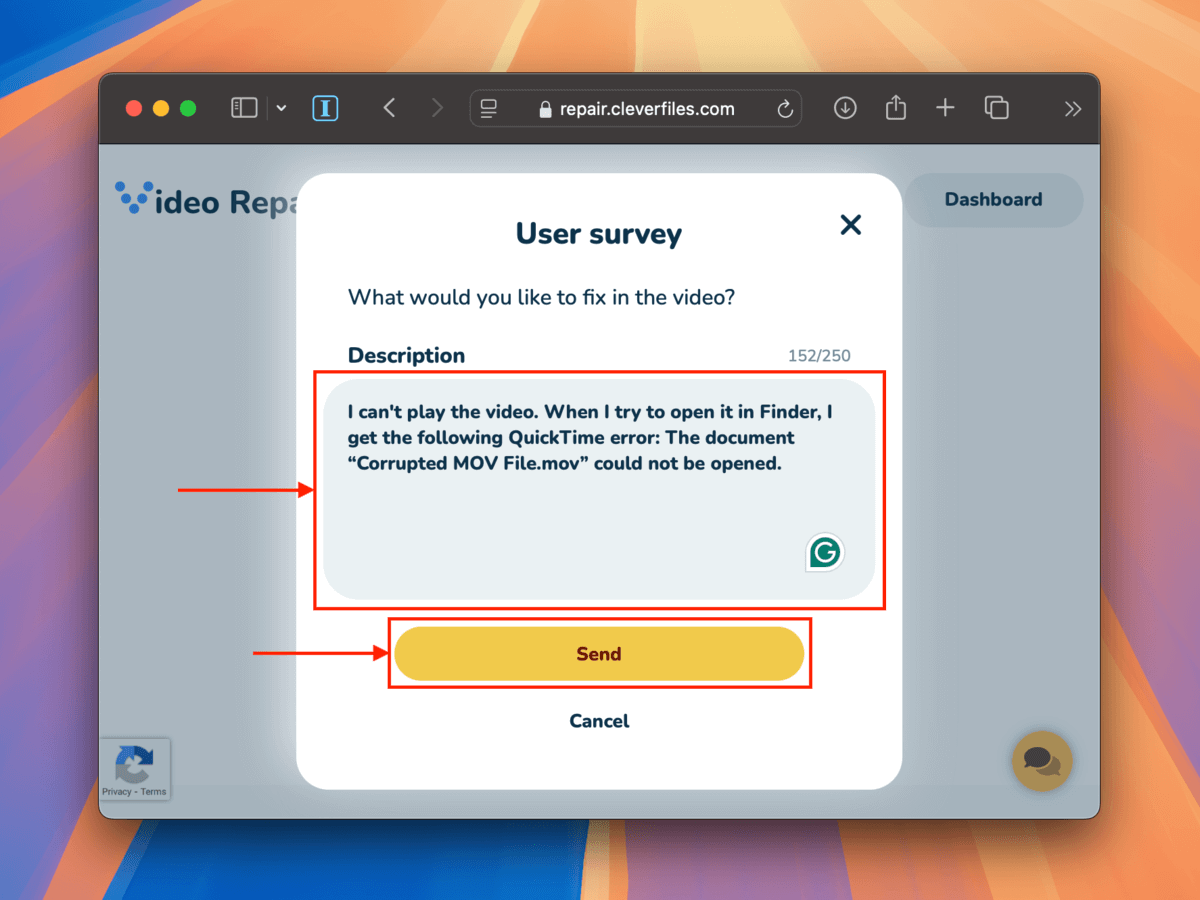
Step 4. If Clever Video Repair Tool is capable of repairing your file (incompatible files will not be accepted), you’ll be prompted with an optional survey. You don’t have to take it, but it’ll help the team improve their app.
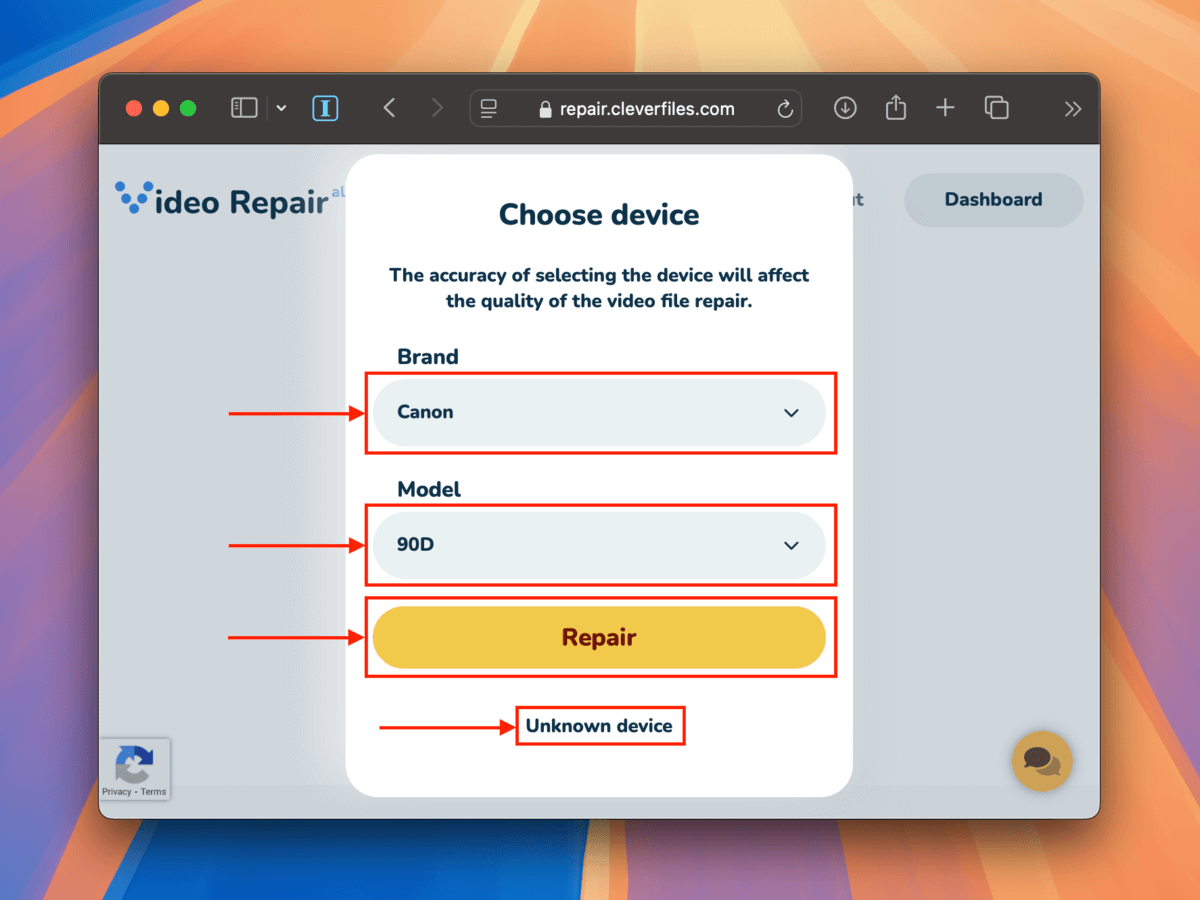
Step 5. You’ll also be prompted to select the device and model of the camera you used to capture the MOV file. Choosing will improve the repair process, but you can click Unknown device if you aren’t sure.
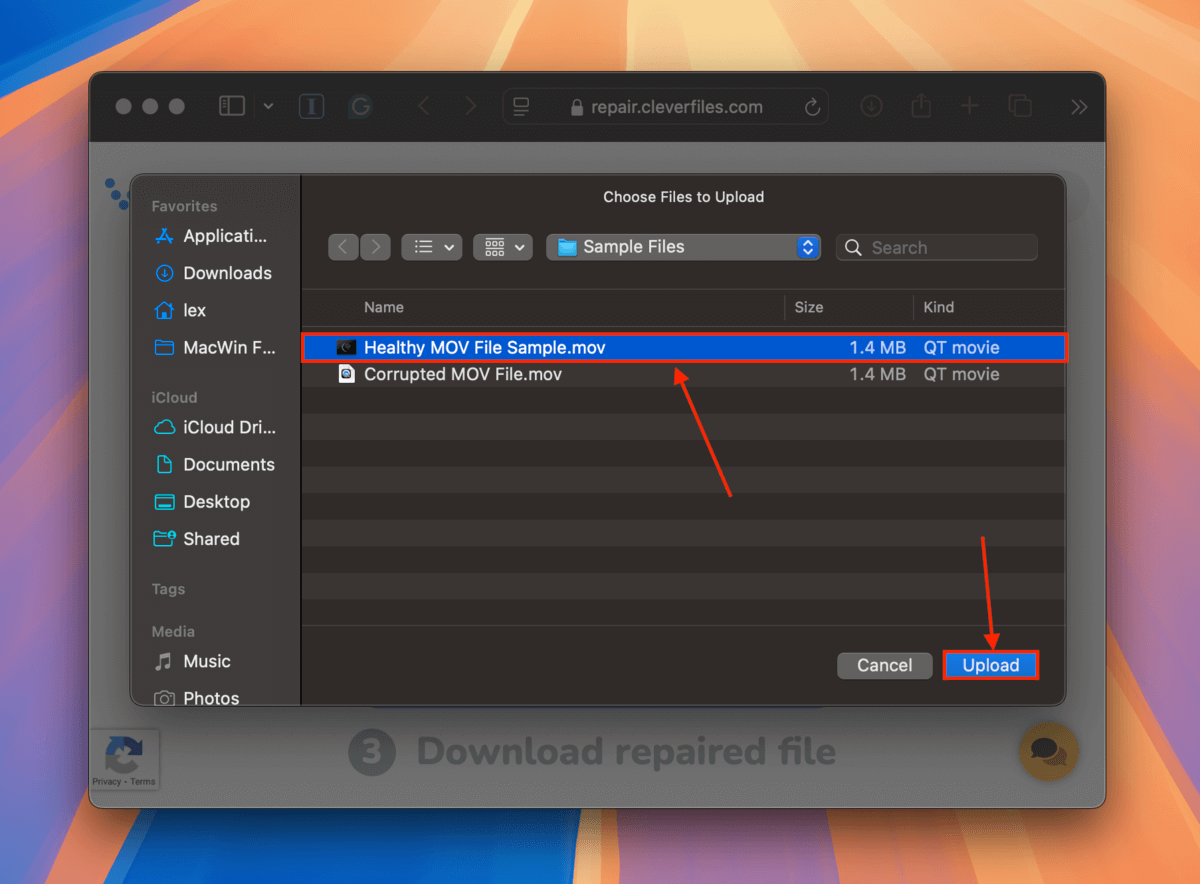
Step 6. Click Choose file.
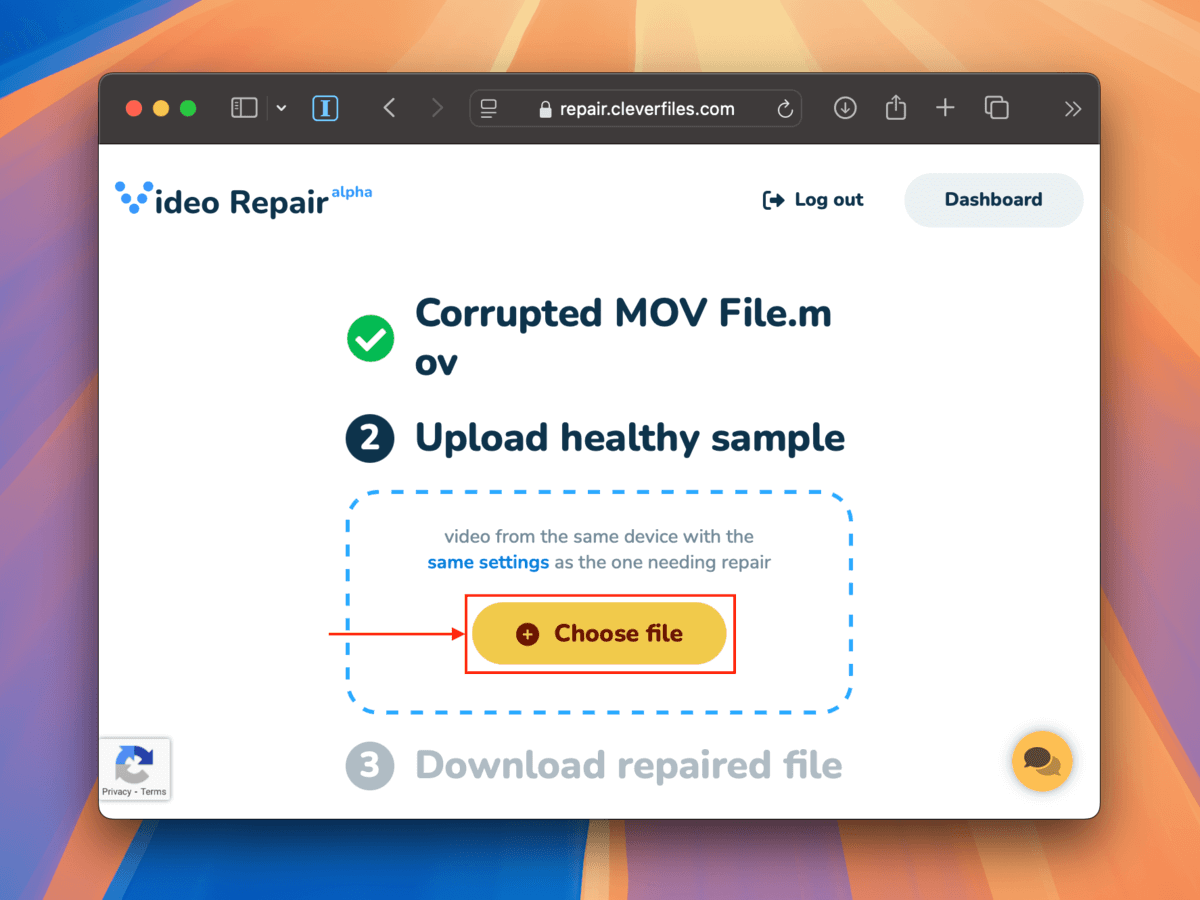
Step 7. Select another MOV file that was captured using the same settings as your corrupted file. Then, click Upload.
Step 8. You can preview screenshots that Clever Video Repair Tool took of the MOV video to ensure that the repair process was successful. Finally, click Download.
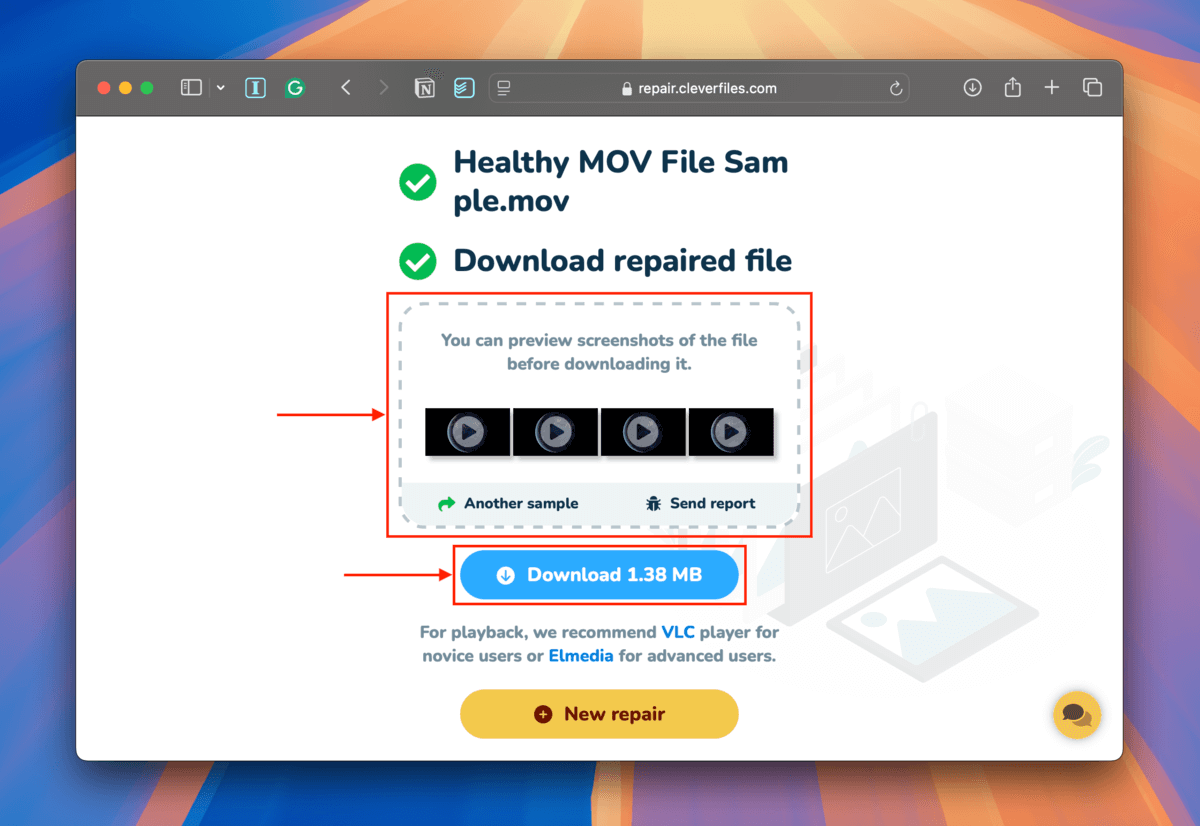
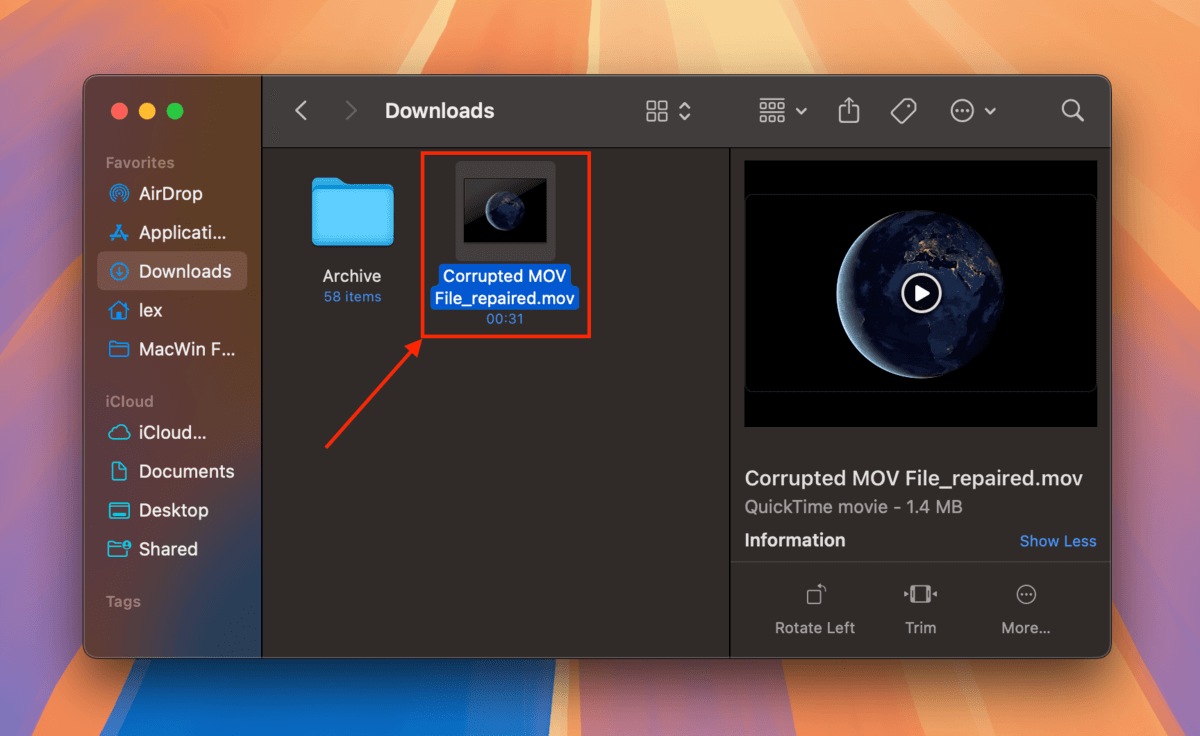
Step 9. The repaired MOV file should appear in the location you selected in step 7 with _repaired added to the end of its file name. Try opening it.
Method 2: Repair Your Corrupt MOV File With QuickTime
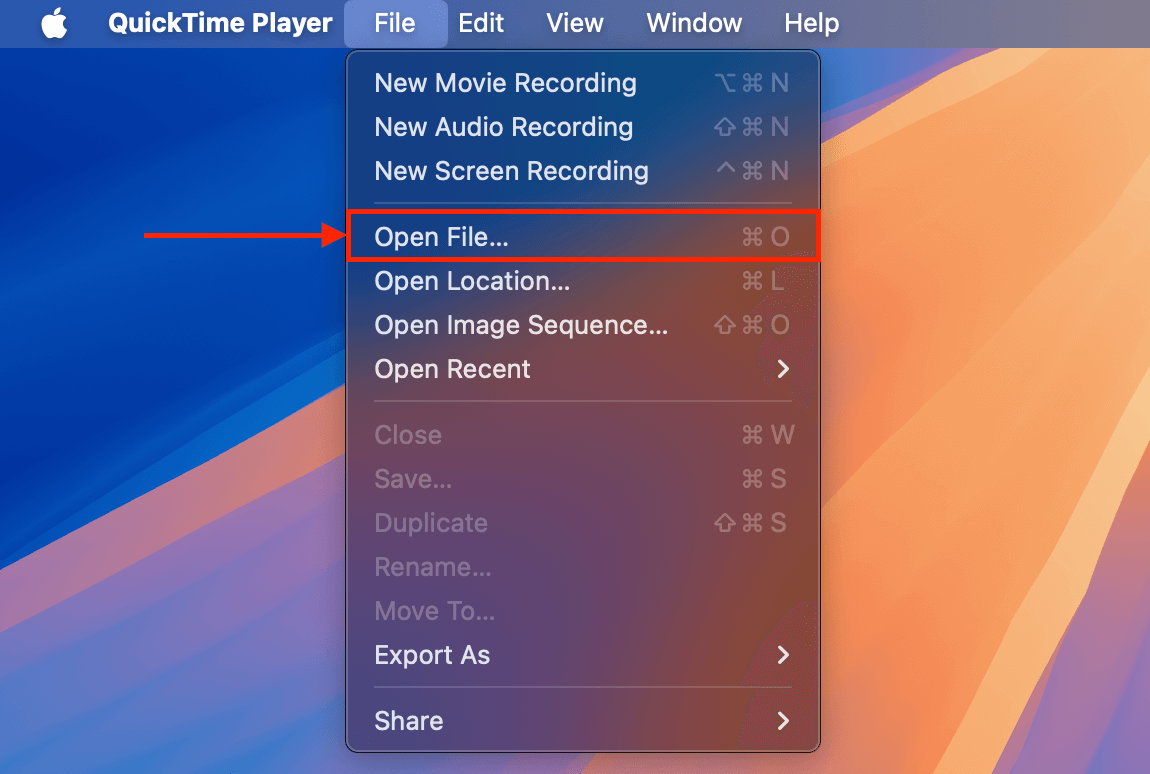
QuickTime is a free built-in media player on macOS. It doesn’t have a dedicated tool to repair broken MOV files, but it will attempt to automatically repair minor cases of corruption – such as missing file metadata.
Simply open the QuickTime app, click File > Open Video, and select your MOV file.
Method 3: Fix a Damaged MOV File by Converting it to MP4 Format
Converting your MOV file may allow it to bypass certain errors, allowing you to play the video. Here’s why: MOV file is a “container” for the video’s raw data, and it contains a bunch of important metadata, like timecode tracks, codecs, etc.
MP4 is another type of container. When you attempt to convert a MOV file to MP4, the process will automatically reconstruct corrupted or missing metadata as it builds the new container. While this solution doesn’t really “fix” corrupted MOV files, it does at least allow your video to be playable.
Option A: Change Your Video’s File Extension
In case of very minor corruption, you may be able to fix your MOV file right inside Finder by simply editing the filename extension string in its file name.
Contrary to other options, this doesn’t actually modify the file’s MOV container. This just tells applications to treat the file as an MP4, which may allow it to bypass error flags and become playable.
Step 1. In Finder, right-click your file > Rename.
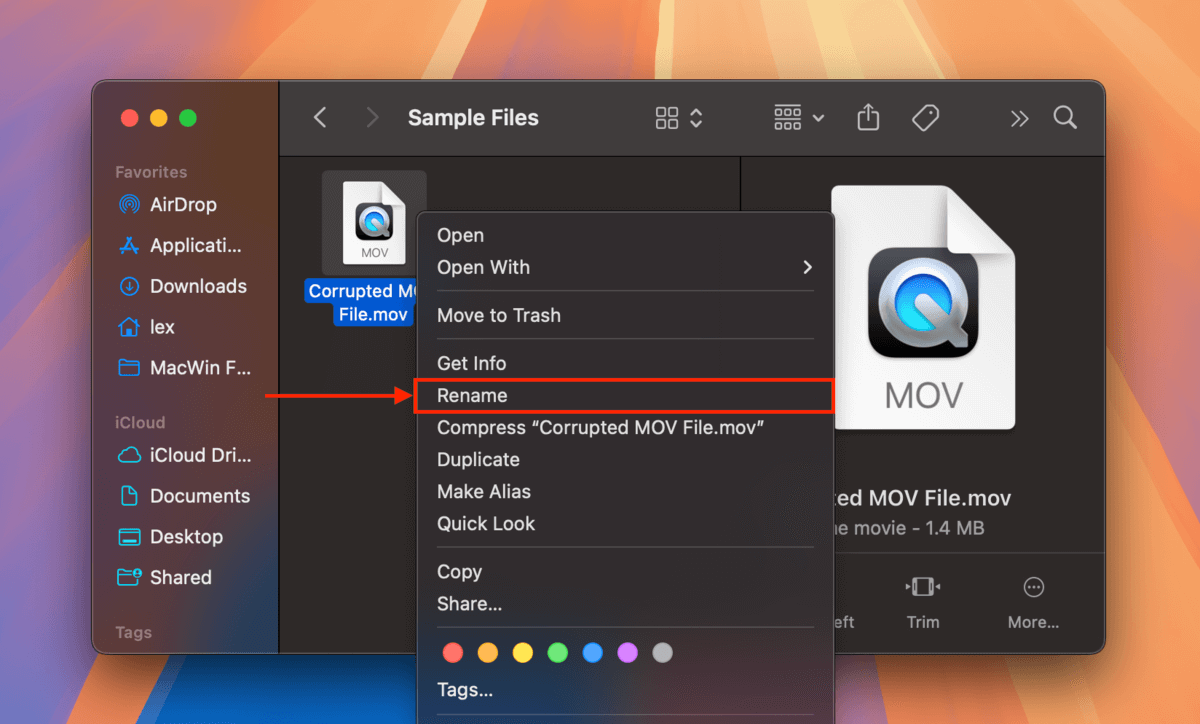
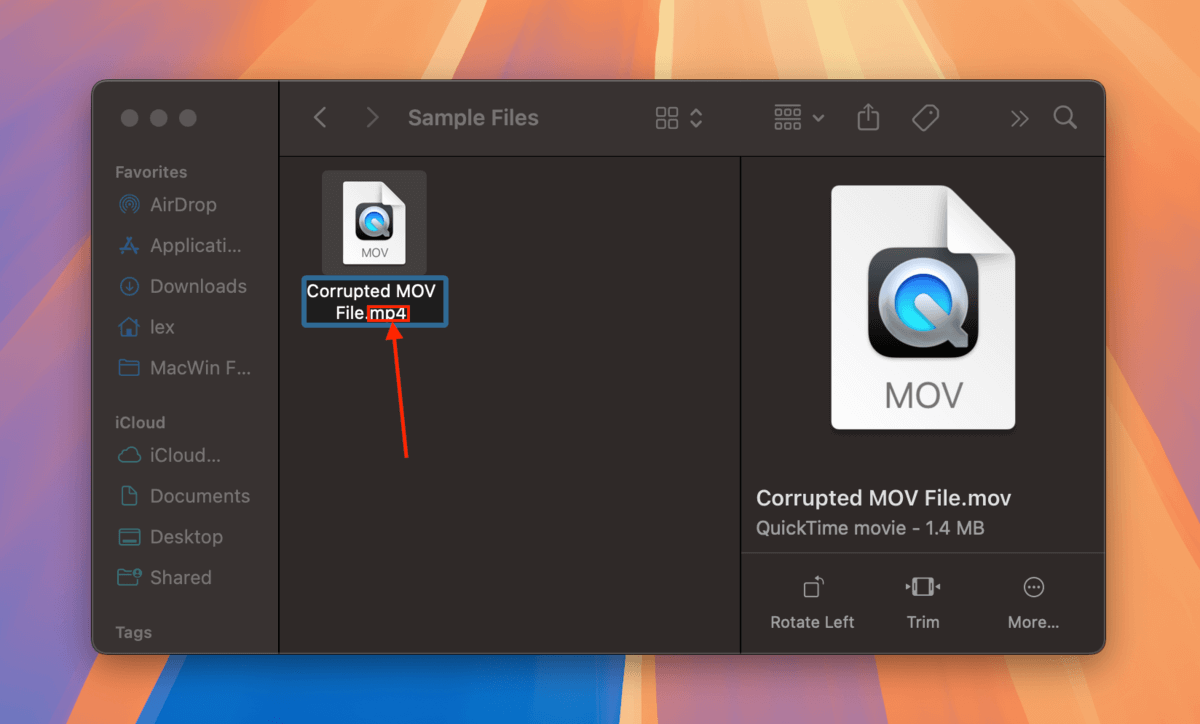
Step 2. Manually replace the MOV string with mp4 and hit Return.
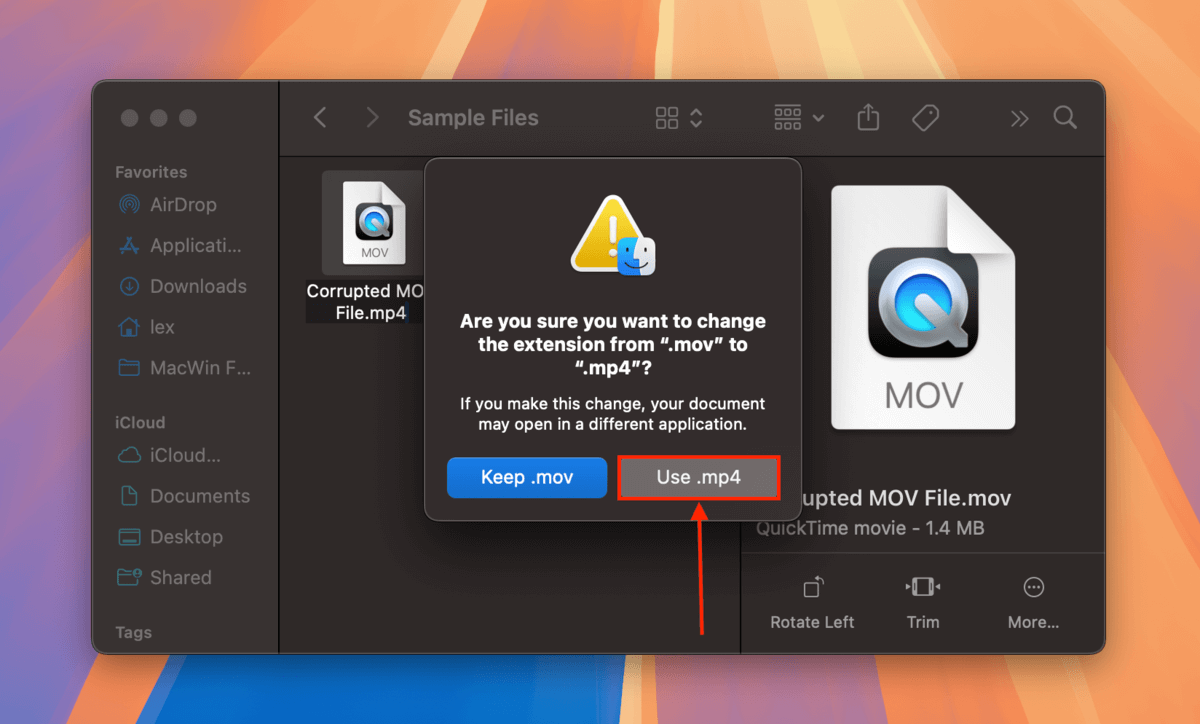
Step 3. In the pop-up prompt window, click Use .mp4.
Step 4. Try opening your newly converted video.
Option B: Utilize iMovie’s Share Settings
iMovie is a video editor that comes built into macOS. The app’s share feature allows you to export your MOV file as an MP4 file, converting it in the process of saving.
This option is a “true” conversion because it essentially builds a fresh MP4 using the MOV file’s data.
Pro Tip: VLC Media Player also has a conversion tool that you can access in the app by clicking File > Convert / Stream…
Step 1. Open iMovie (Finder > Applications).
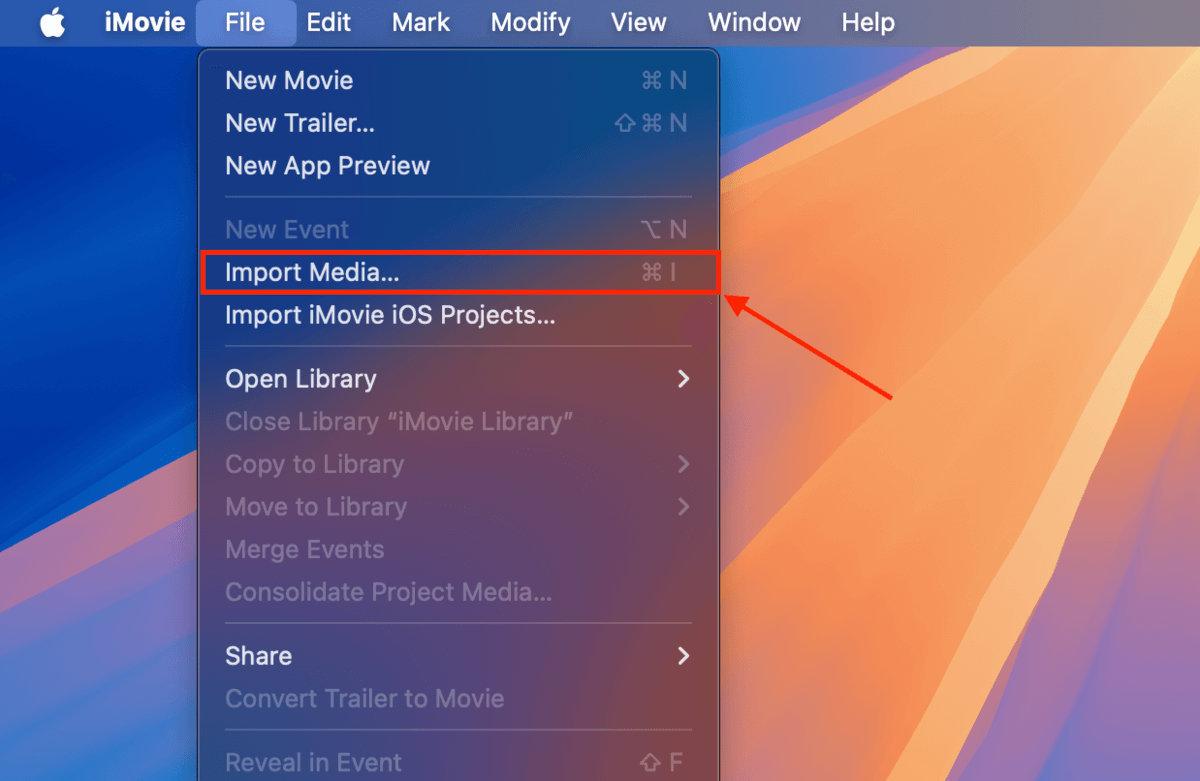
Step 2. Then, click File > Import Media… and open your corrupted MOV file.
Step 3. Once your MOV file has been imported, click File > Share > File…
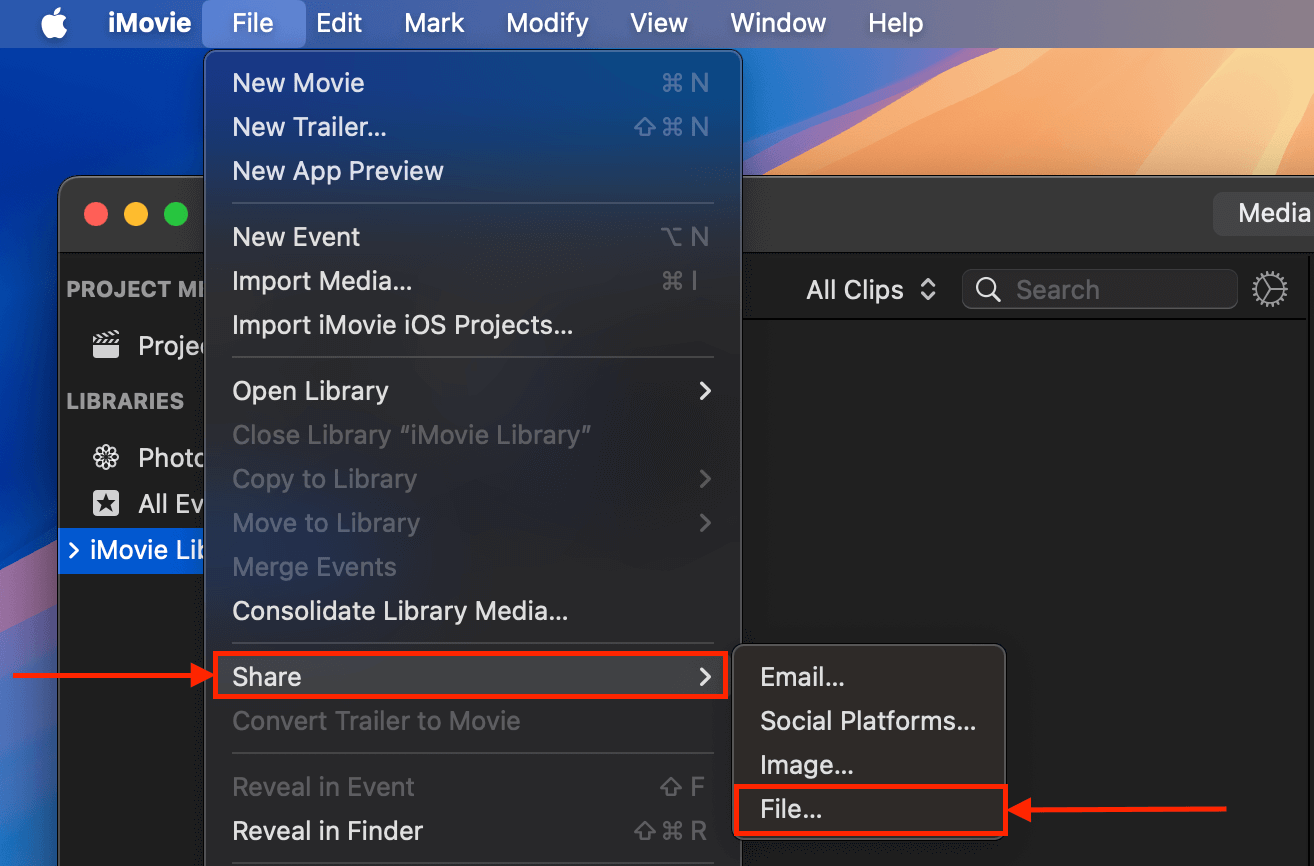
Step 4. Modify the Description, Tags, Resolution, and Compress parameters to your liking. Then, set Format to Video and Audio and set Quality to High (do not go above High). Then, click Next…

Step 5. Choose a location for the saved file. Then, click Save.

Once the process is complete, you’ll find an MP4-formatted version of your corrupted MOV file in the location you chose in step 5. Try opening it!
Option C: Use an Online Video Converter
This option is an alternative to Option B. Similar to iMovie, online video converters can fix MOV file corruption by building a new MP4 container for your video’s raw data. This should resolve issues related to MOV attributes, like missing metadata.
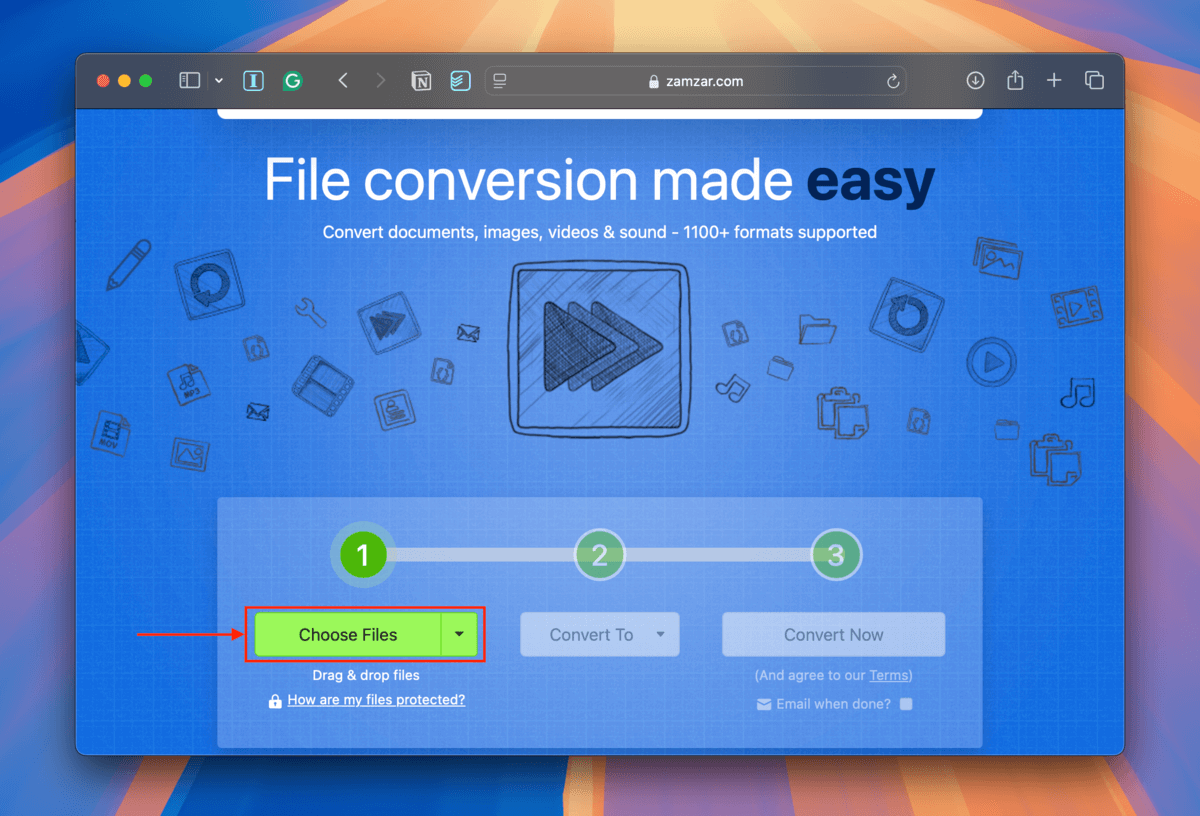
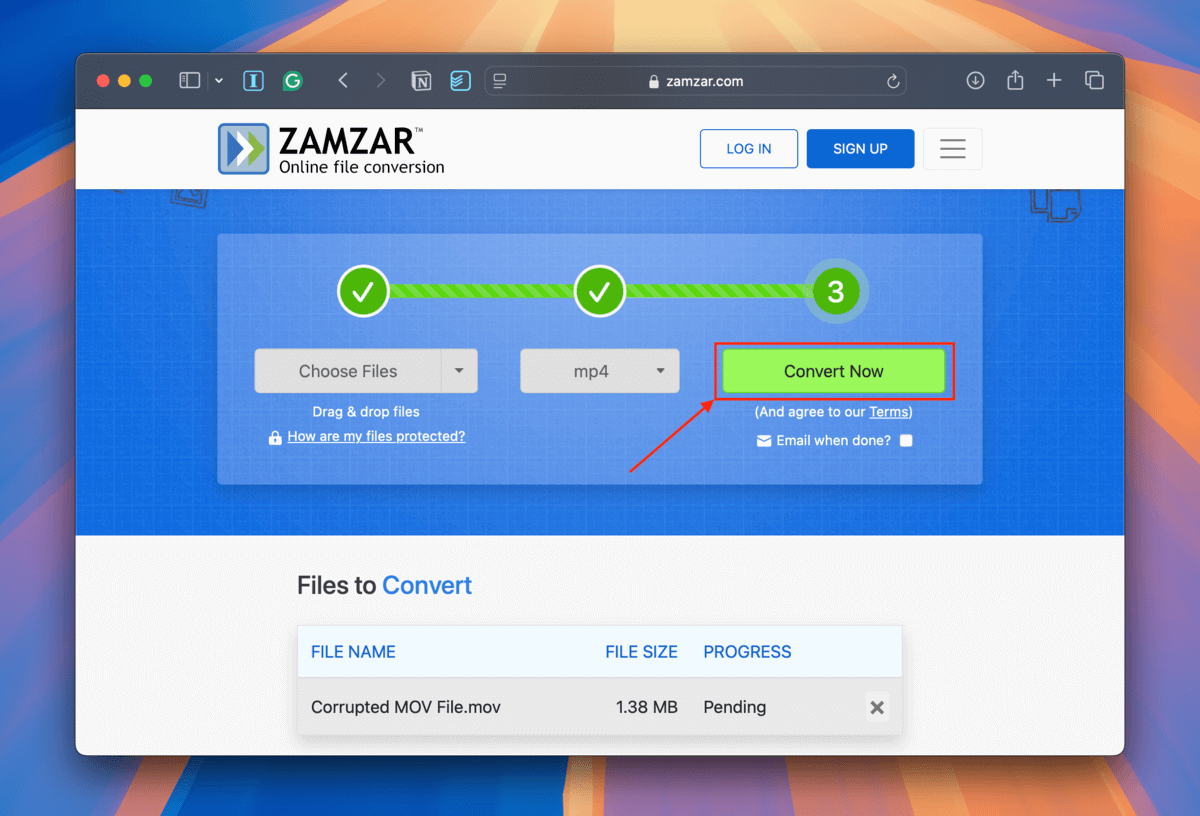
Step 1. Open your video converter website of your choice – you can find dozens of them via Google search. For this demo, we’ll use the popular and free Zamzar.com.
Step 2. When you open the website, click Choose Files.
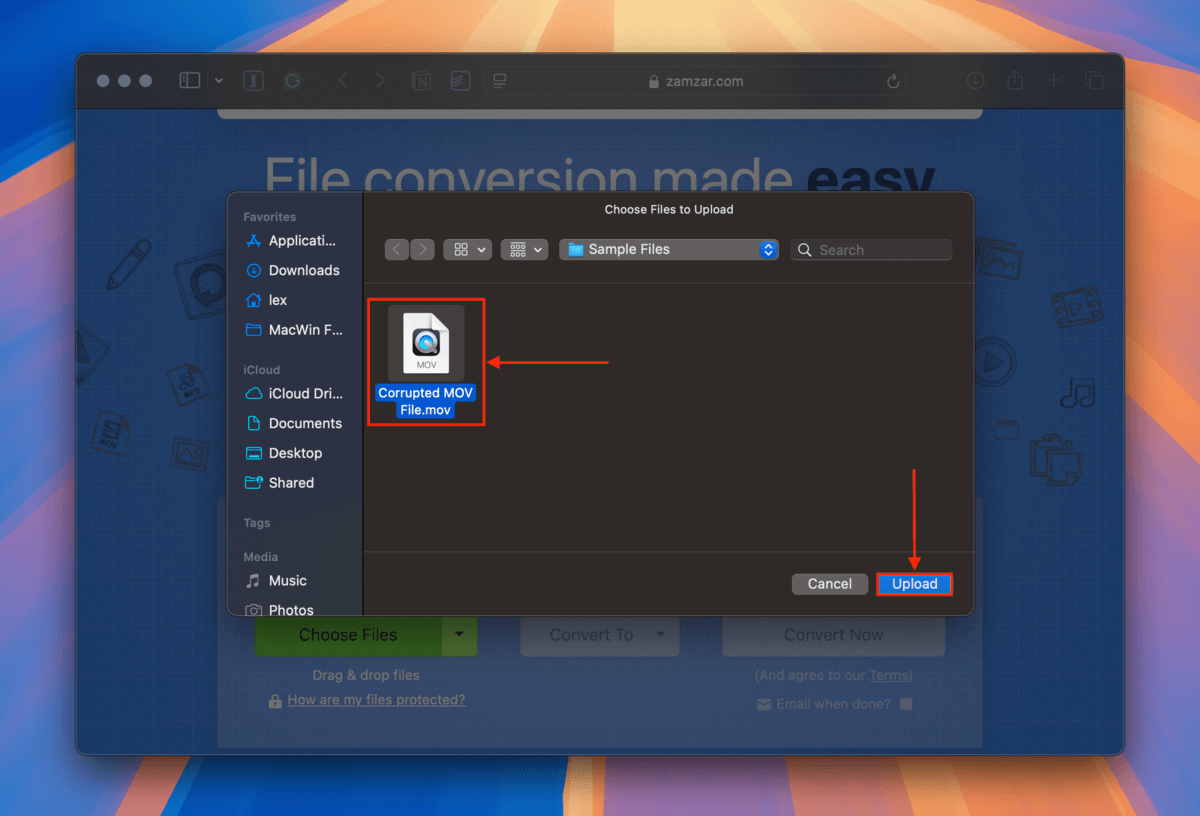
Step 3. Select your corrupted MOV file and click Upload.
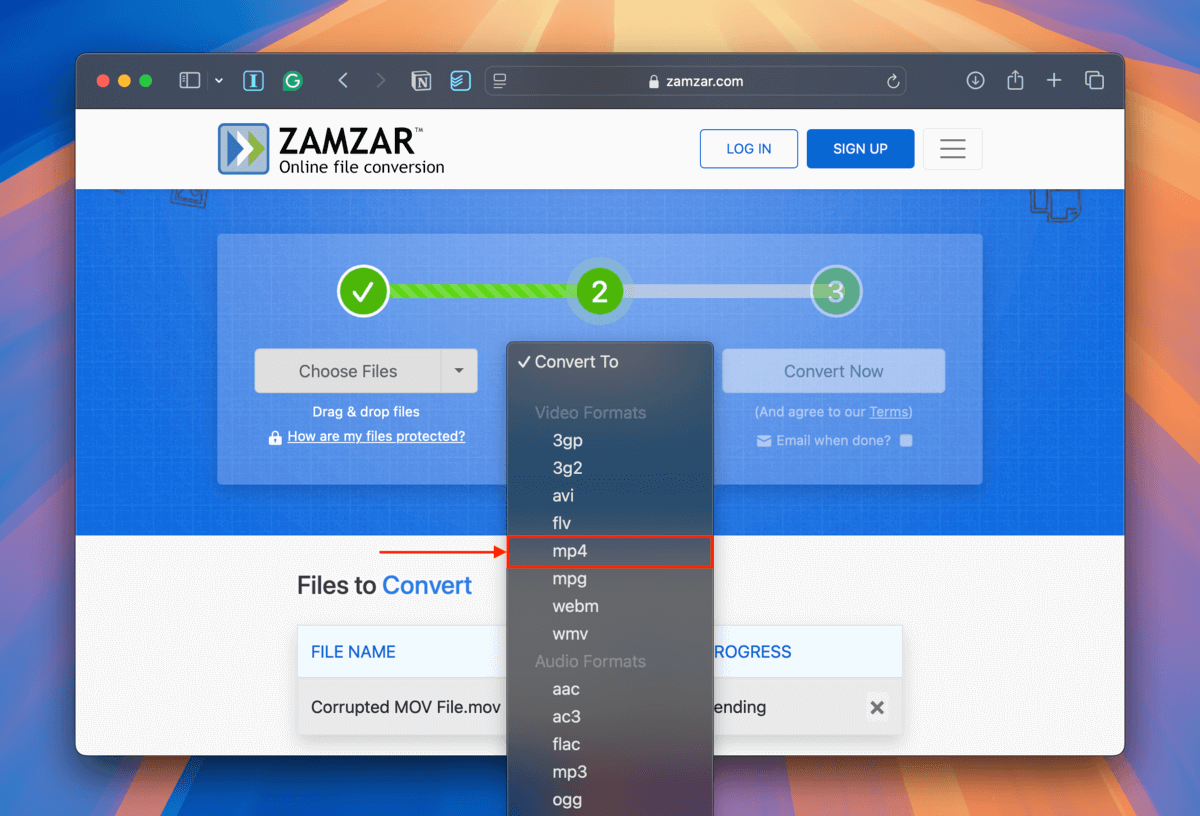
Step 4. Click Convert To. Then, scroll down the popup menu and click mp4 (it should be under the Video Formats section).
Step 5. Click Convert Now.
Method 4: Use VLC’s AVI Repair Tool (Yes, to Fix Your Mov File)
VLC Media Player is a well-known third-party media player available for Mac, Windows, and Linux that you can download and use for free. It has an auto-repair tool for AVI files, which can be enabled in the app’s settings menu. You can utilize the repair tool to fix your MOV file by converting it to AVI format first.
This method has the additional benefit of converting your video’s container to one that is less complex and less likely to be flagged for errors during playback.
Step 1. Download and install VLC Media Player.
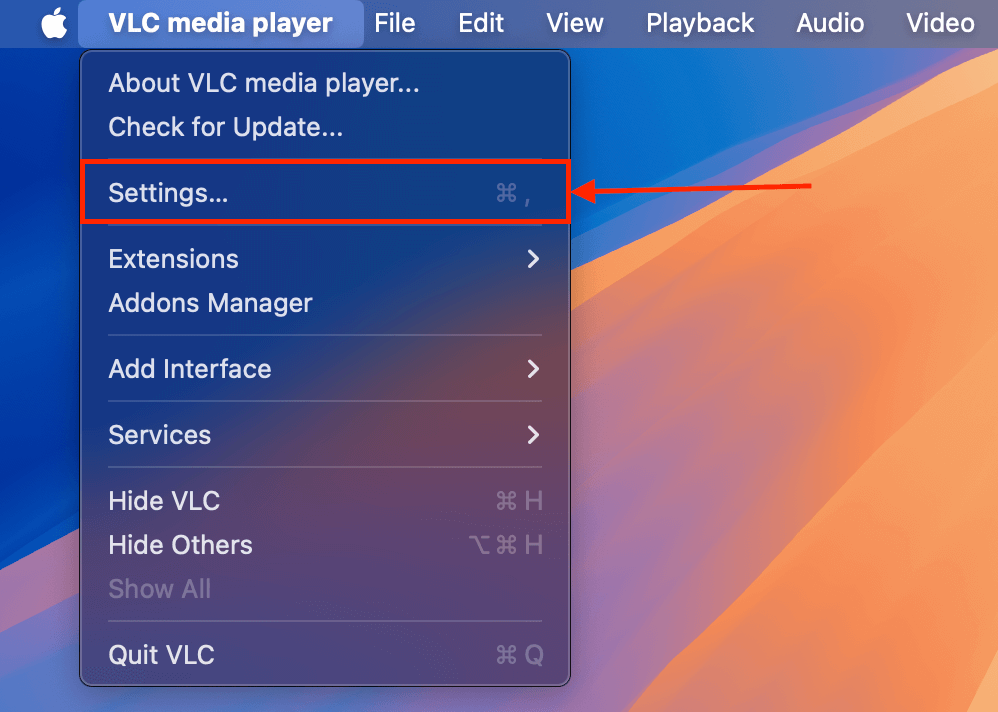
Step 2. On the Apple menu bar, click VLC media player > Settings…
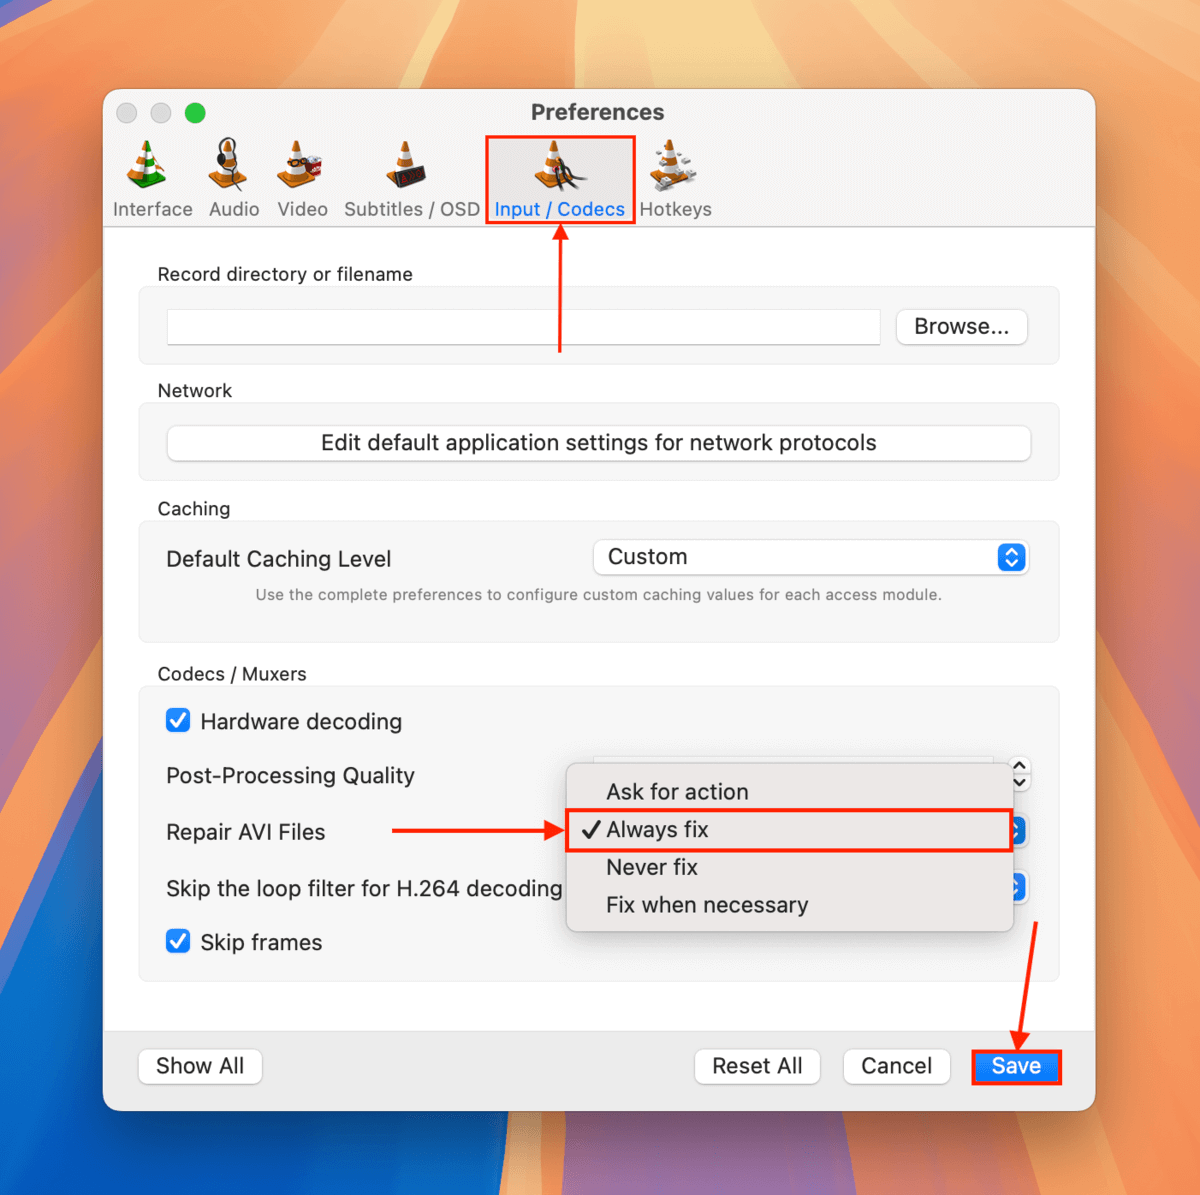
Step 3. Navigate to the Input / Codecs tab. Using the dropdown menu beside Repair AVI Files, select Always fix. Then, click Save.
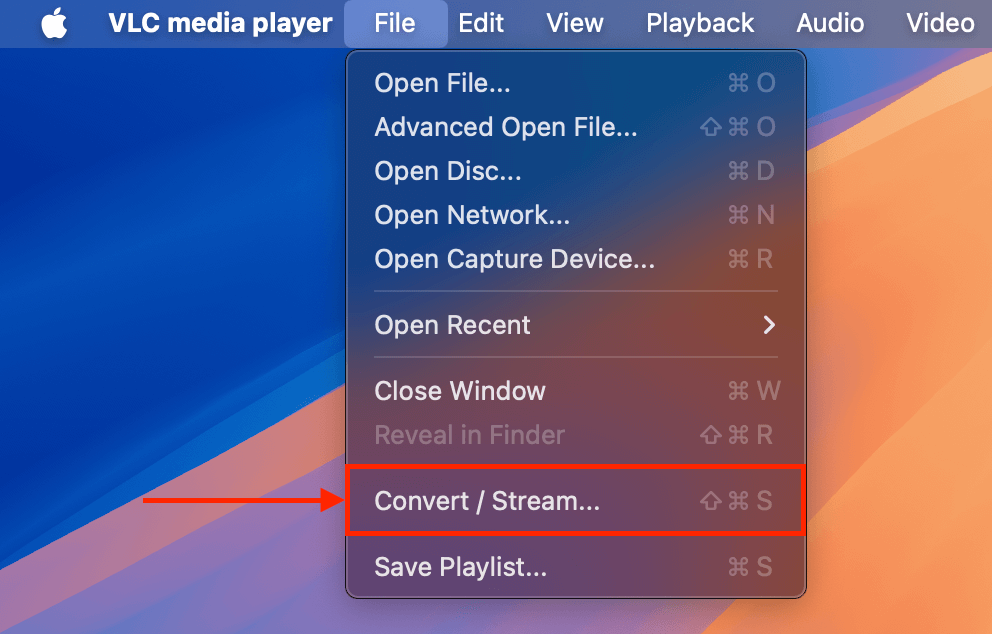
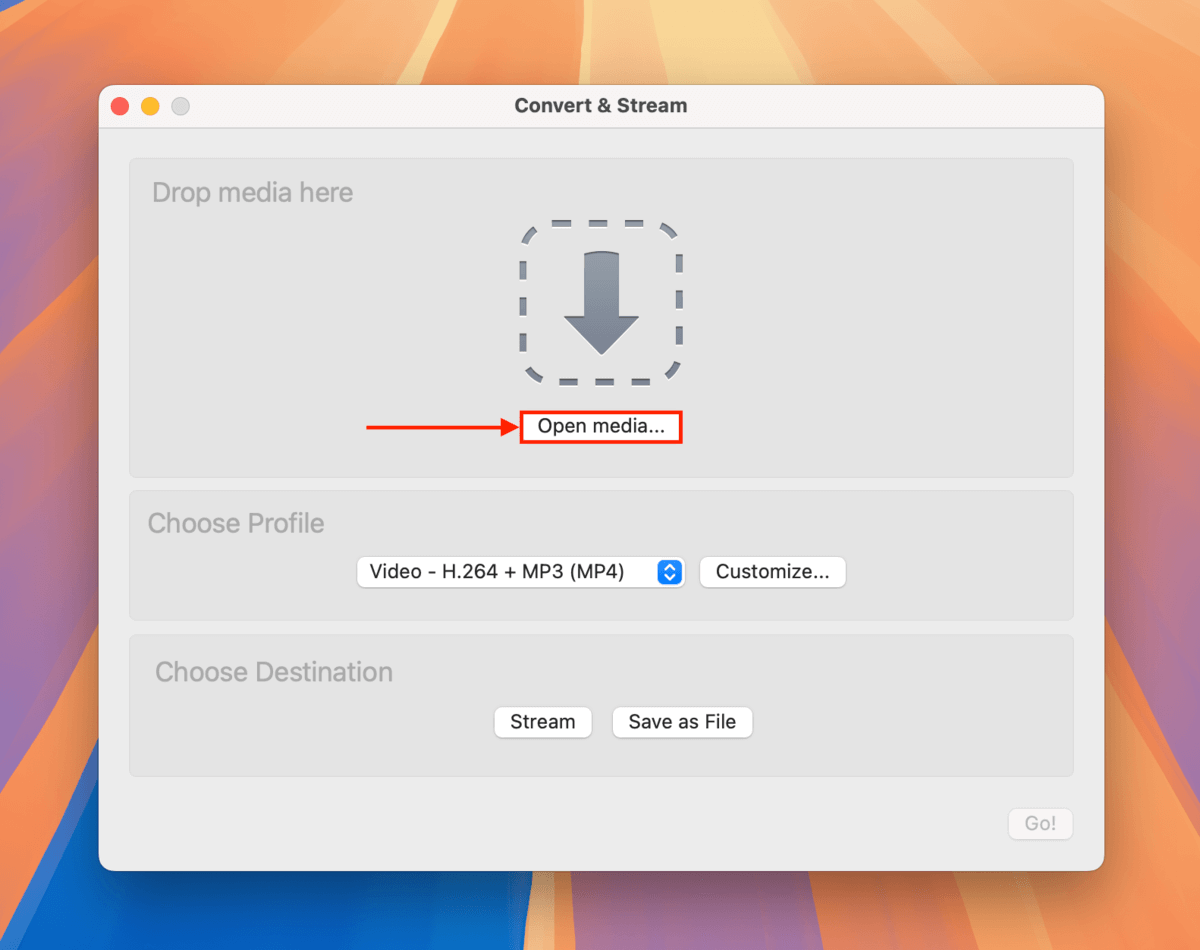
Step 4. Open VLC Media Player and click File > Convert / Stream…
Step 5. Click Open media… and open your corrupted MOV file.
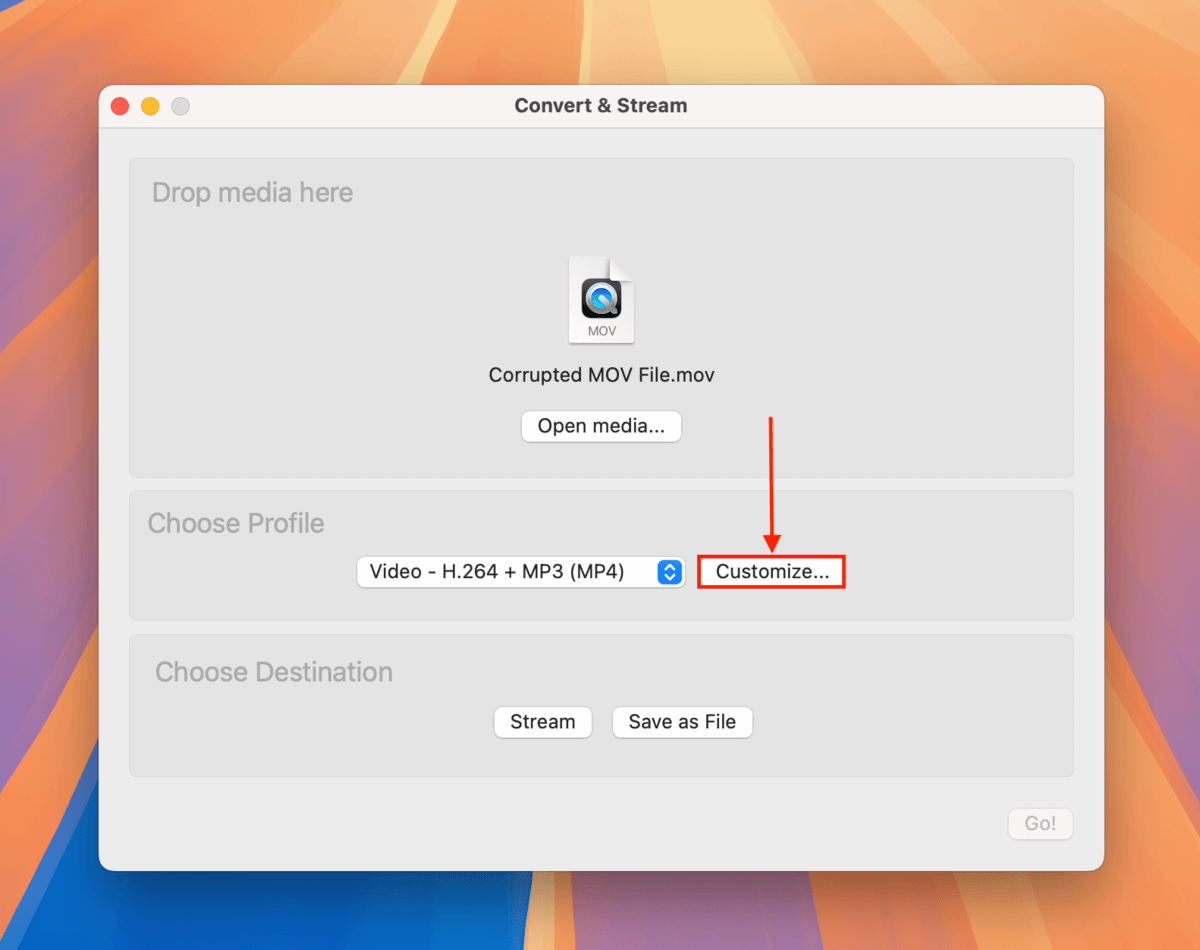
Step 6. In the Choose Profile section, click Customize…
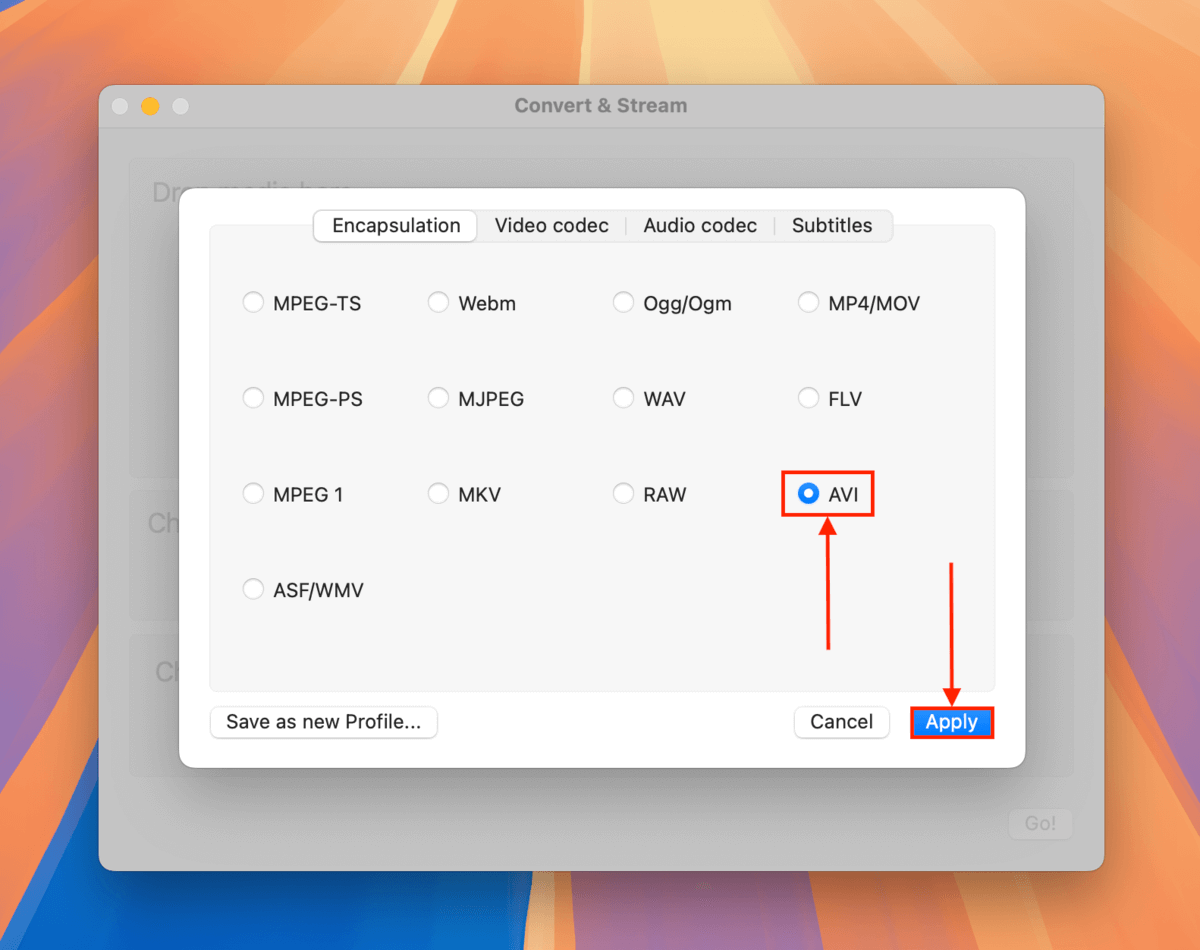
Step 7. Navigate to the Encapsulation menu. Then, select AVI and click Apply.
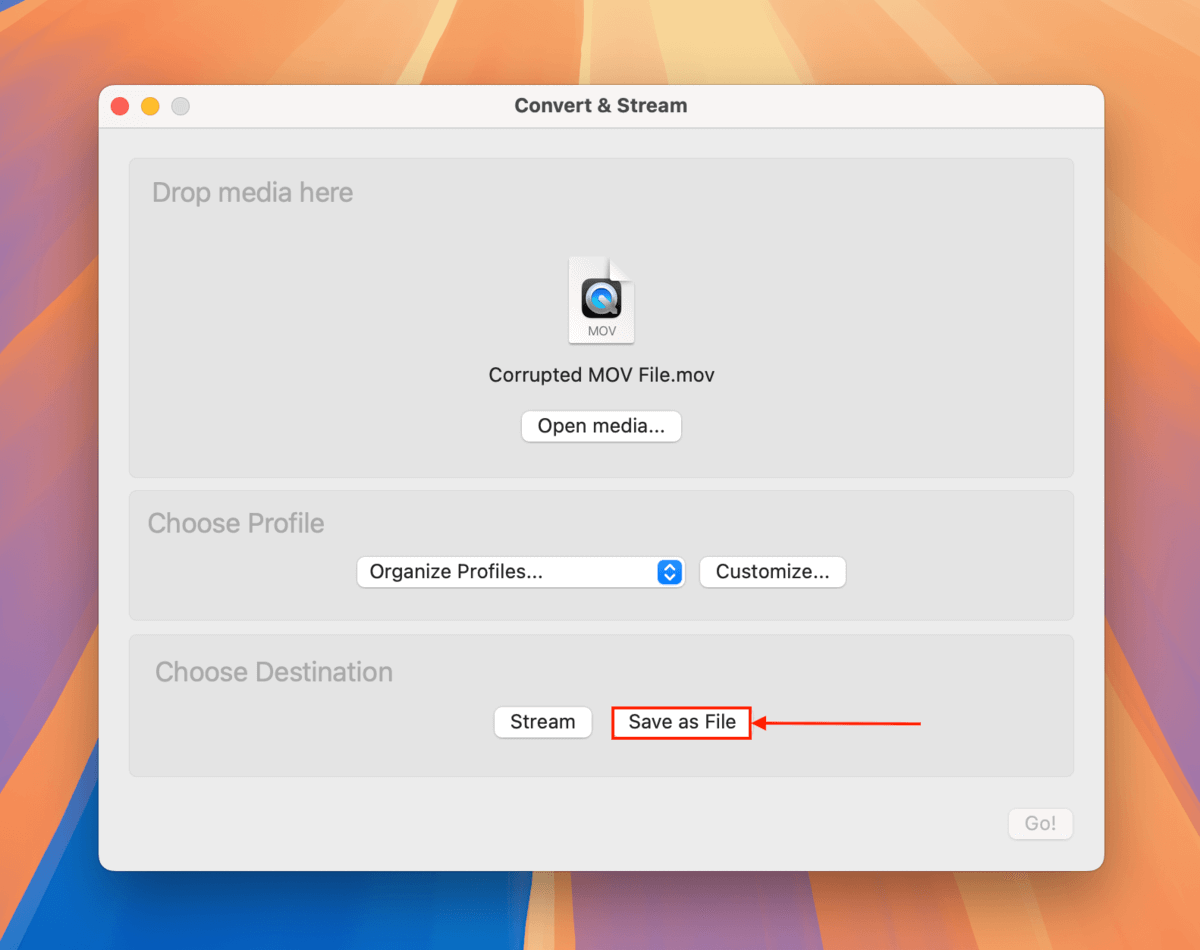
Step 8. Click Save as File.
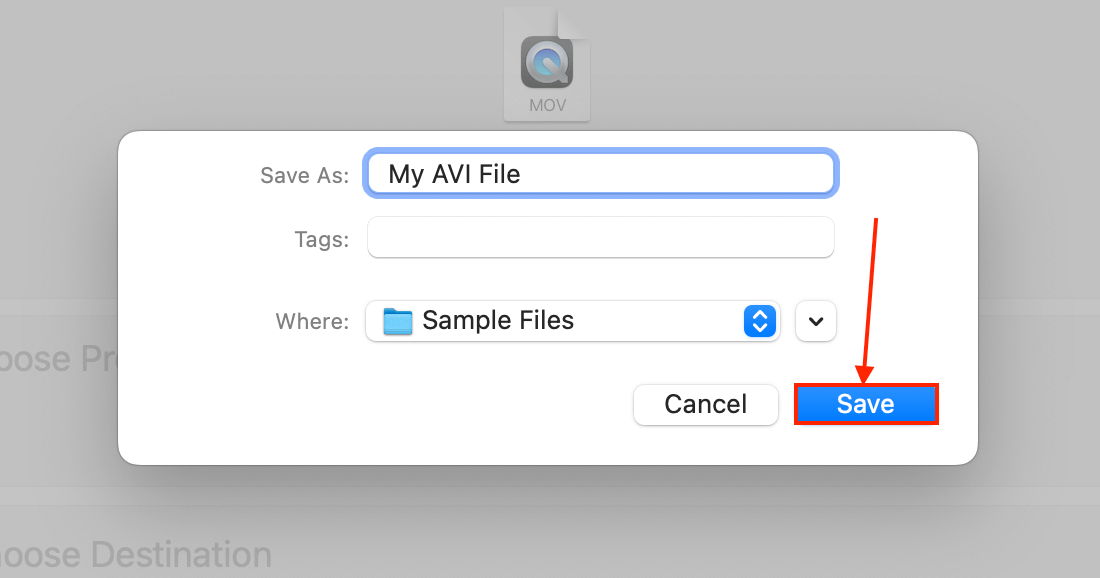
Step 9. Choose your desired file name, tags, and save destination. Then, click Save.
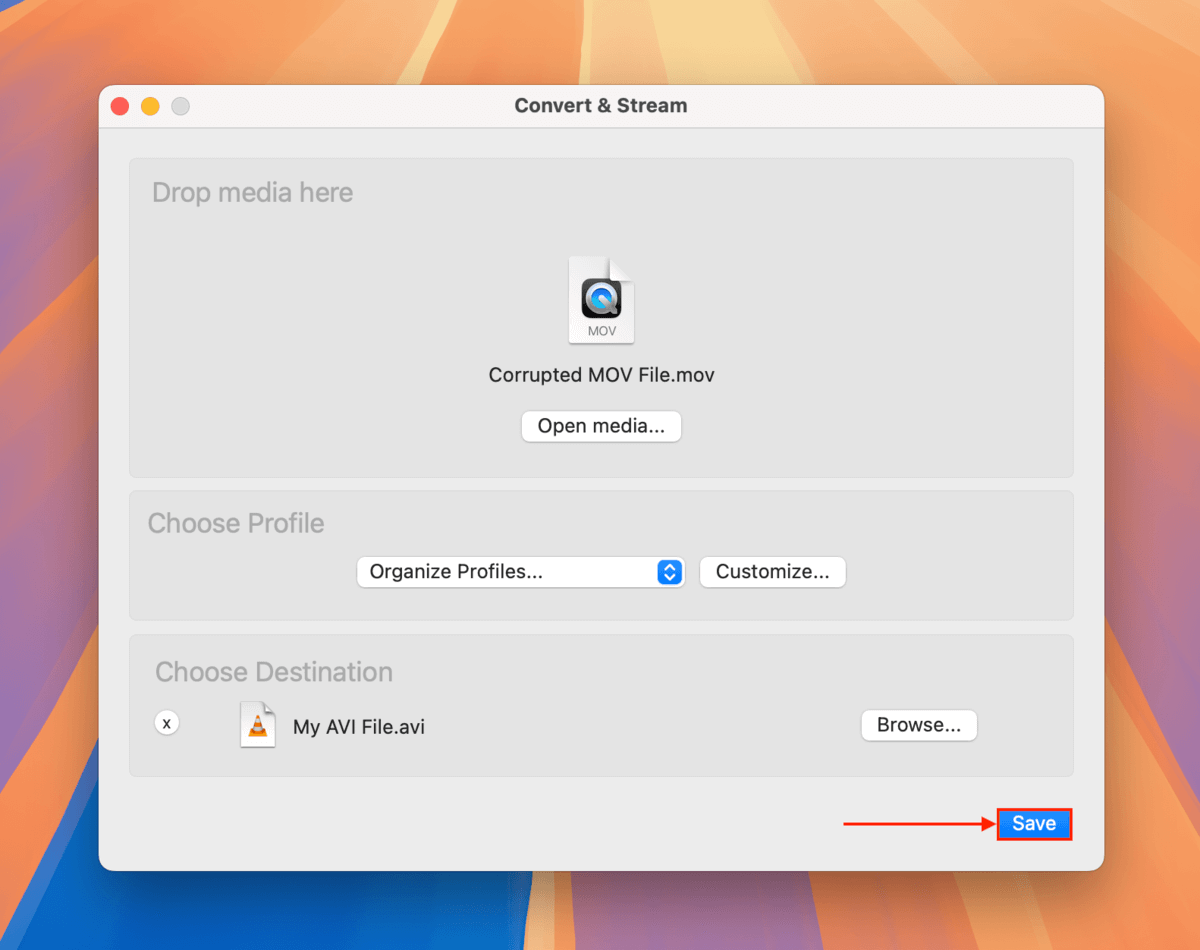
Step 10. In the Convert & Stream window, click Save.
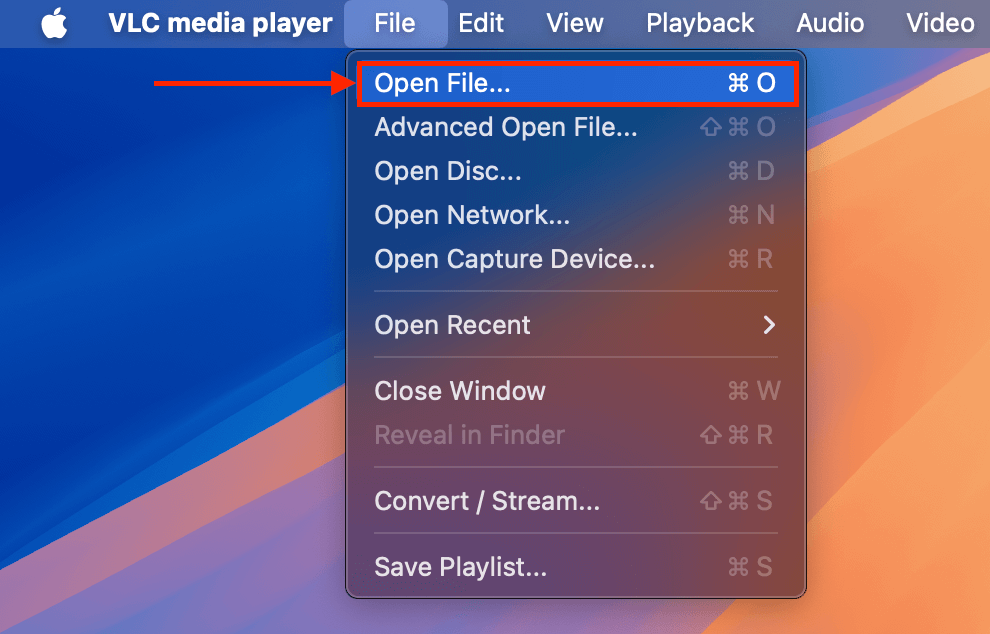
Step 11. Now, try opening the AVI file with VLC Media Player. You can do so by clicking File > Open File… Thanks to the preferences you set in step 3, the VLC app will automatically try to repair your video file (which is in AVI format).
Question – do you format your memory card often?
Before you go, we just want to leave you with a quick tip about maintaining the health of your SD cards, CF cards, and other types of memory cards.
Format your memory card often! Ideally, format it after each intensive use (but after you back up your videos, of course). Formatting your memory card can help prevent fragmentation, which greatly increases the probability of disk corruption.
However, note that all storage devices have a finite life cycle, so you’ll have to replace your memory card eventually.
Furthermore, each instance of corruption has a compounding effect – you’ll encounter more and more corruption as time goes on. After enough times, seriously consider investing in a new card.


