
SD cards are mercilessly manhandled on mobile devices like smartphones and cameras, and their portability means they also read and write data more often than other storage media. This makes them highly susceptible to both physical and logical damage, further resulting in data loss. It also makes human error more likely (have you ever “accidentally” formatted your SD card?) We know losing thousands of photographs and raw footage totally sucks. This article provides step-by-step instructions (and more critical info) on how to recover deleted files from an SD card on your Mac. Read on.
| Method | When to Apply |
| 🗑️ Trash Folder | If SD card was connected during deletion. |
| 💻 Paid Data Recovery Software | Has the highest chance of recovery. |
| 💸 Free Data Recovery Software | Good solution for easy cases of data loss. |
| 🕒 Time Machine | If you have a suitable backup. |
| ☁️ Cloud Backup | If you backed up your files to a cloud storage service (sometimes happens automatically) |
Table of Contents
Tips for Successful Recovery From SD Card
There are a lot of factors that go into the data recovery process that can impact its outcome, especially with ultra-portable storage devices like SD cards. While you can’t control them all, there are some things you can do to at least maximize your chances of success:
- Stop using the SD card as soon as possible: If you accidentally format an SD card while playing with your digital camera, you must stop using it as soon as possible otherwise you risk overwriting the storage space that was occupied by the deleted files and making data recovery impossible.
- Start data recovery ASAP: if your SD card isn’t working correctly, you want to get your data off of it before the card stops working altogether.
- Create an image of the SD card if it’s corrupted: Having a second image of your data, even if it’s corrupted, is a good idea as you can then try to recover data from that second copy.
Method 1: Recover Files from the Trash on Mac
![]() On your Mac computer, there is a special folder called Trash. When you delete a file, the file is first moved to this folder before it is deleted for good. Trash guarantees 100% recovery success rate, and you don’t need any special software to use it. However, this folder is primarily for local files – so this method only works if your SD card was connected during deletion. What most people don’t know is that Mac creates a hidden Trash folder for external storage devices. We’ll explore this more in the next section. To Recover Deleted Files from Trash:
On your Mac computer, there is a special folder called Trash. When you delete a file, the file is first moved to this folder before it is deleted for good. Trash guarantees 100% recovery success rate, and you don’t need any special software to use it. However, this folder is primarily for local files – so this method only works if your SD card was connected during deletion. What most people don’t know is that Mac creates a hidden Trash folder for external storage devices. We’ll explore this more in the next section. To Recover Deleted Files from Trash:
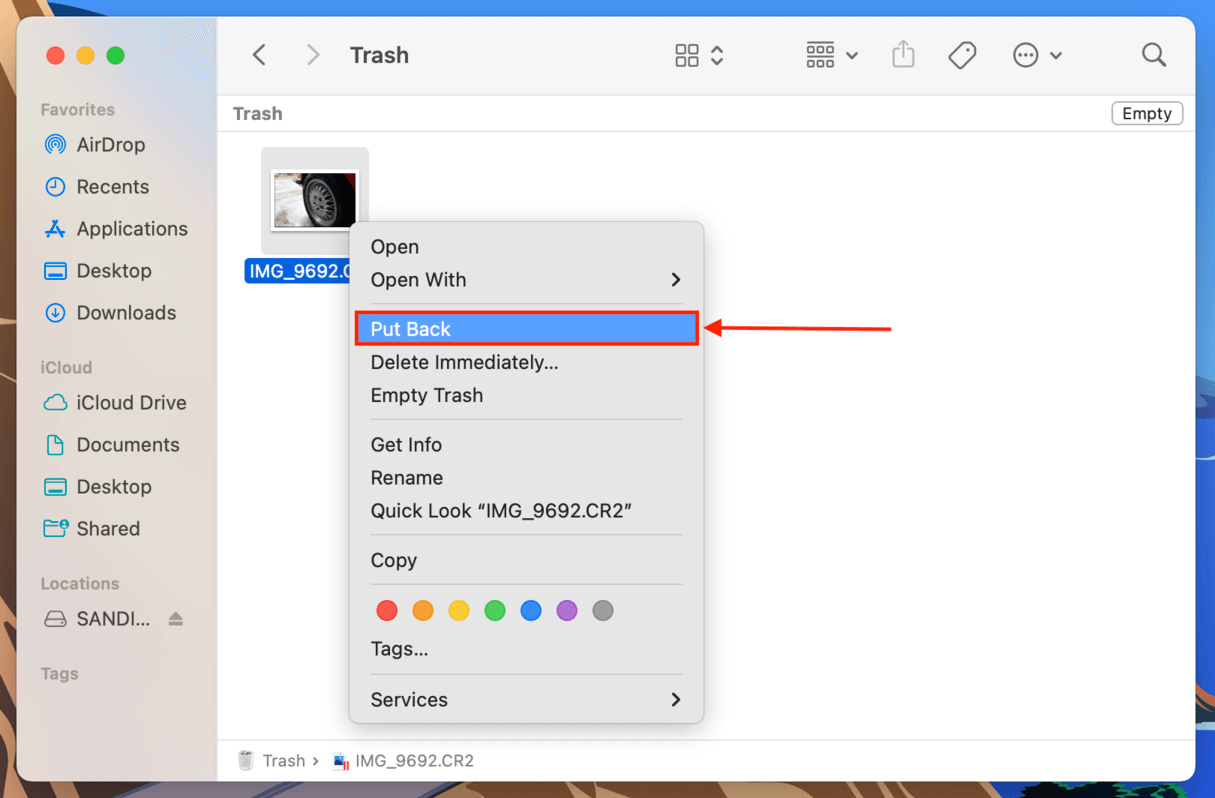
- Click on the Trash icon in the Dock.

- Find your deleted files and highlight those that you want to recover.
- Either right-click on them and select “Put Back” or drag and drop them onto the Desktop or into the folder where they belong.

To Recover Deleted Files From SD Card’s Trash Folder:
- Open Finder and navigate to your SD card’s root folder.
- Hit the key combination (CMD + Shift + >) to show hidden files, revealing the .Trashes folder.
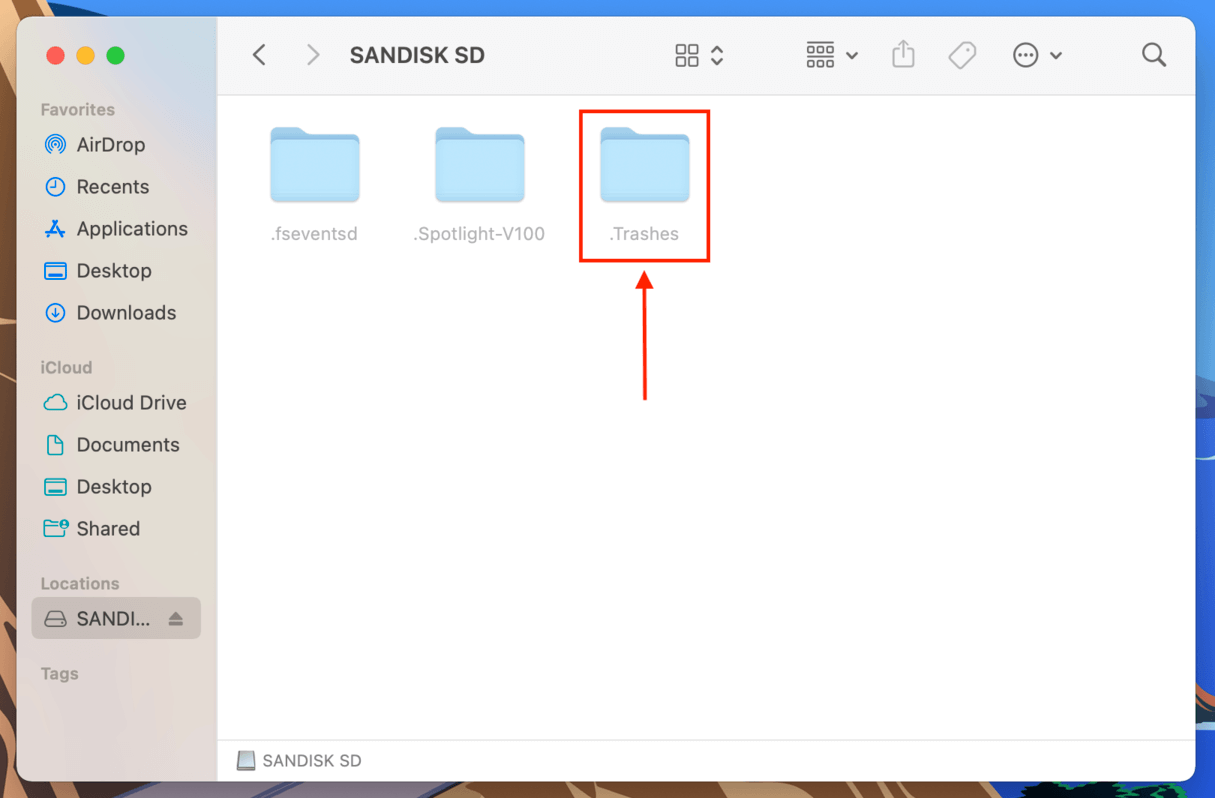
- Open the Trash folder within the .Trashes folder and locate your deleted files. Right-click the item you want to recover, and click “Put Back.”
What if you can’t find the files deleted from your SD card in Trash? In that case, you should use SD card recovery software for Mac, which is where the next method comes in.
Method 2: Recover Deleted Files With Professional Data Recovery Software
If your files are no longer in the Trash folder and you don’t have any backups, the most reliable way to restore your deleted SD card files is by using professional data recovery software. It’s a type of application you can install on your Mac, which is capable of recovering lost data from storage devices.
For this demonstration, we’ll be using a popular app called Disk Drill. It’s very easy to use, it recognizes the file system formats commonly installed on SD cards, and it supports more file signatures (especially photo and video file types) than most of its competitors.
Disk Drill also has a scan type called Advanced Camera Recovery, which was specially designed to rebuild fragmented video files during the recovery process to ensure that they are viewable/playable. Many apps can recover photo and video files, but are unable to rebuild them—this results in recovered files that you can’t even open.
Disk Drill is a paid app, but the Mac version lets you scan your SD card and preview all recoverable files for free, so you know what’s even salvageable. You only need to buy the software once you’re ready to restore the files. We’ll show you how it works.
- Download and install the Disk Drill app.
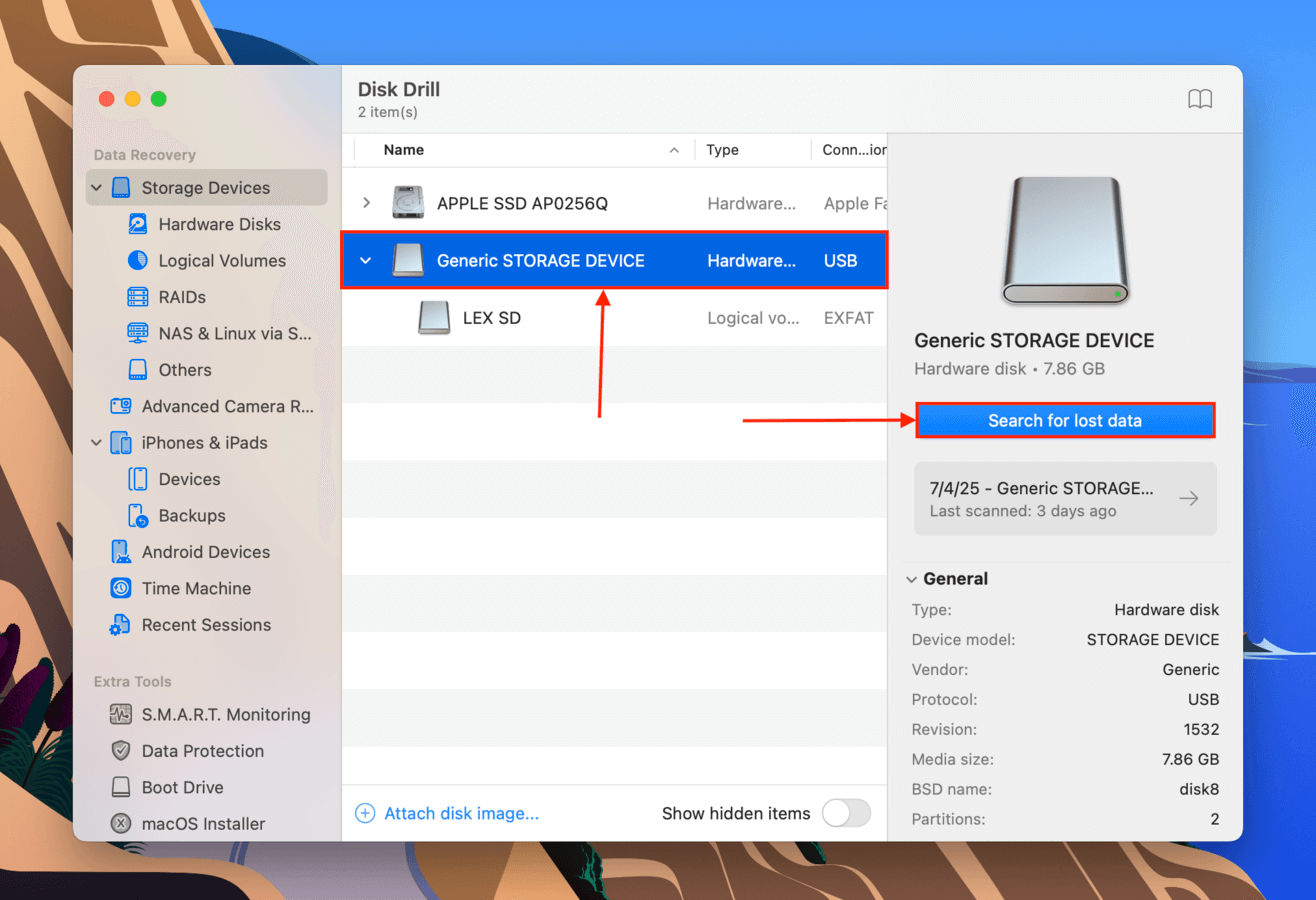
- Open Disk Drill. In the Storage Devices menu, select your SD card. If you’re using a memory card adapter, it may appear as “Generic USB Device” or similar. Then, click Search for lost data.
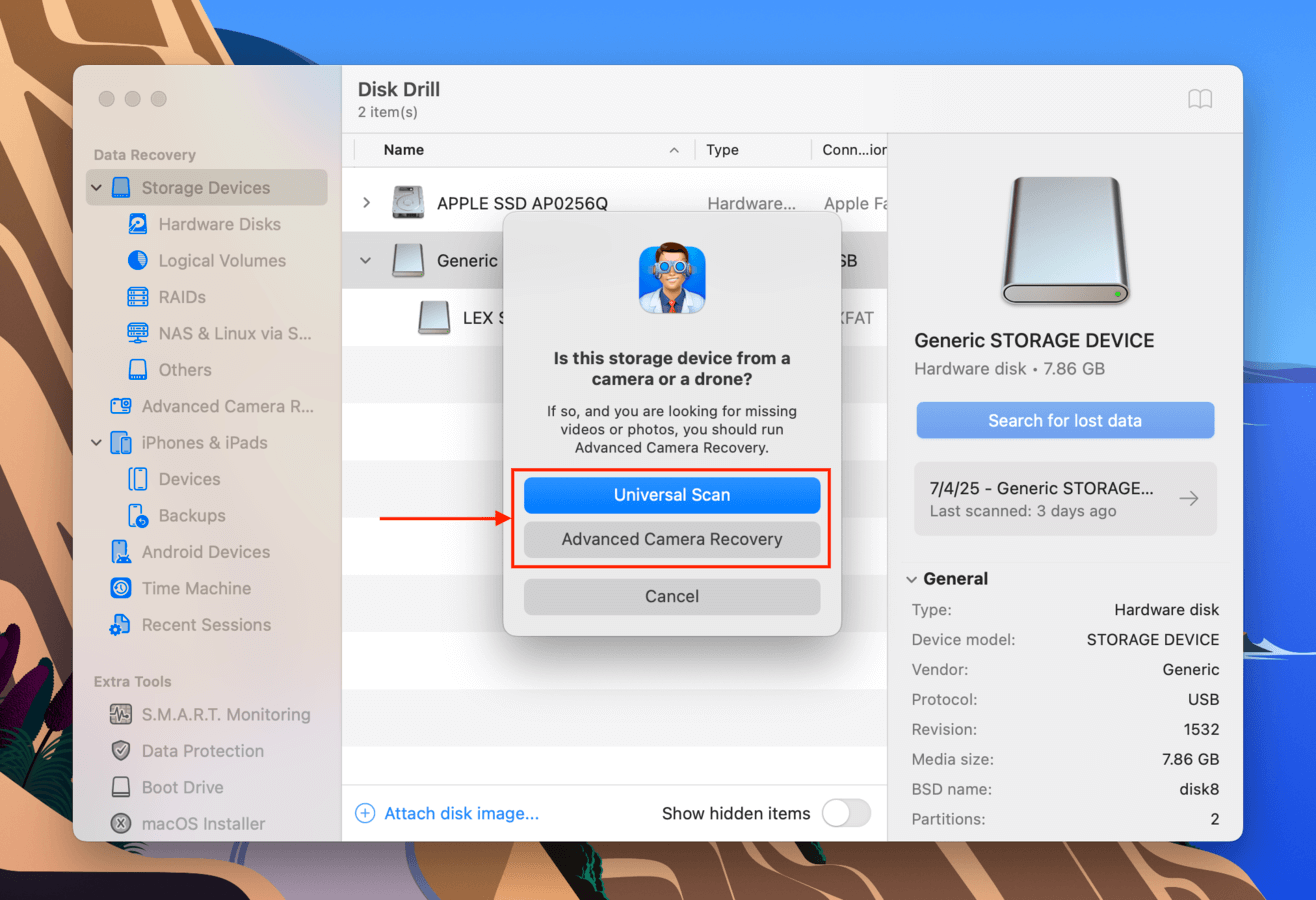
- If Disk Drill correctly recognizes your SD card, a small dialogue window should appear, asking if your storage device is from a camera or a drone. If so, select the Advanced Camera Recovery option. If not, or if your SD card is showing signs of corruption, choose Universal Scan instead. Don’t worry—both processes follow identical next steps.
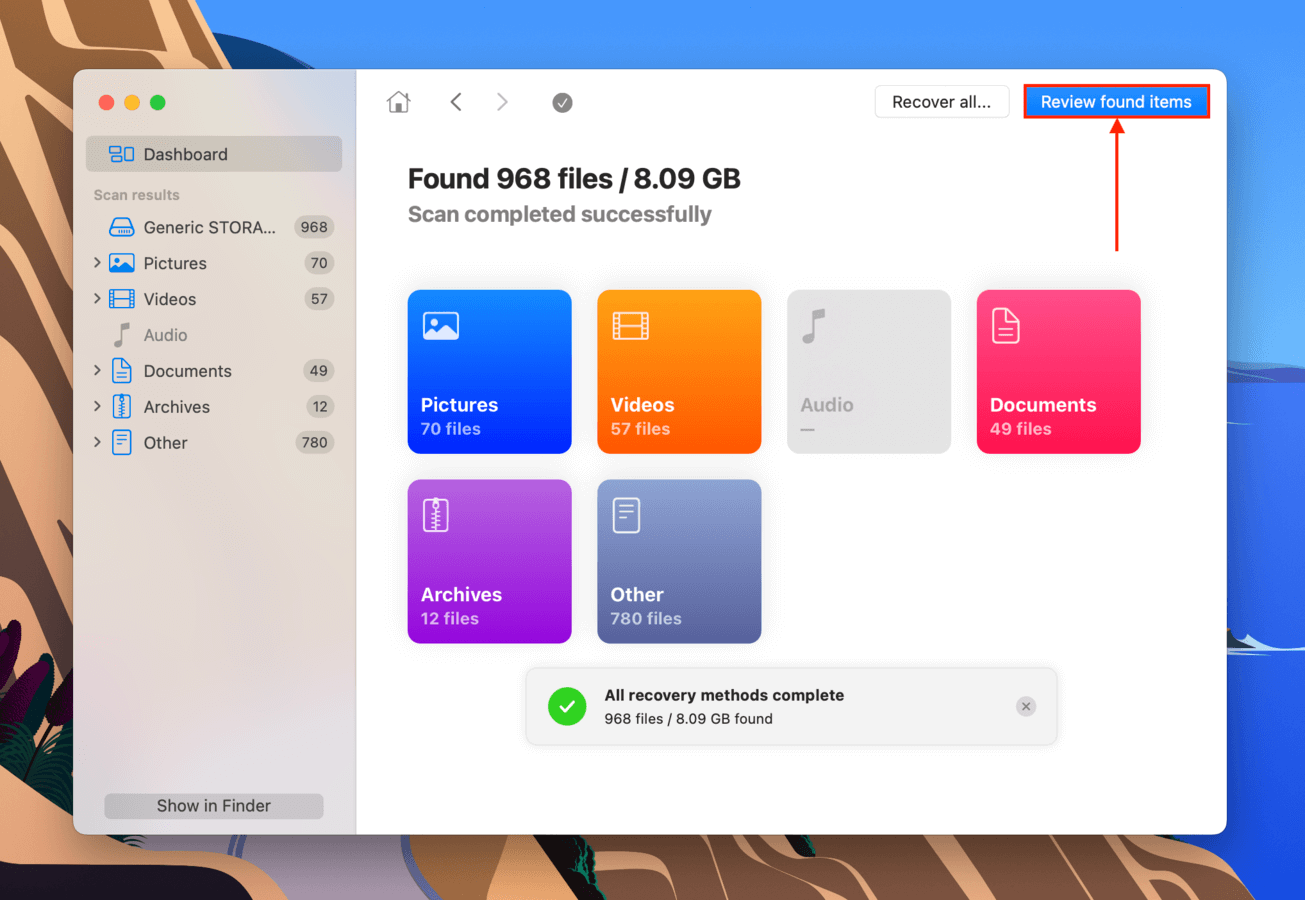
- Wait for Disk Drill to finish scanning your SD card. Once it’s done, click Review found items.
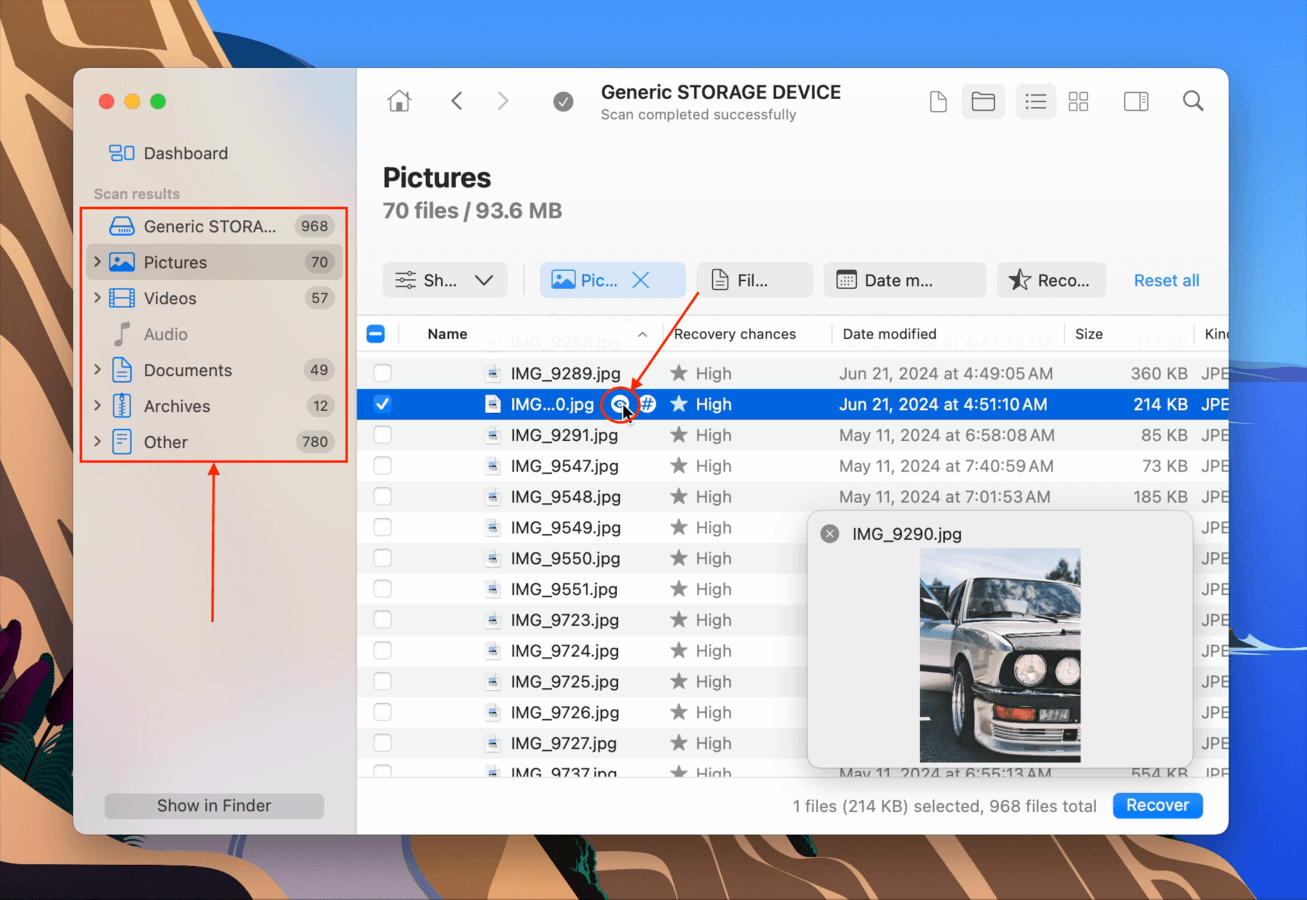
- Use the filters in the sidebar, as well as the search bar in the top-right corner of the window, to narrow down the scan results. To preview a file’s contents, hover your mouse pointer beside it and click the eye button that appears.
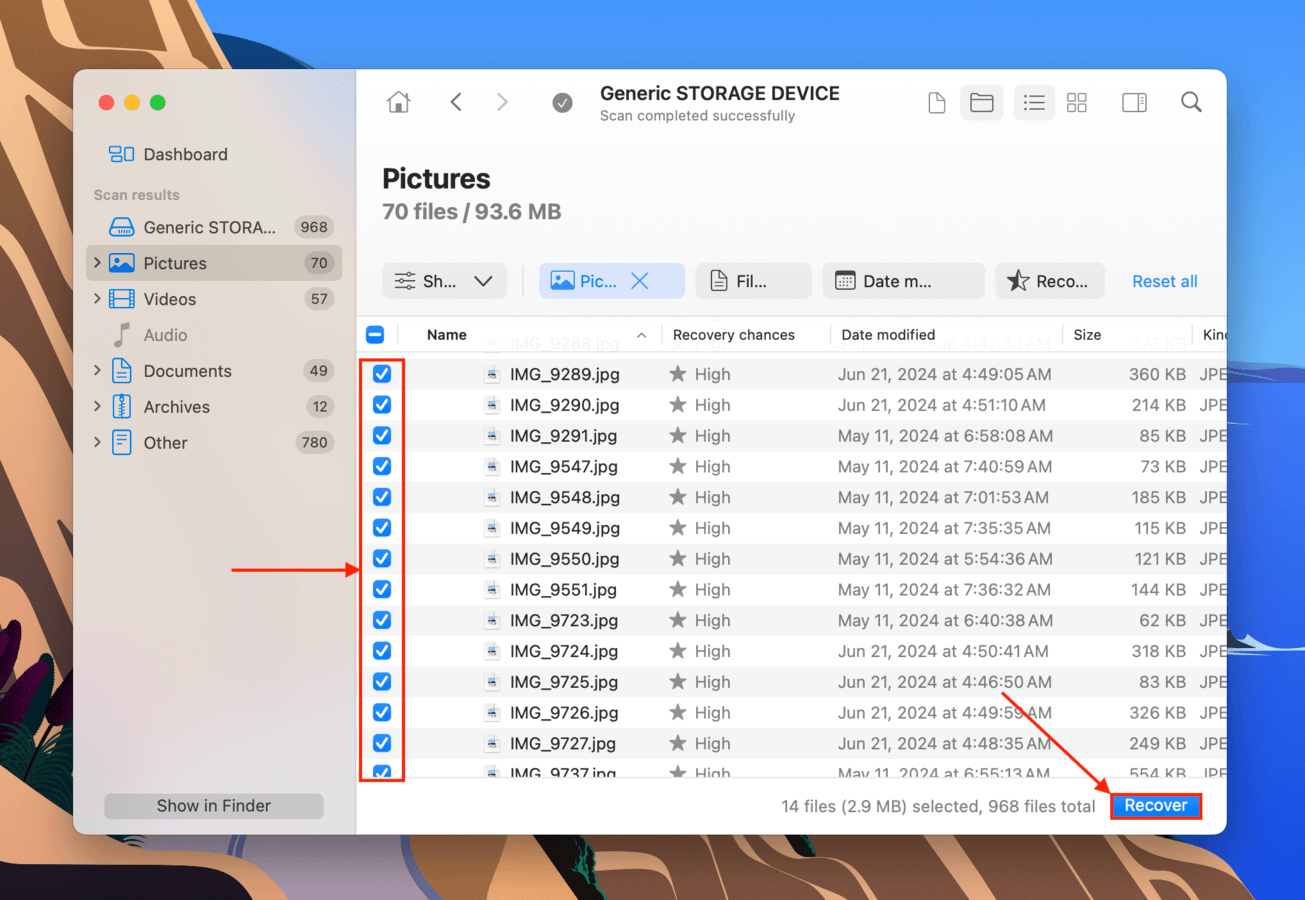
- Once you’ve located the files you want to restore, select them by clicking the boxes in the leftmost column. Then, click the Recover button.
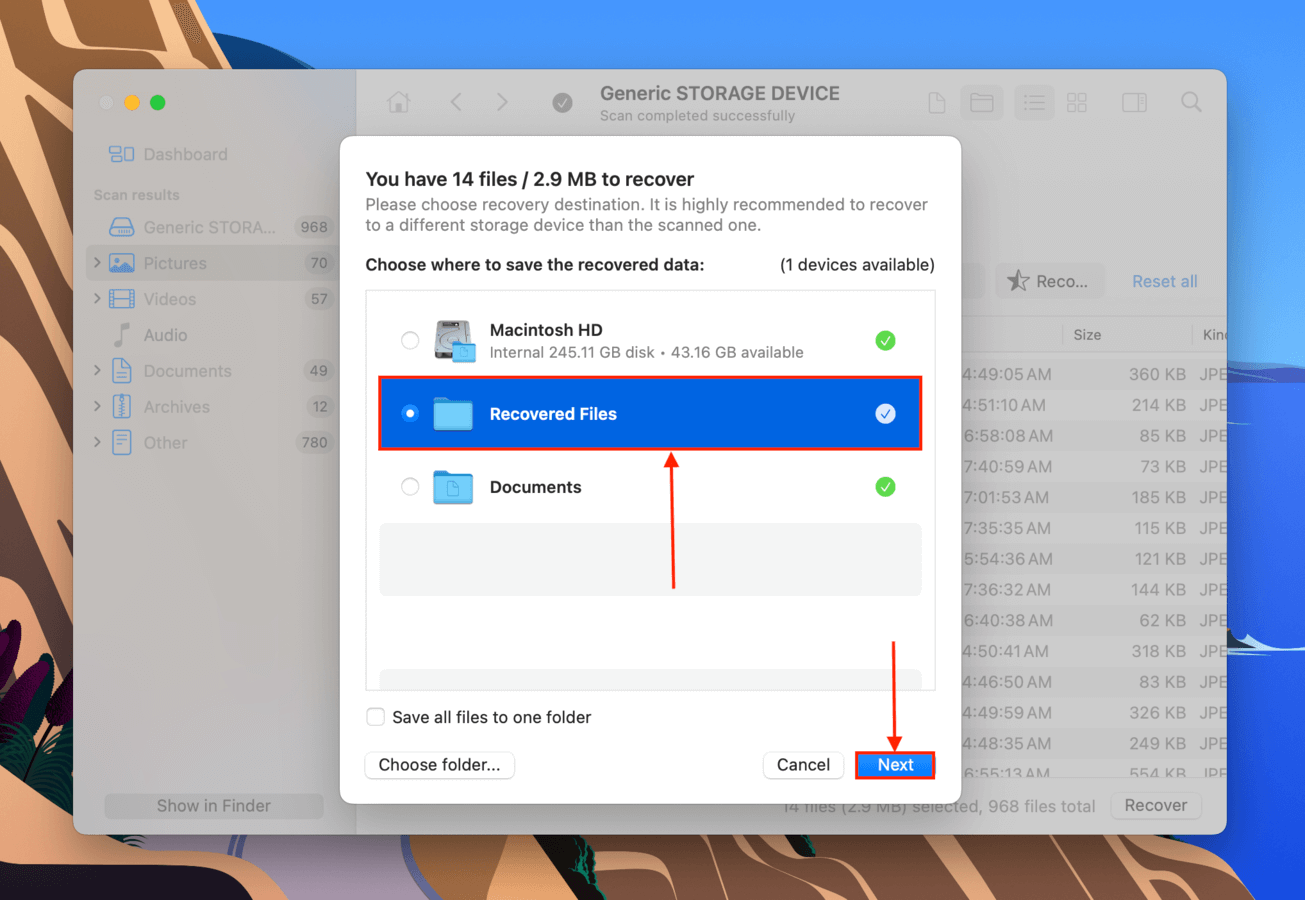
- In the dialogue window that appears, select a location on your Mac (not your SD card) where you want Disk Drill to save the restored files. Finally, click Next.
Once the recovery process is complete, you’ll find your restored files in the location you selected in step 7. We recommend that you immediately test your recovered video files and make sure they are playable.
Method 3: Recover Deleted Files with Open-Source Data Recovery Software
If you’re willing to learn how to use it, the open-source data recovery tool, PhotoRec, is an excellent choice for restoring deleted files from an SD card. It’s not as powerful nor as beginner-friendly as Disk Drill and other paid recovery software, but PhotoRec has an excellent signature scanner that recognizes a lot of file types – including documents, videos, and even RAW photos. PhotoRec’s Terminal-like interface is a bit tricky, but as long as you follow the guide we prepared below, you’ll get through the process quite easily.
- Download and install TestDisk/PhotoRec.
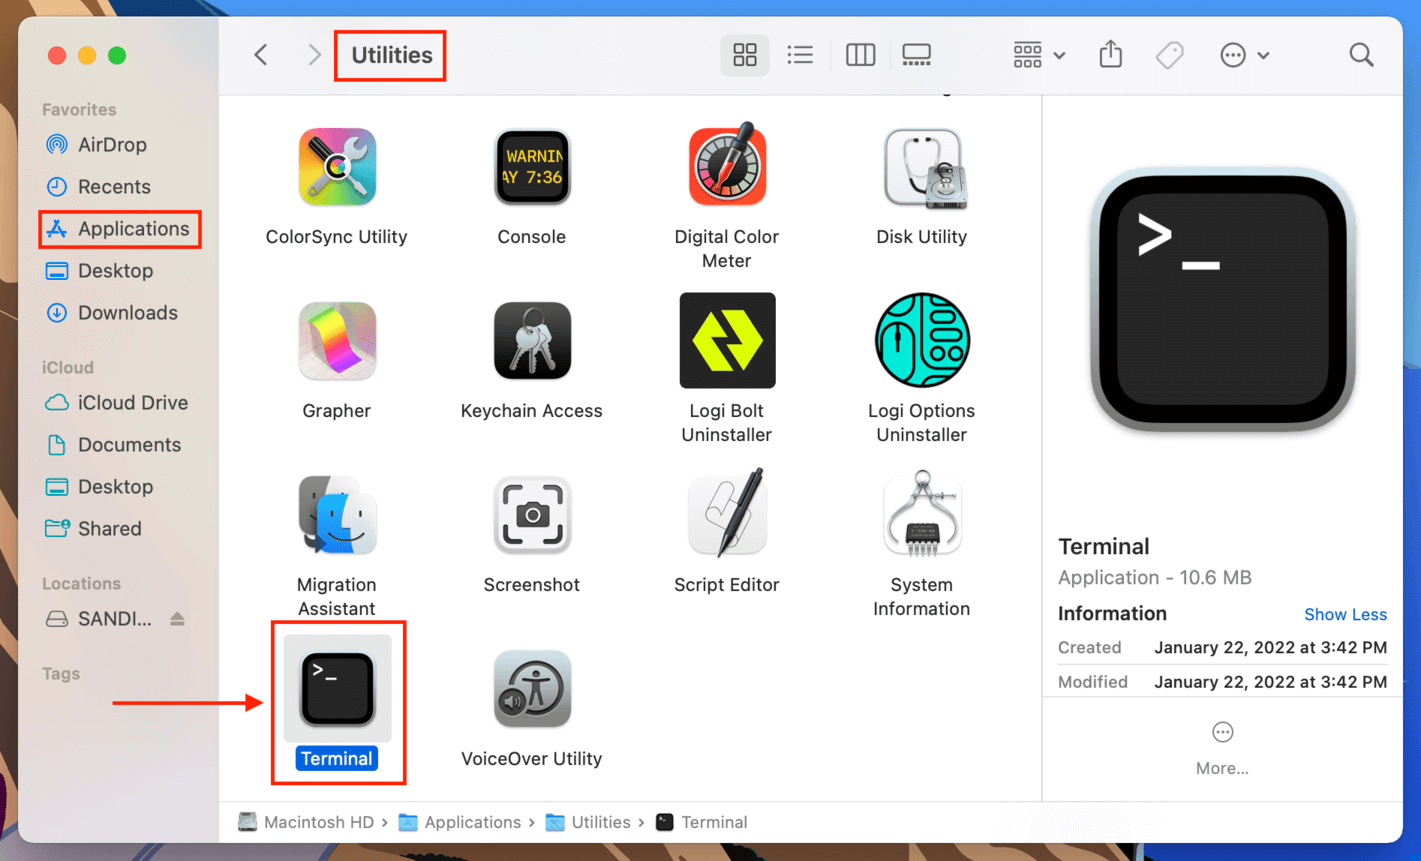
- Launch Terminal (Finder > Applications > Utilities > Terminal).
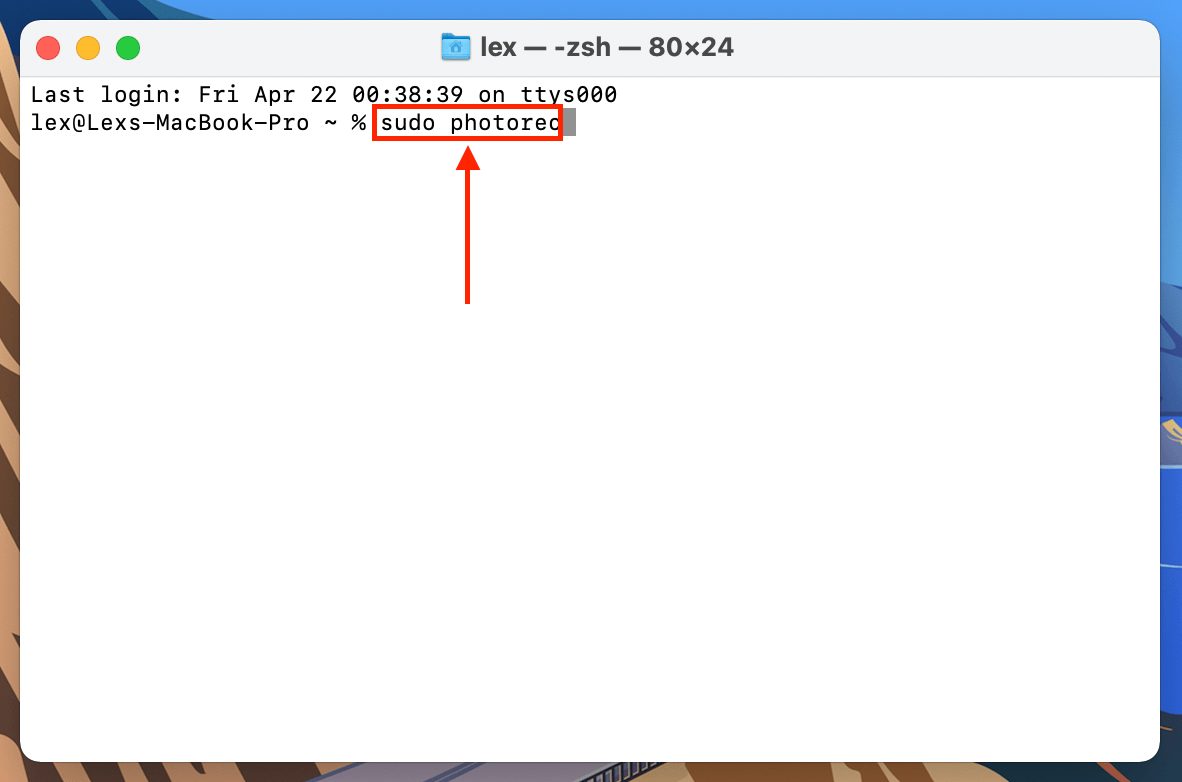
- Type the following command and hit return (enter your password if prompted):
sudo photorec
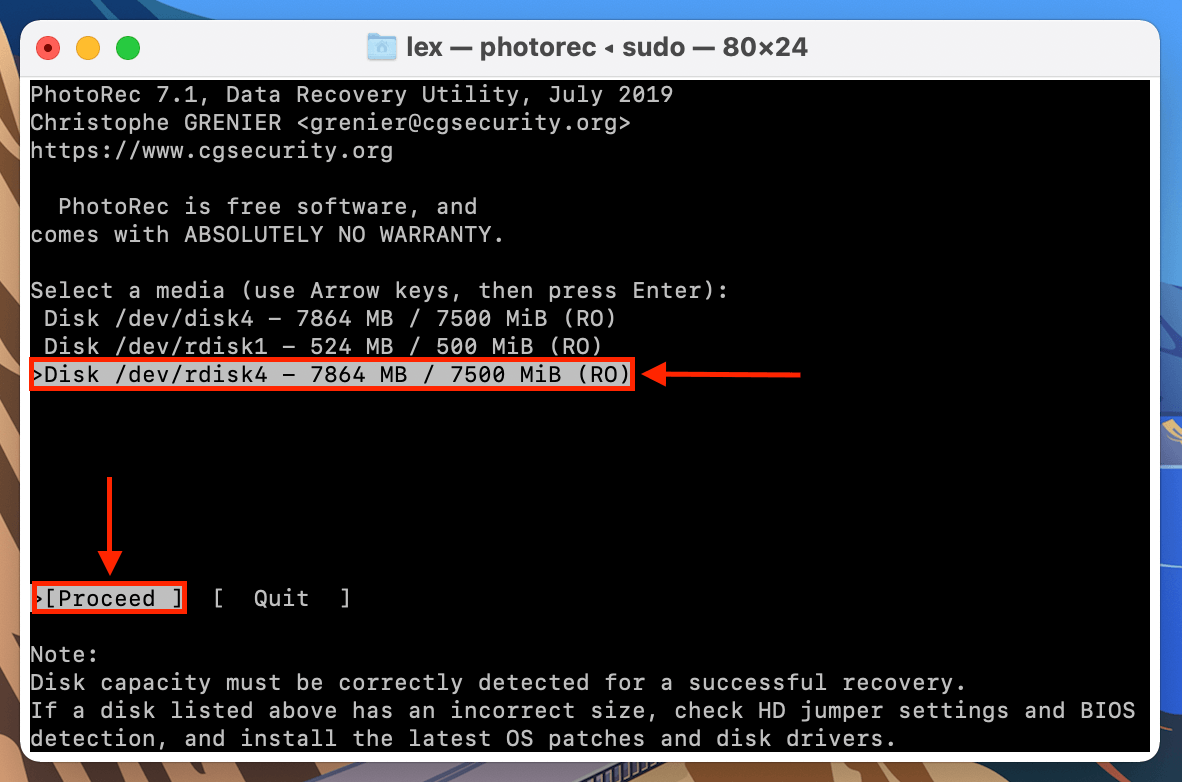
- Use your arrow keys to move up and down the list and select your SD card (you can figure this out by comparing disk sizes in Disk Utility). It’s also a good idea to choose the “rdisk” volume instead of “disk” for a more comprehensive scan. Then, hit return.
- Choose the partition that contains your data, then use your arrow keys to highlight “File Opt” and hit return.

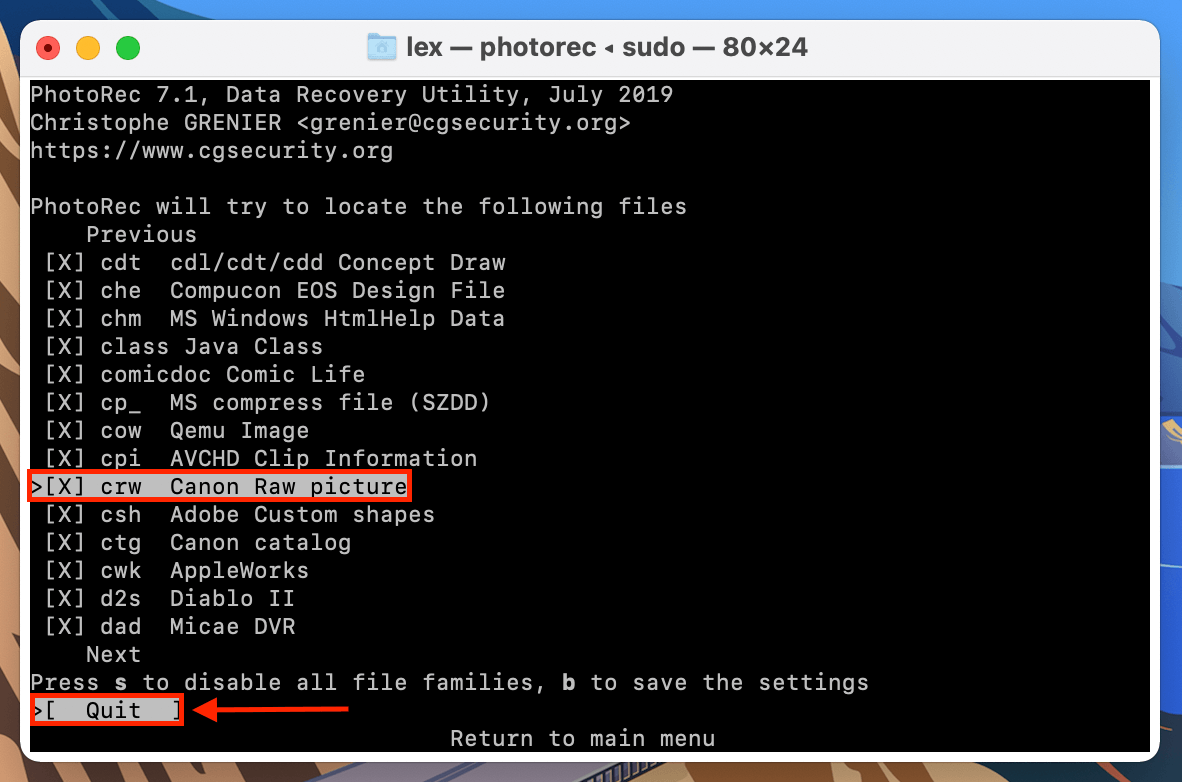
- Browse the list to make sure the file types you want to recover are ticked (ex. RAW files), then hit return to go back to the last screen.
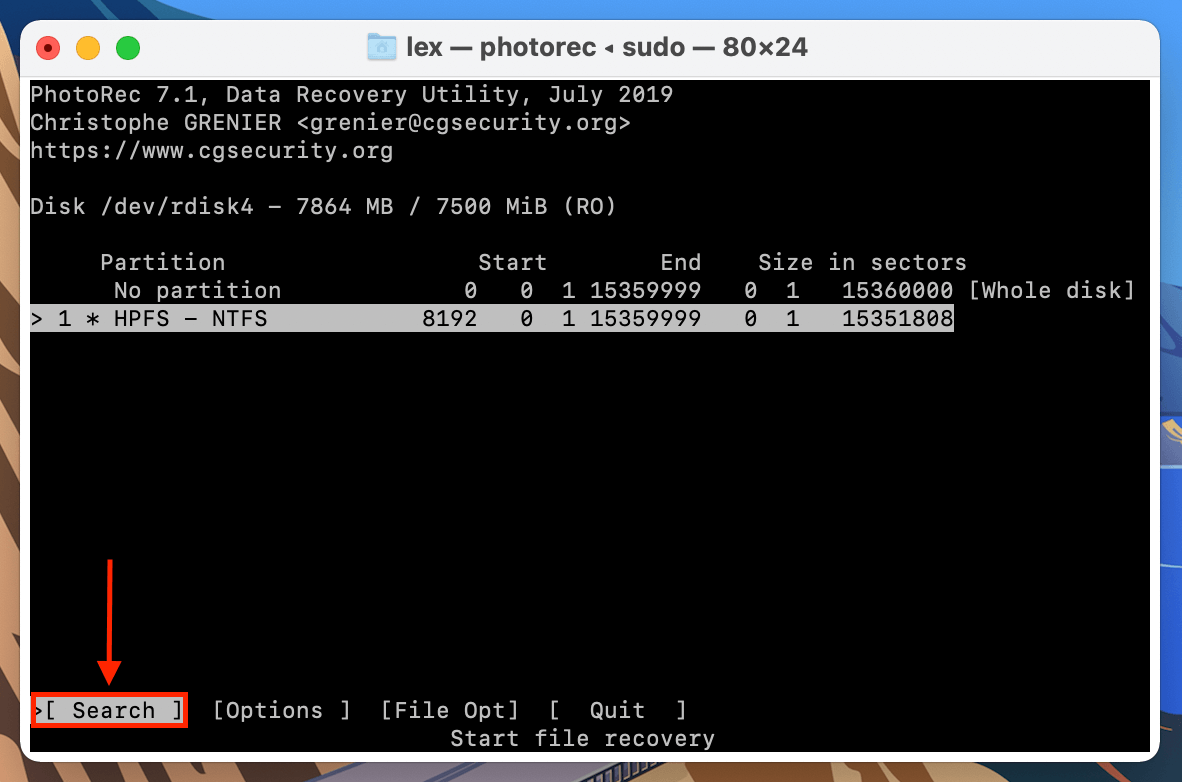
- Use your arrow keys to highlight “Search”, then hit return.
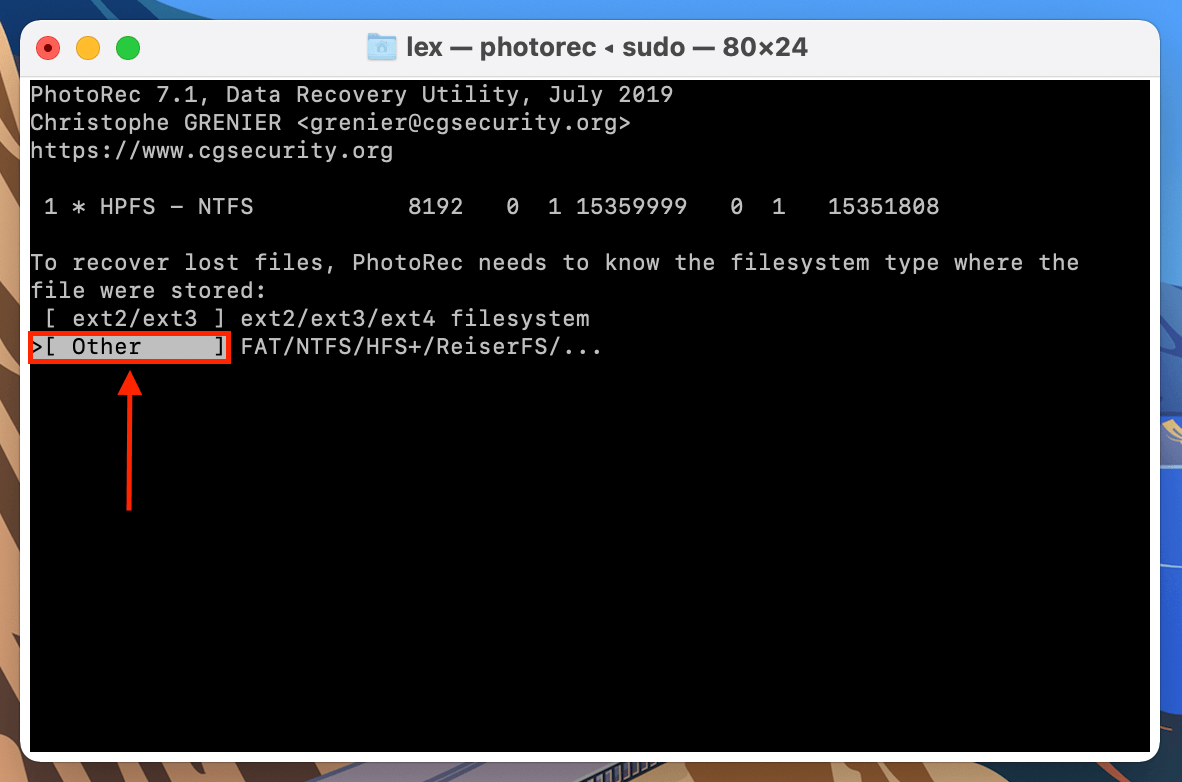
- Select “Other”, then hit return.
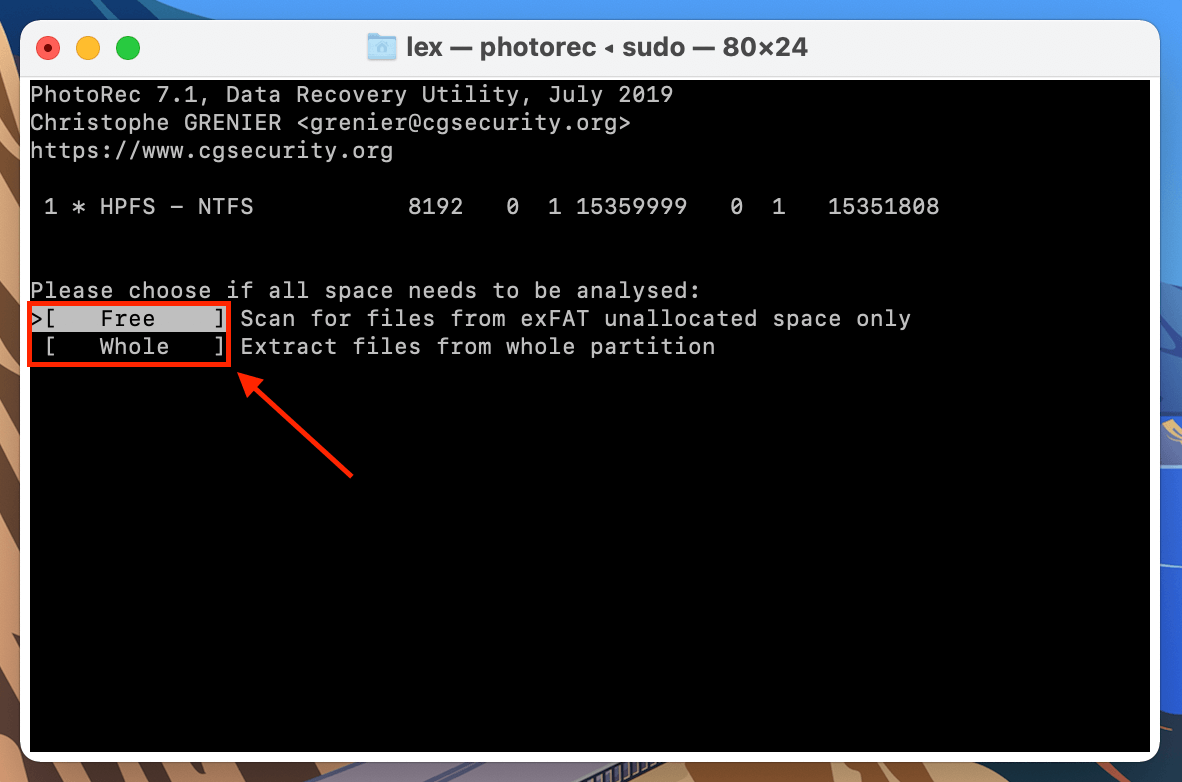
- If you accidentally deleted your files (or formatted your SD card), choose “Free.” If your data (or entire SD card) is corrupted, choose “Whole.” Hit return.
- Choose a destination for the recovered files, then hit (C) to confirm and begin the recovery process. Here’s a tip: Use the left and right arrow keys to go deeper into folders.

Once PhotoRec completes the recovery process, your files will be saved in a folder named “recup_dir” or “recup_dir.1~” in your selected destination.
Method 4: Recover Deleted Files on Mac with Time Machine
![]() If you enabled Time Machine on your Mac before your SD card files were deleted, it’s possible that those files got included in the backup! In that case, you can use Time Machine to travel through your SD card’s timeline and grab those files from the directory’s history.
If you enabled Time Machine on your Mac before your SD card files were deleted, it’s possible that those files got included in the backup! In that case, you can use Time Machine to travel through your SD card’s timeline and grab those files from the directory’s history.
Step 1. Connect your SD card to your Mac using a USB card reader. Step 2. On the Apple Menu Bar, click the Time Machine button > Browse Time Machine Backups… 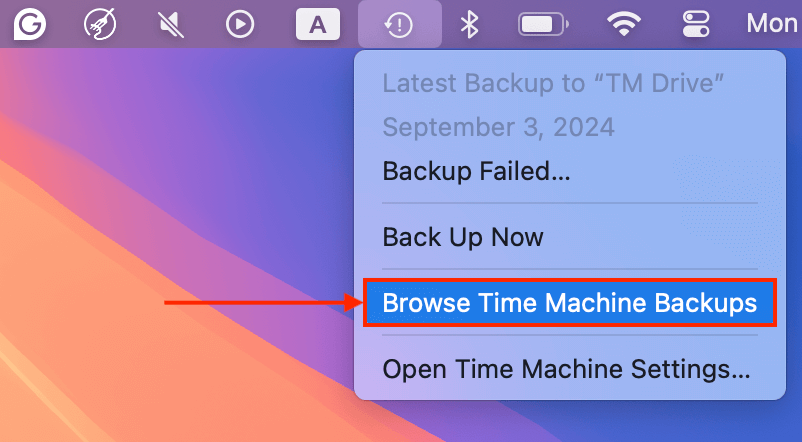 Step 3. Navigate to your SD card’s directory. Then, use the arrows on the right of the window to move backward in that directory’s timeline. Once you go far enough, the deleted files should appear (if they were successfully backed up) – select them and click Restore.
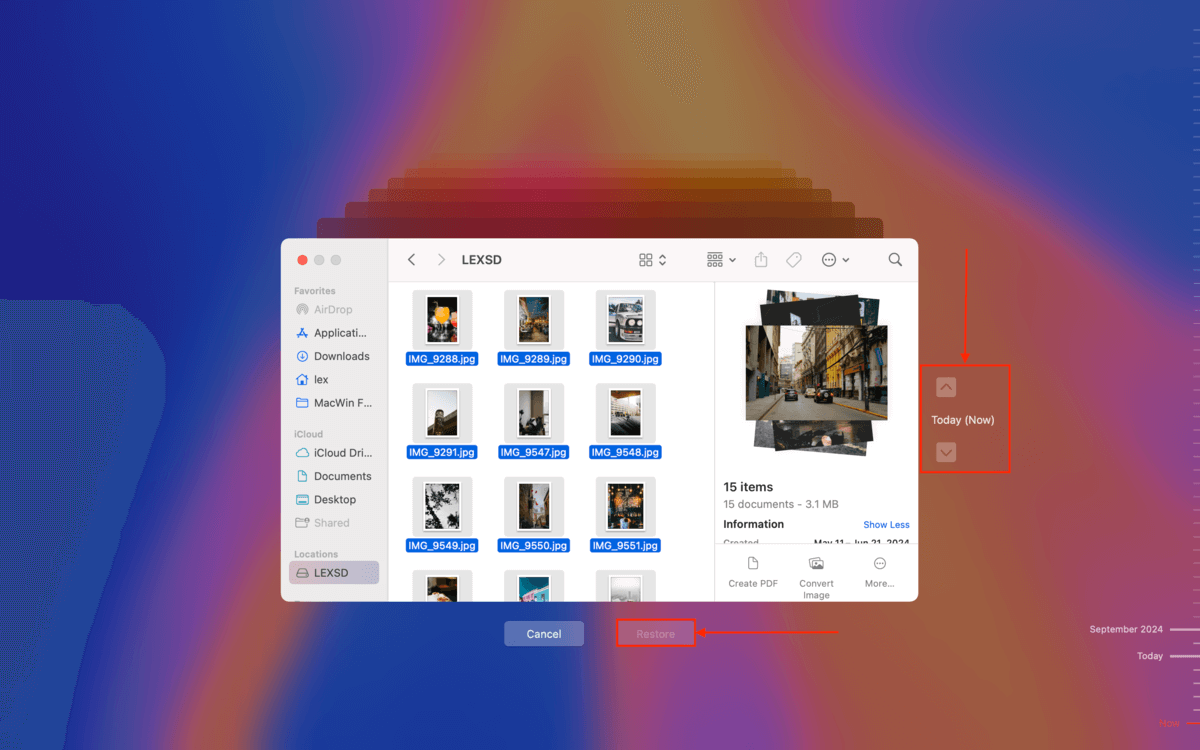
Method 5: Restore Your SD Card Files From a Cloud Backup
Do you have any cloud storage services enabled on your Mac? Certain cloud storage services have features that automate the file-uploading process for you in different circumstances. Depending on how it’s set up, you may have copies of your SD card files that were automatically saved to the cloud.
For example, Dropbox has a feature called Camera uploads. When enabled, Dropbox will automatically back up photos and videos from external storage devices as soon as they connect to your Mac. Even if the original copies of your photos get deleted from your SD card or even from your local Mac disk, you can easily download their backup copies from Dropbox’s (or another service’s) website.
Step 1. Open any browser and log in to Dropbox.com.
Step 2. Navigate to the Camera Uploads folder. Then, select the files you want to save and click the Download button.
Do your SD card files keep mysteriously disappearing?
If your SD card files keep going missing without human intervention (e.g. accidental deletion or formatting), there’s a good chance that it got corrupted. This might have been caused by a number of varying issues, like virus infections, read/write interruptions, etc. If this is the case for you, recovery AND repair might still be possible if you act quickly. Check out our guide on how to recover and fix a corrupted SD card on a Mac.
FAQ:
- R-Studio
- Remo Recover
- Stellar
- Card Rescue
To learn more about these tools (and the other features of Disk Drill and TestDisk/PhotoRec, read the full article).
- Plug the SD card into your Mac via either a dongle or into the side of it if it has an SD card slot.
- Launch Disk Utility by going into Applications and then Utilities or you can use Spotlight search.
- Your SD card will be on the left-hand side, select it from there.
- Click format and then choose the data format that you wish to format it to.
- All of the data will then be removed from your SD card and it will be set up as new again.
- Plug the SD card into your MacBook Air.
- Launch Disk Utility.
- Click on your SD card.
- Choose to format it.
All of the data will then be removed from your SD card and it will be set up as new again.


