
Want to organize your iPhone photos? If you’ve got thousands of them, that can seriously drag your willpower down the drain if you’ve organized your pictures. And the more you put off organizing your photo library, the harder it will become to clean it up later.
Let this article be your sign to start regularly organizing the photos on your iPhone today! We’ll show you how to organize the photos on your iPhone – for a comprehensive cleanup, we broke down the process into 6 steps.
Table of Contents
Importance of Organizing Photos on iPhone
Directly and indirectly, organizing photos on your iPhone can greatly improve your experience with your device. It runs faster, it’s easier to use, and you can avoid having to quickly delete apps or personal data when you run out of storage space.
Let’s quickly go over the reasons why you should organize the pictures on your iPhone (some of which you might not know about) and we’ll jump straight into the steps.
| Benefit | Summary |
| 📦 More storage space | The most obvious benefit of organizing your photos is reclaiming a few hundred megabytes to gigabytes worth of duplicates, blurry pictures, and photos you no longer need. |
| 🚀 Better performance | When your device has less clutter and more available storage space, it can usually perform tasks more quickly. |
| 🧭 Easier navigation | Easily find the photos you’re looking for by setting up albums and folders and ensuring that you don’t have to scroll through photos you don’t even need. |
| 🩺 Improved mental health | A study published in 2018 discovered a correlation between “digital hoarding” and stress levels. In other words, having clutter on your iPhone can stress you out! Good digital hygiene, on the other hand, can help you avoid stress. |
How to Organize Photos on an iPhone
If you want to organize your iPhone, there are a few things you need to do depending on your goals and what your photo library looks like. For example, you may want to declutter the photos on your iPhone, make your pictures easier to find, or organize your camera roll.
We’ll guide you through 6 steps that will help you thoroughly organize the photos on your iPhone.
Step 1: Delete or Manage Clutter
If you take a lot of photos and screenshots, your library might also be filled with blurred takes and duplicates, especially if you don’t regularly purge it. Depending on how much clutter you have, you can deal with it manually or using an app. We’ll briefly demonstrate both solutions below.
Option A: Manual Deletion
If you still have your photo library under control, getting rid of clutter manually is doable. While iOS doesn’t provide direct cleanup tools, it does a good job of organizing your photos, so finding potential clutter is relatively straightforward.
The default albums in the Photos app (that typically store the most clutter) include Selfies, Live Photos, Bursts, Screenshots, and Duplicates.
Here’s how to utilize these albums for cleanup:
Step 1. Open the Photos app. Then, scroll down until you see the Media Types and Utilities sections.
Step 2. Select the media you want to delete. For this demonstration, we’ll choose the Duplicates album.
Step 3. Tap Merge to keep one remaining copy among a group of duplicates. You can also select and delete photos manually. Make sure to confirm when prompted.
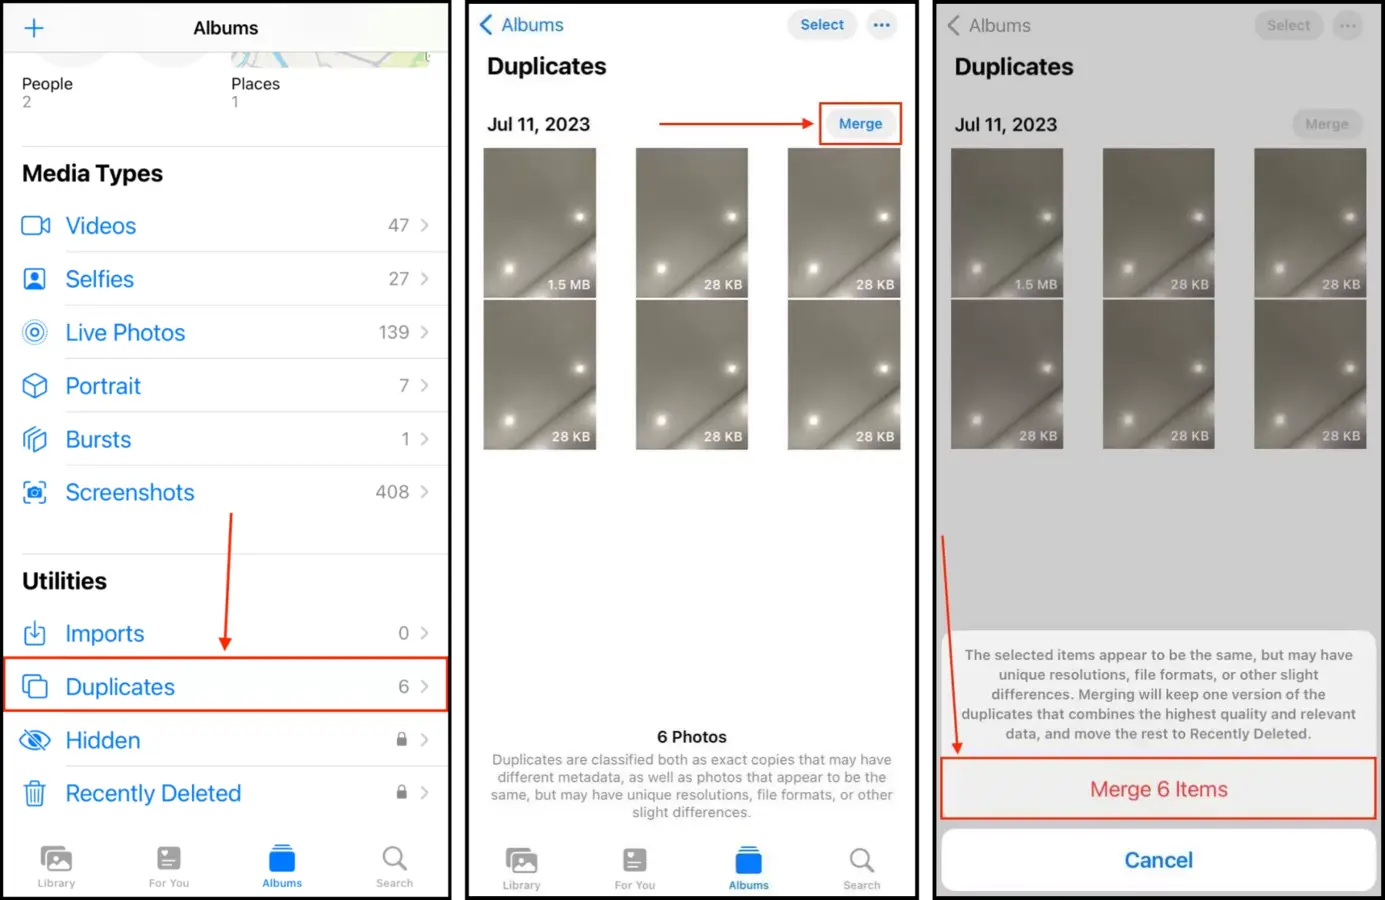
Depending on which media type or utility you review, interface actions might appear different. For example, the Duplicates album has the merge tool, while the Bursts album presents groups of photos as a slideshow for easy selection.
Option B: Using a Third-Party App
Third-party iPhone cleaner apps are software that is designed to make the cleanup process faster and easier—either by improving on existing features or offering new ones.
As an example, we’ll be demonstrating an app called Clever Cleaner: AI CleanUp App. It can detect similar and duplicate photos, whereas the native Photos app can only identify exact duplicates.
Aside from similars, Clever Cleaner app also compiles screenshots, Live photos, and Heavies, which consist of the largest files in your library. And it’s 100% free—with no ads, no sketchy 3-day trials, and no limitations.
Step 1. Download Clever Cleaner: AI CleanUp App from the App Store.
Step 2. Open the app and allow all required permissions. Then, tap on a set of similar photos.
Step 3. Clever Cleaner will automatically select the best version among the group and mark the rest for the trash folder. Modify the selection if you wish. Then, tap Move to Trash.
Step 4. Finally, tap Empty Trash in the dialogue popup that appears at the bottom of the menu.
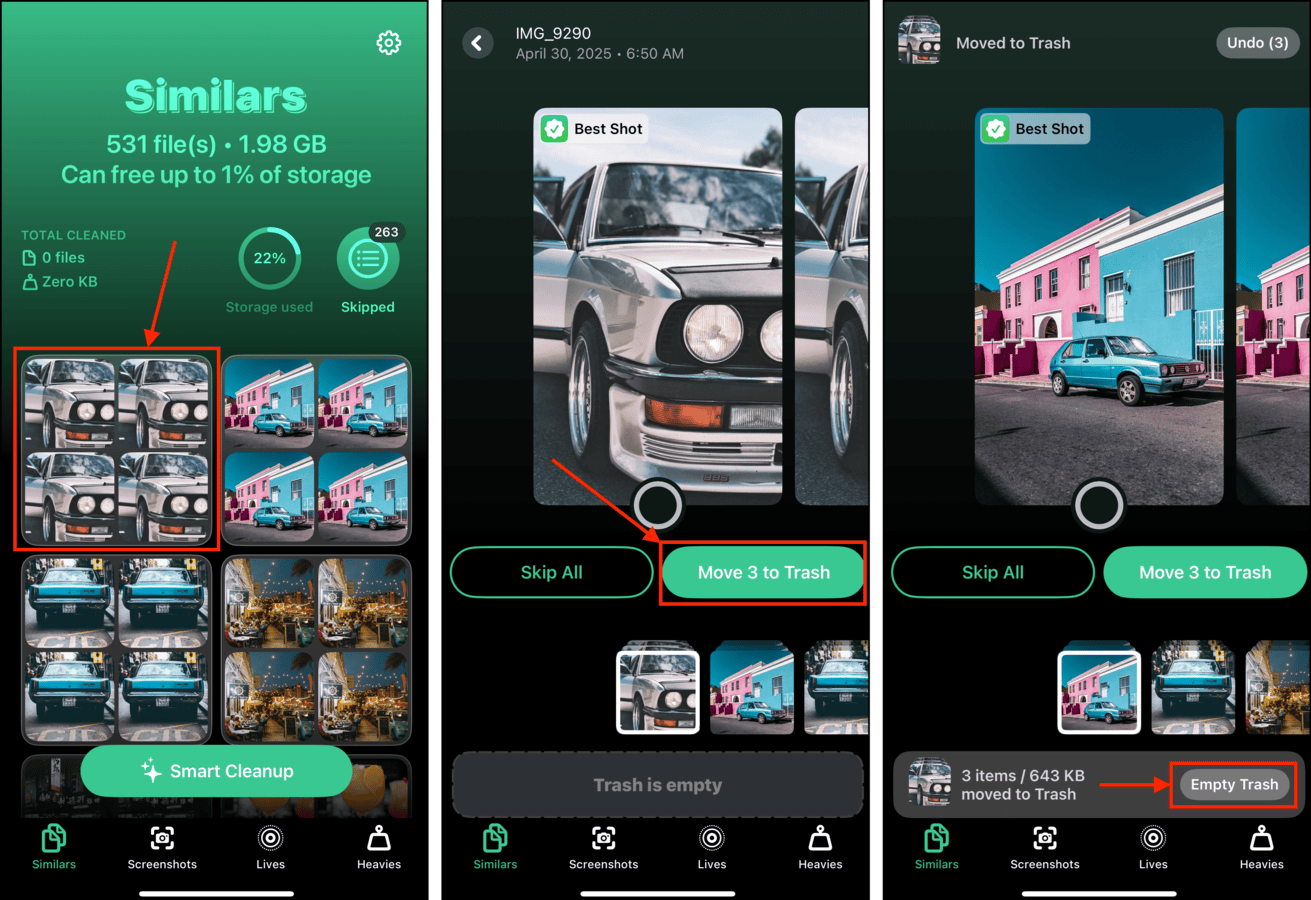
You can also tap the dialogue popup itself to review items you sent to the trash folder and either restore or permanently erase them.
Step 2: Check Hidden Photos
Check your Hidden album. You may have forgotten about high-resolution pictures and videos you previously hid, which are taking up storage, slowing down your iPhone, and bloating your backups – without you even seeing them!
Step 1. Open the Photos app.
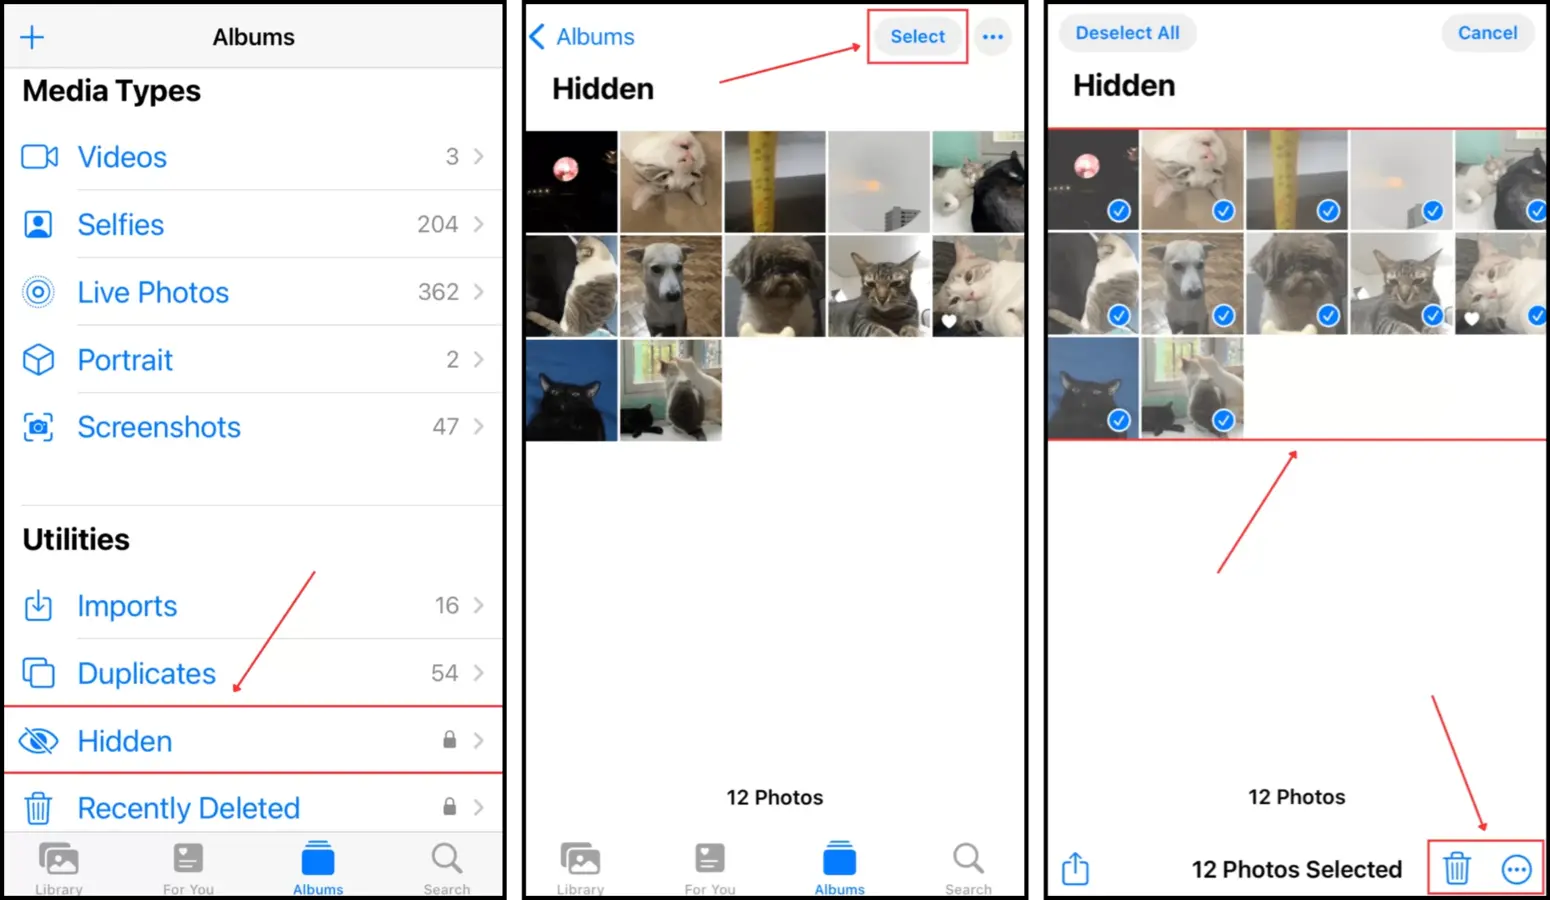
Step 2. Scroll down to the bottom of the main menu until you find the Utilities section. Tap Hidden.
Step 3. In the top-right corner of the screen, tap Select.
Step 4. Tap the photos you want to select. If you want to delete them, tap the trash icon. If you want to unhide them, tap the meatball menu > Unhide.
If you decide to get rid of some of your hidden photos, don’t forget to delete them again from the Recently Deleted album!
Step 3: Sort Photos and Add Tags
Let’s talk about Sorting and Tags in iOS Photos. The purpose of these features is to help you easily find and categorize your photos according to their content.
This makes deleting photos and organizing them into albums much faster and more intuitive. We’ll briefly demonstrate both tools below.
To sort your photos on your iPhone:
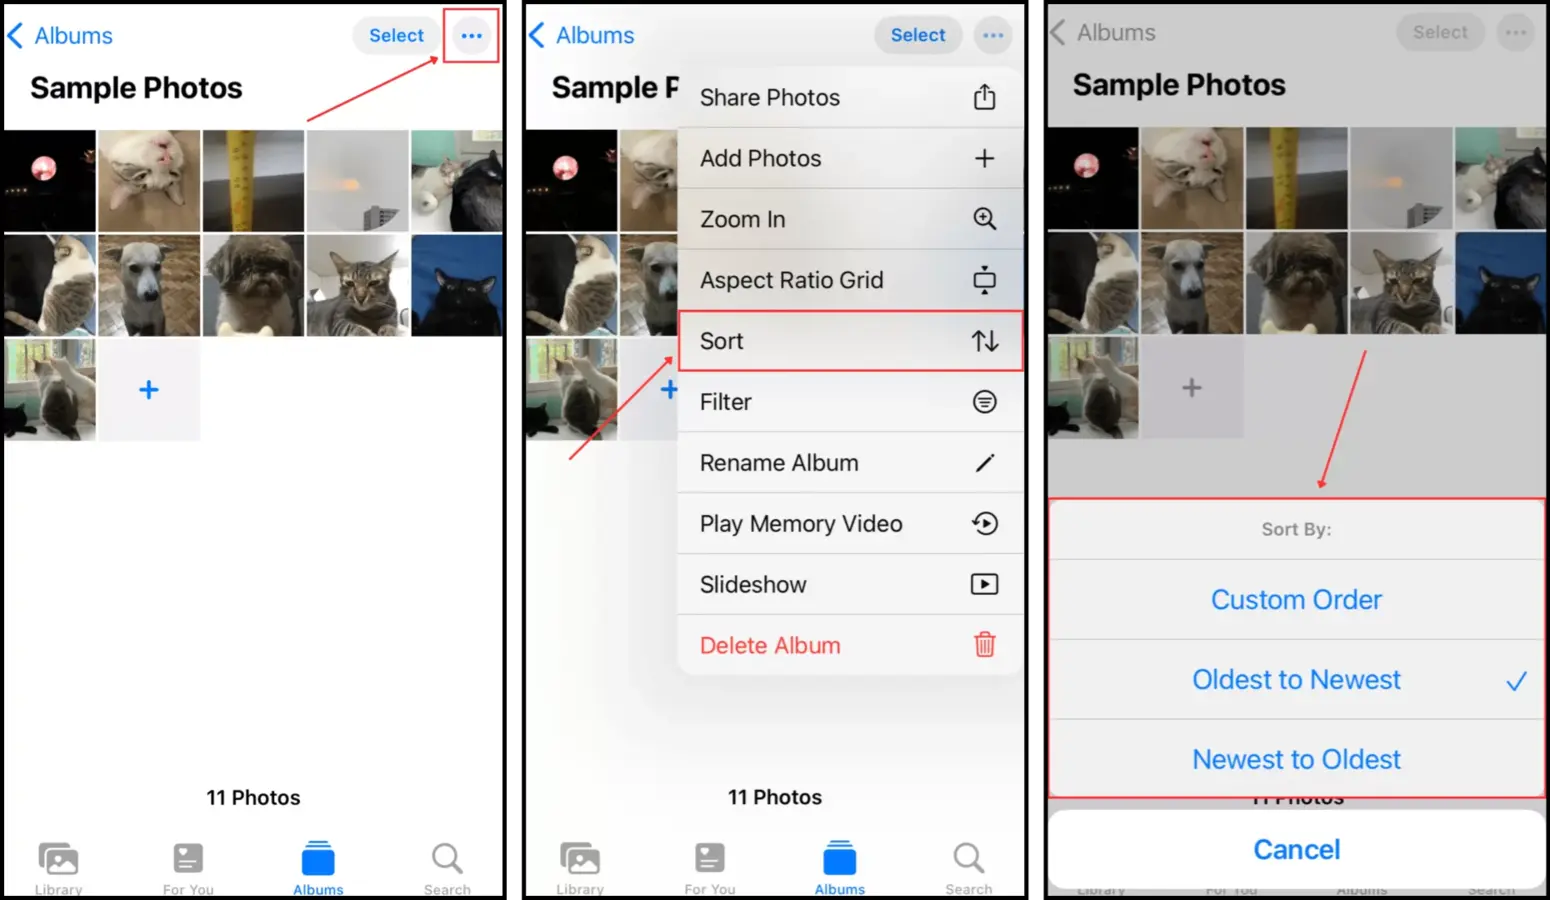
Step 1. Open the Photos app. Then, tap Albums at the bottom of the screen and open any album you want to sort.
Step 2. Tap the More button (3 dots) in the top-right corner of the screen and tap Sort.
Step 3. Choose from the sorting options that appear. Oldest to Newest and Newest to Oldest sorts your photos by date. Select Custom Order if you want to (or already have) sort your photos manually (tap + hold + drag).
To add tags to your photos on your iPhone:
Step 1. Open the Photos app and open your library or any album.
Step 2. Tap on the i button at the bottom of the screen.
Step 3. In this menu, you can add a location, adjust the date and time of the photo, and tag a person. iOS will automatically place tagged photos in the People & Places albums, as well as sort the photos in your library according to date.
Step 4: Manage Albums and Folders
Albums and folders can help you sort and organize photos in a way that makes sense to you and makes it easier for you to access the pictures you need.
Just make sure you know the difference! An album allows you to organize photos in groups according to tags, locations, or simply your own preferences. It’s the easiest way to organize photos on your iPhone.
Folders, on the other hand, can only store new and existing albums as well as other folders.
We’ll show you how to use both of these tools to manage and categorize photos on your iPhone (and how to delete redundant albums and folders if needed.
To add folders and/or albums to your Photos app:
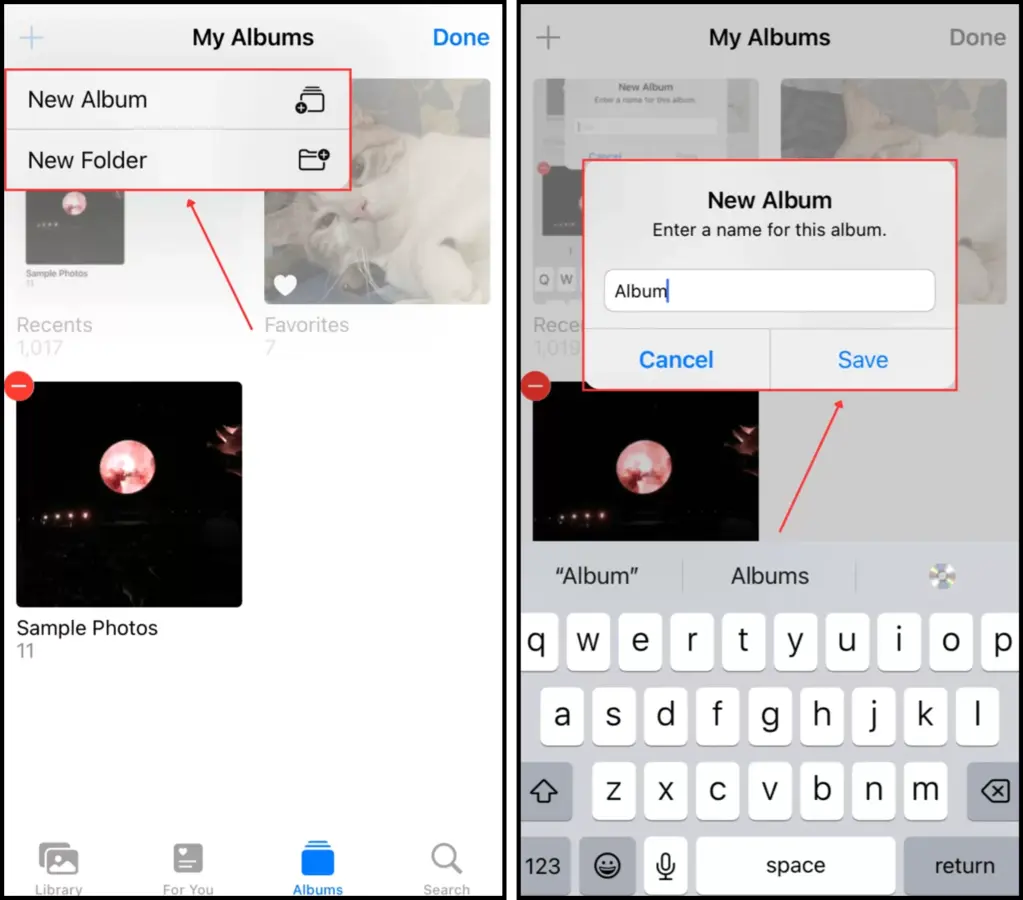
Step 1. Open the Photos app and tap the + button in the top-left corner of the screen. Then, select whether you want to create a new album or a new folder.
Step 2. Type the name of your new album or folder and tap Save.
Step 3. You will then be prompted to select photos to add to the album or folder.
To delete albums on your iPhone (and folders):
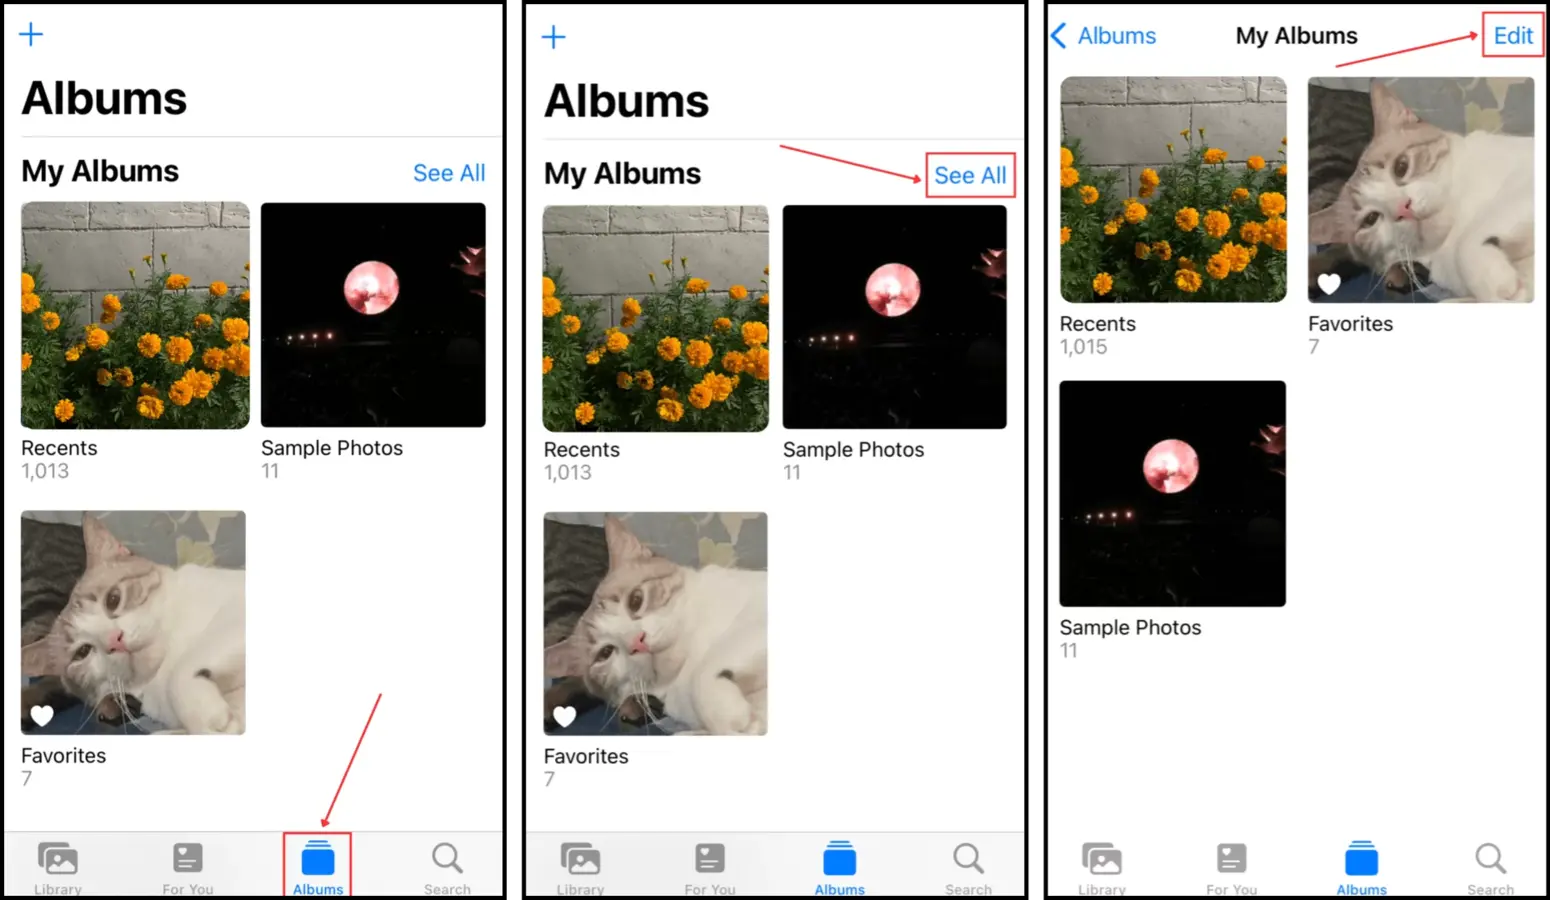
Step 1. Open the Photos app and tap Albums at the bottom of the screen.
Step 2. Tap See All beside My Albums.
Step 3. Tap Edit in the top-right corner of the screen.
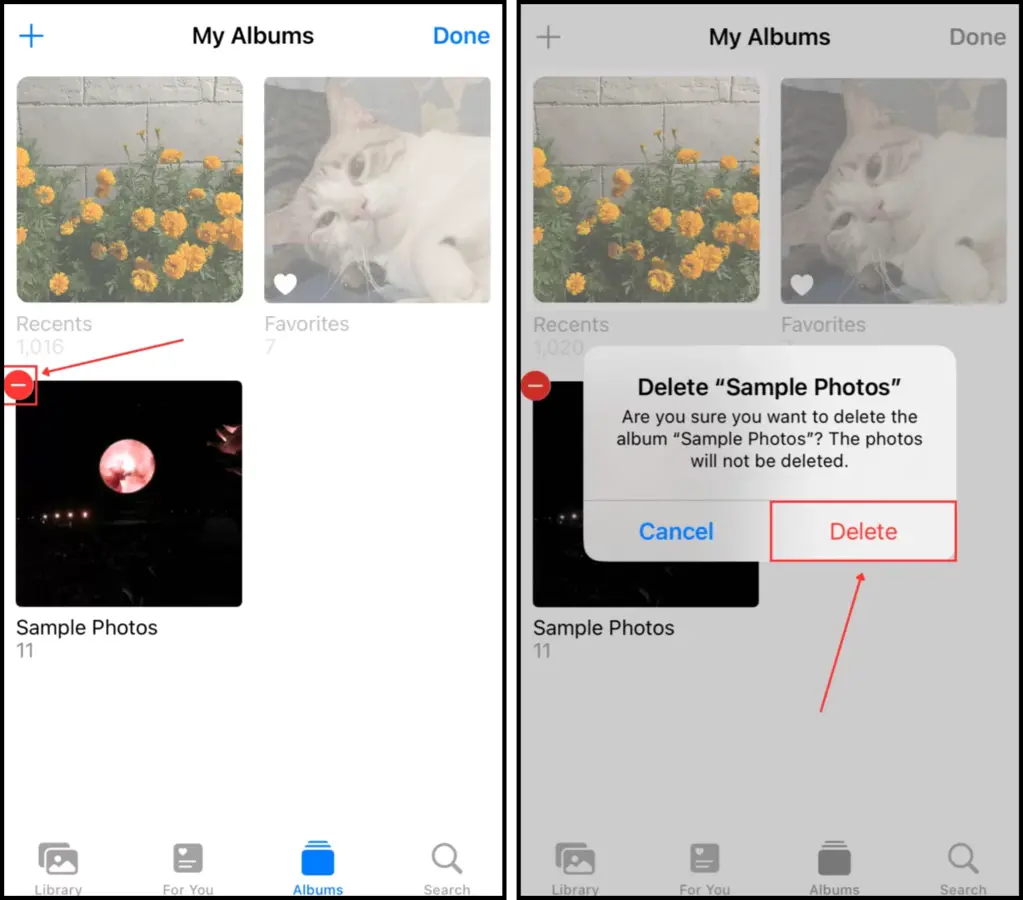
Step 4. Tap the – button in the top-left corner of the album or folder you want to delete.
Step 5. Tap Delete to confirm the action.
Step 5: Back Up Photos Without Duplicates
Duplicates can occur during backups due to errors, conflicts, or redundancies during synchronization. For example, it’s possible that you create a Finder backup of files already synced to iCloud—and during the restore process, iCloud sync glitches out and doesn’t flag duplicate photos appropriately.
Here’s the best practice: if you have iCloud Sync enabled for photos on your iPhone, it’s better to create an iCloud Backup—it generally does a good job of avoiding saving the same files as iCloud Sync. If you have iCloud Sync disabled on your device, use Finder/iTunes backups instead. They capture a fuller snapshot of your device’s data.
Option A: iCloud Backup
iCloud Backup—different from iCloud Sync or Sync this iPhone—lets you save copies of your data to iCloud’s servers. It does not save files already copied by iCloud Sync (e.g., iCloud Drive data).
It’s a good choice if you: (a) use iCloud Sync for Photos, (b) prefer backing up wirelessly over WiFi, or (c) have a lot of free storage space in iCloud (or if you have iCloud+).
Step 1. Open the Settings app. Then, tap your APPLE ID.
Step 2. In the Apple Account menu, tap iCloud.
Step 3. Scroll down a bit and tap iCloud Backup.
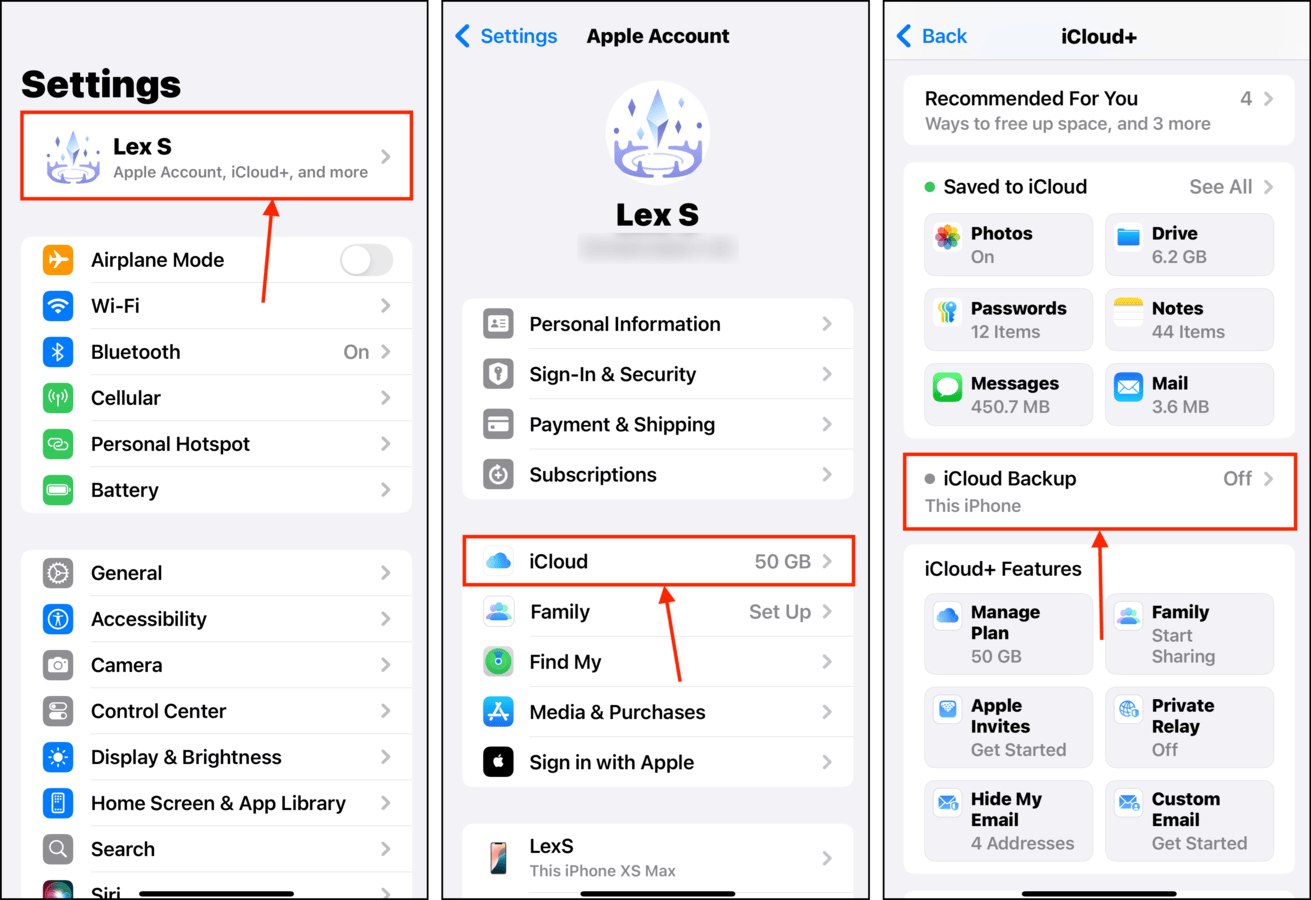
Step 4. Activate the toggle switch beside Back Up This iPhone.
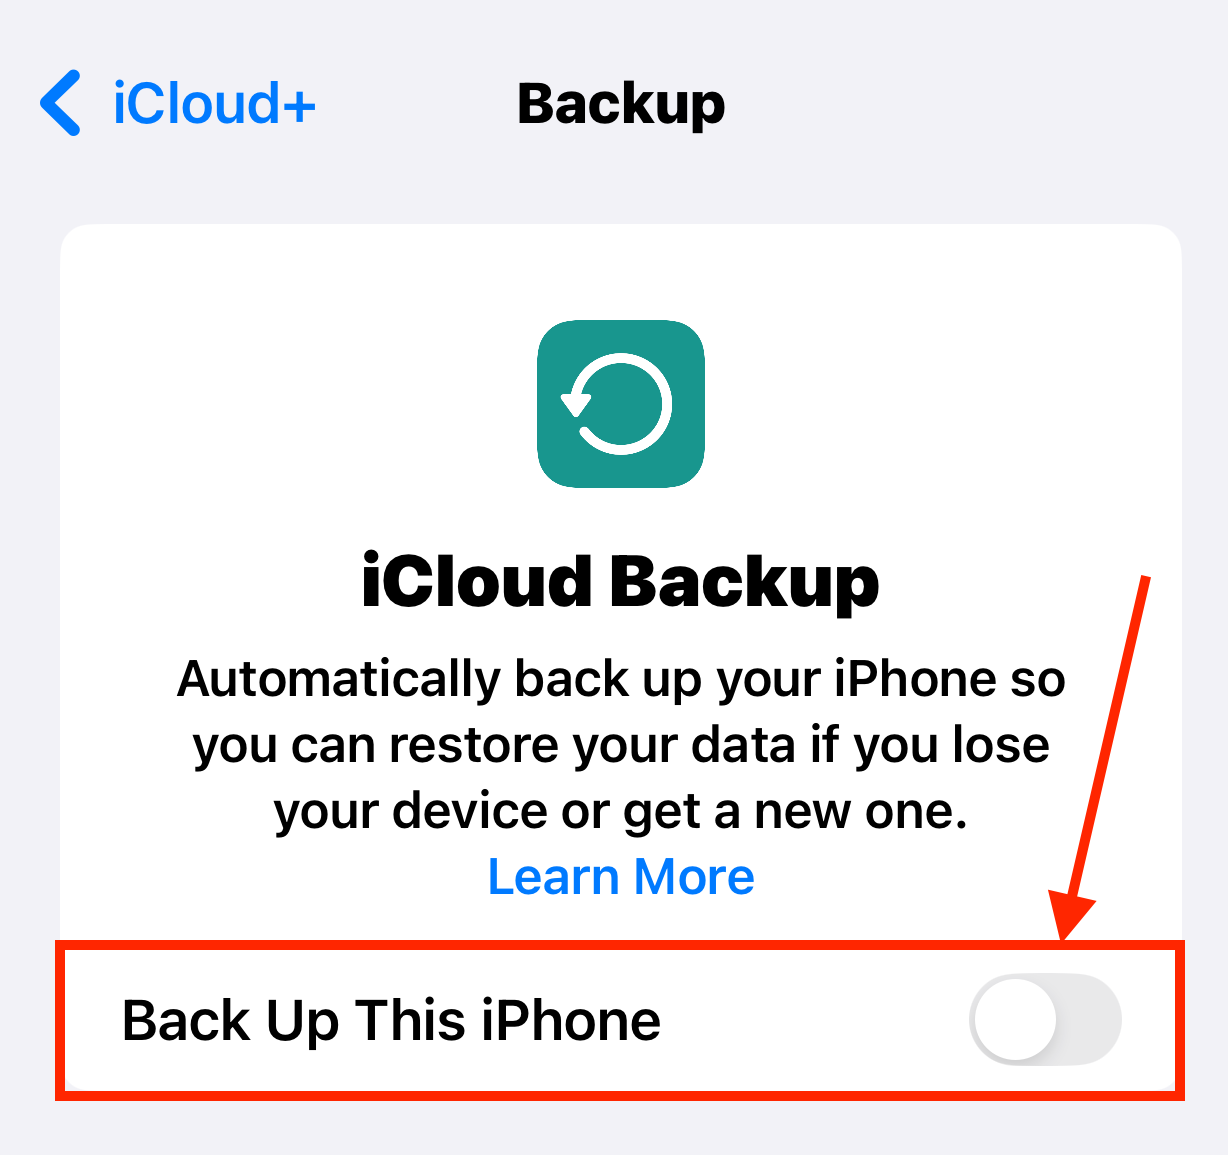
Once iCloud Backup is enabled, leave your device on charge for a few minutes to an hour (or more, depending on how much data you need to copy).
Option B: iTunes or Finder Backup
Using iTunes or Finder to back up your iPhone is a superior choice if you have a spotty internet connection, because all you need is a cable on your Mac.
We also recommend this option if you don’t have iCloud Sync enabled for your photos. iTunes/Finder backups save everything, which is also why being able to save the backup file locally on your Mac is super helpful in terms of storage space.
Step 1. Connect your iPhone to your Mac using the appropriate Thunderbolt cable. Select Trust and/or Allow when any permission pop-ups appear on your iPhone or Mac.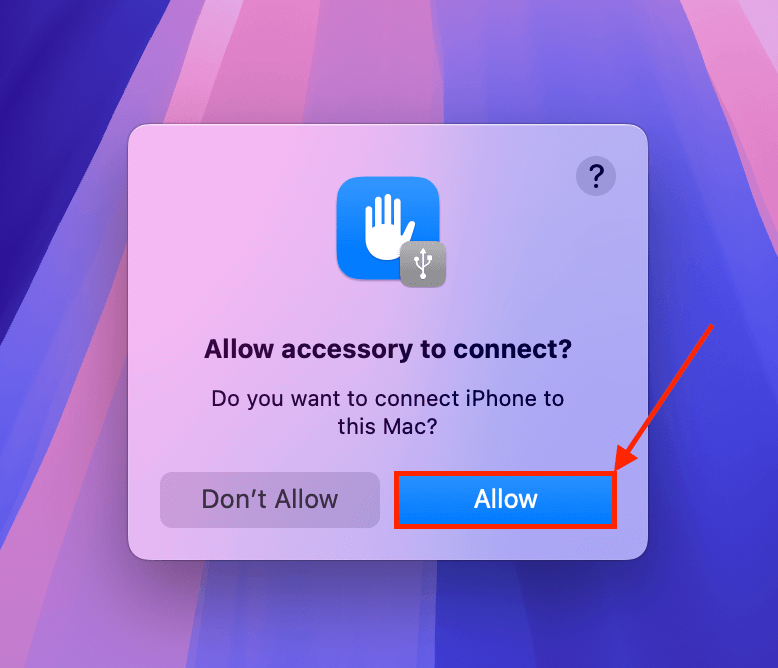
Step 2. Open Finder and click your iPhone in the left sidebar. In the General menu under the Backups section, click Back Up Now.
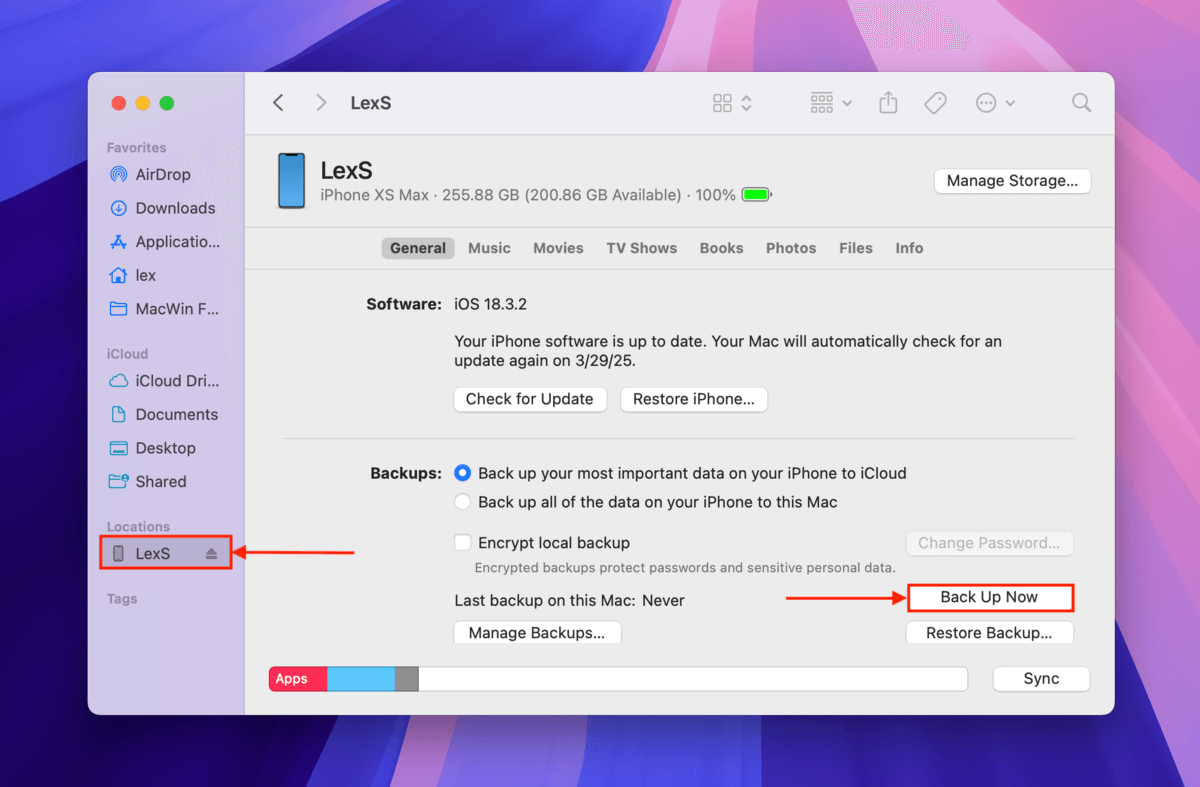
You can opt to encrypt your backup with a password for added security—make sure you don’t lose it!
Tips for avoiding duplicates during backup:
- This may seem obvious, but make sure to delete all duplicates before creating a backup (read this section of the article for a guide).
- Allow iCloud to automatically back up your data for you. Manually uploading your data to iCloud may result in duplicates.
- Make sure you permanently delete all photos in the Recently Deleted album in your Photos app to prevent possible duplicates during backup.
- If you’re restoring your iPhone from an iCloud backup, make sure that you don’t manually import any photos to your device – let iCloud do it.
- Plug your iPhone into a wall charger and ensure that your network is super stable when creating a backup. Interruptions during the backup process may cause duplicates and other issues.
Need More Organizing Help?
It’s normal to get overwhelmed by the sheer number of files on your iPhone–we often take for granted just how much data we accumulate over the years. But just like iPhone cleaner apps, there are third-party tools that can help you organize the files on your device much more easily.
We wrote about them in a recent article on our 10 favorite iPhone organizer apps, which utilize AI, touch gestures, batch operations, cross-platform synchronization, and more, to help you get your photos, contacts, and general files under control.


