
If you’re working with a drive and you keep getting the “Couldn’t Modify Partition Map” error, that typically means the storage device got corrupted or something went wrong with the file system. This makes the entire device unreadable to all but very specific software.
In this article, we explore three ways to deal with this error. We included step-by-step instructions as well as accompanying screenshots so you can safely work on your drive without worrying about your files (more on this later). Read on!
Table of Contents
What is a Partition Map?
To understand what a partition map is, let’s first break down what a partition is. A “partition” is a virtual section of a hard disk. You can have multiple partitions on your hard disk, even if you’re using just a single HDD or SSD.
A “partition map” is your HDD or SSD’s table of contents. When you connect your drive to your computer, the partition map tells the operating system the following information:
- Which partition is bootable
- Where each partition is physically located on the hard disk
- What each partition is used for (e.g., one for macOS, another for file storage, etc.)
The “Couldn’t Modify Partition Map” error usually occurs when this partition map gets damaged or corrupted, if it’s blocked from user access, or when the partition is currently in use.
How to Recover Deleted Data from a Problematic Device
Once you start encountering the Couldn’t Modify Partition Map error, we strongly recommend that you immediately recover your data, even before trying to fix the drive. This is to prevent total data loss in case of corruption or in case the repair solutions demand it (e.g., factory resetting your Mac).
For this task, you need a tool called “data recovery software.” It’s a type of application that can read the raw data on your hard disk and restore them as files—even if the drive is malfunctioning. For this demonstration, we’ll be using an app called Disk Drill. It’s very easy to use, it’s compatible with the latest macOS, and it natively supports a lot more file types than its competitors (especially videos).
Most importantly, it has a feature called Byte-to-byte backup. Disk Drill can create an image backup of your drive and use it as the scanning target, instead of putting your drive through more wear and tear. We’ll show you how it works in the step-by-step guide below.
- Download and install Disk Drill.
- Securely connect your problematic drive to your Mac. Then, open Disk Drill.
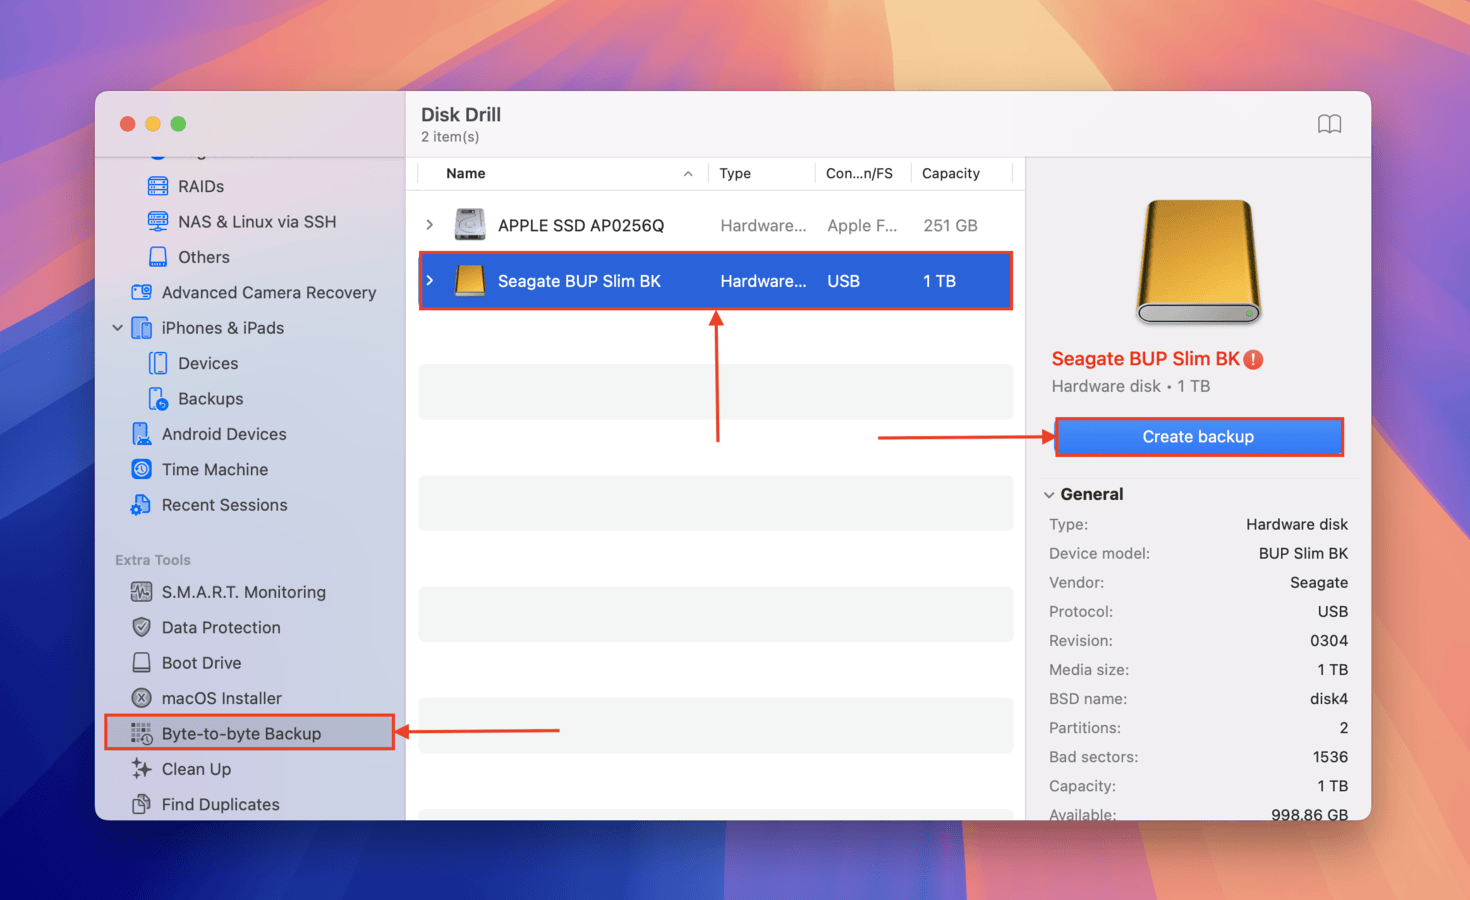
- In the left sidebar, expand the Extra tools section and choose Byte-to-byte backup. Then, select your drive and click Create backup of your drive.
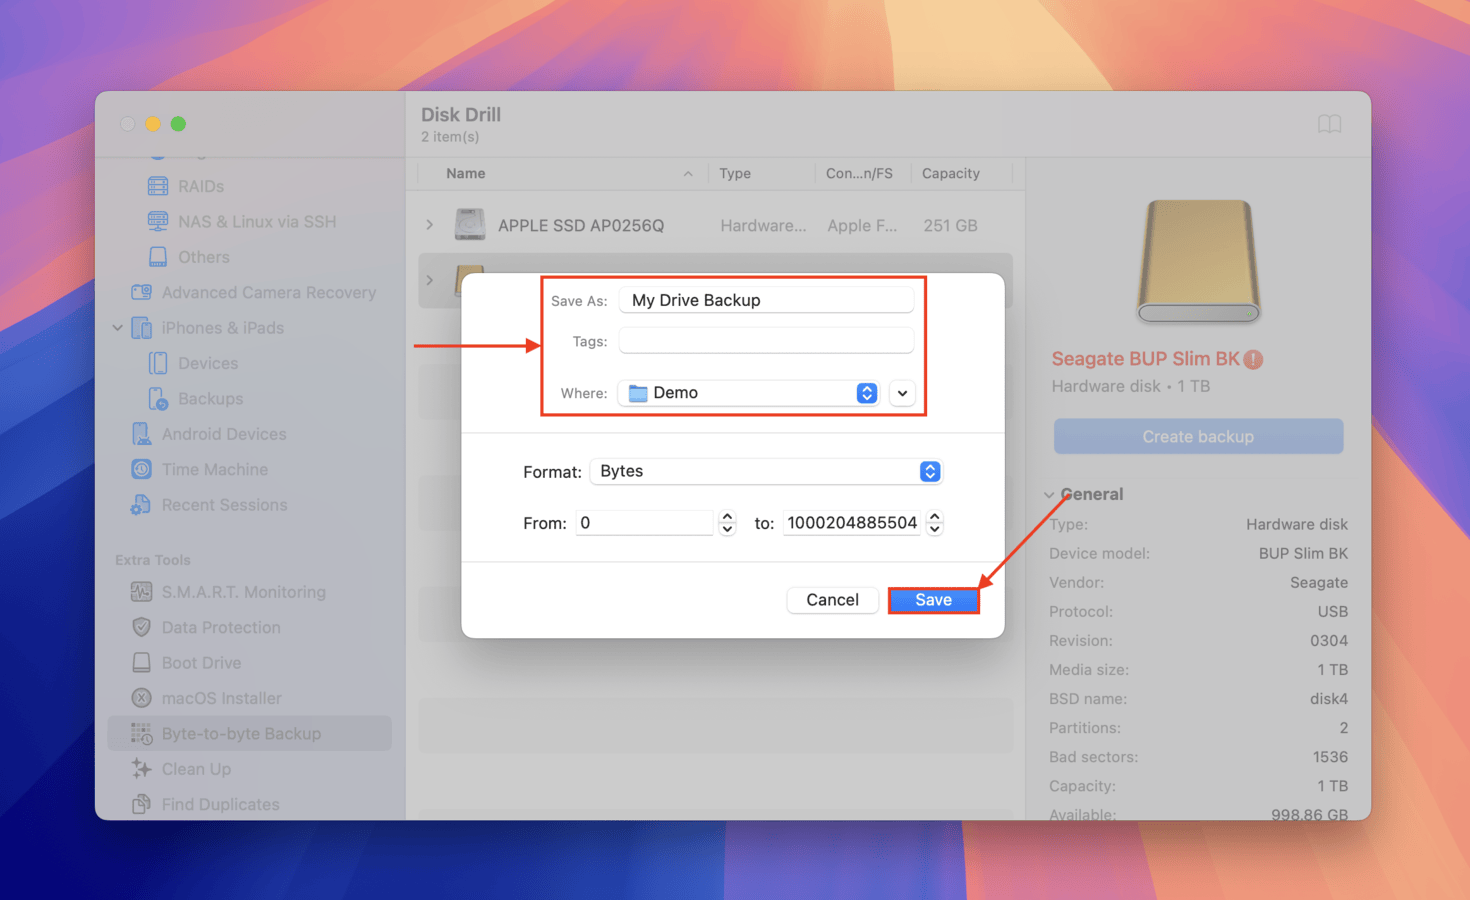
- Choose a name and save location for your backup file. Then, click the Save button.
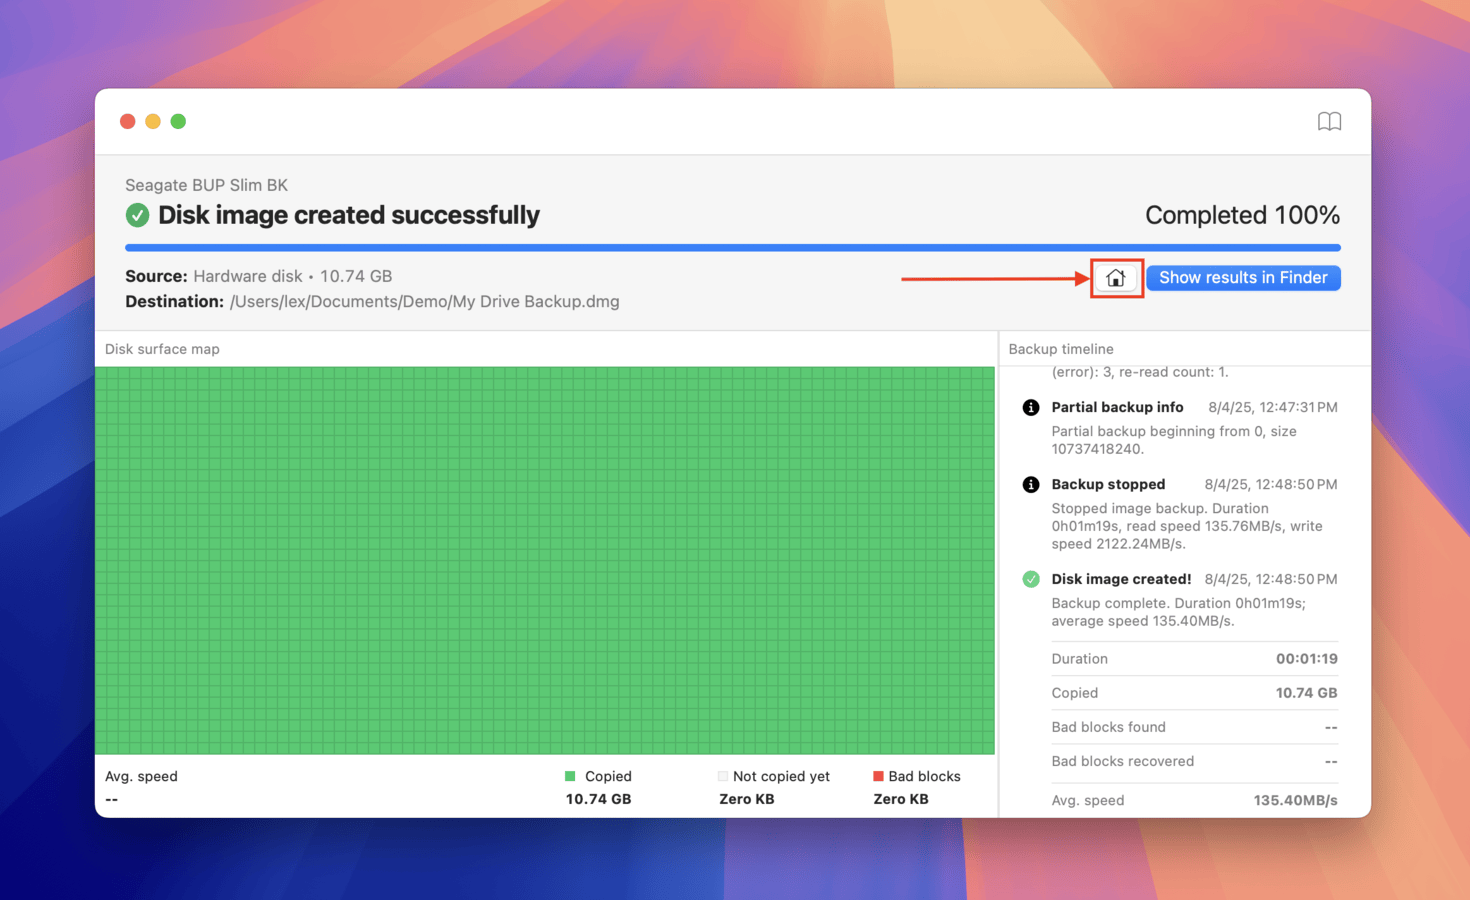
- Once your backup is created, click the Home button to return to the main window.
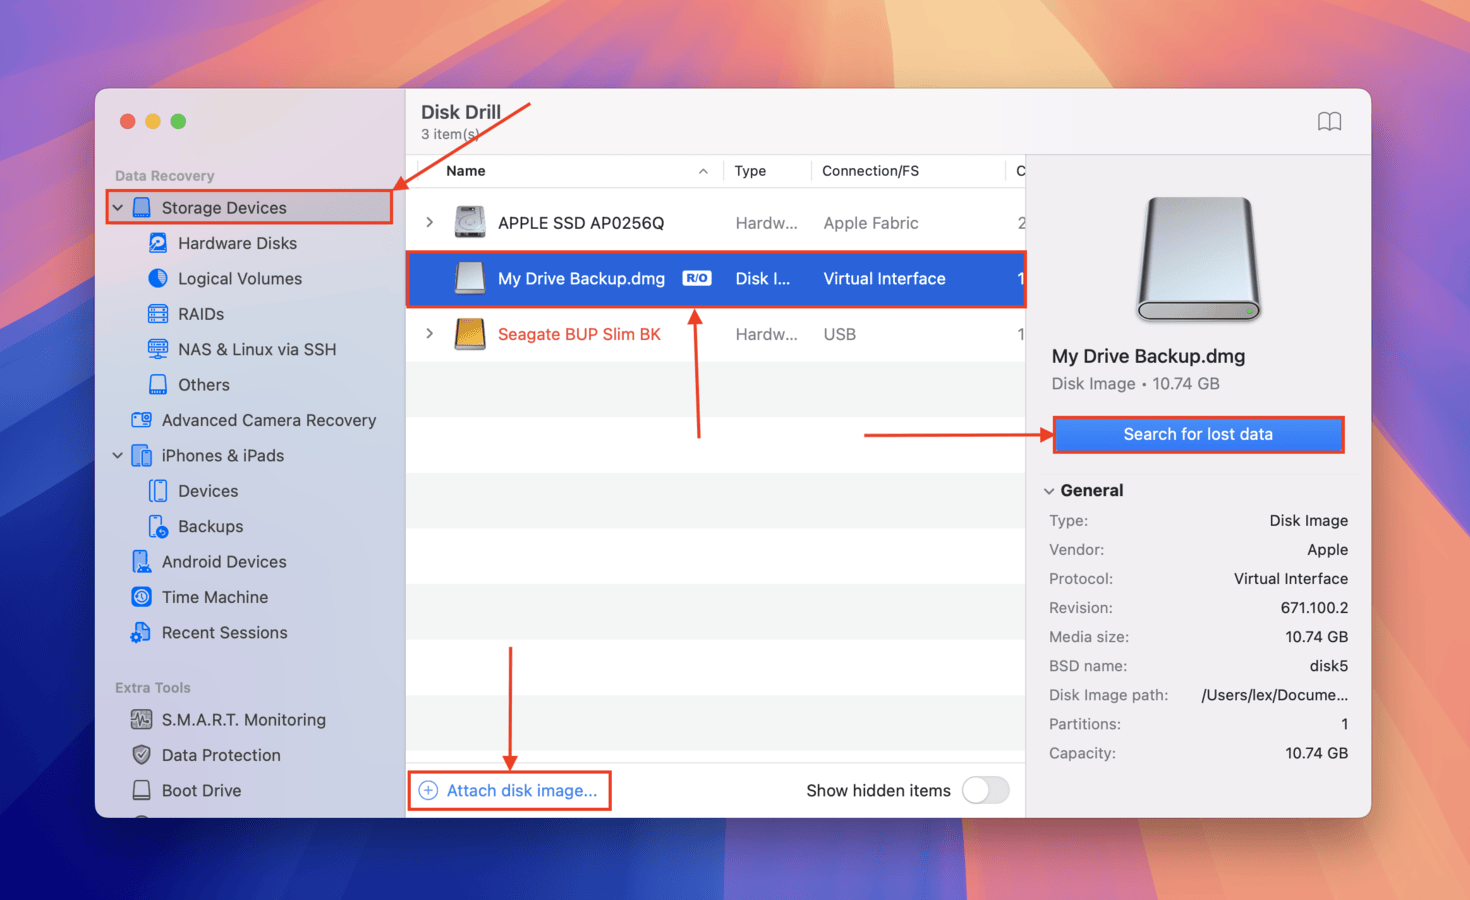
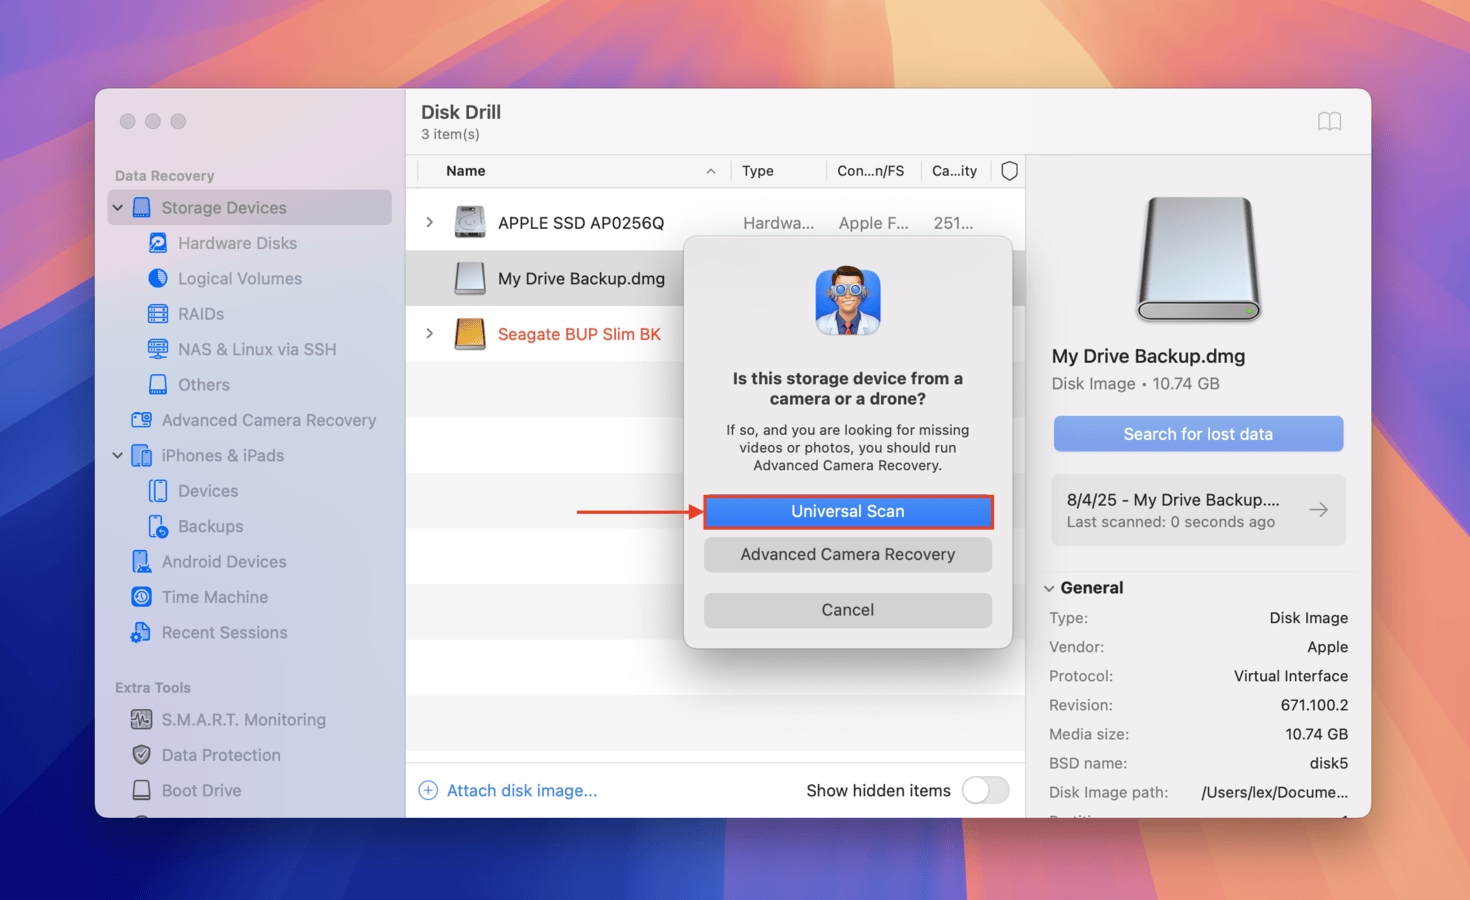
- Click Storage Devices from the left sidebar. Then, use the Attach disk image… button to add the backup file you created in step 4. Once it’s added, select it from the source list and click Search for lost data.
- Select Universal Scan.
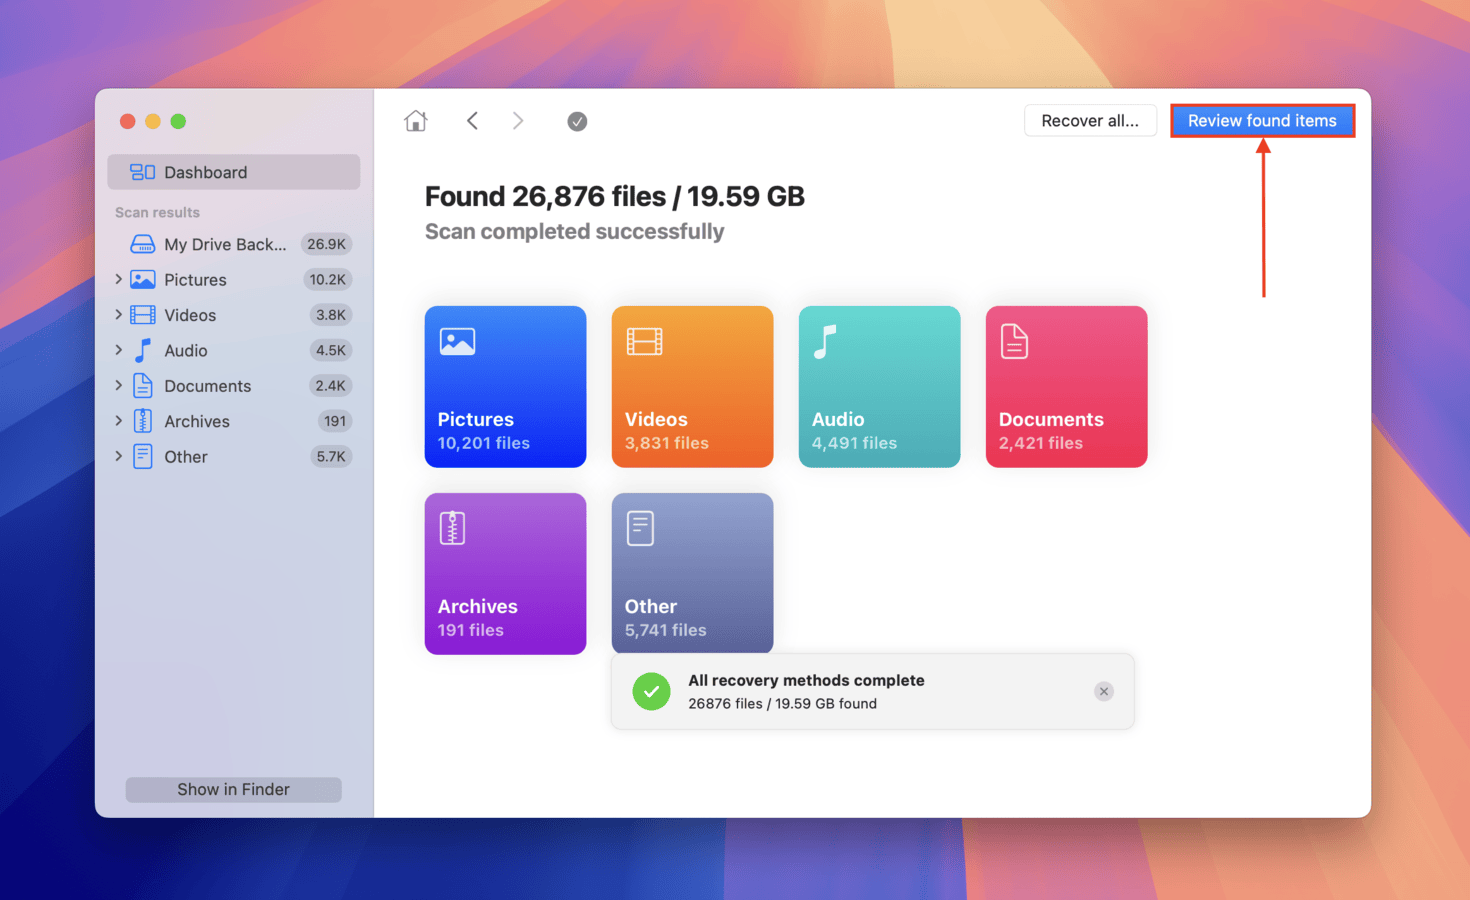
- Once Disk Drill is done scanning your files, click Review found items. Alternatively, Disk Drill may even be able to detect a lost partition–you can opt to review it specifically and only browse files from the affected drive (which can save you a lot of time).
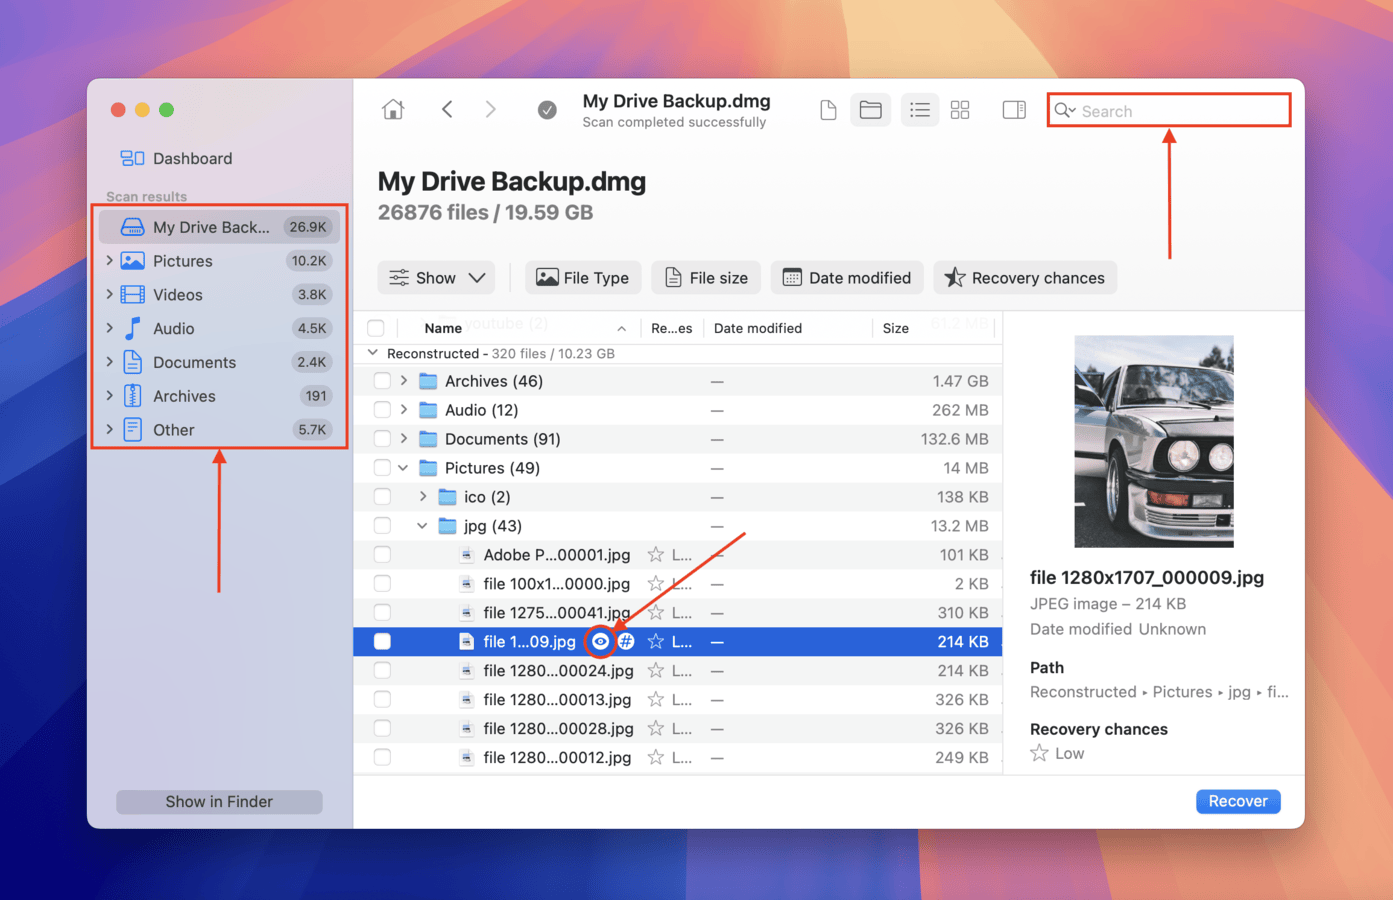
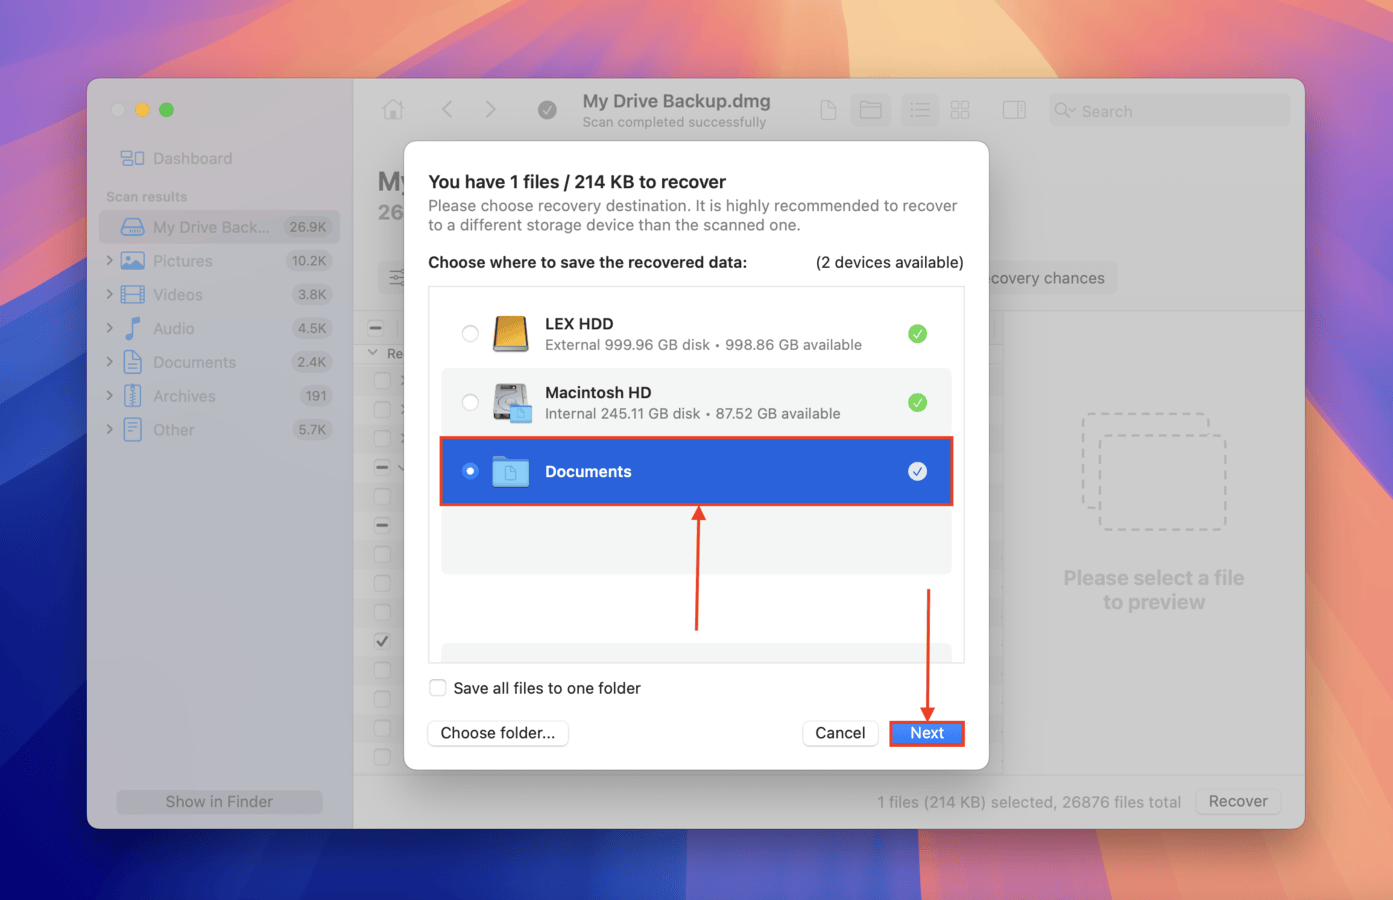
- If you want to recover specific files only, you can use filters in the left sidebar, as well as the search bar in the top-right corner of the window. And make sure to preview your files as you want to recover—hover your mouse pointer beside each file and click the eye button that appears.
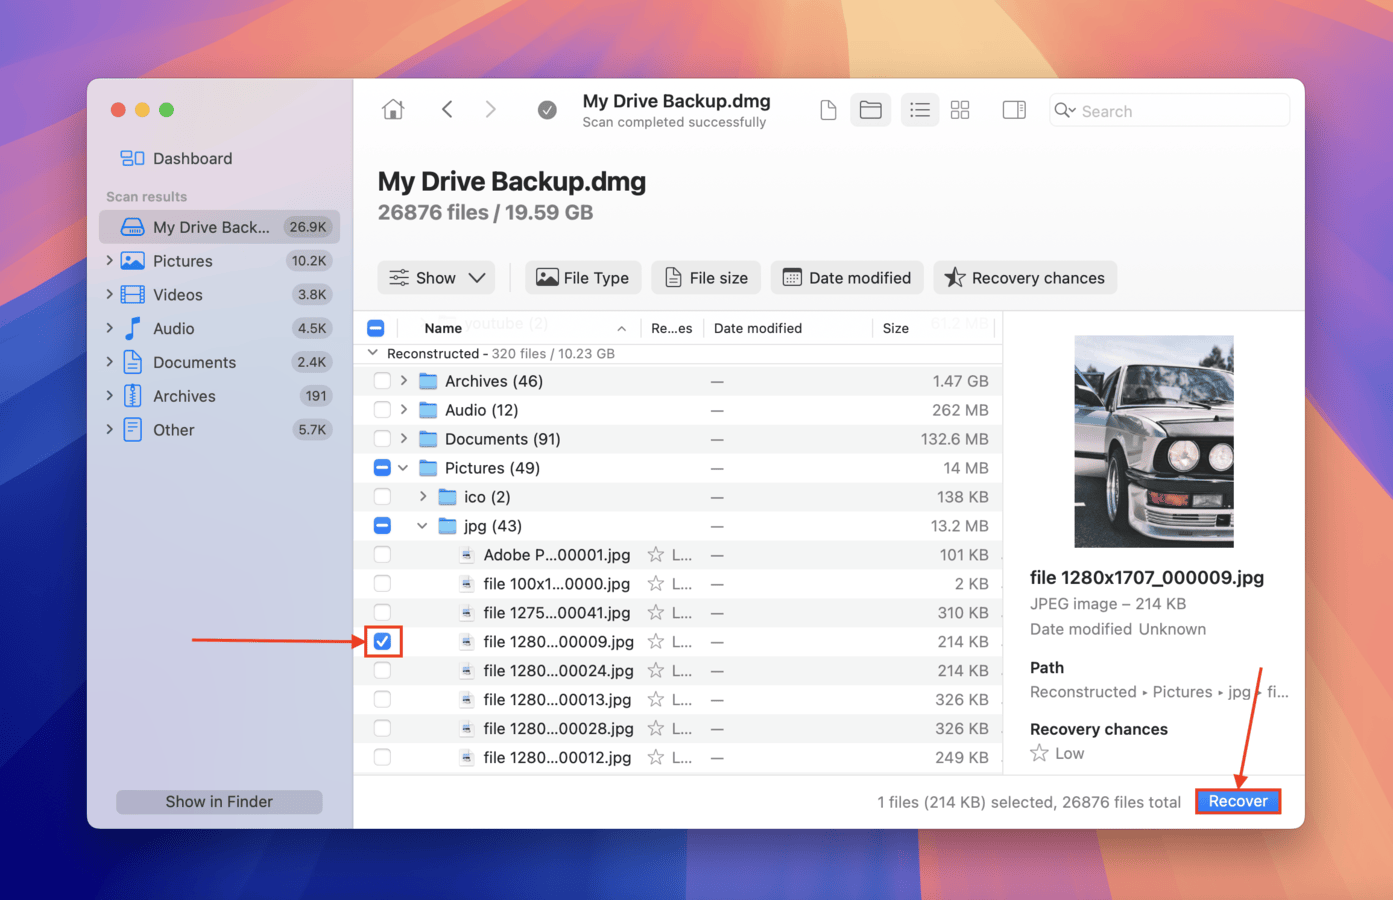
- To select the files you want to restore, tick the boxes beside them (in the left-most column). Then, click Recover. Alternatively, you can leave all boxes unticked and click Recover All.
- In the dialogue box, choose a folder on your Mac that Disk Drill can use to store the recovered files (do not save it to the affected drive–you might overwrite your data). Finally, click Next.
How to Fix “Couldn’t modify partition map” Error
In this section, we’ll demonstrate 3 different methods to fix a drive with the “Couldn’t modify partition map” error. Each method has their own pros and cons and performs the repair operation in different ways–but one good thing they all have in common is that they only use native macOS tools.
Method 1: Use Disk Utility’s First Aid Feature
Disk Utility is macOS’ native disk management tool. It has a feature called First Aid, which is a basic diagnostics and repair tool that can fix the underlying corruption or logical inconsistencies in the disk’s data structure (which could be leading to the partition map error).
It’s unable to repair severe cases of corruption, but it can be highly effective if your partition map just needs a consistency check.
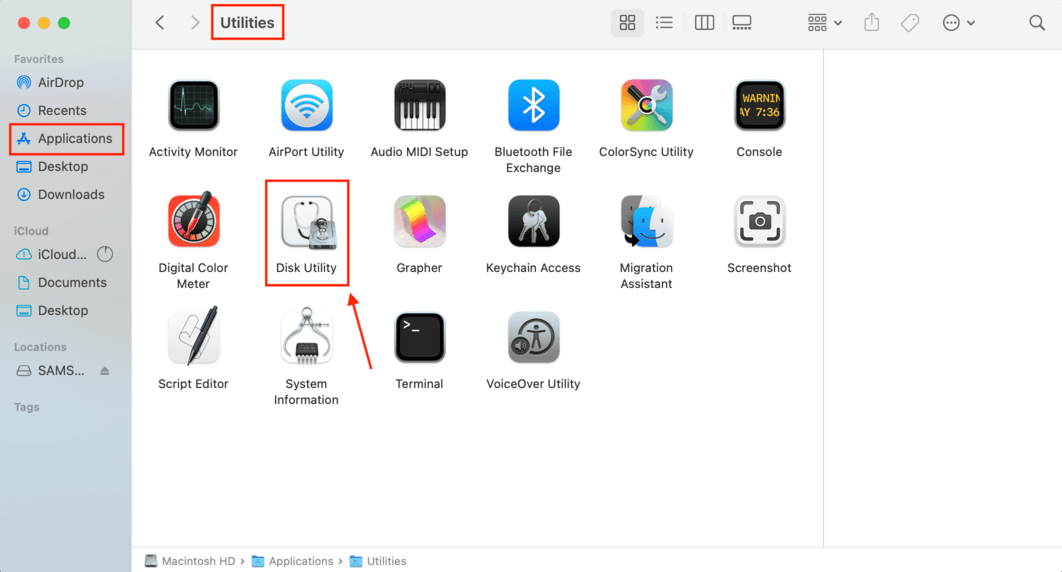
- Open Disk Utility by using Spotlight Search (CMD + Space) or by opening Finder > Applications > Utilities > Disk Utility app.
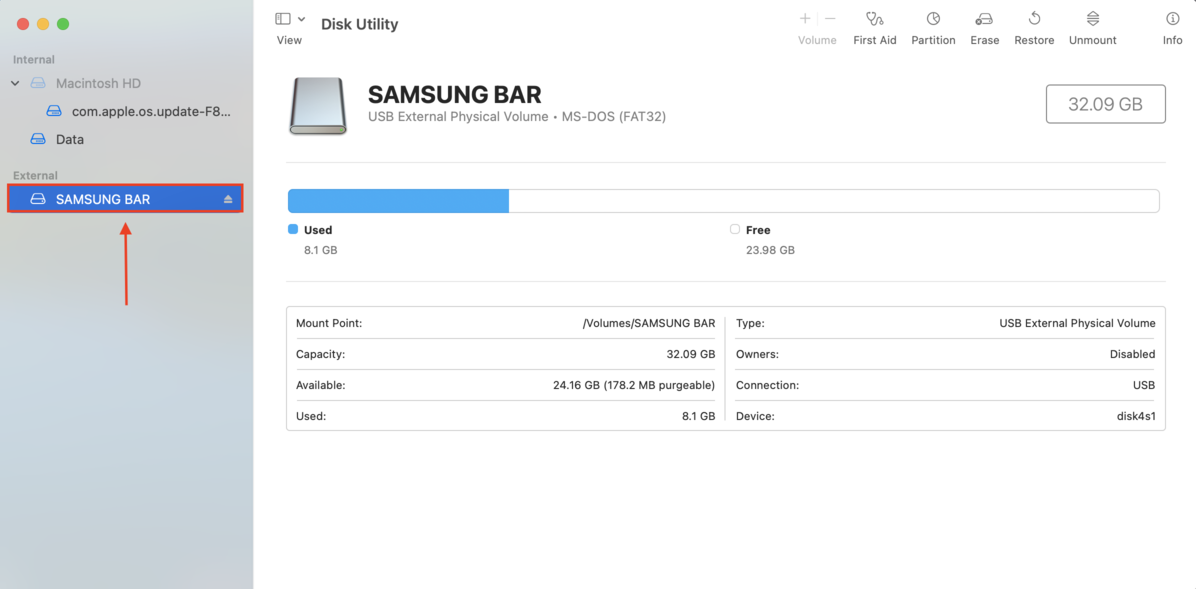
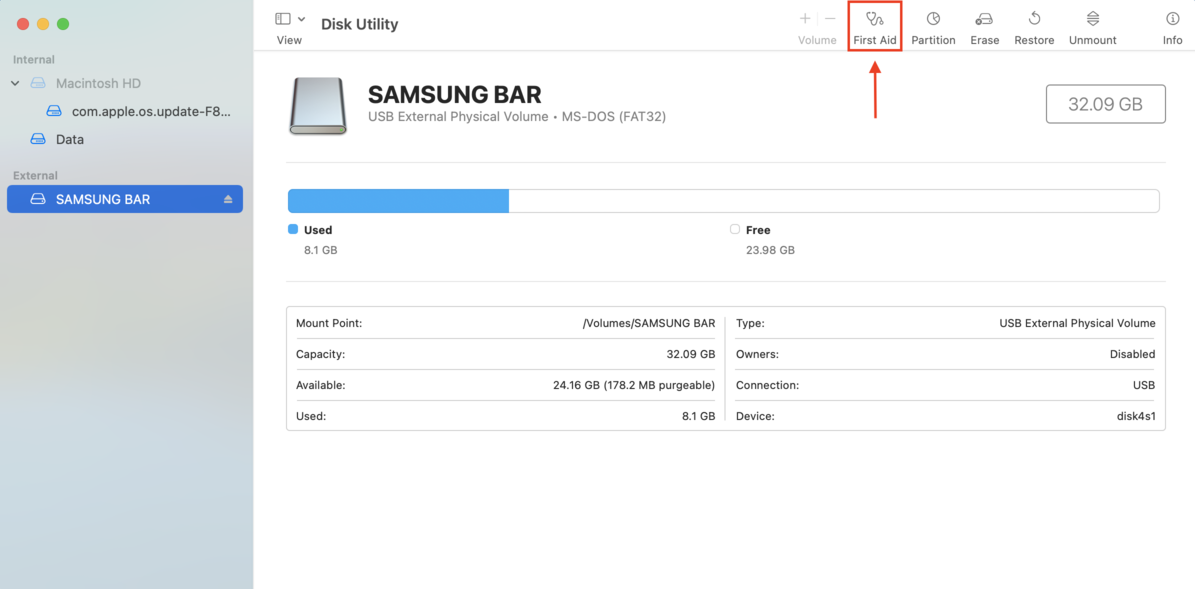
- Select the problematic drive.
- On the top right corner of the Disk Utility window, click the “First Aid” button.
Method 2: Use Disk Utility to Format the Drive and Create a New Partition Map
If you’re unable to resolve the error using First Aid due to the severity of the issue, your next best option is to completely format the drive. This erases everything on the drive and generates a completely new (and error-free) partition map from scratch.
You can use Disk Utility again for this operation; only this time, you’ll be using the Erase tool instead of First Aid. This method is much more likely to succeed than Method 1—just make sure to secure your data beforehand.
- Open Disk Utility by using Spotlight Search (CMD + Space) or by opening Finder > Applications > Utilities > Disk Utility app.
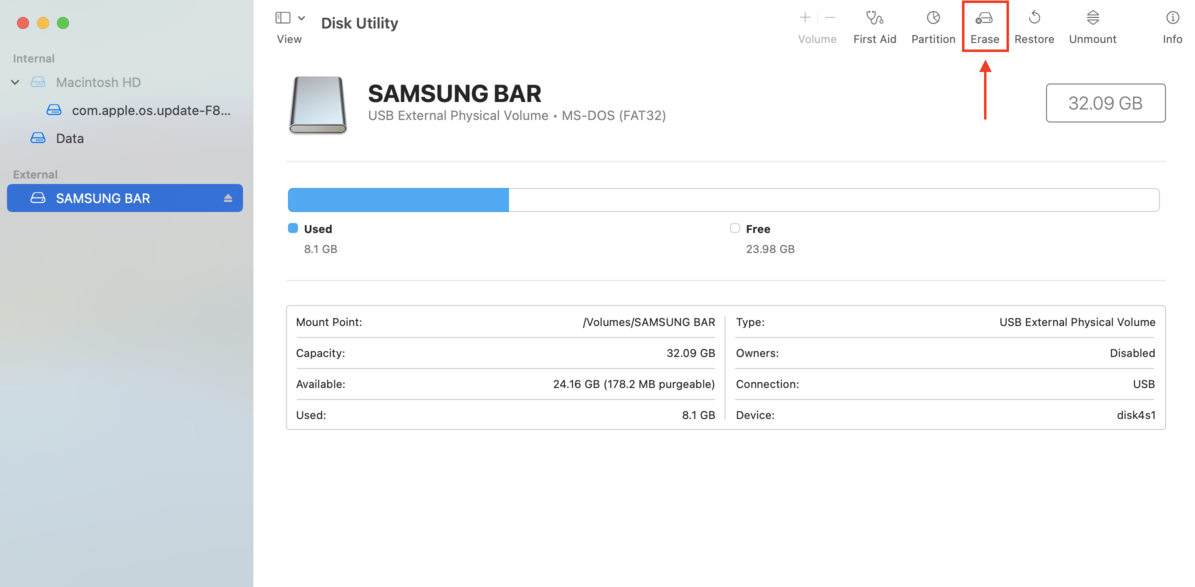
- Click the “View” button on the top left corner of the Disk Utility window and click “Show All Devices.”

- Select the storage device (not the partition) and click the “Erase” button at the top of the window.
- Change the name of the device to whatever you want, and choose MS-DOS (FAT) for the format, and “Master Boot Record” for the scheme. Click the “Erase” button. This overwrites the old partitions and creates a new one, along with a new partition map.
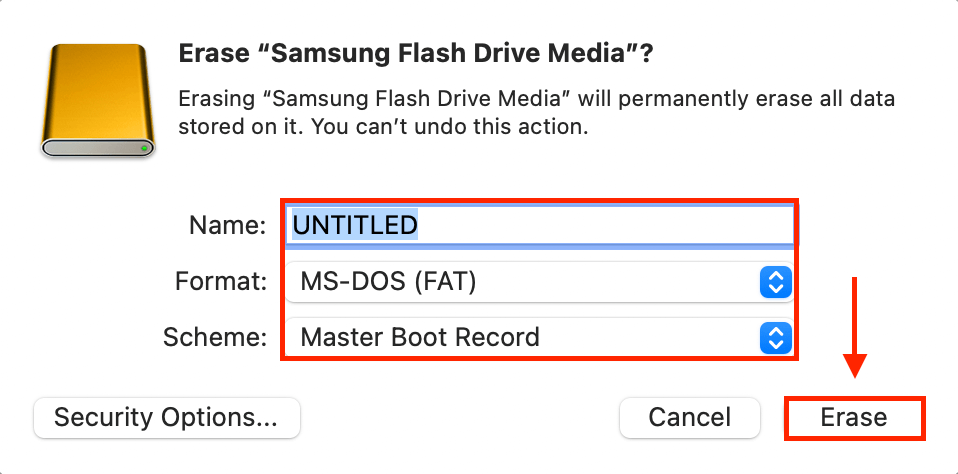
- Wait for the erase process to complete, and click “Done.” You now should be able to use your device.
Method 3: Format Your Drive Using Terminal Commands
Using diskutil Terminal commands is another way to format your drive and generate a completely fresh partition map. Use it if the Disk Utility GUI fails to format your drive due to bugs or limitations, such as in the case of severely corrupted partition maps.
Don’t worry! You only have to run a few easy commands—just follow our guide below.
- Connect your USB flash drive, SD card, or external hard drive to your Mac.
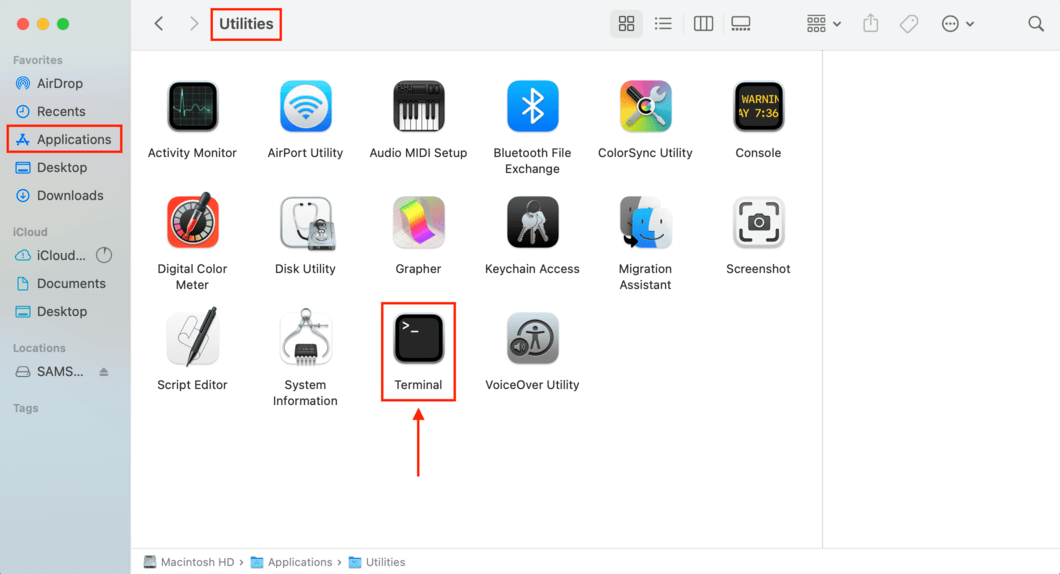
- Open the Terminal app by using using Spotlight Search (CMD + Space) or by opening Finder > Applications > Utilities > Terminal app
- To find your Disk’s identifier, type the following command and press return:
diskutil list
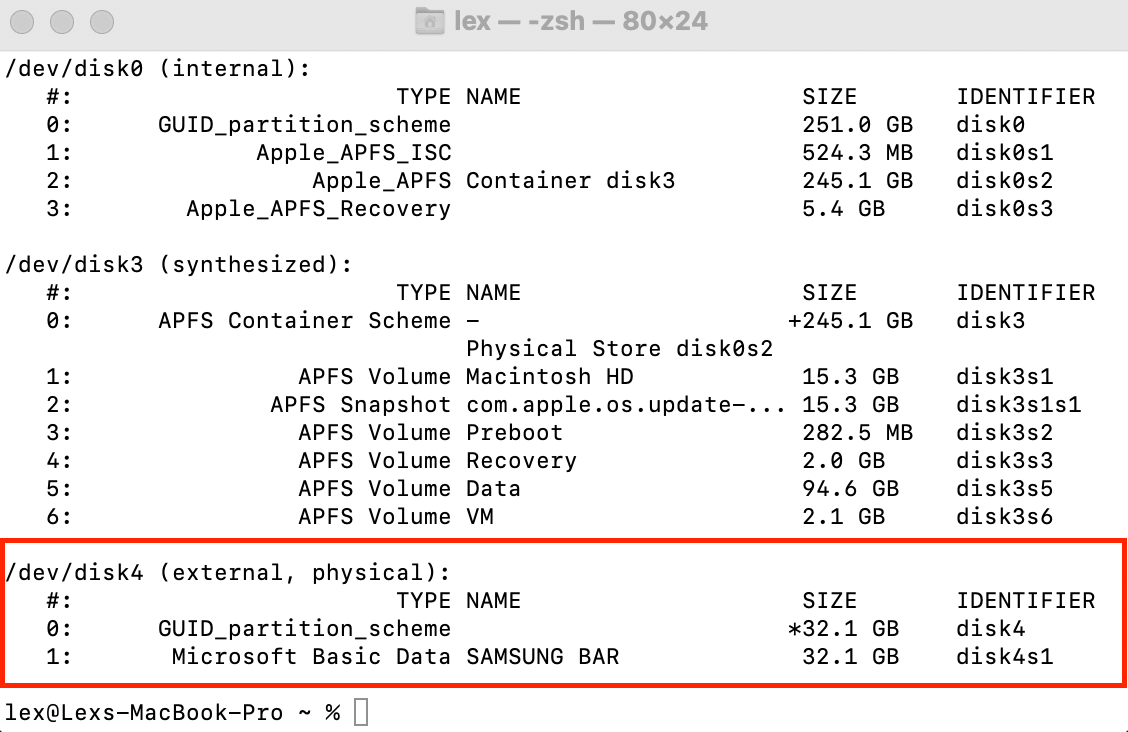
- Once you’ve identified your disk, type the following command and press return:
diskutil eraseDisk MS-DOS “disk name” /dev/”disk identifier”
Change “drive name” to whatever you named your storage device, and “disk identifier” according to the identifier you found in Step #3. For example, here’s what I would type on the Terminal app:diskutil eraseDisk MS-DOS SAMSUNG BAR /dev/disk4s1
If successful, you’ll lose all your data but you will be able to use your device normally again.
Seeing Other Signs of Corruption?
The “Couldn’t Modify Partition Map” error could simply be a symptom of a much larger corruption issue. If this is the case for you, there are more methods you can try to repair the root cause of the error and eliminate it completely.
Check out our other guide on how to fix corrupted hard drives on a Mac. We’ll show you other fixes that are missing from this guide, that could possibly repair the larger instance of corruption causing the partition map error.
FAQ
- Recover and back up your data with data recovery software like Disk Drill.
- Try Disk Utility’s First Aid feature to repair the partition map on your Mac.
- Reformat the disk. Again, recover and back up your data first.


