
Performing a clean install of macOS Sequoia is a great way to optimize your Mac. By wiping your existing system, you can remove any potential lingering issues from previous installations. This not only ensures smoother performance, but it can also help prevent compatibility issues with macOS Sequoia’s enhanced performance, security, and productivity features.
There are multiple ways to do this, but not all of them are compatible with YOUR Mac – and to go one step further, not all clean install methods are equally as effective.
This article is a complete, up-to-date, and easy-to-follow guide on how to do a clean install of macOS. Read on!
Table of Contents
Wait! Before You Proceed, Back Up With Time Machine
To perform a truly fresh install of macOS Sequoia, you’ll have to delete your system disk – that means all your personal files will be wiped along with the OS.
If you have important files on your Mac, you can use Time Machine to create a backup. You’ll just need an external storage device with enough capacity for your data.
Step 1. Connect your external storage device to your Mac.
Step 2. Click on the Apple Menu > System Settings.

Step 3. Navigate to General > Time Machine.

Step 4. Click the + button.

Step 5. Select the external storage device you connected in step 1 and click Set Up Disk…

Step 6. Choose a password and hint for your Time Machine backup drive. Then, click Done.

Step 7. When prompted, click Erase to let Time Machine set up your USB. Once the process is complete, leave your Mac alone for a while so Time Machine can perform its first backup.

Once the backup process is complete, you can safely eject your Time Machine drive the same way you would any regular external storage device… Simply open Finder and click the Eject button beside your Time Machine drive. Then, put it somewhere safe.
3 Ways to Perform a Clean Installation of macOS Sequoia
In this section, we’ll demonstrate 3 different ways to perform a clean installation of macOS Sequoia. The method you end up using will depend mostly on the Mac model that you own as well as your needs and preferences.
Method 1: Total Clean Install macOS via DFU Mode
This method allows you to perform the cleanest installation of macOS Sequoia. DFU (Device Firmware Update) mode is a special recovery state that allows you not only to install macOS but also restore your Mac’s firmware. So in case of firmware corruption, DFU mode is the best option.
However, it’s also the most “difficult” option because you’ll need another “helper” Mac to perform it (along with a cable that is capable of connecting the helper Mac to your Mac).
Step 1. Make sure both Macs are connected to a power source and the internet.
Step 2. On your Mac, identify your DFU port – you can use this list to find it based on your Mac model. Once you’ve identified it, connect one end of your USB-C.
Step 3. On the helper Mac, connect the other end of the USB-C cable to any port.
Step 4. Shut down your Mac by pressing and holding the power button.
Step 5. Once your Mac is totally shut off, press (not hold) the power button and release it. Then, immediately press AND hold the following keys: Left Control + Left Option + Right Shift + Power button.
Step 6. Keep holding all keys for 10. Then, release all keys except for the power button – keep holding the power button.
Step 7. Once the Mac DFU Mode window appears in Finder, release the power button. Then, click Restore Mac…
Step 8. When prompted, click Restore and Update to confirm the action.
A progress bar will appear while the restoration process is underway. Once it’s done, your Mac will either reboot or shut down. If it’s the latter, boot it up. You should be able to enter your Apple ID and go through Setup Assistant.
Method 2: Create a macOS Sequoia USB Installer Using Disk Drill
This method entails creating a bootable USB Mac installer. This is just a regular USB stick with a deployable installer for macOS Sequoia stored on it. Because it’s a “bootable” installer, you can run it directly on your Mac even if your system disk has been erased.
Disk Drill is a third-party data recovery tool that makes it easy to create a bootable USB Mac installer with just a few clicks.
Installing macOS this way provides you with more control over the process because you can choose the exact version of Sequoia you want to use. Finally, Disk Drill’s interface makes the process very easy, even if you’ve never done it before.
Step 1. Download and install Disk Drill on your Mac.
Step 2. Connect a USB stick with at least 32 GB of free storage space to your Mac. Then, open Disk Drill (Finder > Applications).
Step 3. On the left sidebar under Extra Tools, click macOS installer. If you already have macOS Sequoia downloaded, it should appear in the Choose macOS installer column automatically. You can skip to step 6. If you haven’t, click Add macOS installer… > macOS Sequoia.

Step 4. Click Get.

Step 5. In the popup dialogue, click Download.

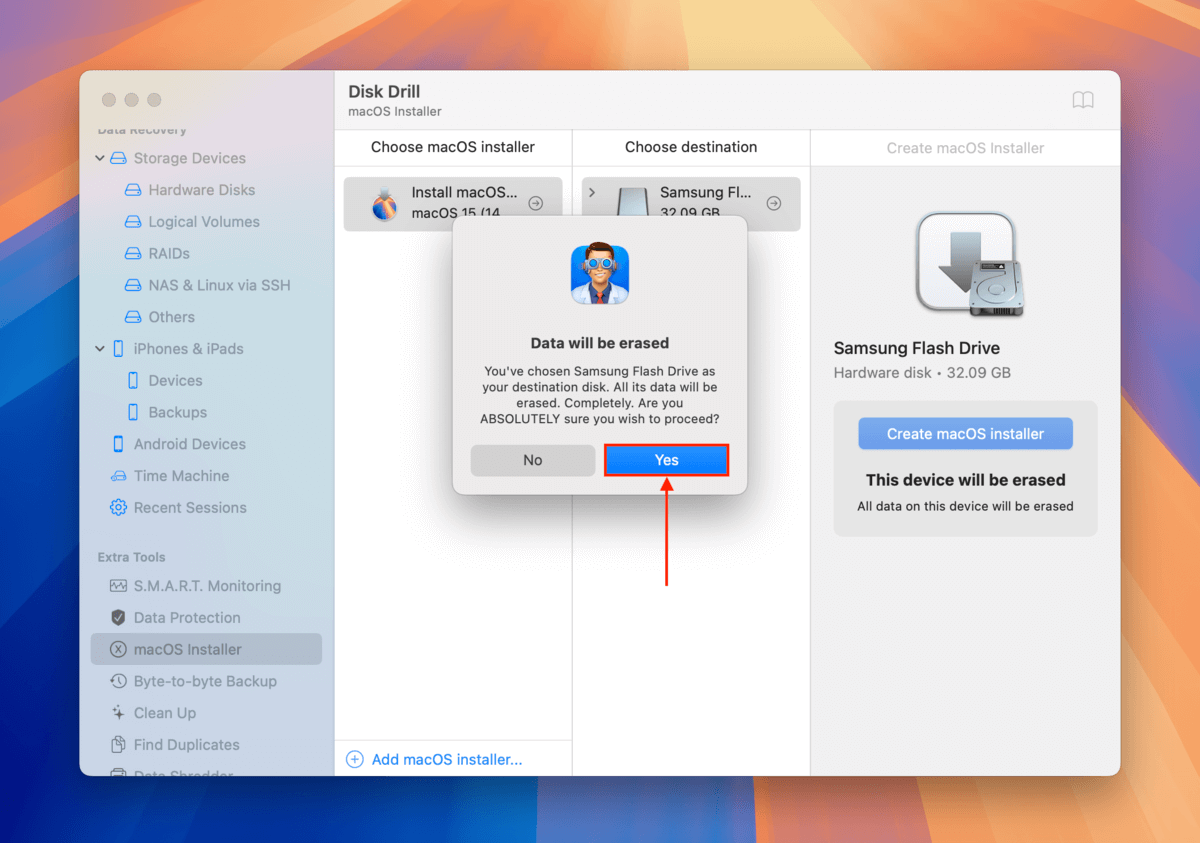
Step 6. Back in Disk Drill’s window, select the installer you just downloaded. Beside it, select the storage device you connected in step 1. Once both items are selected, click Create macOS installer.

Step 7. When prompted to confirm, click Yes.
Step 8. Once Disk Drill is done creating your macOS Sequoia USB installer, close the app and shut down your Mac (without disconnecting your USB stick).
At this point, the rest of the steps deviate slightly depending on what Mac model you’re using. We’ll provide the steps for Apple Silicon-based Macs first. Next, we’ll provide the steps for Intel-based Macs.
Instructions for Apple Silicon Macs:
Step 1. Press and hold the power button until Startup Options appears. Then select Install macOS Sequoia > Continue.
Step 2. On the menu bar, click Install macOS Sequoia > Quit Install macOS.
Step 3. Click Disk Utility and click Continue.
Step 4. On the left sidebar, click on your system drive (”APPLE SSD”). Then, click the Erase button.
Step 5. Set Name, Format, and Scheme to Macintosh HD, APFS, and GUID Partition Map respectively. Then, click Erase.
Step 6. Wait for your Mac to finish the erase process. It will restart itself multiple times until you see the Activate Mac screen. If it says Your Mac is activated, click Exit to Recovery Utilities.
Step 7. Shut down your Mac. Then, press and hold the power button to enter Startup Options again.
Step 8. Select Install macOS Sequoia. Then, click Continue.
Step 9. Follow the wizard until the installation process is complete.
Instructions for Intel Macs:
Step 1. Boot your Mac and immediately press and hold the Command + R keys until you see the Apple logo or a spinning globe.
Step 2. Select Disk Utility and click Continue.
Step 3. Set Name, Format, and Scheme to Macintosh HD, APFS, and GUID Partition Map respectively. Then, click Erase.
Step 4. Wait for the total erasure process to complete. Then, shut down your Mac.
Step 5. Boot your Mac and immediately press and hold the Option key until the Startup Manager appears.
Step 6. Select your USB installer and click Continue.
Step 7. Follow the wizard until the installation process is complete.
Method 3: Manually Create a USB Installer Using Terminal
If you want to reinstall macOS from a USB (without using a third-party app), you can use a rather simple (but lengthy) command in the Terminal app that activates the createinstallmedia script from within the macOS package.
Like the Disk Drill method, this method allows you to install a specific Sequoia version and it doesn’t require an internet connection to work.
Step 1. Connect a USB stick with at least 32 GB of free storage space to your Mac.
Step 2. Open the App Store (Finder > Applications), then search for and download macOS Sequoia.
Step 3. Once the download is complete, close the App Store and open the Terminal app (Finder > Applications). Then, type the following command and hit Return:
sudo /Applications/Install\ macOS\ Sequoia.app/Contents/Resources/createinstallmedia --volume /Volumes/YourDrive --nointeraction
Replace YourDrive with the name of your USB stick.

Step 4. Wait for the installation process to finish, then close the Terminal app.
Step 5. The next step is to delete the current instance of macOS – to do so, follow the instructions from 8 until the end in Method 1 (make sure to return here after).
Step 6. Shut down your Mac.
Step 7. Turn on your Mac and immediately press and hold the Option key until Startup Manager appears.
Step 8. Select your USB installer and proceed with the installation wizard.
When was the last time you checked your SSD health?
After successfully performing a fresh install of macOS Sequoia, now is the perfect time to start learning how to monitor your Mac drive’s health.
Check out our guide on measuring SSD wear level, where we teach you how to use free and freemium tools to analyze your Mac drive so you can learn how to detect potential failure way before it happens.


