After a few years of enjoying your MacBook, you’re eventually going to have to reset it. Maybe you’re encountering slowdowns or some apps are not installing properly. A reset returns it to factory settings, essentially to the state it was when you first bought it.
Resetting a MacBook is easy, but can be intimidating for users who’ve never experienced resetting or reformatting a computer before – especially if there’s important data on your device. We provided an easy-to-follow, step-by-step guide so you can confidently reset your Mac without losing data.
| Step | Name |
| Step 1 | Backup Your Mac with Time Machine |
| Step 2 | Reset Your Mac |
| Step 3 | Restore Data From the Backup |
Table of Contents
Why You May Need to Reset MacBook to Factory Settings
Apple made it easy to factory reset MacBooks for a reason – normal usage will eventually force you to perform a factory reset. Here are a few good reasons why:
- 📈 Improve performance. Generally, resetting your MacBook improves performance because it gets rid of unnecessary files and app data while rebuilding a fresh macOS environment from the ground up.
- ⚙️ Reset system settings. Over time, adjustments made to your Mac’s settings by you, other users, and certain apps can cause conflicts, misconfiguration, and isolated instances of corruption. You’ll notice the performance hit eventually and a factory reset helps you avoid tedious manual cleanup.
- ❌ Recover from failed system updates. If your macOS update got interrupted during the process, important system files may be missing or incomplete. Even if you can boot into macOS, you may eventually encounter errors in the environment. A reset will rebuild the environment from the ground up, ensuring completeness and structural integrity.
- 🧹 Declutter. Resetting your MacBook is not only a good excuse to get rid old files and unused apps, but it also cleans up any remnant data from files and apps that may have been removed a long a time ago.
- ⛓️💥💥 Resolve recurring glitches. As you install more updates, apps, plug-ins, etc., eventual conflicts and corrupted configurations can manifest in glitches (e.g. system lag, app crashes, unresponsive features, etc.).
How to Reset Mac Without Losing Data
Resetting a MacBook Pro to factory settings is a straightforward process. However, it’s always better to be precise when important data is involved. Follow these steps restore to factory settings without losing data:
Step 1. Backup Your Mac With Time Machine or Other Backup Solutions
The #1 way to preserve your data if you want to reset your MacBook is by creating a backup of your files. This allows you to perform a “true” full reset of your Mac, since you don’t need to “exclude” any data from the formatting process.
MacOS already comes with a built-in robust backup tool called Time Machine, which can save your entire Mac drive to an external storage device. We’ll show you how it works in the guide below.
- Plug in a separate storage device. If you backup your data to your MacBook, the factory reset will delete it.
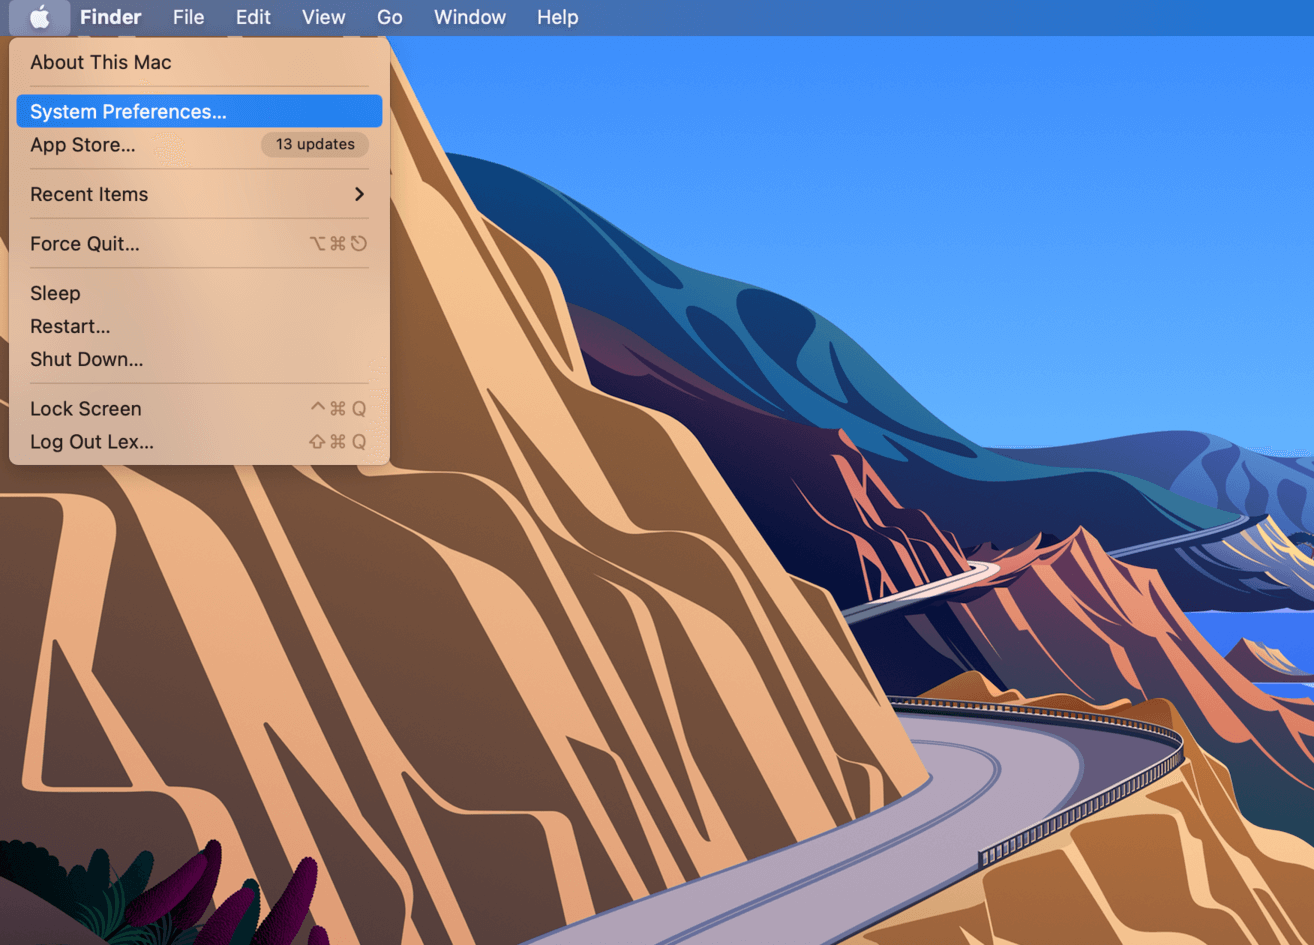
- Open Time Machine by clicking the Apple symbol on the top left corner of your screen and select System Preferences.
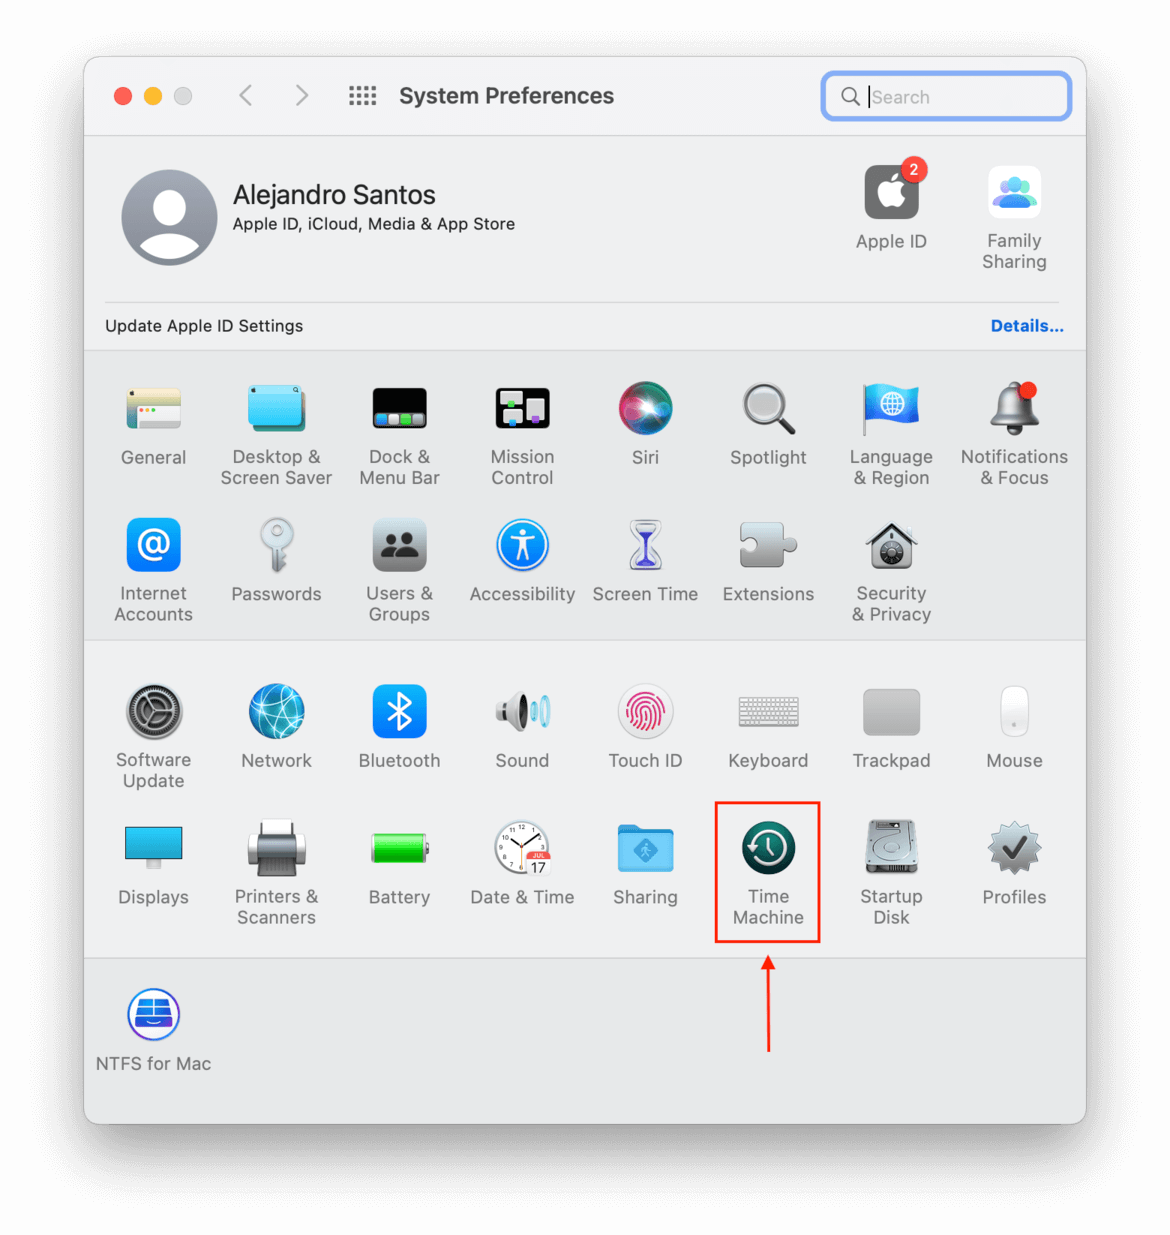
- From the System Preferences window, select Time Machine.
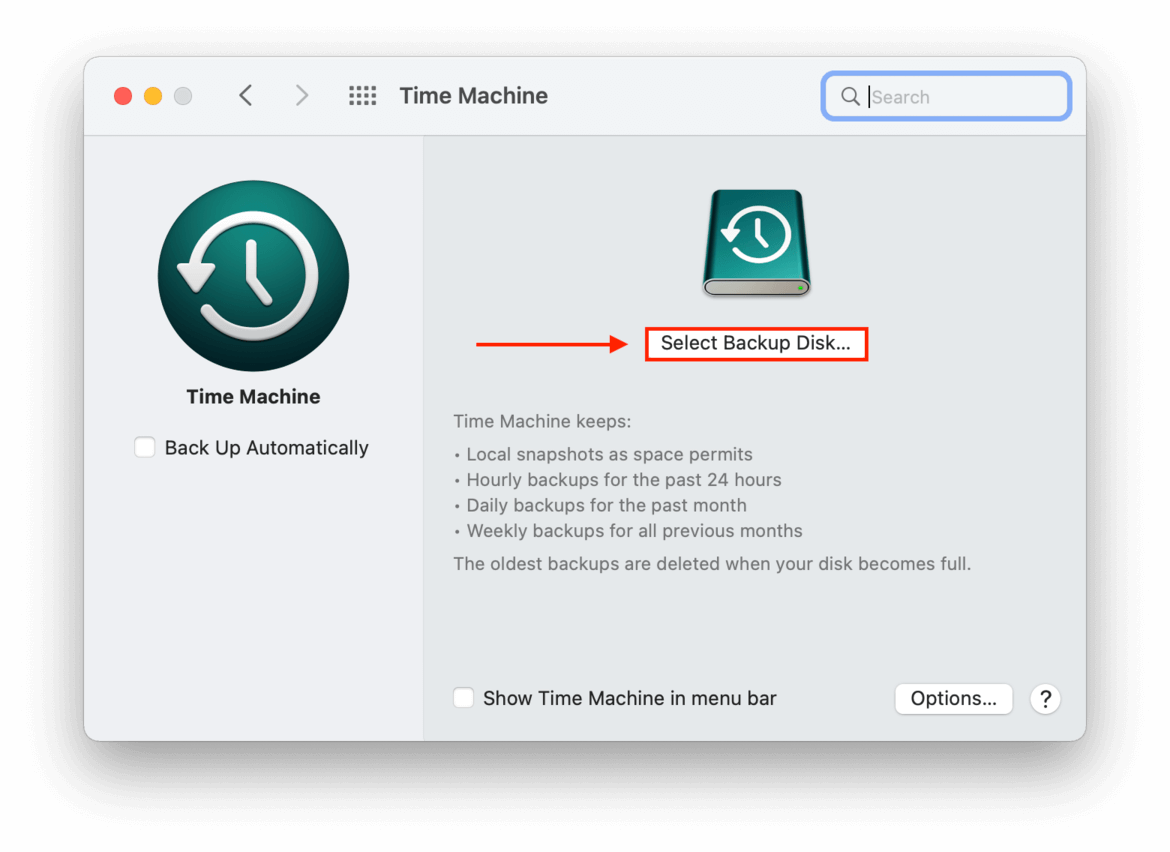
- Click “Select Backup Disk…”
- On the popup that appears, select your external storage device, and click “Use Disk.”
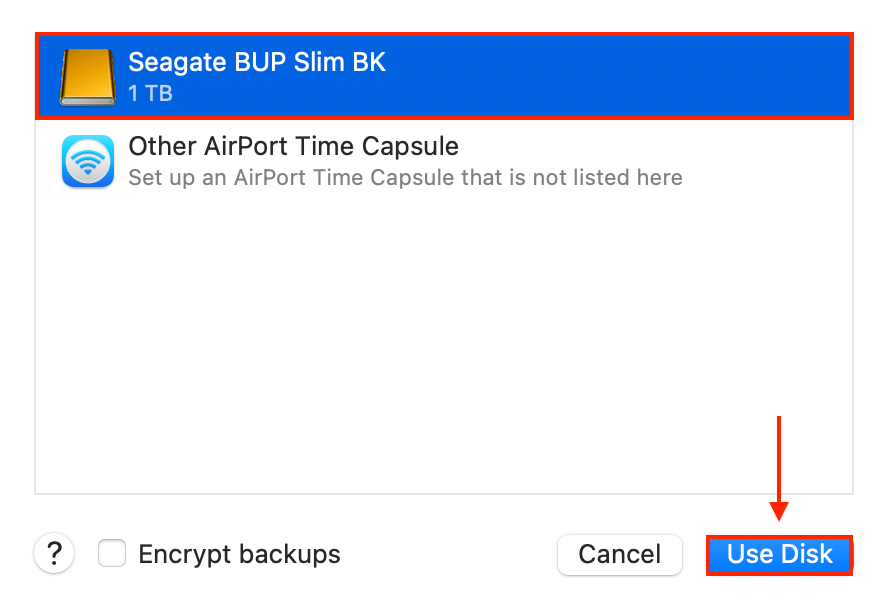
- Sign out of all your active apps and unplug your external storage device to prepare for the next step.
Step 2. Reset Your Mac
Once you’ve backed up your data, you can safely proceed with the resetting process. It’s easy – just follow these steps so you don’t get lost along the way.
- Open your Apple menu > System Preferences.
- On the top left corner of your screen beside the Apple menu, click System Preferences > Erase All Content and Settings…
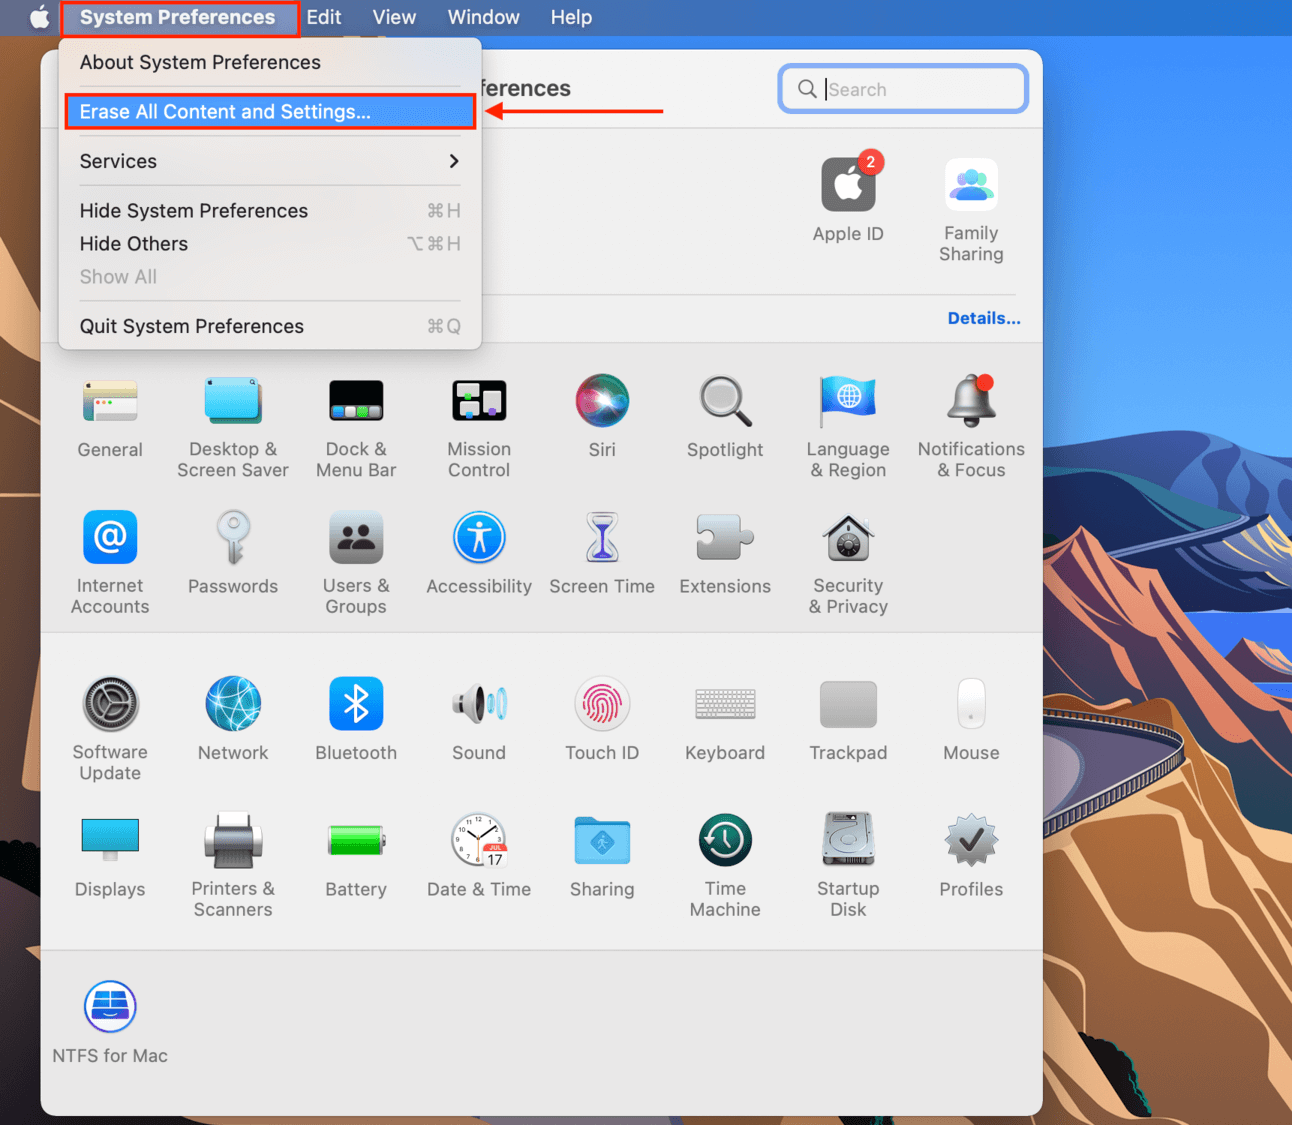
- If prompted, enter your password.
- On the Erase All Content & Settings window, note everything that will be erased and click the “Continue” button at the bottom right corner.
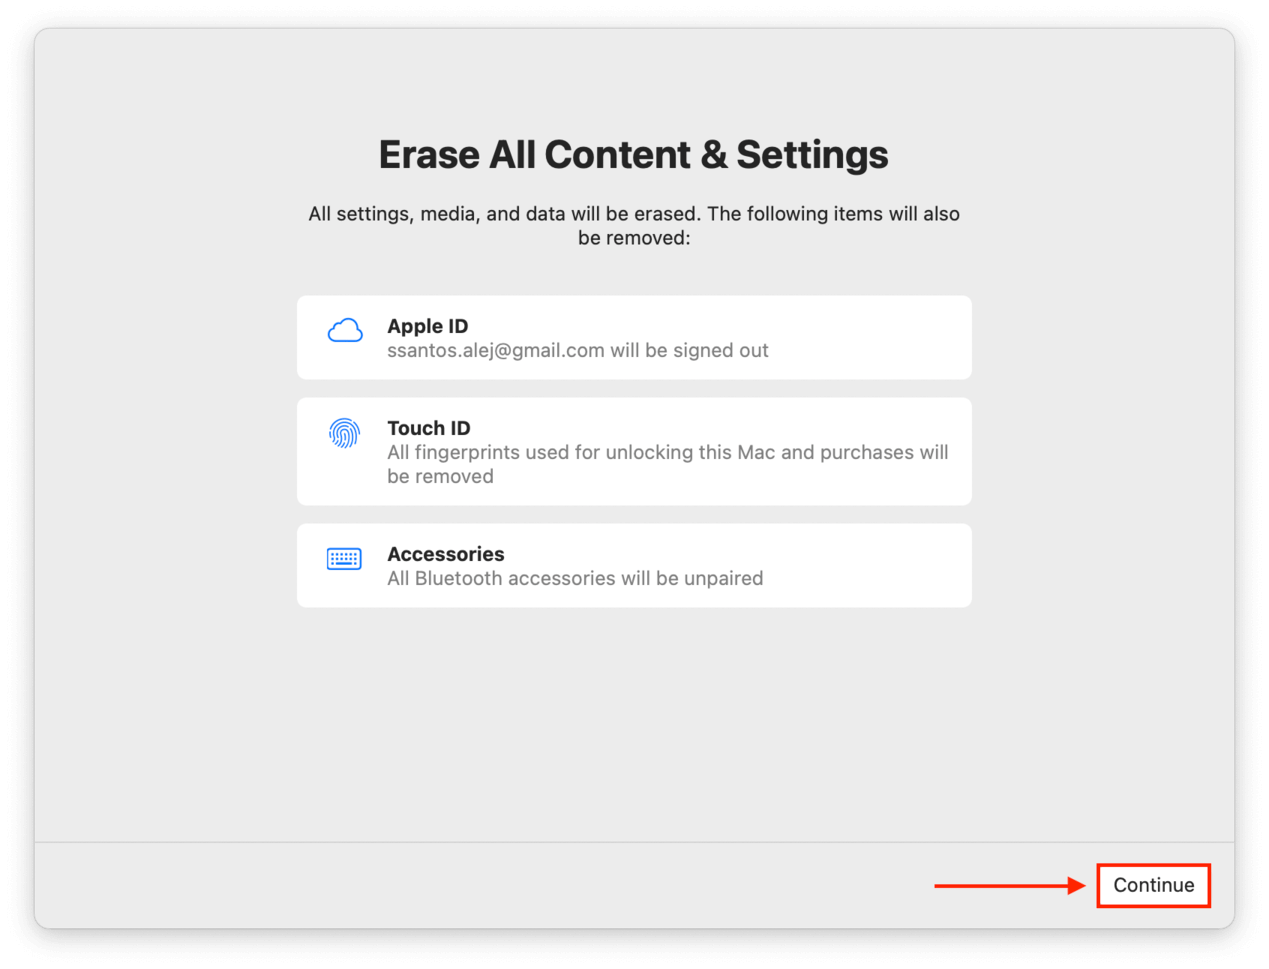
- Once you click continue, all your apps will close automatically. You’ll be asked to sign out of your iCloud account to proceed.
Step 3. Restore Data From the Backup
Once the reset is complete, you’ll go through a familiar setup process – essentially, how you setup your Mac when you first took it out of the box. Once you’re back on the desktop, you can proceed with restoring your data using an app called Migration Assistant.
- Plug in the external storage device where you stored your media.
- Open Finder by clicking its icon on your dock.

- Navigate to the Applications folder > Utilities > Migration Assistant app.
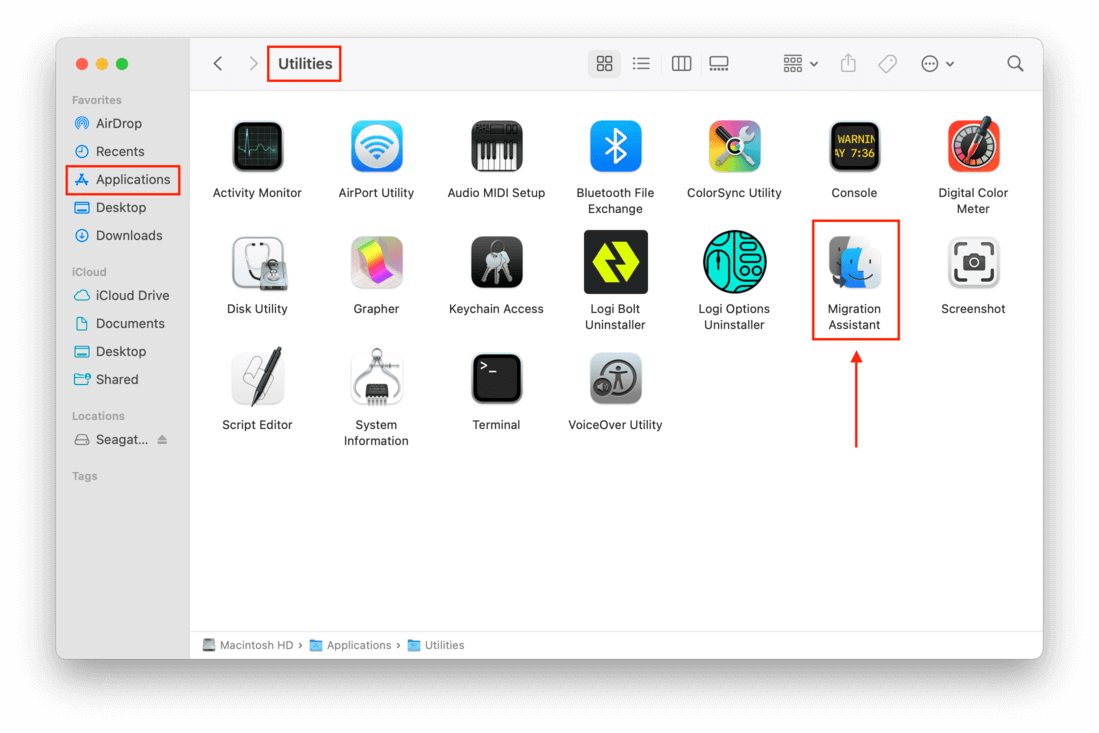
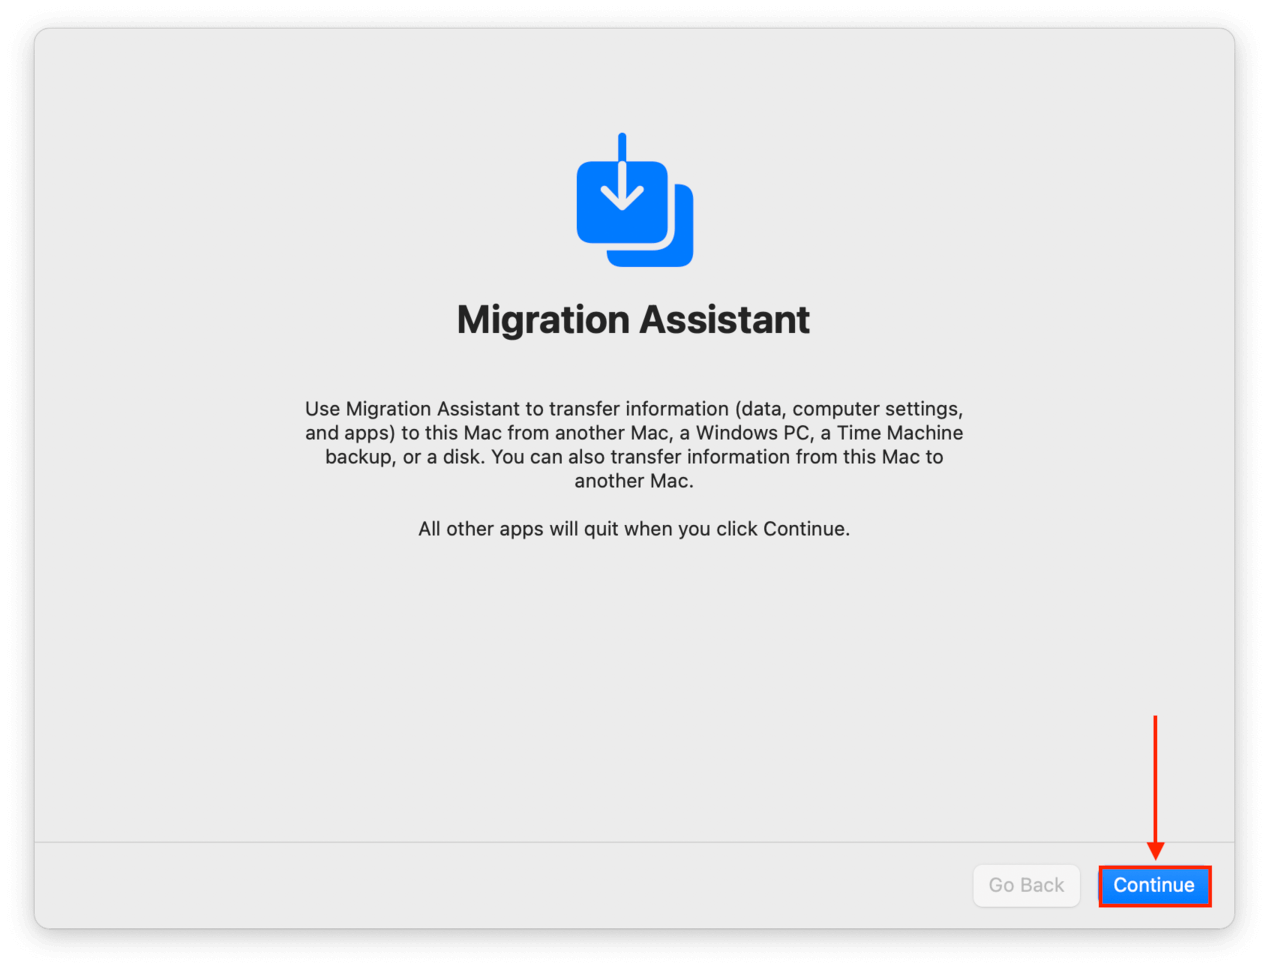
- Close all your open applications, then click “Continue” on the initial Migration Assistant window.
- At this point, it’s a straightforward process. Select your Time Machine backup and click “Continue.”
- Choose the information you want to transfer – such as user accounts, applications, folders, system settings, etc. – then click Continue.
- Simply wait until the process is complete. It can take a few minutes to a few hours, depending on how much data is being transferred.
What to Do if You Lost Data After Factory Resetting
In case you already performed a factory reset and you failed to back up your data (or if your backup drive had become compromised), you can try using a tool called data recovery software. Data recovery software can scan your Mac drive for data and data fragments, then use complex algorithms to make those files available for your use again.
For this demonstration, we’ll be using an app called Disk Drill. It’s very easy to use, even for beginners, and it has excellent support for Mac-based file formats and file systems. And as long as you haven’t saved new files to your Mac yet, there’s a good chance that Disk Drill will succeed in restoring original file names and folder structures as well.
- Connect an external storage device to your Mac, ensuring that it has enough space to store all your files, plus an extra 200 MB for Disk Drill’s installer and installation files. In it, create a folder called “Disk Drill.”
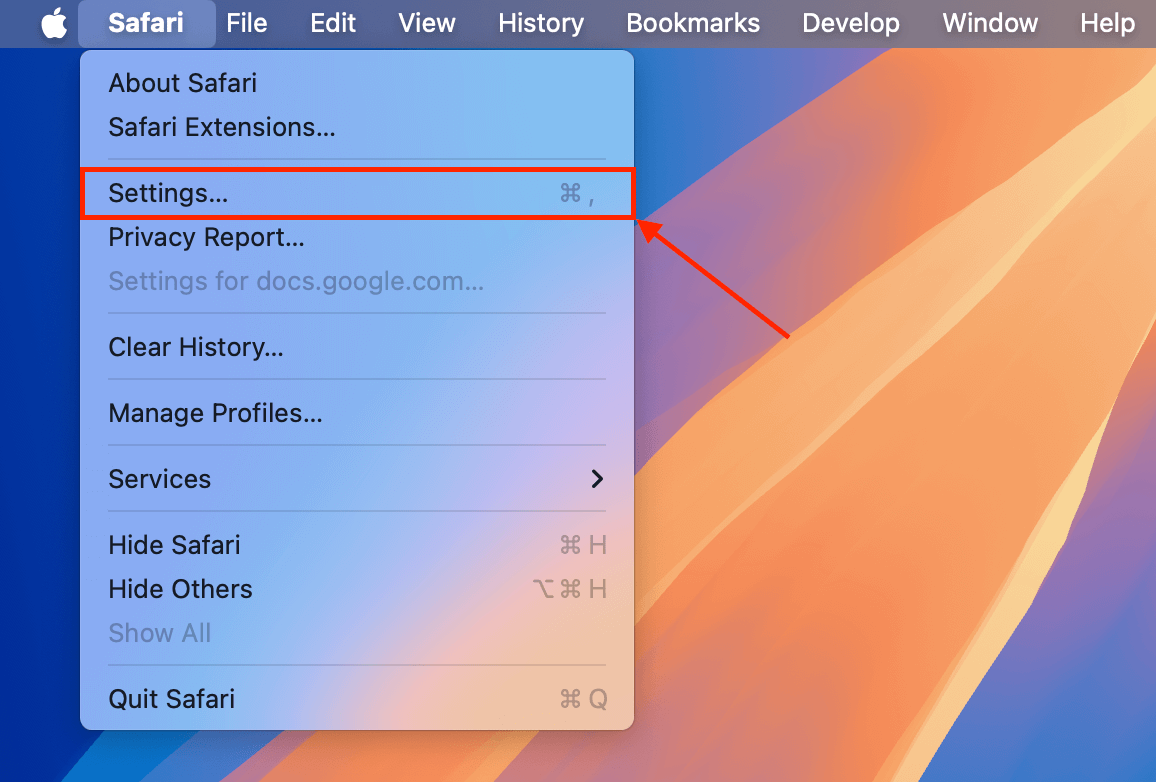
- Open Safari. On the Apple menu bar, click Safari > Settings…
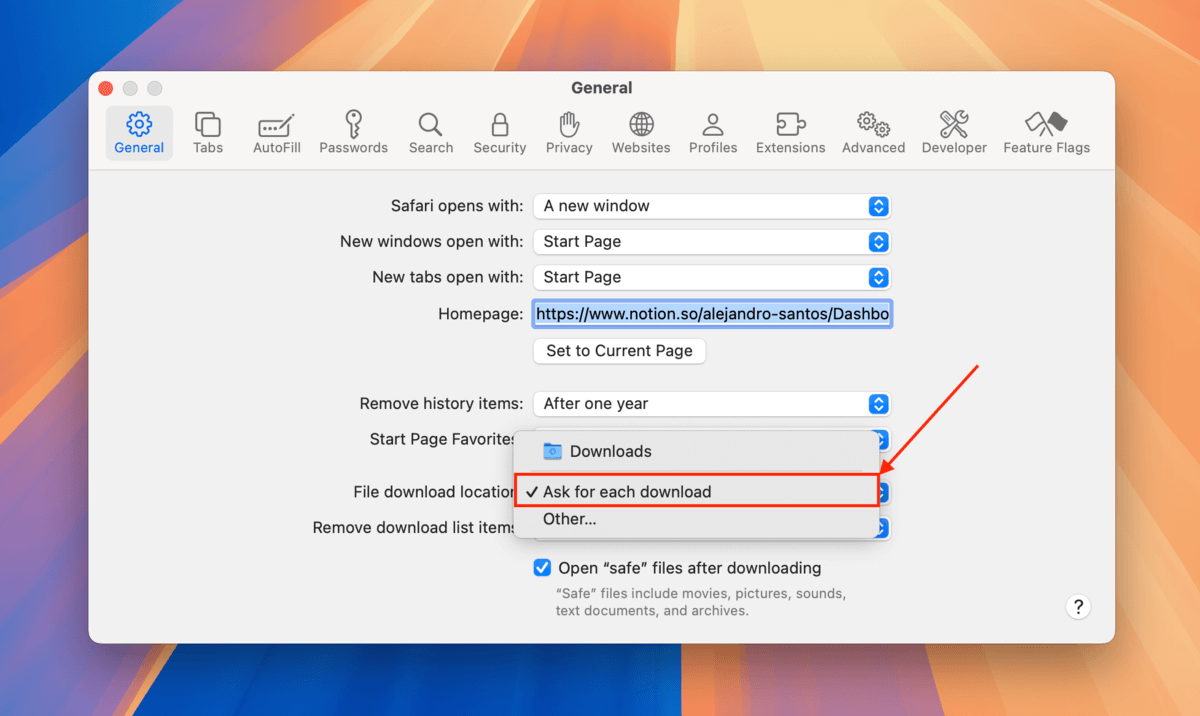
- In the General menu, click the dropdown menu beside File download location and select Ask for each download. Then, close the Settings window.
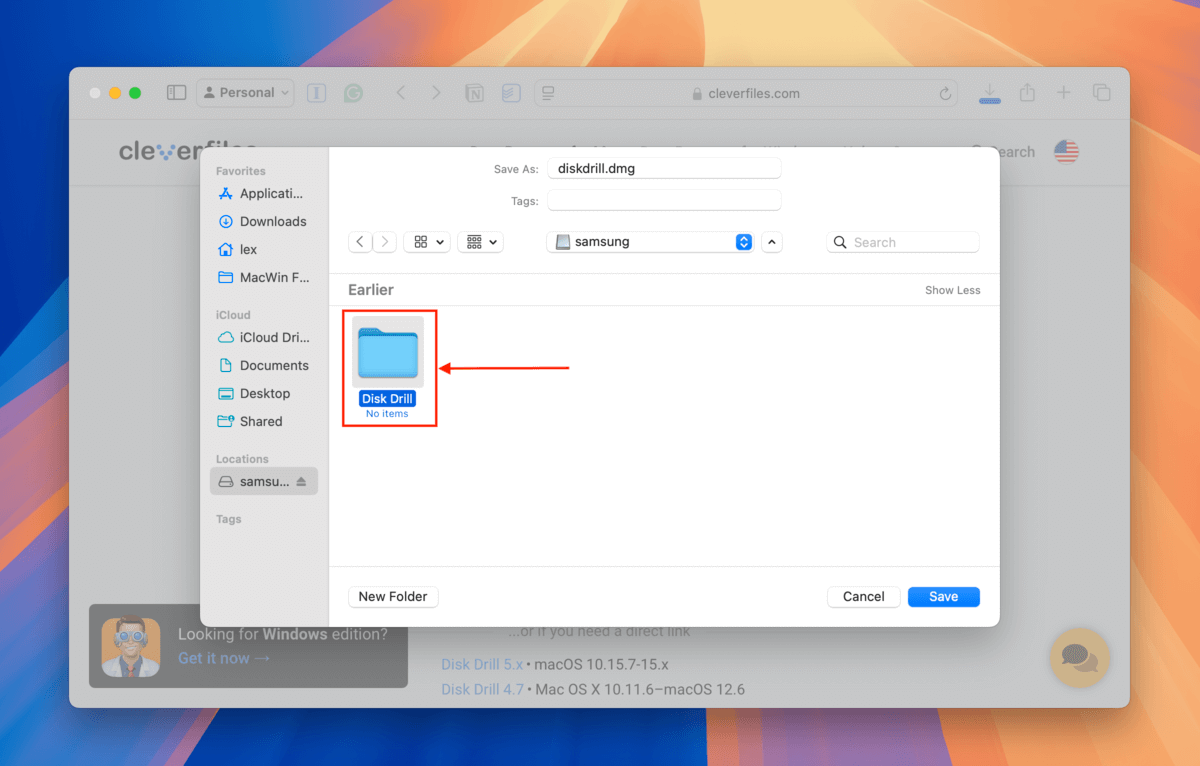
- Download Disk Drill. When Safari asks you where to save it, choose the Disk Drill folder you created in step 1.
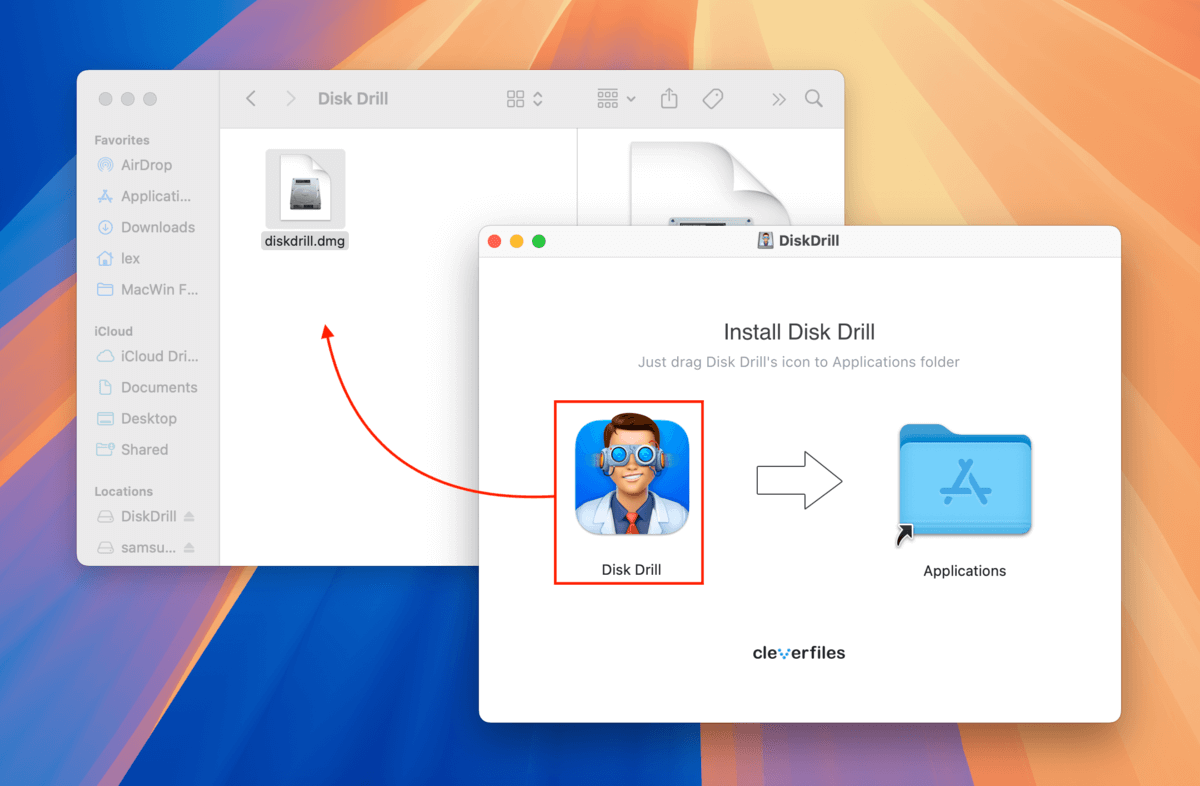
- Double-click the installer file you just downloaded. When prompted, drag the Disk Drill icon from the installer window into the Disk Drill folder (the same location the installer itself is stored in).
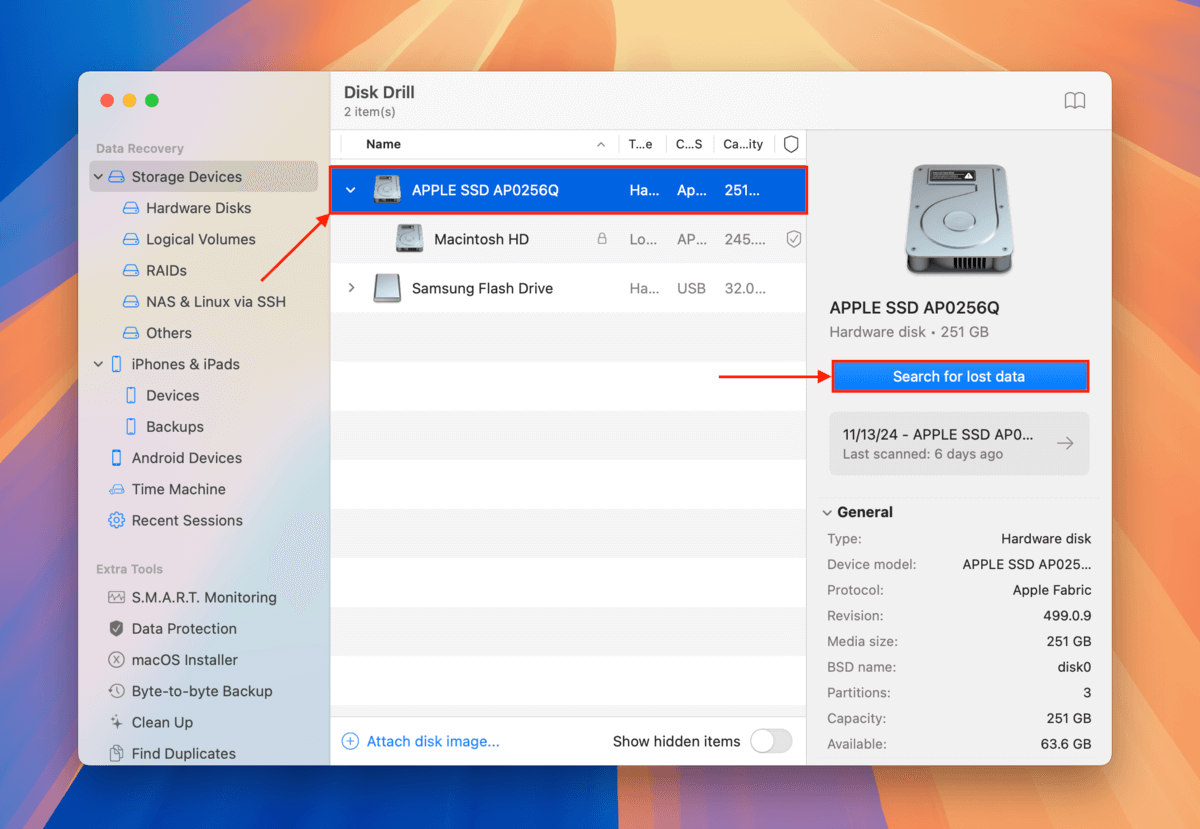
- Double-click Disk Drill’s icon to launch the app. Then, select your Mac drive (usually labeled as “APPLE SSD”) and click Search for lost data.
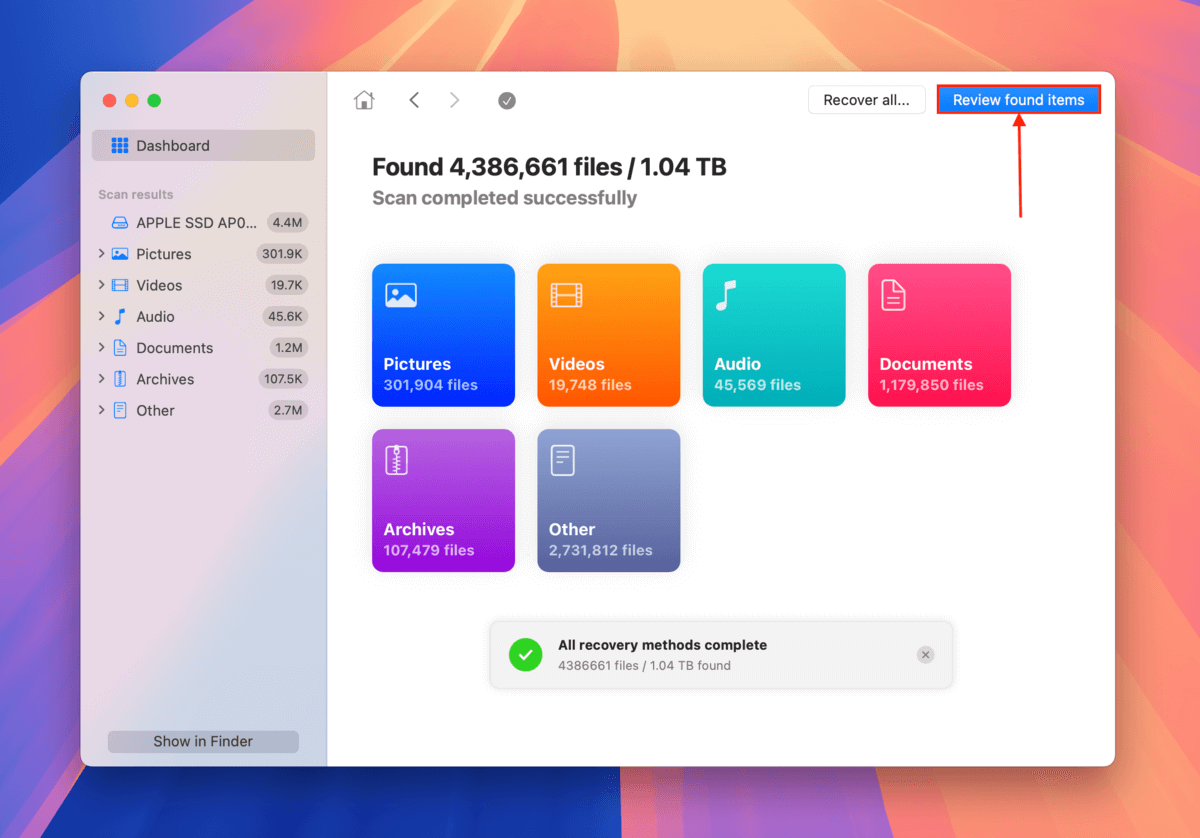
- Once you see All recovery methods complete appear at the bottom of the window, click the Review found items button.
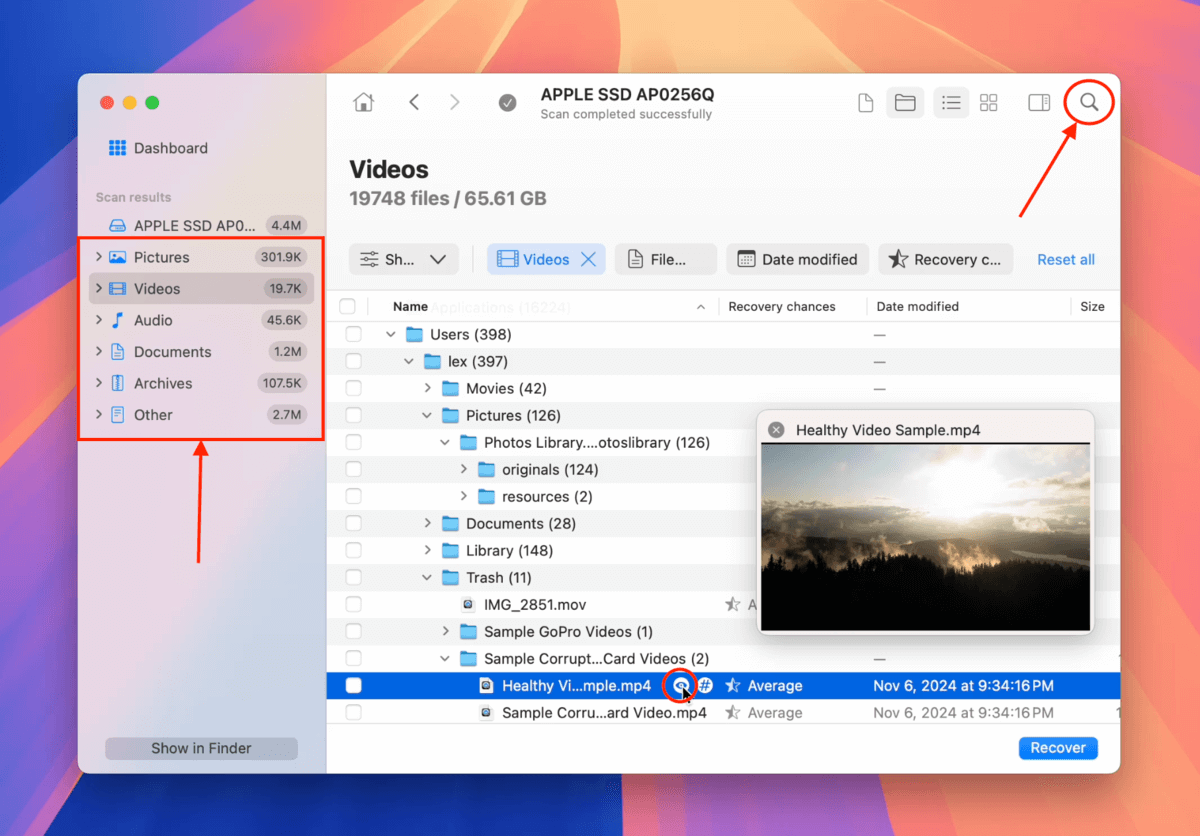
- If you only want to restore specific files or file types, utilize the filters in the sidebar as well as the search tool in the top-right corner of the app. You can preview a file (to make sure it works and is recoverable) by hovering your mouse pointer beside it and clicking the eye button.
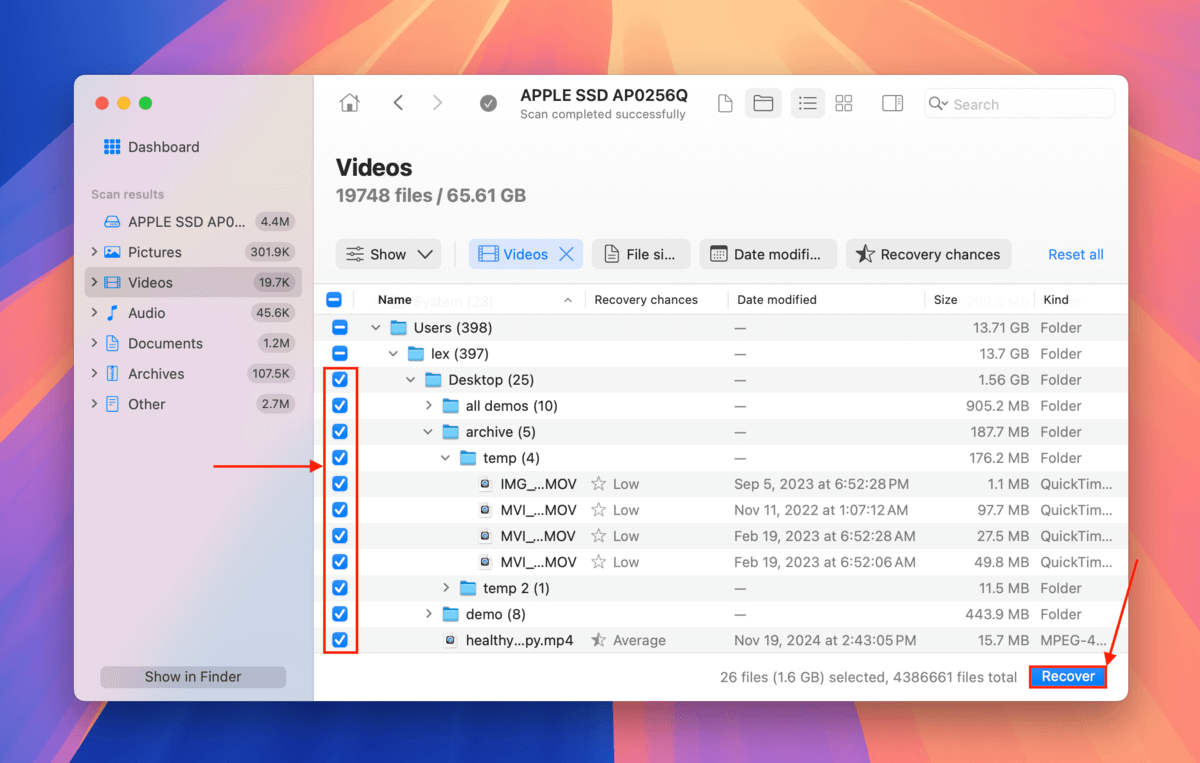
- To select the files you want to restore, mark the boxes beside them. Then, click Recover. If you want to restore all the files that Disk Drill found, leave the boxes blank and click Recover All.
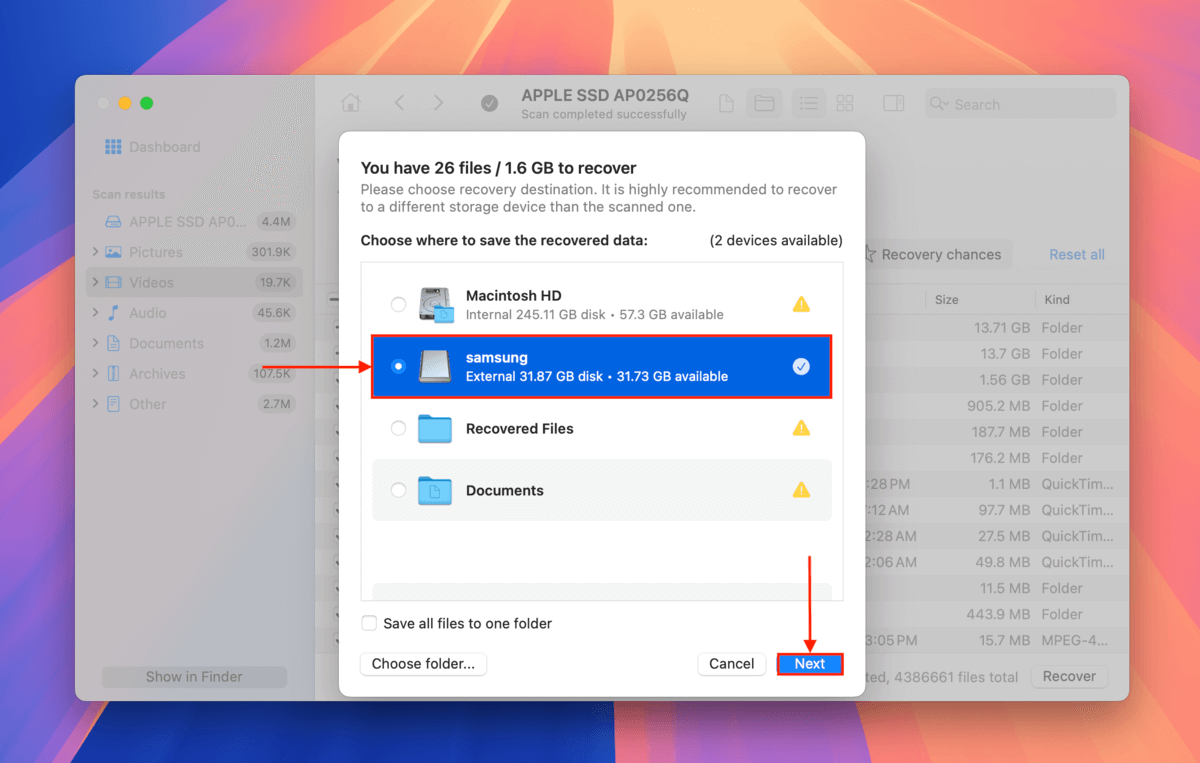
- Select the external storage device you connected in step 1 as the save location for the recovered files. Finally, click Next.
Is There Any Difference in the Process for MacBook Air?
There are very few differences between the process of resetting a MacBook Air and a MacBook Pro, and most of them are not really significant as long as they have the same processing chip (Intel or Apple Silicon) and the same operating system.
The only real considerations you need to keep in mind are:
- A MacBook Air has a lower battery capacity than a MacBook Pro, so you want to be more cautious about fully charging your Air or keeping it plugged in during the resetting process.
- Because of their performance differences, a MacBook Pro may complete the reset process earlier than its Air counterpart because it can accomplish tasks like erasing disks and installing macOS faster.
- MacBook Pro models are typically hooked up to various peripherals, which may require additional setup after the resetting process is concluded.
Aside from the above “logistics” considerations, both MacBook Pro and MacBook Air models follow the same procedure.
Is your Mac stuck in the loading screen?
Are you trying to reset your Mac because it’s stuck in the loading screen? This is often the case if you tried updating to a problematic macOS release, your Mac was infected by a virus, its disk was corrupted, or you experienced power issues that often shut down your Mac unexpectedly.
If so, you might struggle to execute the standard reset procedure and you might even lose your data in the process. Follow our guide on how to fix a MacBook that is stuck on the loading screen, where we’ll also teach you how to restore and secure your data even if you can’t boot into macOS.


