
Storage space on an iPhone can fill up pretty quickly. Photos, videos, applications, and documents can begin to pile up, and then might come a time when you realize that there’s little to no space left on your phone. Luckily, there are ways to add storage to an iPhone (even without paying).
In this article, we’ll cover how to check the storage capacity on your iPhone and describe the best ways to increase it.
Table of Contents
How to Check iPhone Storage Capacity and Free Space
While the About menu in the Settings app can tell you how many gigabytes of storage space you have left, iOS actually provides a much more comprehensive view of how your storage space is distributed. We recommend you follow this short guide for a more efficient approach to storage monitoring:
Step 1. Open the Settings app.
Step 2. Tap General.
Step 3. Tap iPhone Storage.
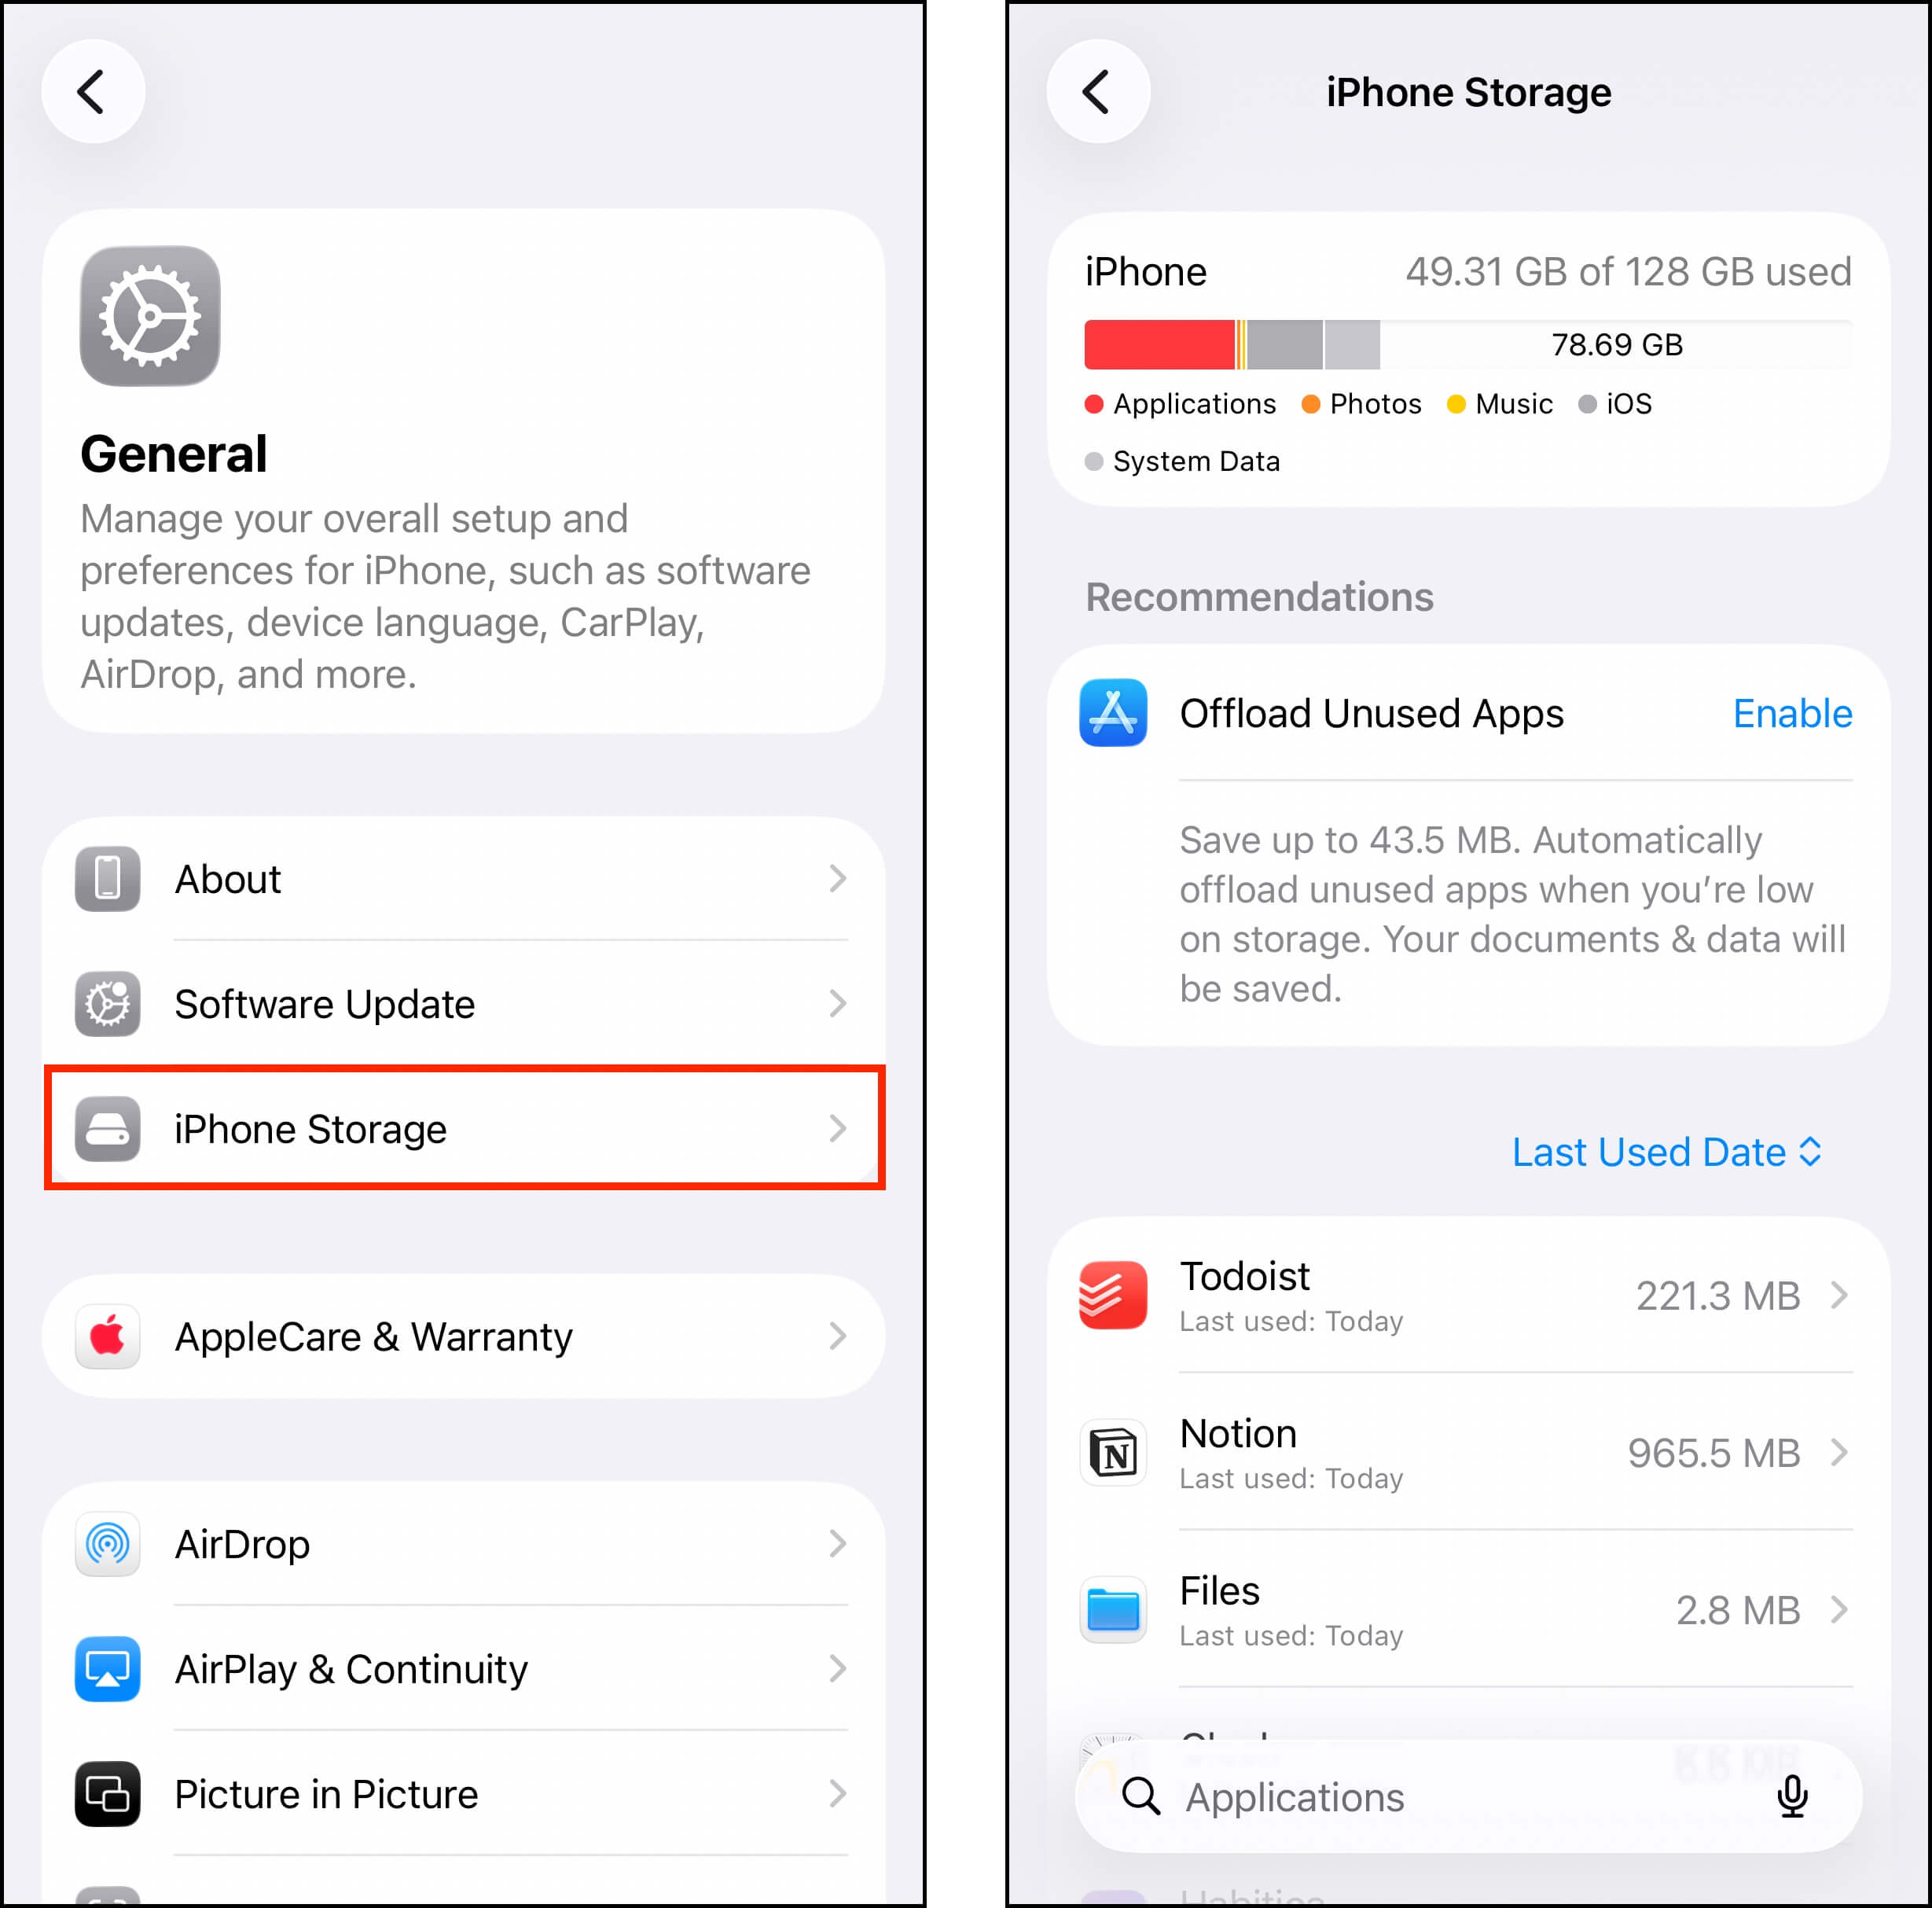
You should see this bar, which provides a breakdown of how your device’s local storage space is allocated. It can help you quickly determine what types of data are taking up the most space.
Here’s what you should do with it:
- Identify what to delete ⬇️ Identify what files or apps take up the most space while providing the least value. This helps you systematically determine “where you need to clean.” iOS actually tries to help with this–below the colored storage graph, you may see “Recommendations” for cleanup (e.g., Offloading unused apps, reviewing large attachments, etc.). This should help you figure out where to start.
- Validate the need for storage expansion ⬇️ If you determine that everything on your device is genuinely valuable, then you need to increase your storage space to accommodate your files.
You can also do both! Keeping a healthy amount of free storage space is not only good for data, but it’s also helpful for maintaining your device’s performance. In this guide, we’ll cover both approaches to storage management.
Can You Add More GB to an iPhone?
Let’s clarify the language. You can’t permanently add “local” storage space on an iPhone the same way you can install a 32 GB microSD card on an Android device. But you absolutely can increase your iPhone’s storage capacity using other methods.
There are two strategies for increasing an iPhone’s storage capacity: (1) acquiring more free space, and (2) reclaiming wasted storage space. Given the huge file sizes of photos, videos, apps, etc., you might be surprised at how much storage space you can free up.
In the guides below, we’ll demonstrate different methods of accomplishing both. We also made sure to include both free and paid methods.
How to Add More Storage Space to Your iPhone for Free
iOS provides many intuitive ways to manage your data and your storage space. Here are the 4 most impactful methods to clean up your iPhone using tools that already come with your device or are free to download and use:
Option 1: Get Rid of All the Clutter
The first way to gain more storage space on your device is to clean up your unwanted data. That sounds obvious, but your device can actually generate gigabytes of useless data across apps, photos, videos, attachments, and even browser caches. Fortunately, iOS can help you clean them up efficiently if you know where to look for the right features.
Photos and Videos
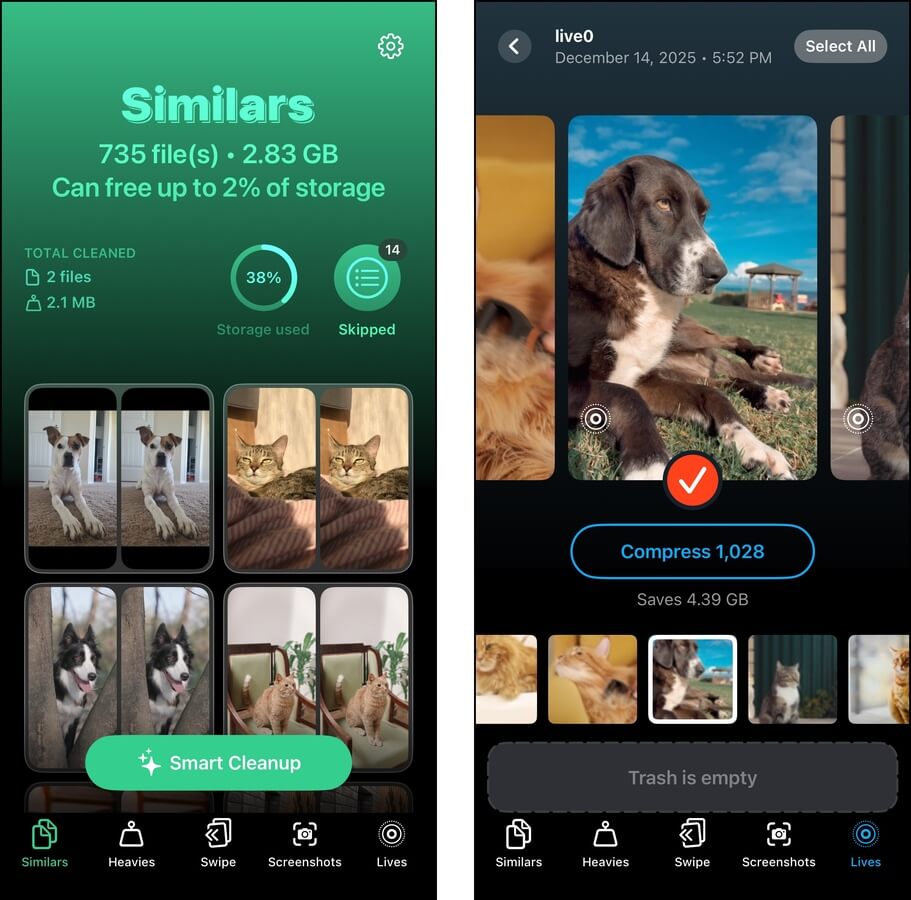
Aside from System Data and iOS, photos and videos usually take up the most amount of storage space (aside from apps)–especially if you’re using the highest capture settings available on your device. Your media library is also prone to cluttering due to duplicates, similar photos (from human errors, bugs, third-party apps, etc.), large videos, obsolete screenshots, and more.
You can delete them manually with the Photos app, but using a third-party app can clean your library faster. There are several great software programs to choose from, but if you want to try a free solution first, we recommend an app called Clever Cleaner: AI Cleanup App. The app currently has no subscriptions and no ads, and it will remain free (with no limitations) for users who download it early.
It can help you clean up duplicate and similar photos, convert all your Live Photos to still images, compress videos with minimal loss of quality, and more.
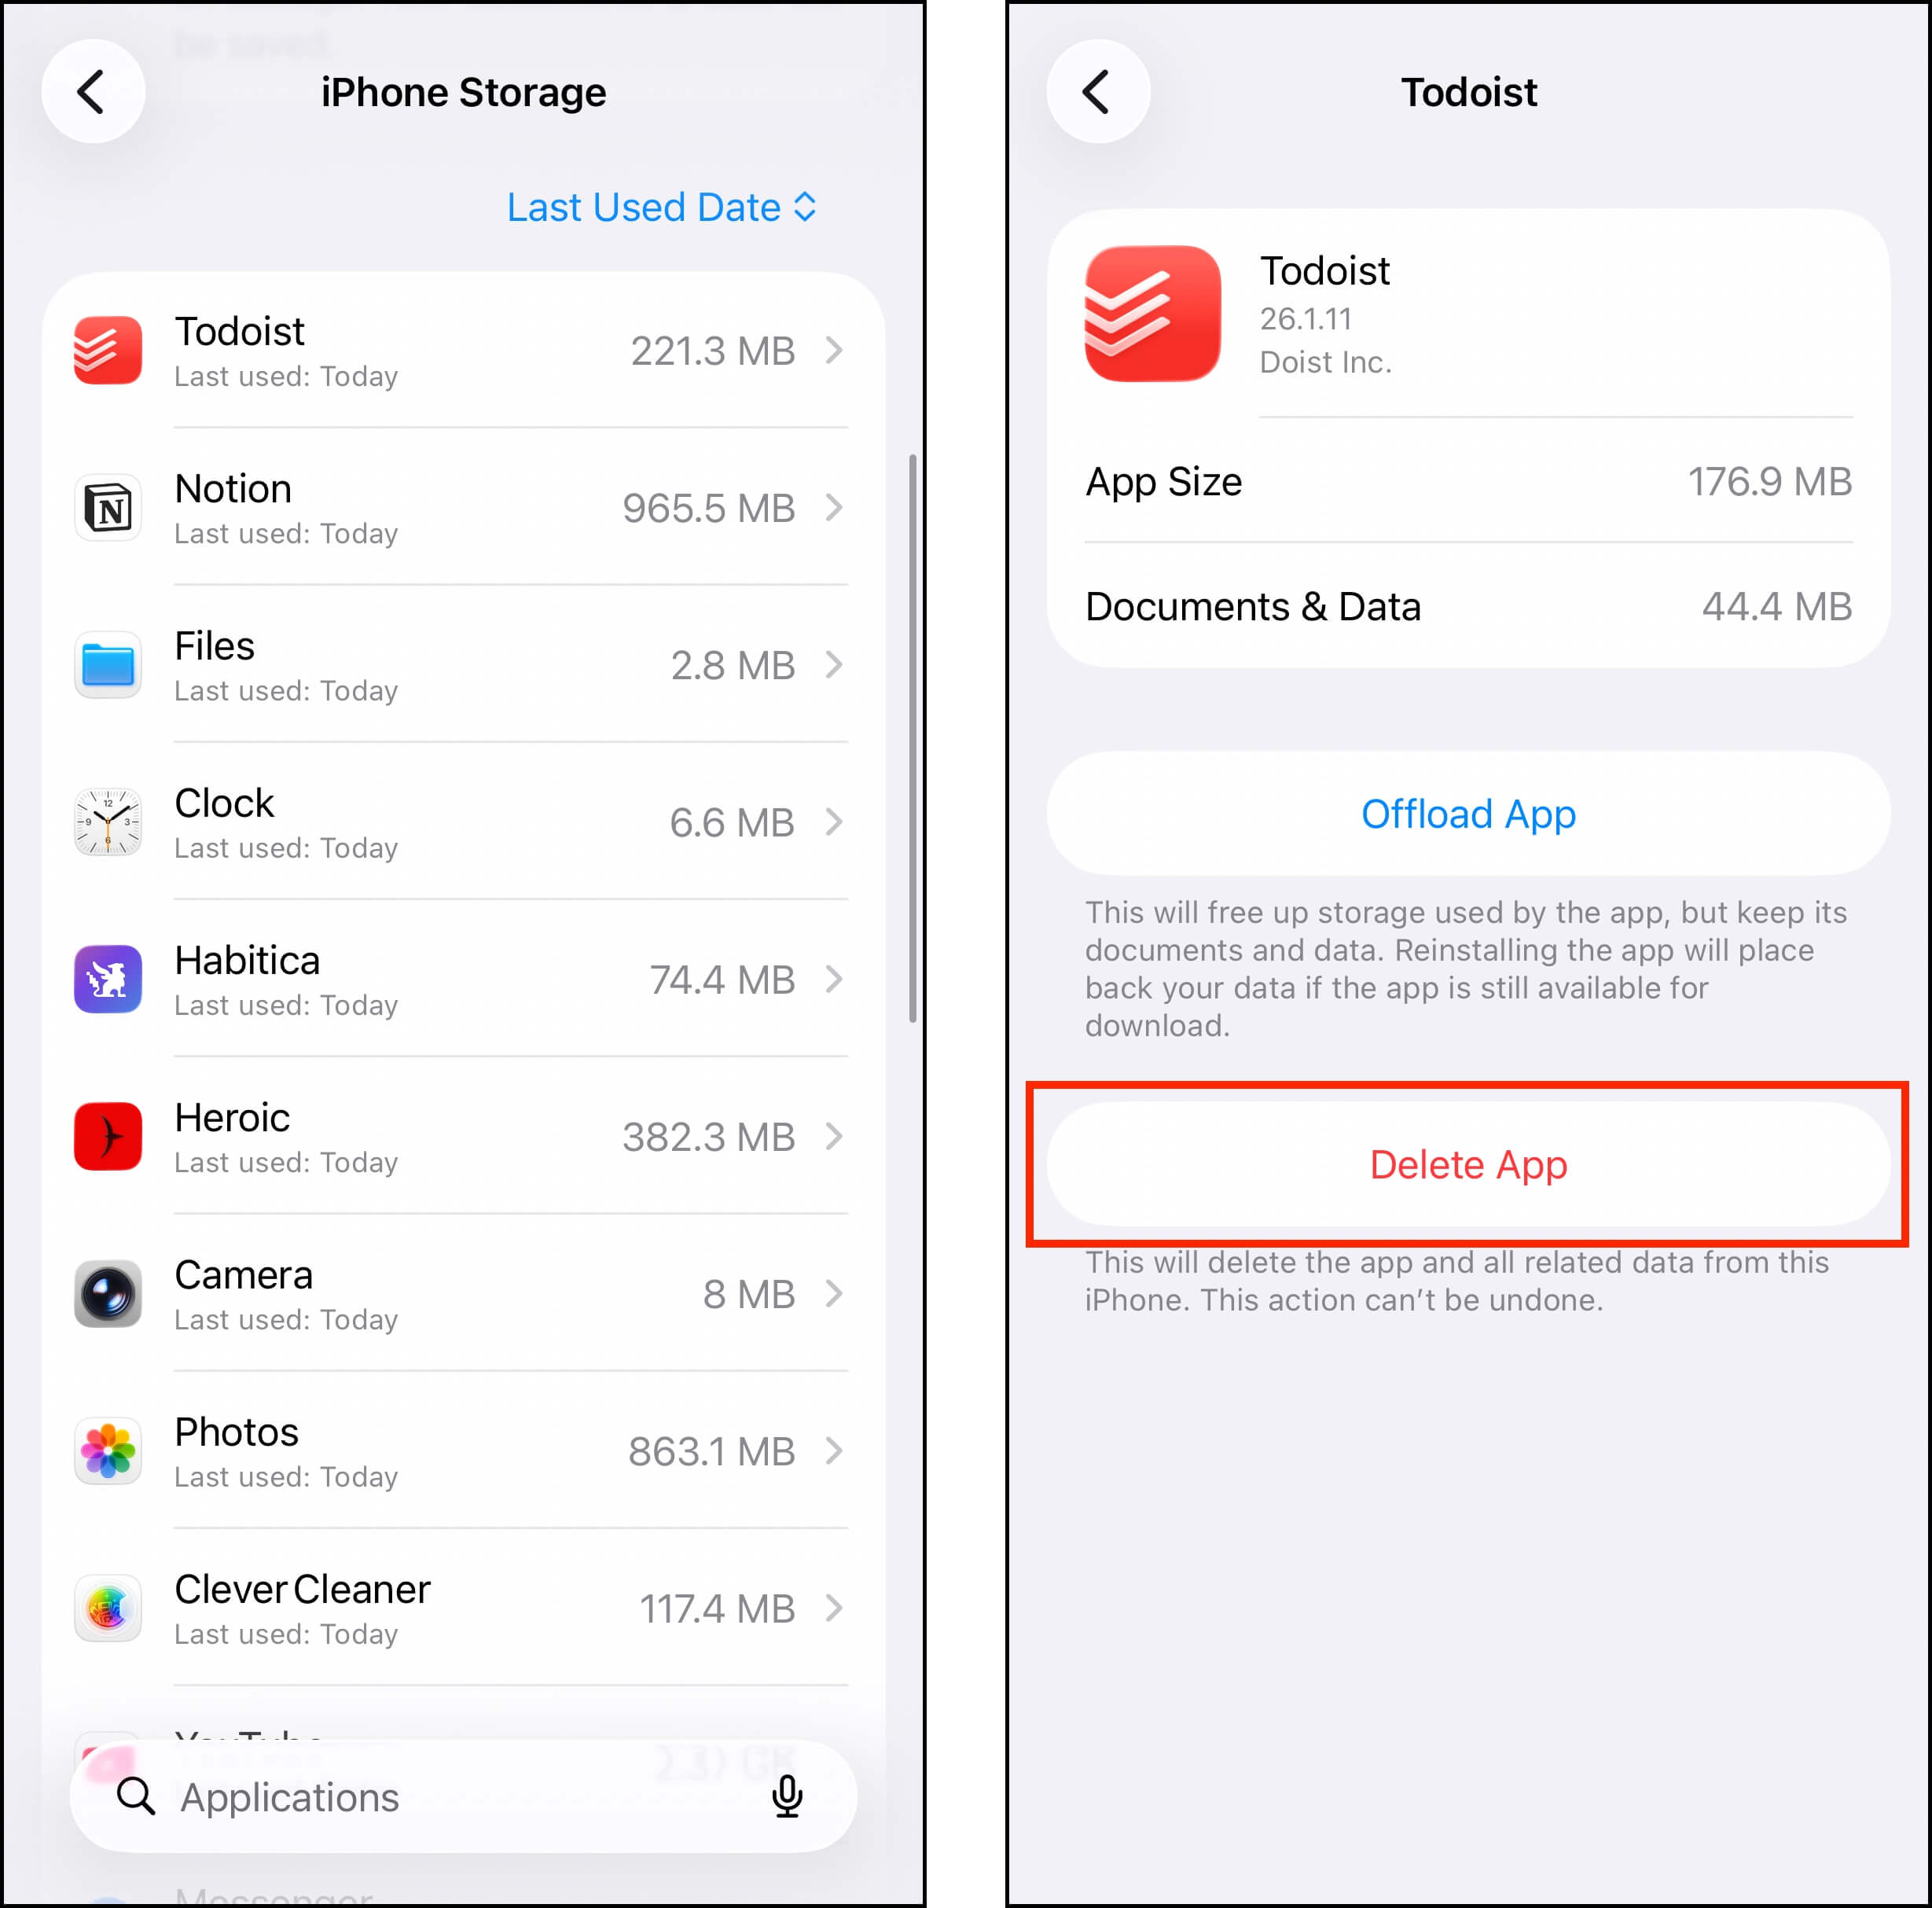
Apps
Go to the iPhone Storage menu via the Settings app > General > iPhone Storage. Then, scroll down to find a complete list of your apps, organized by file size. Tapping an app will open another menu, where you can find the Delete option.
Attachments
Attachments can be made of photos, videos, and thick document files. Not only can they take up a lot of space, but they’re easily forgotten. Fortunately, you can conveniently review and delete your attachments in the Messages app by going to the iPhone Storage menu (shown above) > Messages > Documents section.
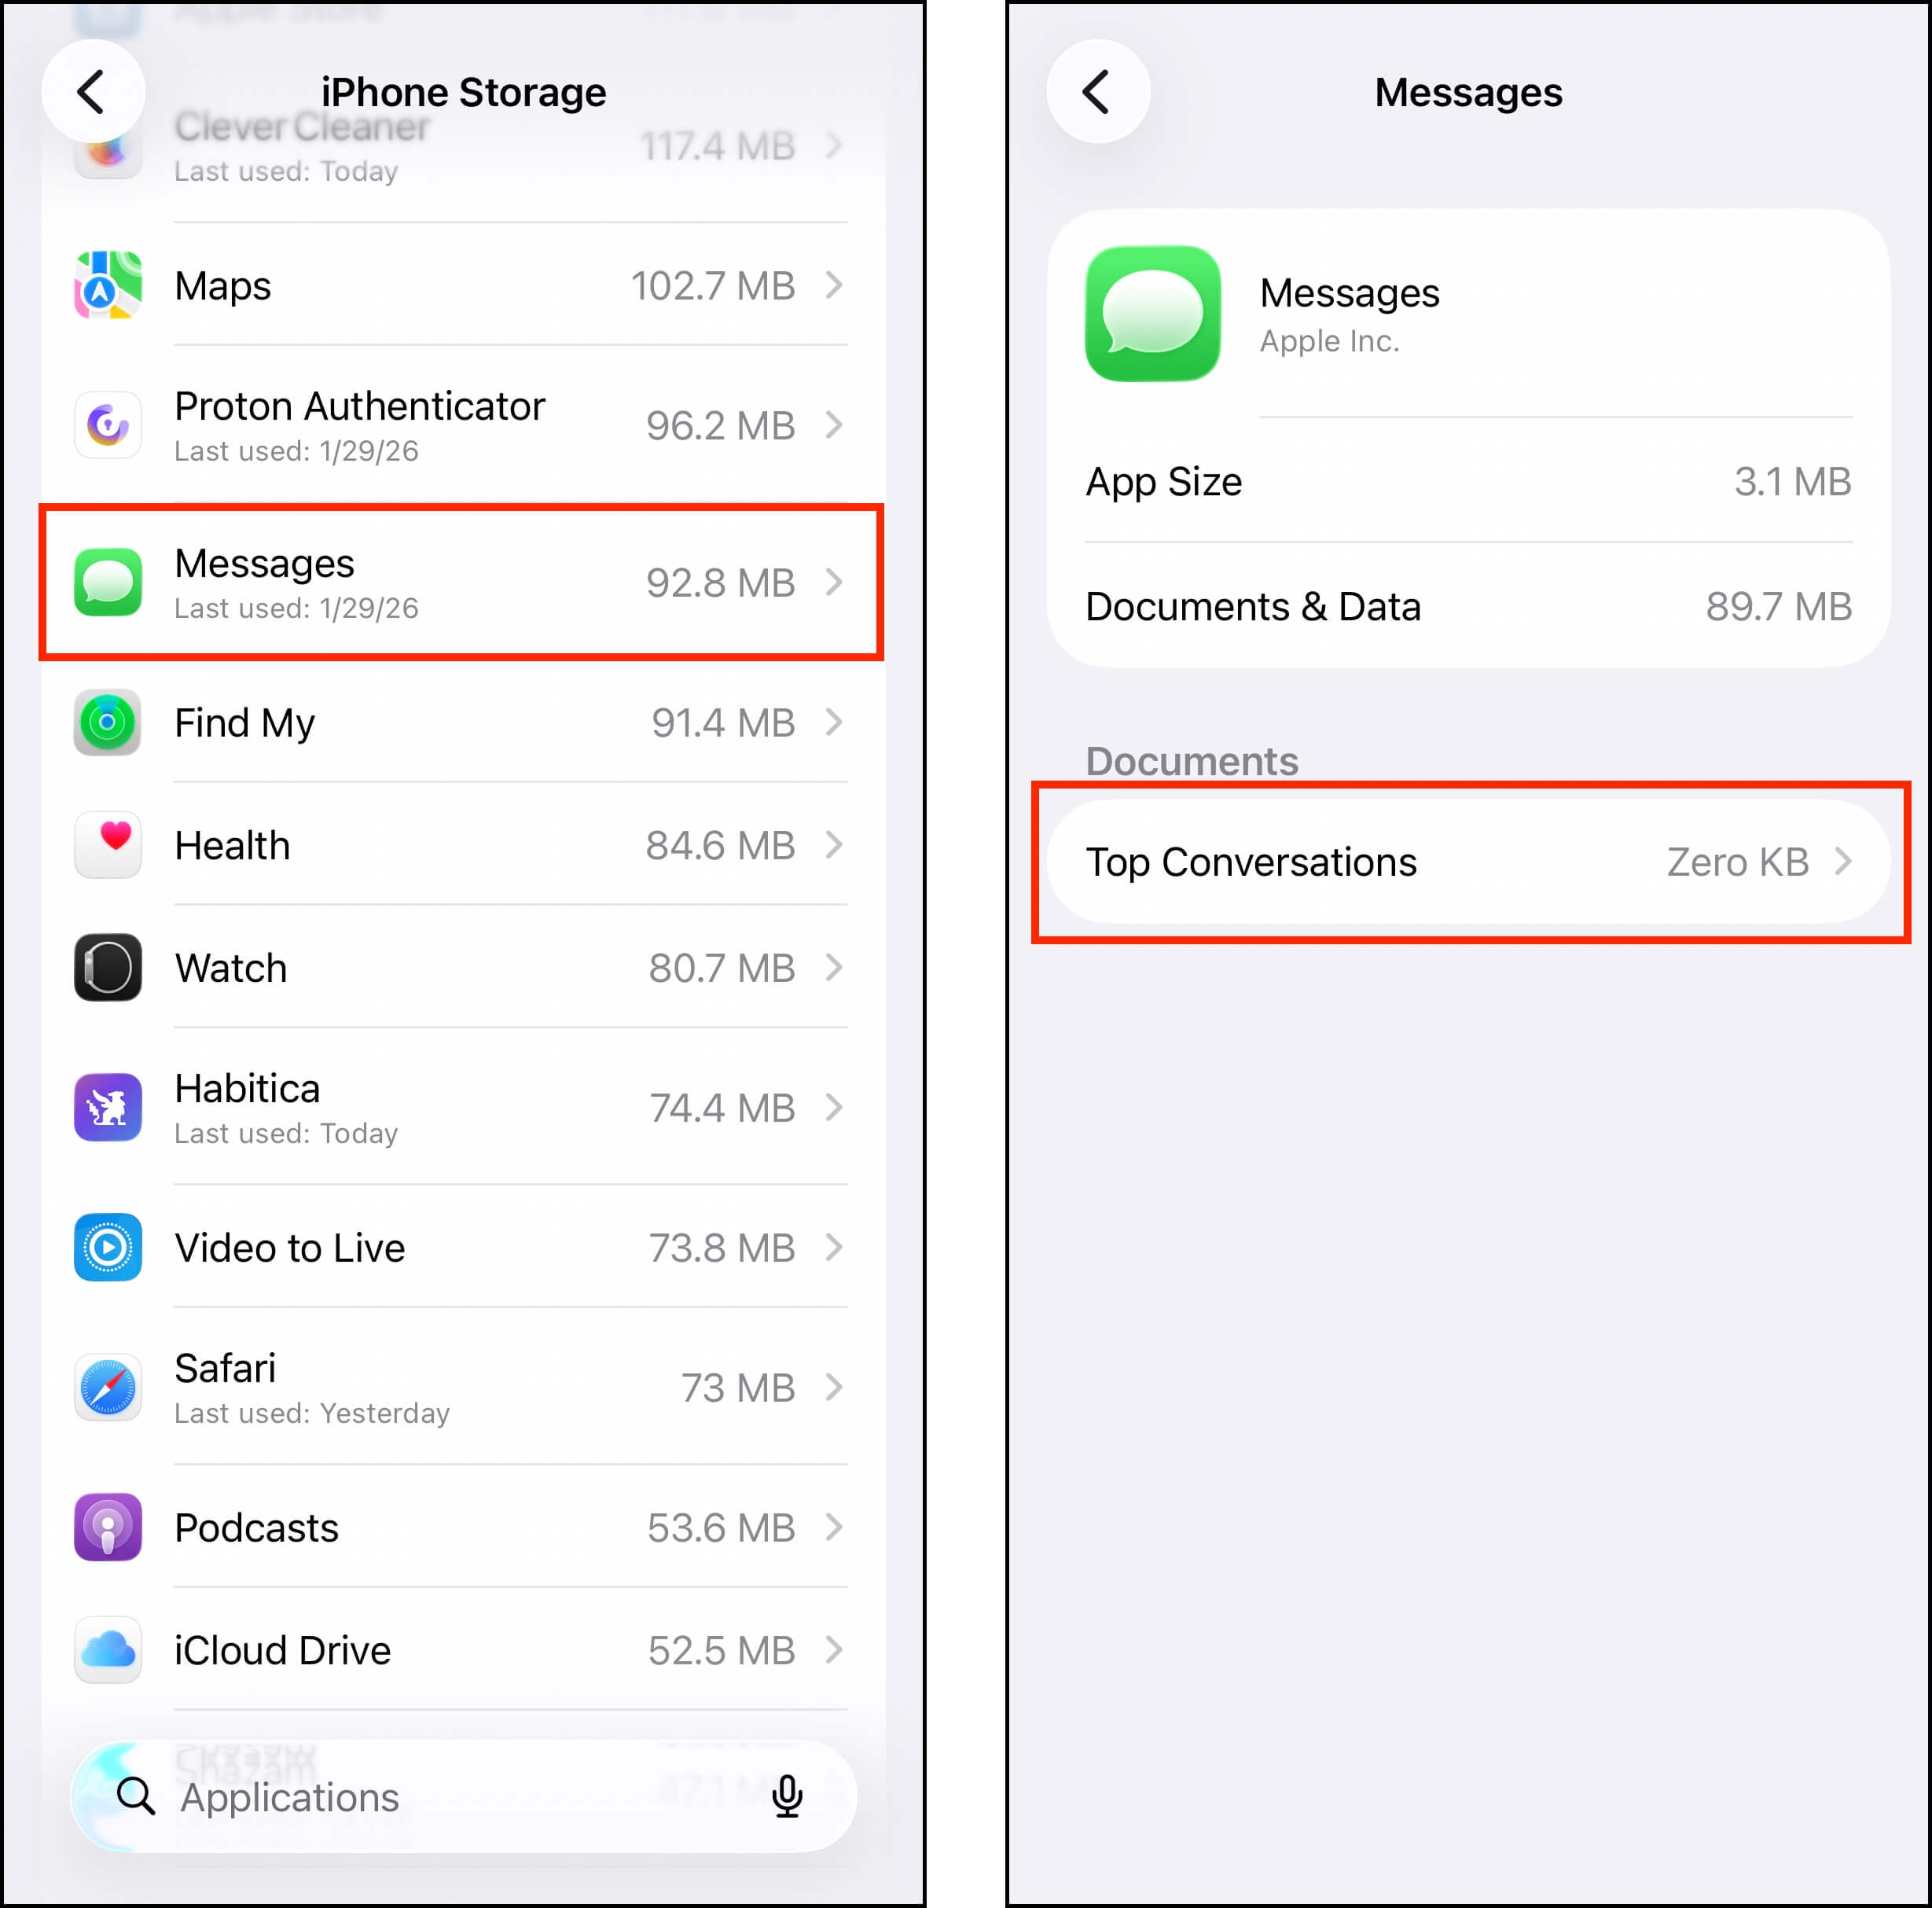
Depending on the contents of your device, you may find categories like Top Conversations, Photos, Videos, GIFs, and Stickers. Simply choose a category, then tap Edit in the top right corner.
Browser Caches
iPhone browser caches can accumulate gigabytes worth of data (per browser) without you even noticing it. They often store large asset files, like images from a website you often visit, in order to load pages faster. iOS and the browsers themselves usually manage cache data automatically, but files can often linger long enough to become a problem for your storage space. Safari is iOS’ default browser, so this section will show you how to clear Safari’s browser cache on your device.
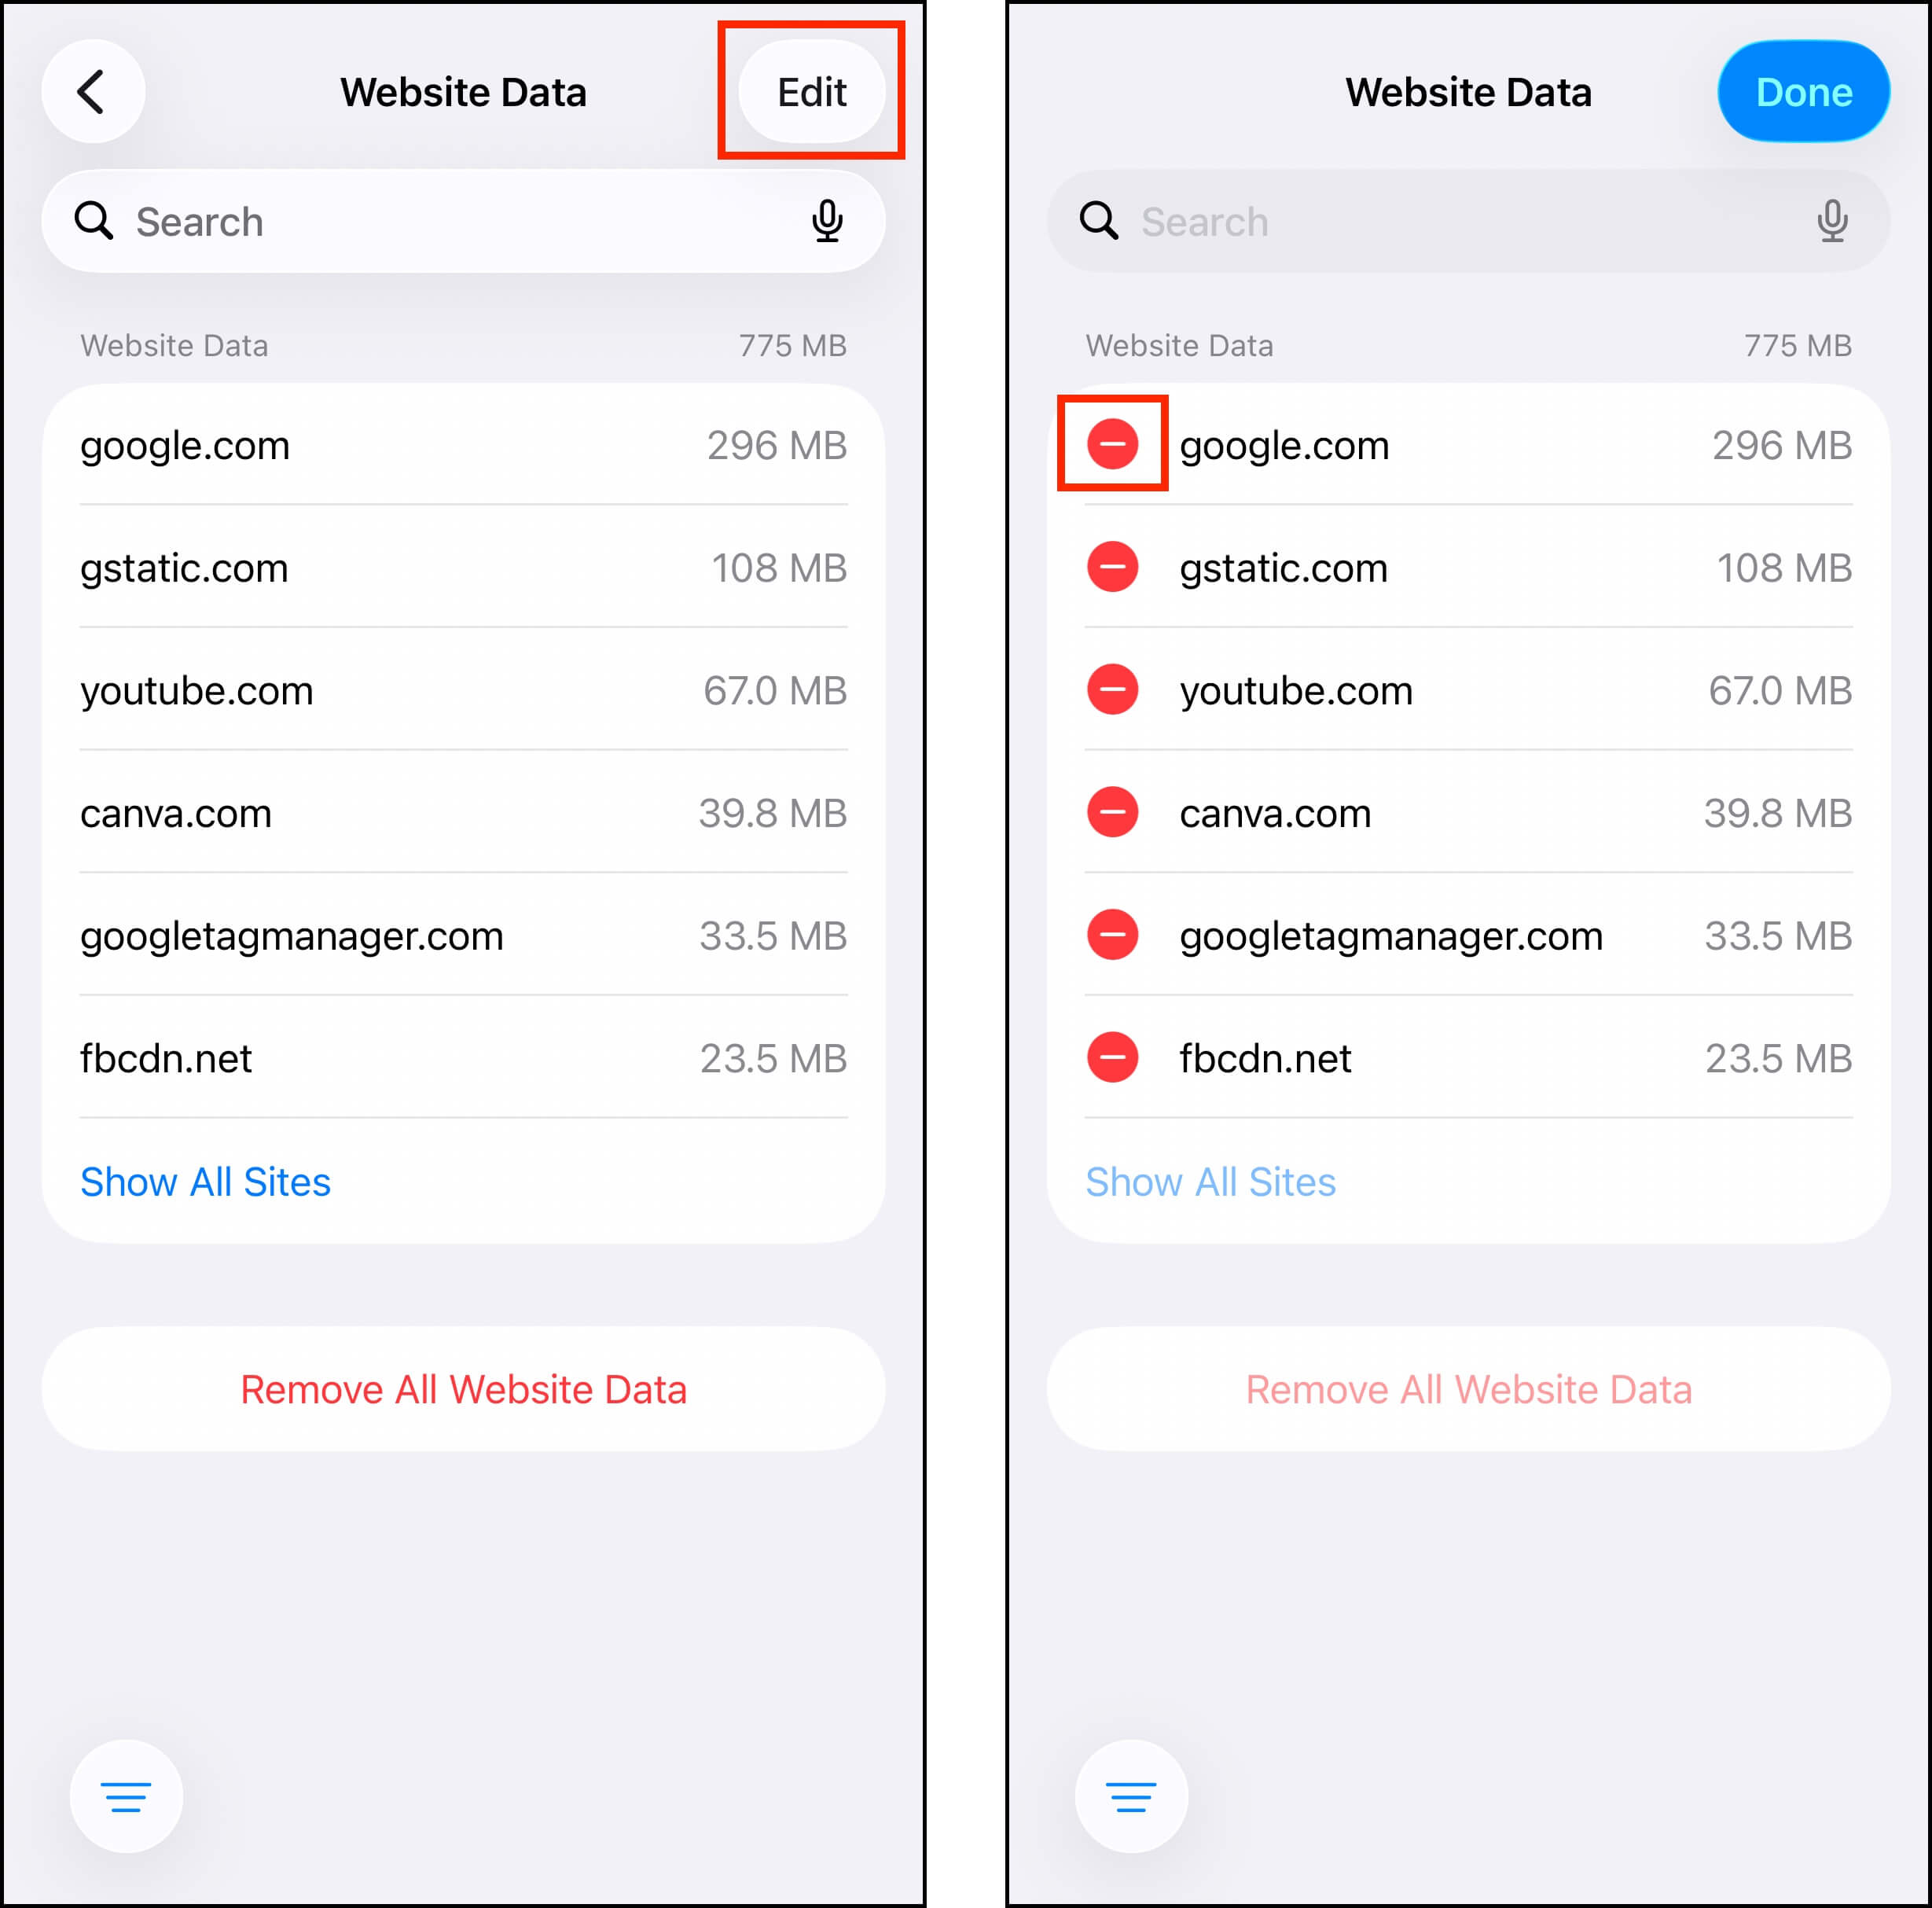
Step 1. In the Settings app, go to Apps > Safari. Then, scroll down to Safari’s settings page and select Advanced > Website Data.
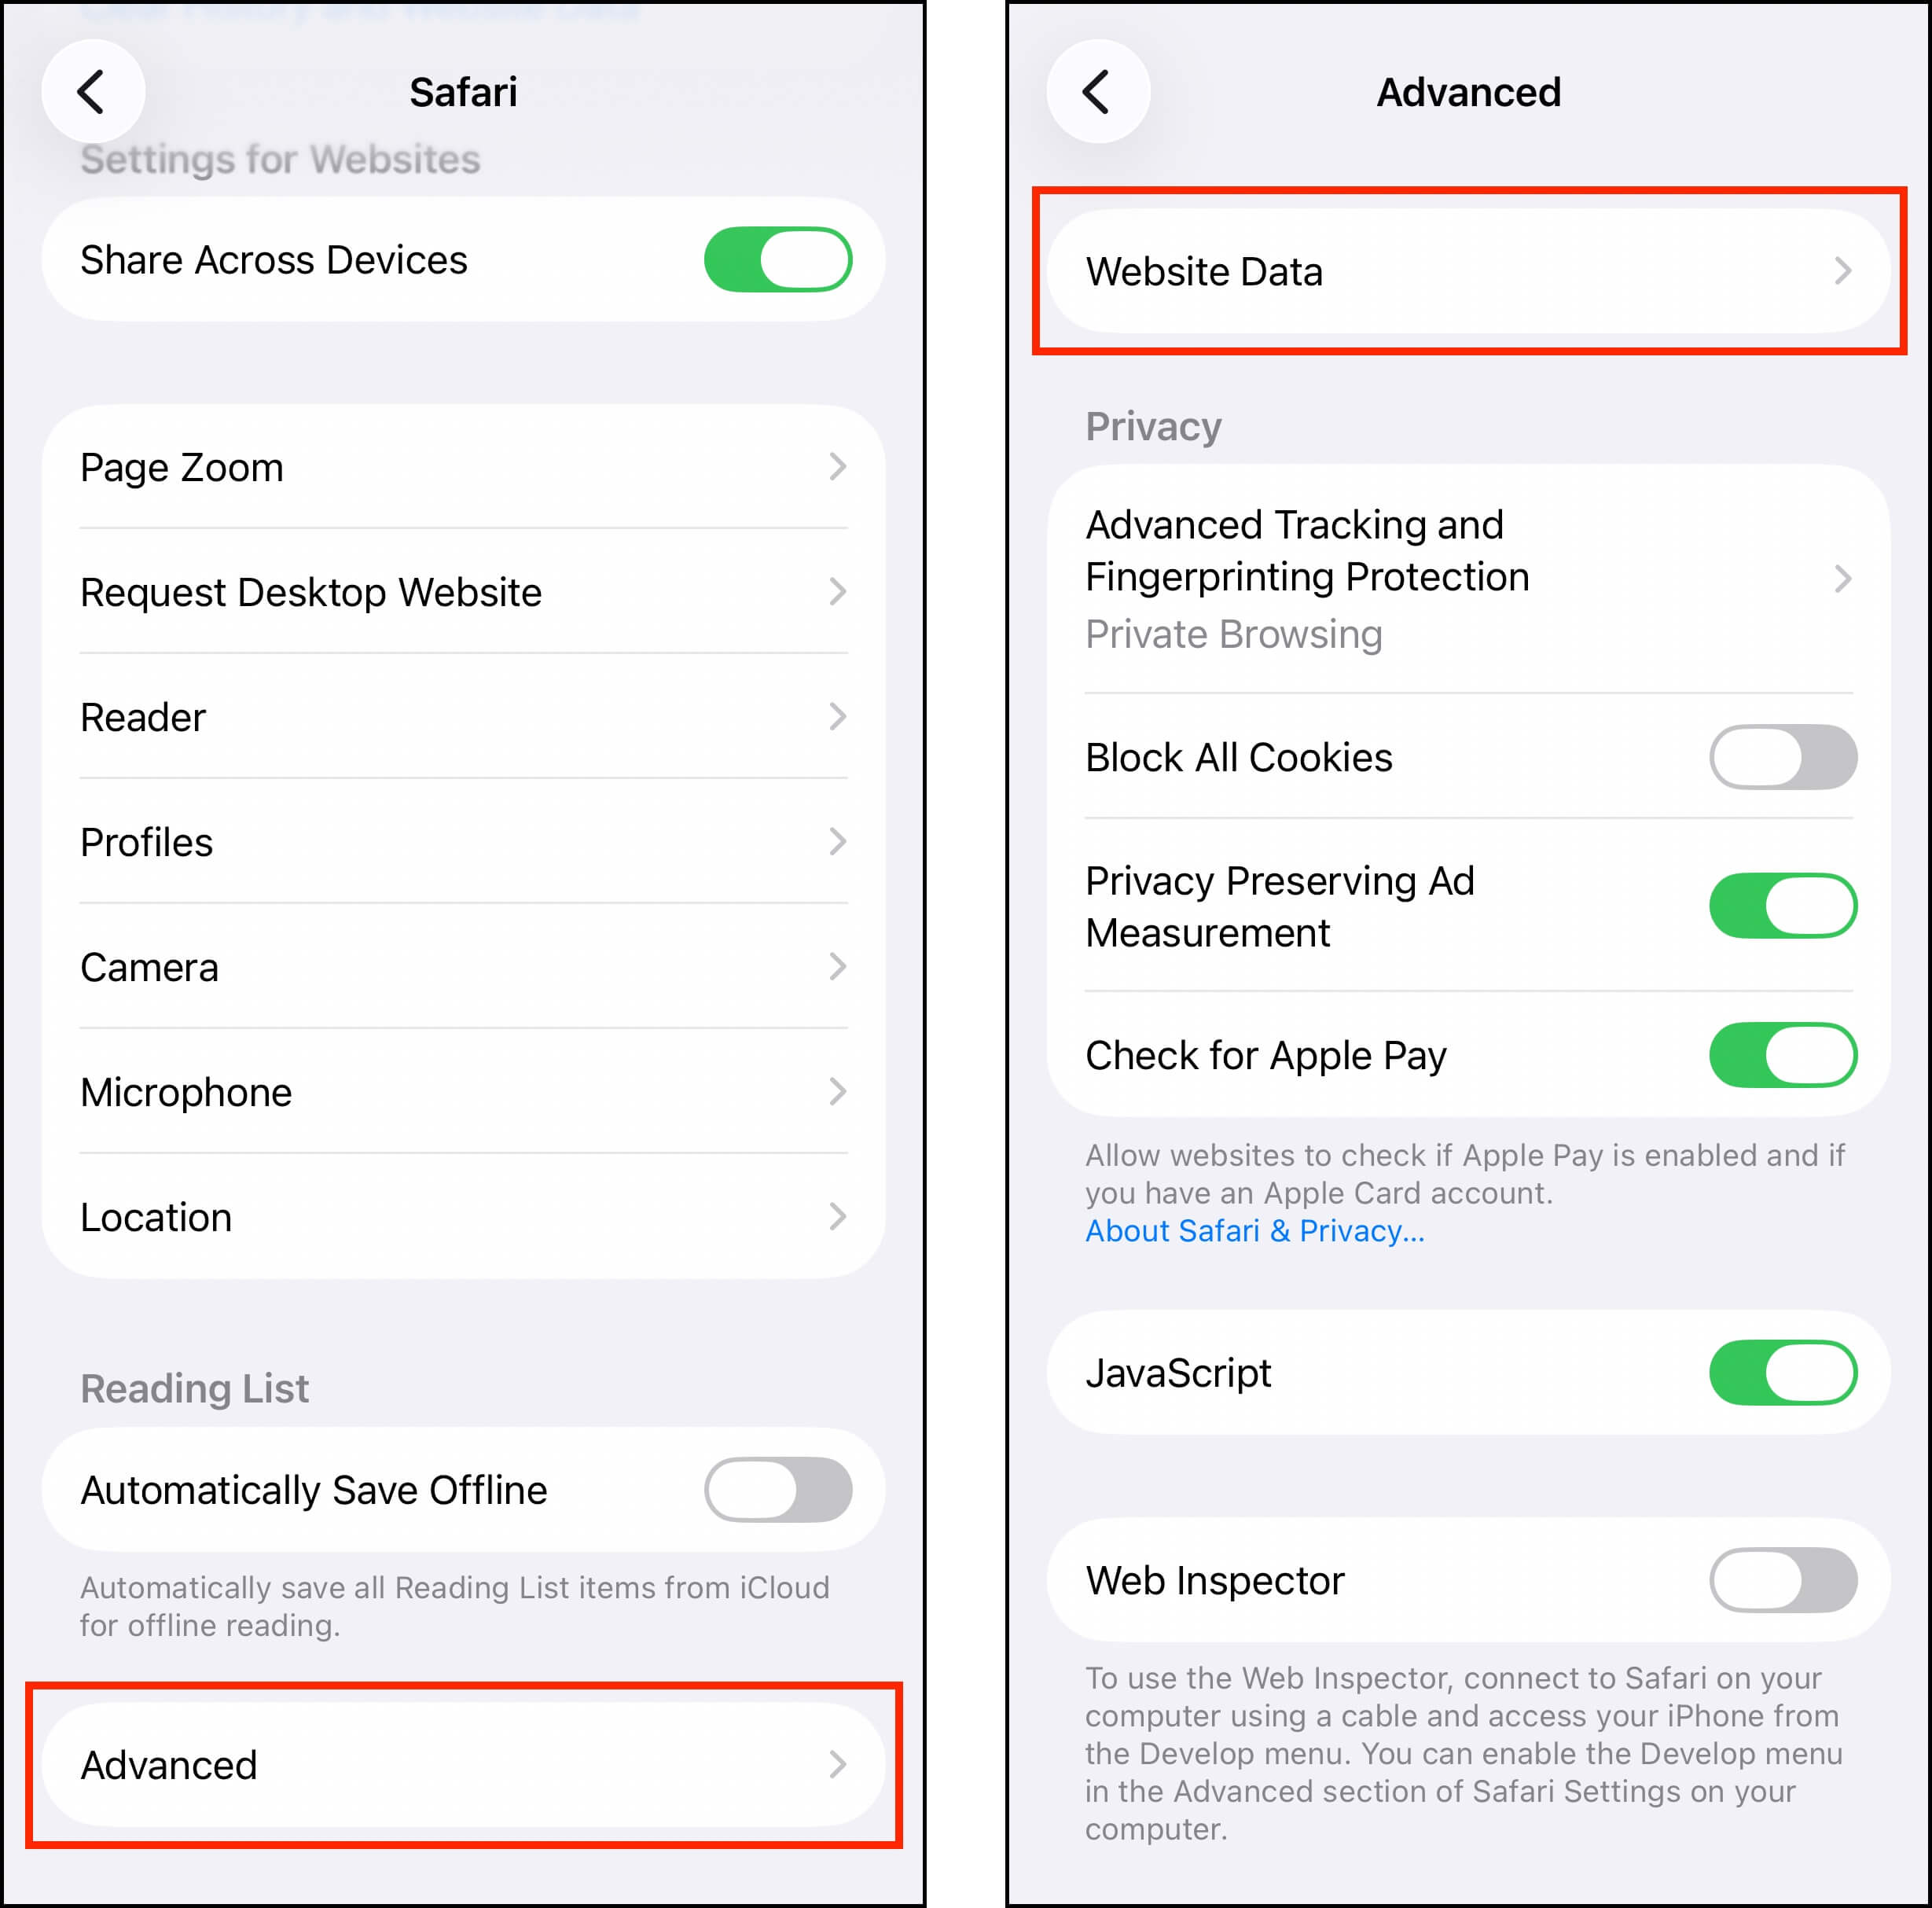
Step 2. In the top right corner of the Website Data page, tap Edit. Then, tap the red button beside the website data you want to delete. Alternatively, you can choose Remove All Website Data to wipe everything.
System Data or “Other” Category
Depending on your iOS version, you may see “System Data” or “Other” as a category in the iPhone Storage menu. Similar to browser caches, system data can accumulate a lot of redundant files that can take up literally dozens of gigabytes of storage. The problem is that you can’t directly manage these files to free up space.
However, there are several methods to clean up these data types indirectly (but they’re too long to include here). If you’re using iOS 15 and later, check out our guide on cleaning System Data on your iPhone. For iOS 14 and earlier, read our guide on cleaning “Other” data instead.
Option 2: Utilize iCloud Storage
iCloud is Apple’s cloud storage service. You can enable it on your iPhone to access 5 GB of online storage space. But the real advantage of enabling iCloud is the Optimize iPhone Storage setting.
This feature allows you to store the original high-resolution versions of your photos and videos in iCloud while only keeping lower-resolution (but still amazing-looking) versions on your device.
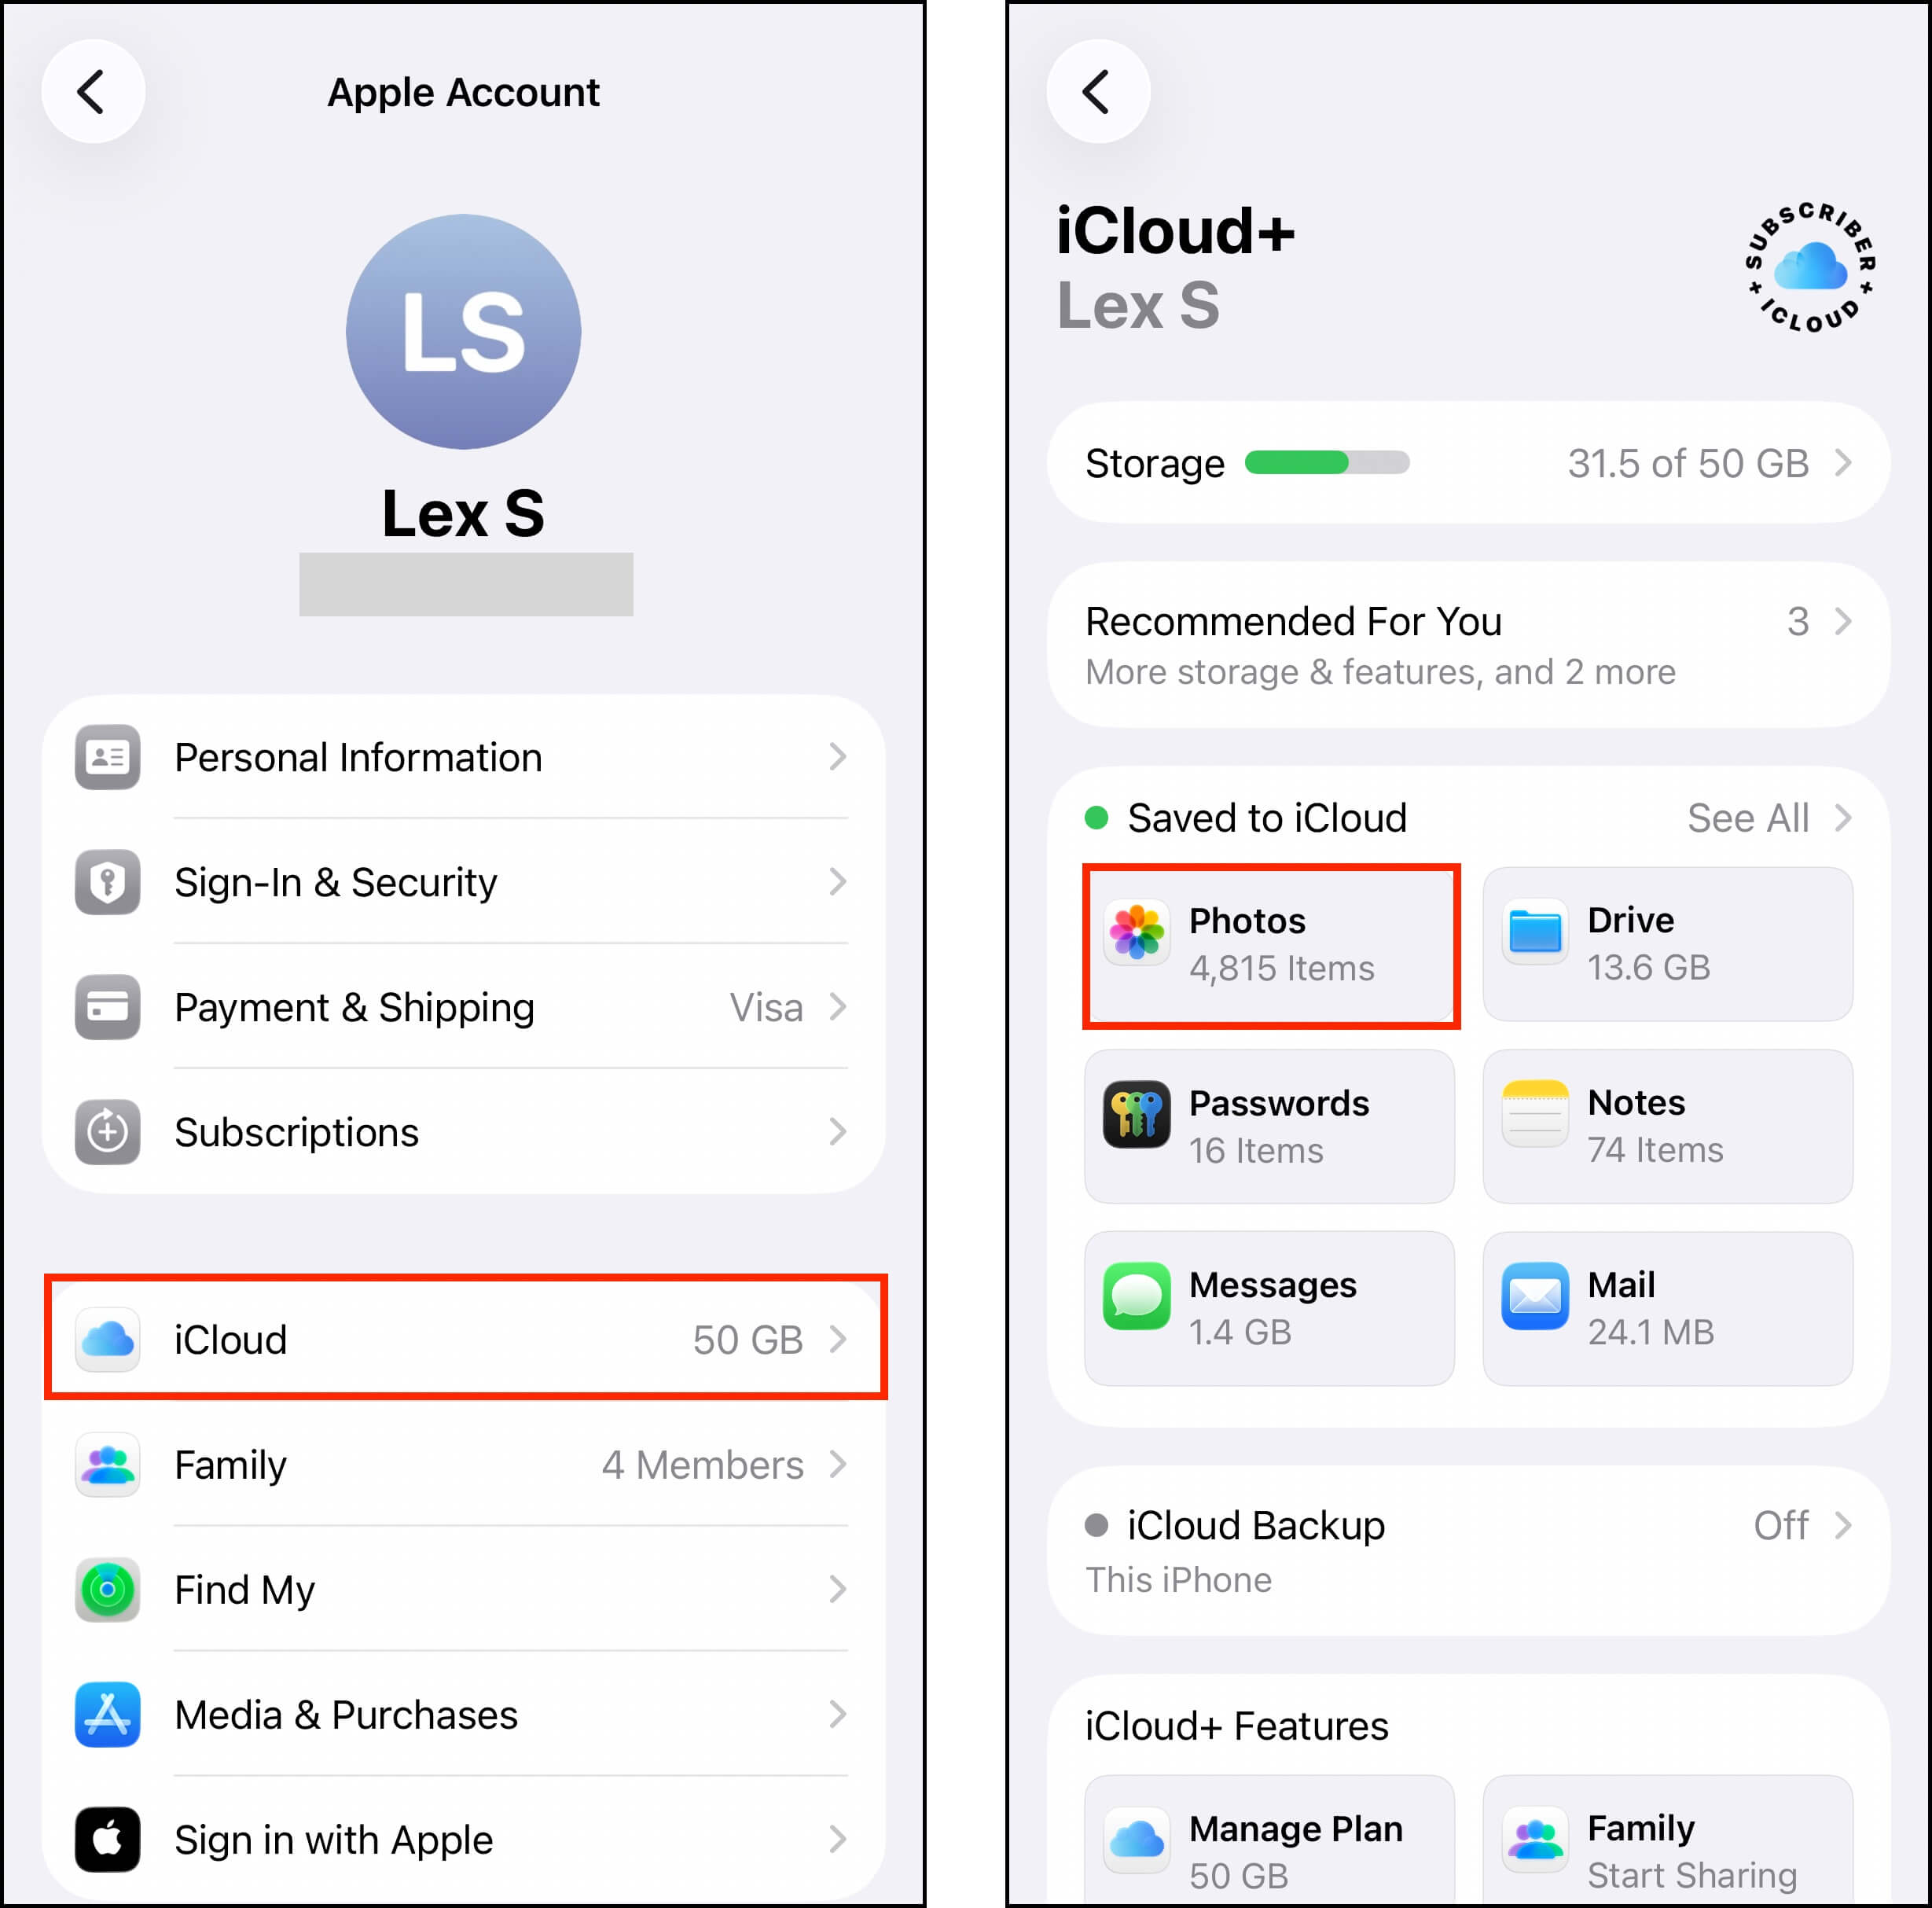
Step 1. Open the Settings app and tap your Apple ID.
Step 2. Tap iCloud.
Step 3. Select the data type you want to save to iCloud. We recommend prioritizing Photos, Drive, and Messages, depending on your usage.
Step 4. Tap the toggle beside Sync this iPhone until it slides to the green position. Then, tap Optimize iPhone Storage.
Once you’ve enabled these settings, iOS will take some time to upload your files to the cloud and assess your device’s local storage (up to an hour or more depending on how much data you have).
Option 3: Utilize Other Cloud Storage Services
Aside from iCloud, there are other cloud storage services that you can utilize that offer limited free cloud space for your files. 2 out of the 3 apps we’ll be recommending also have a storage optimization feature for photos.
- Google One. Offers 15 GB free storage space for Google Photos, Drive, and Gmail. Google Photos (part of the Google One suite) provides the optimization feature, which lets you offload the high-resolution copies of your pictures to the cloud.
- Dropbox. Like Google Photos and iCloud, Dropbox can also upload high-resolution copies of your photos to its cloud storage. It offers 2 GB of free storage space.
- No Optimize: OneDrive. Unfortunately, the optimization feature is not available for OneDrive’s iOS version. However, you can still upload your files manually and delete them from your device.
Option 4: Transfer Photos to Mac (Airdrop without iCloud)
If you have no clutter left to get rid of and you’ve maxed out all free cloud storage options, an easy way to instantly reclaim storage space quickly is to transfer your photos to your Mac. You can do this easily using AirDrop between your Mac and your iPhone.
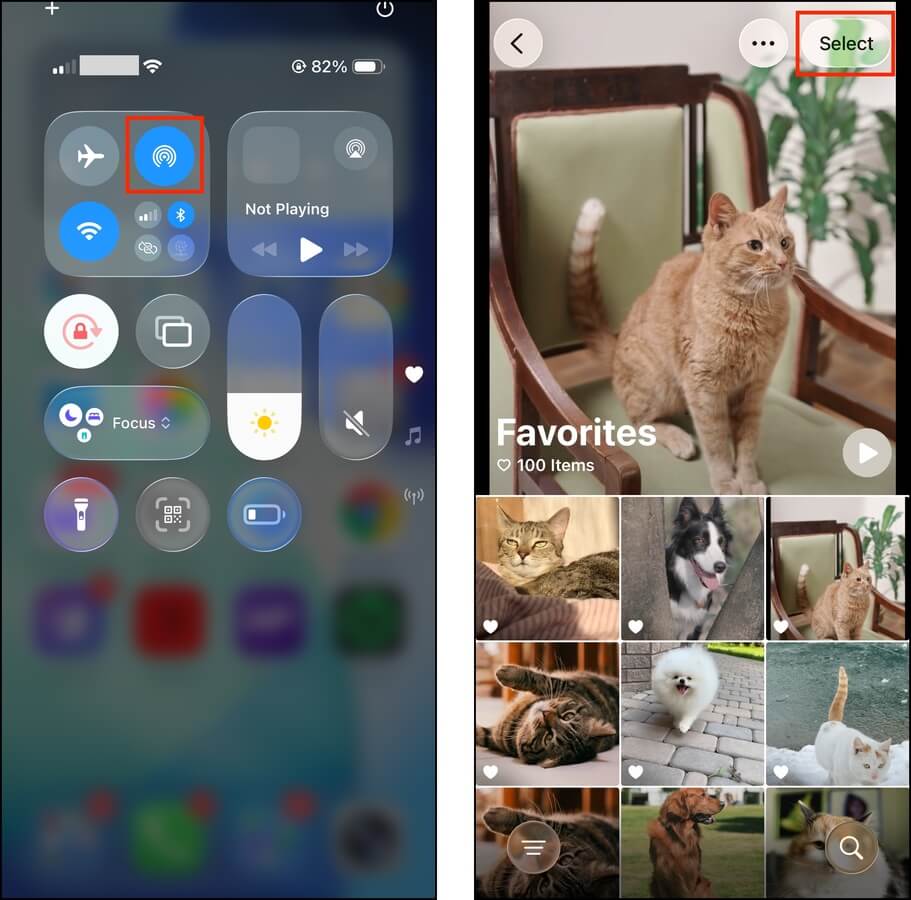
Step 1. On your Mac’s menu bar, click the Control Center icon > tap the AirDrop icon (it should turn blue). You can specify whether you want to open AirDrop for a specific contact or for everyone by clicking the arrow button.
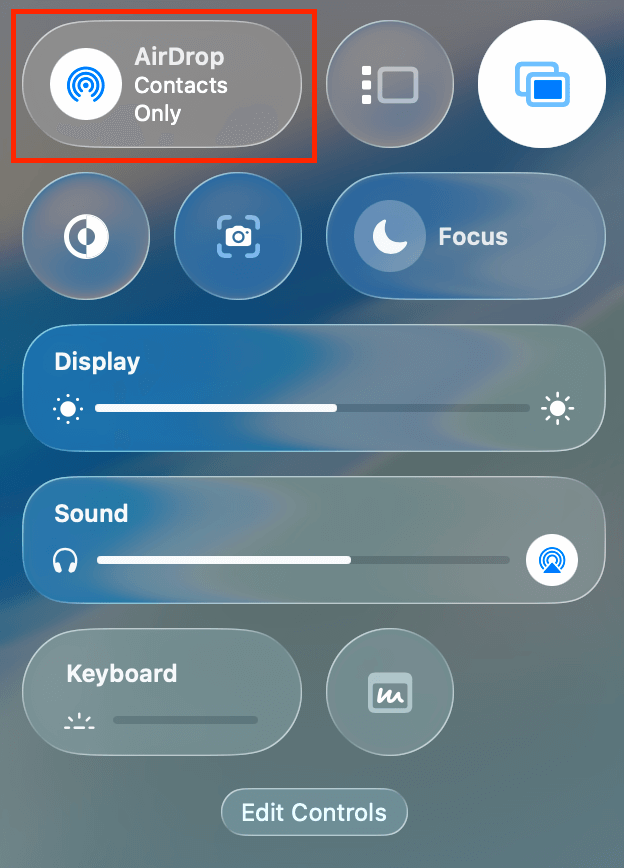
Step 2. On your iPhone, open the Control Center (swipe down or tap the back twice) and tap the AirDrop icon to turn it on (it should also turn blue).
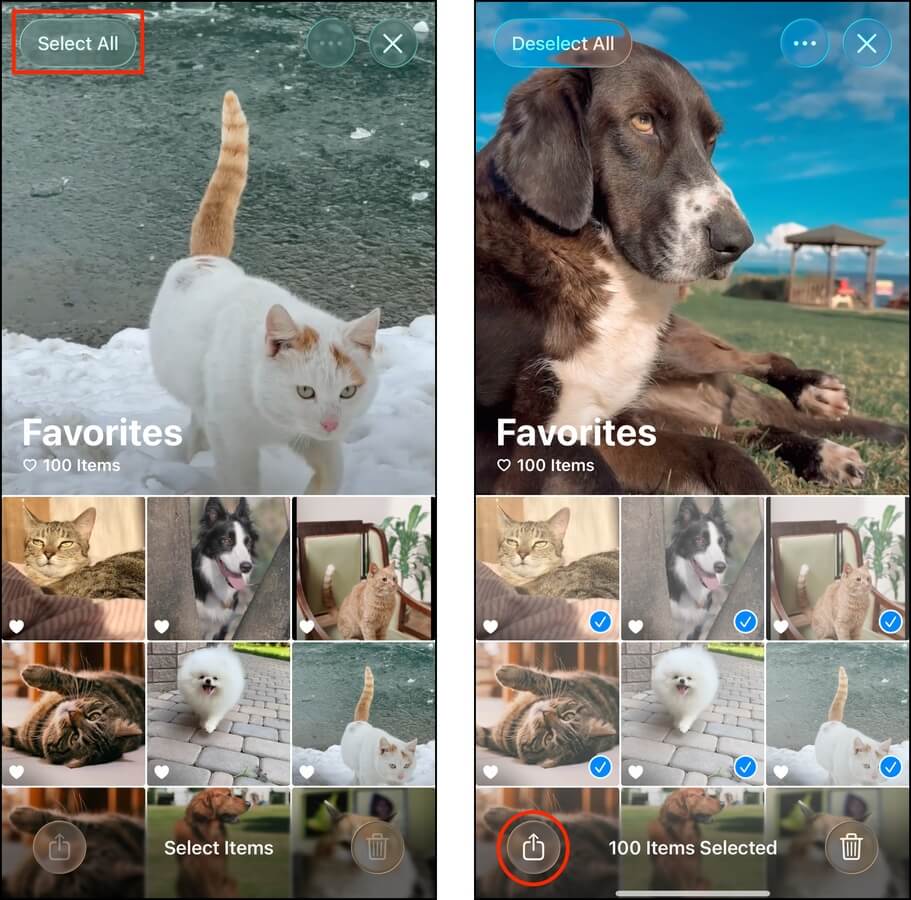
Step 3. Open the Photos app and navigate to your camera roll or open any album with the photos you want to save. Then, tap the Select button in the top-right corner of the screen.
Step 4. Tap the photos to select them. If you’re in an album, you can tap the Select All button that should have appeared in the top-left corner. If you’re choosing photos in your camera roll, you can tap each photo or swipe to select multiple images.
Step 5. Then, click the share button.
Step 6. If your Mac doesn’t automatically appear, tap AirDrop.
Step 7. Finally, tap your Mac’s icon to initiate the transfer (you may have to accept the transfer on your Mac so pay attention to that).
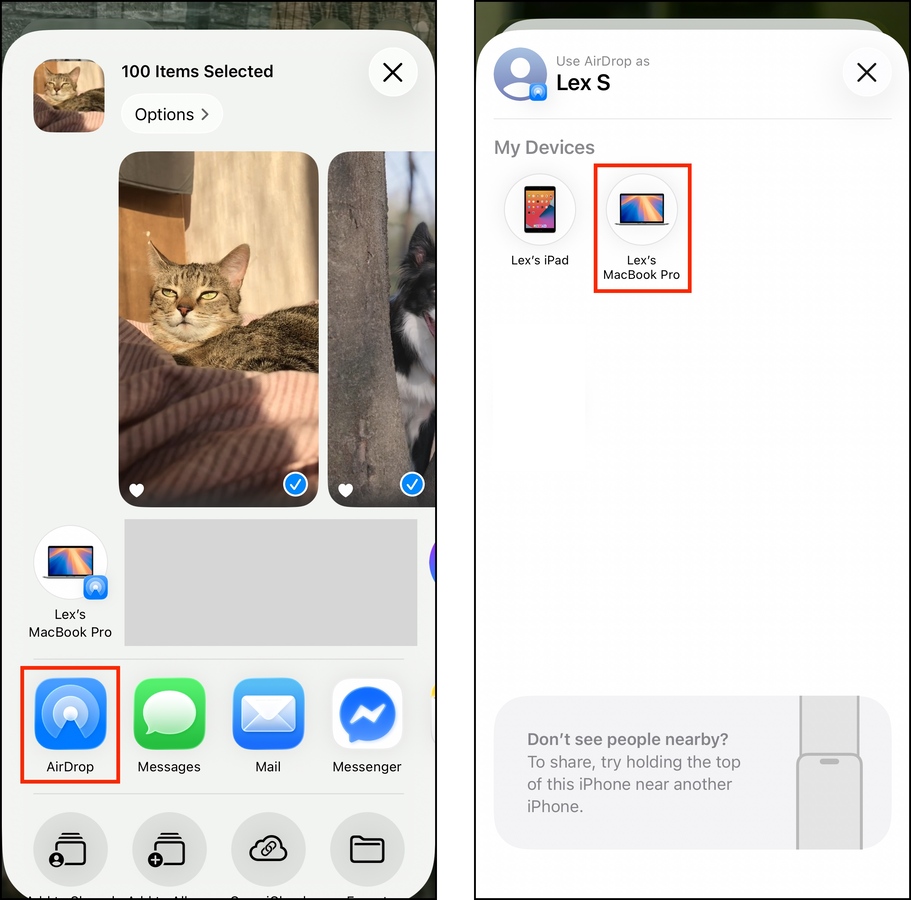
AirDropped photos are usually saved in your Mac’s Downloads folder by default. After confirming that all your photos have been saved, delete them from your iPhone.
How to Buy More Storage Space for Your iPhone
If the free storage management solutions for iOS aren’t enough for your needs, you have two more options if you’re willing to pay (bar purchasing a second device to use alongside your current iPhone):
Option 1: Expand iCloud Storage
iCloud’s free plan that comes with every Apple account offers 5 GB of storage space but you can expand it by paying for a monthly subscription. The options are 50 GB, 200 GB, 2 TB, 6 TB, and 12 TB – the higher you go, the more you pay. This feature is extra useful for users who own multiple devices in the Apple ecosystem.
Step 1. Open the Settings app.
Step 2. Tap your name at the top of the menu.
Step 3. In the Apple Account page, tap iCloud.
Step 4. Scroll down the iCloud page, then tap Upgrade to iCloud+.
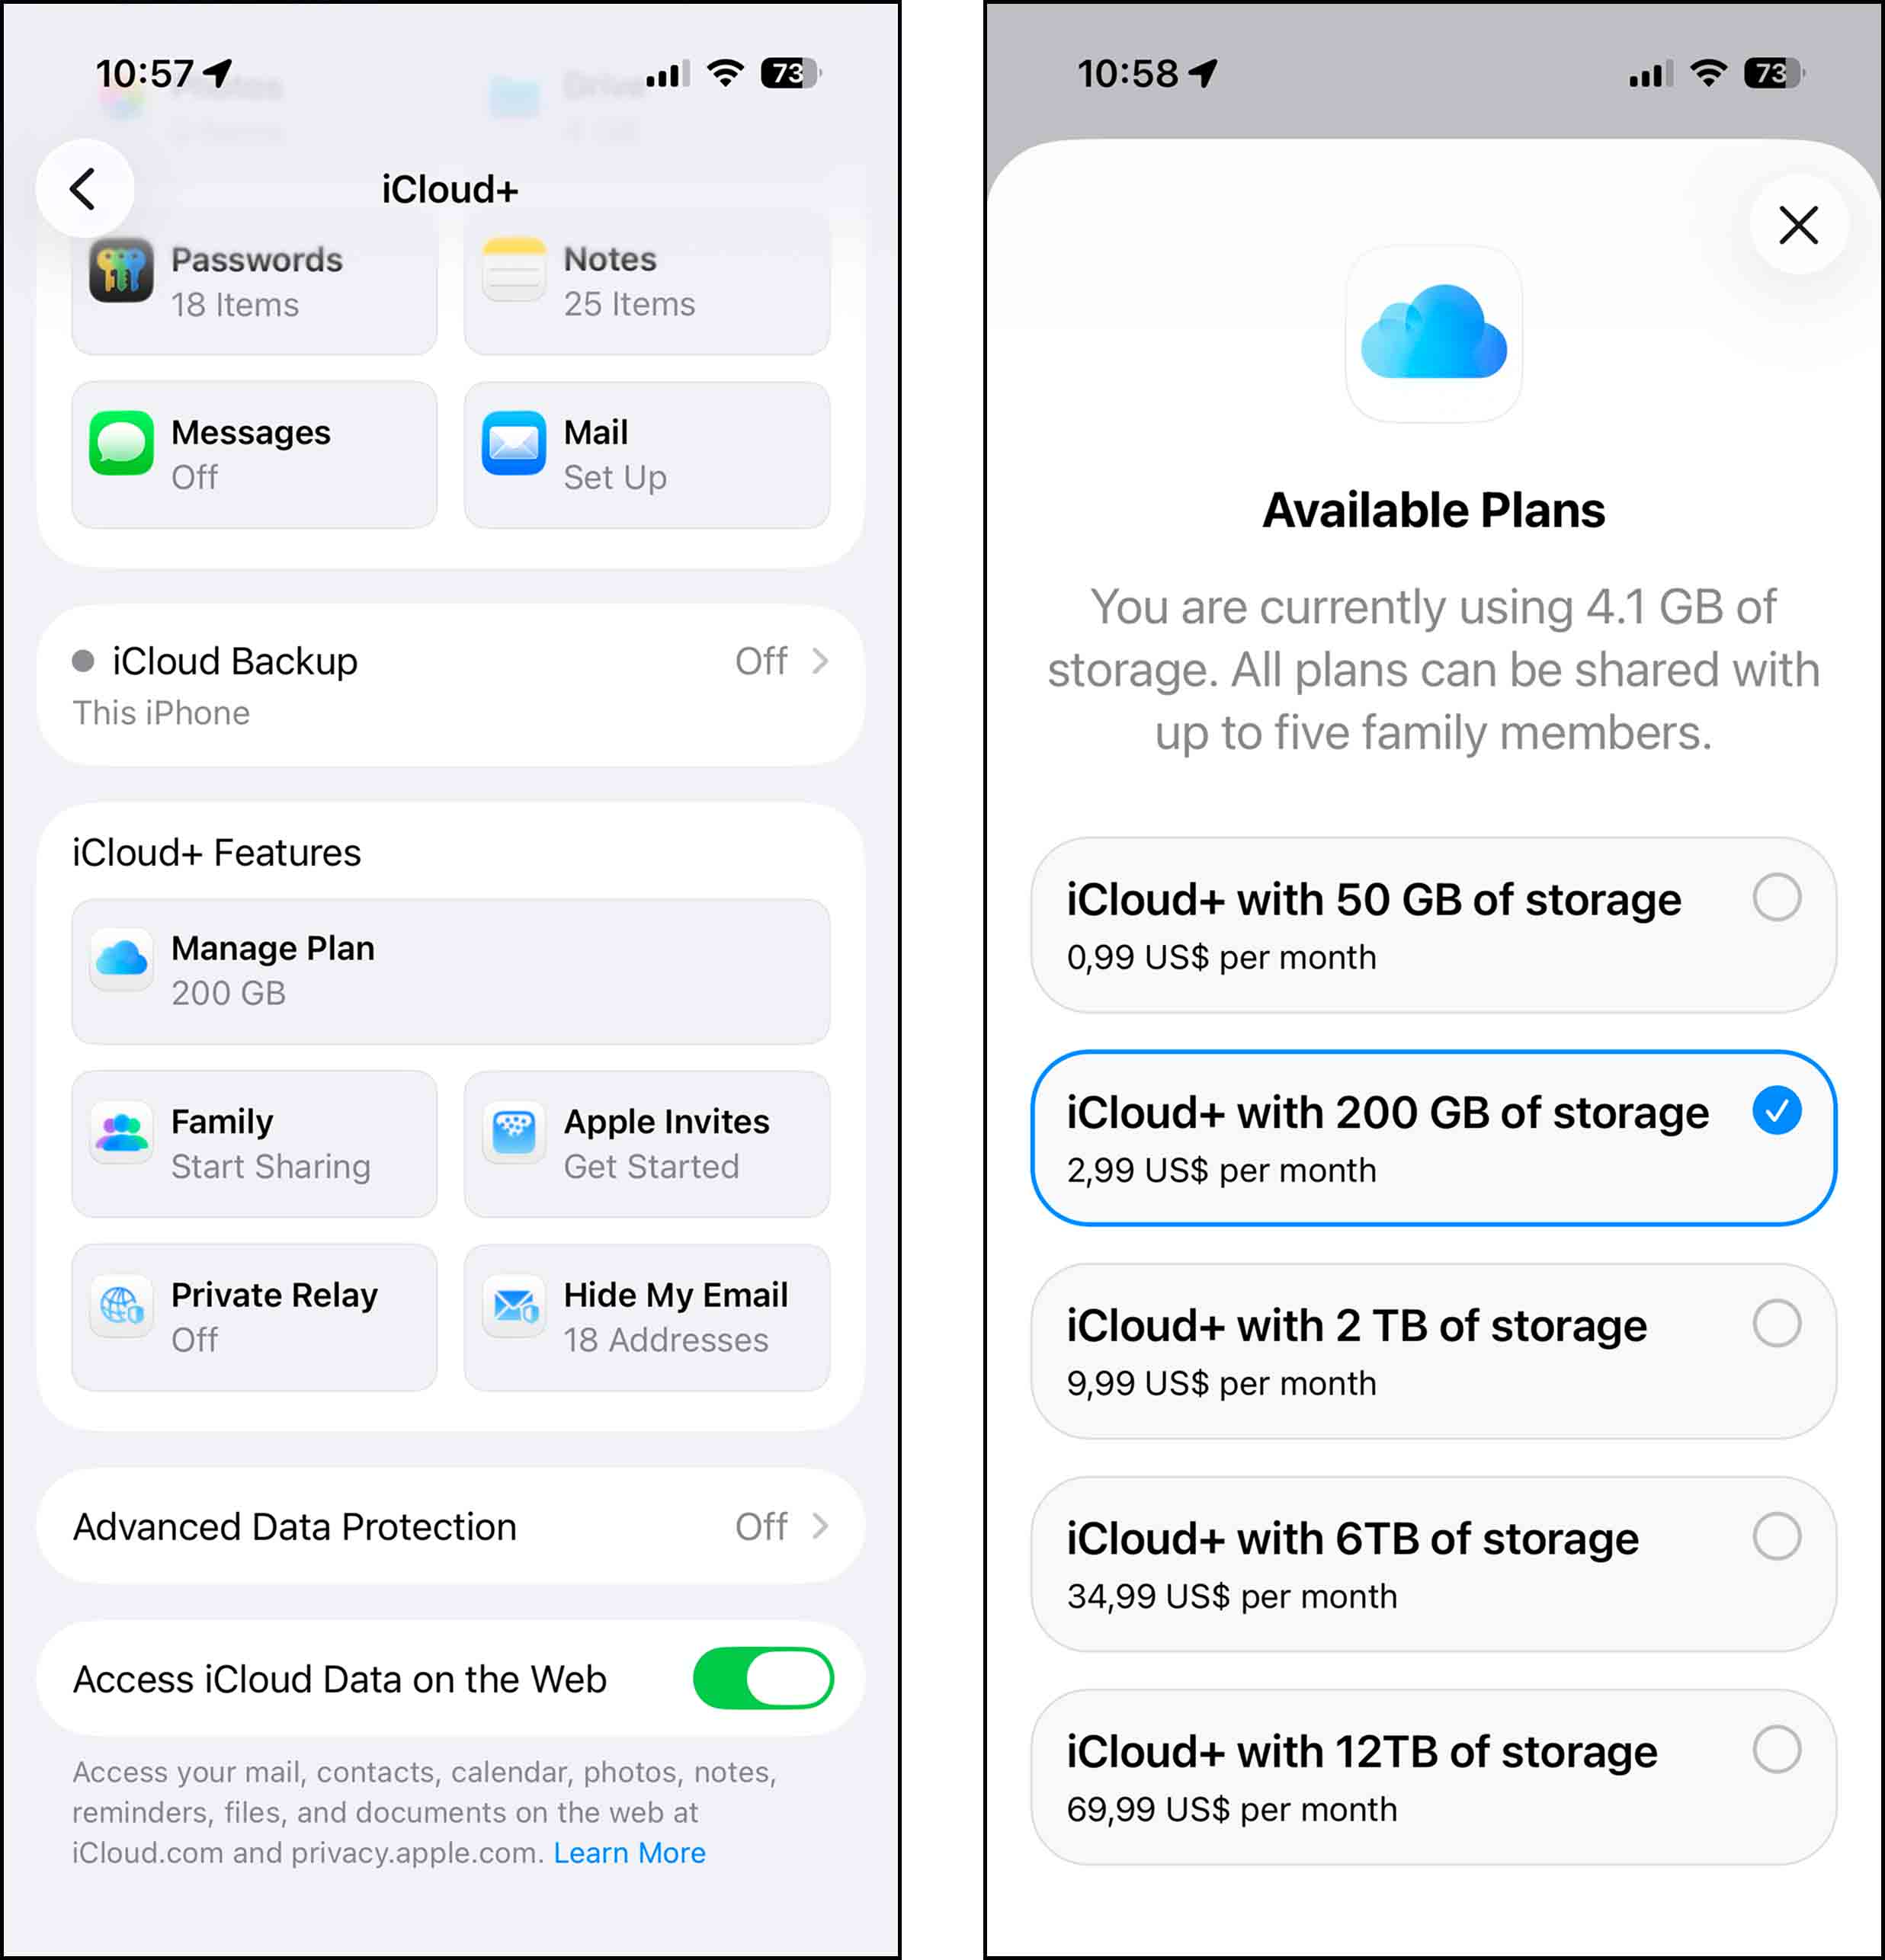
Step 5. You’ll see several options for iCloud+ for your local currency. Tapping one will immediately take you to a purchasing wizard, allowing you to proceed with the upgrade
If you already upgraded to iCloud+ in the past and you still don’t have enough storage space, you may need to choose a higher-tiered subscription option. To do so, follow steps 1-3 and tap Manage Plan in the iCloud+ Features section.
Option 2: Purchase an Upgraded Device or Storage Accessories
It’s possible that even the highest plans of iCloud+ is unsuitable for some users, especially those who store more apps than files on their iPhones. If you want to expand your *local* storage, you’ll need to purchase hardware.
There are really only 2 ways to you can approach it:
- Upgraded iPhone. Purchase a new iPhone with more local storage space. Models starting from the iPhone 14 Pro and Pro Max offer a 1 TB option, and the iPhone 17 Pro Max even goes up to 2 TB.
- External USB drive. There are flash drives designed to fit iPhone thunderbolt ports and some even have iOS-friendly functionality built in. For example, SanDisk’s iXpand Mini Flash Drive allows you to quickly move files between your iPhone and other devices, automatically back up photos and videos, and even capture footage directly to the drive.
Tip: Next Time, Optimize Your Files From the Start
Depending on what type of data usually gets cluttered on your iPhone, there are ways to avoid build-up so you keep more storage space free for longer. For example, if you tend to get loads of message attachments that you always forget to delete, you can limit your message history to 30 days. If you take a lot of photos, limit the use of high-resolution settings unless you really need it. This is especially true for many of your device’s powerful camera features, like Live Photos and Burst Mode, which can end up claiming gigabytes of storage space if you’re not careful.
But if you find it hard to clean up your iPhone regularly, or you don’t configure your device just to save space, we wrote several guides to help you clean up your library efficiently when you need to. We recommend reviewing your media files by category and focusing on one category at a time, so check out our guide on cleaning iPhone photos, deleting large videos, and purging app data. Our methods not only tidy up your library, but also eliminate unwanted media files from attachments, apps, caches, and more.
FAQ:
It depends on how you plan on doing that. For example, if you want to add more storage to your iPhone with the help of a cloud service (such as iCloud), 200GB will cost you $2.99 per month (depending on your country–see Apple’s iCloud+ pricing guide for more info). Or you can start using a special external device to increase the storage capacity of your iPhone; for example, a 256GB iPhone flash drive can cost somewhere around $25).
If you need to free up some space on your iPhone but don’t want to use iCloud for that, here’s what you can do:
- Go to Settings > About > iPhone Storage to see how much space each app occupies. Then simply delete the apps that you’re no longer using. iOS may also provide “recommendations” on this page about which data is taking up a lot of space; utilize them to free up storage without having to find and delete that data manually.
- Buy an external storage device for your iPhone (such as an iPhone USB flash drive or an SD card).
No, iPhone storage and iCloud storage are not the same things. iPhone storage is the number of gigabytes your device came out with (it’s the internal storage of your phone that cannot be changed). And iCloud storage is the available storage on your iCloud account (it’s a type of external storage that can be easily increased).
Yes, you can use any memory card with your iPhone 11 as long as you use a special connector (a lightning SD card reader cable) to attach it to the phone.
It’s pretty rare to have an issue with buying more iCloud storage for your iPhone. But if that’s what’s happening right now with you, here’s what you can try to do to fix it:
- Check your network connection
- Log out and back into your iCloud account
- Upgrade your iPhone to the latest iOS version
- Restart your iPhone


