
Photo synchronization on iPhones and iPads is a powerful but sensitive process. Despite its utility, there are several things that can go wrong along the way that can be hard to diagnose–and resolve–without the appropriate knowledge.
This guide is our answer to that.
Below, we’ll briefly cover why deleting synced photos can sometimes result in errors or glitches, and demonstrate 3 ways to delete synced photos properly. Finally, we’ll show you how to disable synchronization altogether (completely optional).
Table of Contents
Why Deleting Photos Synced With Finder or iTunes Fails
There are several reasons why you’re unable to delete your synced photos—either by design or due to errors. It’s important to figure out which is true, in your case, in order to understand how to resolve it. Here’s a quick breakdown of the most common reasons:
| Causes | Summary |
| Attempting to delete the photo directly on your iPhone or iPad | Photos that exist on your device because they were synced from your computer cannot be deleted using your device. You must use your computer and the same software (whether iTunes, Finder, or a third-party app) to remove the photo from the synchronization process. |
| Following the incorrect procedure on your computer | Removing a synced photo on your device via iTunes or Finder takes several steps in a (in our opinion) not-so-user-friendly software environment. It’s easy to get lost along the way. |
| Outdated or incompatible software | iOS and iPadOS processes require up-to-date software to function. Make sure all operating systems are up-to-date—whether it’s iOS, iPadOS, macOS, or Windows. If on Windows or macOS 10.14 Mojave (or earlier), make sure iTunes is also up-to-date. |
| Synchronization errors | Synchronization is a software process that requires a stable wired connection. It’s possible that the software simply glitched or your connection is intermittent. Try rebooting your iPhone or iPad and using a different cable and/or port. |
| Critically full device storage | iOS requires ample free storage space to operate properly. If your iPhone or iPad storage is completely full, the synchronization process may not have been executed as it should. Delete unneeded apps and media files to free up as much space as possible immediately. For unruly photo libraries, use third-party apps like Clever Cleaner: AI Cleanup App (completely free) to clean up media clutter fast. |
How To Delete Synced Photos From iPhone/iPad
In this section, we cover 3 methods to delete synced photos from your iPhone or iPad using native and third-party apps. Note that these cover photos are synced via iTunes or Finder. We have a separate guide for deleting iCloud photos.
Method 1: Change Sync Settings on Finder or iTunes
Using iTunes to disable the synchronization feature is the method that Apple provides and recommends. We also recommend using this method if you want to use only native tools and features to get it done.
By disabling synchronization, you’ll get the option to remove synced photos from your iPad or iPhone all at once or delete them individually after applying the change.
Step 1. Connect your iPhone to your computer and open Finder (macOS Catalina and later) or iTunes (macOS Mojave and earlier, Windows). Then, click on your device’s icon.
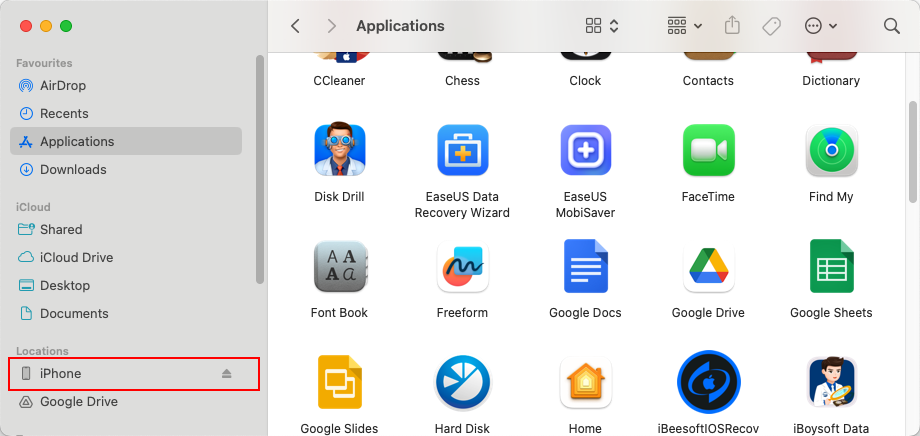
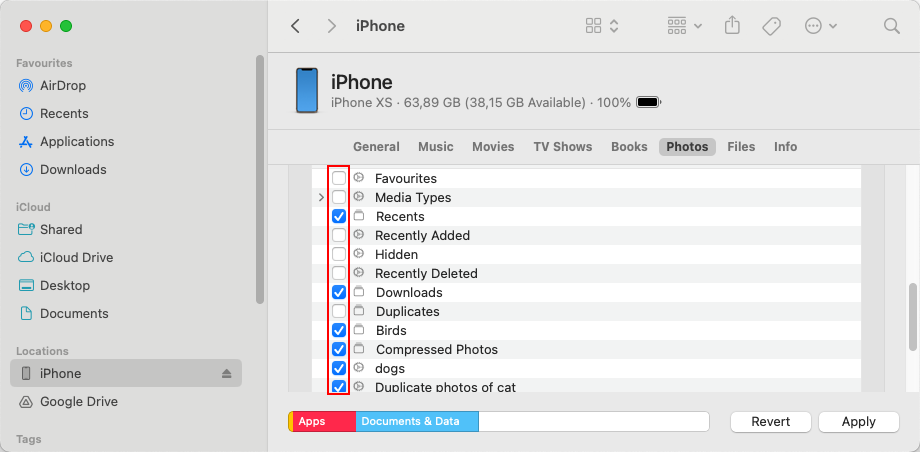
Step 2. Navigate to the Photos menu. Then, unmark the folders (containing the photos) that you want to remove from your iPhone. Click Apply to confirm the action.
Step 3. If you wish to delete all photos at once – locate the Sync photos to your device from: parameter. With the dropdown menu to its right, choose Photos. Then, unmark the box beside the setting.
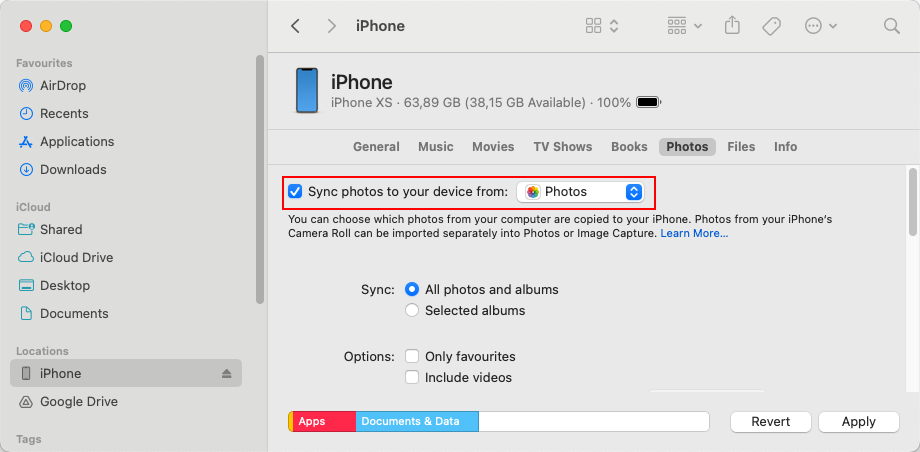
Step 4. Click Remove Photos when prompted if you want to delete all synced photos from your iPhone.
Step 5. Click Apply and wait for the operation to conclude before disconnecting your iPhone.

Method 2: Remove the Photos From the Synced Folders
Another way to delete synced photos from your iPhone or iPad library is by removing them from the synchronized folders. This change will also be mirrored to your device the next time you sync it to your computer.
Step 1. Open Finder and navigate to the folder that you sync with iTunes or Finder (see step 3 of Method 1).
Step 2. Move your selected photos to another location via dragging or the Cut + Paste functions. You can also delete them (right-click > Delete).
Step 3. Synchronize your library to your iPhone or iPad again via iTunes or Finder.
Method 3: Delete the Photos Using a Third-Party App
iTunes and Finder are not the only sync options you can choose from—especially for managing (and deleting) synced photos on your iPhone or iPad. If you’re open to third-party apps, many of them offer a more straightforward method of deleting photos.
For this demo, we’ll be using DearMob iPhone Manager. Despite its name, it works for both iPhones and iPads! It can help you import, export, and delete synced photos on your device directly through its interface (unlike iTunes and Finder, which mirror the entire folder state).
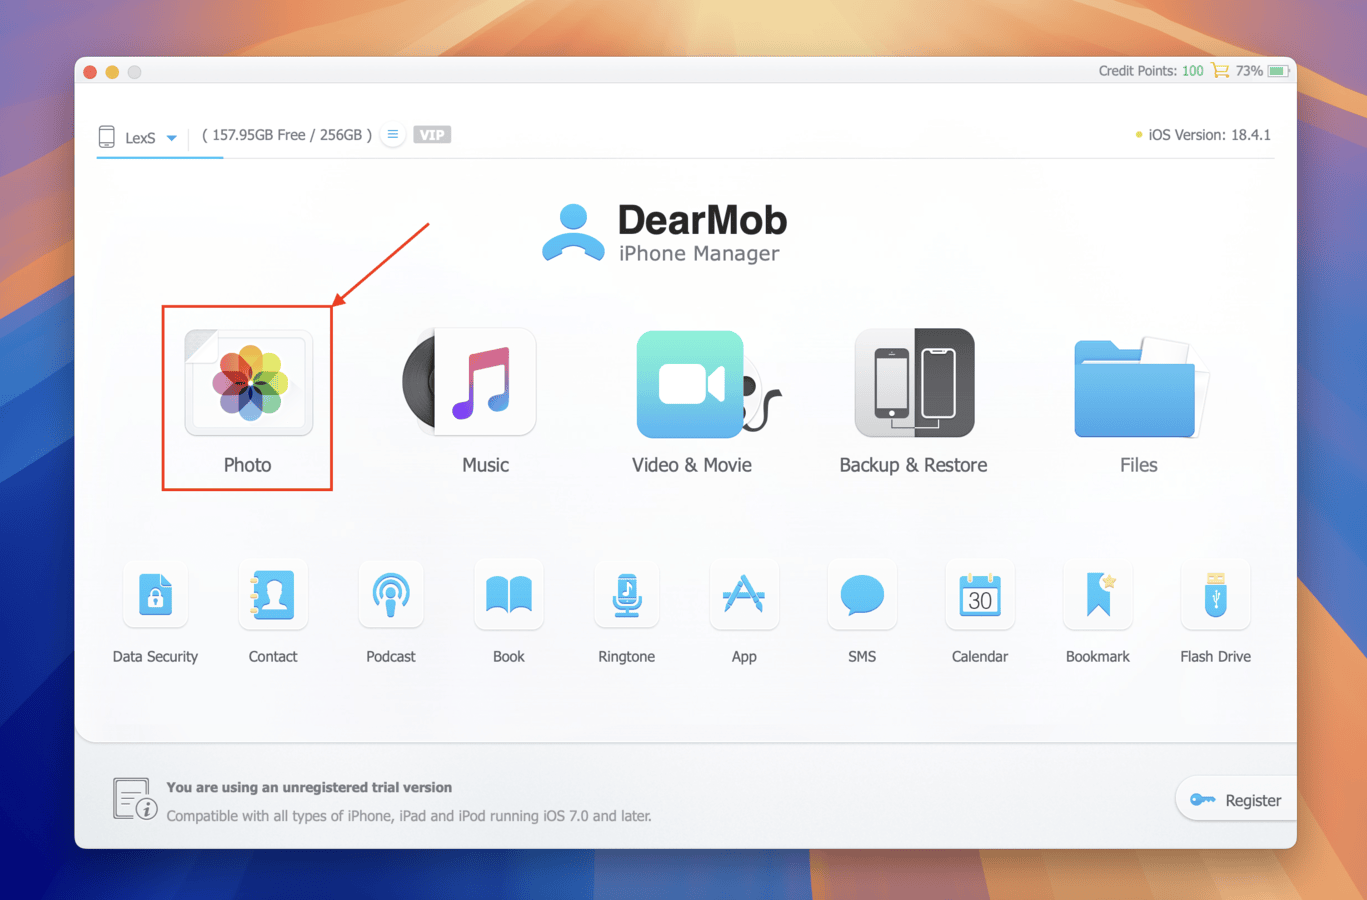
Step 1. Download and install DearMob iPhone Manager on your Mac.
Step 2. Launch DearMob iPhone Manager and connect your iPhone or iPad to your computer with the appropriate cable.
Step 3. Once your device has been detected by the app, click Photo.
Step 4. DearMob will display all the photos in your library for you to browse and you have the option to filter them by album using the left sidebar. Click on the photos you want to remove (you can use Shift + Click or CMD + Click for bulk selection). Or, mark the box beside Select All. Then, click Delete Photo on the menu bar.
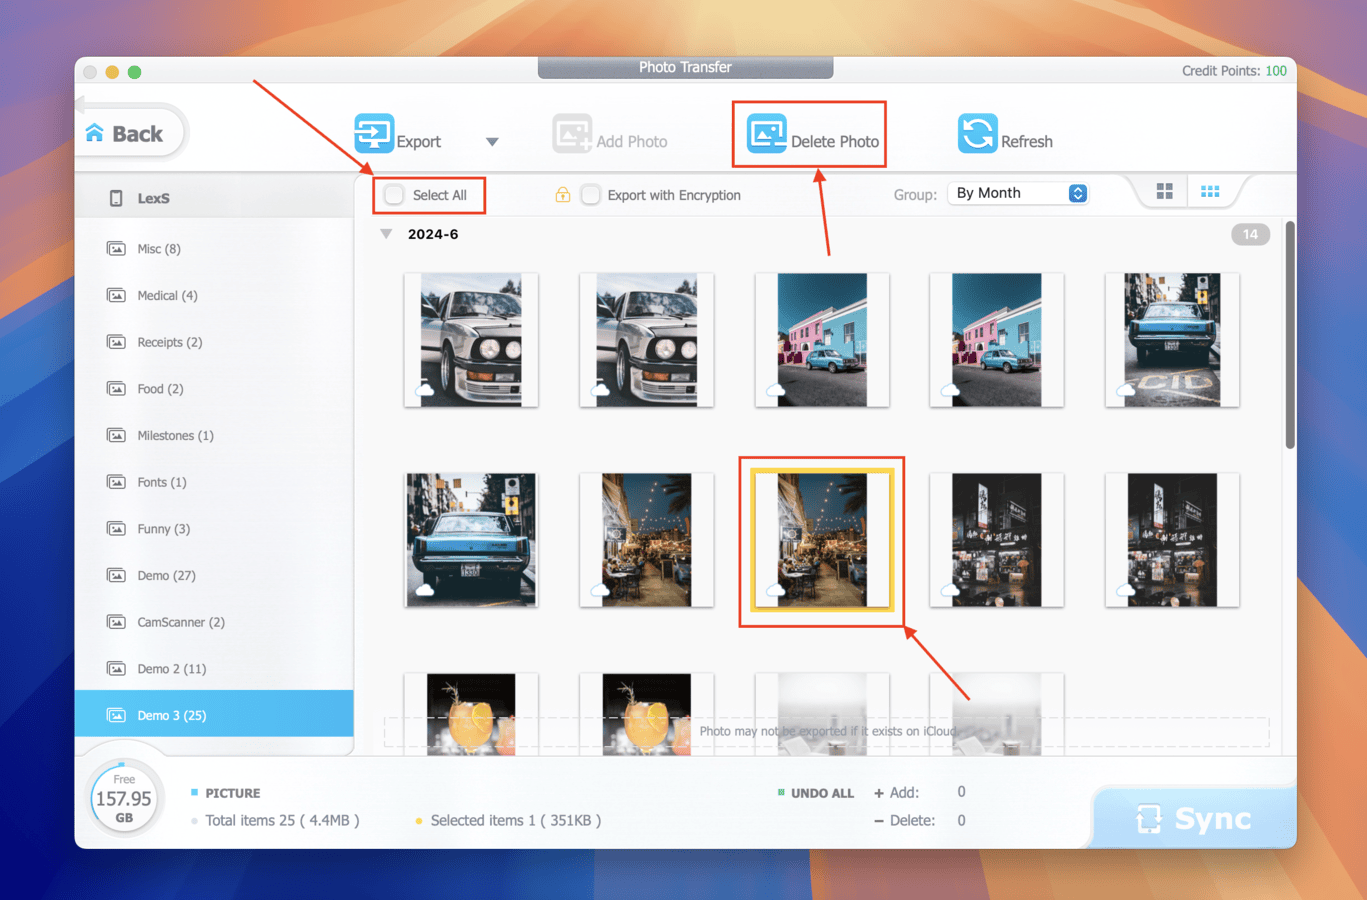
Step 5. Confirm the photos you want to delete–you’ll see a red mark on their thumbnails and you can verify the selection count at the bottom of the screen. Finally, click Sync to apply the changes.
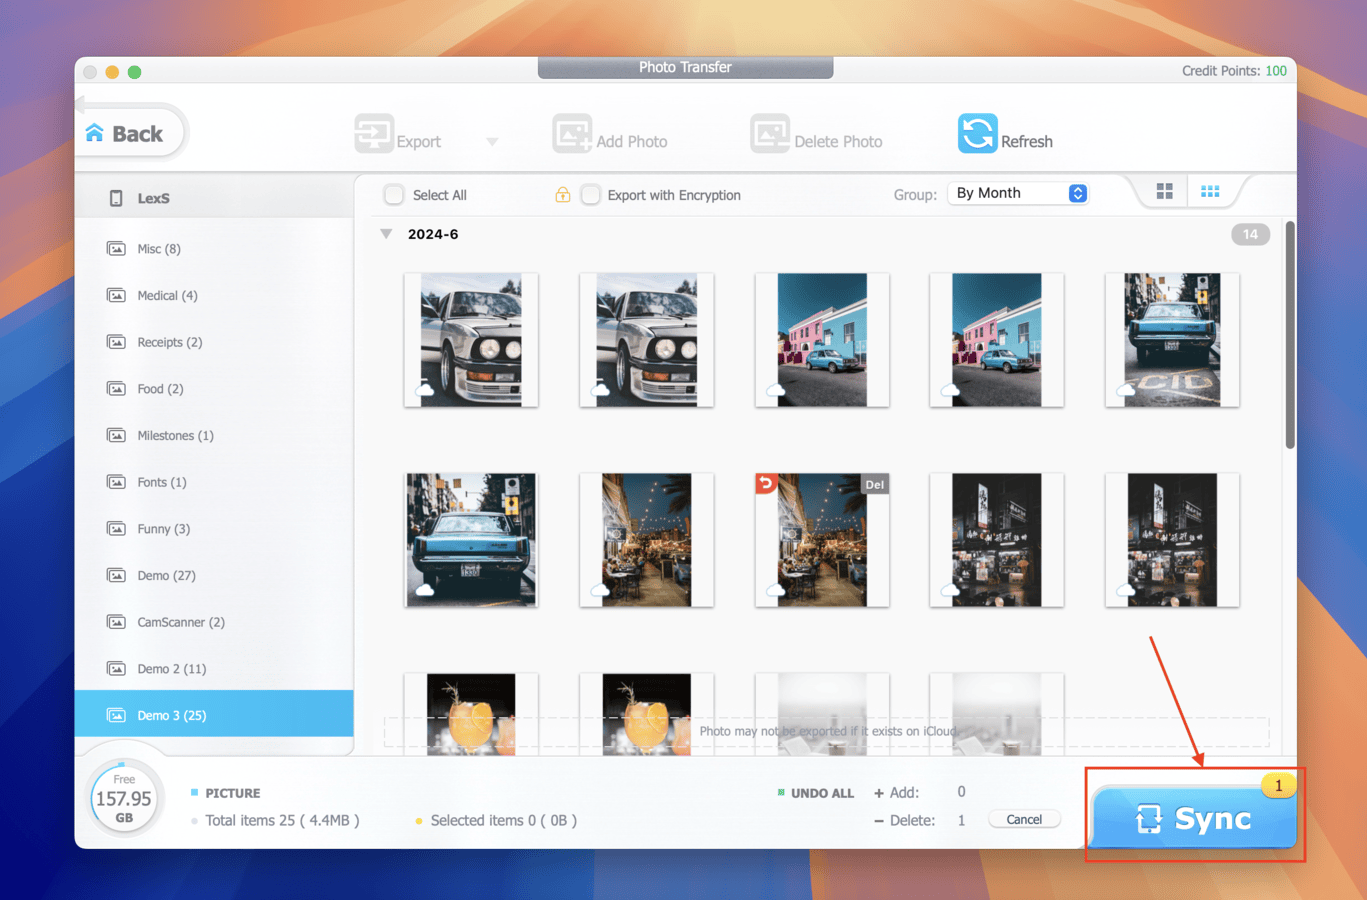
Once you click Sync, DearMob iPhone Manager will begin synchronizing the changes to your iPhone or iPad’s library—including the removal of the photos you selected in step 3.
How to Prevent Future Syncing?
There are several good reasons to disable (or simply ignore) synchronization features on your iPhone or iPad altogether. First, sync features are completely reliant on other components—such as an internet connection or a computer.
Second, as convenient as sychronization is, there are many ways it can go wrong. Changes may not carry over if your connection is unstable. You may encounter glitches that disrupt your workflow.
If synchronization feels like too much trouble than it’s worth, we’ll show you how to disable both iCloud and iTunes/Finder sync in the sections below.
iCloud
Even though iCloud is way more streamlined and requires less hands-on management than iTunes, its synchronization feature can still cause some trouble – especially if you often don’t have a stable network.
If you don’t need the benefits of iCloud and simply want to get rid of any potential issues with synchronization, you can simply disable the feature for the photo library on your iPhone.
Step 1. Open the Settings app and tap your Apple ID. Then, tap iCloud.
Step 2. In the APPS USING ICLOUD section, tap Photos.
Step 3. Beside the Sync this iPhone setting, slide the toggle to the OFF position (gray).

Finder/iTunes
If you want to prevent synchronization from iTunes or Finder, you can disable the feature completely for your iPhone and any other individual device you want using the same iTunes library.
You can also leave the setting on for certain devices that you still want to benefit from synchronization.
Step 1. Connect your iPhone to your computer and open Finder or iTunes.
Step 2. Open your device’s menu and click General (Finder) or Summary (iTunes). Then, locate the setting called Manually manage music, films, and TV programmes or Manually manage music and videos and uncheck the box beside it.
Step 3. Apply the new settings.
Scrubbing Your iPhone or iPad Clean?
Are you trying to get rid of more than just your synced photos? Check out our step-by-step guide on how to delete every single photo on your iPhone (or iPad). We’ll show you how to utilize iCloud sync to remove media items from your device, how to delete photo attachments that secretly take up so much space when accumulated, and more.
FAQ
- Delete them from any device signed in to the same Apple ID
- On any browser, log in to iCloud.com > Photos and delete them from there


