
If your Toshiba external hard drive is not showing up on Mac, it’s possible that you’re on your way to data loss. And if you continue to use a problematic drive, the damage often gets worse. So stop using it until you finish reading this article.
Below are all the possible reasons why your drive isn’t showing, as well as the fixes you can try. More importantly, we guide you step-by-step through recovering the data on your drive with tools you can download on your Mac. Read on.
Table of Contents
Why Mac Is Not Recognizing Toshiba External Hard Drive
While there are are multiple possible causes why Mac is not recognizing your Toshiba external hard drive, they usually only fall under 4 categories:
- Drive corruption. Usually caused by interruptions to read and write processes (like sudden shutdowns), drive corruption often affects a storage device’s file system structure and partition table. These are core software components of your HDD that your Mac and other computers use to mount and communicate with it. A corrupt drive will struggle to mount or even communicate with other devices.
- Outdated drivers. Drivers are important pieces of software that are responsible for establishing communication between your Toshiba HDD and your Mac, as well as handling other operational tasks like power management, error reporting and handling, and more. If your drivers are outdated, it possibly makes your HDD and your Mac unable to work with each other.
- Incompatible file system. Your drive may be using a file system format that macOS doesn’t natively support (such as NTFS).
- Physical damage. External hard drives are prone to extreme temperatures, water damage, and scratches from dust, debris, or getting bumped (grinding mechanical parts against each other). Any of these can cause data loss and should be handled by a professional data recovery service.
The first 3 cases can usually be resolved by the user without needing to hire a service. Before attempting to fix your drive, restore your data first. Some fixes either wipe your data or reorganize disk sectors, which could make your data inaccessible. We’ll show you how in the next section.
How to Recover Data from a Toshiba External Hard Drive
If your drive appears in Disk Utility (Finder > Applications > Utilities) with the correct disk size, we strongly recommend that you attempt to restore your files ASAP using data recovery software.
Data recovery software is a special tool that can scan your Toshiba hard drive for any leftover data it can use to restore your files. In the guide below, we’ll be demonstrating how to use a data recovery tool called Disk Drill to scan an external hard drive and recover different types of files.
We chose Disk Drill for this guide because it’s very easy to pick up for beginners and it provides excellent support for all known file system formats (including ExFAT, APFS, and HFS+). It also has one of the most complete file signature databases among its competition. In other words, it’s good at recognizing different types of files with various extensions (which is commonly the case with external HDD files).
Step 1. With your Toshiba external hard drive disconnected, download and install Disk Drill on your Mac.
Step 2. Now, connect your drive to your Mac and launch Disk Drill.
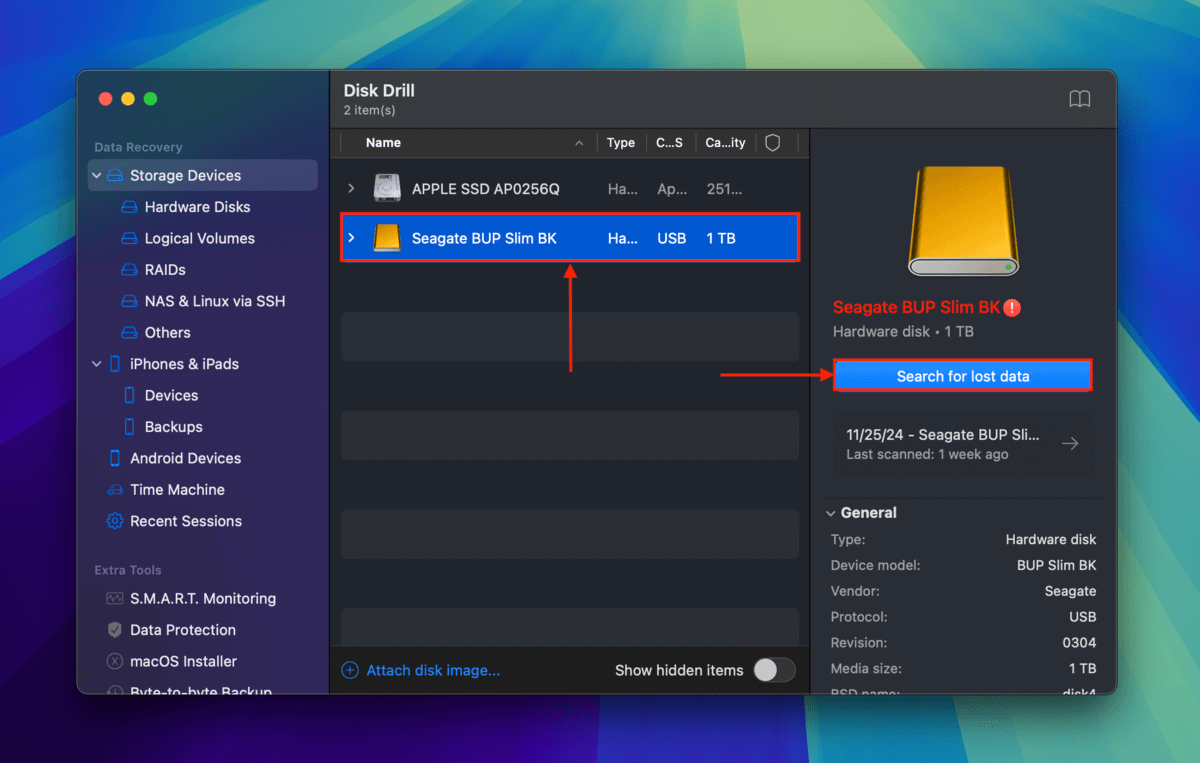
Step 3. In the source selection menu, select your drive and click Search for lost data. For a more accurate demonstration, we used a Seagate guide with the exact same problem.
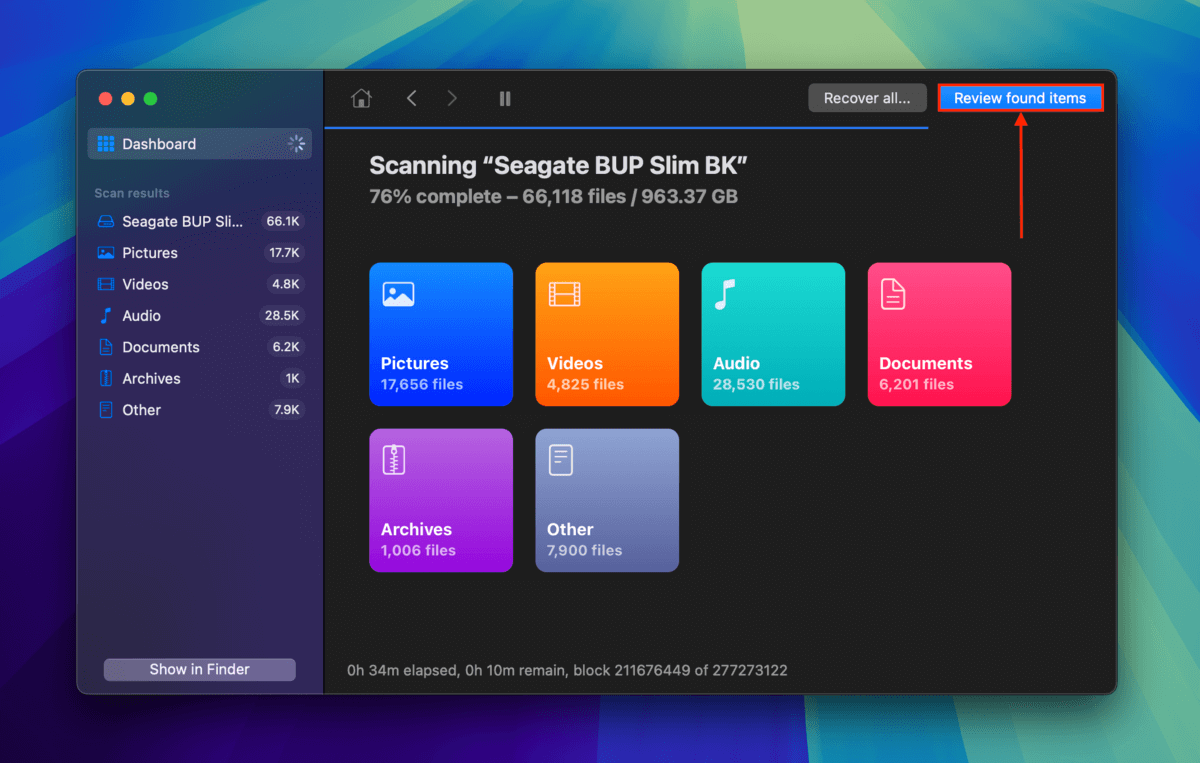
Step 4. Disk Drill will let you know once it’s done scanning your drive. When it does, click Review found items (or you can start reviewing files while the scan is still running).
Step 5. If you only want to restore specific files, you can utilize the filters in the sidebar as well as the search tool in the top-right corner of the window to narrow down the scan results. To preview your Toshiba drive’s files, hover your mouse pointer beside any filename and click the eye button that appears.

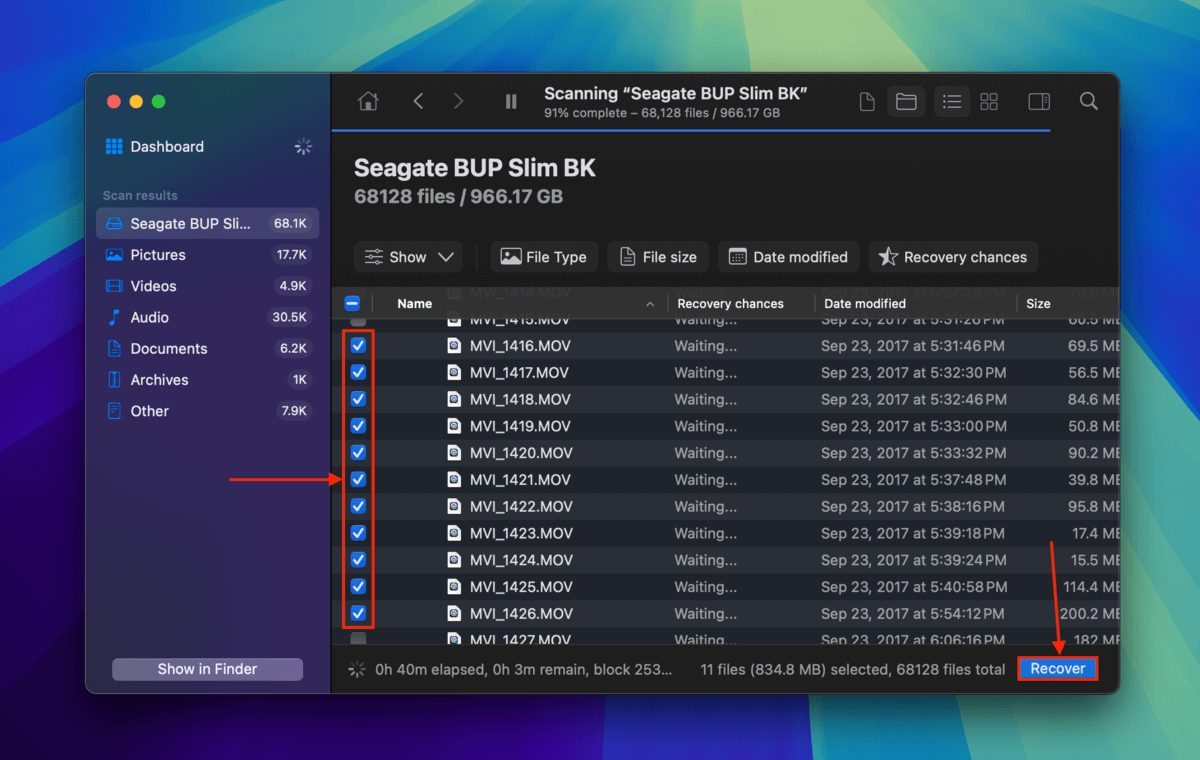
Step 6. Once you locate the files you want to restore, mark the boxes to their left. Then, click Recover.
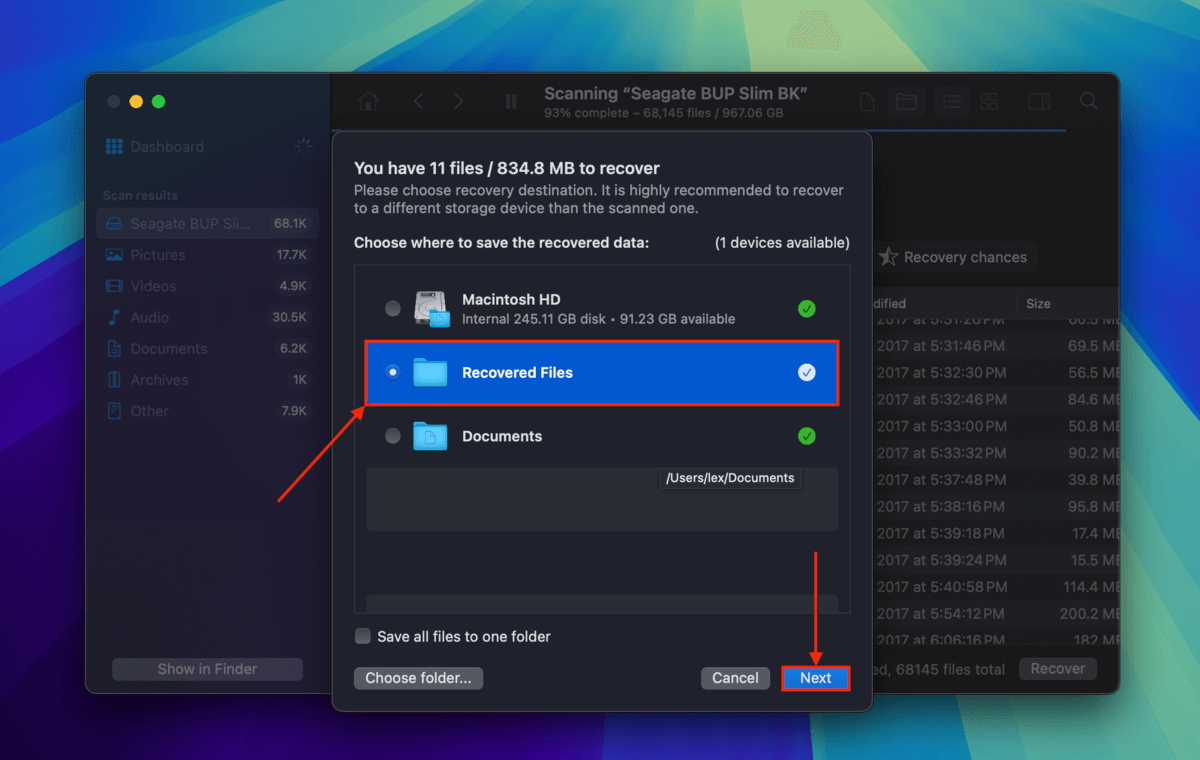
Step 7. Choose a folder on your Mac where you want to Disk Drill to save the files it recovered from your drive. Finally, click Next to start saving the files.
Disk Drill will let you know once the files have been saved to the folder you specified in step 7. We recommend that you pop into Finder asap to ensure that all your files are accounted for.
How to Fix Toshiba Hard Drive That Isn’t Working on Mac
Depending on why your Toshiba external hard drive is not working on your Mac, there are a couple of fixes we can try. Note that using a problematic hard drive can often make things worse and cause permanent data loss. Recover any important data before proceeding (you can follow the guide in the previous section).
Fix #1: Reset your Mac
As your Mac continues to launch and run programs, it occasionally refreshes itself to clear out the cache and temporary files. It could have gotten stuck during one of these refreshes as your Mac was about to mount your drive. Try getting it “unstuck” by rebooting.
Step 1. On the menu bar, click the Apple Button and click Restart…
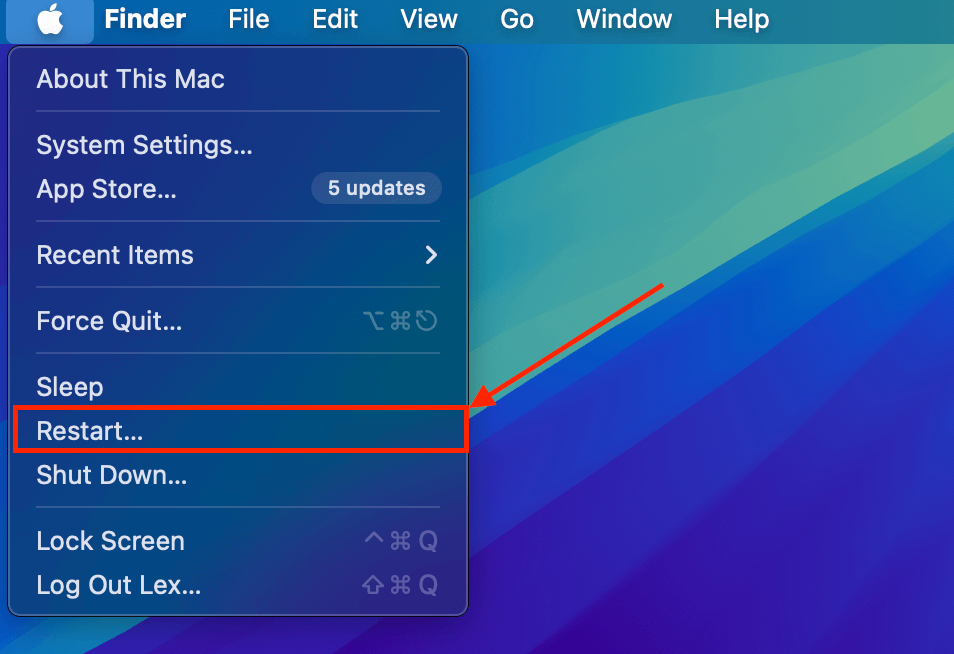
Step 2. In the dialogue window that appears, click Restart to confirm the action

Fix #2: Try Another Port or Mac
Dust and debris may be causing blockages and preventing a proper connection between your Toshiba drive and your Mac. Try cleaning your ports and connectors, as well as trying other ports on your Mac.
If you have another Mac or PC available, try connecting your HDD to either of them. You want to confirm whether the problem is your drive or your computer.
Fix #3: Mount Your Drive Manually
MacOS needs to “mount” your Toshiba drive, which assigns the drive to a location in its directory structure — thereby allowing users to access it through their computer. This process can fail to initiate on its own due to a variety of reasons (e.g. lack of RAM, conflicts, etc.).
If your Toshiba drive won’t mount on its own, you can try mounting it manually using Disk Utility.
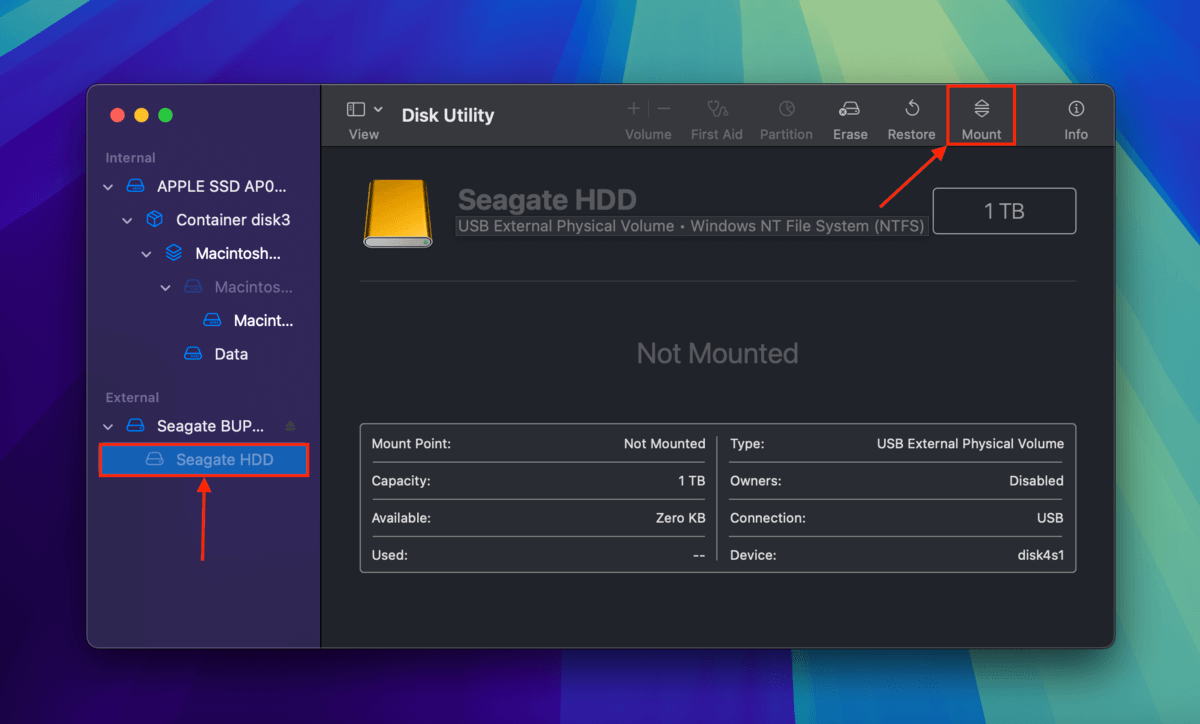
Step 1. Open Disk Utility (Finder > Applications > Utilities).
Step 2. Select your drive from the sidebar and click Mount.
Fix #4: Use Disk Utility’s First Aid Feature
Corruption can affect your Toshiba drive’s file system structure, which macOS uses to access and understand the storage system itself. If the corruption isn’t too severe, you can use Disk Utility’s First Aid feature to repair it.
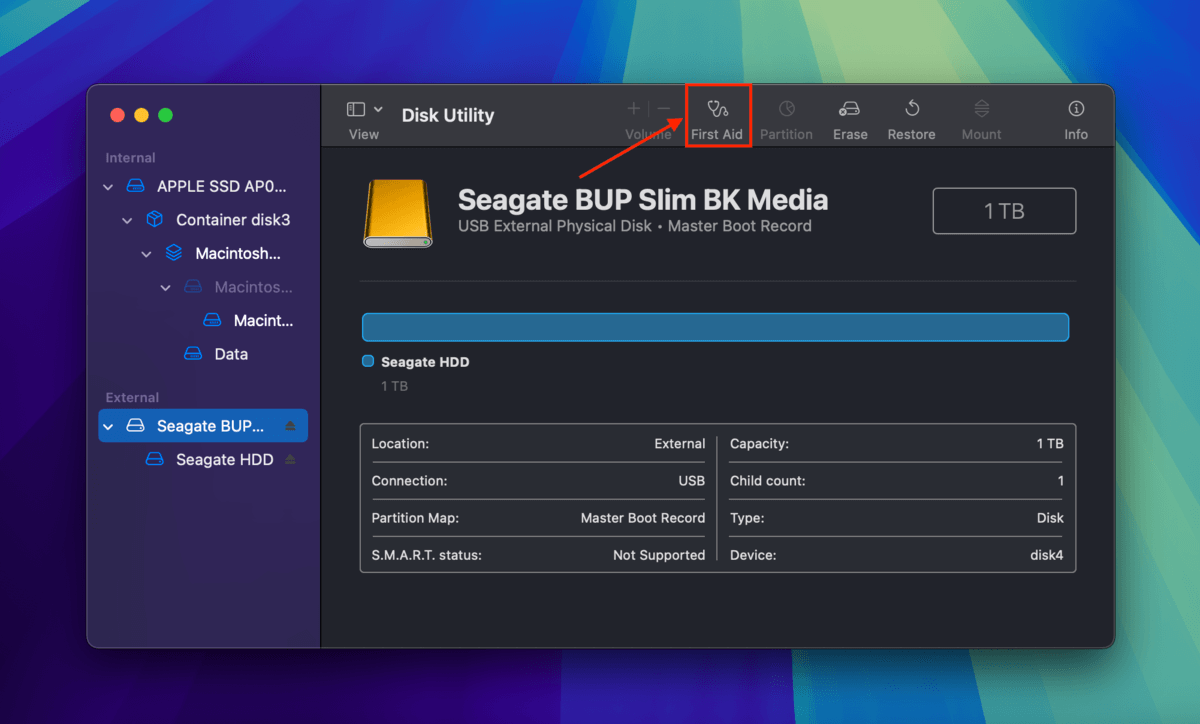
Step 1. Open Disk Utility (Finder > Applications > Utilities).
Step 2. Select your Toshiba drive in the sidebar and click First Aid.
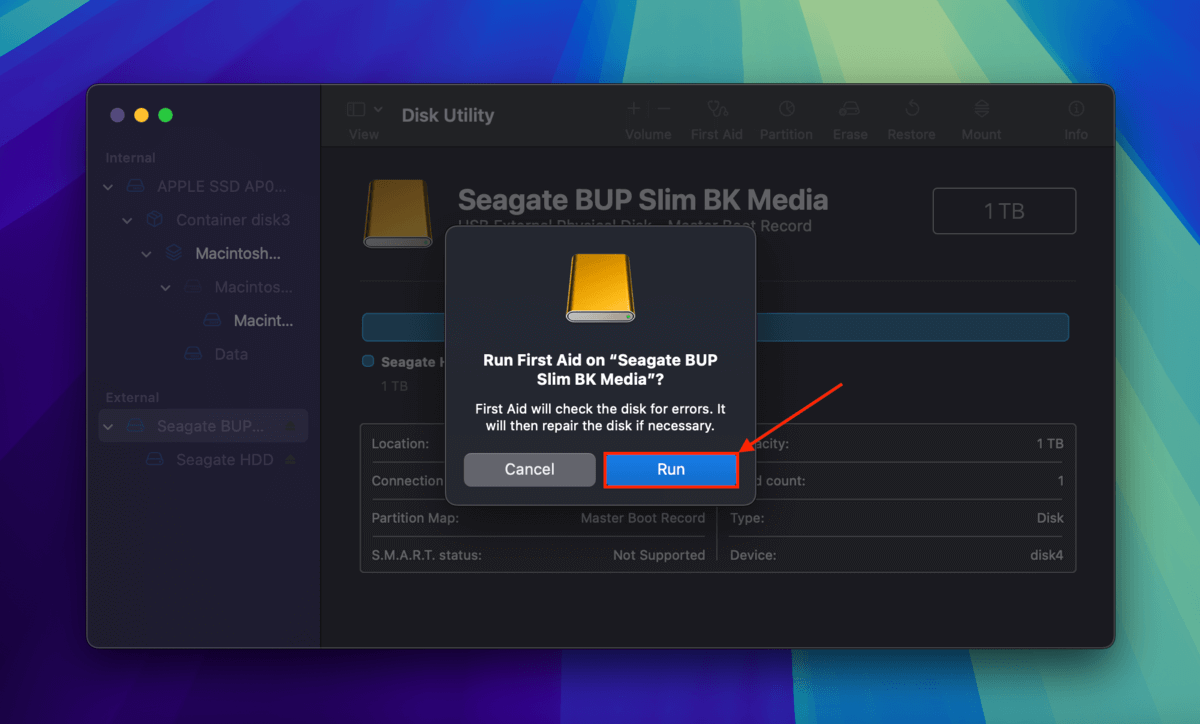
Step 3. In the dialogue box that appears, click Run to confirm the action.
Fix #5: Update Your Drivers
If your Mac’s drivers are outdated, it may not have the necessary instructions to communicate with your Toshiba drive, mount it, and interact with its file system. You can update your Mac’s drivers by updating macOS itself, which we’ll demonstrate in the short guide below.
Aside from updating macOS, we recommend checking the official website of your drive’s manufacturer for any proprietary drivers and other relevant software. For example, Seagate’s Paragon Driver enables your Mac to communicate with NTFS-formatted disks.
Step 1. Click the Apple button > System Settings…
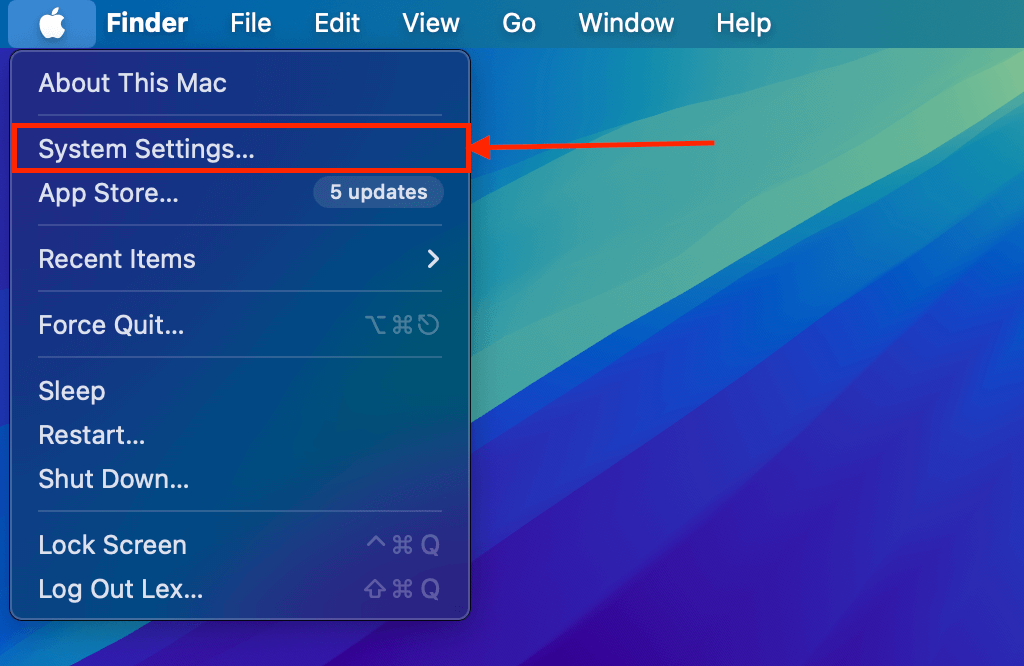
Step 2. Select General in the sidebar and click Software Update in the right pane.
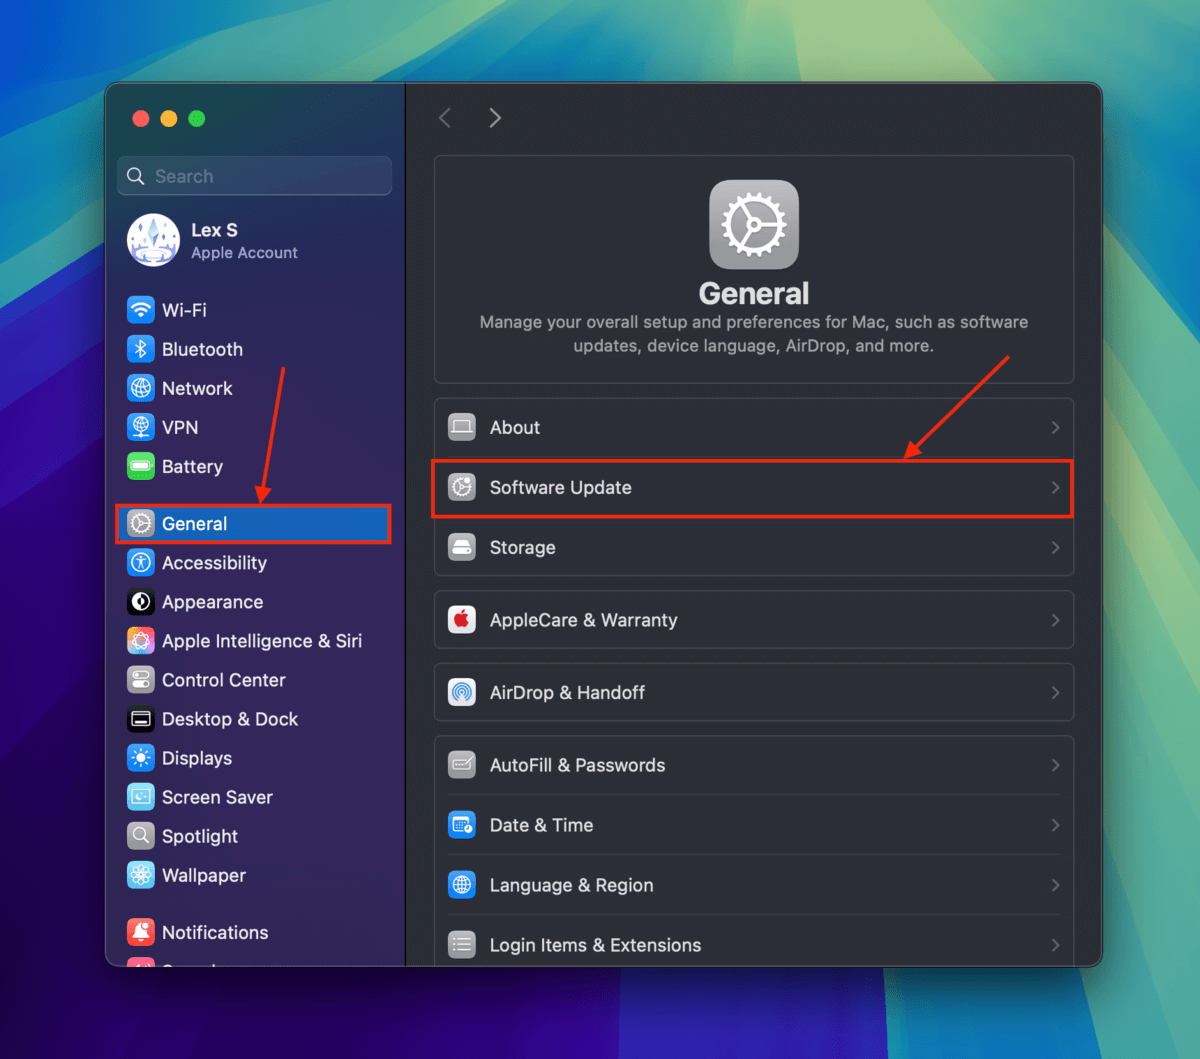
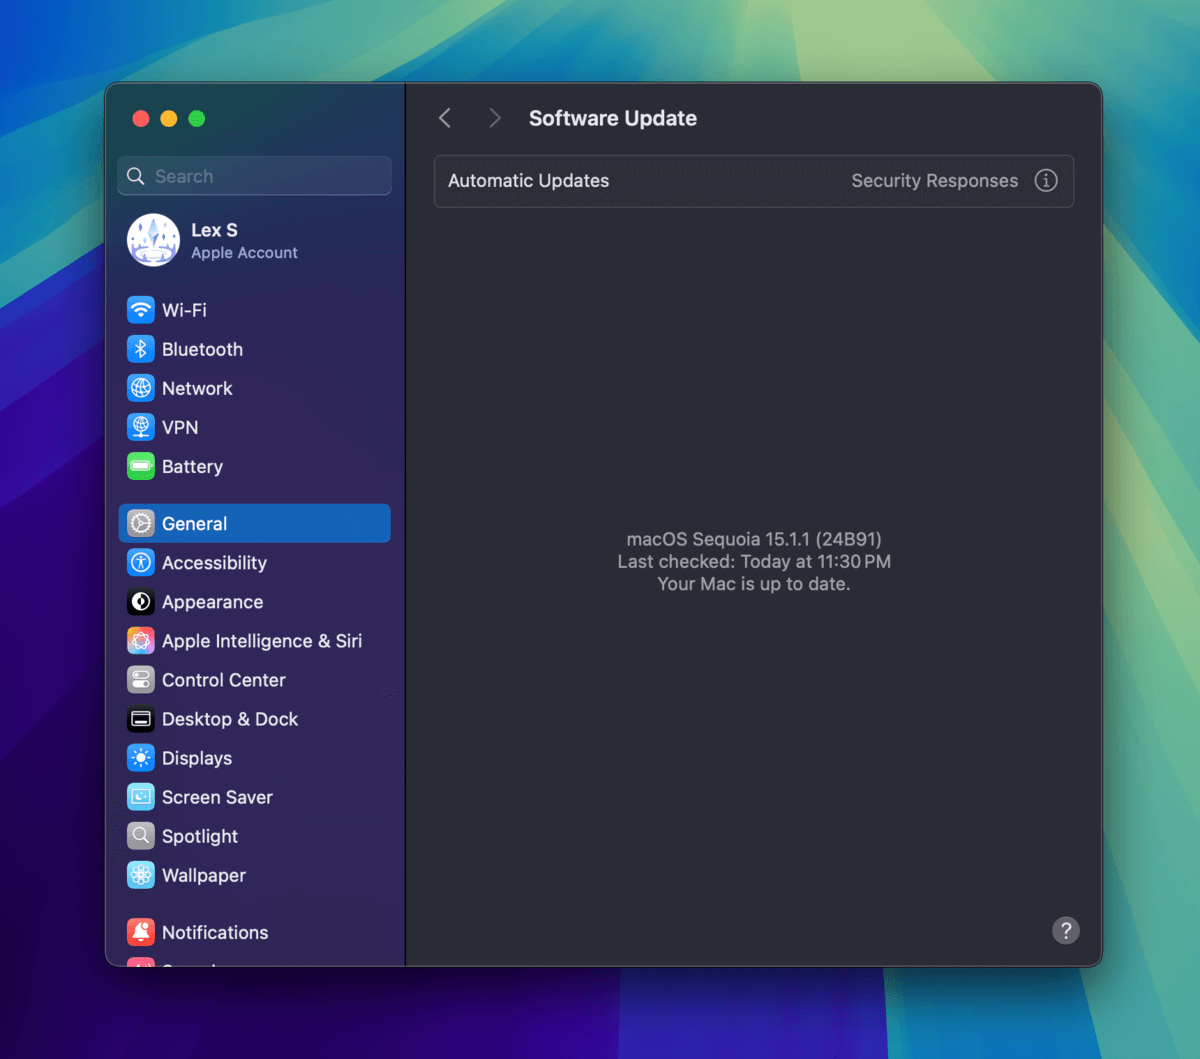
Step 3. macOS will automatically check for updates. If there are any updates available, you can download and install them from the System Settings window.
Fix #6: Format Your Toshiba External Hard Drive
Formatting a drive is the process of preparing it to store and manage files, including building its file system. During cases of corruption, formatting can help in three ways: (1) because the drive’s file system is being rebuilt, corruption related to that will be wiped out.
(2) Formatting also deletes all data on the drive. If you have infected or corrupted files, formatting is a great way to get rid of them. Finally, (3) it allows you to change your drive’s file system format in case it’s using one incompatible with macOS (like NTFS).
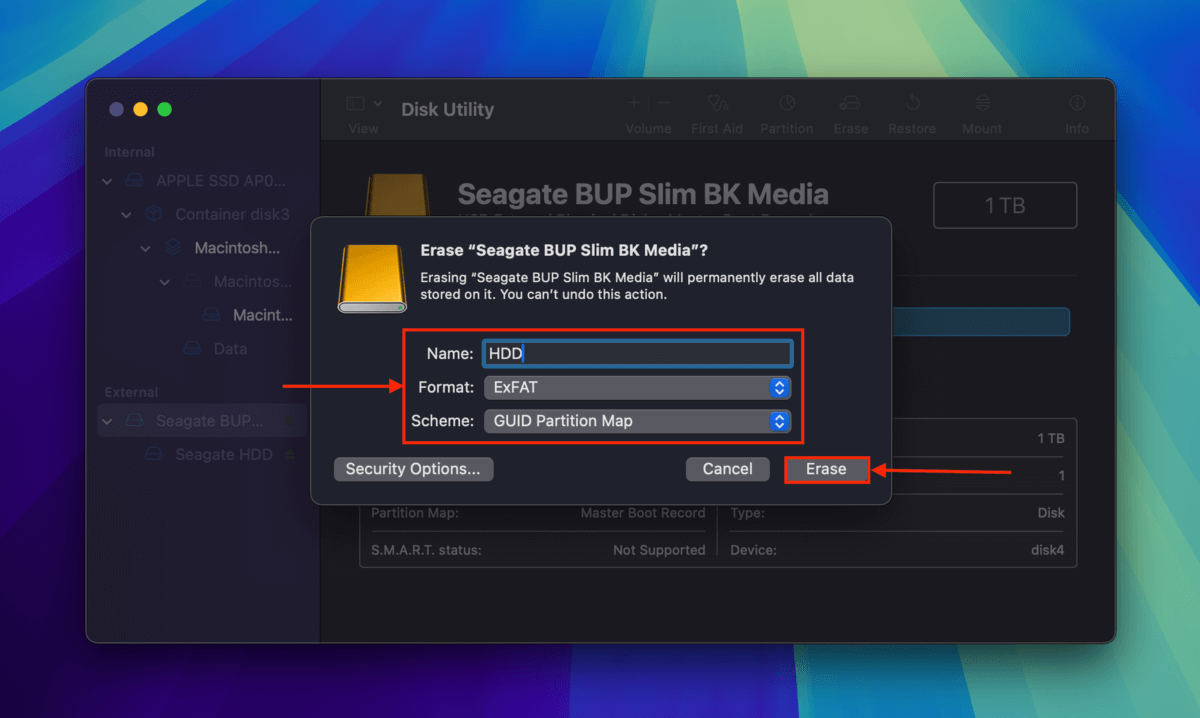
Disk Utility also has a tool for formatting, called Erase. We’ll demonstrate its usage in the guide below.
Step 1. Open Disk Utility (Finder > Applications > Utilities).
Step 2. Select your Toshiba drive on the left sidebar and click Erase.
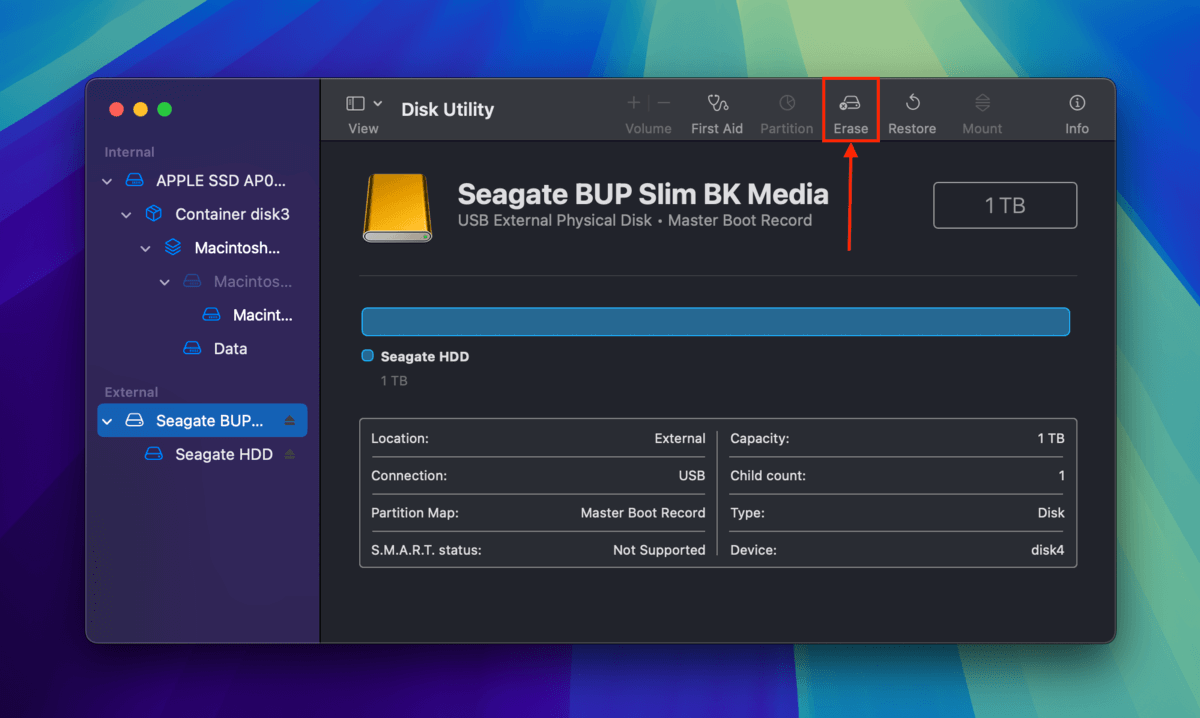
Step 3. Choose a new name for your drive, select ExFAT as its Format, and select GUID Partition Map as its Scheme.
Fix #7: Check Your Toshiba Drive’s Warranty Status
If you just bought your drive and it already showed signs of non-functional behavior even if you didn’t drop it or otherwise damage it, you can have it refunded for a Visa Reward Card equal to its price. If there have been issues from the onset, it’s better to just replace the device with a new one.
Before you go, here’s a helpful way to manage corruption
If you keep your hard drive long enough, something will go wrong with it eventually. And not because they aren’t well-designed, but because corruption can be caused by many factors outside your control.
One way to prevent corruption from escalating or causing data loss is to monitor your drive health as you use it. Check out our guide on how to check hard disk health on your Mac, where we help you get started with free and beginner-friendly tools.


