
If your CCTV footage has been corrupted and has become unplayable, don’t panic — you have a window of opportunity to potentially fix it if you act quickly.
Due to how CCTVs are utilized, set up, and maintained, as well as the potential for interference, this type of footage is especially vulnerable to logical damage. But with the right tools (and conditions), you can reverse the effects of corruption.
This article will be your guide — here are 5 ways to repair CCTV video footage of any brand.
Table of Contents
How to Maximize CCTV Footage Repair Success
It’s very difficult to eyeball exactly why a CCTV video gets corrupted and issues can often compound on each other, making it hard to predict repairability. However, there are a few well-known best practices that you can do that greatly improve your chances of successfully fixing your footage:
- Immediately stop recording. In certain conditions, it’s possible for corrupted CCTV videos (specifically) to be treated by storage devices as “free” space, making them vulnerable to being overwritten by new footage due to loop recording.
- Safely eject your CCTV’s storage device. Safely ejecting a storage device ensures that all required operations for safe disconnection have been properly executed. Failing to do so may corrupt your data further (or even the storage device itself).
- Back up your CCTV’s storage device. Once you’ve safely ejected your storage device, create multiple duplicates of your corrupted video. Some of the fixes you’ll attempt will modify the original file, which may affect the efficacy of the other methods.
5 Ways to Fix Corrupted CCTV Videos
“Repairing” a video typically means modifying or replacing the damaged or missing parts of its data. Fortunately, there are several (free) tools with unique methods of accomplishing this, which we’ll demonstrate step-by-step in the guides below.
Fix 1: Repair Your CCTV Video Footage Online With Web Apps
The easiest fix you should try first for any corrupted video is to utilize online video repair applets, which are tools that run fully inside your browser — you don’t have to download or install anything.
For this guide, we’ll be using the Clever Online Video Repair website. It can fix common CCTV video file formats like AVI, MP4, and even DAT, which often results from CCTV malfunction or improper maintenance. It’s also free to use and supports files up to 5 GB in size.
Finally, it’s capable of repairing videos with a missing moov atom, which is a part of a video file in charge of storing its metadata). This type of damage commonly happens when a CCTV camera is interrupted while it’s capturing footage — for example, due to human interference or network issues.
Step 1. Open a browser and navigate to the following page: repair.cleverfiles.com.
Step 2. Click the Choose file button.

Step 3. Use the dialogue box to navigate to the folder where your corrupted video is stored. Then, click it and click Upload.

Step 4. In the empty text field, describe the events leading up to and following the corruption of your CCTV footage. Did the camera shut off mid-recording? Did its storage device (e.g. SD card) get corrupted by malware? Then, click Send. If you can’t recall the facts, click Skip and repair instead.

Step 5. Using the dropdown menu under Type, select Camera. Then, select the Brand, and Model of your CCTV camera and click Repair. If it’s not listed down, you can add custom entries.

Step 6. Once your corrupted CCTV footage has been uploaded, click the new Choose file button that appears.

Step 7. This time, select your healthy reference video file and click Upload.

Step 8. Click the available thumbnail previews to ensure that the repair operation was successful. Then, click Download.

Your repaired file will appear alongside the rest of your online downloads. We recommend you try to open it with a media player to ensure it really works.
Fix 2: Use VLC Media Player’s AVI Repair Tool (Works for Non-AVI)
VLC Media Player is a beginner-friendly, free, and open-source multimedia tool with streaming, modification, and minor repair features that can help make corrupted videos playable again.
Specifically, its auto-repair tool can fix minor issues affecting its index or container (e.g. bad timestamps). We’ll demonstrate how to use it even with non-AVI videos.
Step 1. In any browser, head to VLC Media Player’s official website. Download the app and install it but don’t open it yet (if you already did, just close it again).
Step 2. If your CCTV footage already uses the AVI format (it has the .avi file extension), jump to step 5. If not, open Finder and navigate to the location of your video.
Step 3. Right-click your video file and click Rename. Change the file extension (last 3 letters after the . ) to avi. For example, corrupt.mp4 → corrupt.avi.
Step 4. Finder will prompt you with a confirmation dialogue. Click Use .avi.

Step 5. Open VLC Media Player. On the menu bar, click VLC Media Player > Settings…

Step 6. At the top of the window, click Input / Codecs. Then, click the dropdown menu beside Repair AVI Files and click Always fix. Click Save to finalize these parameters and close the settings window.

Step 7. On the menu bar, click File > Open File… Then select your video and try opening it.

Fix 3: Convert Your CCTV Video
Converting a CCTV video file to another format can help resolve errors related to its “container”. This refers to a part of the video file that “contains” the actual streams as well as information about the footage (e.g. indices, file headers, etc.). A damaged container means one or more of those elements could be missing, rendering the footage unplayable.
Converting a video replaces its current container and generates a new one with the desired format (e.g. MP4, MOV, AVI, etc.) in its place. You can use VLC Media Player (free and open-source) to convert your video file to another format in case of container damage.
Step 1. In any browser, head to VLC Media Player’s official website. Download the app and install it.
Step 2. Open VLC Media Player and click File > Convert / Stream.

Step 3. In the Convert & Stream window, click Open media…

Step 4. In the dialogue menu that appears, find and select your video file. Then, click the Open button.

Step 5. Click Customize…

Step 6. On the tabs at the top of the dialogue box, click Encapsulation. Then, click MP4/MOV and click Apply. Note: You can technically convert your CCTV video file to any container format you want, but we recommend MP4/MOV to minimize errors and maximize compatibility.

Step 7. Click Save as File.

Step 8. Click Browse…

Step 9. In the Save As field, type your file’s new name. Then, click the dropdown menu button beside Where and choose where on your Mac you want to save the file. Finally, click Save.

Once the process is complete, you can open Finder and navigate to the folder you selected in step 9. You’ll find your video there — try playing it to see if the fix worked!
Fix 4: Re-encode Your CCTV Video
If converting your corrupted CCTV footage doesn’t fix it, the video’s codecs may have been damaged on its own or along with the container. To fix it, you can re-encode the video file, which not only replaces its containers but also allows you to install new codecs of your choice.
For this operation, we recommend a tool called FFmpeg, which is not only free and open-source, but it’s also capable of ignoring errors during operations with the right commands (so it copies over data that DOES work without getting disrupted by the data that doesn’t)
Step 1. In any browser, navigate to Homebrew’s website. Then, click the clipboard icon beside the command snippet to copy it.

Step 2. Open the Terminal app and paste the command you just copied. Hit Return to execute the command and install Homebrew on your Mac.

Step 3. After installing Homebrew, you can now install FFmpeg using the following command:
brew install ffmpeg

Step 4. The next command you need to execute will direct Terminal to the directory where your corrupted file is stored using the change directory command:
cd desktop/demo

Replace desktop/demo with the appropriate folder path for your file.
Step 5. Once you’re in the correct directory, you can utilize the following FFmpeg command to re-encode your corrupted video:
ffmpeg -err_detect ignore_err -i yourcorruptedfile.mp4 -c:v libx264 -c:a aac repairedfile.mp4

Step 6. If the command above doesn’t work, it’s worth trying an alternate version of the command that omits the audio stream (in case it’s also damaged):
ffmpeg -err_detect ignore_err -i yourcorruptedfile.mp4 -c:v libx264 -an fixedfile.mp4

Once FFmpeg is done with the transcoding operation, the re-encoded CCTV video file will be saved in the same location as your original corrupted file.
Fix 5: Use Untrunc to “Truncate” Corrupted CCTV Videos
Untrunc is a free and open-source video repair tool designed specifically to repair “truncated” or “incomplete” videos. This usually occurs as a result of an interrupted recording session — parts of the file don’t get saved, which is why media players struggle to play it.
Untrunc is capable of parsing the data of a “healthy file sample” (a working video captured with the same camera and settings) as a reference when repairing corrupted videos. Unfortunately, Untrunc can be tedious to install — make sure to follow the instructions below closely.
Step 1. Follow steps 1-2 in Fix 4.
Step 2. Once Terminal’s logs tell you that Homebrew has been fully installed on your system, you can utilize it to install the Docker app, which will help you build Untrunc properly. Use the following command:
brew install —cask docker

Step 4. Open the newly installed Docker app (Finder > Applications). Go through the dialogue boxes and skip those that you can (e.g. sign-in and profile customization) until you see Docker’s main dashboard. Make sure you see the words Engine running at the bottom left corner of the window.

Step 5. Back in your browser, navigate to this GitHub page, which is an updated fork of the Untrunc app. Click Code and click Download ZIP.

Step 6. Open the Terminal app once again, then type cd and add a space. Then, open your Downloads folder and drag the untrunc-master folder (which you downloaded in step 5) to the Terminal window. Press Return.

Step 7. Next, execute this command to build a Docker environment that sets up untrunc to utilize everything it needs from FFmpeg’s framework:
docker build --build-arg FF_VER=3.3.9 -t untrunc .

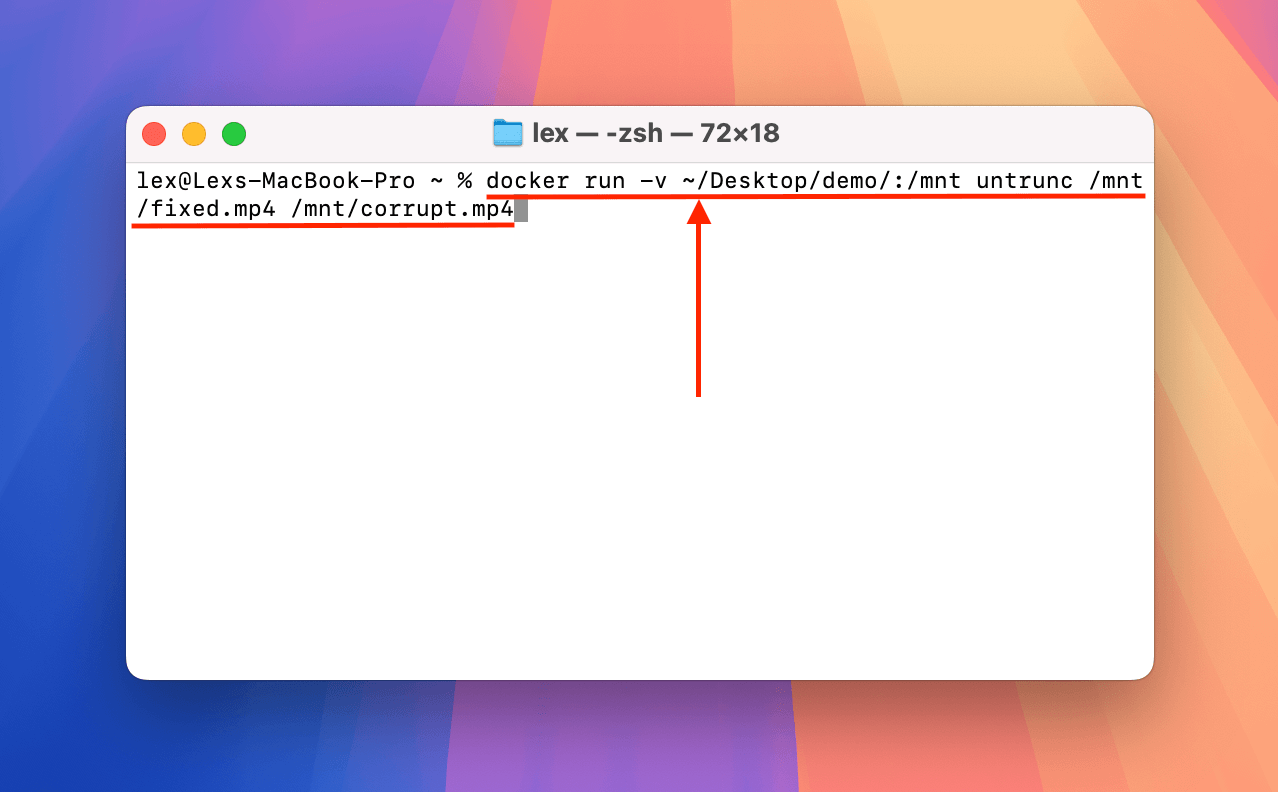
Step 8. Finally, you can execute this command to run the untrunc process on your corrupted CCTV video file:
docker run -v ~/Desktop/demo/:/mnt untrunc /mnt/fixed.mp4 /mnt/corrupt.mp4
Once the command has been executed successfully. you’ll find fixed.mp4 (or whatever you named it) in the same directory where the original corrupted CCTV footage was stored.
Wait! Take Some CCTV Footage Tips With You!
While you can’t prevent corruption 100% of the time, there are a few best practices you can apply to protect your footage as much as possible. First, consider using a UPS (Uninterruptible Power Supply) as a backup to prevent recording interruptions in case of power outages.
Second, CCTVs are always looping and overwriting footage, so make sure to use high-endurance or surveillance-rated storage devices to avoid premature degradation (bonus tip: you can use the S.M.A.R.T. indicator in your Mac’s Disk Utility app to check your storage devices’ health periodically).
Finally, always stop recording and use the safely eject feature before removing the storage device from your CCTV camera.
Good luck!


