
Did you lose data as a result of a virus infection? The situation isn’t hopeless, but the whole process of removing the virus and getting your data back is a delicate one.
You have to do it in the right order, make appropriate preparations beforehand, and use only reliable and data-safe tools and methods.
This guide contains all of the information and resources you need to safely clear the virus on your Mac and restore your files. Read on!
Table of Contents
How to Improve Your Chances to Successfully Remove the Virus and Restore Your Files
Virus infections can be fast and unpredictable. Before attempting malware removal and data recovery, there are several emergency steps you can take ASAP to potentially improve the outcome. Here’s what to do if your Mac has a virus:
- Change your passwords! Your login data may be compromised – possibly including your social accounts, email (which may include bank account information), contacts, etc. Modify ALL your login data ASAP. It’s tedious but necessary.
- Create an emergency backup. Back up your Mac with Time Machine. This only exists as a way to return to square 1 in the event that the virus completely wipes out your data (and you have no existing backups). However, refrain from using it unless absolutely necessary… The virus MAY infiltrate the backup as well.
- Disconnect your Mac from the internet. Until the guide calls for a network connection (e.g. downloading an app), keep your Mac disconnected from the internet. This may prevent it from mining your online data and/or uploading your sensitive information.
- Don’t download or save new files. If the virus deleted your files, you still have a chance to get them back. However, some of the methods we’ll show you rely on the remaining file data. If you save new files, the new file data may overwrite the old file data, making recovery impossible.
Step 1: Eliminate the Threat
First, you need to remove the virus from your system by any means necessary. If you don’t, any files you attempt to restore will likely get infected again. They may even get corrupted as the virus further attacks the integrity of your Mac’s file system.
Removing malware from your Mac can be done using several different methods, depending on the severity of the infection as well as your available resources. We’ll go through each of them in the guide sections below.
Option A: Use Antivirus or Anti-Malware Tools
There are several antivirus and anti-malware tools available for macOS. They primarily work by using different techniques to identify malware on your computer.
Once the anti-malware tool identifies the threat, it warns the user and systematically quarantines or attempts to get rid of the virus on your Mac. We’ll show you how to get rid of viruses on your Mac using anti-malware tools using the free version of Malwarebytes for macOS.
Step 1. Download and start the Malwarebytes for macOS installer.
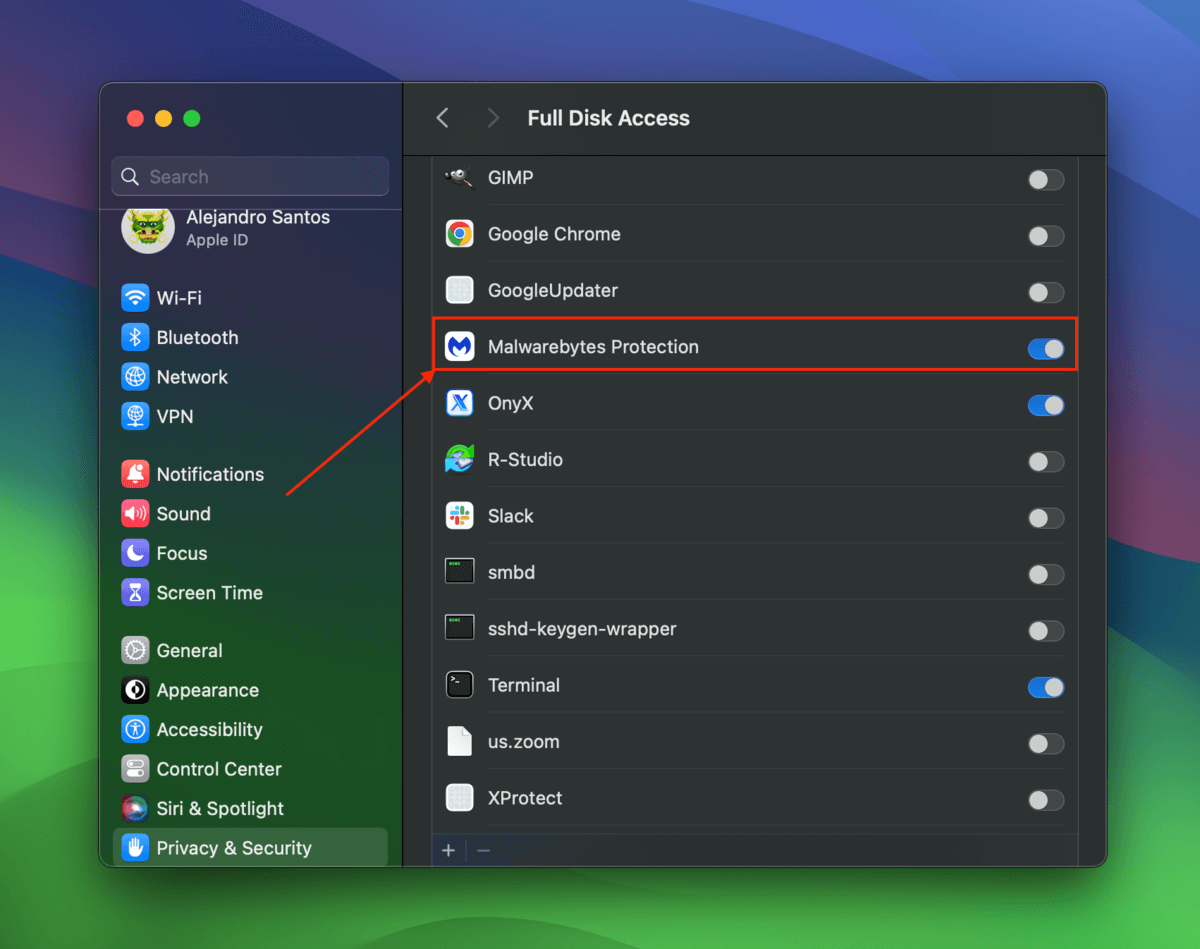
Step 2. When prompted, allow the installer to open your Full Disk Access settings (click Open Settings).

Step 3. Slide the toggle beside Malwarebytes Protection to the enabled position (blue).
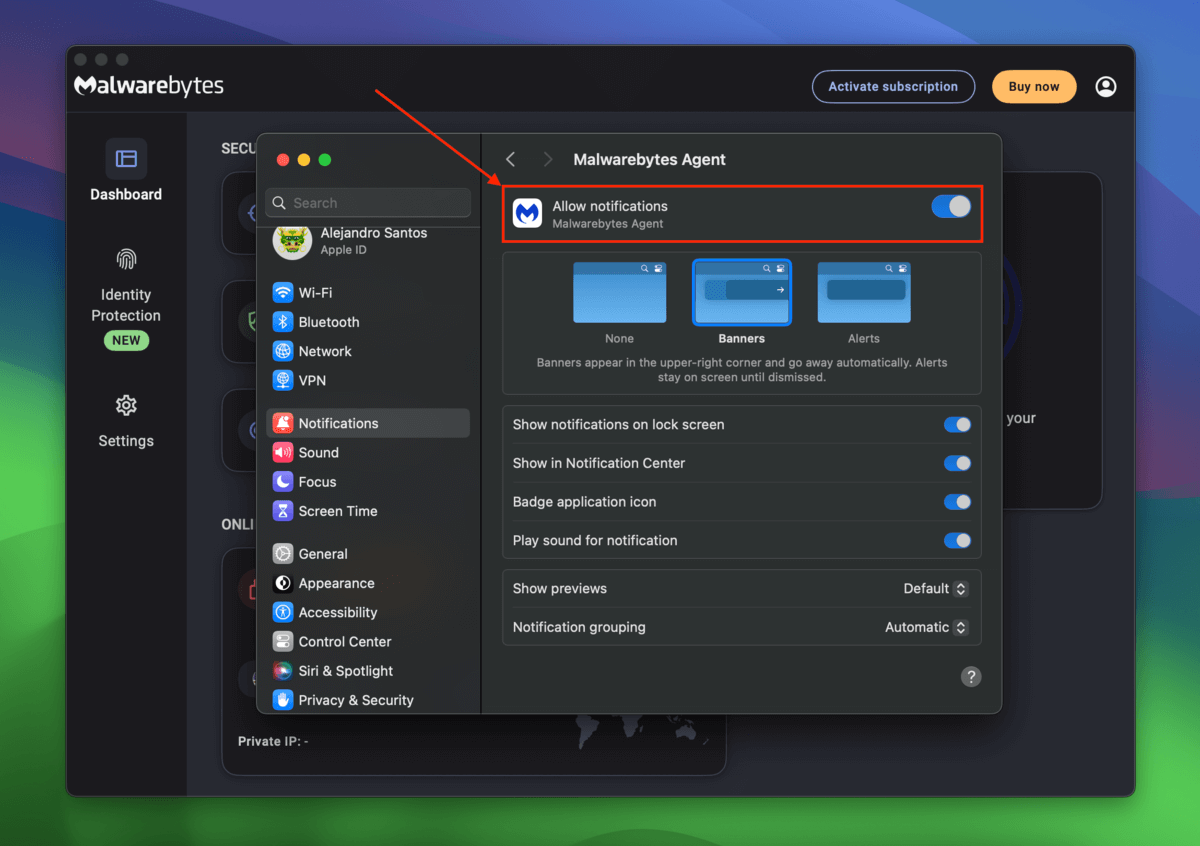
Step 4. Follow the rest of the installer wizard’s instructions. When prompted, allow notifications for Malwarebytes Agent.
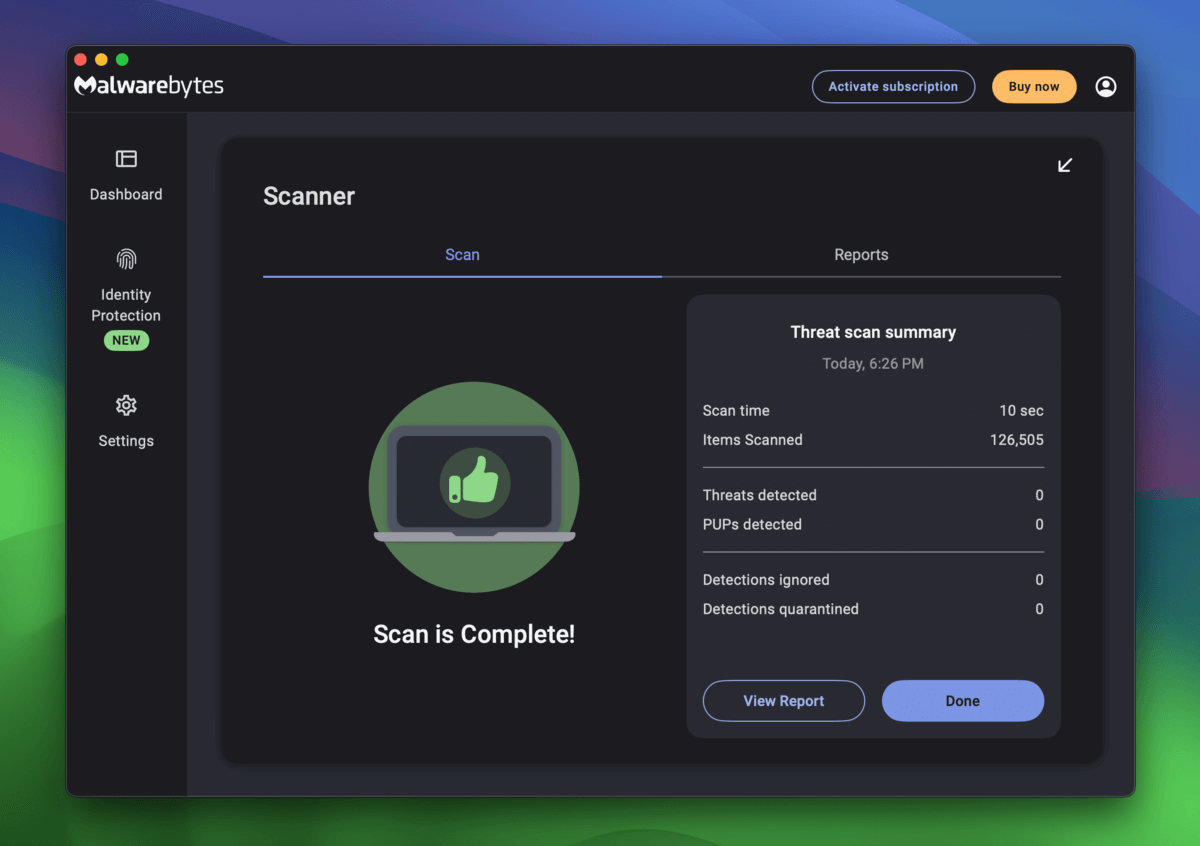
Step 5. In the Dashboard screen, click Scan. This is how to check if your MacBook has a virus.

Step 6. Malwarebytes will then let you know if it finds any threats and will give you options on how to handle them.
Option B: Restore Your Mac From a Clean Time Machine Backup
If anti-malware tools are unable to eliminate the virus and its symptoms, you can roll back your Mac to a backup you created with Time Machine before the virus infection occurred.
These methods will restore your Mac to the state it was in when the Time Machine backup was created – before the virus was introduced to your system.
Step 1. Shut down your Mac.
Step 2. Connect your Time Machine backup drive to your Mac. Then, press and hold the power button.
Step 3. Once you see Options, let go of the power button. Then, click Options and click Continue.
Step 4. From the Recovery Mode menu, click Restore from Time Machine and click Continue.
Step 5. Follow the wizard to fully restore your Mac from a Time Machine backup. Just make sure that you select the correct Restore Source!
Option C: Reinstall macOS
If you have no backups that were created before the virus infection, your last resort is to reinstall macOS. This will completely clean your Mac from viruses, as well as the rest of your data, to make way for the new installation.
Reinstalling macOS also means that its file system will be built from scratch, ensuring its integrity… This is an important consideration if anti-malware tools are unable to prevent nor reverse some or all of the effects of the virus.
Step 1. Shut down your Mac.
Step 2. Press and hold the power button until you see Options.
Step 3. Click Options and click Continue.
Step 4. From the Recovery Mode menu, click Reinstall macOS Sonoma. Then, click Continue.
Step 5. Follow the installation wizard to fully reinstall your macOS.
Step 2: Recover the Files That Were Deleted by the Virus
Once the virus has been completely eliminated from your system, you can safely attempt data recovery. Note that it’s still possible for your Mac to be reinfected if you restore suspicious files.
Don’t save any new personal files to your Mac until you’ve confirmed with anti-malware that everything’s clear.
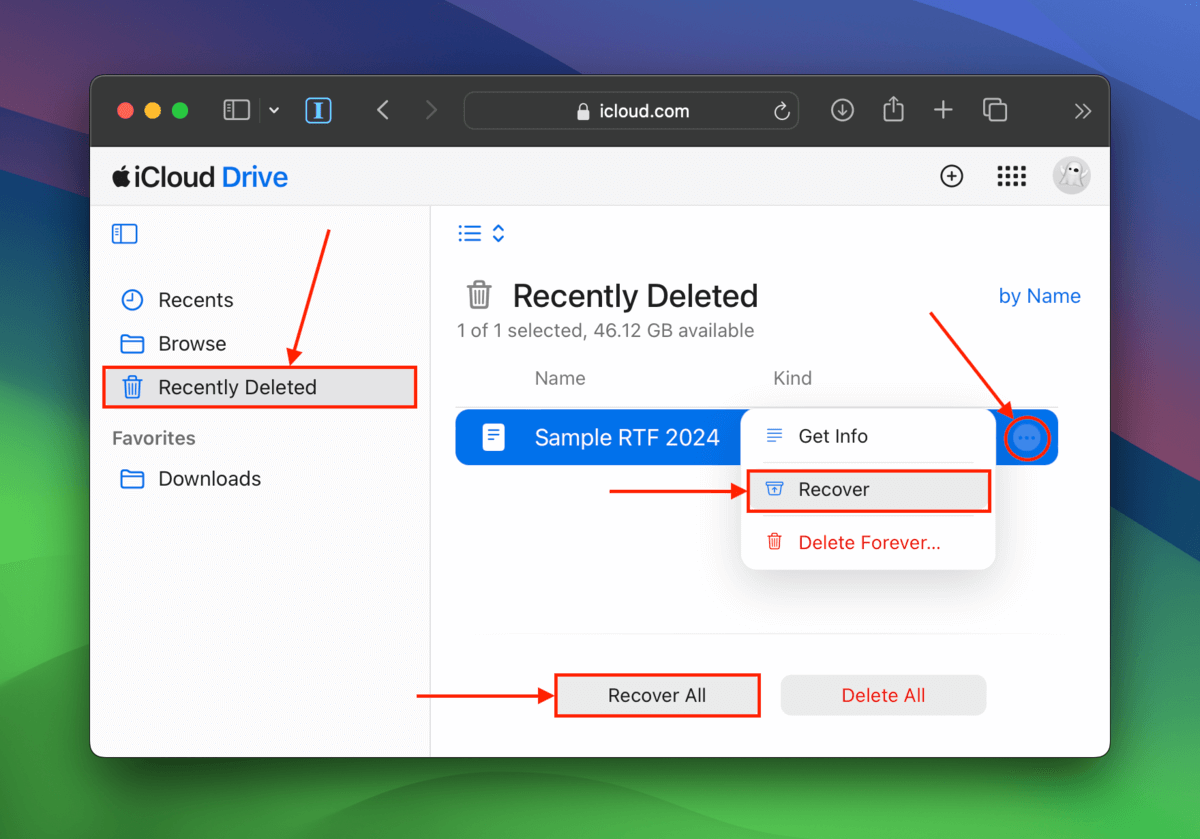
Option A: Check the Recently Deleted folder in iCloud
If (1) you enabled iCloud on your Mac and (2) the deleted files were originally stored in your iCloud Drive folders, then you might find your files in iCloud’s Recently Deleted folder.
You can access your iCloud Drive from any browser on any device.
Step 1. Open any browser and login to iCloud.com.
Step 2. Click iCloud Drive.
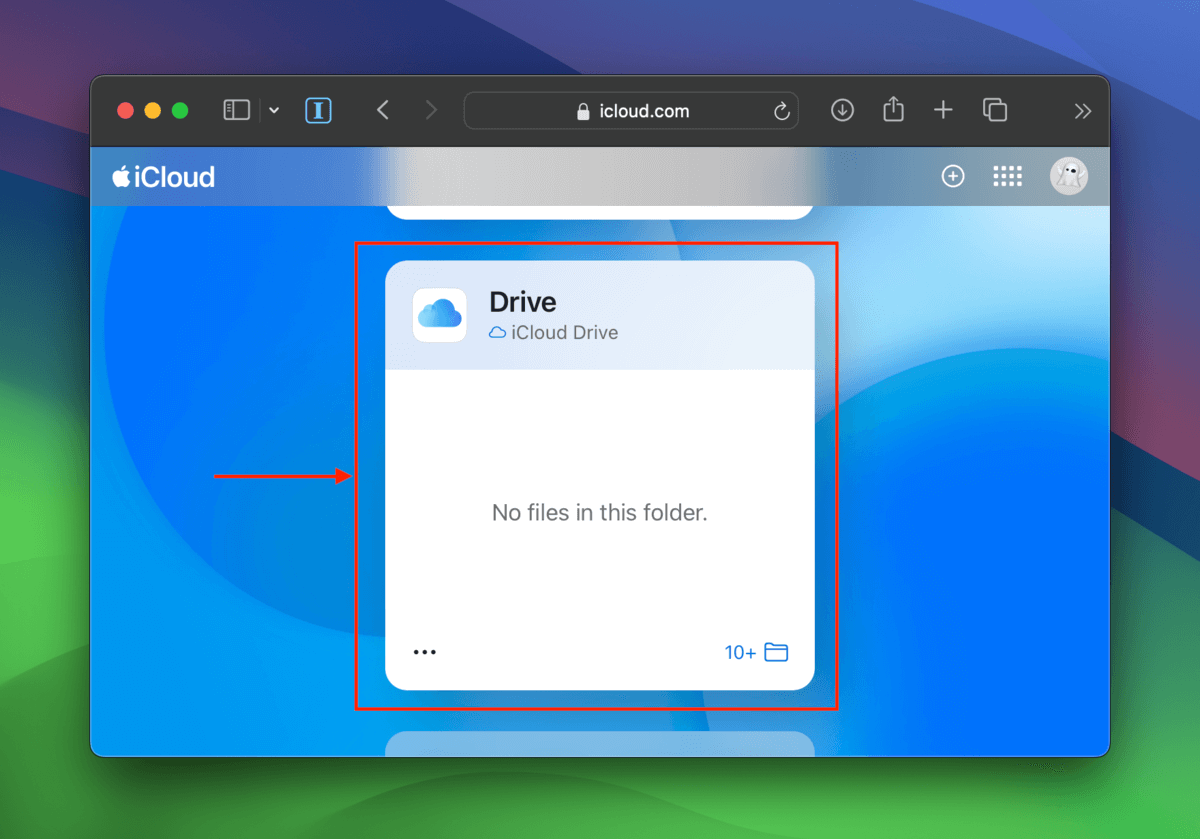
Step 3. Select the Recently Deleted folder in the left sidebar. Click the menu button beside your file and click the Recover button.
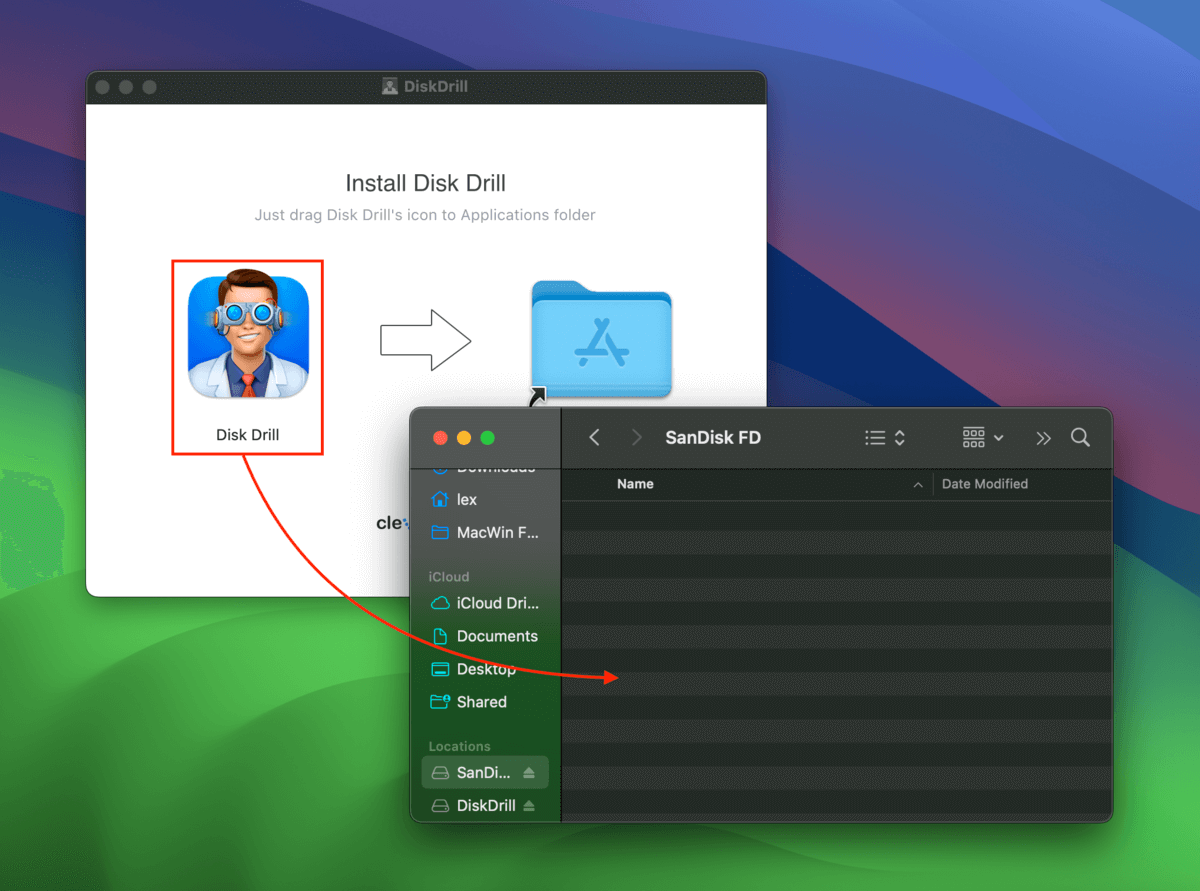
Option B: Restore Your Data With Data Recovery Software
If the deleted files are not in iCloud, you can attempt to restore them using data recovery software. Data recovery software is a tool that can scan your Mac disk directly for the remnant data of your lost files.
There are several data recovery apps for macOS, but we’ll be using Disk Drill for this demonstration. It’s easy to use for anyone and it recognizes almost all Mac-based file types.
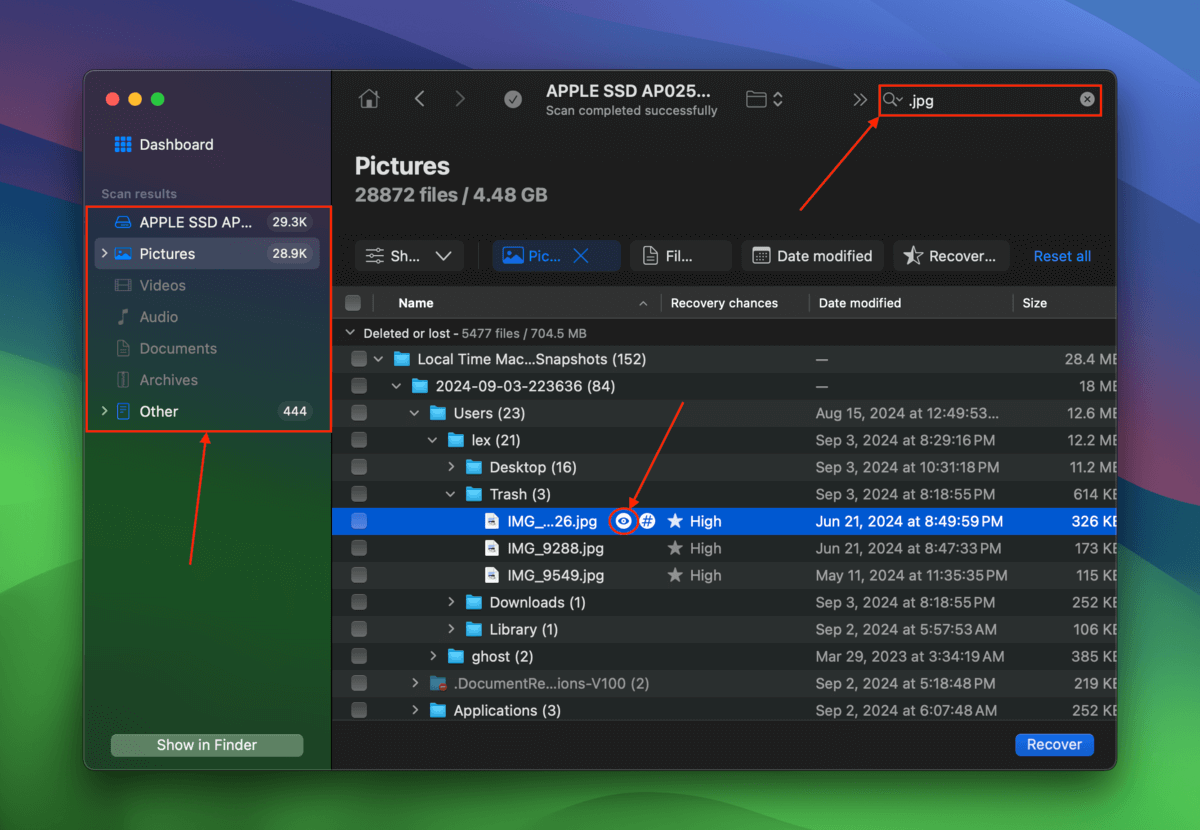
Disk Drill also has one of the best preview tools among its competitors, which is helpful for identifying whether or not your files have been corrupted (if you can preview it, you can recover it).
Step 1. Download Disk Drill’s installer but save it on an external storage device (either by using another computer or by changing your browser’s download settings).
Step 2. When prompted by the installer, drag Disk Drill’s icon to the external drive’s root folder in Finder.
Step 3. Select your Mac drive as the recovery source and click Search for lost data.

Step 4. Once Disk Drill is done scanning your Mac, click Review found items. Then, use the filters sidebar as well as the search tool to narrow down the list of found files. To preview a file, hover your mouse pointer beside it and click the eye button that appears.
Step 5. Select the files you want to restore and click Recover.
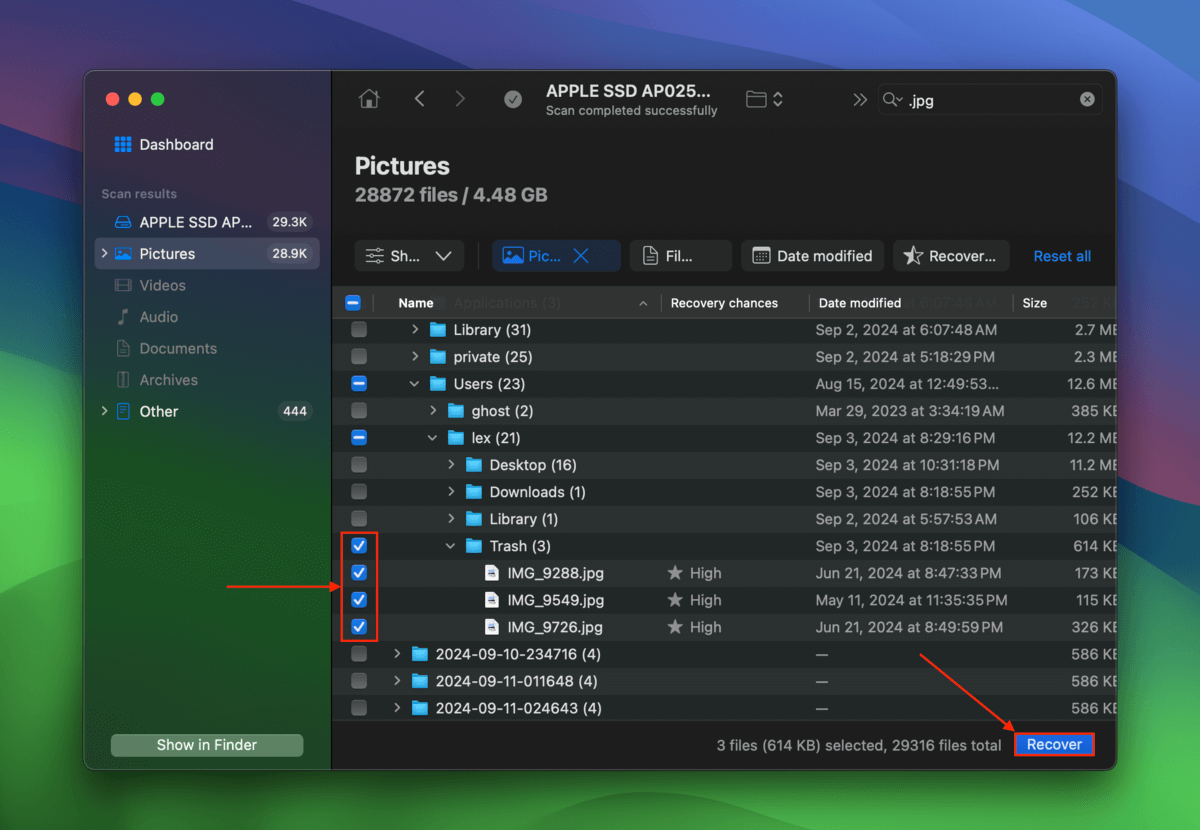
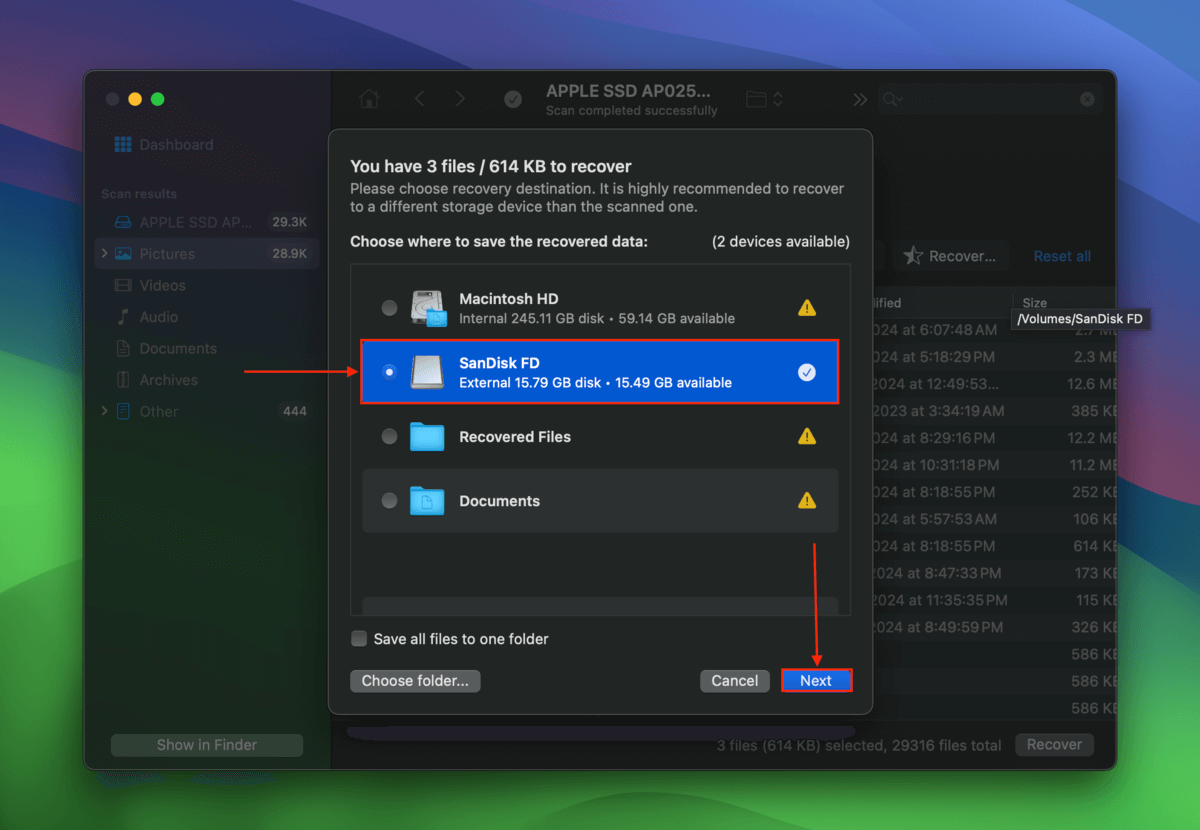
Step 6. Choose the external storage device you used in step 1 as the destination for your recovered files. Finally, click Next.
Option C: Professional Data Recovery Service
If data recovery software was unable to recover your files (or if you want to go straight to a specialist), consider sending your Mac to a professional data recovery service.They have more advanced software and tools and they draw from the expertise of professional recovery specialists.
There are literally dozens (if not hundreds) of data recovery services all over the globe. To get started on your search, here’s what to look for:
- No data – no charge guarantee. Prioritize shops that offer a “No Data – No Charge Guarantee”, which means you only pay the recovery fee if they restore the files you specifically wanted. Most shops will send a list for you to approve before they proceed with the attempt.
- Free estimate. Many shops will provide you with an initial quotation over the phone, then a more comprehensive estimate once they check your drive in their lab.
- Shipping discounts. You can find data recovery labs that offer free inbound shipping – however return shipping is usually not free.
- Good customer reviews. Check the customer reviews of the specific branch you plan on sending your Mac to. Make sure to consider only recent reviews and check those with 1 star all the way up to 5 stars.
Did the virus corrupt your drive?
While you may have successfully eliminated the virus and restored your data, it’s possible that the infection already affected the drive’s file system and caused corruption. If you haven’t reinstalled macOS at this point, you can use our guide on how to fix corrupted hard drives on a Mac.


