
Duplicate photos can take up so much space on your iPhone, especially as your library grows. They’ve been much easier to get rid of since the latest updates to iOS. However, there are still challenges that can prevent you from getting rid of all the duplicate and similar photos on your device.
Sometimes iOS can’t identify them, or they simply don’t show up due to system delays. Or maybe you haven’t explored the new duplicate detection feature from iOS yet.
Whatever the case, this guide will show you all the ways to merge duplicate photos on your iPhone.
Table of Contents
Can You Merge Photos on an iPhone?
Yes, merging duplicate photos on an iPhone is possible. However, the method to do so depends on whether the photos are exact duplicates or only similar photos. While both duplicate photos and similar photos are “photos that look like each other”, they are considered totally different in the context of merging.
To learn how to merge photos on an iPhone and to get the most out of our guide, it’s important that you can distinguish the two.
- Duplicate photos: Duplicate photos have the same binary data as one another. In other words, they are exact copies of a single file. They usually occur when you import or receive the same image multiple times.
- Similar photos: Similar photos look the same but are completely different files or copies with slight variations. For example, you took multiple photos of the same subject in a fast sequence, or you duplicated a photo and changed its resolution.
Here’s the problem: iOS’ detection system only works on exact duplicates. This is why there are several different solutions worth trying, which we’ll be exploring in this guide.
How to Manually Trigger the Duplicates Album
Aside from detecting duplicates, iOS also compiles them for you in a special utility album that we cover in Method 1 of the guide below.
However, there are times when this process (which happens in the background) gets delayed. In this case, you can try “kickstarting” the scan by manually creating an exact duplicate using the Photos app.
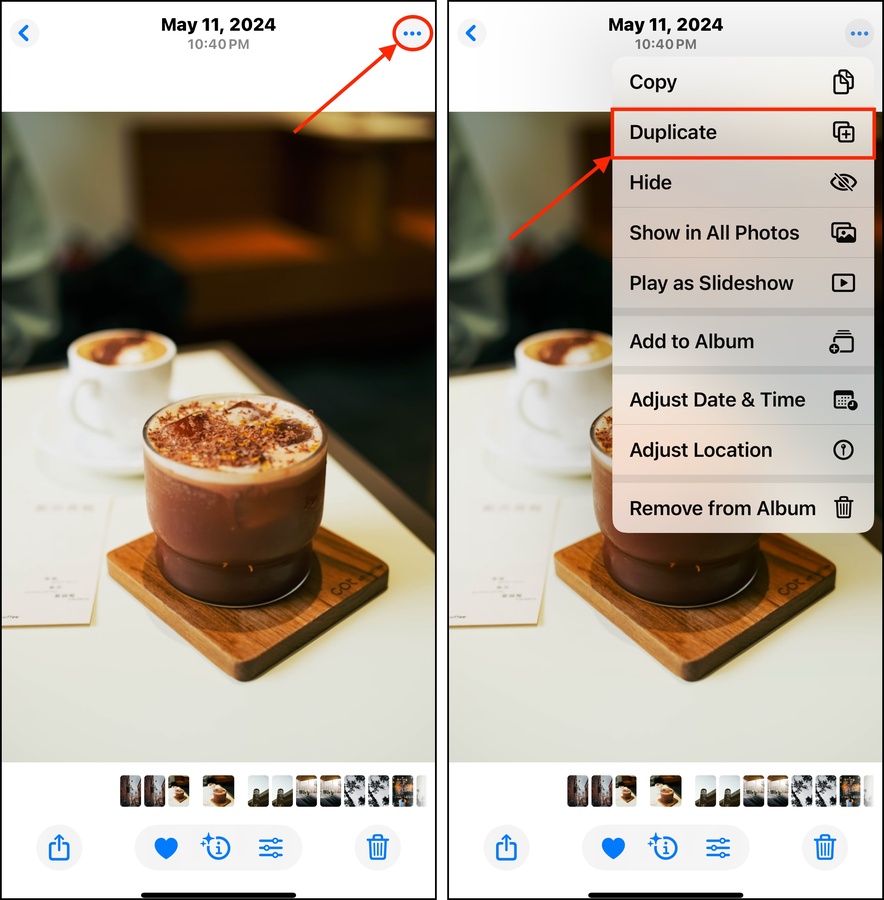
Step 1. Open the Photos app and open any photo from your library.
Step 2. In the top right corner of the menu, tap the meatball menu button. Finally, select Duplicate.
After duplicating your photo, lock your iPhone’s screen. Then, charge it and set it aside for an hour or so. This gives iOS enough time to conclude other processes and run the detection algorithm.
4 Ways to Merge Duplicate Photos on an iPhone
In this section, we’ll cover 4 different methods of merging photos on an iPhone using iOS 17 and later versions. We wrote the list in order of convenience, so we recommend starting with Method 1 and working your way down.
Method 1: Utilize the Merge Tool in the Photos App
The easiest way to eliminate duplicate photos from your library is to utilize the Merge tool, which can be found in the Duplicates album in the Photos app.
So what happens when you merge duplicate photos on an iPhone? The best photo is selected to be retained, the rest of the photos in the set are deleted, and their data is combined. We’ll show you how it works:
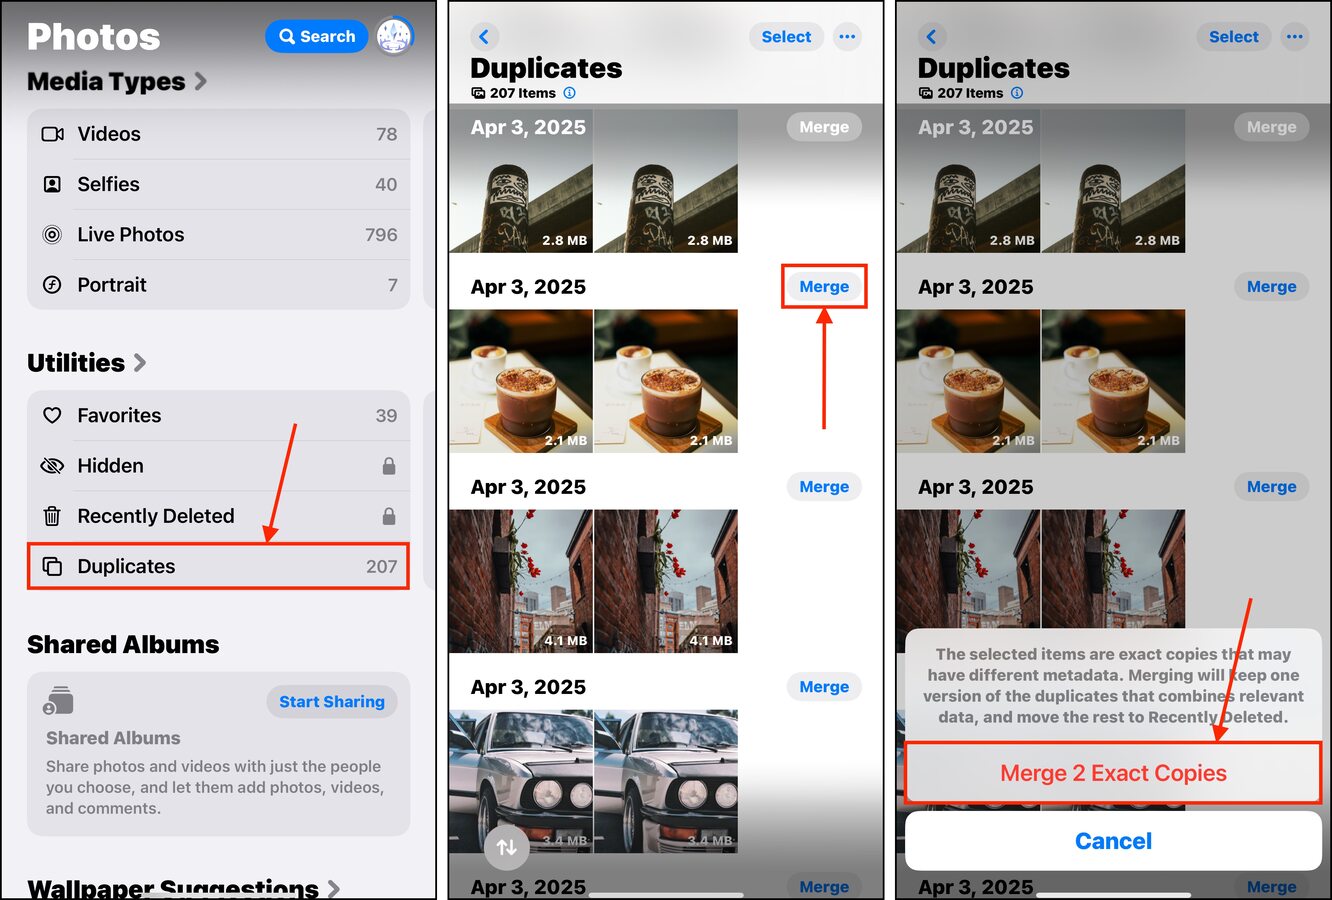
Step 1. Open the Photos app. Scroll down to the UTILITIES section. Then, tap Duplicates.
Step 2. Tap Merge beside the set of duplicates you want to merge.
Step 3. In the pop-up that appears below, tap Merge Exact Copies to confirm the operation.
Method 2: Use Third-Party iPhone Cleaner Apps
If you’re hunting down similar photos (not exact duplicates), we recommend using a third-party iPhone cleaner app. They use different detection algorithms than the Photos app does, which might be more effective for your library.
To show you how cleaner apps work, we’ll be demonstrating an app called Clever Cleaner: AI Cleanup App. It’s completely free and requires no sign-ups, and it has zero ads. Most importantly, it can find both similar photos and exact duplicates with good accuracy.
Step 1. Open the App Store and download Clever Cleaner: AI Cleanup App. Make sure you grant it Full Access to your library.
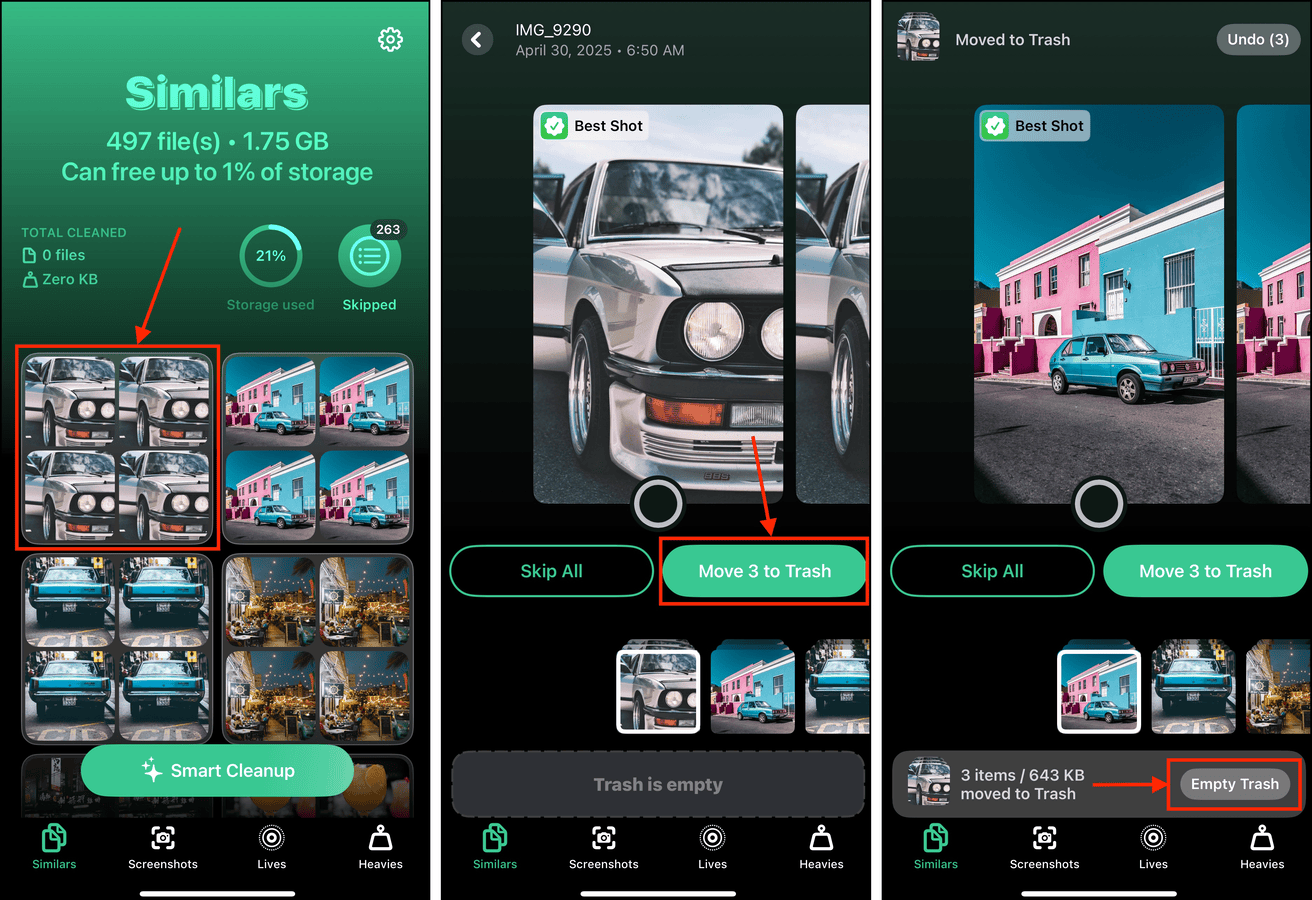
Step 2. Tap Similars on the bottom menu. At this point, you can tap the Smart Cleanup button to merge all duplicates in Photos. But if you want to review sets of duplicates one by one for more precision, tap one to proceed.
Step 3. Clever Cleaner will automatically preserve the best copy out of the set and select the rest for deletion. All you have to do is tap Move to Trash.
Step 4. A confirmation pop-up will appear at the bottom of the screen. Tap the Empty Trash button to confirm deletion. You can also tap the pop-up dialogue itself to review photos you deleted.
Don’t worry! Even if you delete your photos again from the Trash menu, you’ll have another chance to review them in the Recently Deleted album (in the Photos app).
Method 3: Delete Duplicates Manually Using Advanced Search
Another option is to delete duplicate photos on your iPhone manually. It’s more tedious, but this negates having to rely on third-party apps and iOS’ flawed detection feature.
If you have an idea of what photos in your library may have produced duplicates, you can improve this method’s efficiency by utilizing the Photos app’s advanced search tool. With the right keywords, you can narrow down photos of events or subjects you suspect may have been duplicated.
We’ll show you how it works:
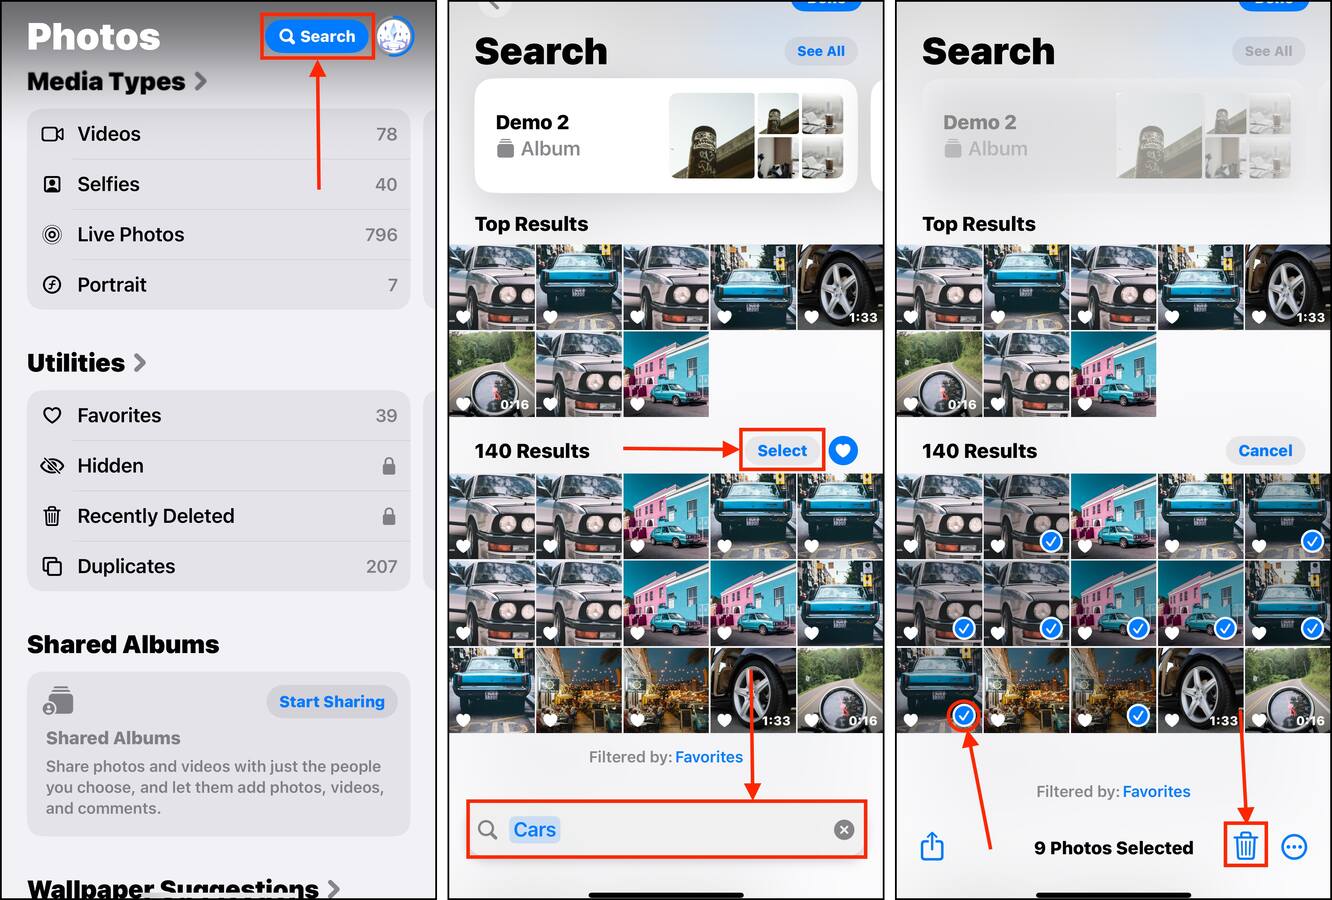
Step 1. Open the Photos app and tap the magnifying glass in the top right corner of the screen.
Step 2. In the search field, type keywords related to the contents of the duplicate photos. For example, I’ll use the keyword “Cars.”
Step 3. At the top of the Results section, tap Select. Then, tap the duplicate photos you want to delete—make sure you leave at least one copy unmarked! Finally, tap the trash button and confirm if prompted.
Method 4: Use Smart Albums on Mac
Similar to Method 3, this method utilizes the advanced filtering tools of the Photos app—but this time, on a Mac.
We’ll teach you how to create Smart Albums, which are special albums that don’t require you to choose specific photos. Instead, you set various conditions and filters so the album automatically compiles the appropriate photos for you.
Step 1. On your Mac, open the Photos app.
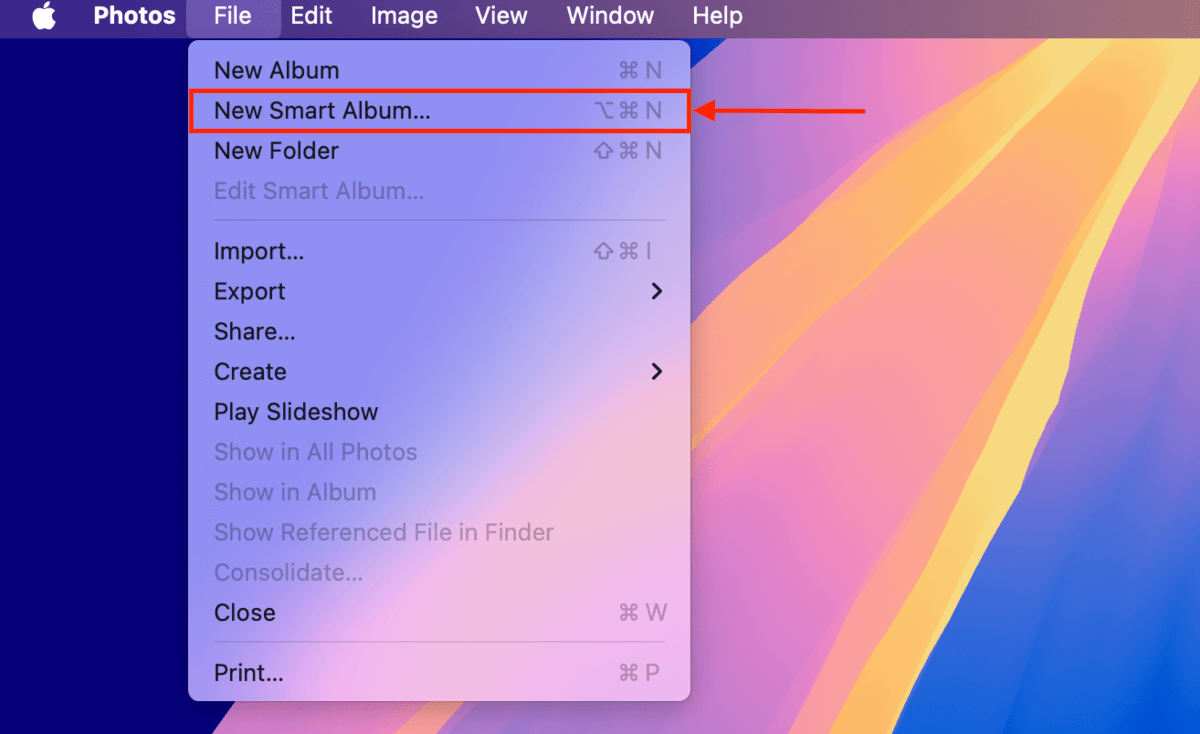
Step 2. On the menu bar, click File > New Smart Album.
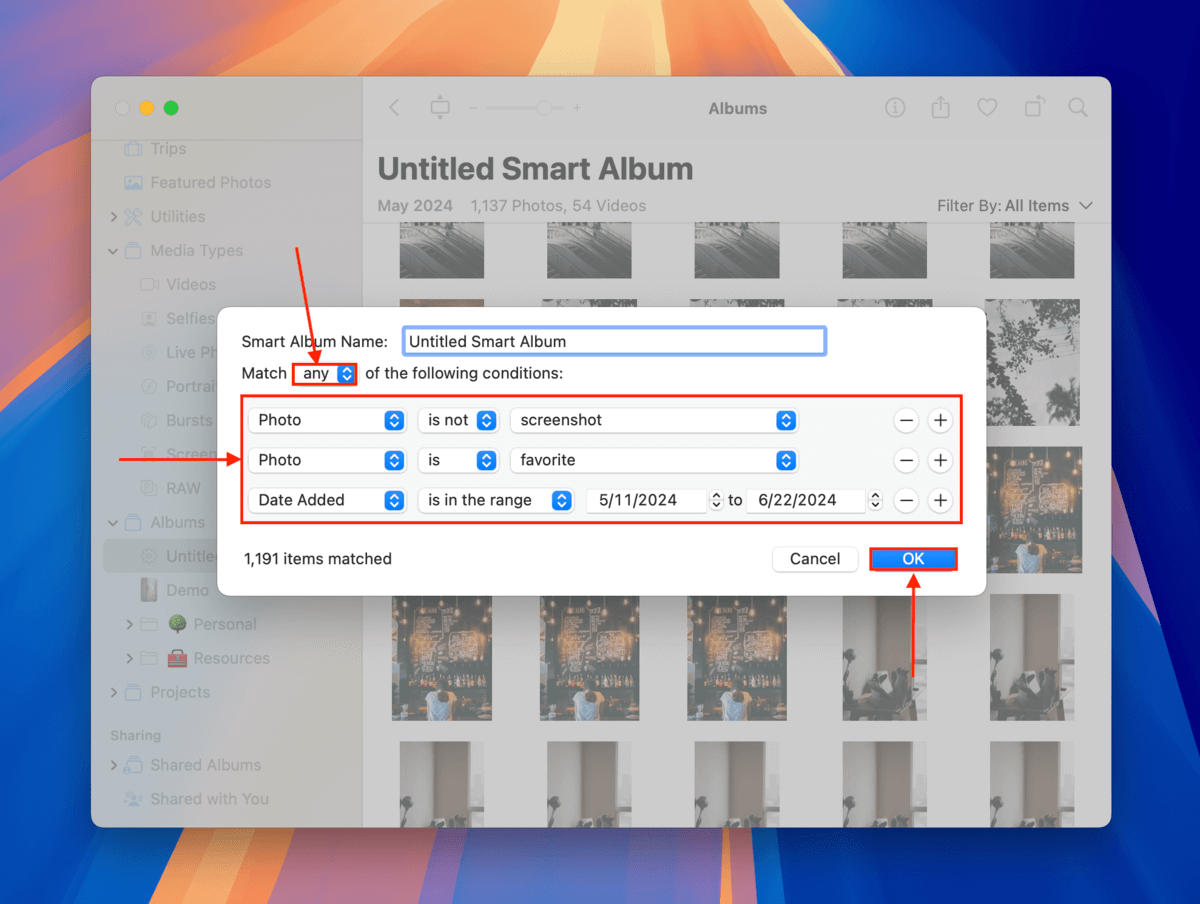
Step 3. Name your album. Then, make sure to match all conditions and start adding filters to help narrow down the selection. Once you’ve set the conditions, click OK.
Step 4. Start manually selecting the duplicate photos you want to get rid of. You can use Command + Click to select multiple photos that aren’t adjacent to each other. Finally, right-click your selection and select Delete Photos from the context menu.

Want to Organize Your Library While Avoiding Duplicates?
There are various ways to manage, organize, and back up your photo library. Unfortunately, duplicate photos can be glossed over or even occur as a result of lack of knowledge. It’s enough of a problem that we created a specific guide for it!
Check out our article on how to organize thousands of photos on your iPhone without duplicates. We’ll show you different ways to tidy up your library using the Photos app’s organization tools while making sure duplicates are eliminated and prevented from occurring in the process.


