
It’s easy to format a USB drive to FAT32. However, there’s a lot of (in our opinion) critical information left out of most guides regarding data preservation during different types of formatting — especially on macOS.
And while FAT32 is a commonly used format, it has unique attributes that you ought to know to maximize your USB. Finally, there are users coming to this guide who have already formatted their USB but need the files that were deleted in the process.
So the scope of this guide includes formatting your USB to FAT32 while preserving data, recovering files lost during formatting, and maintaining your FAT32 USB’s health.
Table of Contents
How to Prevent Data Loss When Formatting Your USB to FAT32
The way formatting works (regardless of file system format) is that all the data blocks on the drive are deleted in order to prepare for the new file system and new files.
Aside from using special tools to restore the files deleted during formatting (which we’ll explore in further down the guide), there are ways to preserve your data so you can avoid needing recovery or increase the number of files you get back:
- If you’re disconnecting your USB drive from another device (e.g. Tesla dash cam), make sure that you use the safely eject feature to ensure that all read and write processes have concluded properly. This prevents corruption, which can cause data loss even before you format your drive.
- Back up the data on your USB drive. The easiest way to accomplish this is by copying and pasting your files from your drive to your Mac. Another option is to utilize backup software like Carbon Copy Cloner to back up your USB drive itself.
- Only use Quick Format unless a Full Format is necessary (e.g. a virus may survive a Quick Format and will require a Full Format, but other forms of corruption typically don’t). A Quick Format only prepares the data blocks to be overwritten, which means the actual data is still available for recovery tools to find and restore.
- After formatting your USB drive, don’t save any new files to it until you verify your backup files or recover your deleted files. This is to avoid overwriting formatted file data, which recovery tools rely on to restore files.
How to Format a USB to FAT32 on Mac
If this is your first time formatting a storage device, it might sound a bit intimidating. Fortunately, Mac provides intuitive (and free) tools built right into the operating system. Below, we’ll cover Disk Utility and Apple Terminal. Disk Utility has a user-friendly GUI (graphical user interface), while Terminal is a spartan command line system. For both apps, the entire process only takes 5 steps. Here’s how to format a USB drive to FAT32 on Mac:
Method 1: Conveniently Format Your USB Using Disk Utility’s GUI
Disk Utility is a powerful and easy-to-use disk management tool that lets you format, partition, repair, and mount/unmount storage devices. Let’s try using Disk Utility for format a flash drive to FAT32 on Mac:
Step 1. Make sure your USB drive is securely connected to your Mac.
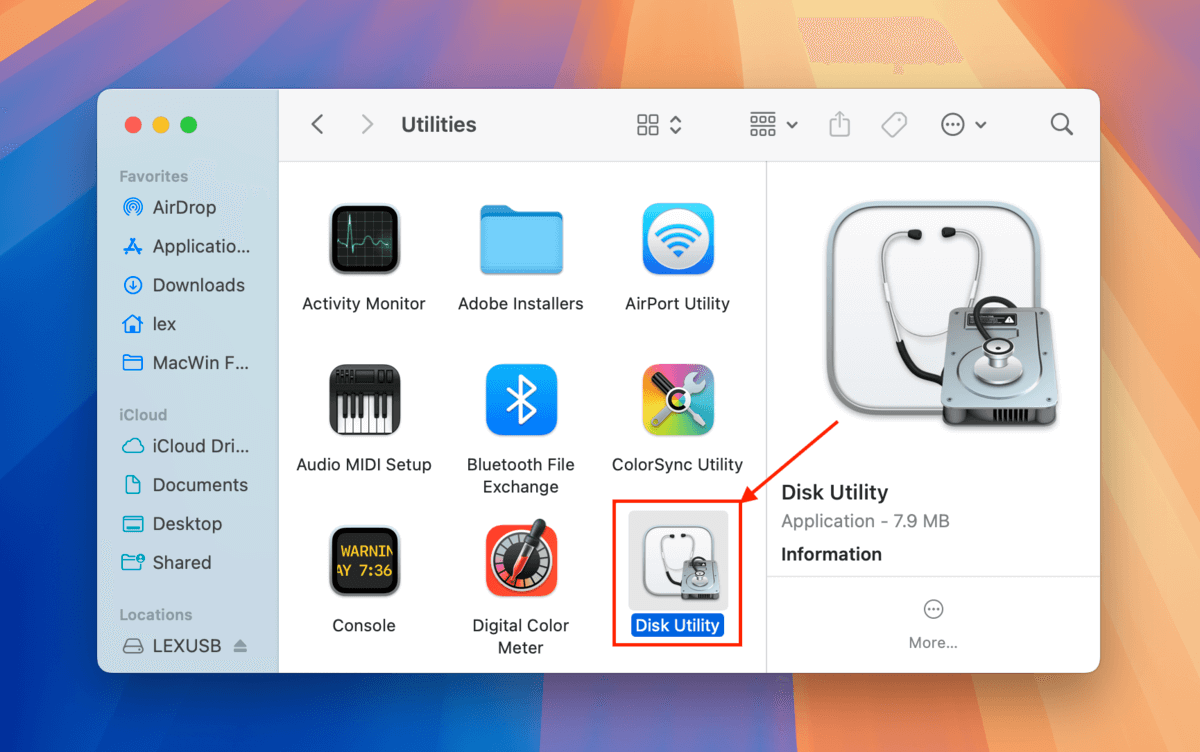
Step 2. Open Disk Utility by opening Finder > Applications > Utilities, and double-clicking Disk Utility.
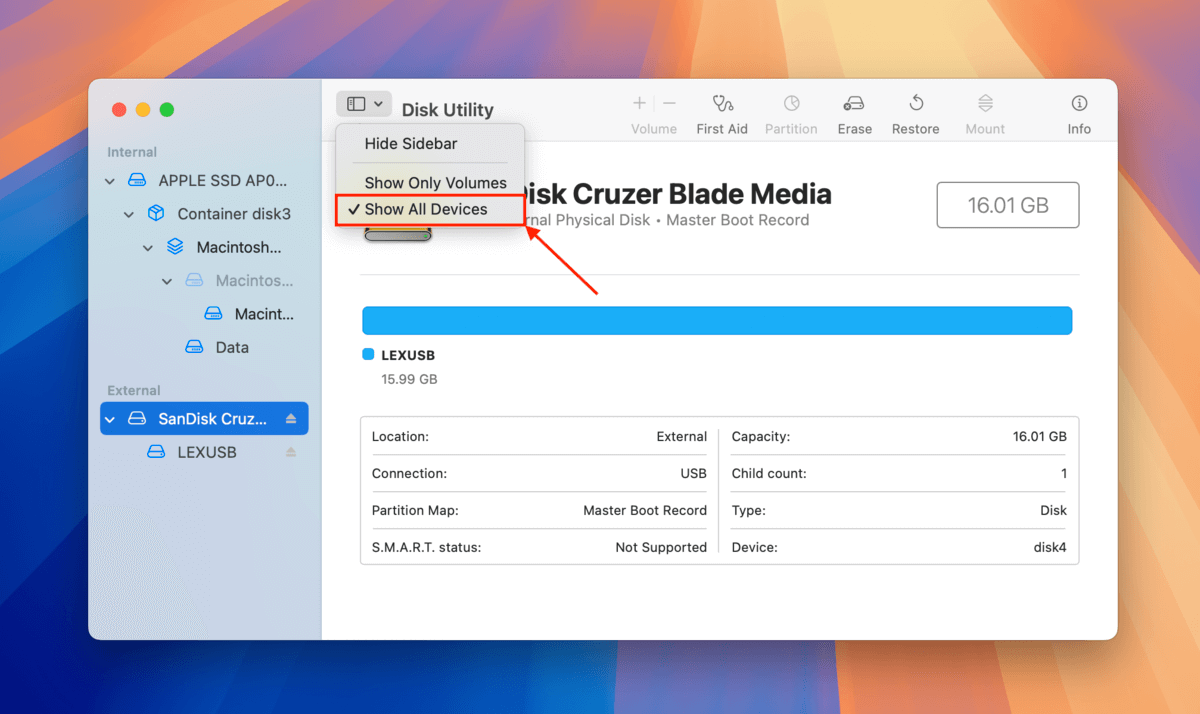
Step 3. On the Disk Utility window, click the “View” button and click “Show All Devices.”
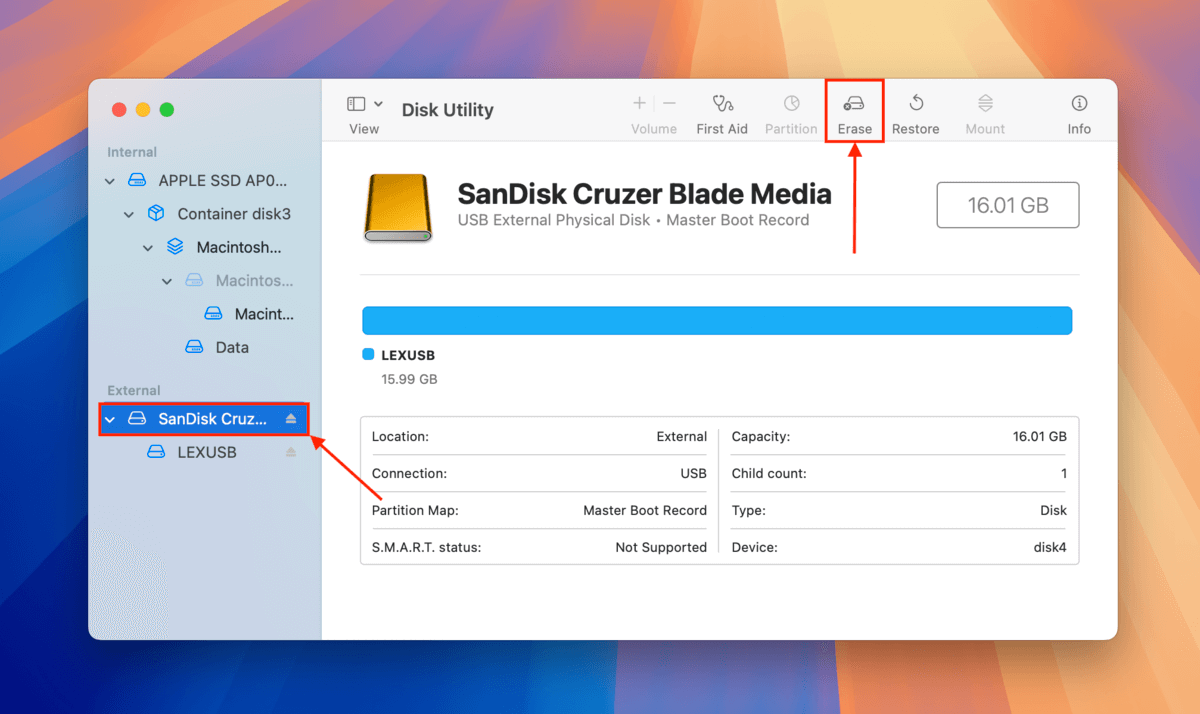
Step 4. Select your USB drive on the left sidebar, then click the “Erase” button near the top of the window.
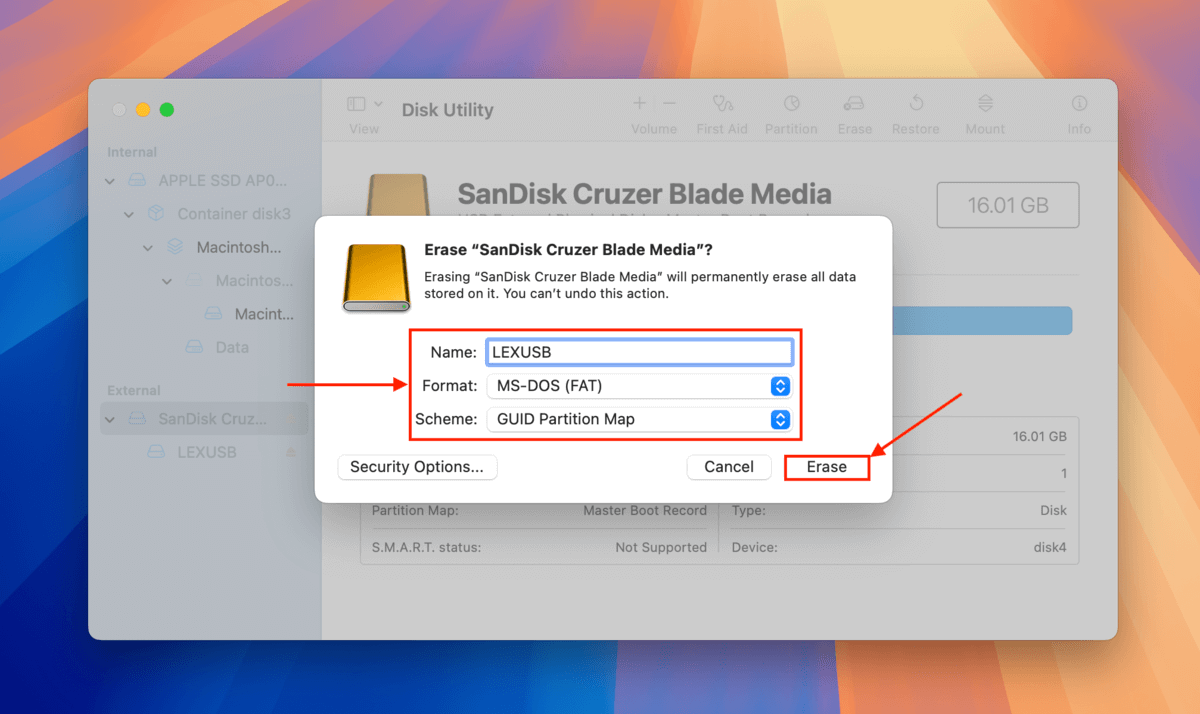
Step 5. Choose a name, select MS-DOS (FAT) for the format, then Master Boot Record for the scheme. Then, click “Erase.”
Method 2: Format Your USB Drive With More Precision Using Terminal
Terminal is another powerful native Mac tool, but it’s a lot less visual than Disk Utility. In fact, you use it mainly by typing in commands. But the steps to format USB from Terminal are still relatively straightforward as long as you follow our guide below:
Step 1. Make sure your USB is securely connected to your Mac.
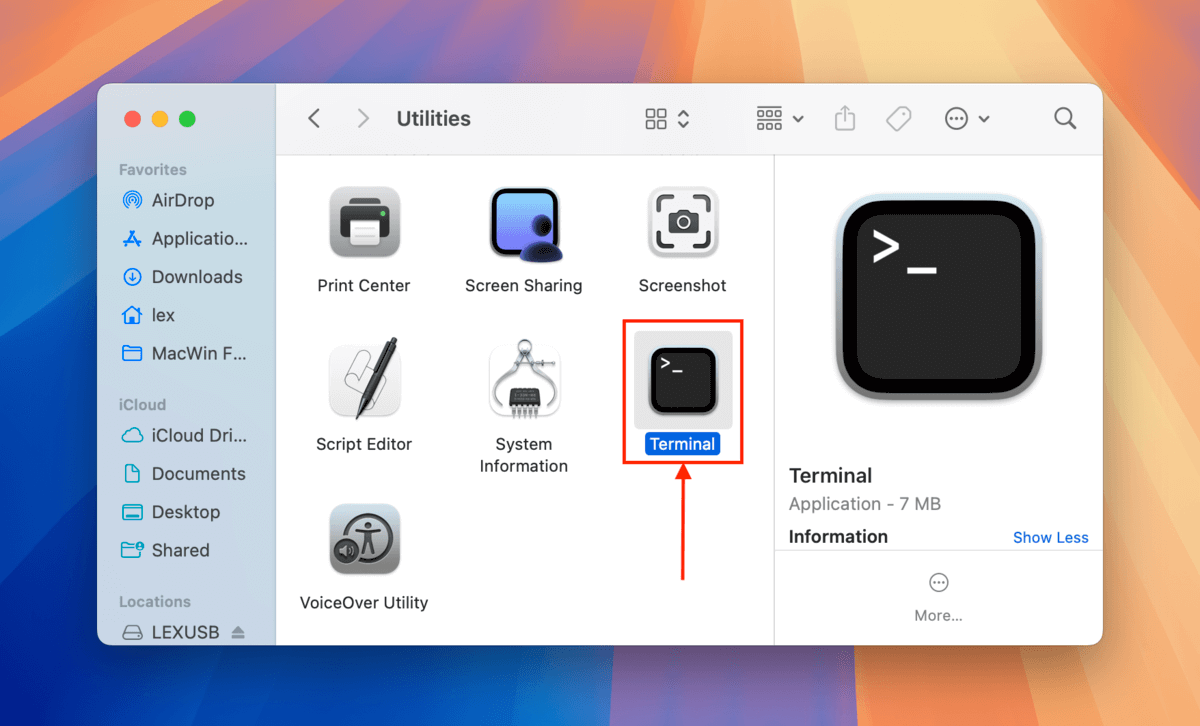
Step 2. Launch Terminal by opening Finder > Applications > Utilities, and double-clicking terminal.
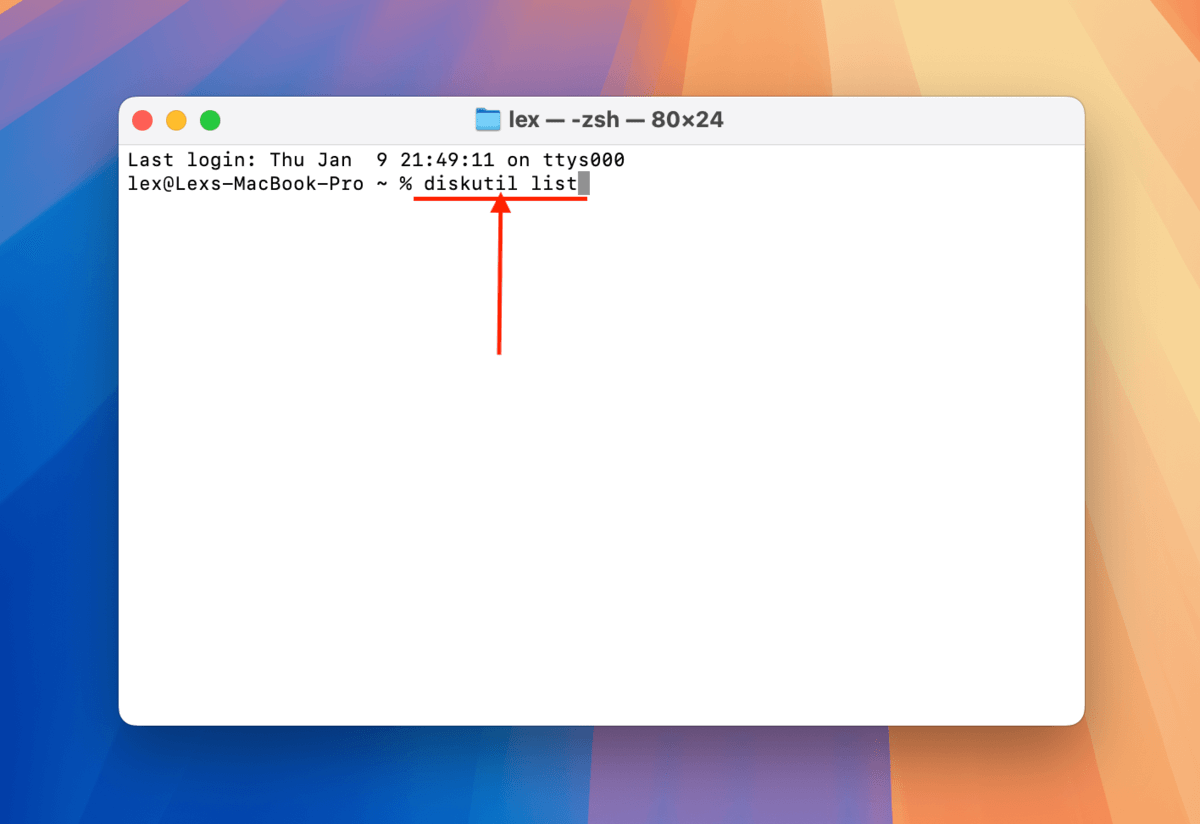
Step 3. Type the following command and press return:
diskutil list
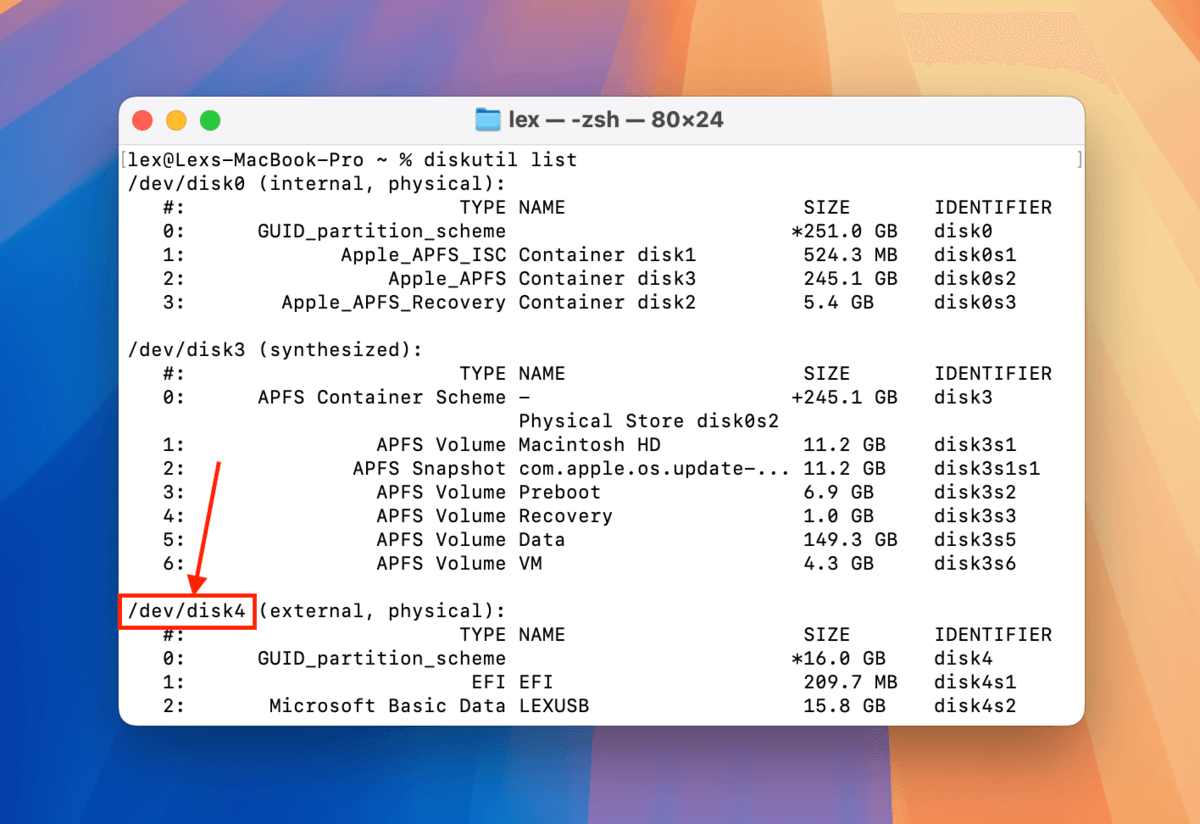
Step 4. Identify your USB’s disk name from the list of drives and take note of it. In my case, my USB’s disk name is “/dev/disk4”.
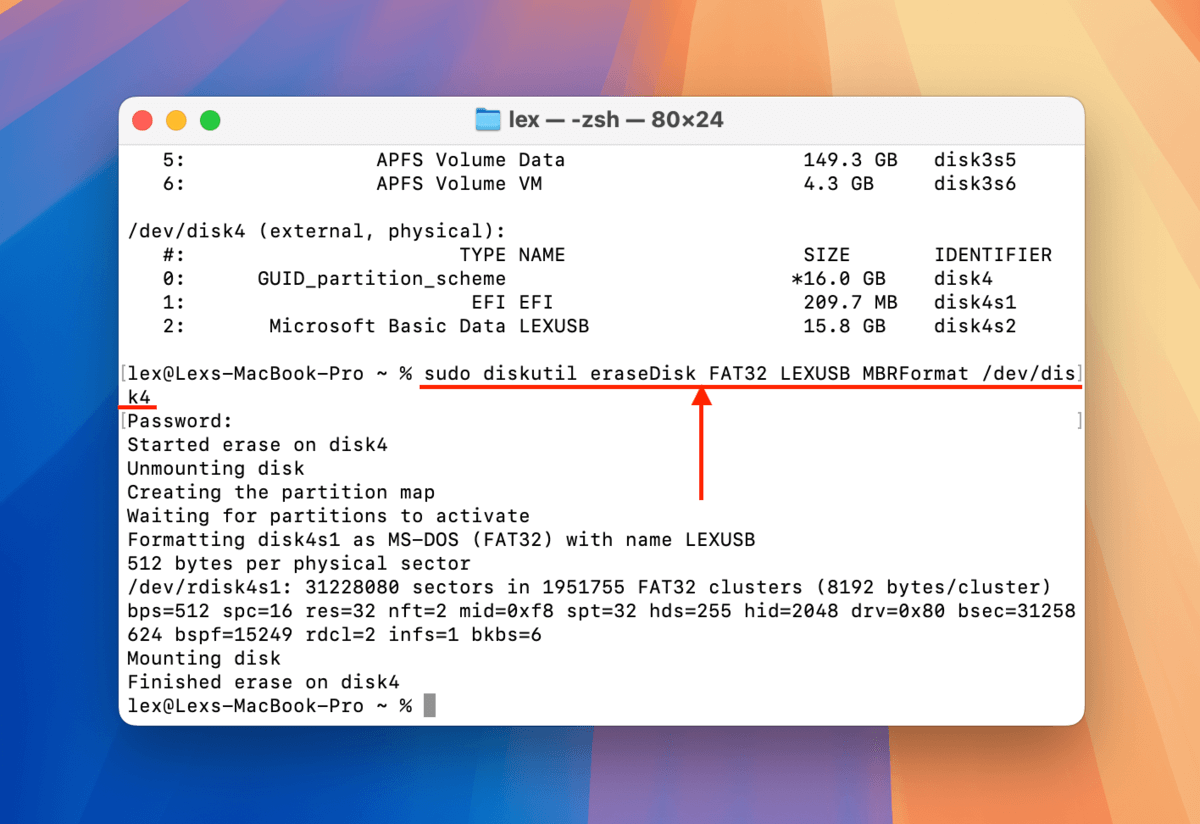
Step 5. Type the following command and press return:
sudo diskutil eraseDisk FAT32 LEXUSB MBRFormat /dev/disk4
or
sudo diskutil eraseDisk FAT32 LEXUSB GPT /dev/disk4
Replace “LEXUSB” with what you want to name your drive, and replace “/dev/disk4” with your own USB’s disk name.
How to Recover Data Lost From a Flash Drive During Formatting
If you already formatted your USB drive but were unable to back up important files (or you were unable to access the files before formatting due to corruption), you can attempt to restore them using data recovery software. Data recovery software is capable of scanning drives and restoring files from whatever is left in the USB’s data blocks.
For this guide, we’ll be demonstrating an app called Disk Drill. It has a beginner-friendly interface that makes it easy to scan your USB, browse and select the files (and folders) you want to restore, and save them to any location you want.
Disk Drill also recognizes a lot of different file signatures from a variety of file types and it can fully preview almost all recoverable files (including RAW photos and videos). It can also scan almost all known file system formats, including ExFAT, FAT32 HFS+, and APFS.
Step 1. With your USB drive disconnected from your Mac (to avoid overwriting), download and install Disk Drill.
Step 2. Once Disk Drill is installed, securely connect your USB drive to your Mac.
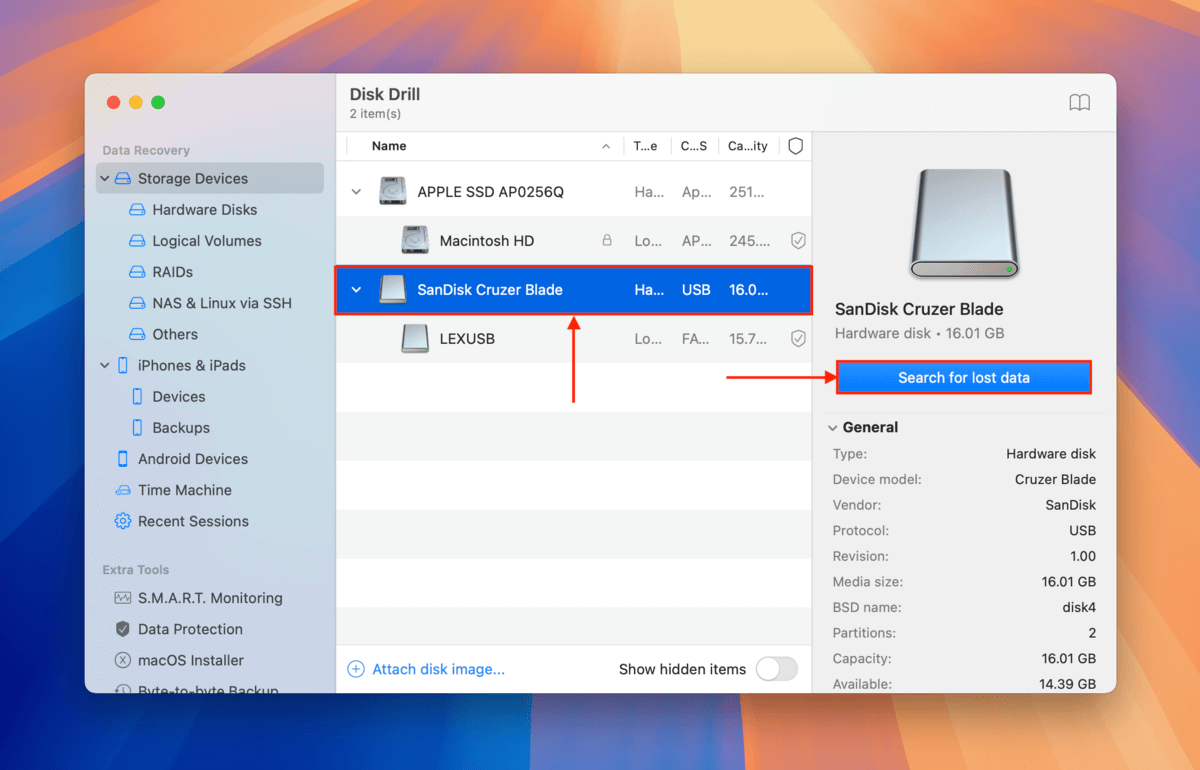
Step 3. Open Disk Drill. Then, select your USB drive from the list and click Search for lost data.
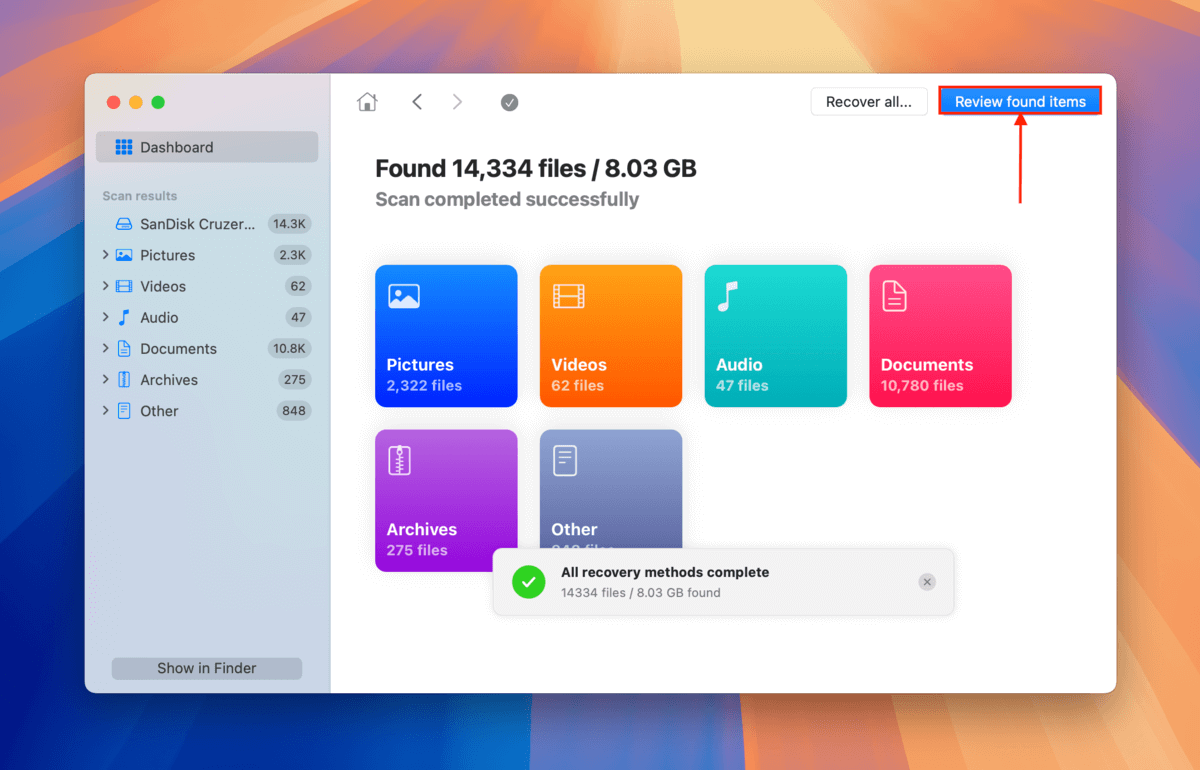
Step 4. Disk Drill will let you know when it’s done scanning your USB. Click Review found items.
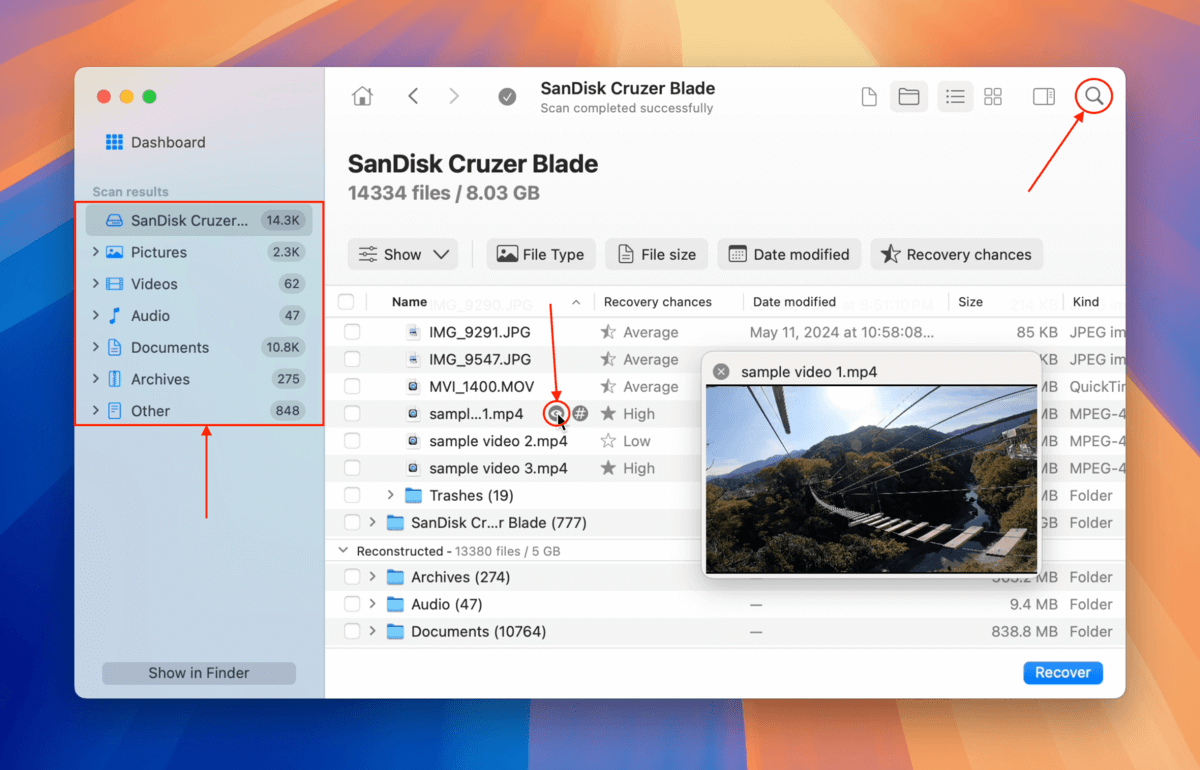
Step 5. If you only want to restore specific files or file types, use the filters in the sidebar or type a file name or file extension in the search tool (top right corner). Once you locate the files you want to restore, hover your mouse beside each of their file names and click the eye button that appears. This will allow you to preview the file.
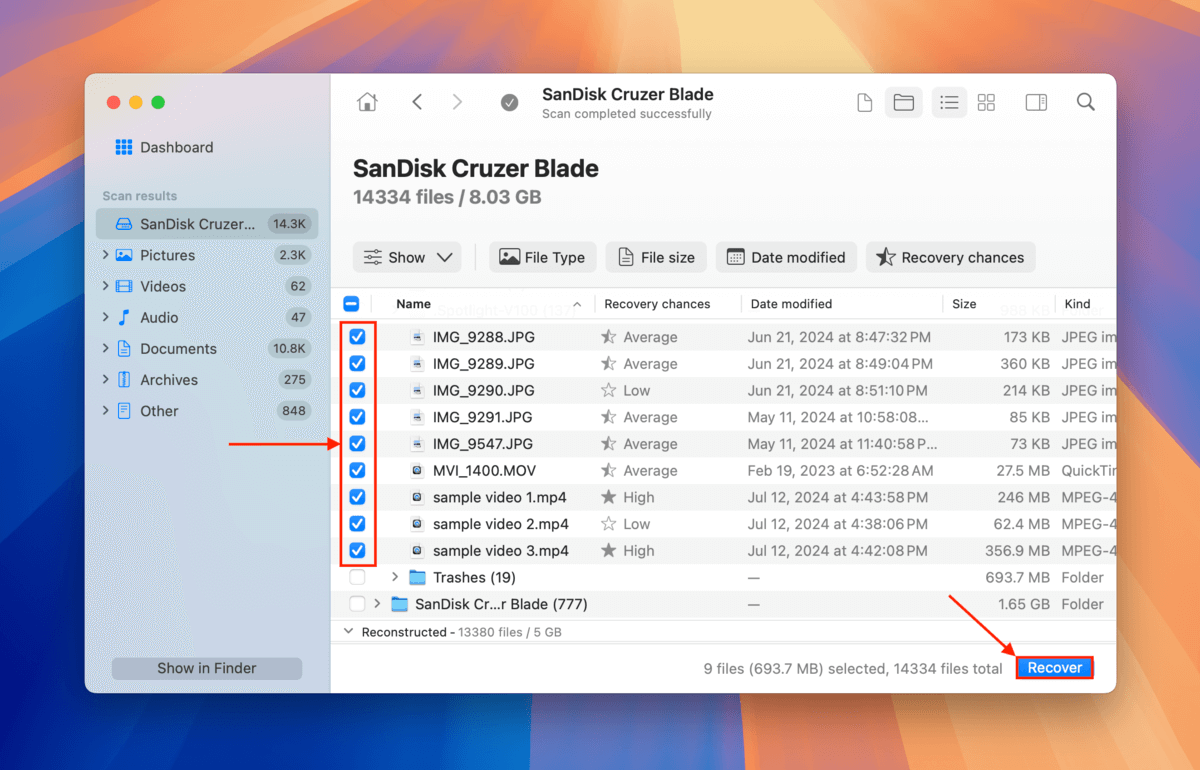
Step 6. After previewing your files, mark the boxes beside the files and folders you want to restore. Then click the Recover button.
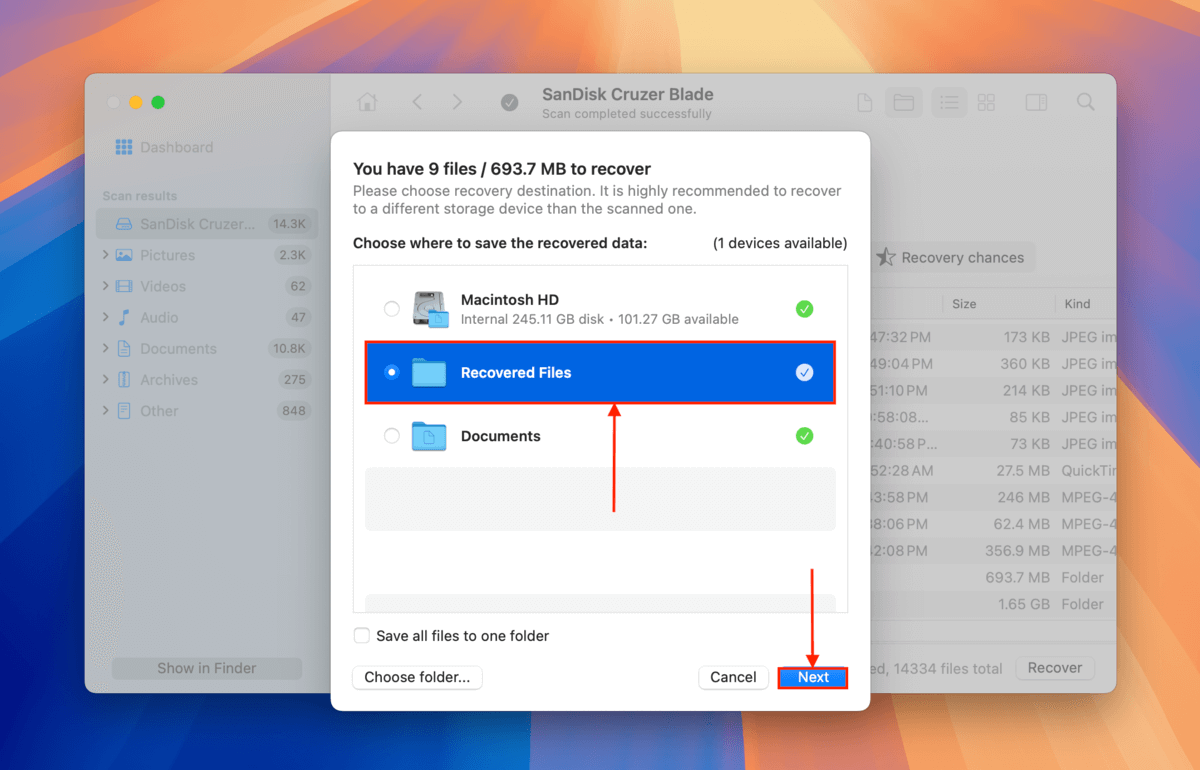
Step 7. Choose a folder on your Mac (not on the USB drive) where you want Disk Drill to save the files it recovered. Finally, click Next.
Disk Drill will display a completion message once it’s done saving all the files you selected in step 6. You’ll find them in the location you selected in step 7.
Before You Go, Take These FAT32 USB Health Tips With You
FAT32 is still a robust and highly compatible file system format. However, it’s prone to corruption and data loss and has its own share of weaknesses – just like any file system format. Here are a few tips to keep your new FAT32 USB in top shape for as long as possible.
First, avoid transferring files larger than 4 GB in size – due to FAT32’s 4 GB file size limit, this may eventually lead to corruption. Second, always safely eject your USB to ensure that all read and write processes are concluded properly. Finally, avoid storing highly sensitive files and scan your USB for viruses regularly – FAT32 lacks certain encryption and security features, making it more vulnerable than its other file system counterparts (e.g. ExFAT).
FAQ
- Use Disk Utility’s “Erase” feature.
- On Terminal, identify your disk using the following command:
diskutil list
Then, type the following command and press enter:
sudo diskutil eraseDisk FAT 32 MBRFormat LEXUSB /dev/disk4
Change “LEXUSB” to what you want to name your hard drive, and change “/dev/disk/4” to your drive’s disk name.


