
Need to reclaim storage space without deleting any of your files or apps? iOS has several data management features that can help you achieve this–however, not all of them are easily accessible or even obvious to the average user. Some of them are embedded system processes that can sometimes get stuck, causing junk data to accumulate.
This article is a comprehensive guide on the 7 best ways to free up space on your iPhone without deleting any of your files, using native features and third-party apps.
Table of Contents
Non-User Data That Affects iOS Storage (That We Can Clean)
User files aren’t the only “space invaders” on your iPhone. There are gigabytes worth of useless non-user data (including temporary background processes) eating up your storage at any given time, especially if your device is loaded up with apps. Cleaning them up does not require you to delete specific files most of the time.
And if you really don’t want to get rid of anything, iOS still provides several built-in features and functionality choices that can help use storage space more efficiently. Specifically, here are components of iOS that provide ample opportunities for space saving:
- Caches. iOS uses temporary storage areas—called caches—to keep certain files readily available in case an app or process needs them. Users typically never interact with cache files directly and they can often stay past their usefulness. Purging them can reclaim gigabytes worth of storage space.
- Built-in optimization features. iOS provides multiple built-in features to maximize local storage space without having to sacrifice user files or even file accessibility.
- App sandboxes. Apps operate within their own sandboxes—they manage their data and caches independently. Some apps bloat their caches more than others and require manual cleaning.
- System data. This includes system files such as caches, error logs, and other iOS-specific data that users don’t interact with. iOS is already pretty good at managing its own system data, but you can manually initiate the process using different tools.
7 Ways to Free Up Storage Without Deleting Your Files
In this section, we’ll cover 7 ways to free up storage space on your iPhone without deleting a single user file or getting rid of data you actively use. You can pick and choose which methods best suit your needs, but you can also do all of them to ensure you maximize your storage space to the fullest.
Method 1: Utilize iCloud Optimization Settings
The absolute best way to clear space on your iPhone easily without deleting ANY file is to utilize iCloud’s built-in optimization settings.
This feature is most powerful when enabled for the Photos app. In a nutshell, iCloud’s optimization feature for Photos allows you to store the high-resolution versions of your images in the cloud.
Only low-resolution copies will be stored locally (which still look very high-quality), which can save dozens of gigabytes in storage space if you take a lot of photos and videos.
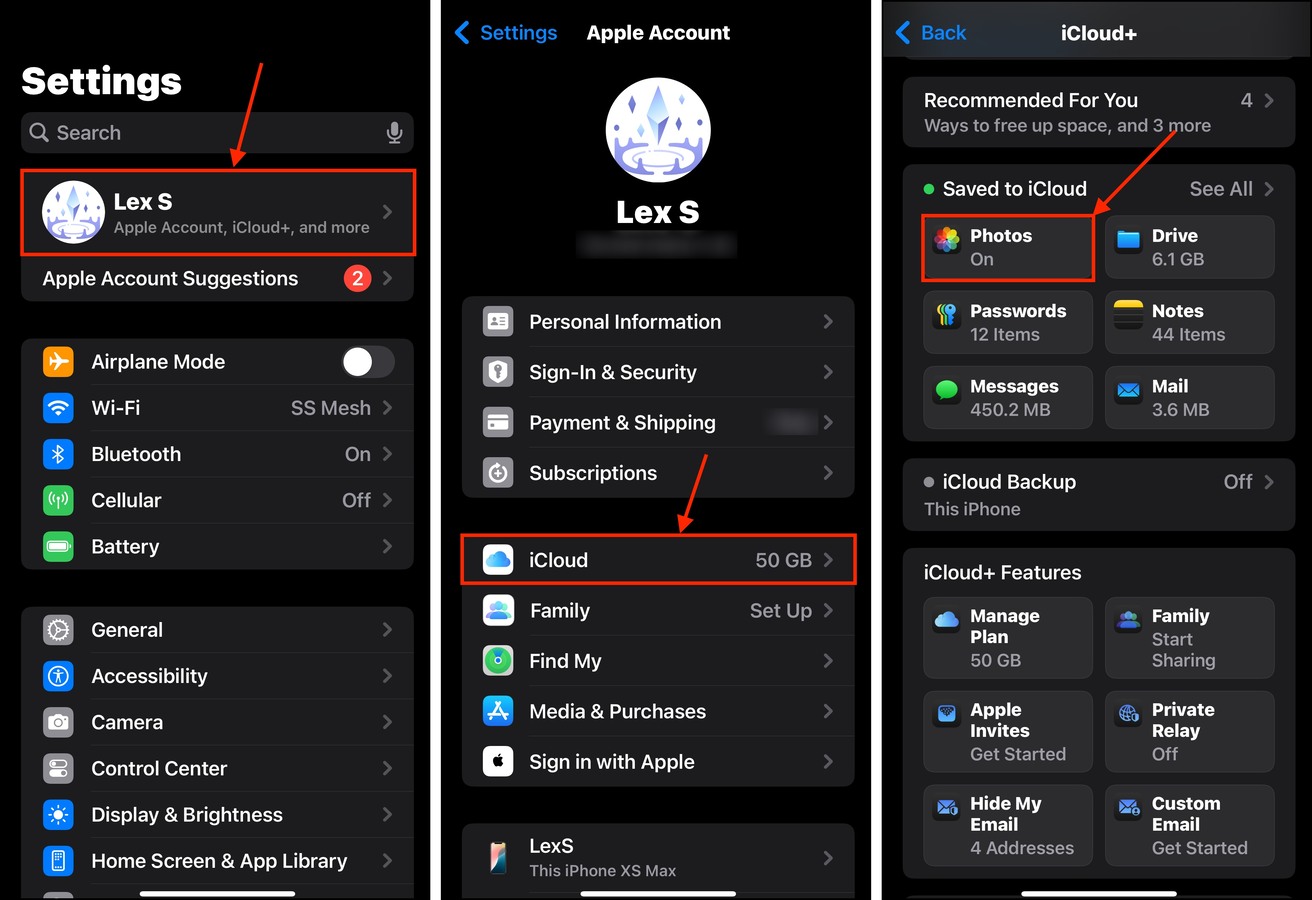
Step 1. Open the Settings app. Tap your Apple ID at the top of the menu.
Step 2. In the Apple Account menu, tap iCloud.
Step 3. Tap the data you want to manage. For this demonstration, we’ll choose Photos.
Step 4. Activate the toggle button beside the Sync this iPhone setting. Then, tap Optimize iPhone Storage to enable the optimization feature.
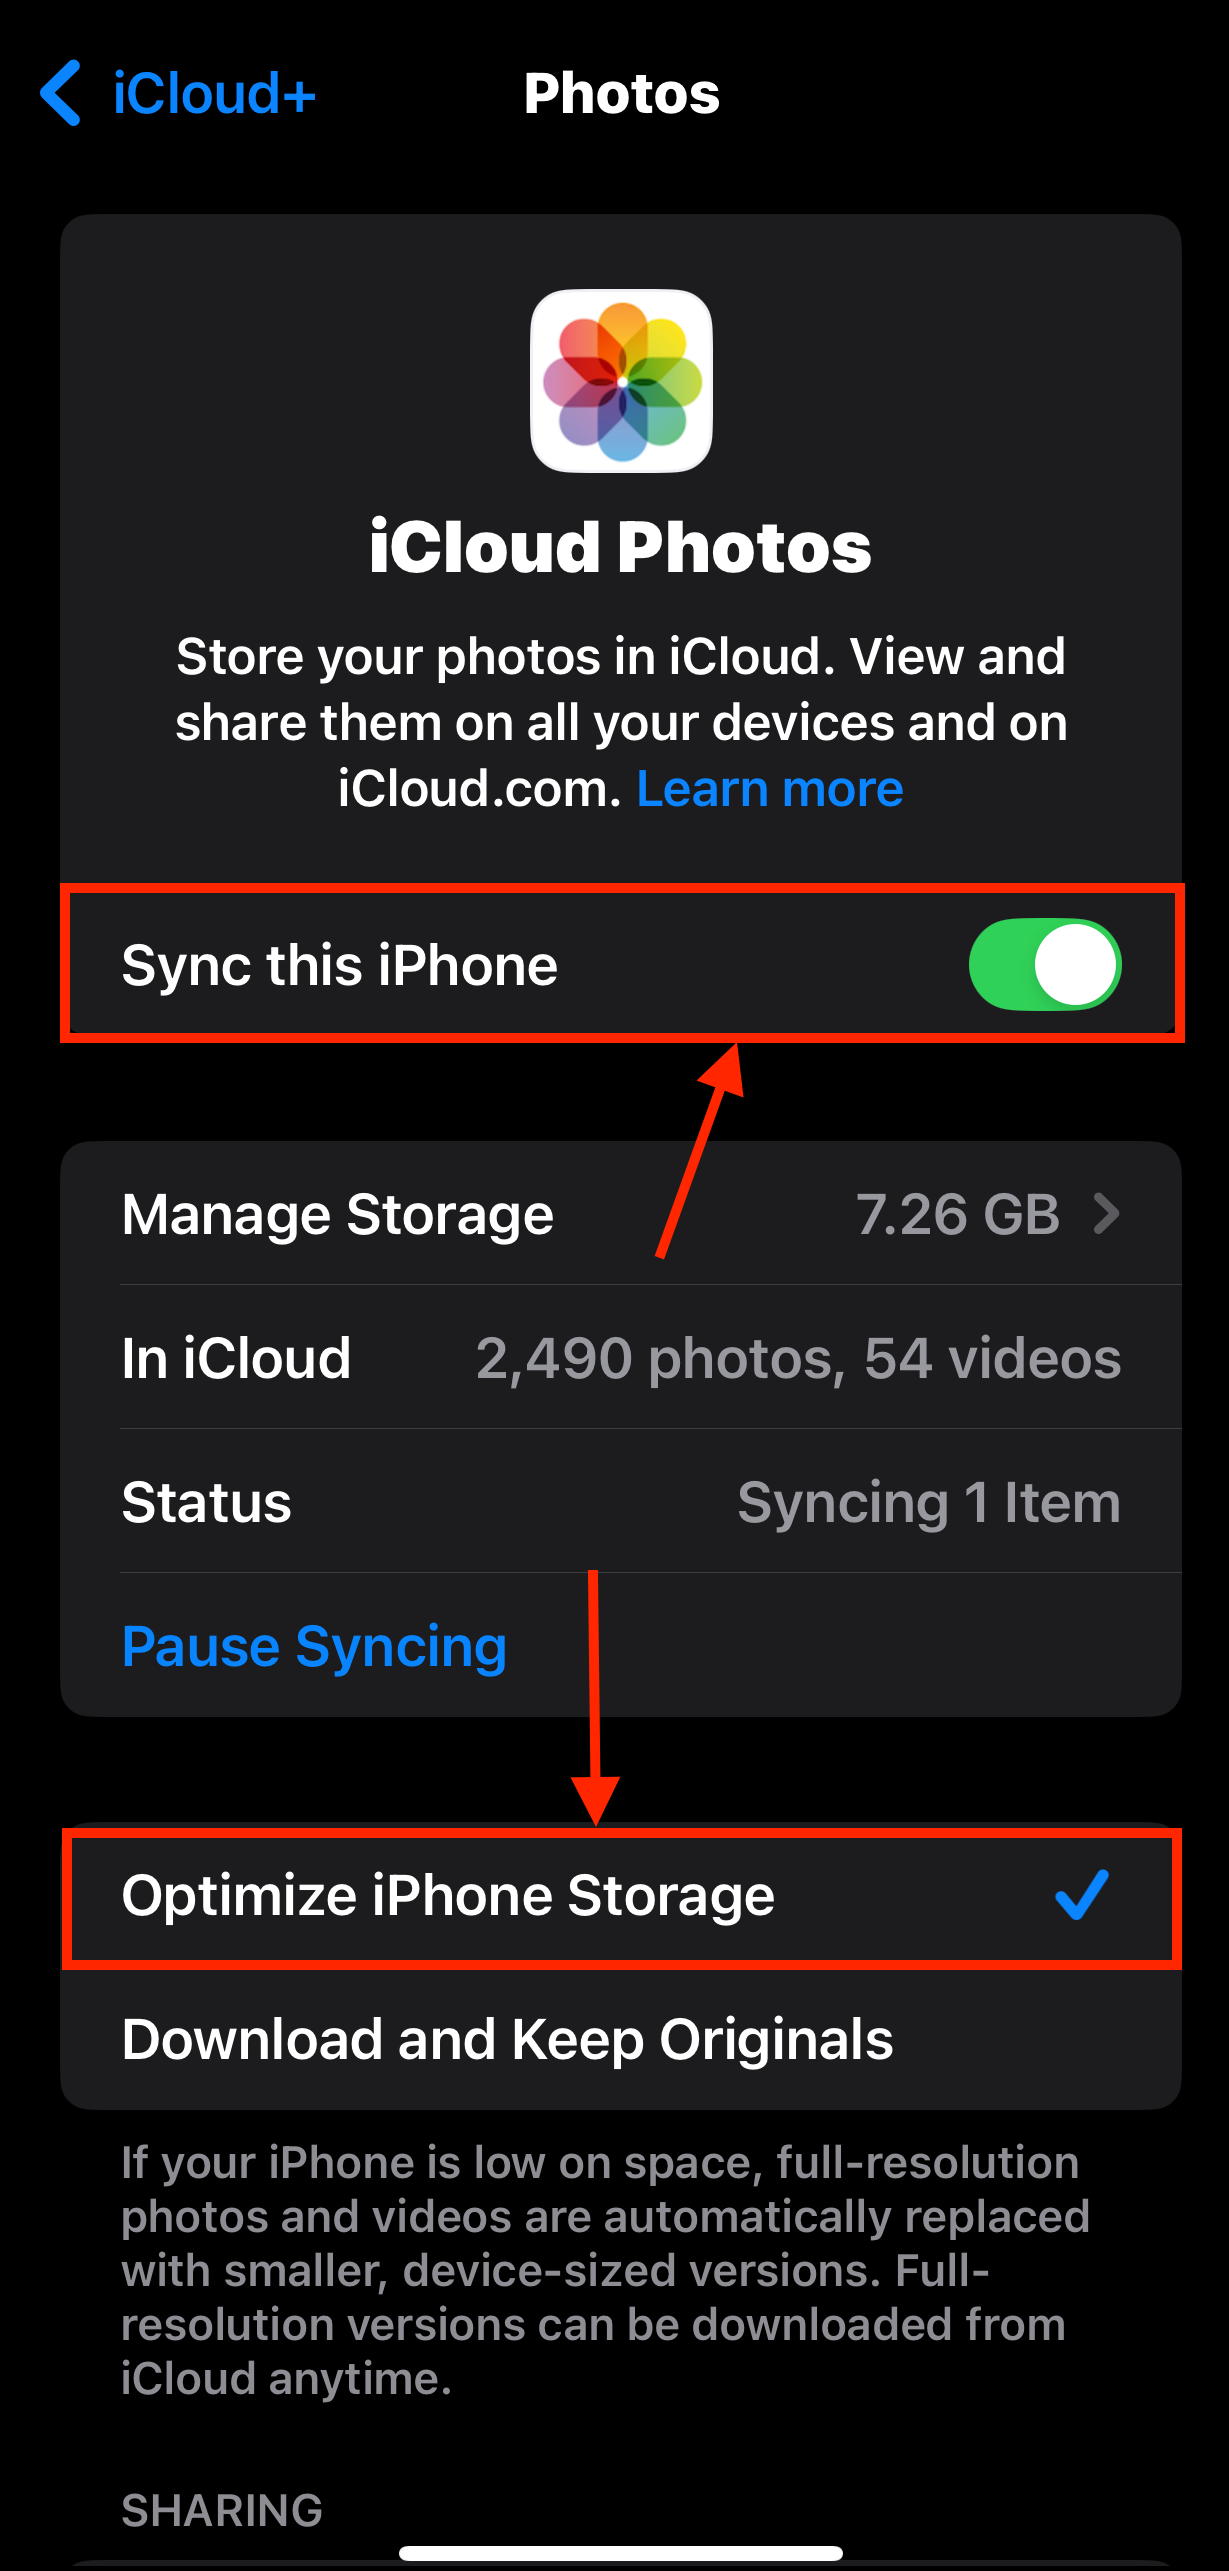
Set down your phone for an hour or more, depending on how many photos you have. Make sure it has a sufficient battery charge so it can finish all necessary processes while freeing up space on your iPhone.
Method 2: Clear Browser Caches
Browser caches operate the same way general caches do—users never interact with them directly. They store temporary files to help load websites faster; a common example is high-resolution banner photos from recently visited pages.
This data can add up over time if Safari fails to purge the cache for some reason, and it may even keep temporary files for websites you haven’t visited in months (and don’t plan on returning to). This method can quickly free up memory on your iPhone–several gigabytes worth.
Step 1. Open the Settings app. Scroll to the bottom and tap Apps.
Step 2. Locate Safari on the list and tap it.
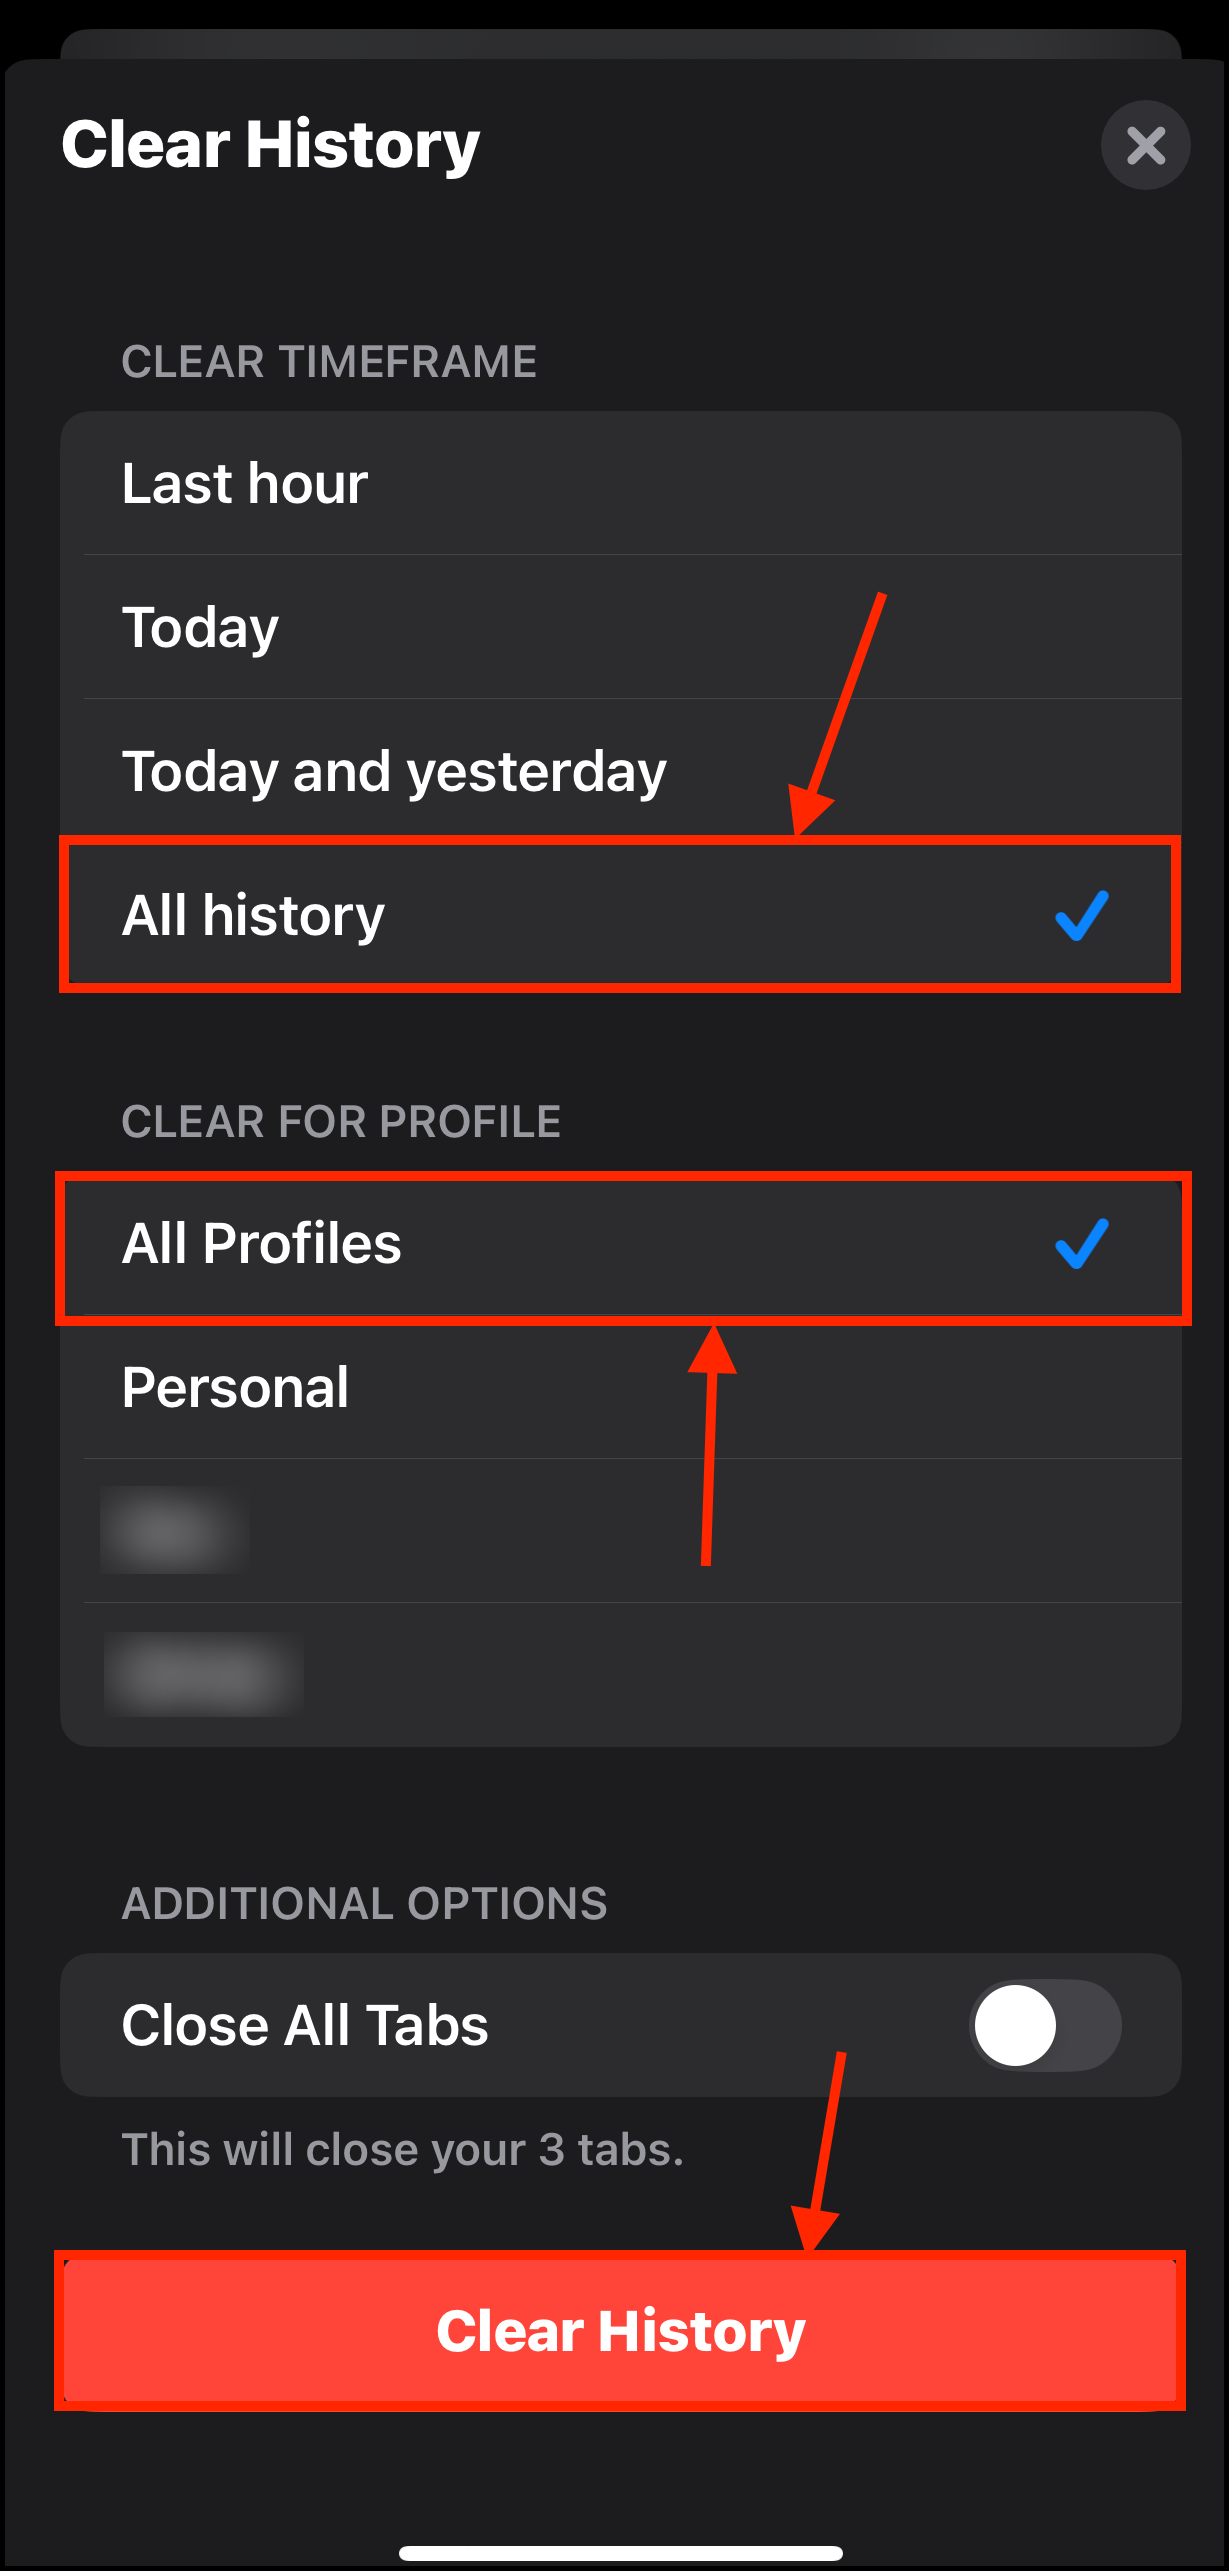
Step 3. Scroll down to the HISTORY AND WEBSITE DATA section. Tap Clear History and Website Data.

Step 4. Select a timeframe and the profile of the cached data you want to delete. If you want to clear everything, tap All history and All Profiles. Finally, tap Clear History.
Method 3: Remove Downloaded Media
Many media apps allow you to download files locally so you can view them offline. Some of them even do so automatically (or have a setting that allows it). Plus, it’s easy to forget to delete the media you’ve downloaded.
Removing downloaded media from your iPhone won’t prevent you from streaming them, as long as you have a network connection.
Step 1. Open the app with the downloaded media you want to review.
Step 2. Tap the library, playlist, or downloads button, usually located in a menu at the bottom of the screen.
Step 3. Remove the downloaded media file from the app.
Step 4. Confirm when prompted.
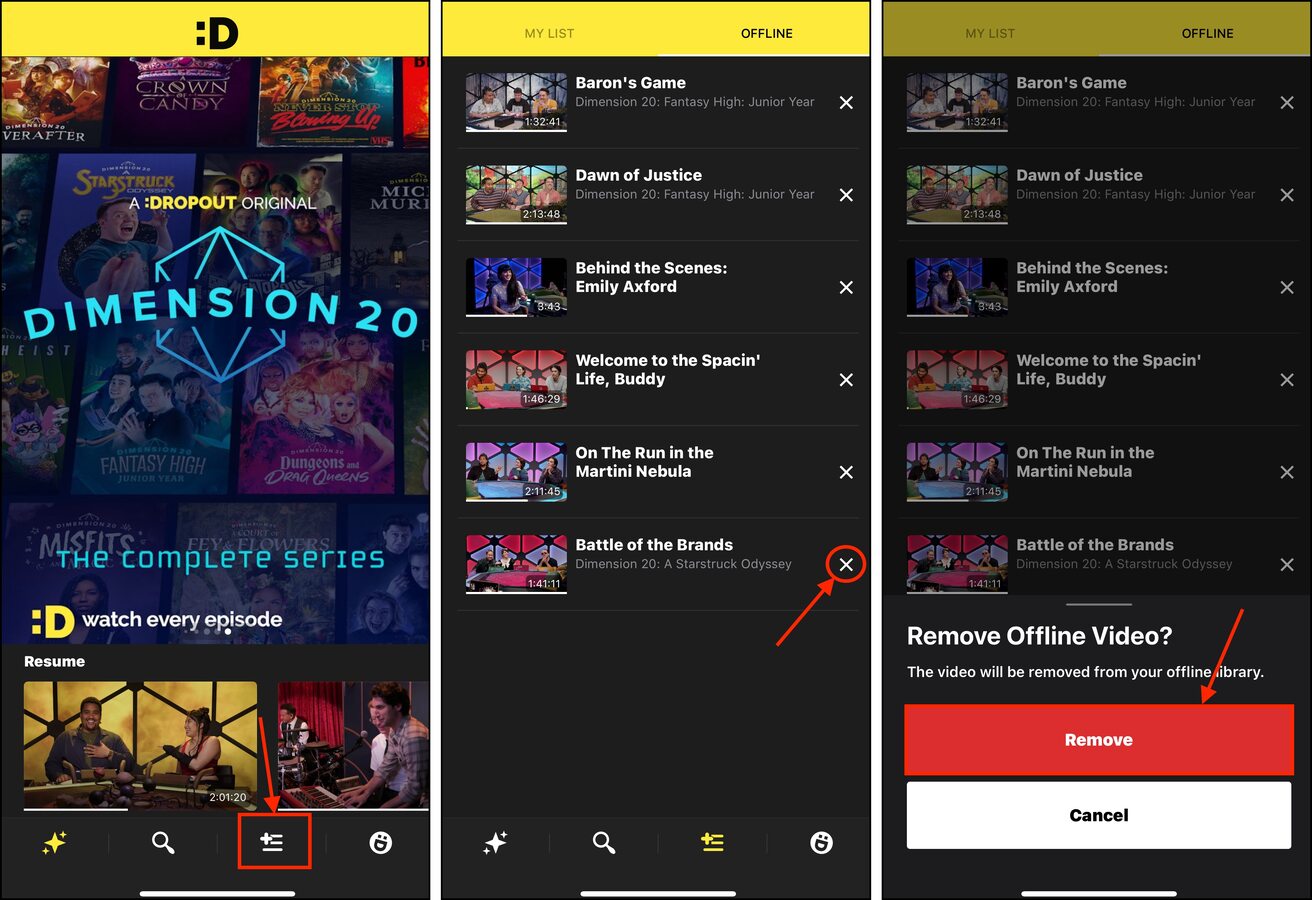
Different apps will have various interfaces, but the functionality largely remains the same.
Method 4: Clean Up System Data
System data is a collection of iOS files and temp data. You won’t interact with any of them, and if iOS does not need those files, they are taking up storage space unnecessarily.
While iOS does its best to manage system data, files can fall through the cracks. If you accumulate enough of them, you can lose gigabytes worth of useless data. Here’s how to purge it safely.
- Restart Your iPhone. Restarting your iPhone can clear temporary data being used for background processes. This can help if you haven’t restarted your iPhone in a while and you’ve installed multiple apps with less-than-optimal memory management.
- Manually initiate device cache cleaning. You can start iOS’ self-purge sequence by attempting to capture a ProRes video. Your iPhone will anticipate the need for more space and will start clearing up its caches.
- Update iOS. iOS updates can deliver bug repairs and performance enhancements; these can fix errors and improve functionality related to iOS’ ability to manage its storage and cache data
Method 5: Utilize Optimization Features From Other Cloud Storage Services
If you use other cloud storage services, they may also have an optimization feature that works on your iPhone. This can be a good option if you utilize iCloud for other data, such as app files (e.g. GarageBand songs).
- Dropbox. Dropbox offers 2 GB of free storage space and allows you to upload high-resolution copies of your photos to the cloud while keeping low-resolution copies on your device.
- Google One. Google One offers 15 GB of free storage space which works across the entire suite, including Google Photos. Google Photos and Google One also allow you to upload high-resolution copies of your library, while keeping low-resolution photos in your local storage.
Method 6: Manage Your iPhone’s Data Clutter
It’s possible that you still have clutter data on your iPhone that you no longer need. A good example is duplicate photos; you may have several similar images on your device that iOS failed to identify as duplicates.
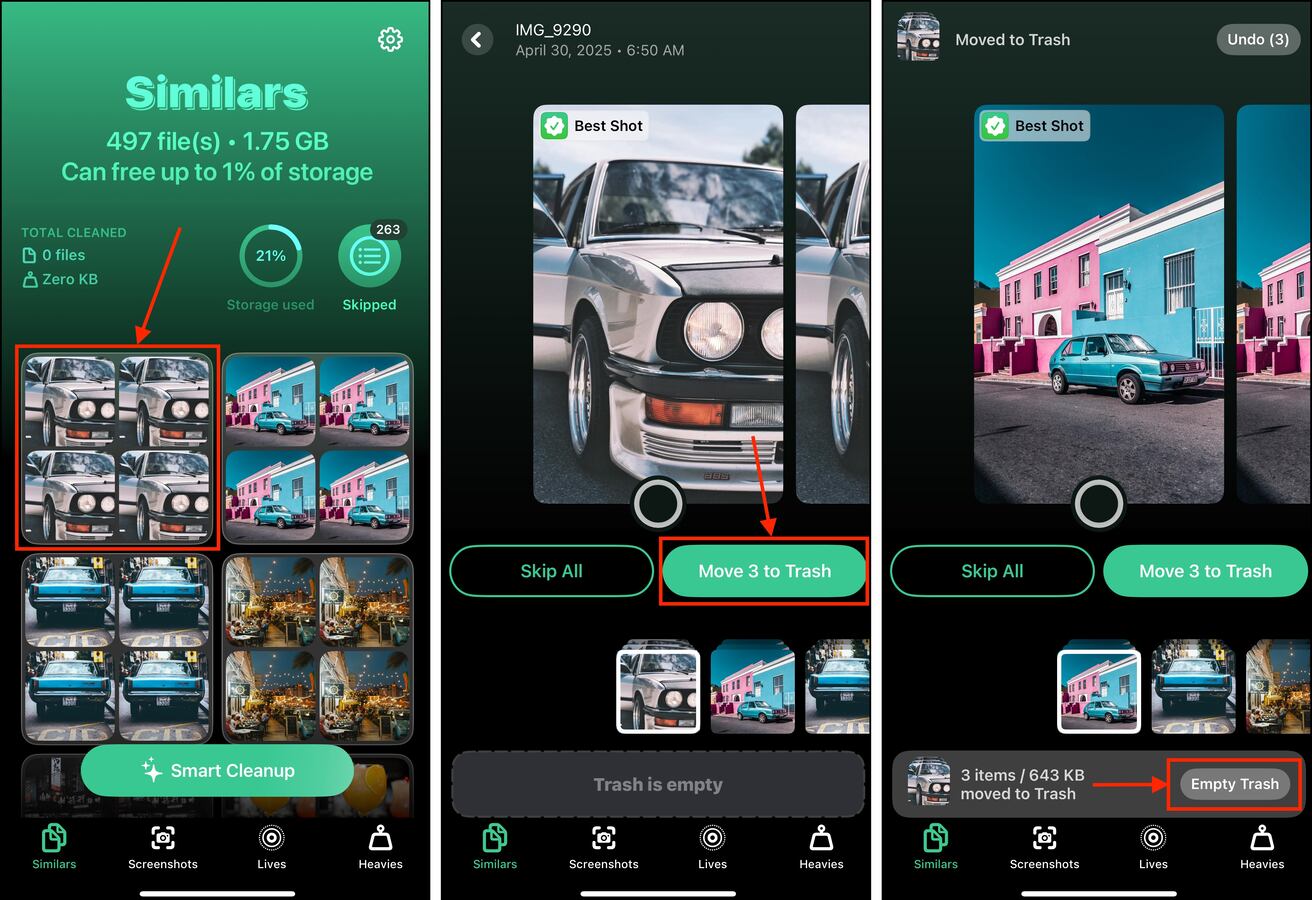
We recommend using third-party cleaner apps just to make sure every byte of your iPhone’s storage is being used with intention. For this guide, we’ll be using Clever Cleaner: AI Cleanup App. It’s 100% free with zero ads and you can use all of its features without limits. It can easily find the aforementioned similar photos that the Photos app misses, along with all your Live photos, screenshots, and “Heavies” (media files with the largest file size).
Here’s a quick demo:
Step 1. Download Clever Cleaner: AI Cleanup App from the App Store and allow it Full Access to your photo library. Then, tap a set of similars you want to view.
Step 2. Clever Cleaner will automatically select the best shot for you and select the rest for deletion. Tap Move to Trash.
Step 3. When the prompt appears at the bottom, tap Empty Trash to confirm the action.
Method 7: Reinstall Bloated Apps
Apps not only take up free space on your iPhone as software, but they also accumulate cache data that can add up over time. Sometimes, these temporary files linger in your storage past their necessity.
They can take up a lot of space without you ever interacting with them again. Deleting an app from your iPhone clears all of its data, including any temporary files in the cache. When you reinstall
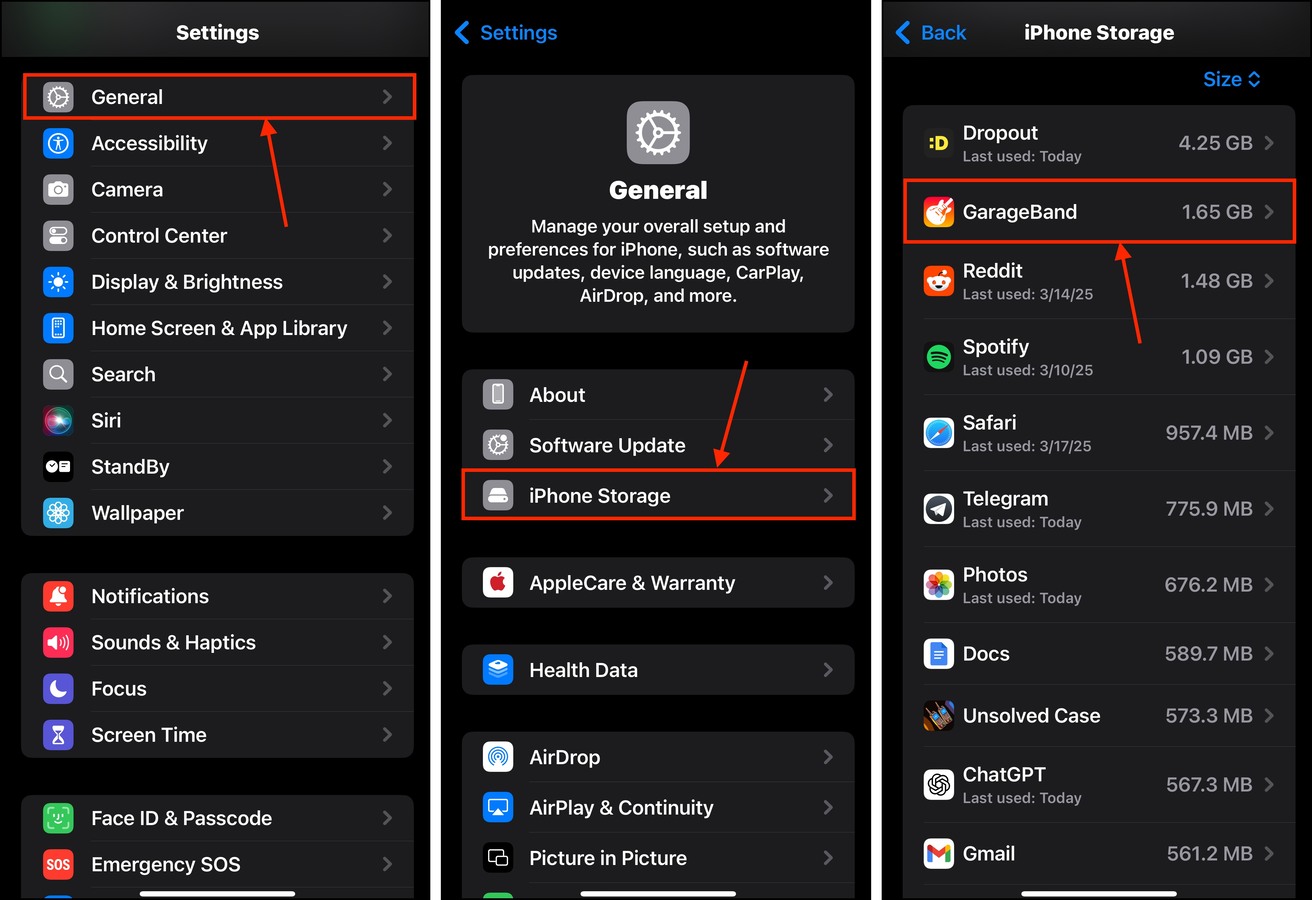
Step 1. Open the Settings app.
Step 2. Tap General > iPhone Storage.
Step 3. Scroll down to your list of apps. Tap one you want to offload or delete—ideally, pick the ones at the top (largest file size).
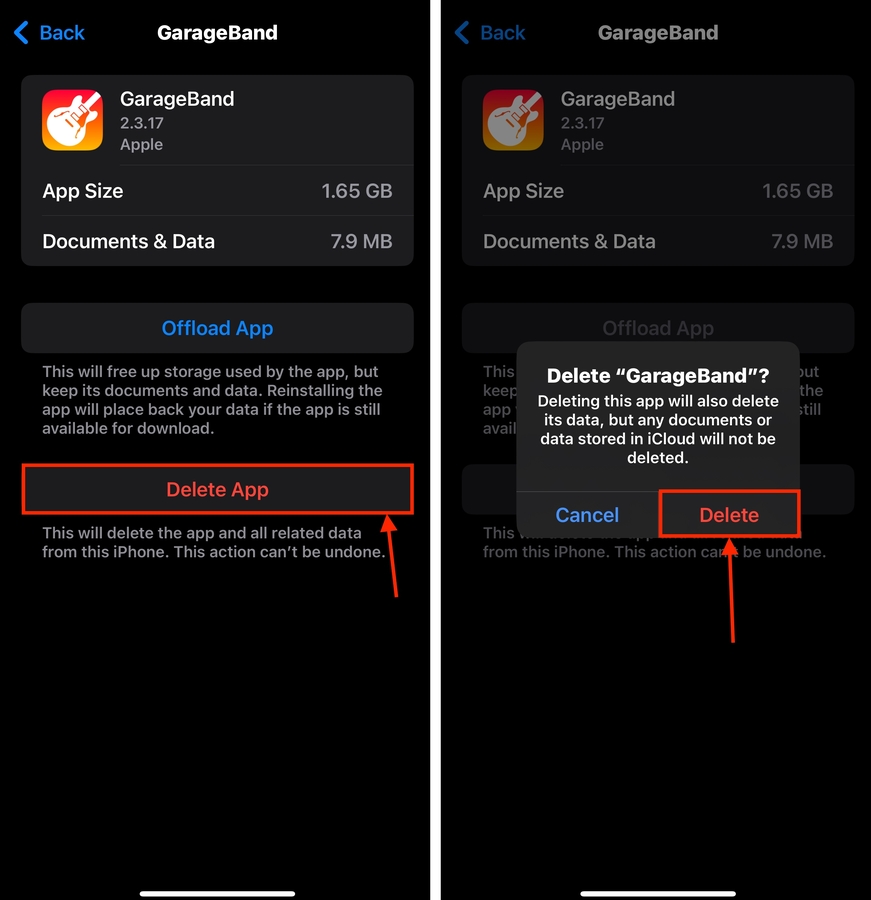
Step 4. Tap Offload App or Delete App.
Step 5. Confirm either action when prompted with the confirmation pop-up.
Try to offload and reinstall as many apps as you can to get rid of as much cache data as possible.
Tips to Avoid Storage Space Build-Up
Even if you’re mindful of your storage habits, it can be tough to reliably predict iOS’ storage management functionality. Sometimes it works flawlessly, sometimes it doesn’t. However, there are a few ways you can keep your device as lean as possible.
First, be more critical about installing apps. Even if they work well, some apps don’t have optimal memory management functionality. This can blow up your storage space easily. Second, consider investing in higher-tiered iCloud storage options if you take a lot of high-res photos and videos.
Finally, back up your device often. If you keep your iPhone long enough, you’ll have to factory reset it eventually to keep it running fast. Some bugs or existing consequences on your storage space just aren’t reversible by updates. Keeping an updated backup ensures you can clean up your device anytime.


