
There are a few good reasons to clear system data on an iPhone and iPad. You can free up storage space, optimize performance, resolve software issues, enhance battery life, improve system stability, and more. And you won’t even be losing anything – most of what you’ll be clearing out is junk or redundant data.
But there is more than one way to delete system data on an iPhone and iPad. We’ll cover them all in this article. Read on!
Table of Contents
What is System Data on iPhone and iPad Storage
System data on iPhone or iPad storage refers to various files and data that the operating system needs to function properly. They typically include your device’s system files, caches, log files, firmware, diagnostic data, and other similar backend components.
System files are usually put to work in the background and are not directly accessible or viewable by users (by design). But you can get an idea of how much storage is taken up by system data. We’ll show you how.
To view system data on your iPhone or iPad:
Step 1. Open the Settings app on your iPhone or iPad. Then, scroll down and tap General.
Step 2. Tap iPhone/iPad Storage.

Step 3. Note the System Data section. It shows the amount of storage used up by system data. As you decrease the system data on your iPhone using the methods we outline below, that change will also be reflected in the menu.

Why is System Data So High on iPhone or iPad
System data on your iPhone or iPad is made up of important files that keep your iPhone operational. It can be frustrating to see system files eat up a huge chunk of your storage space, but they keep your device running and are actually designed to make life easier for you.
To better understand how iOS uses your storage space for its own use, here are the most notorious “space invaders” and the role they play on your device:
| Type of data | Description |
| 📲 iOS updates | iOS updates take up a lot of storage space due to new features and enhancements, additional asset libraries and resources, and even bug fixes and improvements. Most of these actions require adding more files to the system, which your device has to accommodate. |
| 🗃️ Cache and temporary files | Cache and temporary files can reach several gigabytes in size under certain circumstances. A good example is your browser cache storing high-definition headers from a frequently visited website in order to load its pages faster. |
| 🗄️ Logs and diagnostic data | Depending on your settings, iOS may be collecting various logs and diagnostic data in order to troubleshoot issues and/or send them to Apple for feedback. Logs don’t take up much space on their own but can quickly add up. |
| 🧩 Pre-installed apps | While not strictly considered “system data”, the pre-installed apps on your iPhone or iPad (e.g. Messages) take up storage space just like any other app. |
| 👾 Software bugs and memory leaks | Some apps have bugs or lack optimization, leading to memory leaks or bugs. For example, some apps might be caching too much data unnecessarily (or fail to delete expired cache data). |
How to Clear System Data on iPhone or iPad
In this section, we cover 9 different ways to clear System Data on an iPhone or iPad. While some methods resolve specific issues, we recommend using several of them. iOS does its best to manage storage space autonomously, but System Data clutter comes from various sources… So, cover as much ground as you can!
Method 1: Restart Your iPhone or iPad
Restarting your device can quickly clear temporary caches and processes that may be contributing to System Data bloat. There are few situations where this provides a permanent fix, but it’s easy and harmless.
If your System Data expanded in size only recently, you may be using an app that doesn’t manage its processes or memory properly. Restarting your device takes care of that momentarily.
Step 1. Open the Settings app and tap General.
Step 2. Scroll down to the bottom of the menu and tap Shut Down.
Step 3. Drag the slider to the right to confirm shutdown. Once your iPhone or iPad has fully shut down, press the lock button to boot it up again.

Observe whether opening certain apps bloats your System Data again. You may want to Offload or Delete them (Method 3).
Method 2: Check for iOS Updates
There are several types of bugs that can cause System Data bloat. For example, some bugs can prevent iOS from automatically clearing expired cache data. Others cause iOS to log system events excessively, which accumulate as data.
iOS updates often come with bug fixes that address these issues and allow your device to properly regulate its System Data (like it’s designed to do).
Step 1. Open the Settings app and tap General.
Step 2. Tap Software Update.
Step 3. If an iOS update is available, you’ll be able to download and install it directly from this menu.

iOS can usually handle the entire update process by itself without any user input. Just keep your iPhone or iPad charged during the update process to avoid data corruption due to sudden shutdown.
Method 3: Offload or Delete Seldom-Used Apps
This method can help you swiftly cut down on System Data in two major ways. First, it gets rid of app-related cache files that may have been categorized by iOS as System Data. Second, it gives you a chance to review your apps carefully. You may have installed one that lacks optimizations to prevent memory leaks or unnecessary background processes.
You have two options: Offload or Delete. Offloading an app deletes the software itself but keeps your user data (which shouldn’t take up much space if the app was properly designed). Deleting an app gets rid of everything. We recommend deleting and reinstalling apps if you don’t need the user data or if it’s saved in the cloud.
Step 1. Open the Settings app and tap General.
Step 2. Tap iPhone Storage.
Step 3. Scroll down; you’ll see a list of apps on your device in order of file size. Tap one that you want to offload or delete.

Step 4. In the app’s storage menu, tap either Offload App or Delete App depending on what you want to do.
Step 5. Tap Offload App or Delete App again to confirm.

Repeat this process until you’ve cleared up enough System Data or eliminated the cause of the bloat.
Method 4: Clear Your iPhone or iPad’s Browser Cache
If you want to reduce system data on your iPhone or iPad, your device’s browser cache/s should be the first to go. Browser caches can easily bloat up your iOS system data size as they sometimes save heavy assets like high-resolution images.
By saving these assets locally, your device can open websites much quicker. However, there are scenarios where browser caches store assets from websites that you don’t visit anymore. In this case, your iPhone system data is huge but you don’t even need any of its files.
The process varies only slightly depending on which browser you’re using. We only covered Safari and Google Chrome, but you should be able to follow along with most mainstream browsers.
To clear browser cache using Safari:
Step 1. Open the Settings app. Then, scroll down and tap Apps.
Step 2. Find and tap Safari.
Step 3. Tap Clear History and Website Data and confirm the action when prompted.

To clear browser cache using Google Chrome:
Step 1. Open the Chrome app. Then, tap on the meatball menu in the bottom-right corner of the screen.
Step 2. Tap History.
Step 3. Tap Clear Browsing Data…

You can clean up Cookies, Site Data, and Cached Images and Files.
Method 5: Trigger Cache Clearing by Shooting a ProRes Video (iPhones Only)
A neat trick to harness iOS’ own features against it is to capture ProRes footage. ProRes is a proprietary video format developed by Apple that you can enable for your iPhone’s camera.
Due to its ultra high quality, ProRes video files take up a lot of storage space. So, when you attempt to capture ProRes videos, iOS anticipates that your device will need space to store the videos and optimizes accordingly.
Step 1. Open the Settings app and tap Camera.
Step 2. In the Camera menu, tap Formats.
Step 3. If you have the option, activate the toggle switch beside the Apple ProRes setting to turn it on.
Step 4. Once Apple Pro Res is enabled, open your device’s camera and choose the VIDEO option at the bottom. Then, tap the ProRes HDR button to turn it on.
Step 5. When you activate ProRes mode, iOS will start clearing your cache to preemptively make space for the “video.”
Once the purge is initiated, you should see text that says Freeing Resources at the top of your screen, following an indicator for the time left until the purge is complete.
Method 6: Force Cache Expiration by Changing the Date
Most cache data will expire, even if iOS missed certain files during an earlier purge. This method allows you to jump forward to the expiration date so iOS clears up the “expired” cache files.
This can eliminate tens of wasted gigabytes made up of months-old accumulated cache data. However, note that many apps and processes rely on your device’s time and date settings. Make sure to follow the initial steps carefully and back up your data just in case.
Step 1. Disable WiFi and Bluetooth on your device. Then, turn on Airplane Mode.
Step 2. Open the Settings app and tap General.
Step 3. Tap Date & Time.
Step 4. Deactivate the toggle switch beside Set Automatically. Then, tap the current date and set it to sometime 1 year ahead from today.

After setting the date, let iOS run the cache purge processes in the background, but try to keep your device awake; tap an empty space on the screen occasionally or check every minute or so if your System Data shrinks.
Allow it to purge until your System Data stops shrinking.
Method 7: Reset Network Settings
Another way to clear system data on an iPad or iPhone is to reset the device’s Network Settings. It can be beneficial for several reasons – you can free up storage space (though minimal), troubleshoot network issues, improve network stability, and more.
To reduce system data on your iPhone or iPad by resetting its Network Settings:
Step 1. Open the Settings app. Then, scroll down the pagel under Settings and tap General.
Step 2. Scroll down to the bottom of the page and tap Transfer or Reset iPhone/iPad.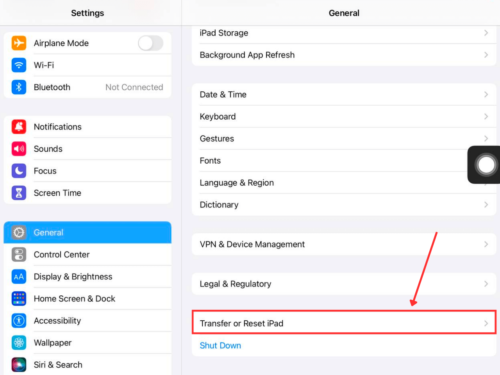
Step 3. Tap Reset at the bottom of the page.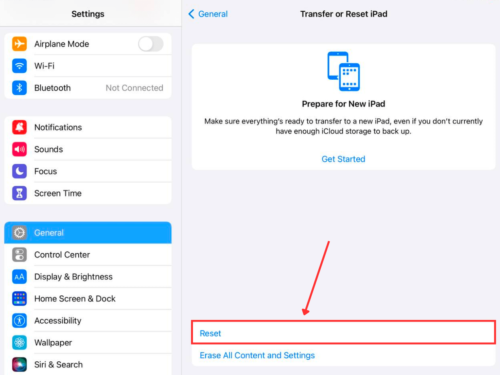
Step 4. Tap Reset Network Settings and enter your passcode (if you have one) to confirm the action.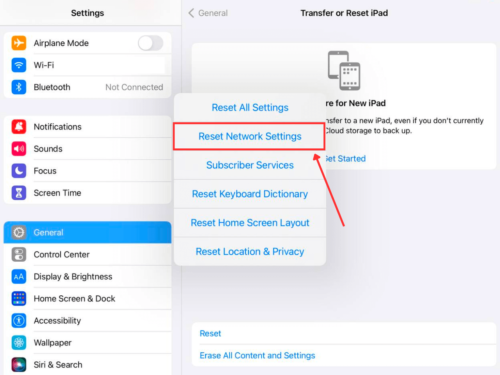
Method 8: Reset All Settings on Your Device
Resetting all the settings on your iPhone or iPad is a great catch-all troubleshooting step that can resolve software-related issues like crashes and other abnormal behavior. It can also fix conflicts in your settings that have built up over time.
It basically resets everything to default EXCEPT your data, which remains 100% intact.
To erase the system data on your iPhone or iPad by resetting all settings:
Step 1. Open the Settings app. Then, scroll down the page under Settings and tap General.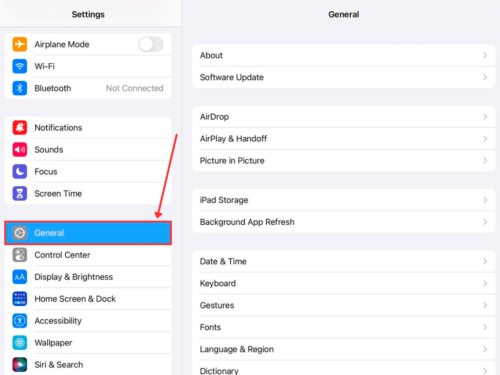
Step 2. Scroll down to the bottom of the page and tap Transfer or Reset iPhone/iPad.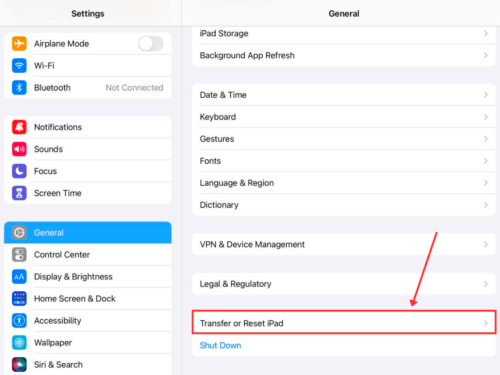
Step 3. Tap Reset at the bottom of the page.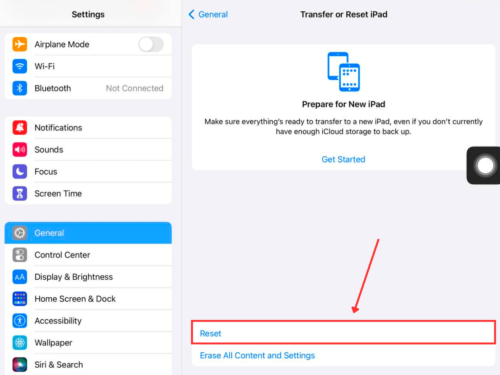
Step 4. Tap Reset All Settings and enter your passcode (if you have one) to confirm the action.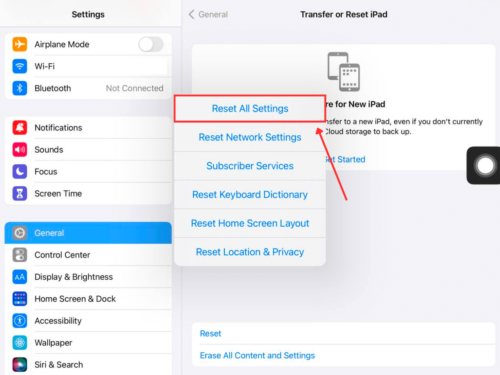
Method 9: Factory Reset Your iPhone or iPad
Method 4 is the most comprehensive way of clearing system data on an iPhone or iPad (as well as all other data). It completely wipes everything from the device, including any persistent issues or malware or viruses that may be affecting its performance. Junk files, of course, aren’t spared.
To free up system data on your iPhone or iPad by performing a factory reset:
Step 1. Open the Settings app. Then, scroll down the pagel under Settings and tap General.
Step 2. Scroll down to the bottom of the page and tap Transfer or Reset iPhone/iPad.
Step 3. Tap Erase All Content and Settings at the bottom of the page. When prompted, confirm the data that will be deleted and tap Continue.

Follow the wizard to proceed with resetting your iPhone or iPad. Your device will reboot a few times – make sure it’s plugged into a wall adapter until the process is complete.
How to Effectively Manage System Data
If you find yourself urgently needing to clear system storage on an iPhone or iPad, your device hasn’t been running in optimal condition. Otherwise, iOS’ housekeeping should have been able to handle it (iOS tries to automatically delete system data taking up space when it thinks it needs to).
To avoid this situation in the future, here are some easy tips to help you maintain your device system’s data hygiene:
- Keep your device updated. iOS updates usually include performance improvements and bug fixes. The latest iOS versions are much better at managing system data on your behalf.
- Regularly clear your browser caches. Your browser caches can build up quickly with loads of data you might never need. iOS tries its best to do some housekeeping, but manually clearing your device’s caches will go a long way.
- Monitor storage usage. Checking your storage usage from time to time will help you get ahead of potential build up.
- Avoid sketchy Profiles. Profiles have their own configurations of settings, restrictions, and features that can be applied to your device (e.g. by a school or organization). Make sure you trust the Profile!
- Regularly backup and Factory Reset your device. This may sound counterintuitive to “avoiding” having to clean up your device. However, Factory Reset is a great way to maintain device hygiene especially after it goes through multiple iOS updates. Just make sure to back up your data first!
Tips to Keep System Data as Low as Possible
System Data bloat is twice as frustrating because it’s (mostly) out of your control. Fortunately, there are a few storage hygiene practices you can apply to avoid speedy accumulation as much as possible.
First, be mindful of the apps you install on your device – make sure they’re well-developed (check user reviews, online reviews, etc.). Second, keep iOS updated; the risk of System Data bloat never really goes away, and Apple continues to develop better ways of managing it. Finally, try to keep ample free storage space at all times to help iOS manage its caches more efficiently.
FAQ
To clear system data on your iPhone without resetting, you have 2 options:
- Clear your iPhone’s browser cache. For Safari, open the Settings app > Safari > Clear History and Website data. For Chrome, open the Chrome app > 3 dots > History > Clear Browsing Data.
- Reset your iPhone’s Network Settings. Open the Settings app > General > Transfer or Reset iPhone/iPad.
You can also Reset All Settings without erasing any data. You can find this option in the same menu where you can reset your iPhone’s Network Settings.
Clearing your iPhone’s cache won’t delete any of your personal data, aside from saved passwords and other account details in your browsers. When you remove system data from your iPhone, It will mostly delete junk or redundant files. You can safely:
- Delete app caches
- Delete browser caches
- Reset your iPhone’s Network Settings
- Reset All Settings on your iPhone (NOT “Erase All
- Content and Settings)


