
Yes, there are cases where you delete everything you possibly can… But your iPhone storage won’t budge. However, this is usually due to a bug or some oversight. Fortunately, this problem is 100% solvable if you know the right methods!
That’s where we come in.
Here is the ultimate guide to the mystery of the unmoving iPhone storage. Below, we briefly explain all the possible reasons why your iPhone is still full even after deleting as much of your data as possible–and most importantly, how to fix it.
Table of Contents
What Causes iOS Storage to Appear Full After Deleting Everything
There are several potential reasons why your iPhone storage continues to appear full even if you just deleted a lot of data from your device. These range from iOS issues to files you might have missed or can’t directly access. Here’s a quick breakdown:
- Software bugs or delays: To reflect your device’s current storage capacity, iOS has to scan your device to make the calculation. Sometimes, bugs can delay the scanning process or the report update itself. See Method 1.
- Recently deleted files: Most native and third-party apps have a Recently Deleted folder that saves deleted files. This prevents accidental loss, but the files will continue to take up the same amount of storage space. See Method 2.
- Residual data: In some cases, files can be only partially deleted due to bugs, but they leave behind residual data that have no usable function nor appear as actual “files.” See Method 4.
- Unsuccessful iOS update: If you recently had a failed iOS update, the update files may still reside on your device—these can be several gigabytes of data in size and are completely unusable. See Method 12.
- System Data/Other: iOS uses various miscellaneous files and data to function properly. Not only can they take up a lot of space, but you can’t even delete them directly. We wrote a guide for that—check out our blog post on how to clear out your System Data or “Other” storage (depending on your device).
Aside from the last bullet (which is covered in another guide), every other cause on this list is solvable by the methods below.
Additional Ways to Clean Your iPhone Storage
In this section, we cover 13 different ways to clean up and fully reclaim your iPhone storage. They target data that you usually don’t notice during daily use, but can accumulate to the equivalent of several dozen gigabytes of storage.
So even if you’ve already deleted most of your apps and files, this guide will help you get even more storage space.
Method 1: Reboot Your iPhone
Just like the technical support person tells you when you’re having computer issues, sometimes a simple reboot can fix a variety of problems. By restarting your iPhone, iOS scans and recalculates your storage space, so you might just see an increase in available space. Think of it as refreshing your iPhone by turning it off and back on.
Step 1.To turn off your iPhone, press and hold the side button on the right and either volume button on the left. For an older model before iPhone X, use only the side button or for an iPhone SE first generation, use the top button.
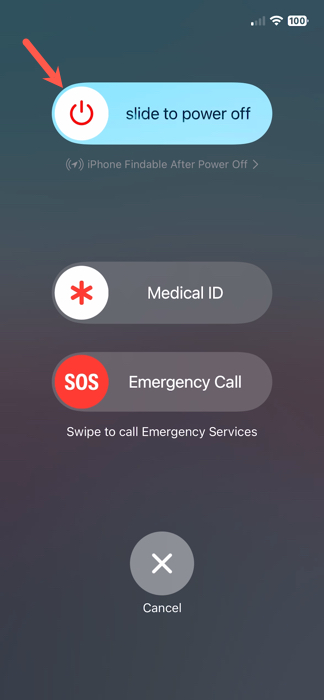
Step 2.When you see the power-off slider, release both buttons and drag the slider to turn off your iPhone.
Step 3.Wait approximately 30 seconds and then turn your iPhone back on by pressing and holding the side button on the right until you see the Apple logo.
Step 4.You can then unlock your device as normal and recheck your storage space.
Method 2: Clean Recently Deleted Files, Photos, and Videos
You may not be aware of it, but deleting a file, photo, or video on your iPhone doesn’t immediately remove it from your device. In actuality, these items go into a folder called Recently Deleted and do affect your iPhone storage space.
Files remain in the Recently Deleted folder for approximately 30 days while photos and videos hang around for about 40 days before they’re automatically and permanently deleted. However, you can manually delete those items which may result in an increase in available iPhone storage space.
Remove Recently Deleted Files
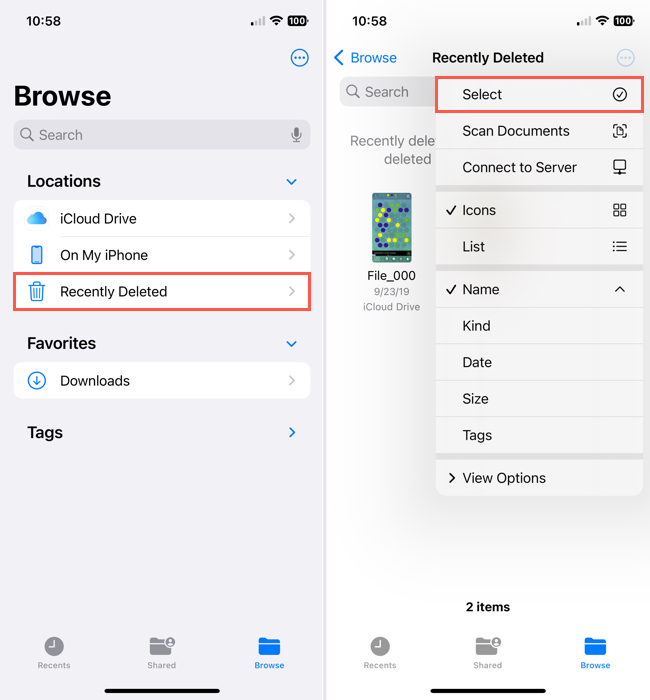
Step 1.Open the Files app and select the Browse tab.
Step 2.Choose Recently Deleted.
Step 3.Tap the three dots on the top right and pick Select.
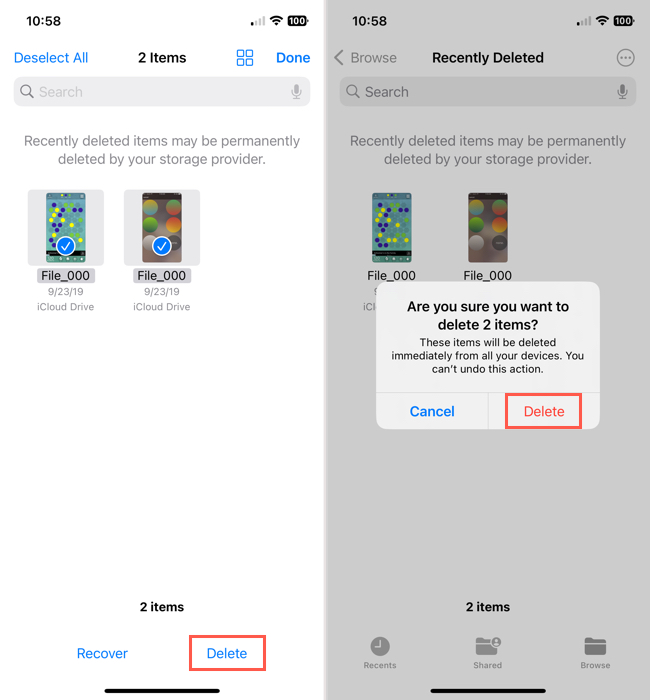
Step 4.Mark each file that you want to remove or tap Select All on the top left for all files.
Step 5.Select Delete or Delete All at the bottom.
Step 6.Confirm that you want to remove the item by tapping Delete.
Remove Recently Deleted Photos and Videos
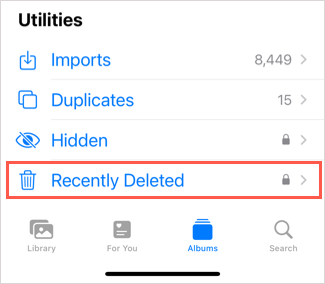
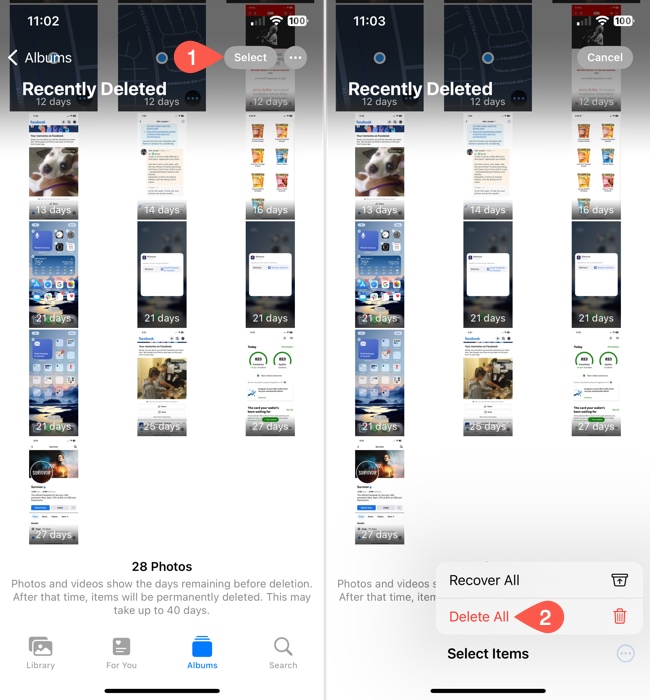
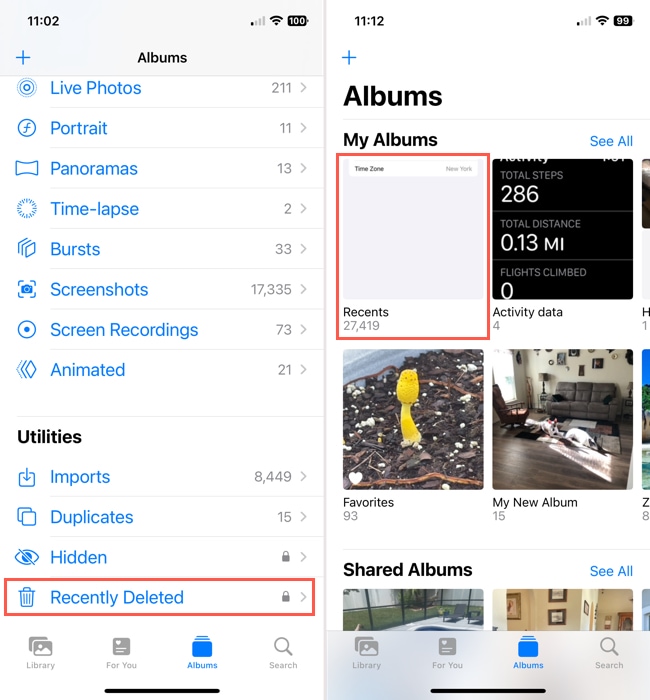
Step 1.Open the Photos app and select the Albums tab.
Step 2.Scroll to the Utilities section and pick Recently Deleted.
Step 3.When the folder opens, you can delete photos and videos one at a time or all at once.
- To delete a single item, select it and tap Delete at the bottom.
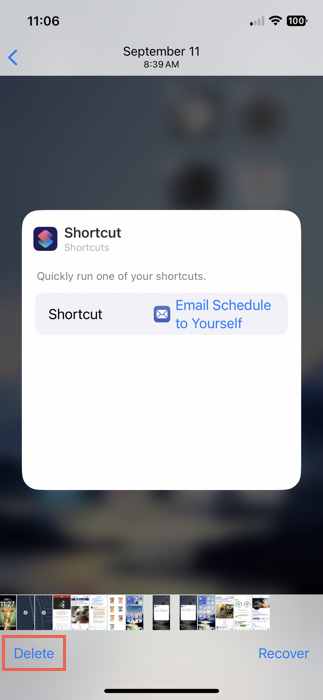
- To delete all items, tap Select on the top right and then Delete All using the three dots at the bottom.
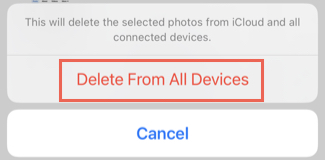
Step 4.Confirm that you want to delete the item by tapping Delete From All Devices.
Method 3: Utilize iCloud’s Storage Optimization Feature
iCloud is a great way to shrink the storage footprint of your photos without having to delete anything. When you enable iCloud for your photos, you can also activate a setting called Optimize iPhone Storage. When active, iOS automatically saves the high-resolution copies of your photos to iCloud, leaving the lower-resolution copies on your device.
These take up much less space—but don’t worry! The quality difference is negligible, making it a great space-saving but non-destructive alternative to deletion.
Step 1.Open the Settings app and tap your Apple ID.
Step 2.In the Apple Account menu, tap iCloud.
Step 3.Under Saved to iCloud, tap Photos.
Step 4.Activate the toggle switch beside Sync this iPhone, then tap Optimize iPhone Storage to enable the setting (make sure it has a check mark beside it).

Once the setting has been enabled, set down your iPhone and charge it. iOS will soon start optimizing your library—leave it for 30 minutes to an hour, depending on how many photos you have.
Method 4: Change the Date and Time to Reveal Ghost Files
While a bit of a mystery, there are times when photos or videos you delete from your iPhone return as hidden files. Because you can’t see these files, hence the term Ghost Files, you can’t simply find and remove them. However, there is a workaround you can use which is to change the date on your device and then look for these files.
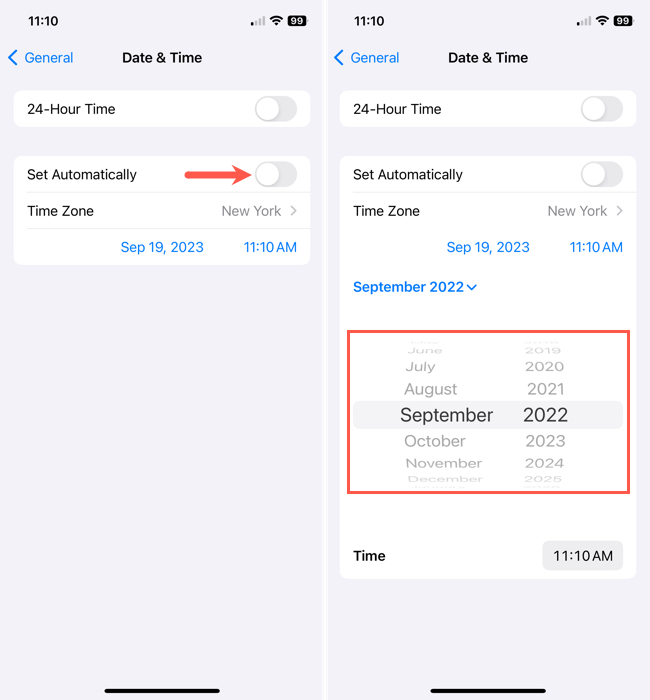
Step 1.Open the Settings app and select General.
Step 2.Choose Date & Time.
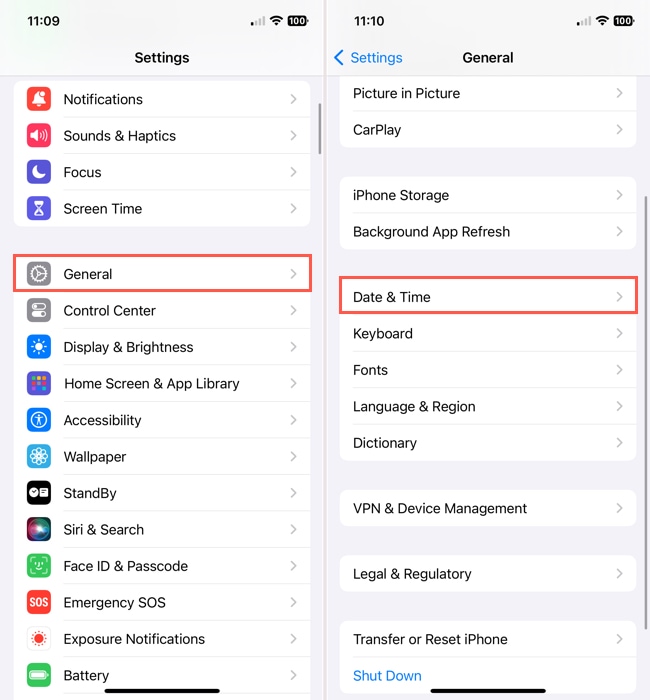
Step 3.Turn off the toggle for Set Automatically.
Step 4.In the field that appears beneath, change the date to a year in the past. You can go back one to two years per your preference.
Step 5.Open the Photos app and review the Recently Deleted folder to see those hidden files reappear. You can also check your Recents album in case some items appear there.
Step 6.Then, delete the photos and videos as described earlier.
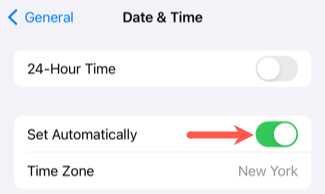
Step 7.When you finish, return to Settings > General > Date & Time to reenable the Set Automatically toggle.
Method 5: Factory Reset Your iPhone
If you would prefer to give your iPhone a completely new start or fix any possible iOS issues, you can consider resetting your device to its factory settings. This erases all content from your iPhone and clears the system data, letting you start fresh.
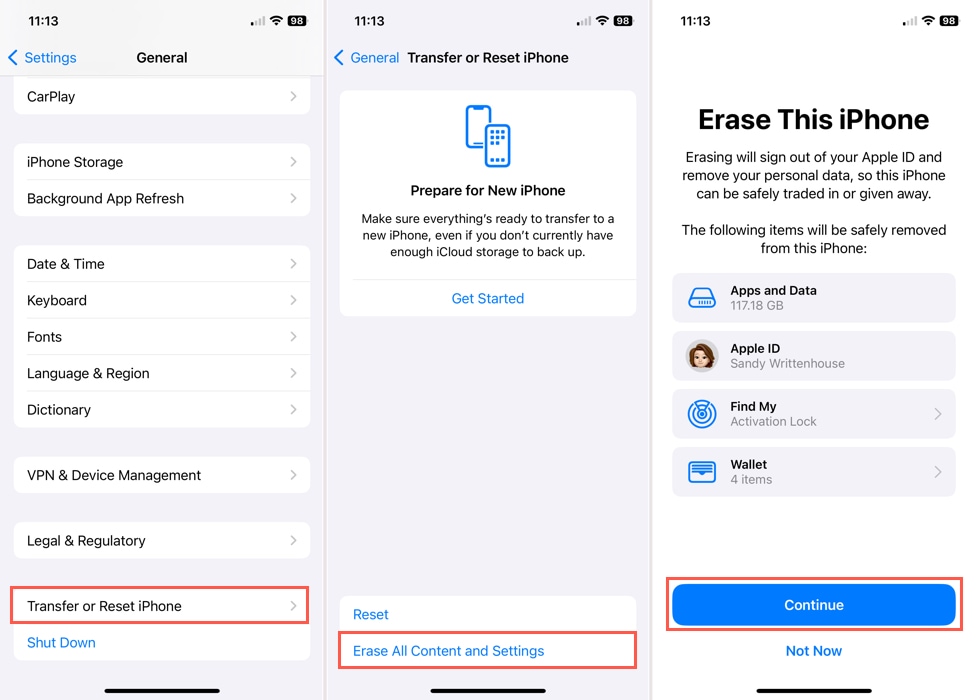
Step 1.Open the Settings app and select General.
Step 2.Scroll to the bottom and choose Transfer or Reset iPhone.
Step 3.Tap Erase All Content and Settings.
Step 4.Review the Erase This iPhone screen and select Continue to proceed.
Step 5.Follow the subsequent prompts to reset your iPhone.
Method 6: Use iPhone Cleaning Apps
Photo clutter is sneaky. You think you got them all, but there are usually several junk photos that blend into the rest of your library (especially if you have thousands of images). More importantly, the native Photos app is not the best at efficient cleanup–for example, it can only detect duplicate photos but not similar or identical photos with minor differences. If you relied solely on the Photos app’s management features, we recommend trying a third-party cleaner app.
For this guide, we’ll be using an app called Clever Cleaner: AI Cleanup App. It’s 100% free and has no ads or usage limits. It automatically compiles similar and duplicate photos (even those that weren’t flagged by iOS), Live photos, screenshots, and “Heavies” (large media files) for you.
It also has better sorting options and a superior interface, specifically for library cleaning, compared to the native Photos app.
Step 1. Open the App Store and download Clever Cleaner: AI Cleanup App. Then, launch Clever Cleaner and grant it full access to your library (don’t worry—it’s safe!).
Step 2. From the menu at the bottom of the screen, choose the data type you want to clean. Then, tap the media item you want to review.
Step 3. When deleting Similars, Clever Cleaner automatically chooses the best copy for you and marks the rest for deletion (you can choose manually if you want). Once you’re satisfied with the selection, tap Move to Trash.
Step 4. Finally, tap Empty Trash in the pop-up menu to confirm deletion.
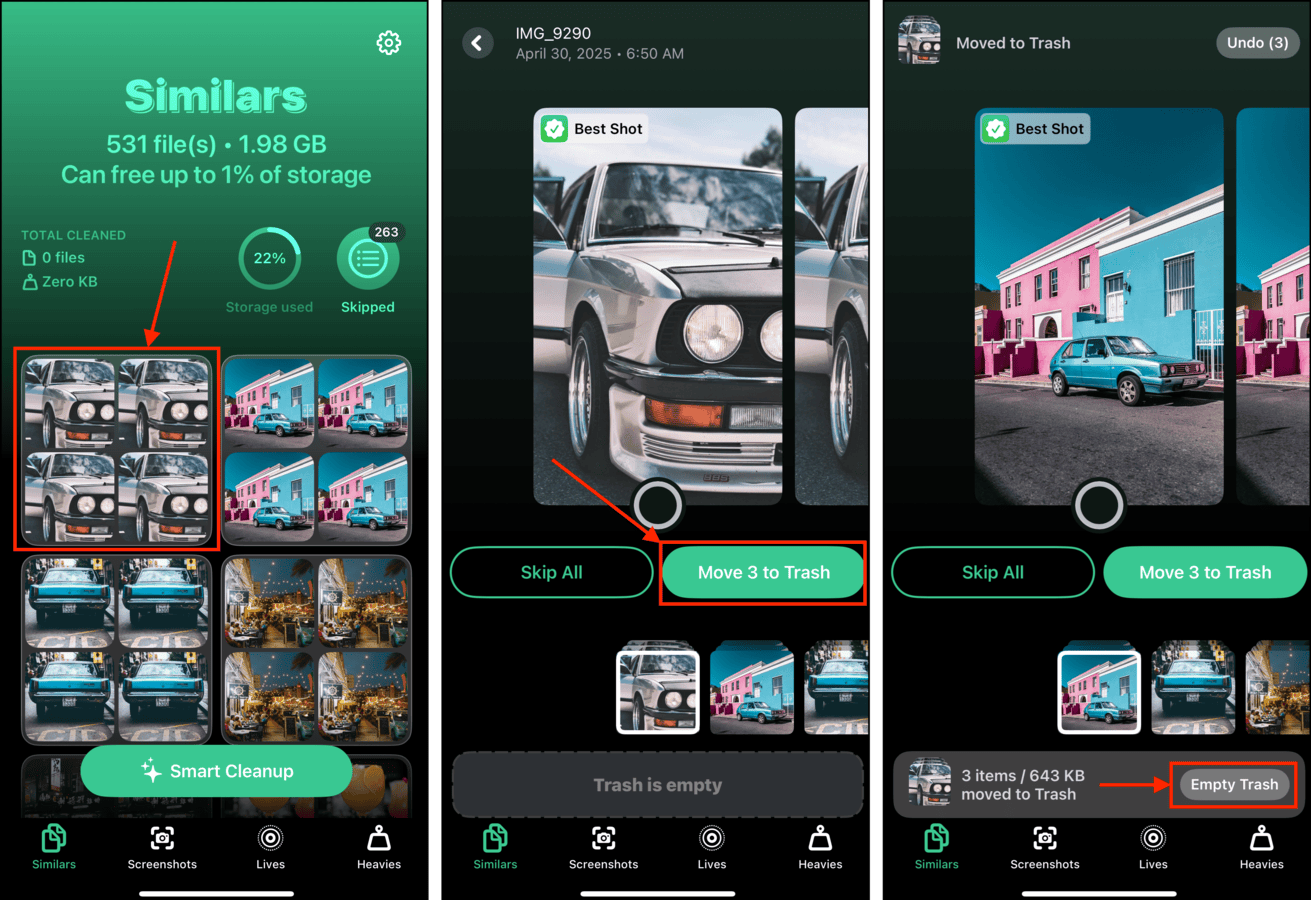
You can also tap the pop-up itself to review all deleted items before permanently erasing them.
Method 7: Contact Apple Support
Maybe you’ve tried everything on this list and more, but your used iPhone storage won’t go down to give you more available space. In this case, it may be time to contact Apple Support.
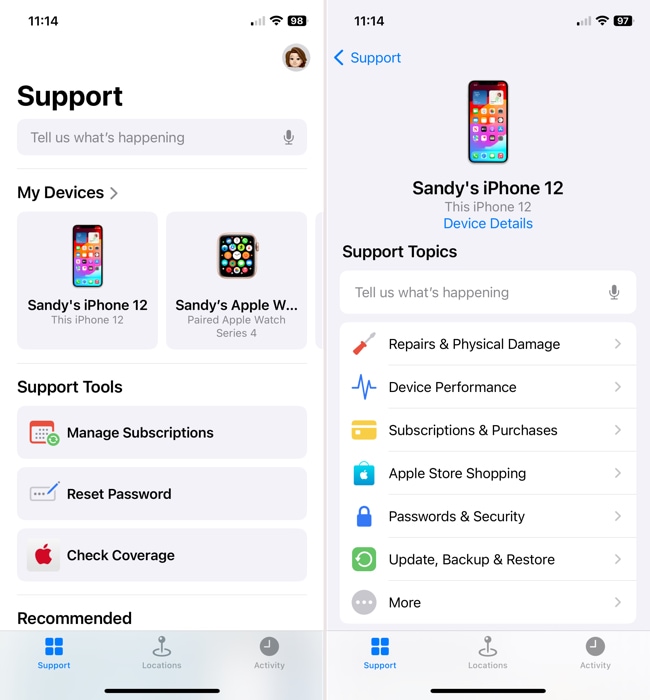
Use the Apple Support mobile app: One of the easiest ways to contact Apple Support is with the official iPhone app. Once you download the free app, sign in with your Apple ID and choose your device. Then, pick a topic, enter your question, or tap to chat with a representative.
Visit the Apple Support site: If you don’t want to add another app to your iPhone, you can visit the Apple Support website for assistance. Just like the mobile app, you can choose your device and a topic to zero in on the support you need or click to chat with a team member.
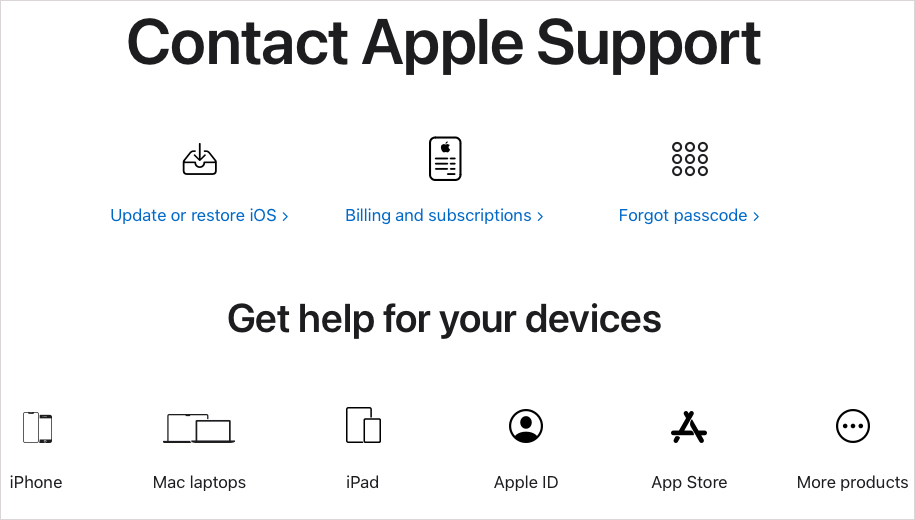
Call Apple Support: If you prefer to speak to someone in person, you can call Apple Support. The phone number varies by region, so visit the Contact Apple for Support and Service web page to obtain the number for your area or access the call feature via the Apple Support mobile app or website.

Method 8: Clear App Caches
App caches are made up of temporary files that are stored locally, enabling easy access in case an app process needs them. However, cache files can sometimes be stored far past when they are needed.
For example, Telegram’s app cache is made up of recent media files and documents that were sent to you via chat. They are automatically saved to your device so you don’t have to download them manually from Telegram’s every time you view your conversations.
Step 1. Open the app you want to review.
Step 2. Then, tap Settings > Data and Storage.
Step 3. In the Data and Storage menu, tap Storage Usage.
Finally, tap Clear Entire Cache.
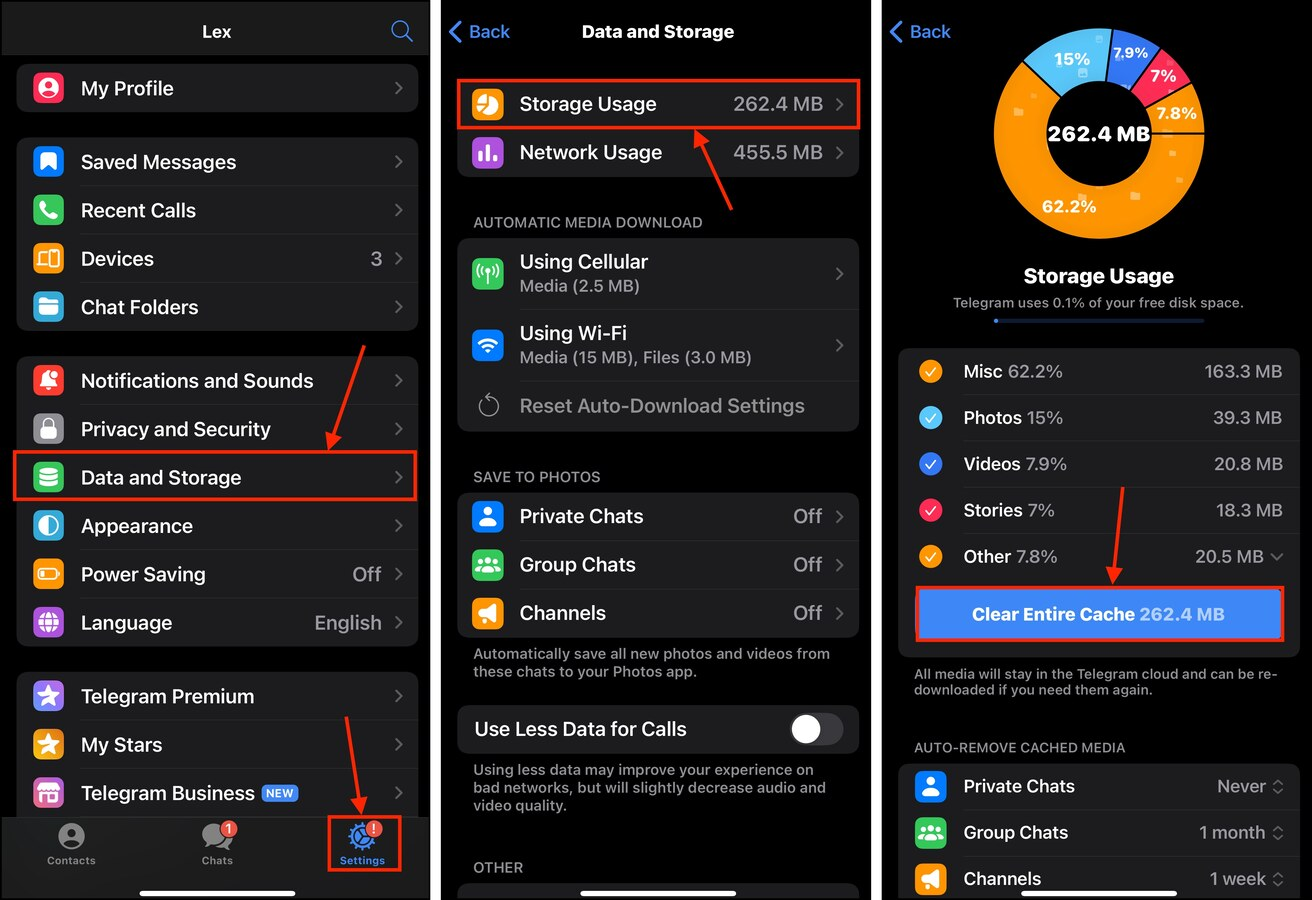
Depending on how many attachments were locally downloaded (and how large they are), you should see considerable storage space free up on your device.
Method 9: Offload Seldomly Used Apps
Modern apps can take up dozens of gigabytes worth of storage space on your iPhone. If you have apps installed on your device that you don’t use often, consider offloading them for now. Unlike deletion, offloading an app saves your user data but deletes the app installation itself. So when you re-download the app, you’ll still have access to your data.
Step 1. Open the Settings app. Then, tap General.
Step 2. Tap iPhone Storage.
Step 3. Scroll down to the list of apps on your device. Tap one that you want to delete or offload.

Step 4. In the app’s storage menu, tap Offload App.
Step 5. When prompted, tap Offload App again to confirm the action.
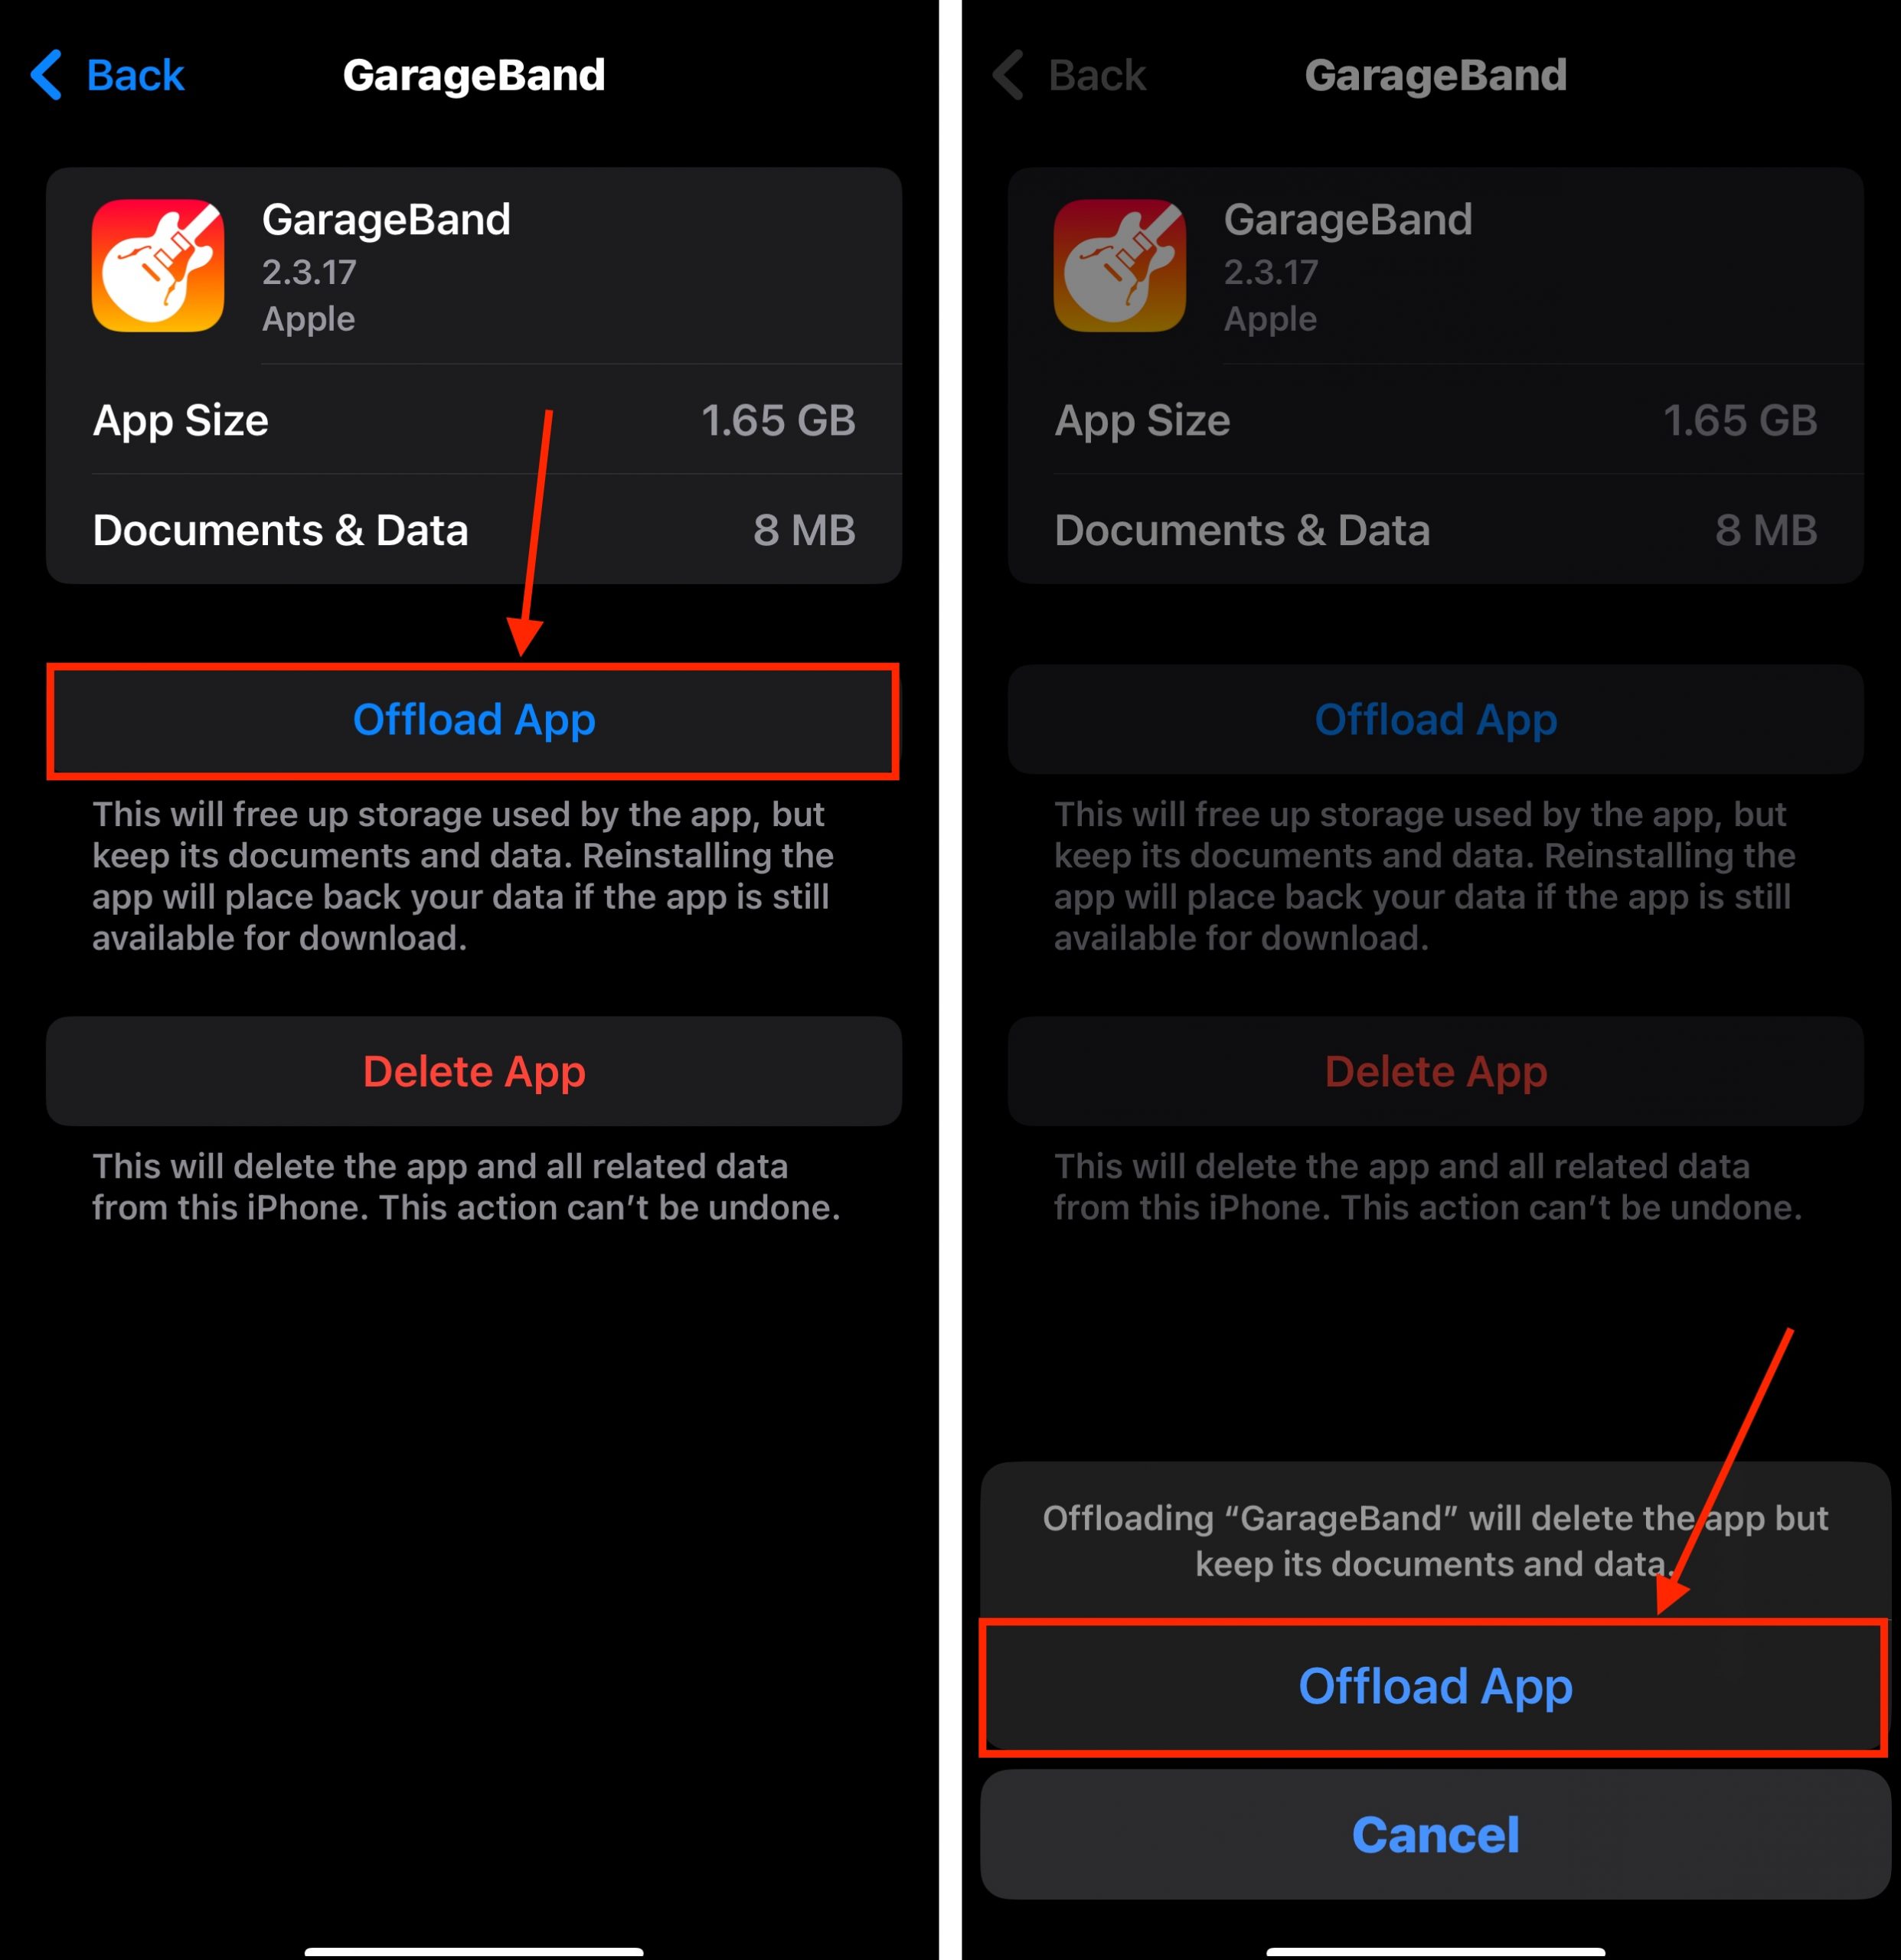
If you opted to offload the app, you should still see the app icon on your device’s Home Screen with a cloud beside it. This indicates that the app has been successfully offloaded.
Method 10: Remove Downloaded Media
Many streaming services (e.g., Netflix, YouTube) allow you to download media so you can view or listen to them later. Downloaded media is saved within the app itself, not in the Files app or Photos app. This makes them easy to miss during an initial cleanup pass.
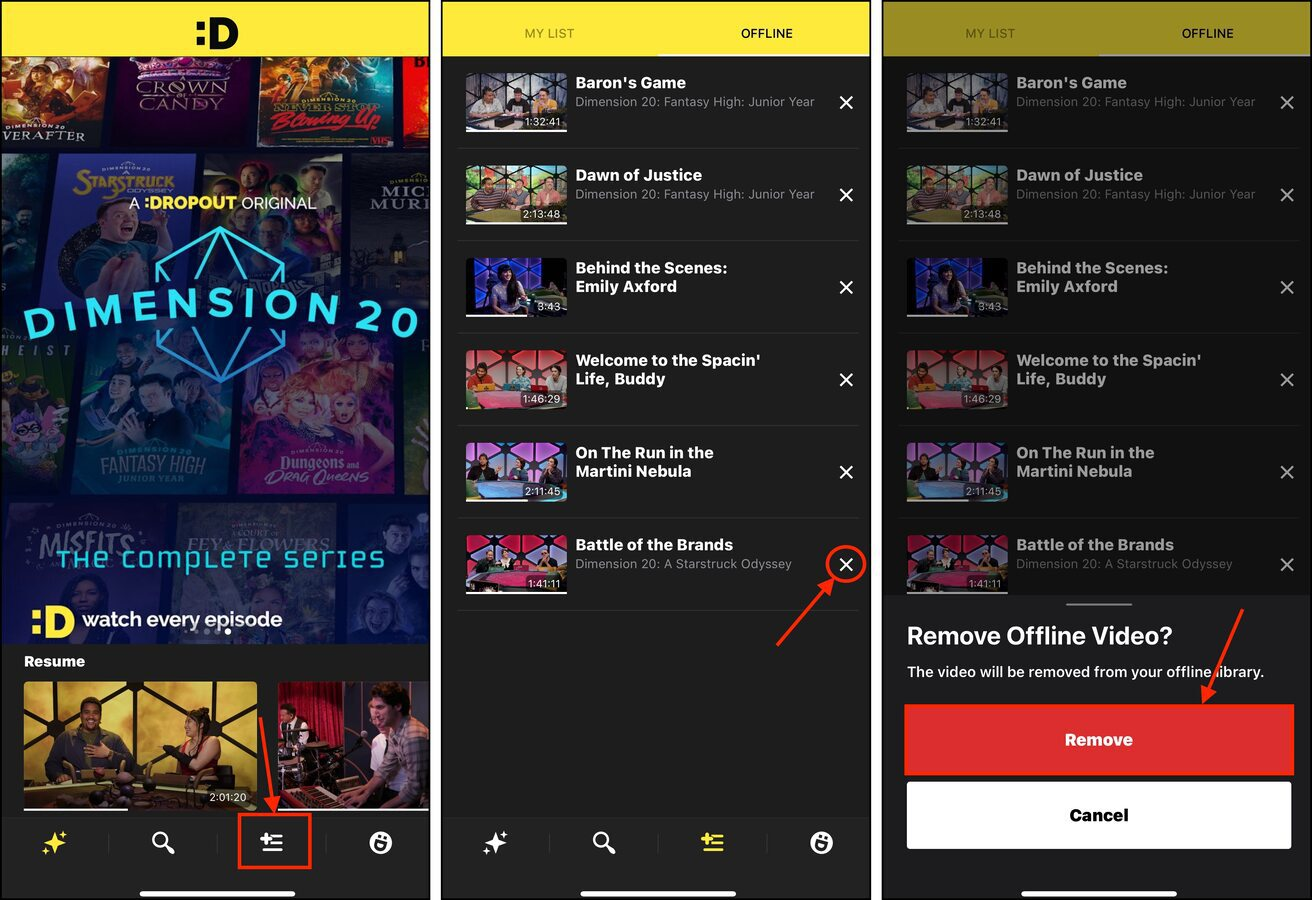
Fortunately, it’s usually very easy to delete them from within the app as well. We’ll be demonstrating this with an app called Dropout, but the steps should look very similar in other streaming apps.
Step 1. Open the app you want to review.
Step 2. Tap the Downloads button.
Step 3. Delete the media item you want to get rid of.
Step 4. Confirm the deletion when prompted by the app.
Method 11: Trigger iOS’ Automatic Cache Management Function
Like apps, iOS itself uses caches to improve its performance. Some examples include thumbnails (for previewing photos and videos), predictive text, and other system-related data. Unfortunately, you can’t access cache files directly. You also can’t delete them the same way you delete apps or regular files.
Instead, a handy workaround is to fill up your storage space by capturing the highest-resolution video possible with your iPhone camera. During recording, iOS will automatically clear the device cache (and even prompt you for further cleaning) to make space for the video file.
Step 1. Open the Settings app. Then, tap Camera (it’s under General and Accessibility).
Step 2. In the Camera menu, tap Record Video.
Step 3. Select the highest available resolution. If you have ProRes, enable it.
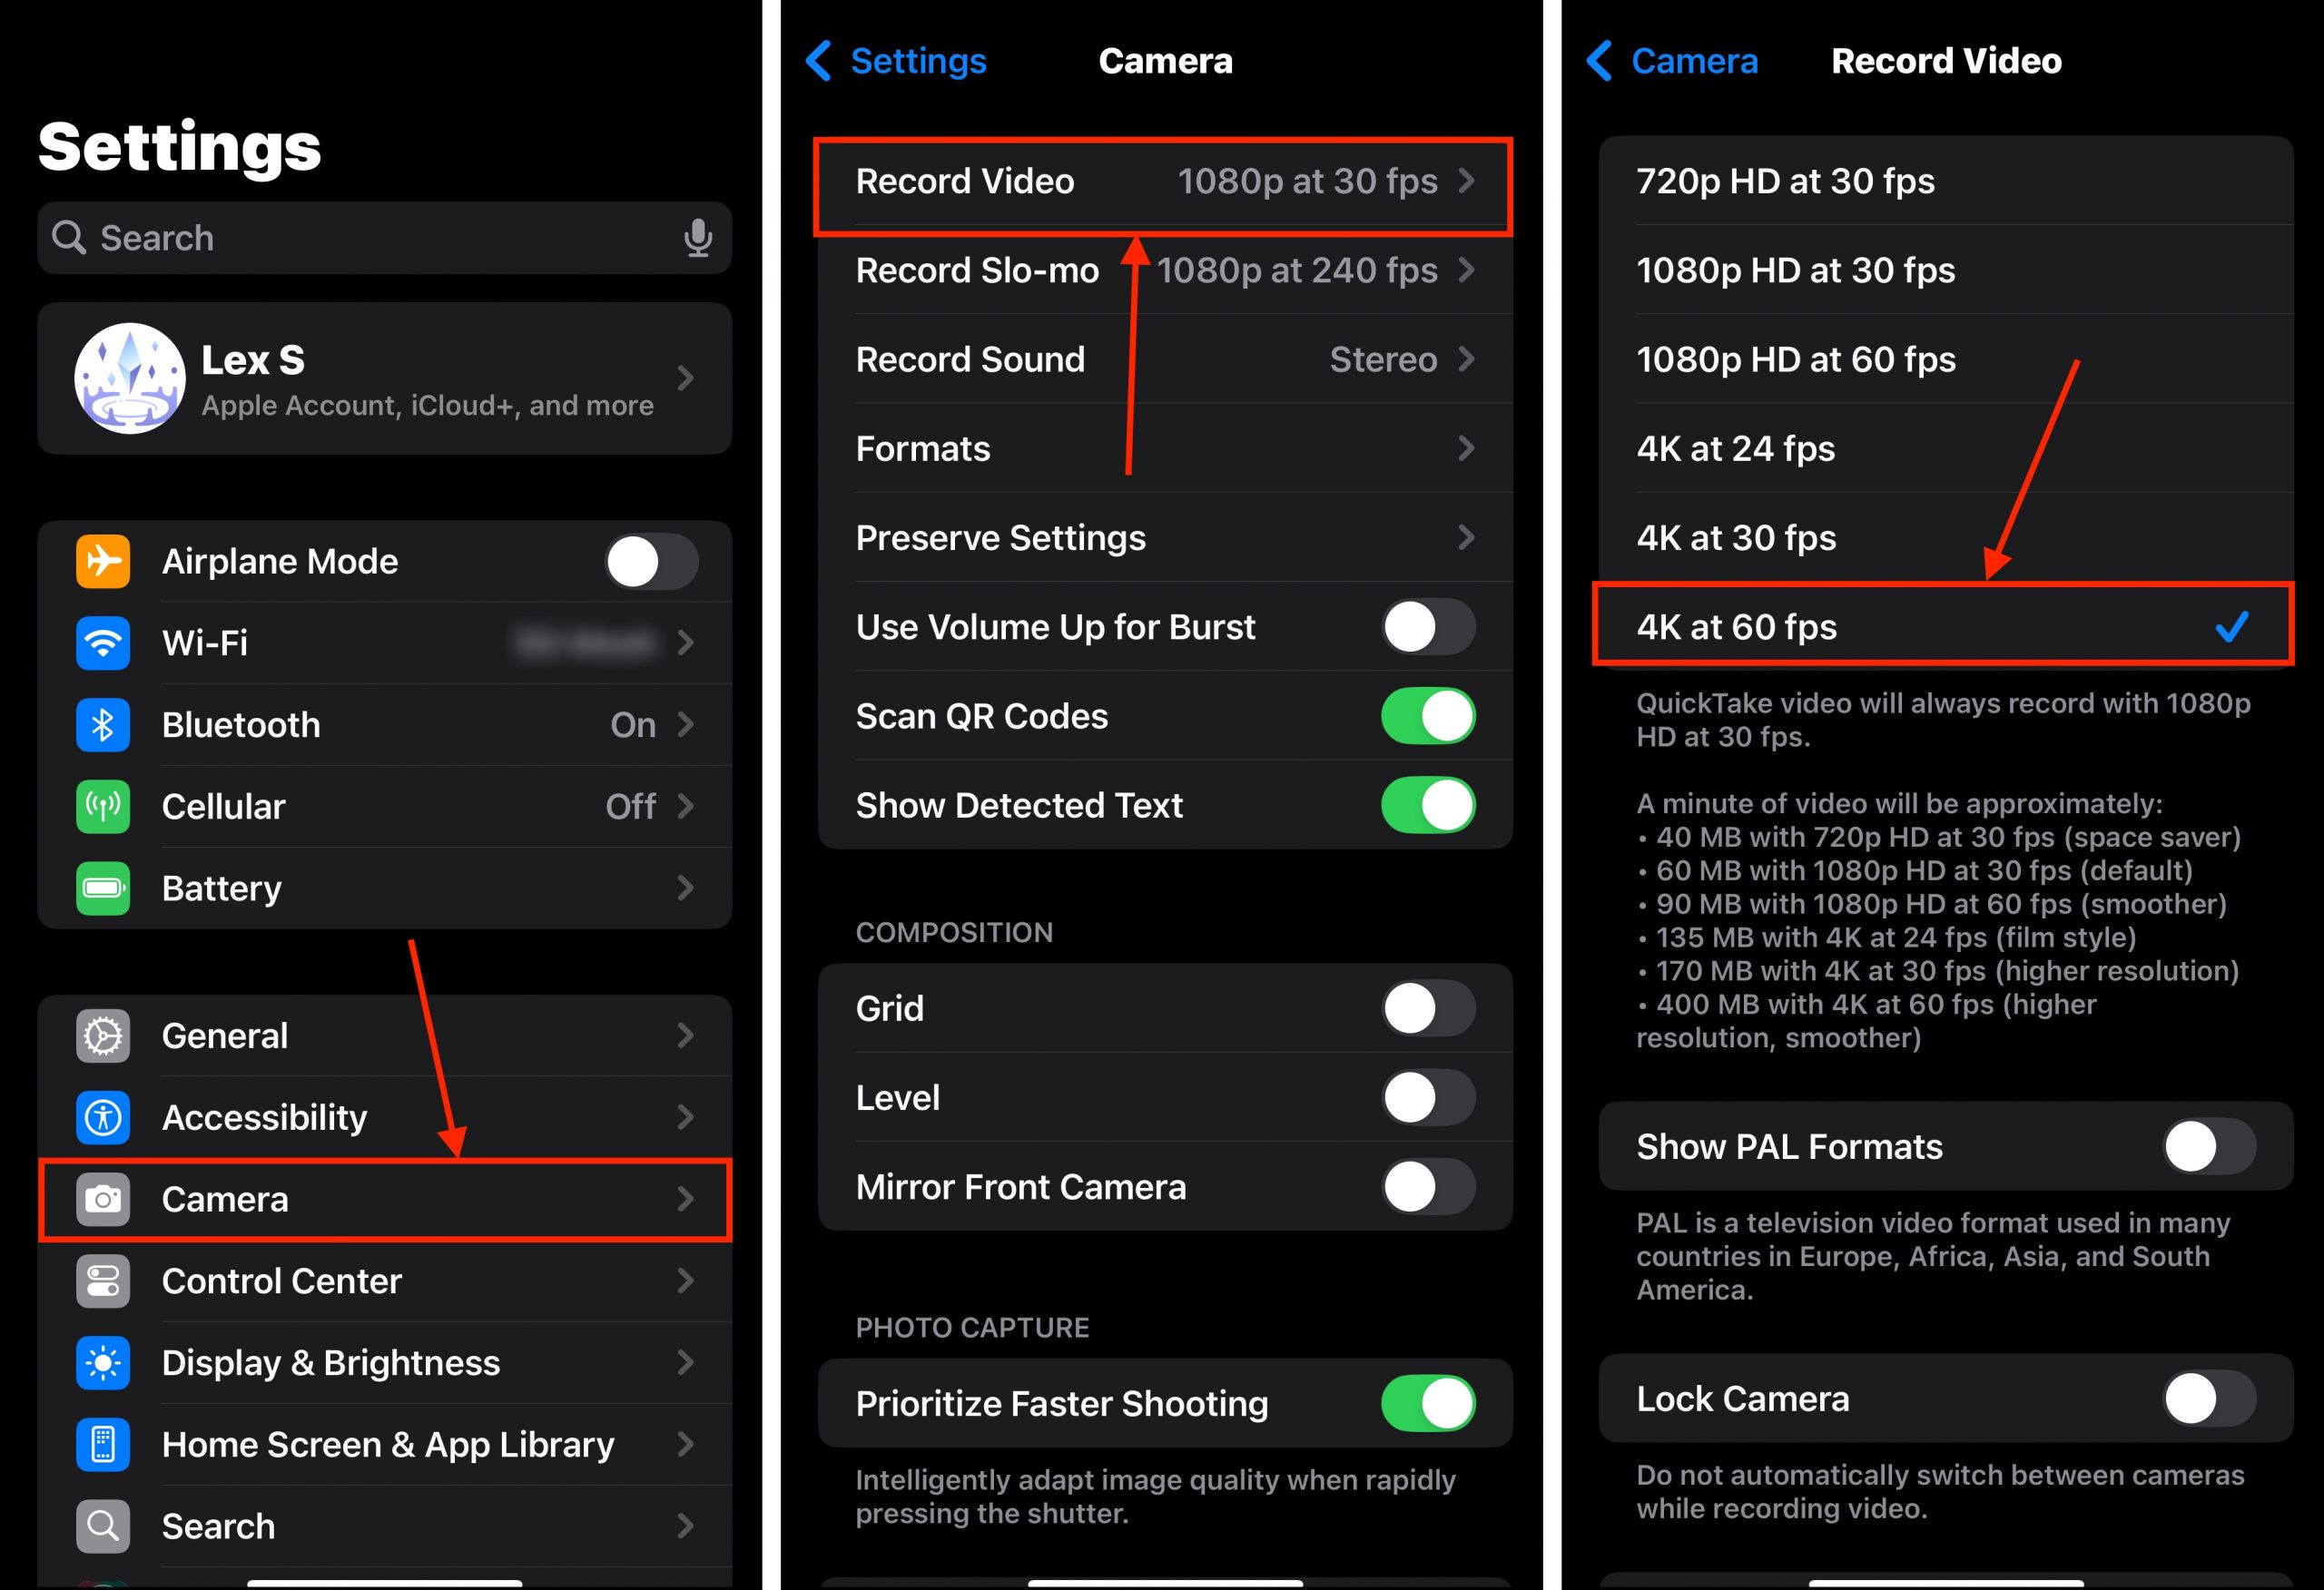
After applying these settings, start taking videos with your iPhone camera. As your storage space fills up with media, you should see the text “Freeing Resources”—this indicates that iOS is clearing up its cache to make room.
Method 12: Delete Incomplete iOS Update Files
To update iOS, you’ll first have to download the update files. However, if something goes awry during the update session—such as a sudden shutdown, network loss, or even a random glitch—the update may not push through. And in some of these cases, the iOS update files are left behind.
Fortunately, you can easily delete iOS update data directly from the Settings app!
Step 1. Open the Settings app.
Step 2. Tap General.
Step 3. In the General menu, tap iPhone Storage.
Step 4. Scroll down to the list of installed apps. If you see the iOS update listed, tap it.
Step 5. Finally, tap Delete Update.
After deleting the iOS update file, you can attempt to update your device again—just make sure you have enough storage space.
Method 13: Purge Unneeded Message Attachments
On iOS, message attachments usually have a limit of around 100 MB. And once you receive them, they are automatically downloaded by iOS and saved within the Messages app. In that instance, those attachments already take up storage space.
So, you might have gigabytes worth of attachments you no longer need floating around in the Messages app. Let’s get rid of them!
Step 1. Open the Messages app and select the conversation thread you want to review for attachments.
Step 2. Tap the contact icon at the top of the conversation thread.
Step 3. Tap the See All button by the attachments section.
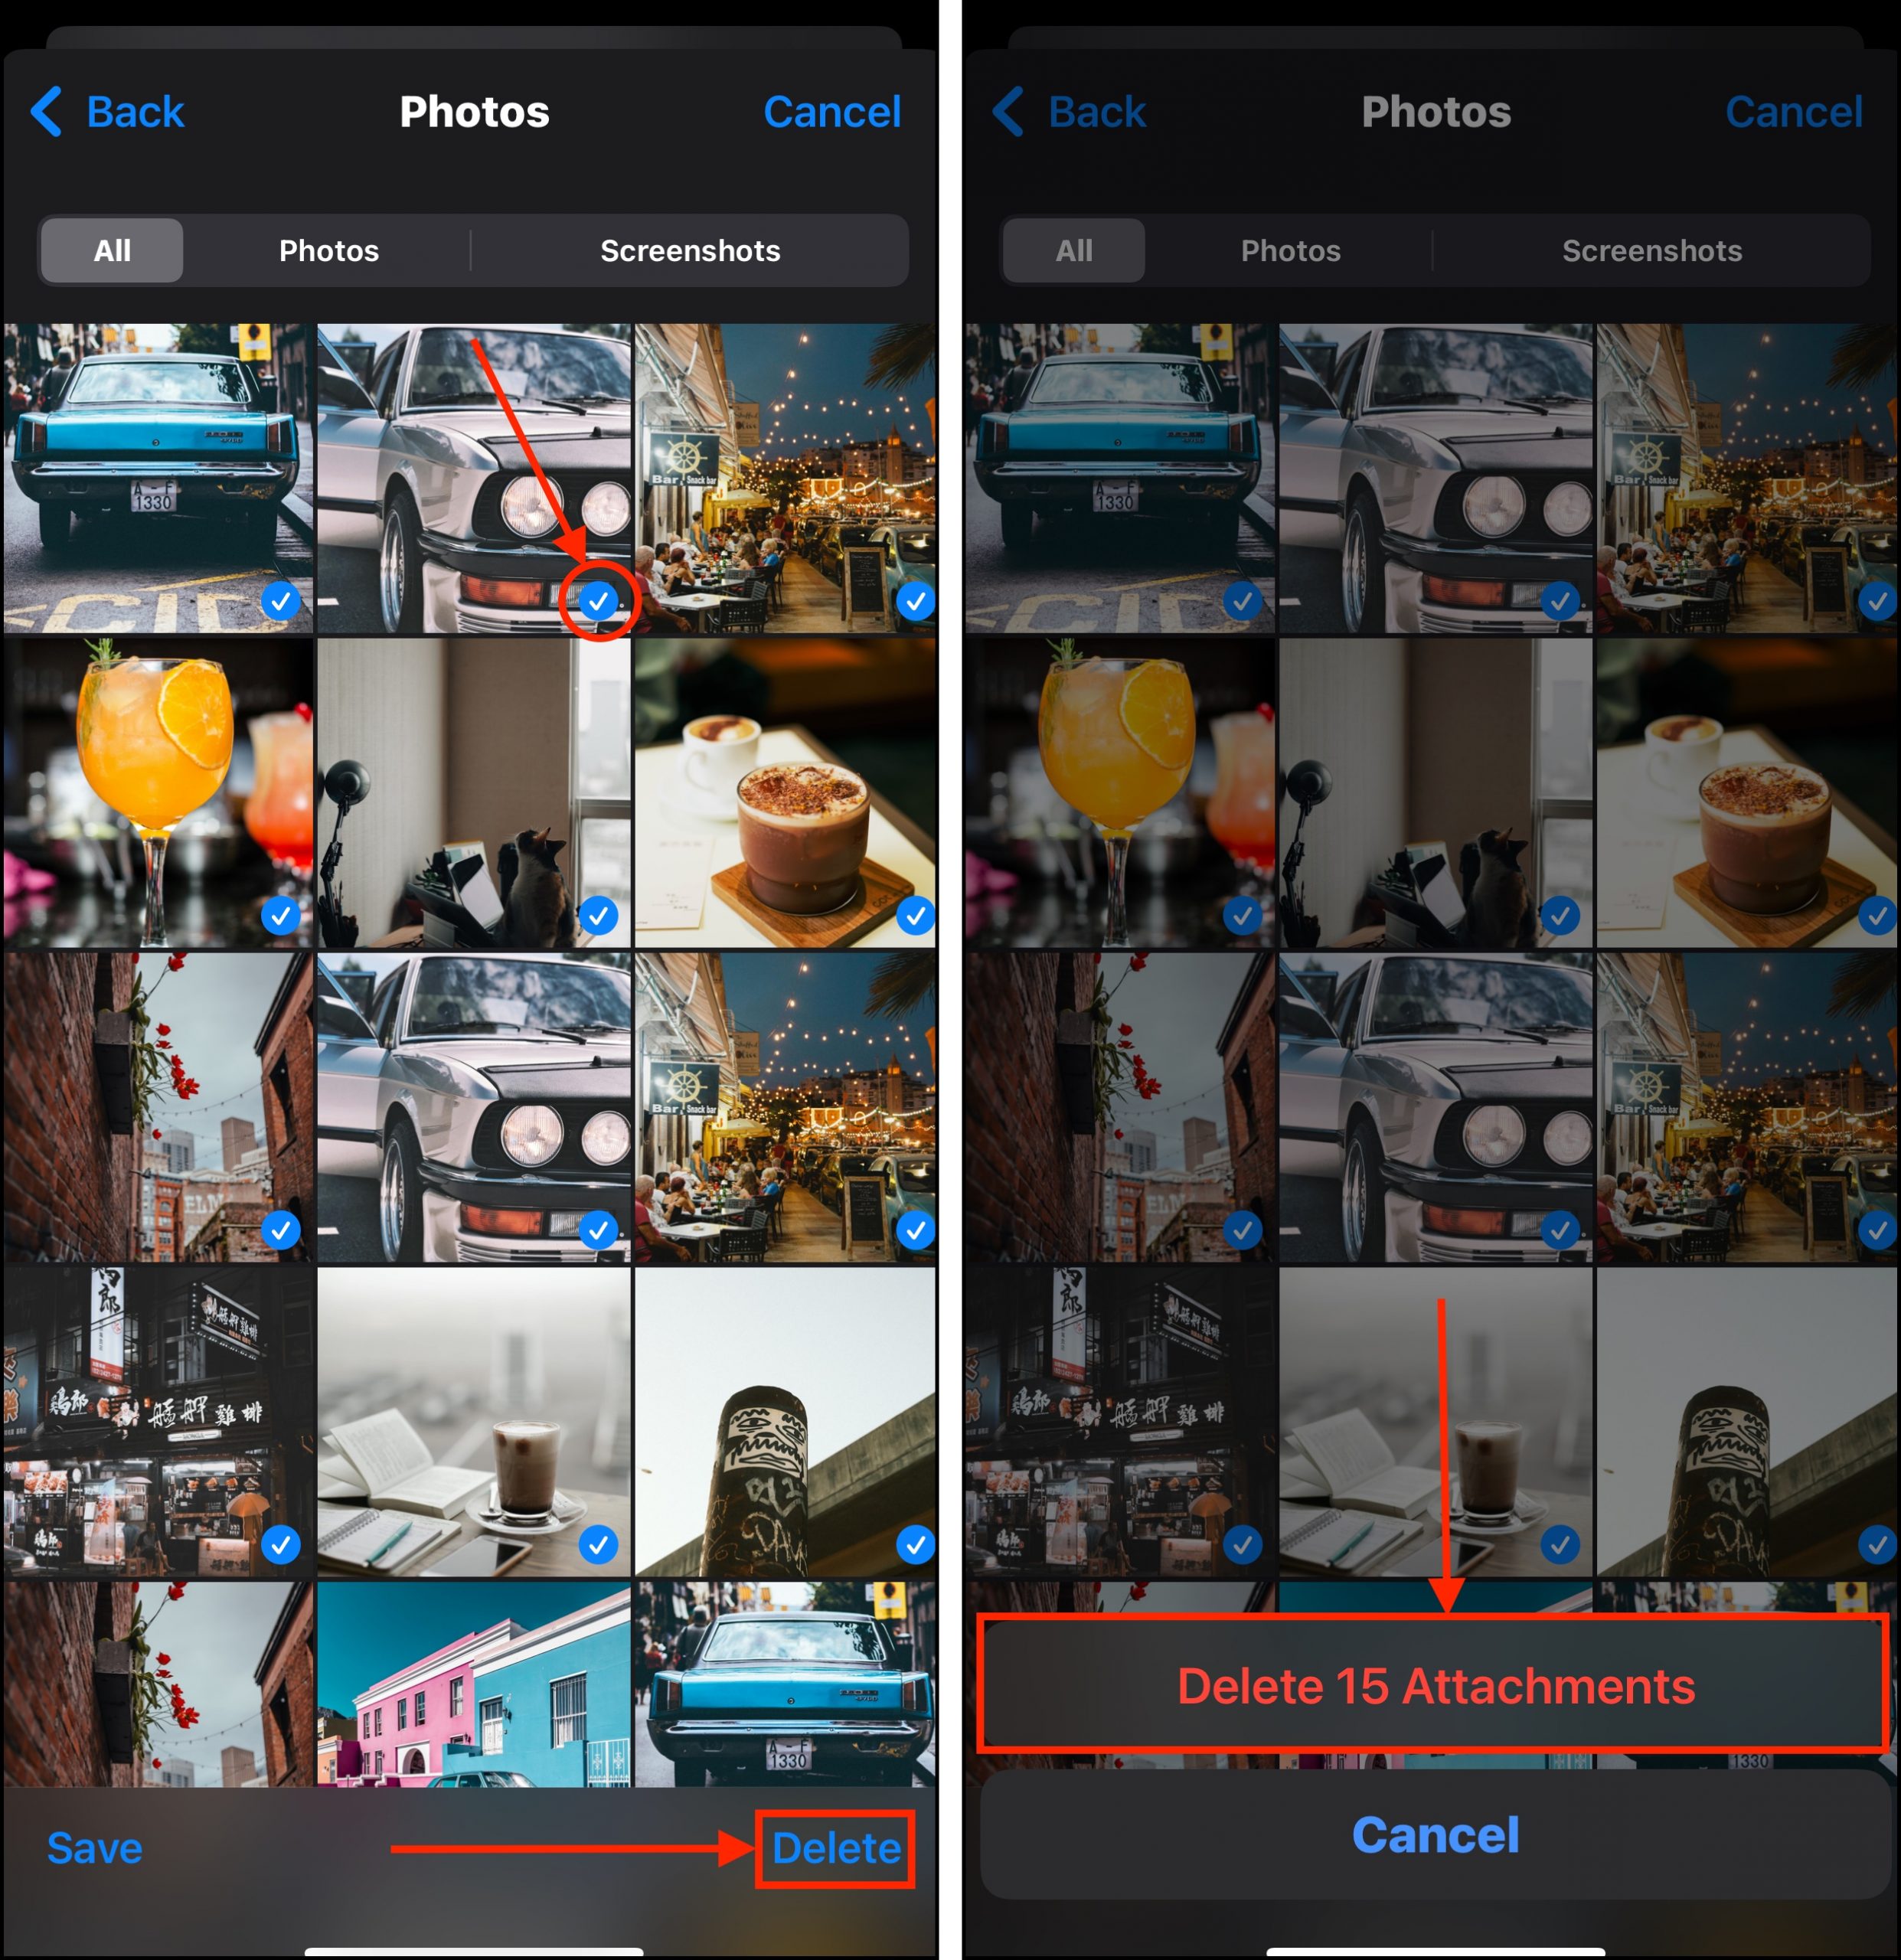
Step 4. In the top-right corner of the screen, tap Select.
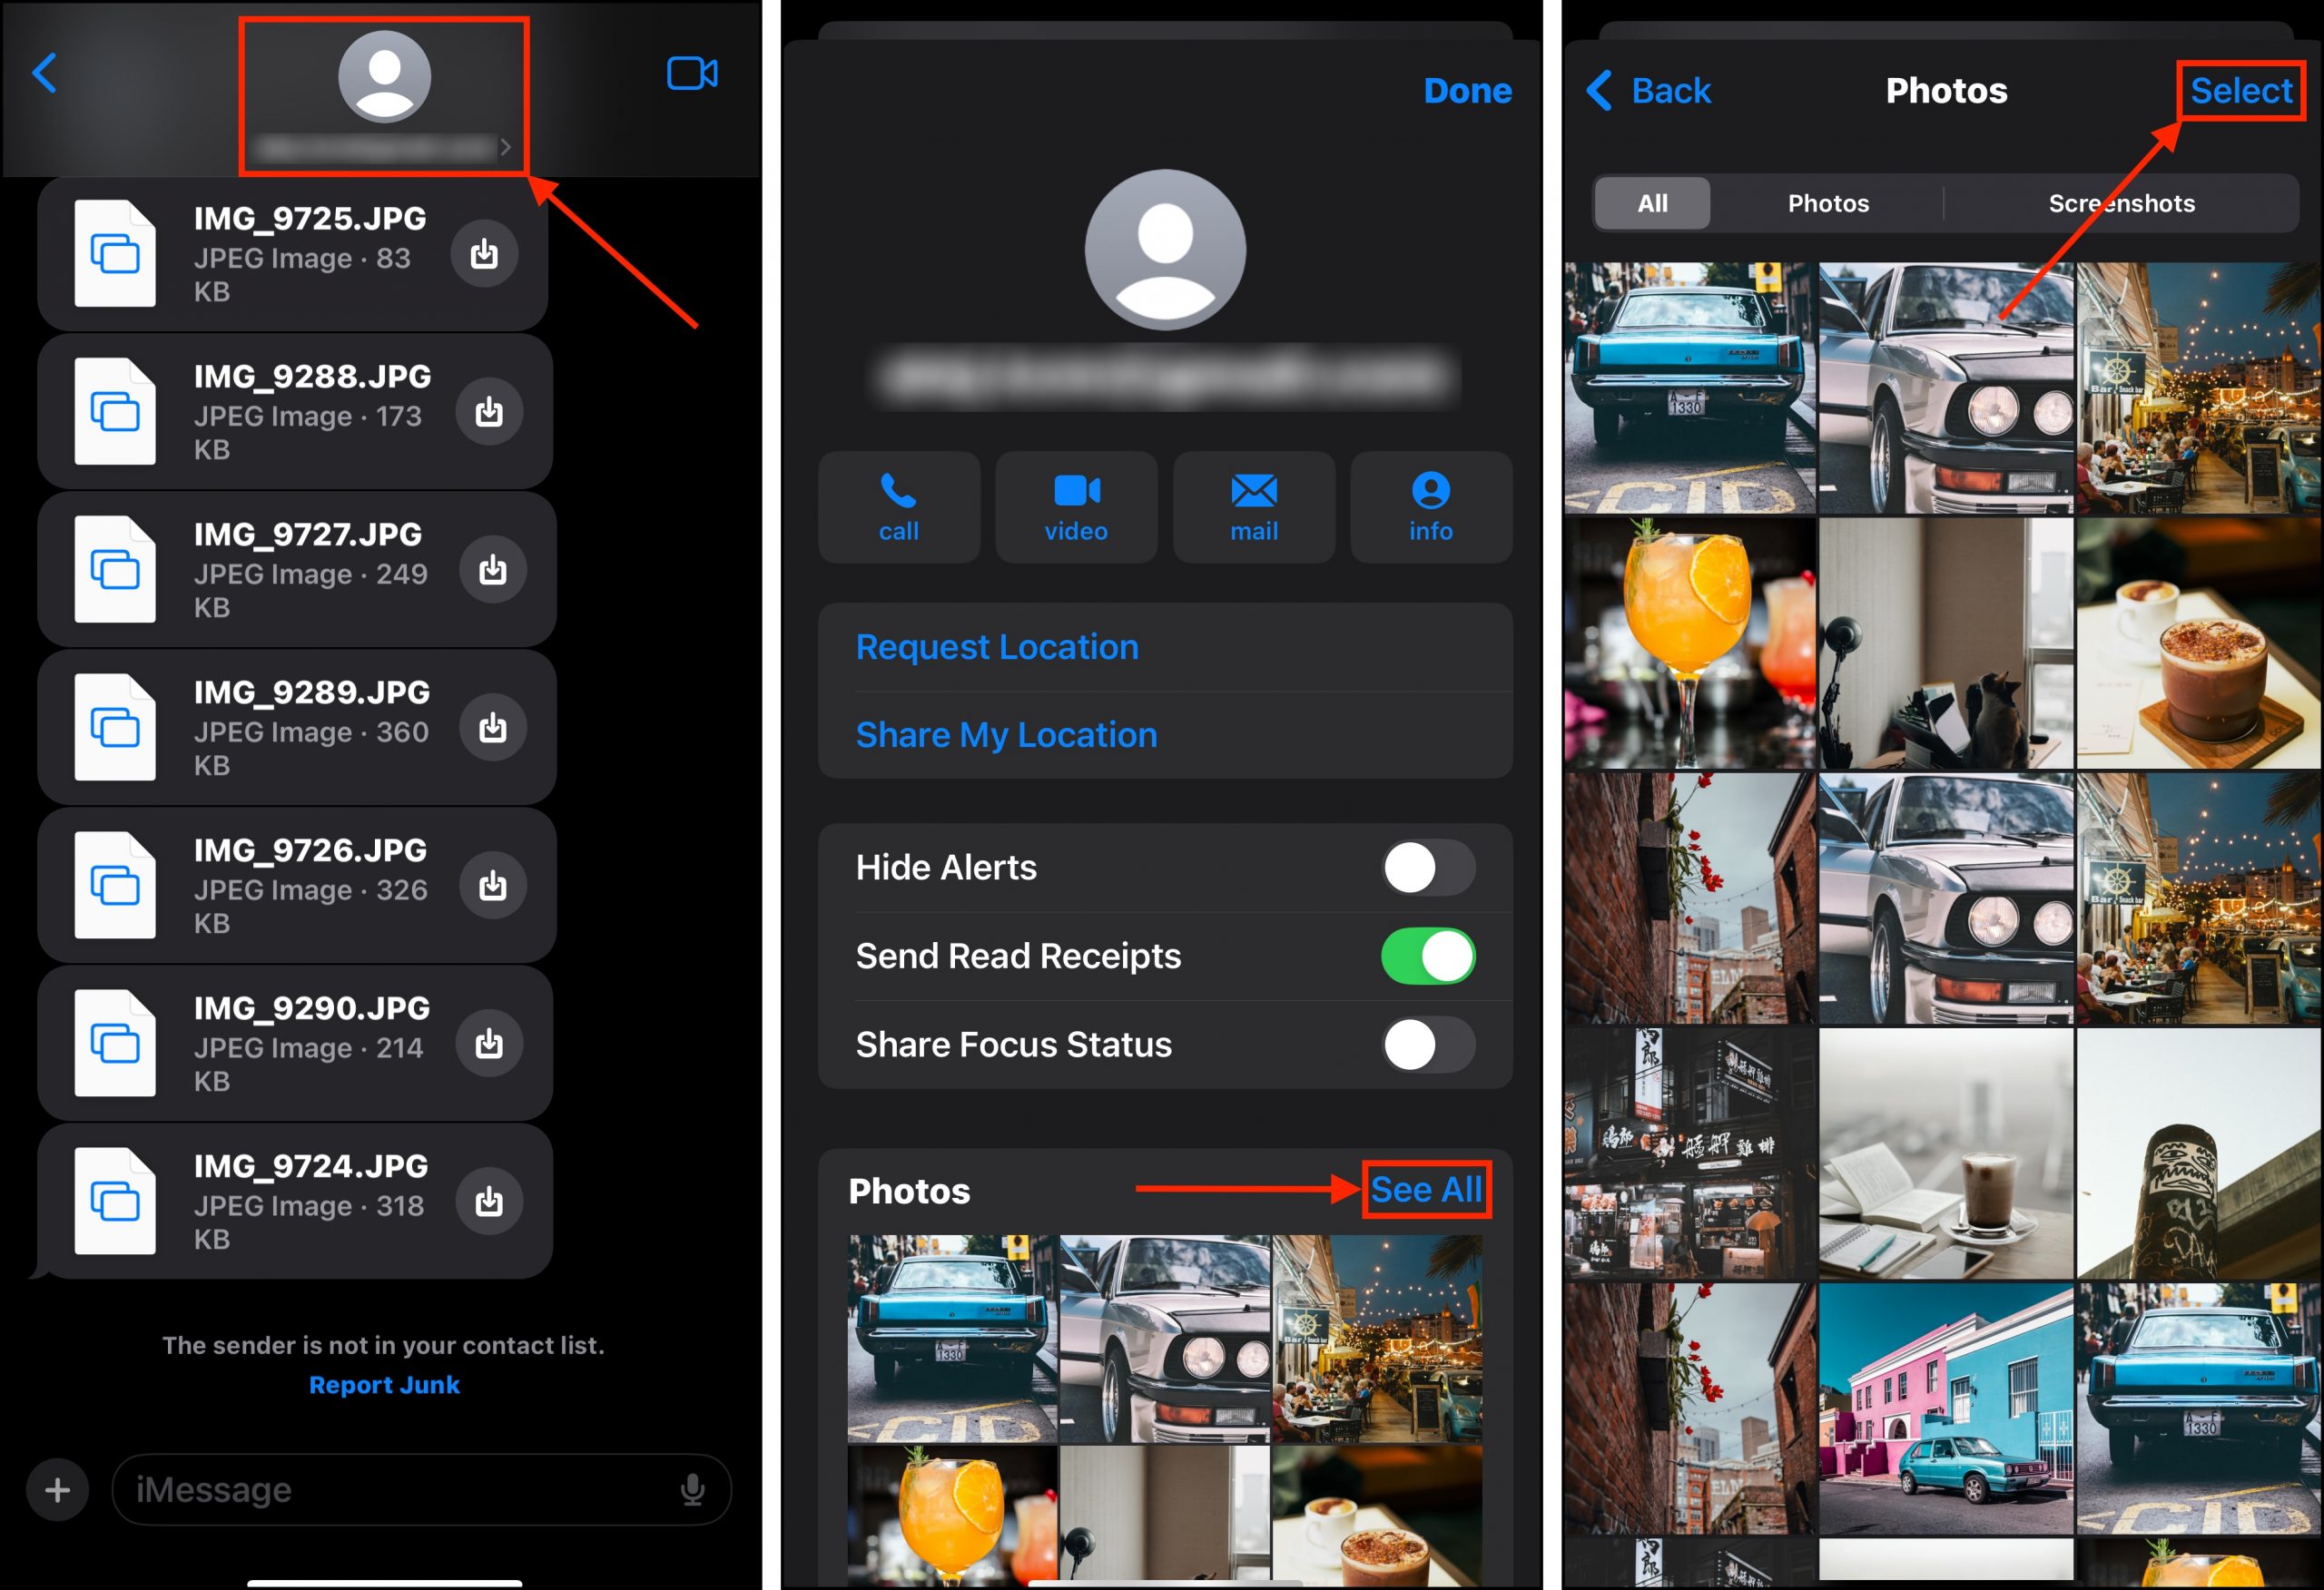
Step 5. Tap the attachments you want to delete. Then, tap the Delete button.
Step 6. When prompted, tap Delete again to confirm the action.
Make sure that you double-check before confirming! Message attachments don’t have a Recently Deleted folder where you can restore them from.
Before You Go, Some Good Storage Hygiene Tips
While you can’t fully control all the data that circulates around your device, you can do your best to optimize its natural flow.
First, maintain adequate free storage space on your device. iOS actually uses it to help manage its own storage by utilizing it for temporary files that aid in system operations (including cleanup). Second, keep iOS updated. iOS updates don’t only fix bugs and introduce new features, but they also deploy efficiency improvements.
Finally, back up your files regularly! At some point in time, you might just have to factory reset your iPhone for a true deep clean. Keeping regular backups ensures that you can do that anytime you need to.


