
If your USB is not showing up on Mac, it may have suffered logical damage and became unreadable. Fortunately, we can fix most cases of logical damage with tools we already have in our Macs. These methods are also relatively easy to do, even for those who aren’t power users.
By the end of this article, you will have a good idea of what caused Mac not recognizing your USB, how to fix this issue, and even how to recover your data once it’s repaired. Read on.
Table of Contents
How to Find a USB Drive on Mac
USB drives and other external storage devices appear in multiple locations on your Mac, so you can access them in different scenarios. With a problematic drive, even if it doesn’t show up in one location, it may still show up in another. Here’s how to find your USB drive on Mac:
- Desktop – External drives appear on your desktop with an icon of a volume and its label underneath.
- Finder – Mounted drives appear on the left sidebar of the Finder window, under “Locations” (try expanding the Locations section if you don’t see it).
- System Information – Drives appear in the “About This Mac” window. Click the Apple icon > About This Mac > More Info… Scroll down to the Storage section.
- Disk Utility – Mounted and unmounted drives appear in the left sidebar of Disk Utility (Finder > Applications > Utilities).
How to Fix a USB That is Not Showing Up on Mac
Here’s some good news: for as long as your USB drive only suffered “logical damage” – such as drive corruption, virus infection, accidental formatting, etc., you can safely repair it yourself. These are common problems that could be the cause of your flash drive not showing up on Mac.
Fortunately, Mac provides free native tools for users to troubleshoot the problem themselves. Below are the best DIY fixes that you can do right now to repair your USB, using tools already provided by Mac.
Fix 1: Try another port or device
First, make sure that your USB is really the problem. Try connecting it to another port or computer. Likewise, try using another USB on the same ports and check if your computer recognizes it.
Fix 2: Check your Mac’s external drive display settings
Mac allows users to set whether external drives are displayed in Finder and on the Desktop. You or an app may have changed the settings by mistake, which is why your thumb drive is not showing up on Mac. Do the following steps to make sure your external drive display is enabled:
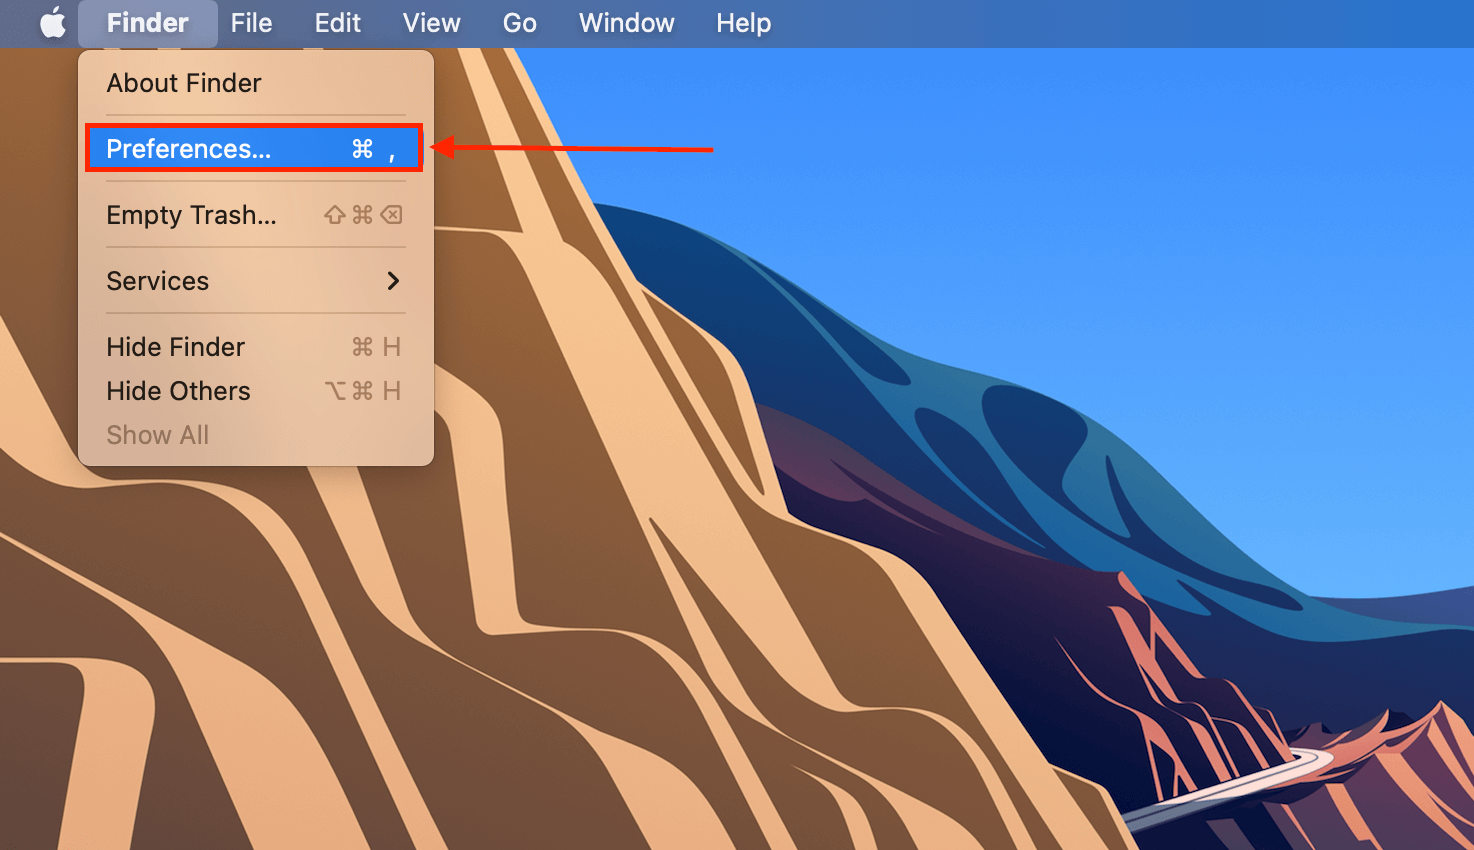
Step 1. Make sure Finder is open. Then, click “Finder” on the Apple menu bar, then “Preferences.”
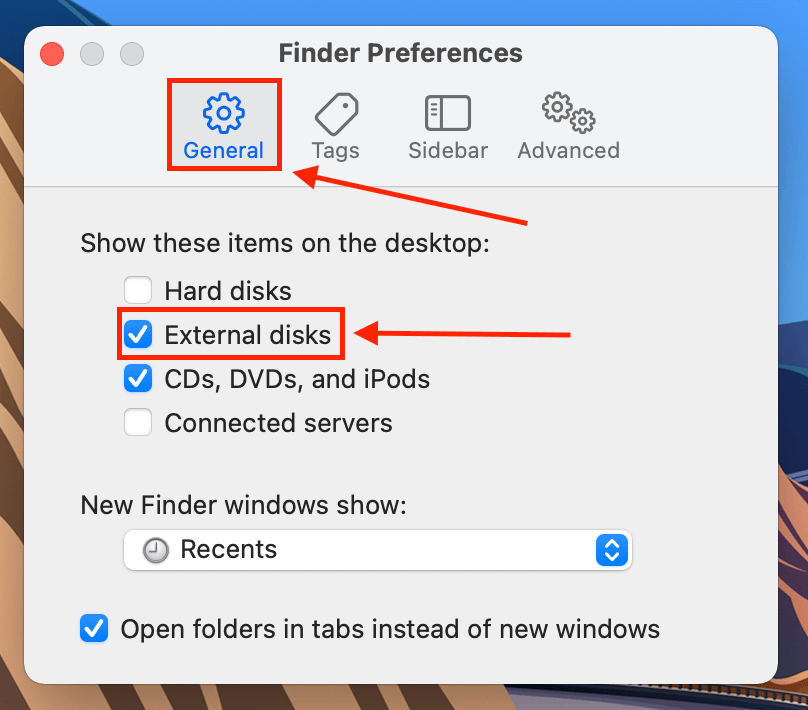
Step 2. Click on the General tab, then make sure the checkbox beside “External disks” is ticked.
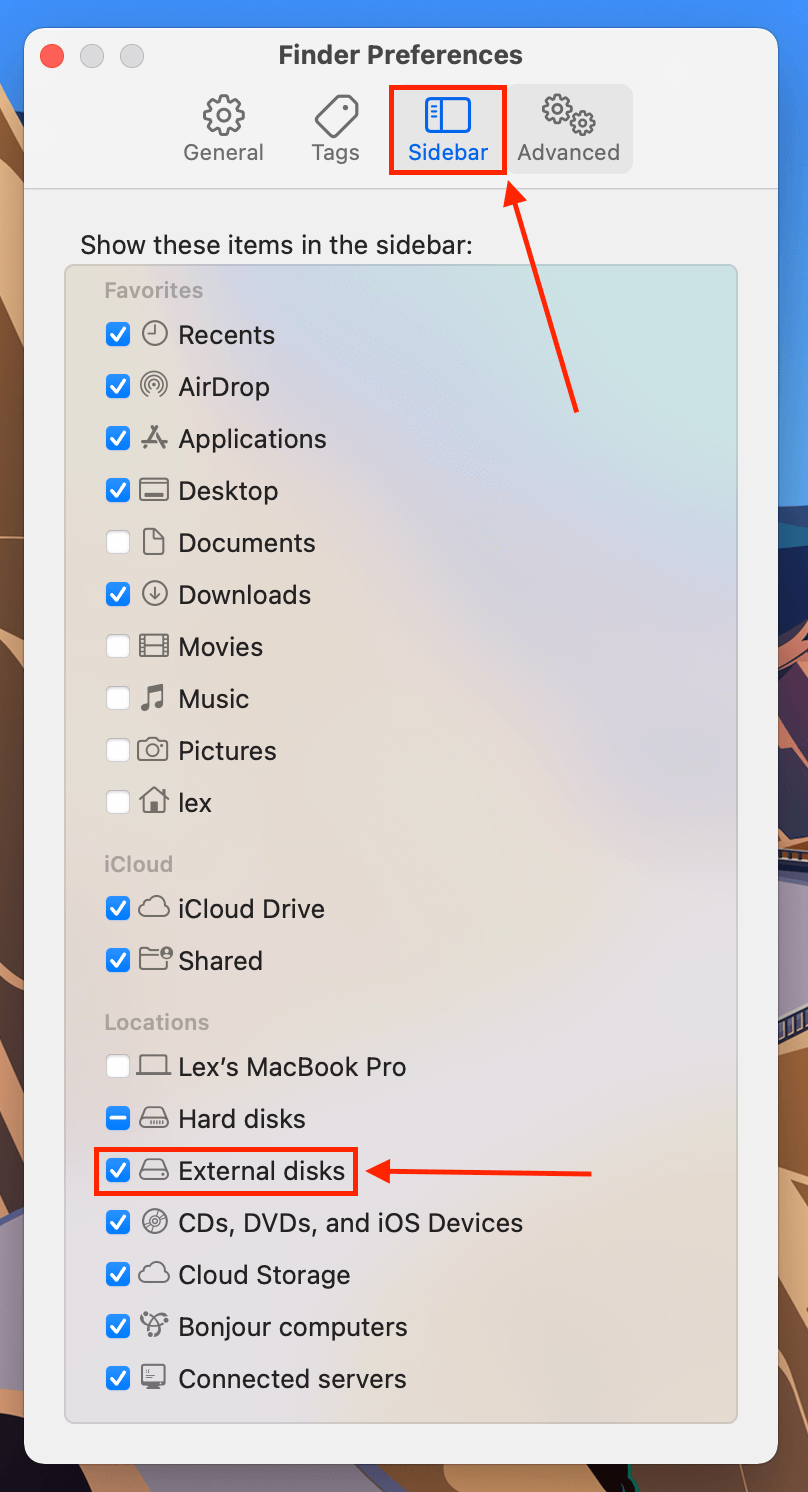
Step 3. Do the same in the Sidebar tab under the “Locations” section.
Fix 3: Update your drivers
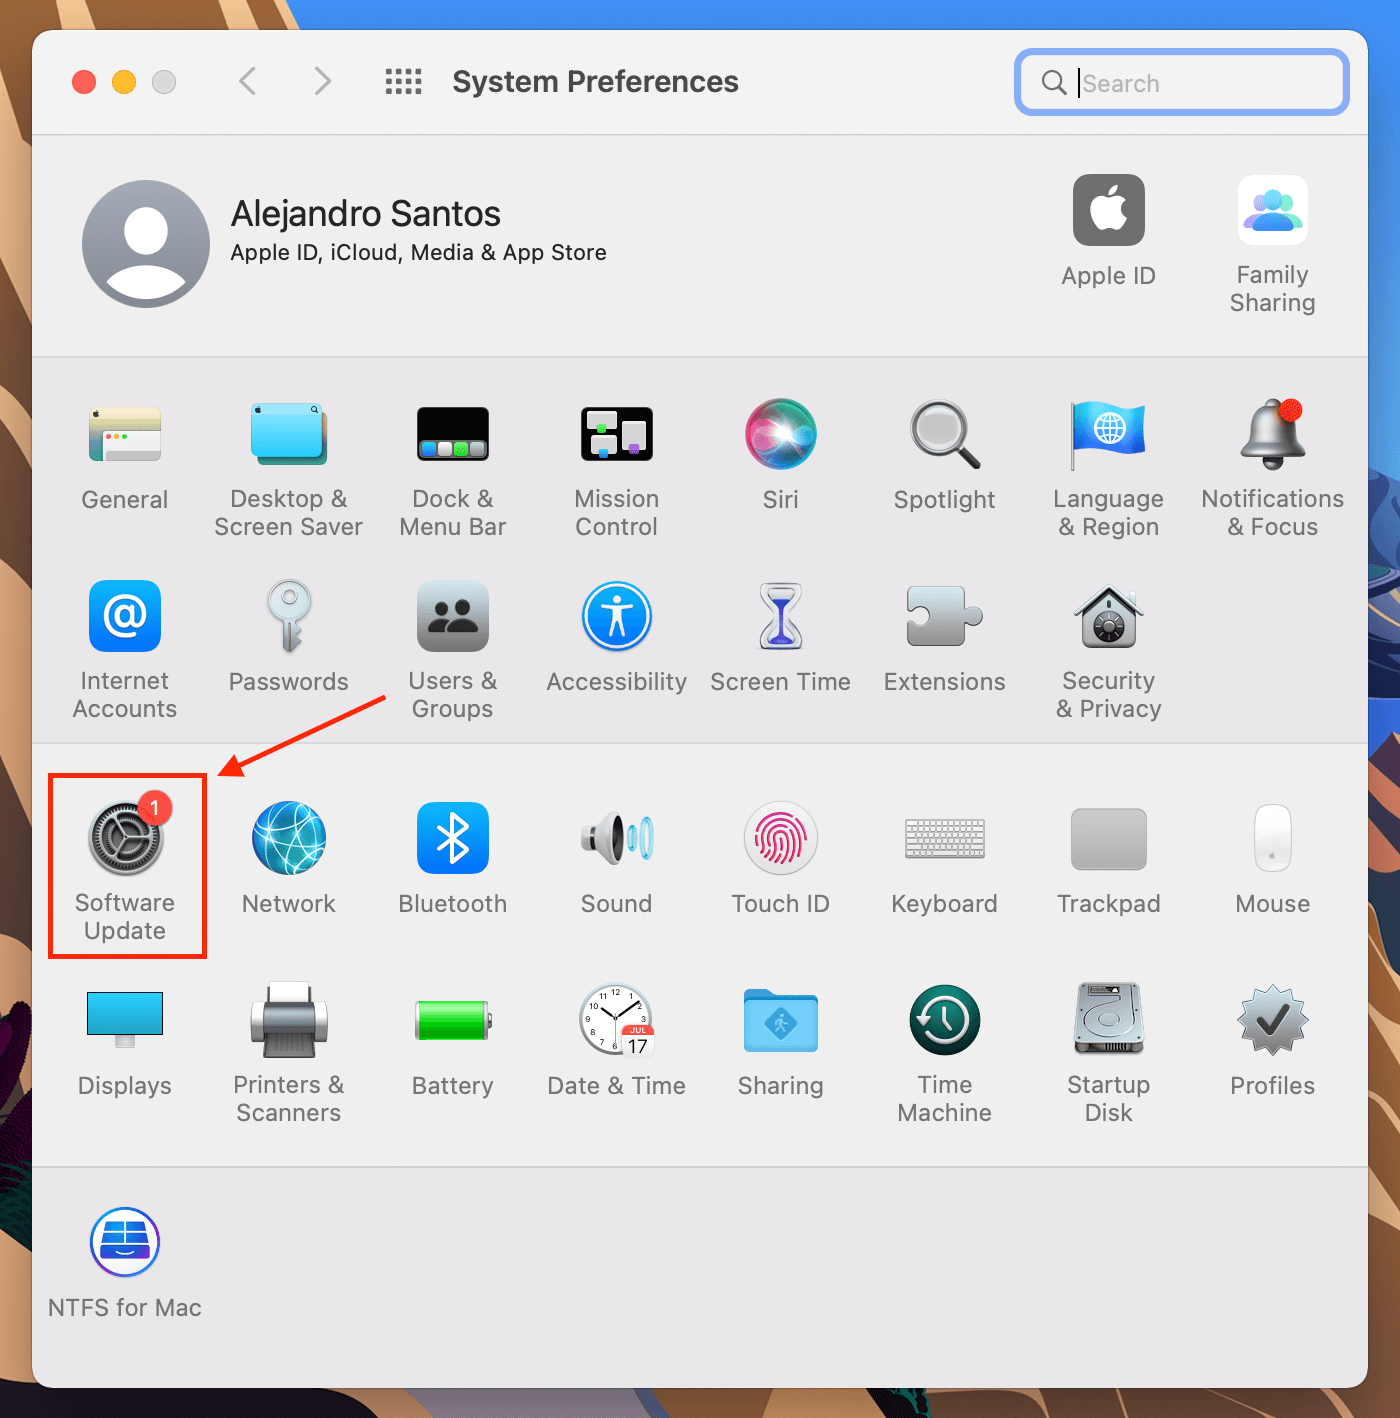
It’s also possible that your Mac is using outdated drivers, which may be why Mac won’t recognize your USB. To update your drives, open System Preferences > Software Update (yes, you’ll have to update the whole macOS to update your drivers).
Fix 4: Mount (or remount) USB drive
Your operating system might have gotten interrupted while mounting your USB, or your USB had been mounted improperly – this commonly happens when using faulty connectors or Mac ports. In many cases, Disk Utility will still be able to detect a USB even if macOS doesn’t. Open Disk Utility and try mounting/remounting your USB.
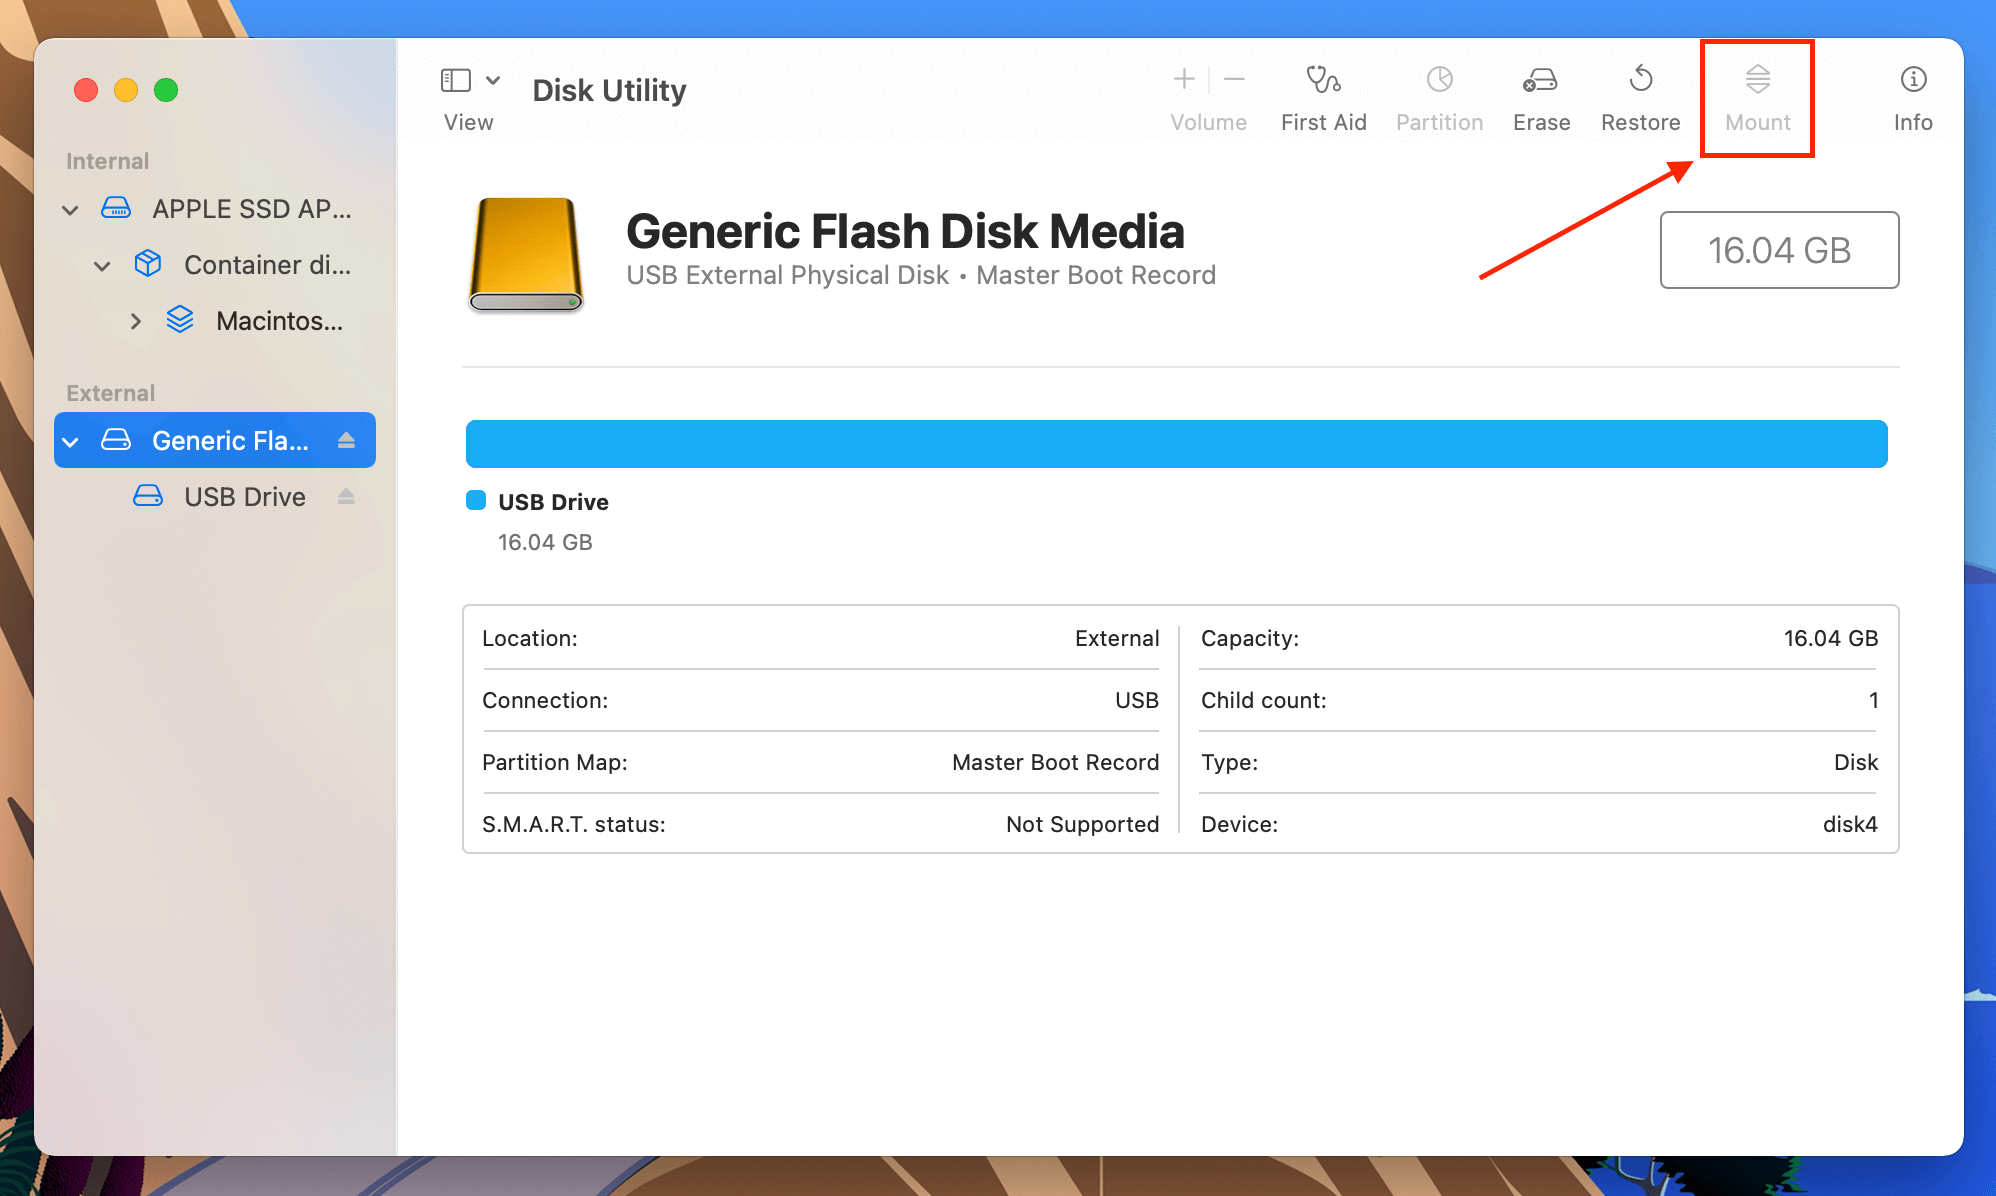
Fix 5: Use Disk Utility’s First Aid tool
Disk Utility also has a repair tool that scans for and fixes disk errors, mostly related to formatting and directory structure. It could possibly solve issues like your Mac not recognizing your USB device. To use it, open Disk Utility, select your USB, then click “First Aid.”
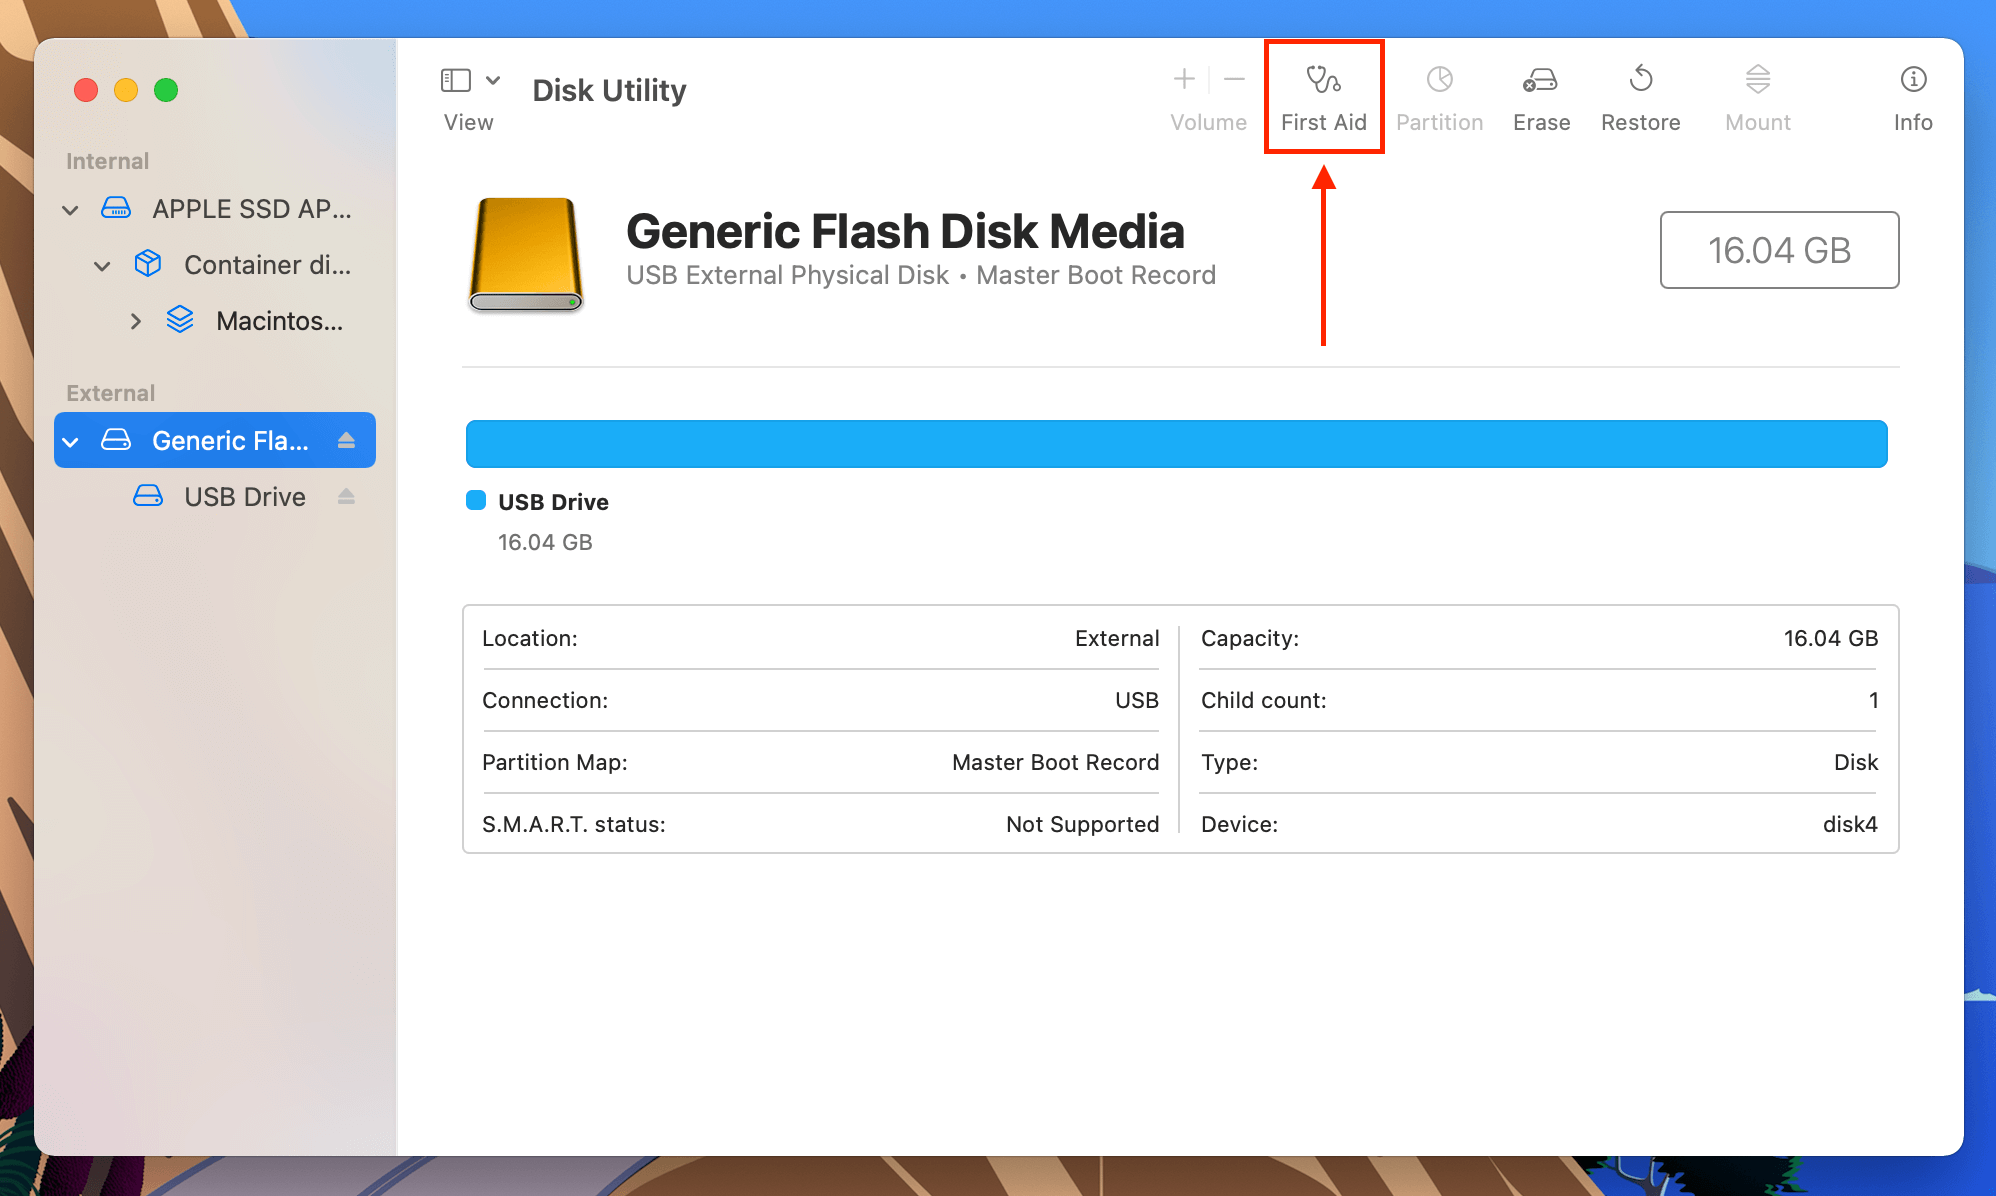
Fix 6: Reformat your drive to the file systems recognized by Mac
Mac can recognize the following file systems: APFS, HFS/HFS+, NTFS, exFAT, FAT32, and ext2. Your drive may be using a different file system, which is why your Mac doesn’t recognize the USB. You’ll have to reformat your USB to a file system Mac does recognize. Again, Disk Utility is the tool of choice. Simply launch it and click the “Format” button at the top-right half of the window.
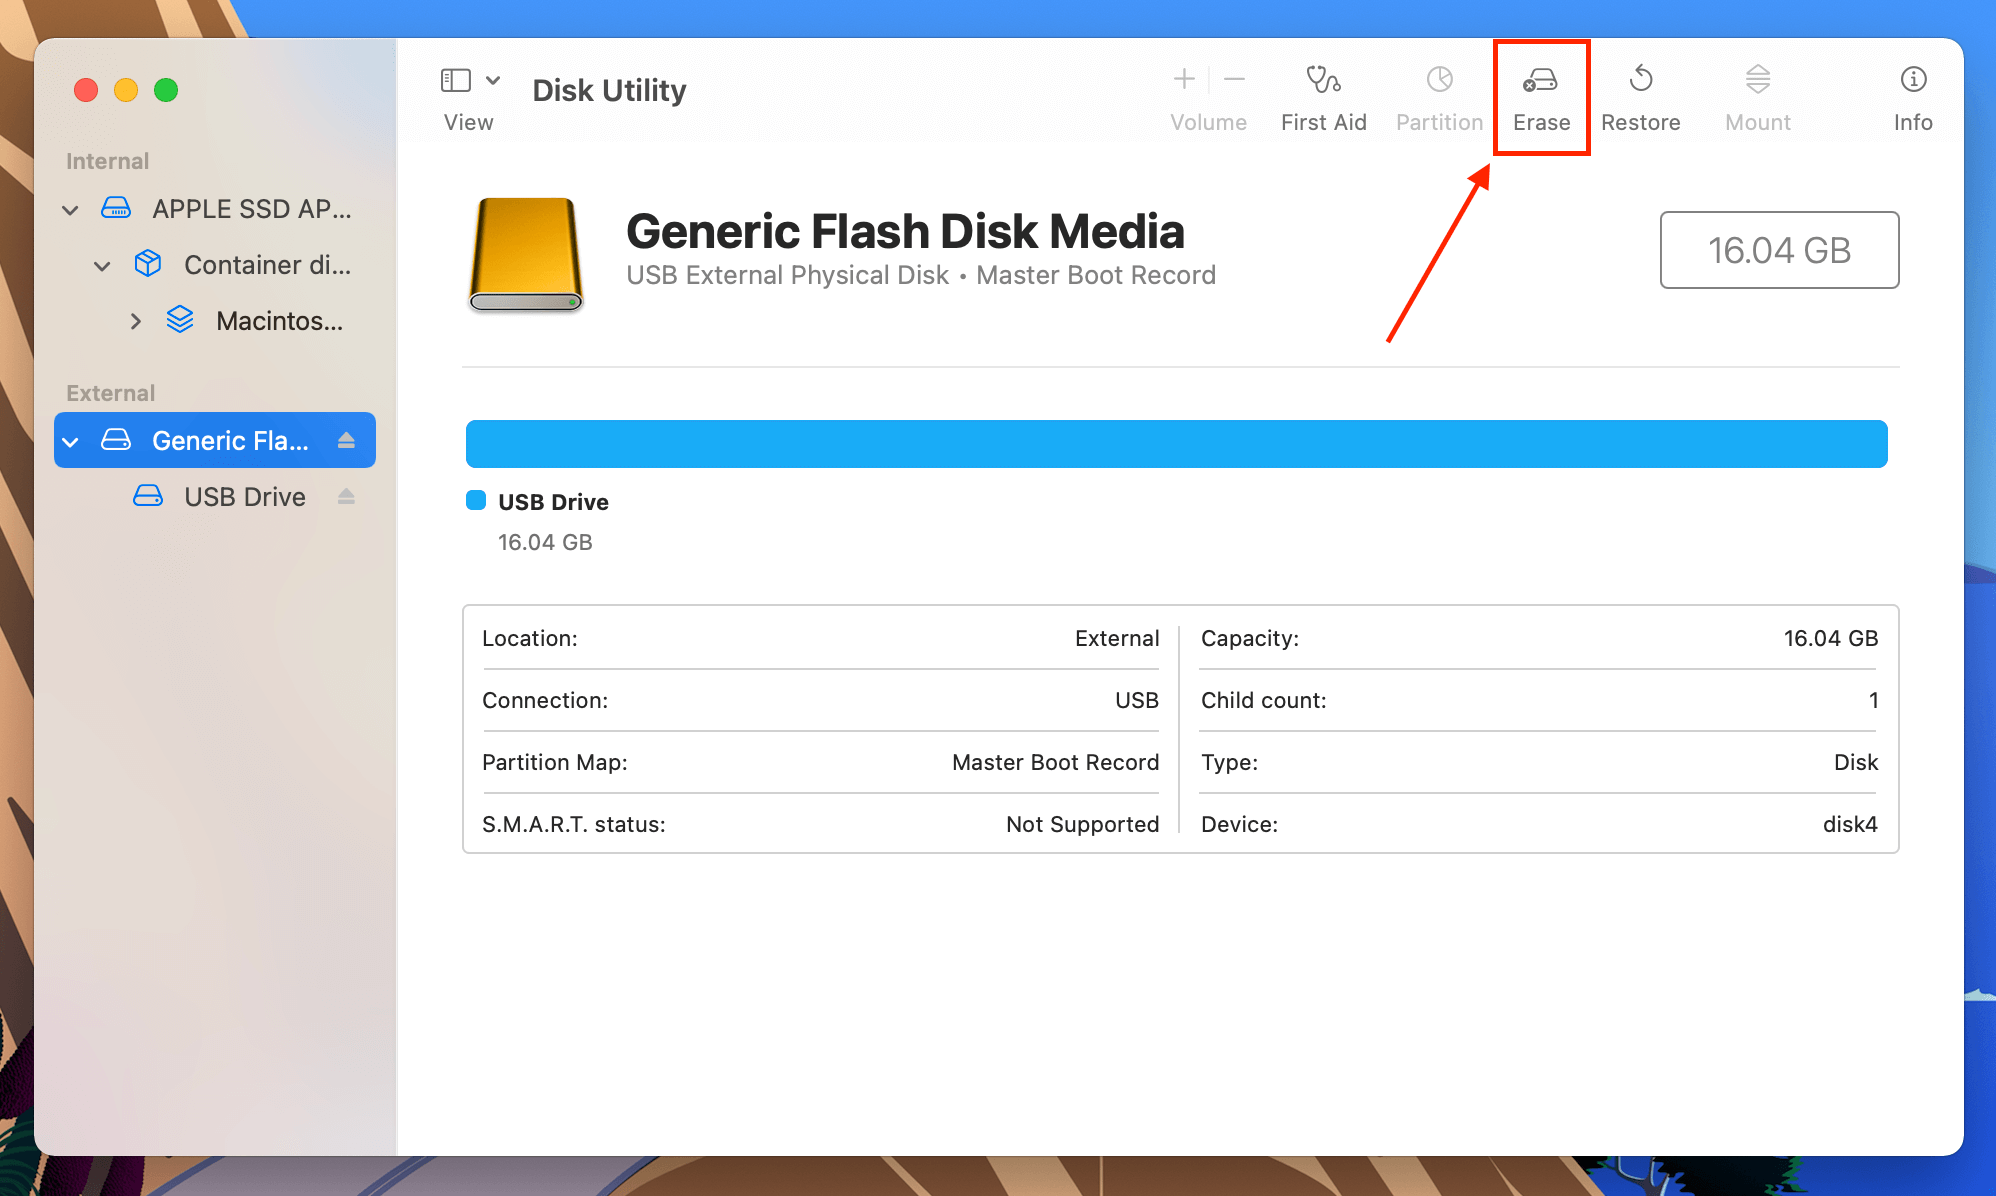
Fix 7: Use Another Computer
There are some partitions that Disk Utility won’t even detect at all (such as EXT4), which means you won’t be able to format it on your Mac. Instead, try connecting the USB drive to another computer that successfully recognized the device in the past. Then, use that computer to format the USB drive to a macOS-compatible file system.
Fix 8: Reset PRAM and SMC
If you’re using a Mac that isn’t using Apple Silicon (basically any Mac older than the M1 model), you can reset the PRAM and SMC controllers to troubleshoot your USB connection. PRAM stores information about your Mac’s settings, which can affect the behavior of its mechanical components – like USB ports.
The SMC, on the other hand, also manages hardware functions as well as power management. It’s possible that your Mac isn’t providing the USB with enough power to work as intended.
To reset your Mac’s PRAM:
- Turn off your Mac.
- Boot your Mac and immediately press and hold the following keys: Command + Option + P + R.
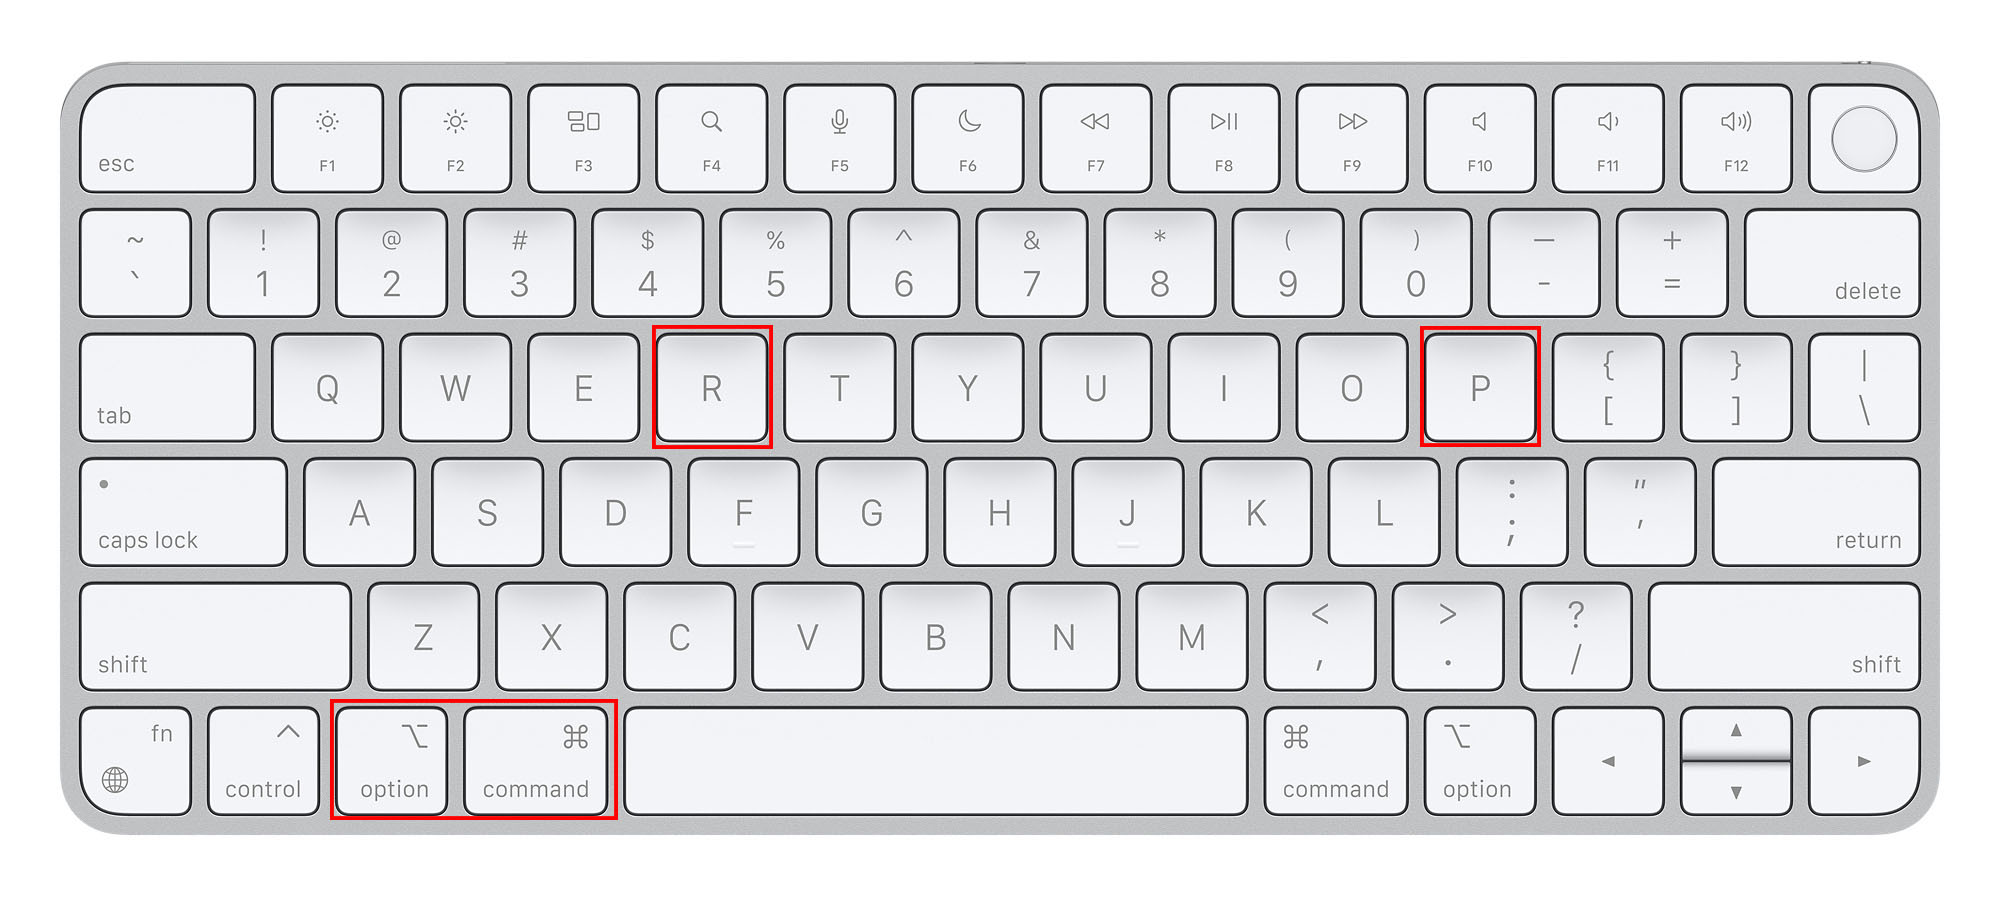
- Release the keys when your Mac shuts off and reboots again.
To reset your Mac’s SMC:
- Turn off your Mac.
- Press and the following keys: Power Button + Shift + Control + Option.
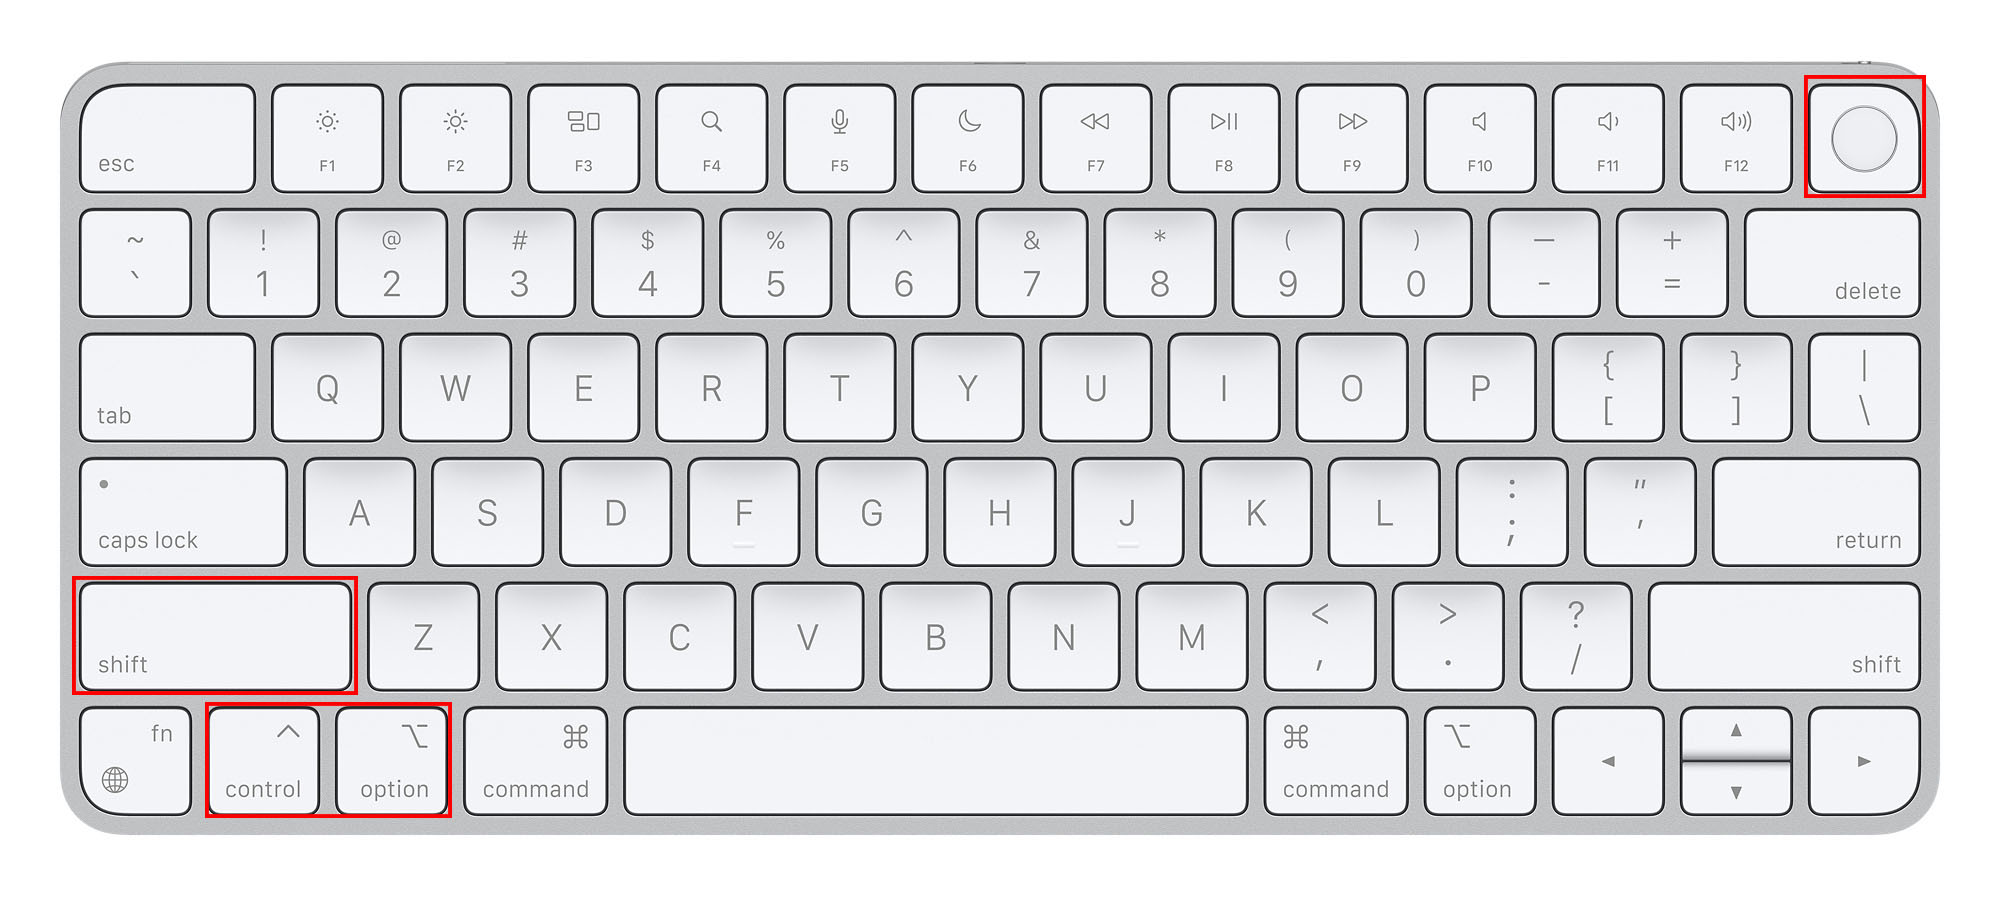
- Release the keys and boot your Mac.
How to Recover Data From USB Drive on Mac
Once your Mac properly recognizes your USB drive, check if all of your data is intact. When a storage device suffers damage, it’s best to expect that there will be data loss – even after fixing it. Some fixes (such as formatting) also cause this data loss for the sake of cleaning up the file system.
This section of the article focuses on recovering data from your USB drive. The most efficient (and cost-effective) way of doing this is by using data recovery software. For the sake of this guide, we’ll be using Disk Drill – a tool we often recommend to our readers due to its ease-of-use and high recovery rate. Don’t worry though, the process is similar for most data recovery tools.
Step 1. Make sure your USB is securely connected to your Mac, then download and install Disk Drill.
Step 2. Launch Disk Drill by opening Finder > Applications > Disk Drill and double-clicking its icon.
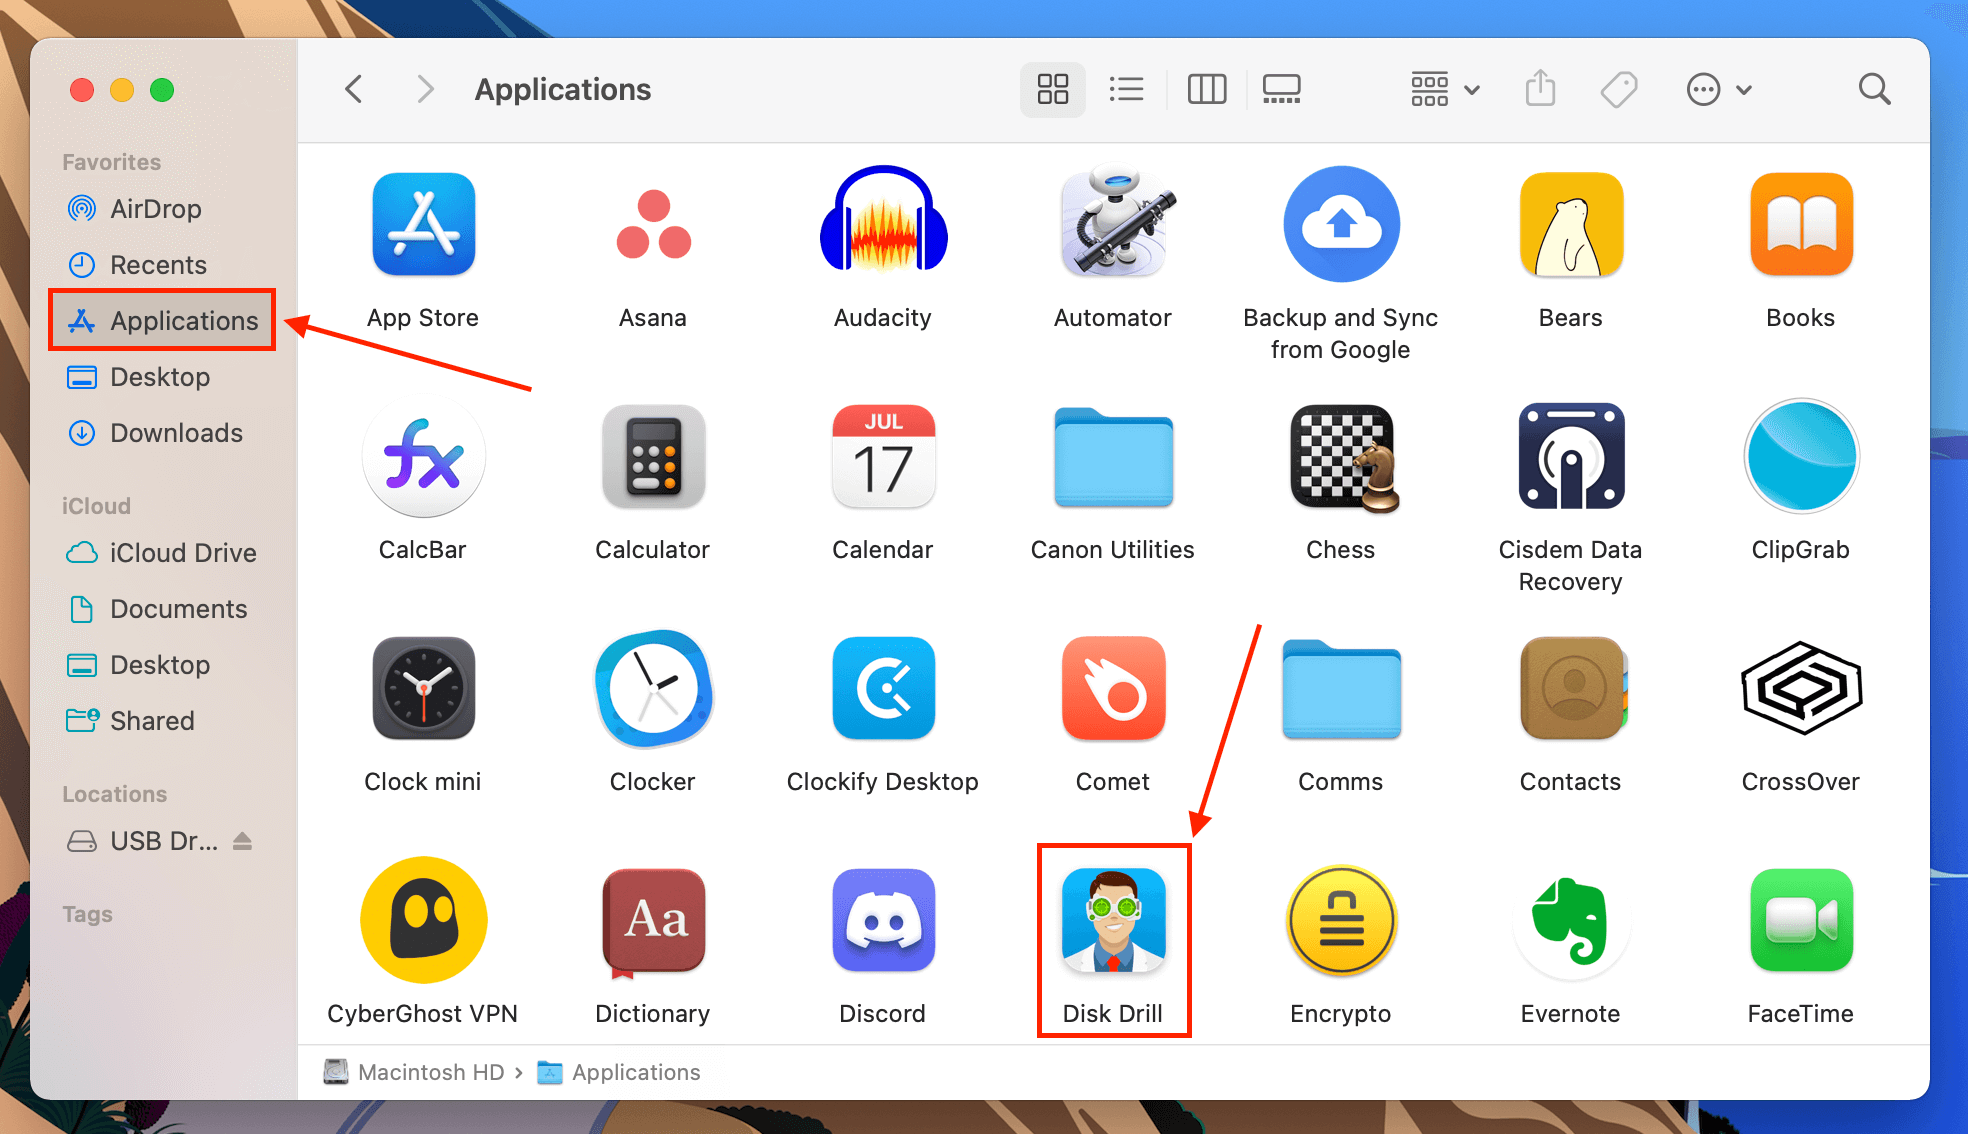
Step 3. At this point, there are two options. First, you can create an image backup of your drive and scan that instead. This is the preferred method if the USB is physically damaged, and we’ll show you how to do it in the following steps. If you want to recover your USB drive directly, skip to step 8.
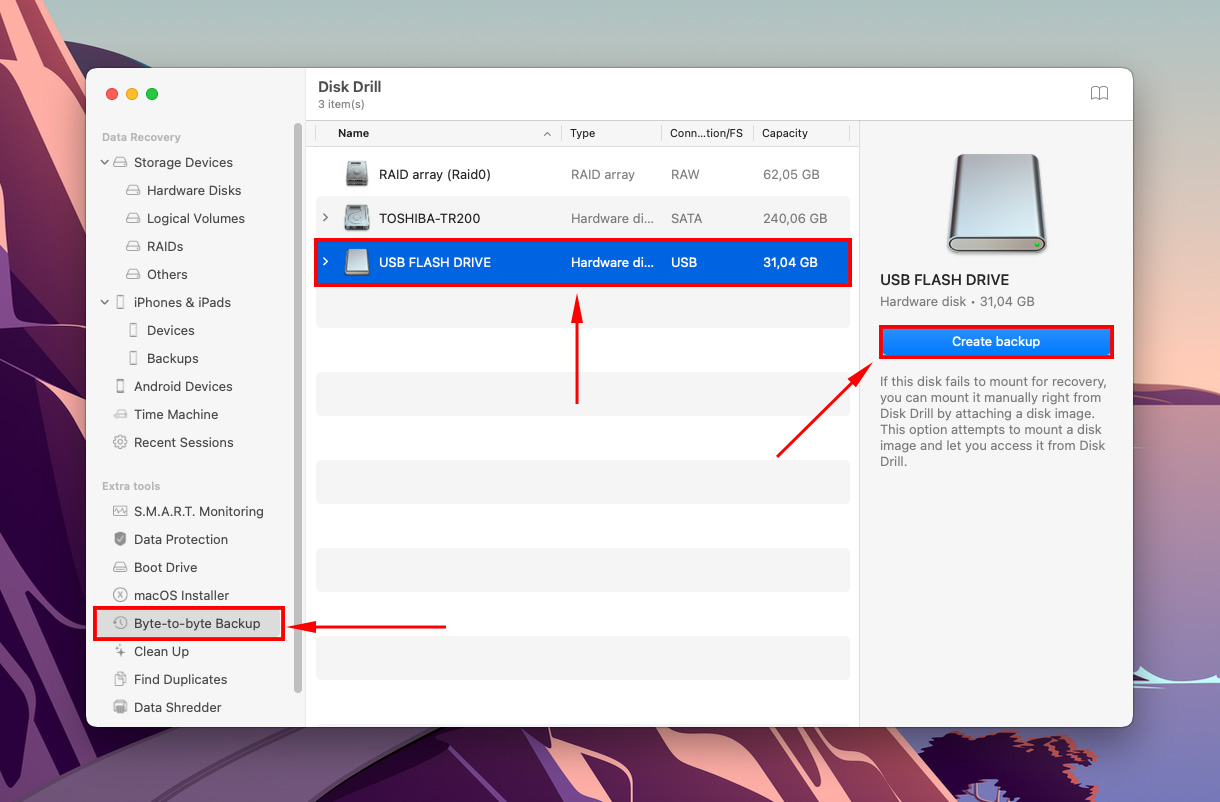
Step 4. On the left sidebar, select “Byte-to-byte backup.” Then, select your USB from the list, then click “Create backup.”
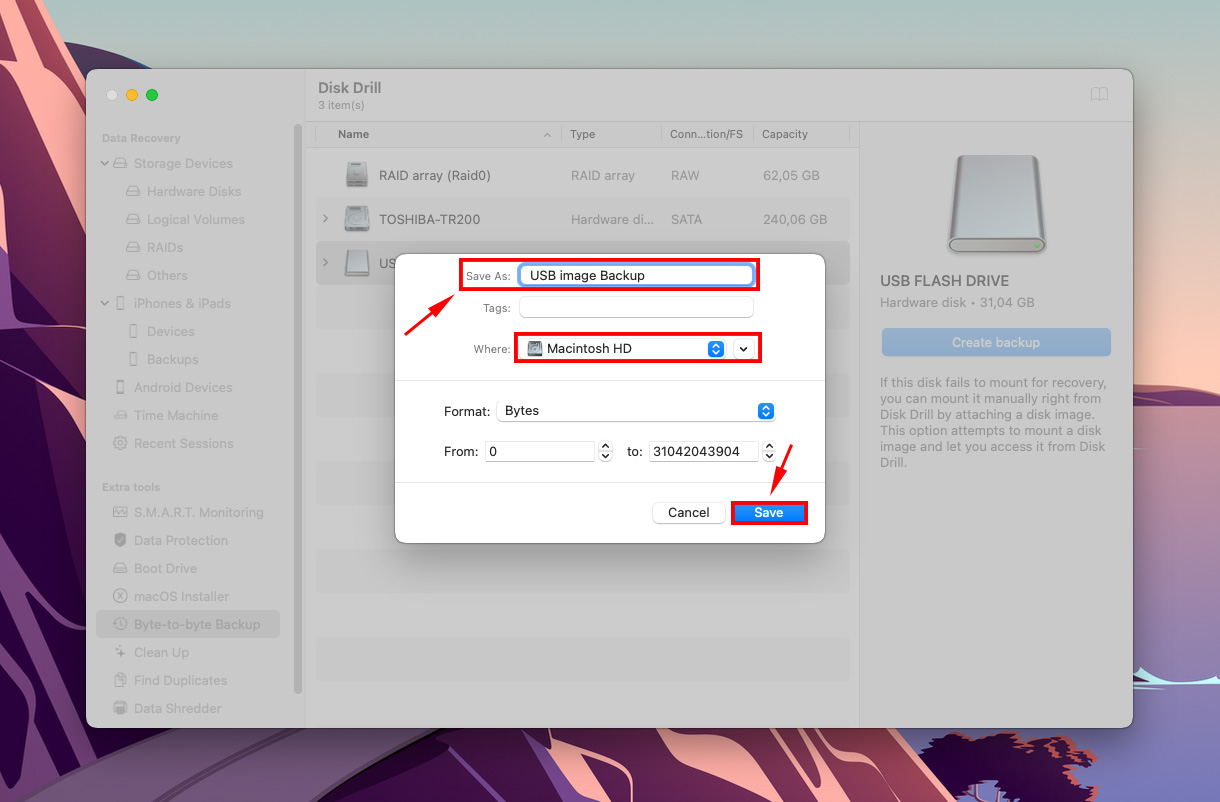
Step 5. Name your image backup, select a location on your computer to save the backup file, then click “Save.”
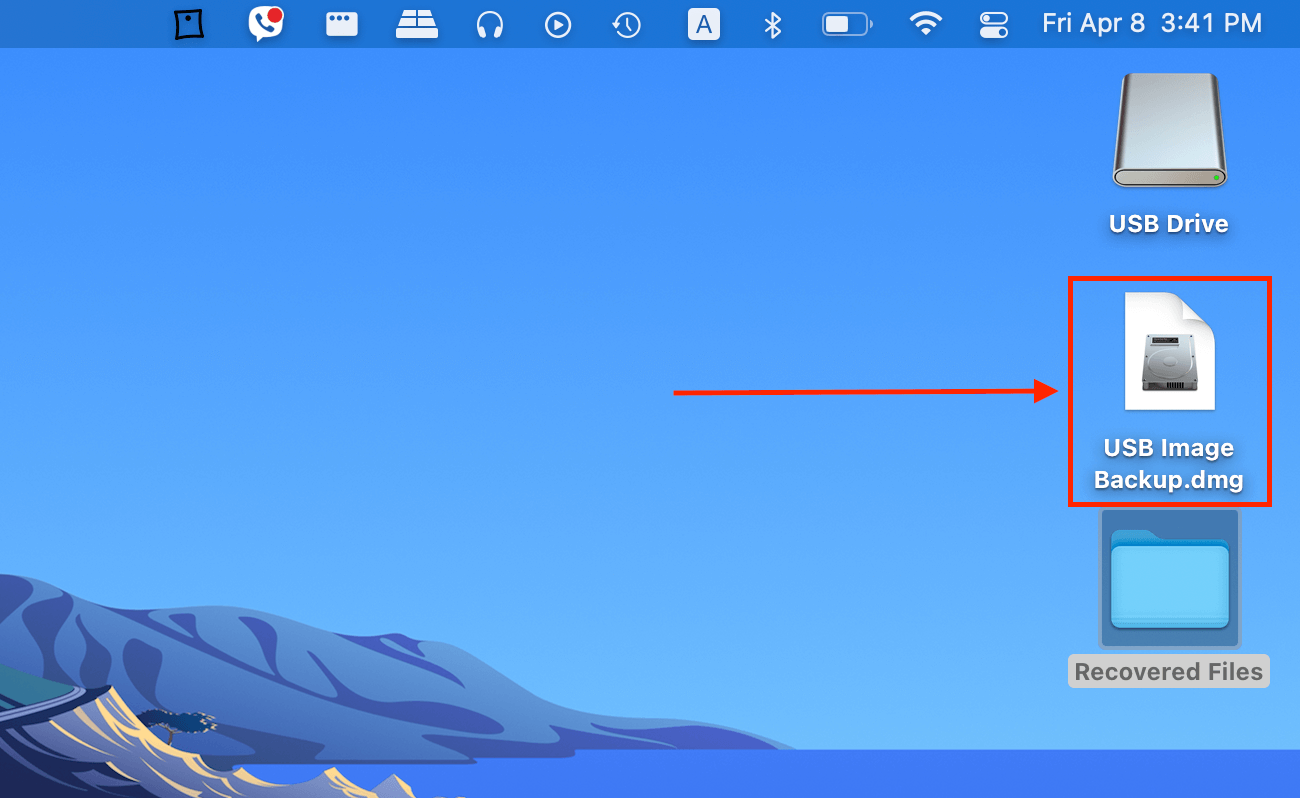
Step 6. Wait for the process to complete. You can then double-click the image backup file to mount it.
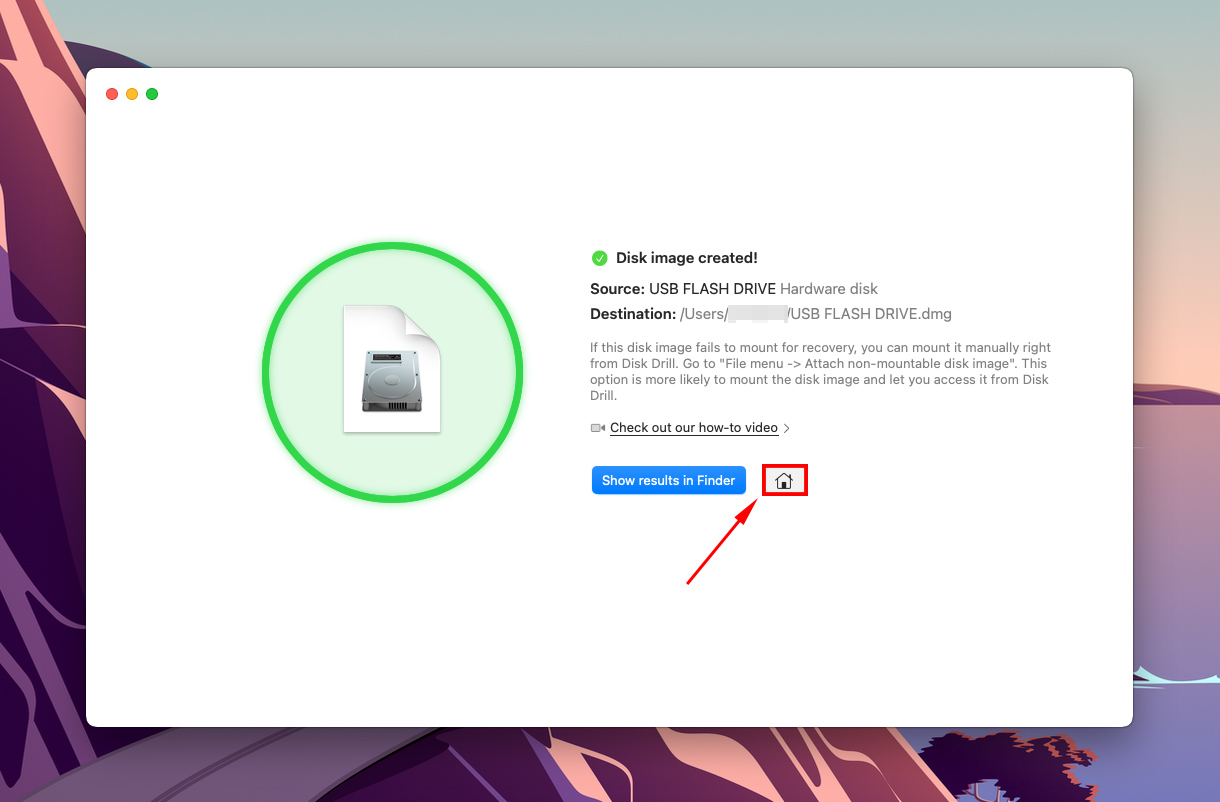
Step 7. Return to Disk Drill’s home screen using the home button.
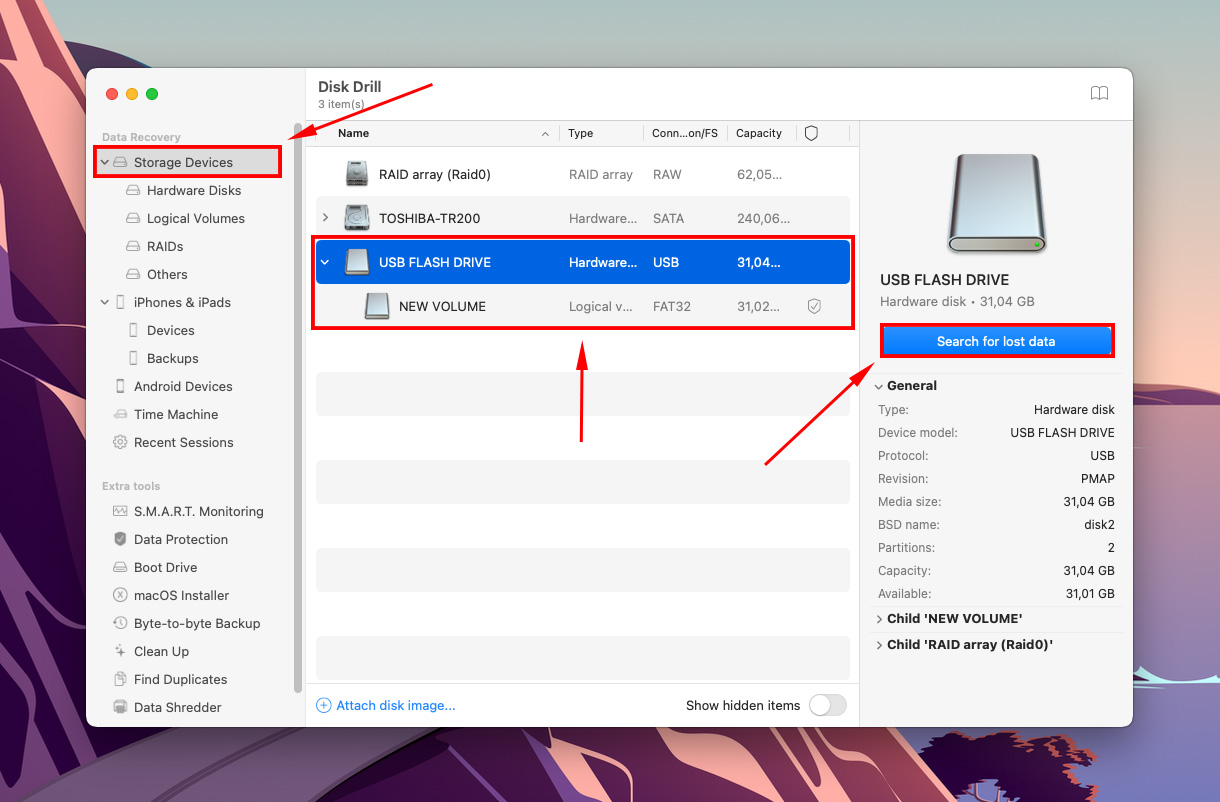
Step 8. Select “Storage devices” under “Data Recovery” in the left sidebar. Then, select your backup disk (or your USB if you’re recovering it directly), and click “Search for lost data.”
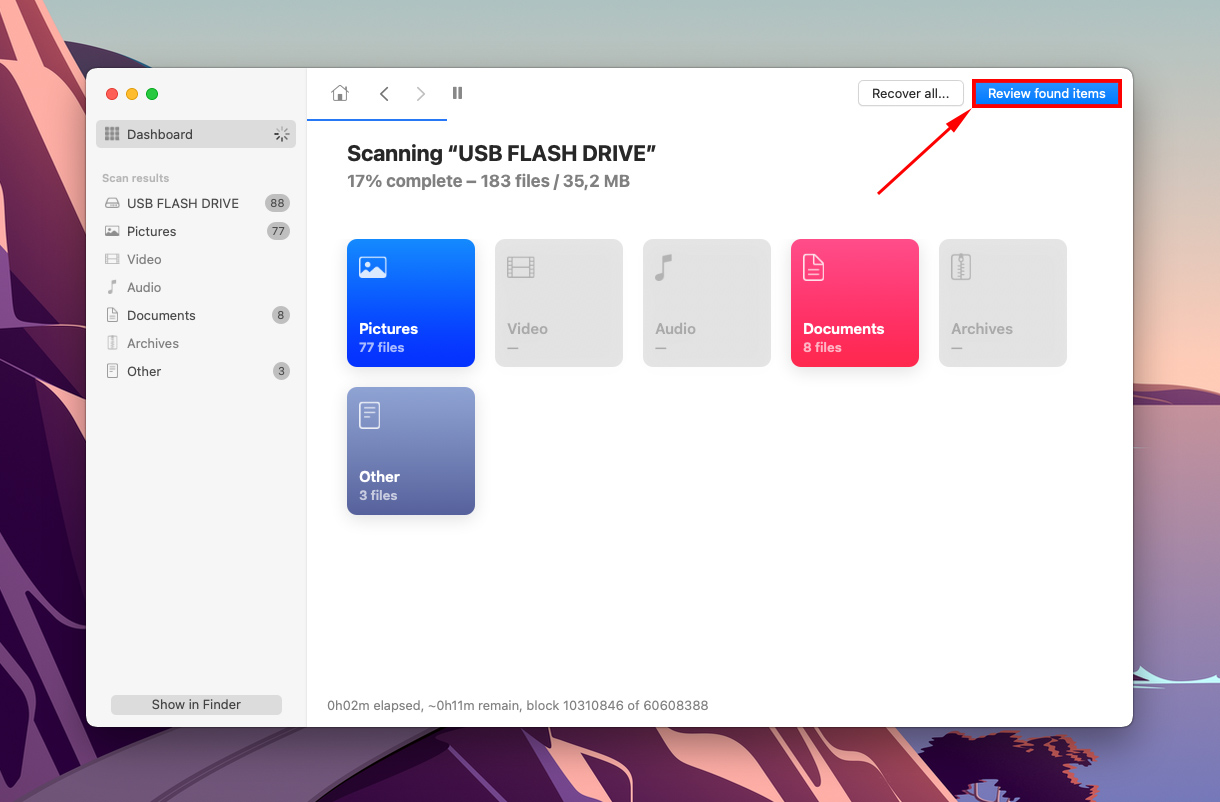
Step 9. Disk Drill will now scan your drive. Wait for the process to complete, then click “Review found items.”
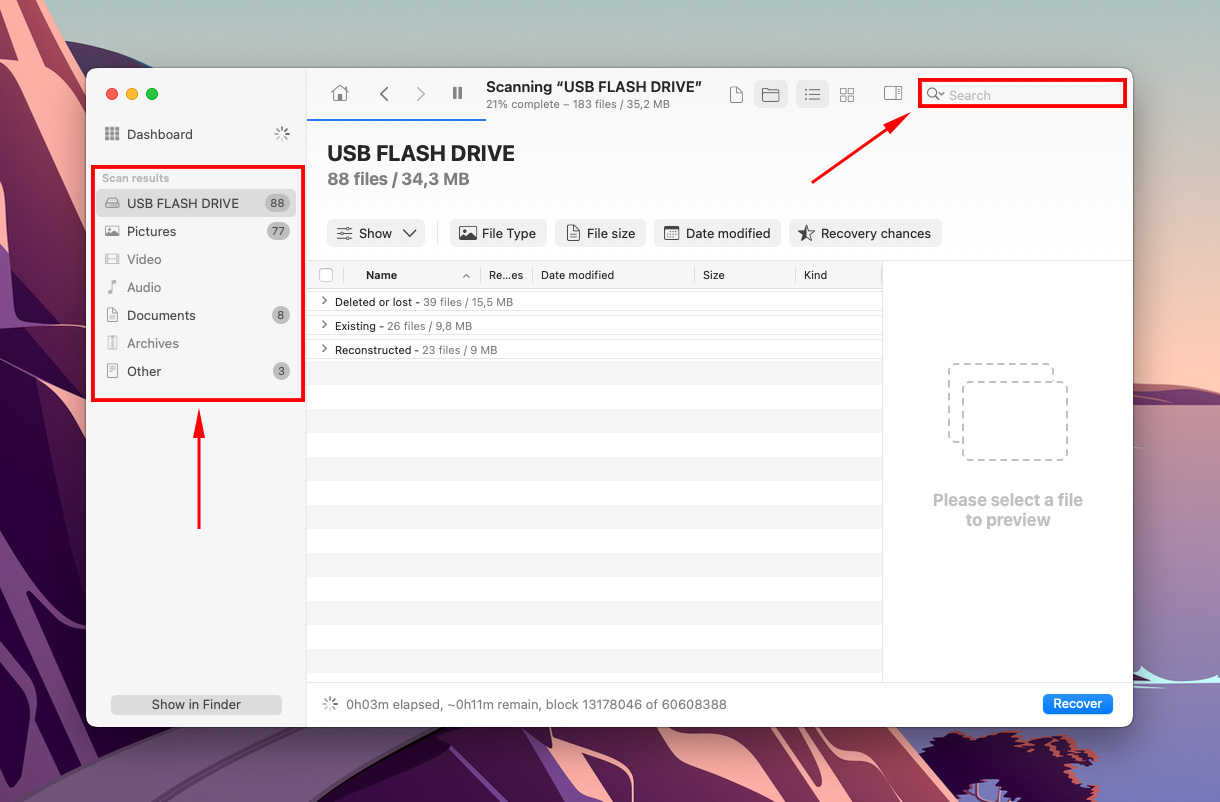
Step 10. You can filter the results by using the sidebar on the left, or search for specific files using the search bar on the top-right corner of the window.
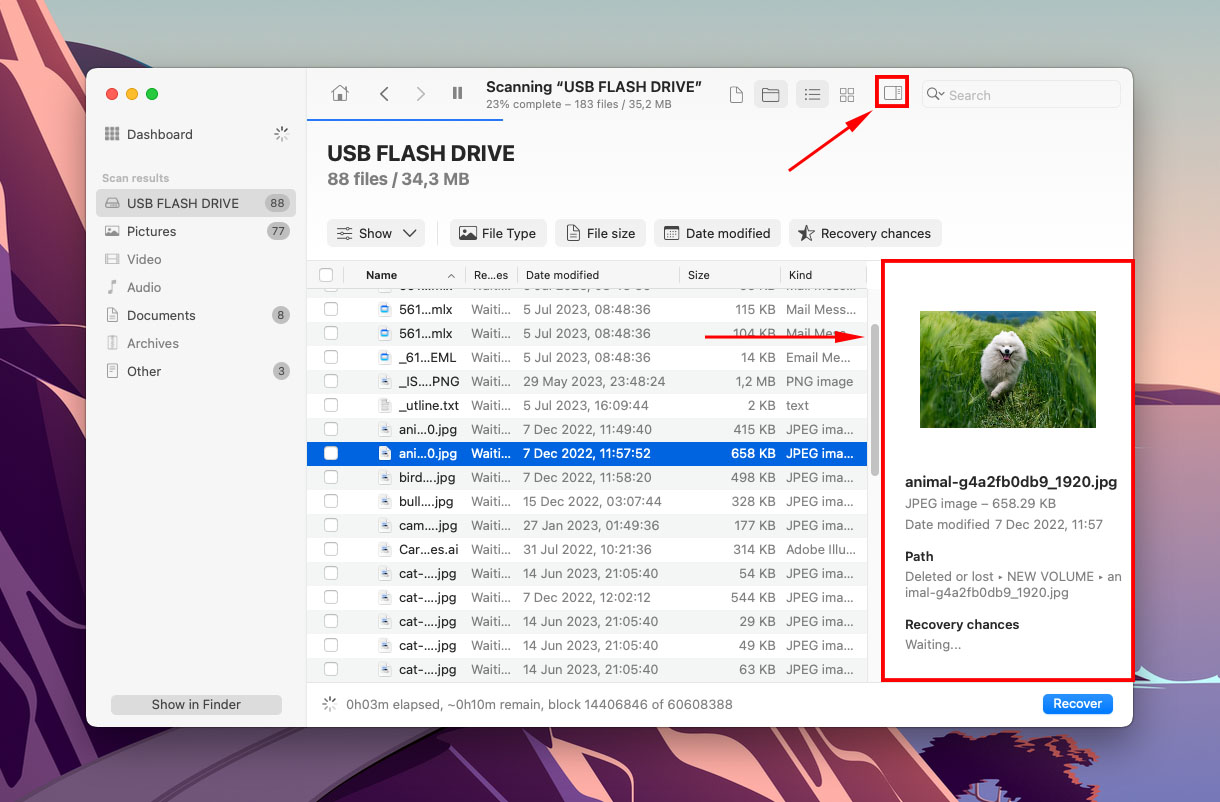
Step 11. Preview files by moving your mouse pointer to the right of their file names and clicking the eye button that pops up or enabling sidebar using a button at the top of the window.
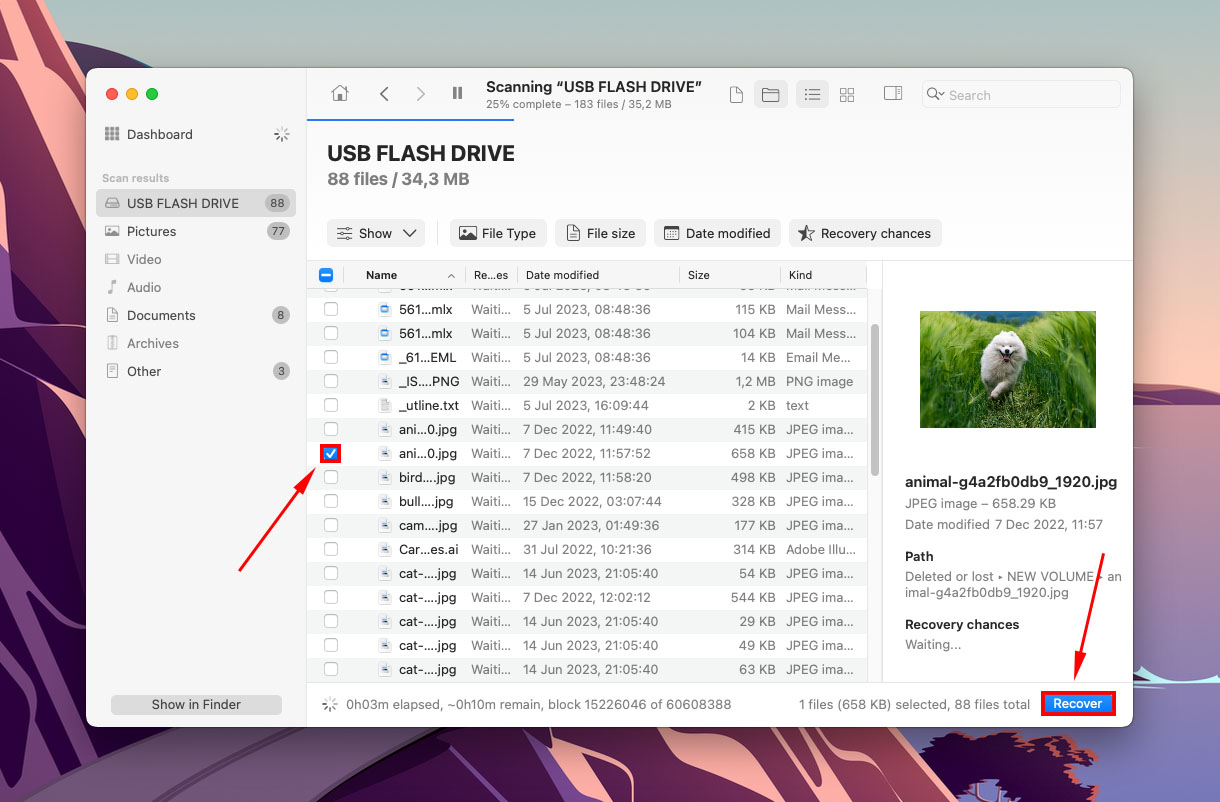
Step 12. Use the checkboxes in the left-most column to select the files you want to recover, then click “Recover.”
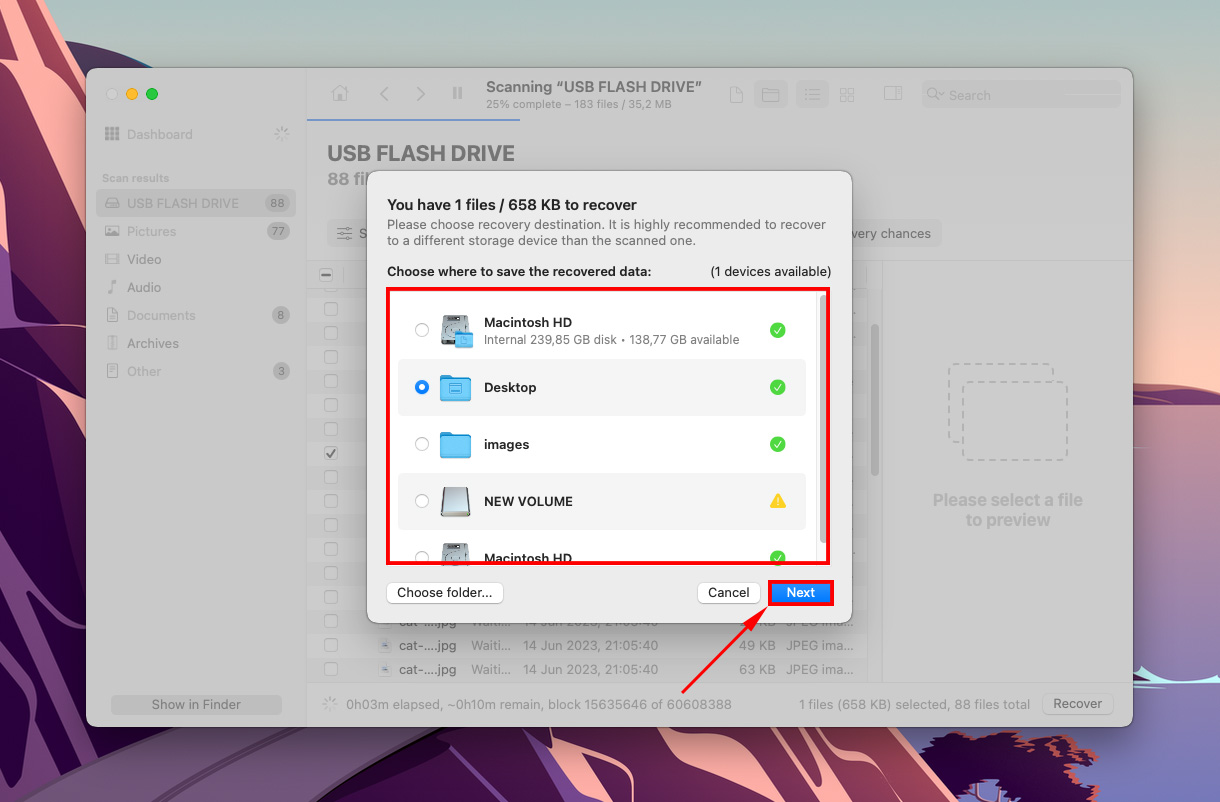
Step 13. Choose a folder on your computer where you want Disk Drill to save the recovered files. Don’t save it to your USB – you might end up overwriting the existing data. Then, click “Next.”
Conclusion
If your USB is not showing up on your Mac, immediately stop using it and assess its condition. The issue may be minor and easily worked around (like a faulty port) or it may indicate impending failure. Fortunately, you can often recover data from your USB in this state and you can even repair it.
However, remember that all storage devices have a finite lifespan. If your USB is old and experiencing these issues often, it may be near the finish line. So back up your data before it’s too late!
FAQ
- Incompatible format
- Drive corruption
- Faulty ports and connectors
- Outdated drivers
- Try another port and device and make sure that your USB is the problem.
- Open Finder > Preferences and make sure that “External disks” is checked in both the General tab and the Sidebar tab.
- Update macOS (System Preferences > Software Update).
- Use Disk Utility (Finder > Applications > Utilities > Disk Utility) to mount (or remount) your USB drive.
- Use Disk Utility’s First Aid function.
- Use Disk Utility to reformat your USB drive (formatting wipes your data from the disk, so make sure to read our flash drive data recovery guide after formatting).
- Desktop (as a .dmg file)
- Left sidebar in Finder
- Storage tab in System Information window (Apple menu bar > Apple icon > About This Mac)
- Disk Utility (Finder > Applications > Utilities > Disk Utility)


