
Is your Time Machine “Restore” button grayed out? Get started on repairs ASAP! Your backup data is at risk and it will only get worse the longer you wait. You also risk further loss while using your machine without the safety net of your backup drive.
Since Time Machine has a more complex file system structure than regular storage devices, this task requires a bit of finesse to ensure the least amount of data loss.
There’s a lot of info going around the internet, but we believe that we have compiled the most accurate, up-to-date, and reliable guide available. Read on!
Table of Contents
Reasons Why the Time Machine “Restore” Button is Greyed Out
Time Machine is powerful and reliable, but it uses a lot of software components (such as configuration files), to function the way it does. Unfortunately, those can become vulnerabilities – if one of them is affected by something like disk corruption, the entire backup system will not work as intended.
Start with identifying why Time Machine “Restore” is greyed out in order to determine the appropriate solution.
| Cause | Summary & Solution |
| You’re viewing the current timeline. | If you just entered Time Machine when you noticed that the Restore button is greyed out, you’re probably just looking at the current instance of Finder (as it is right now). Try clicking the “up” arrow on the right to view past snapshots. |
| Your Time Machine drive has an incompatible file system format. | Your Time Machine drive and your Mac must have the same file system format for them to work together properly. Solution: Method 2 |
| Your Time Machine backup is incomplete. | Time Machine might have been unable to finish backing up your data. You’ll have to delete that backup and start again from scratch. If you need whatever data was backed up originally, see this section. |
| Your Time Machine backup is corrupted. | Your Time Machine backup drive may have gotten corrupted due to a virus infection, improper shutdowns, and other logical damage. This can severely affect the integrity of the backup itself. Your backup drive may still be recognized by macOS but it won’t function as intended. Solution: Method 1 |
| Your local Time Machine local snapshots are corrupted or incorrectly indexed. | Disk errors, software bugs, disk space issues, and file system changes may corrupt your local Time Machine snapshots, causing the error. Solution: Method 3 |
| You don’t have the necessary permissions. | Time Machine may have backed up certain files that were owned and restricted by another user. If this is the case, try logging in with the file owner’s user account. On the other hand, it’s also possible that permissions have been corrupted. Alternative Solution: Method 1 |
| Time Machine is not configured and greyed out or its configuration data is corrupted. | It’s possible that Time Machine is not working because its configuration files have gotten corrupted or damaged by disk errors that affected your local directories. Solution: Method 4 |
Yes, Your Backup Data is At Risk – What To Do
Unfortunately, issues with your Time Machine backup very much affect the actual backup data. While fixing your backup is possible, some, most, or all of its data may be lost in the repair process (depending on the method).
If the data on your Time Machine drive is important, we strongly recommend that you secure your files before attempting repair – do it ASAP if you can.
- Disk Drill Beginner-friendly data recovery software that excels at scanning APFS file systems and recognizes a massive number of file signatures. It allows you to unlock encrypted drives (with a password) and you can create an image backup of your backup drive (backup-ception) in case it’s at risk of failure.
- UFS Explorer One of the best-performing data recovery software on the market but it’s kind of ugly. The interface is cluttered and has a lot of popup menus that make the process tedious, but it’s good at restoring different types of files (especially documents) from APFS file systems.
- R-Studio Intimidating but very powerful data recovery app that can also unlock encrypted drives and create (and restore) image backups. You can “teach” R-Studio custom file signatures, so it’s suitable for users with a lot of unique project files. There is a slight learning curve.
How to Fix A Greyed-Out “Restore” Button in Time Machine
There are 4 methods to repair a greyed-out Restore button on your Mac. Each fix is specific to the error that caused it, so make sure that you conduct a proper diagnosis first.
Method 1: Run First Aid on Your Time Machine Drive
First Aid is a Disk Utility feature that can automatically detect and repair simple disk errors. It’s not powerful enough to fix everything, but it can solve many logical errors related to the drive’s file system that could likely be preventing Time Machine from operating properly.
Step 1. Connect your Time Machine backup drive to your Mac.
Step 2. Open Disk Utility (Finder > Applications > Utilities).
Step 3. Select your Time Machine drive (not volume) from the left sidebar, then click the First Aid button.
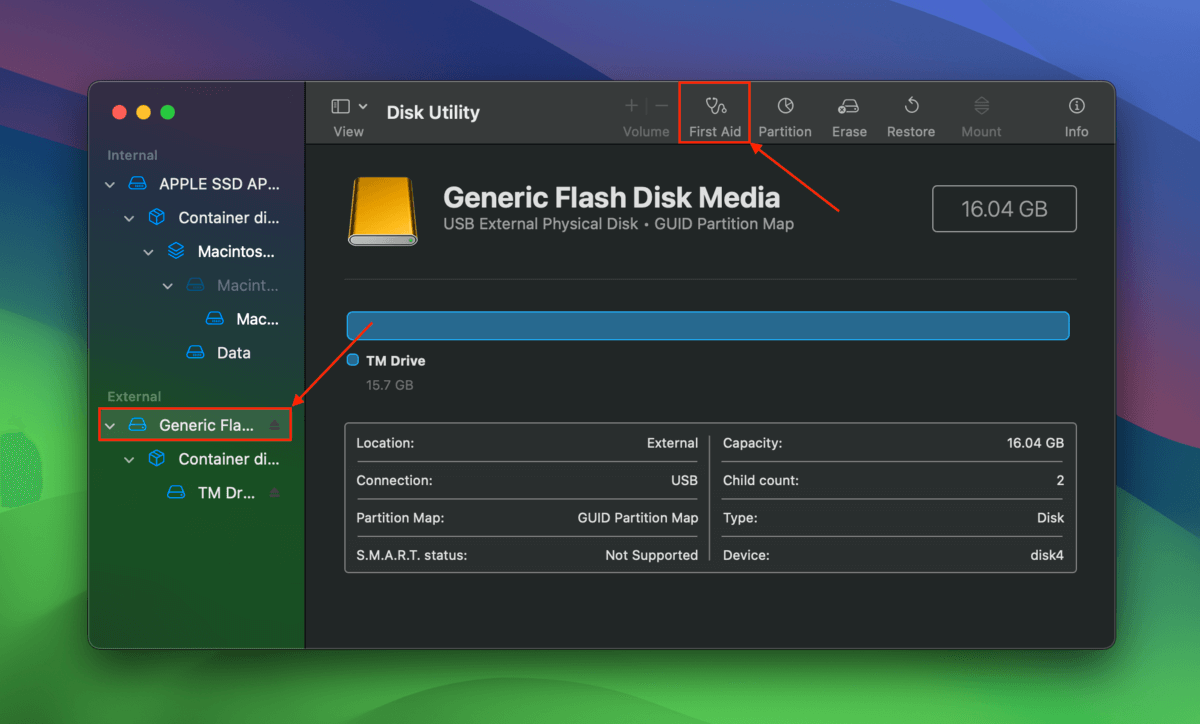
Step 4. Click Run when prompted to confirm the operation.

Method 2: Reformat Your Time Machine Drive
MacOS can only work with Time Machine drives using the same file system format – in fact, Time Machine sets up your drive this way by default.
It’s possible that you created the backup while your Mac was using another file system, and then changed it down the line.
To get your Time Machine drive to work with macOS, you need to format it to the correct file system. Time Machine will do this automatically for you, but we prefer using Disk Utility’s Erase tool at least for the first time you’re setting up your backup again.
Step 1. Connect your Time Machine drive to your Mac.
Step 2. Open Disk Utility (Finder > Applications > utilities).
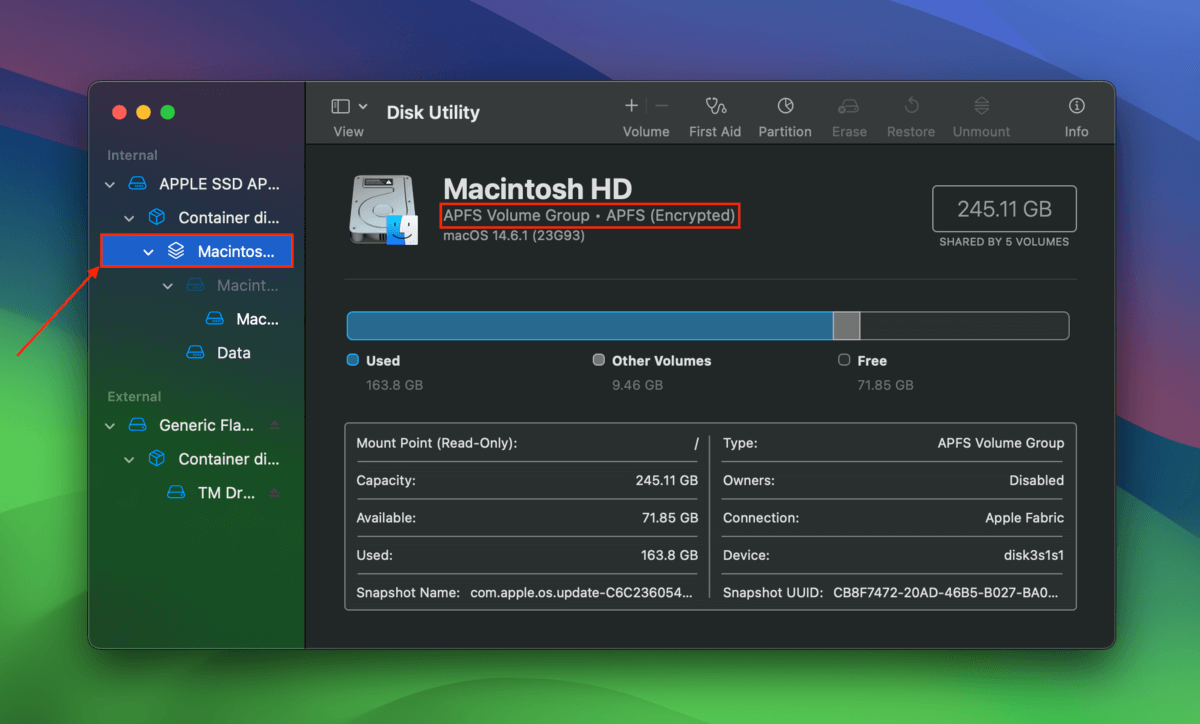
Step 3. On the left sidebar, expand your Mac’s system drive and click Macintosh HD. Check which file system your computer is currently using.
Step 4. On the left sidebar, click your Time Machine drive (not volume). Then, click Erase.
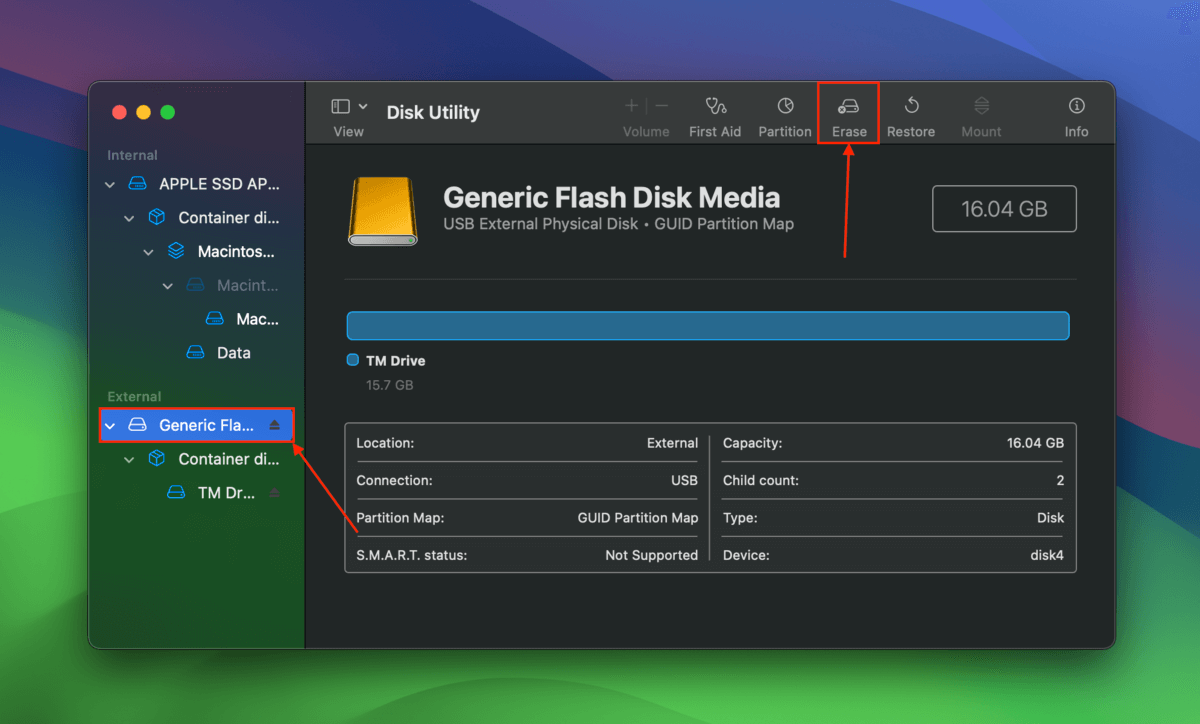
Step 5. Name your drive. Then, set its Format to whatever file system you noted in step 3 and its Scheme to GUID Partition Map. Finally, click Erase to confirm the action.

Method 3: Delete Local Time Machine Snapshots
When you enable Time Machine and set up your backup drive, it continues to take “local” snapshots of your data even when your drive isn’t connected. Unfortunately, they can be corrupted and improperly indexed, leading to issues with Time Machine’s functionality.
Deleting these local snapshots may also eliminate the conflict they are causing with Time Machine. You can delete them with just a few lines of Terminal commands.
Step 1. Open the Terminal app (Finder > Applications > Utilities).
Step 2. Start with the command that lists down all the local Time Machine snapshots on your machine:
tmutil listlocalsnapshots /
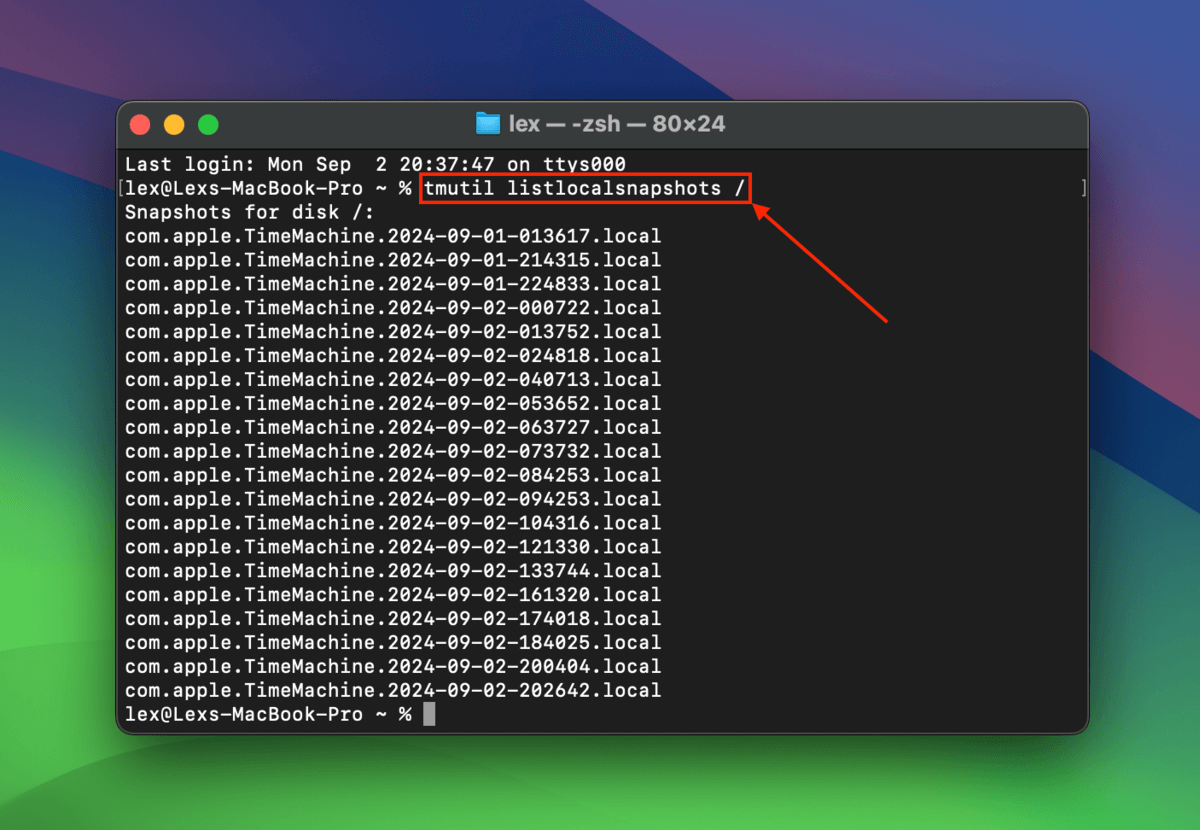
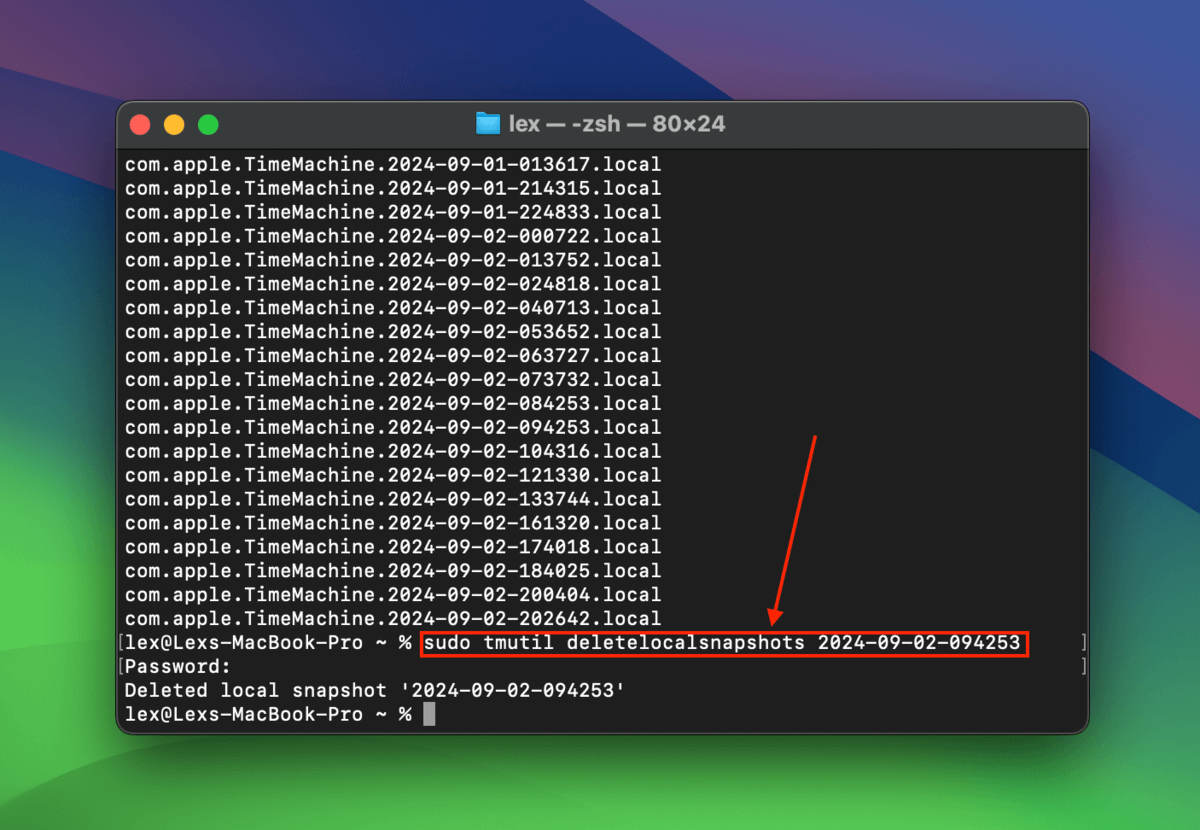
Step 3. Next, execute this command to delete a local snapshot:
sudo tmutil deletelocalsnapshots 2024-08-30-185712
Replace the last chunk of the command with your own snapshot’s date and code.
Step 4. Keep deleting local Time Machine snapshots one by one until you find the snapshot responsible for the error.
Method 4: Reset Time Machine Preferences
Your Time Machine preferences are stored in a system file in your Mac library. Like any other file, it’s prone to getting corrupted. If it appears, you can reset your Time Machine preferences by deleting com.apple.TimeMachine.plist in the ~/Library/Preferences/ and the /Library/Preferences/ folder.
Is your Time Machine drive unfixable?
If none of the above methods were effective in repairing the error, it may be too severe for DIY solutions. We recommend following our guide on how to recover data from an external hard drive, where we use one of the tools we suggested near the beginning of this article.


