
Did you accidentally delete precious photos from your SD card? Recovery is still possible, especially if not much time has passed. But to ensure that you have the best chance of recovering as many photos as possible, you need the right methods, right now.
This article is a short and sweet guide on: (1) how to recover deleted photos from your SD card on a Mac and (2) how to maximize your recovery success rate. Read on!
Table of Contents
Simple Ways to Maximize the Success Rate of Your SD Card Recovery Attempt
While it’s definitely possible to recover deleted pictures from an SD card, successful data recovery is never a 100% guarantee, but there are ways that you can improve your chances and possibly increase the number of files you recover during your attempt:
- Stop taking photos! Each new photo saved to your memory card can potentially overwrite the remaining data of the deleted images (which recovery tools need to restore your photos). Overwriting makes it impossible to recover deleted photos from your camera SD card. We recommend that you safely eject your SD card and set it aside until you’re ready to perform recovery.
- Prepare your gear. Keep your Mac plugged into the wall and make sure that you have a high-quality USB card reader so you don’t have to worry about disruptions while you recover images from your SD card (which can make the situation a LOT worse).
- Attempt recovery ASAP. Lost files are easiest to recover right after they get deleted. The longer you wait, the harder it will be to restore your missing photos. Even if you never used it since, the additional wear from age can still affect recoverability (not by much but every little bit counts).
4 Methods to Restore Deleted Photos From an SD Card on Mac
In this section, we compiled comprehensive guides on how to get pictures off your SD card on a Mac. We recommend starting with method 1 and working your way down the list.
Method 1: Restore Your SD Card Photos From the Trash and .Trashes Folder
If you deleted the photos using your Mac, they may not have been immediately removed from your SD card. They would have been sent to your Mac’s local Trash folder, where you can either restore them or delete them permanently.
In some cases, especially when you delete photos using a handheld device (like a camera), a hidden folder called .Trashes is created on the SD card. Delete photos go here instead.
We’ll show you how to utilize both Trash folders to restore your files.
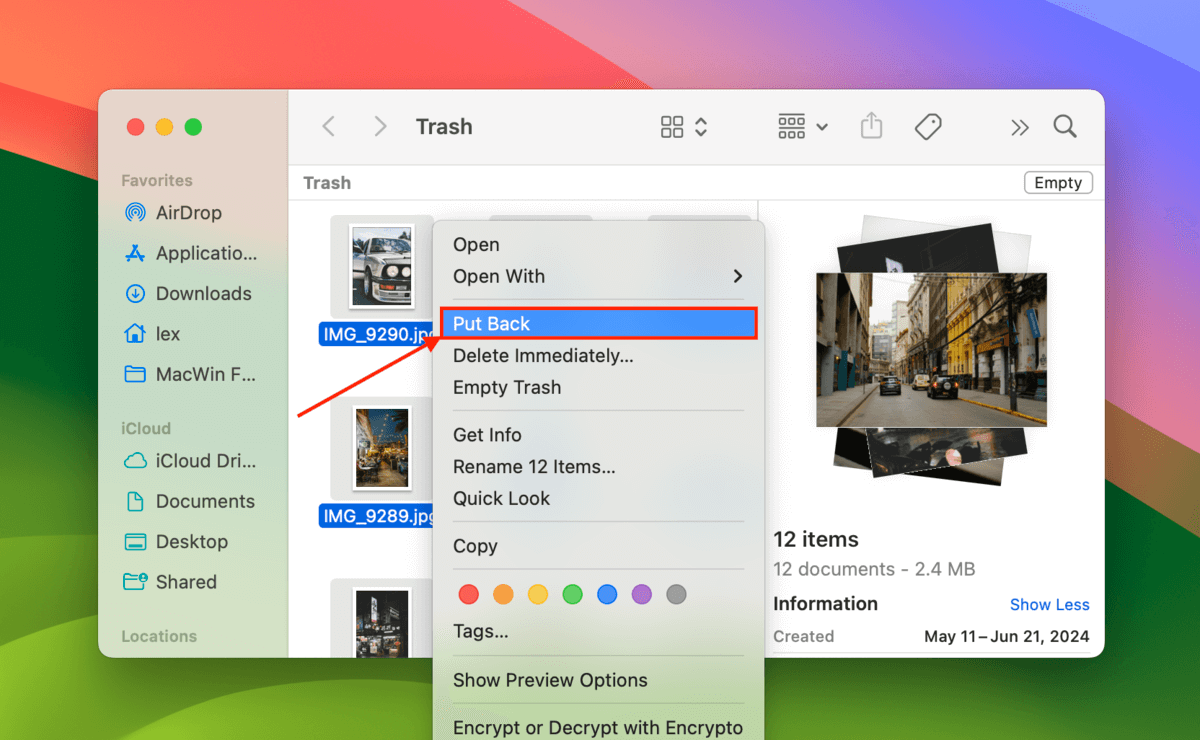
To restore SD card photos from your Mac’s local Trash folder:
Step 1. Connect your SD card to your Mac using a USB card reader.
Step 2. Open the Trash folder on your Mac by clicking the trash can icon on your dock.
Step 3. Select the photos you want to restore. Then right-click > Put Back.
To restore SD card photos from the .Trashes folder on the memory card:
Step 1. Connect your SD card to your Mac using a USB card reader.
Step 2. Open Finder and navigate to your SD card’s root folder. Then, press the Command + Shift + > keys simultaneously to reveal hidden files and folders. If you spot the .Trashes folder, you can simply copy its contents to a safe location on your Mac.
Method 2: Download Your Photos From the Cloud
If you have a cloud storage service app installed on your Mac (such as Google Drive, iCloud, OneDrive, Dropbox, etc.), check if your files are on the server! Some apps can scan external drives for any newly added files, which they automatically upload to the cloud.
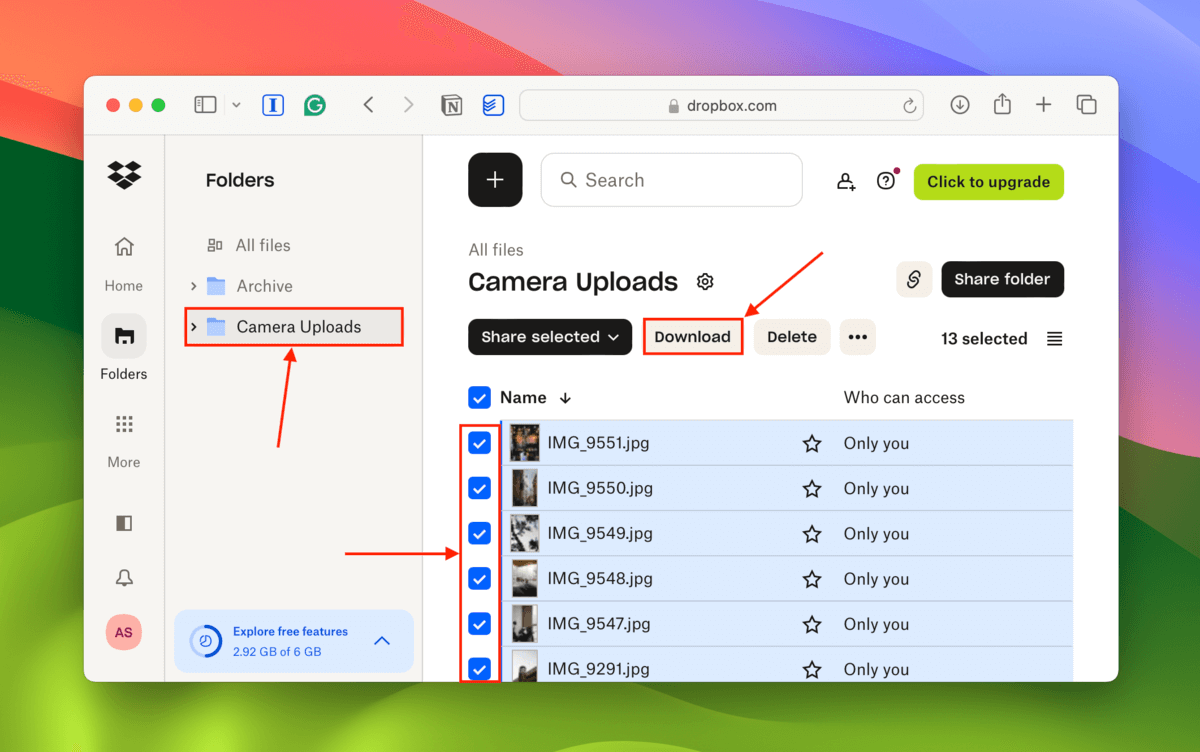
Dropbox, specifically, will automatically download photos from your SD card to your Mac and/or upload them to a special Camera Uploads folder. We’ll show you how to download them. For other cloud storage services, you can check their website for details.
Step 1. Open Safari (or any browser) and log in to Dropbox.com.
Step 2. Navigate to the Camera Uploads folder. Then, mark the boxes on the photos you want to save. Finally, click the Download button.
Method 3: Restore Your Photos With Data Recovery Software
If your photos aren’t in the Trash folders and you were unable to secure a backup, the next best method is to use data recovery software. You can use data recovery software, which is a special tool that can extract your photos’ physical data from your SD card and turn it into usable files again. For this guide, we’ll be using an app called Disk Drill.
Disk Drill is a well-known data recovery tool that we like using specifically for restoring photos. Among its competitors, it’s one of the best at recognizing both standard and proprietary file signatures – such as .jpg, .png, .bmp, .cr2, .nef, .gpr, .heic, .kdc, and many, many more.
Disk Drill also has one of the best preview tools on the market, especially for RAW photos (other recovery apps can only preview standard file types).
Here’s how to get photos from your SD card to your MacBook using Disk Drill:
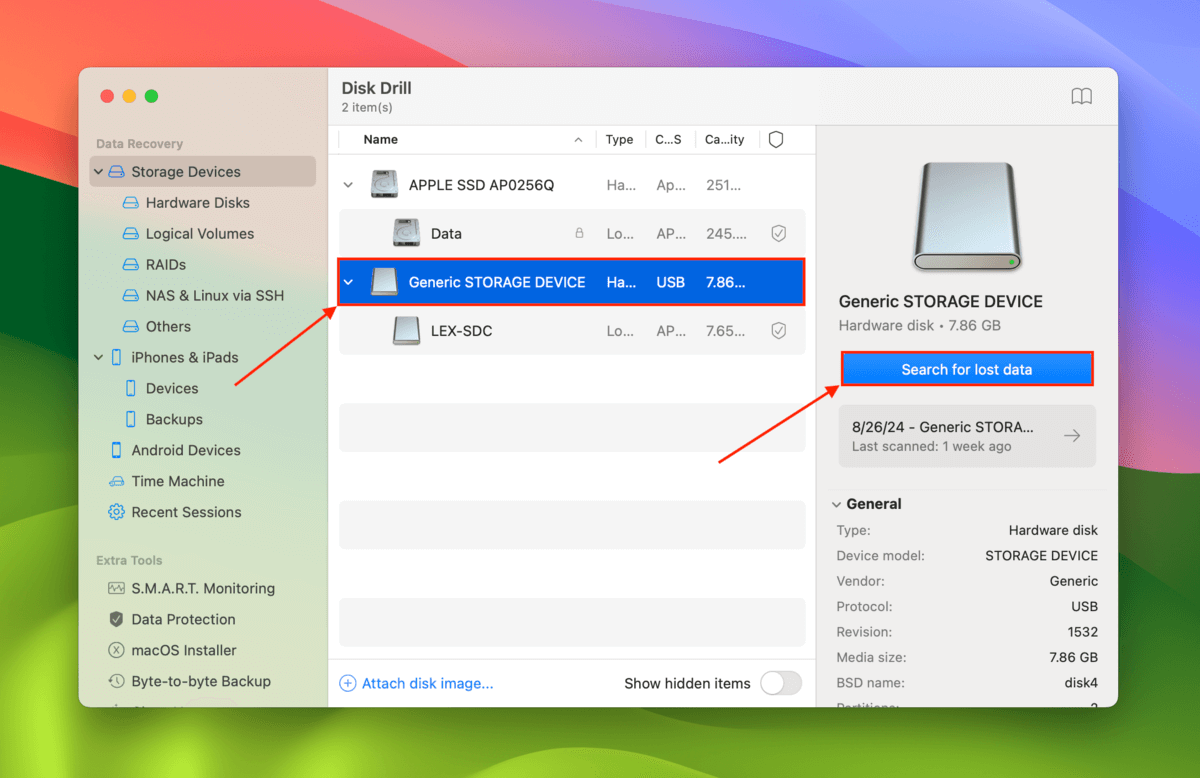
Step 1. Download and install Disk Drill on your Mac.
Step 2. Select your SD card from the source selection menu (we recommend selecting the USB card reader device itself if it shows up). Then, click Search for lost data.
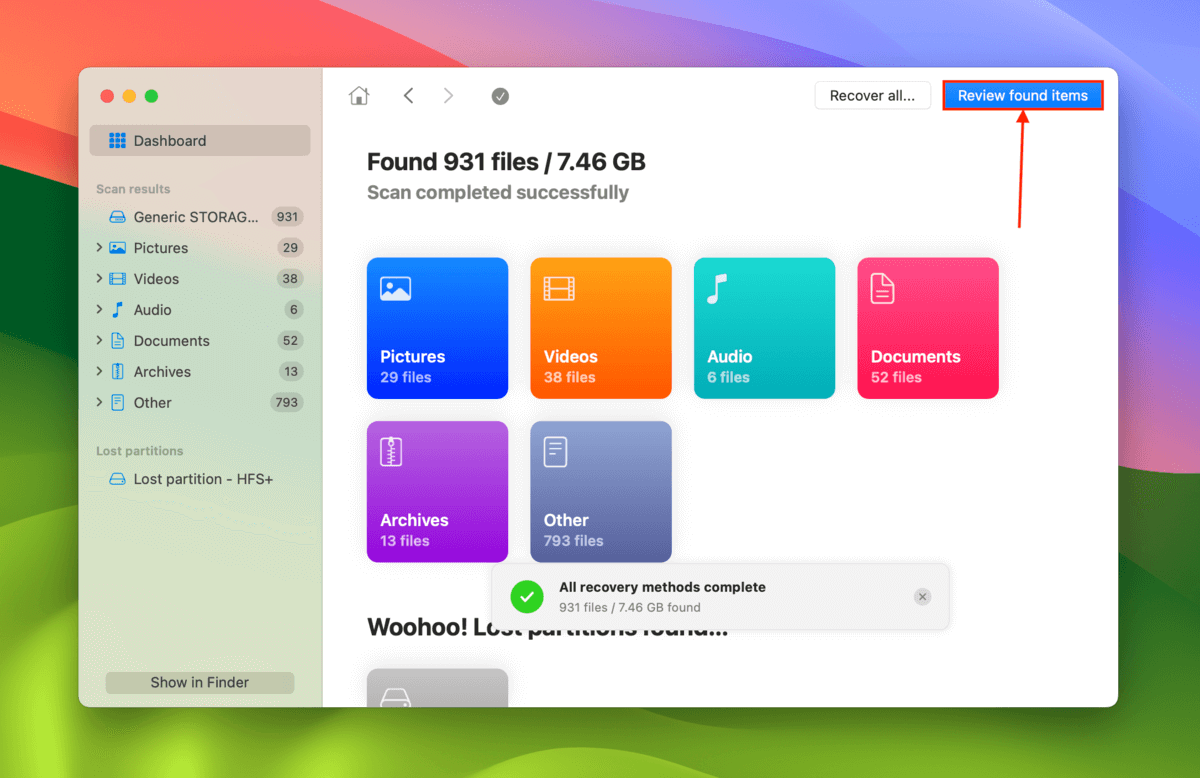
Step 3. Once Disk Drill is done scanning your SD card, click Review found items.
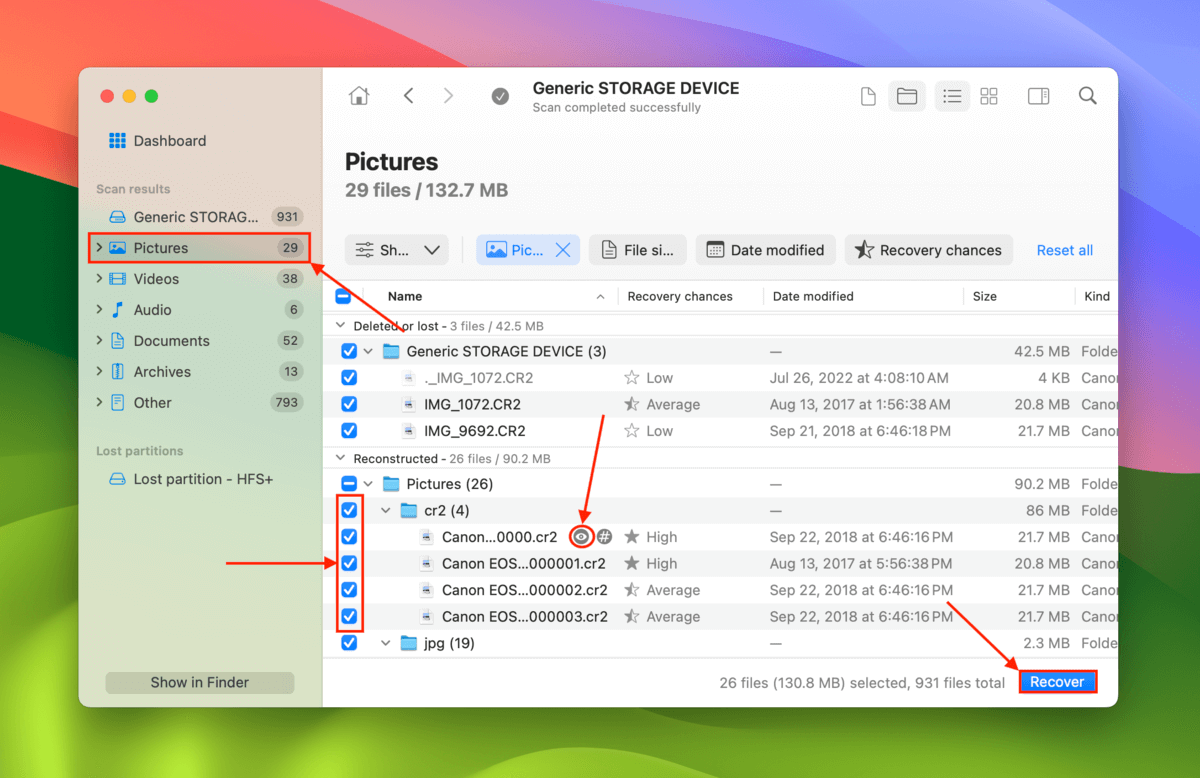
Step 4. On the left sidebar, click Pictures. If you’re looking for specific file names or file extensions (e.g. .cr2), use the Search tool (magnifying glass) to find them. Make sure to hover your pointer beside your files and click the eye button that appears – this will display a preview. When you locate the photos you want to recover, mark the boxes beside them. Then, click Recover.
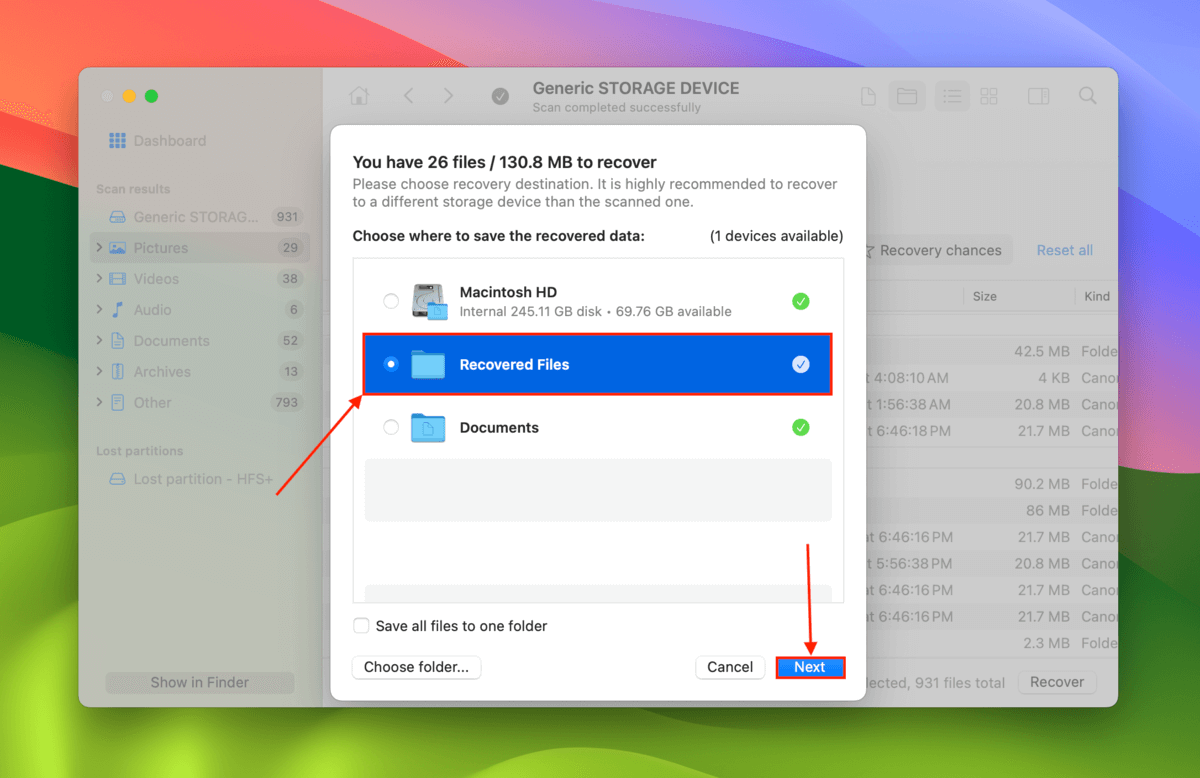
Step 5. Choose a location on your Mac where you want Disk Drill to save the recovered photos. Finally, click Next to begin the recovery operation.
Method 4: Send Your SD Card to a Professional Data Recovery Service
Professional data recovery services are establishments that can recover your data for a fee. They are either the last resort when all else fails or the first choice solution if you need the highest recovery success rate possible for your photos.
If you’ve never used a professional data recovery service before, here’s a brief guide on how to get started:
Step 1. Look for data recovery services in your location via Google Search.
Step 2. Read reviews about the specific service location/branch you’re thinking of calling. Make sure the reviews are recent and that you read those with 1-star ratings, 5-star ratings, and everything in between.
Step 3. Check their website or call their customer service desk and ask if they offer the following (the more they offer, the better):
- No data – no charge guarantee
- Free phone and in-lab estimate (you can also ask)
- Free or low-cost inbound shipping (optional, depending on your budget)
- Class 100 cleanroom (optional, but an indication of a shop’s capabilities)
Step 4. Ask about the potential maximum difference between the estimate and the final quotation (some users have been burned by being quoted hundreds of dollars over the original estimate).
Step 5. Follow the shipping or drop-off instructions of your chosen data recovery service.
What if your SD card isn’t showing up on your Mac?
Most DIY recovery solutions require that your SD card is readable on your Mac. Otherwise, your computer won’t be able to interact properly with the memory card, preventing you from restoring your data.
Read our guide on how to fix an SD card that isn’t showing up on your Mac – it also has a useful data recovery section that you can utilize once your SD card is successfully recognized by your computer.


