
Did you accidentally delete an important folder? The good news is that recovering folders is very similar to recovering files; there are already several known, reliable solutions. The process just requires the right tools (and knowledge of those tools) to maximize your recovery success rate–especially if your folder contains many files.
So, we created this guide to provide you with everything you need to recover your folder, while keeping all of its files intact, using native and third-party tools on your Mac.
Table of Contents
Read This BEFORE Recovering Your Folder
MacOS has a specific folder structure for all of its directories. Its purpose is to keep files organized, but it also ensures that system-related folders can easily be secured from unauthorized access. Here’s a simple breakdown:
| Folder | Description |
| 💻 Applications | As the name of this folder suggests, this is where you can find all apps installed on your Mac. It’s not possible to simply delete the Applications folder, so it’s unlikely that you would ever need to recover it. But if you do, we recommend you restore your Mac from a Time Machine backup. |
| 📚 Library | This is where macOS and applications store their data, settings, cache files, and other important data. While you can’t delete the entire library folder, you can delete the folders inside, which may cause apps to stop working correctly. To recover a deleted Library folder on Mac, boot to Recovery and restore from Time Machine. |
| ⚙️ System | As a regular user, you can’t modify the content of the System folder, in which the operating system holds various files required for it to operate. If something ever happens to the folder, you will most likely need to reinstall macOS and recover your data from a backup. |
| 👤 Users | This is the folder where all your documents, movies, music, pictures, and other personal data are located. Unsurprisingly, the Users folder is the most commonly recovered deleted folder on Mac. In addition to backups, data from the Users folder can also be recovered with data recovery software. |
How to Recover Deleted Folders on Mac
In this section, we’ll show you 4 different ways to recover deleted folders on your Mac. The method best suited for your personal needs depends on several factors. See below which scenario applies to you:
- Method 1 or Method 2: When you delete a folder without deleting it again from the Trash folder (or emptying the Trash folder).
- Method 3: When you delete a folder, it’s not in the Trash folder, and you don’t have a backup.
- Method 4: When you delete a folder, it’s not in the Trash folder, and you have a backup.
Method 1. Check the Trash Folder
The Trash folder is a hidden directory on your Mac where files and folders are stored when they get deleted. Your deleted folder will remain safely in the Trash unless you delete it again (from there) or empty the Trash. This gives you a chance to restore your folder from the Trash and back to its original location on your Mac. We’ll show you exactly how to do it:
Step 1. Open Trash by clicking on its icon, which is located on the right side of the Dock.![]()
Step 2. Right-click the folder you want to recover. Select the Put Back option.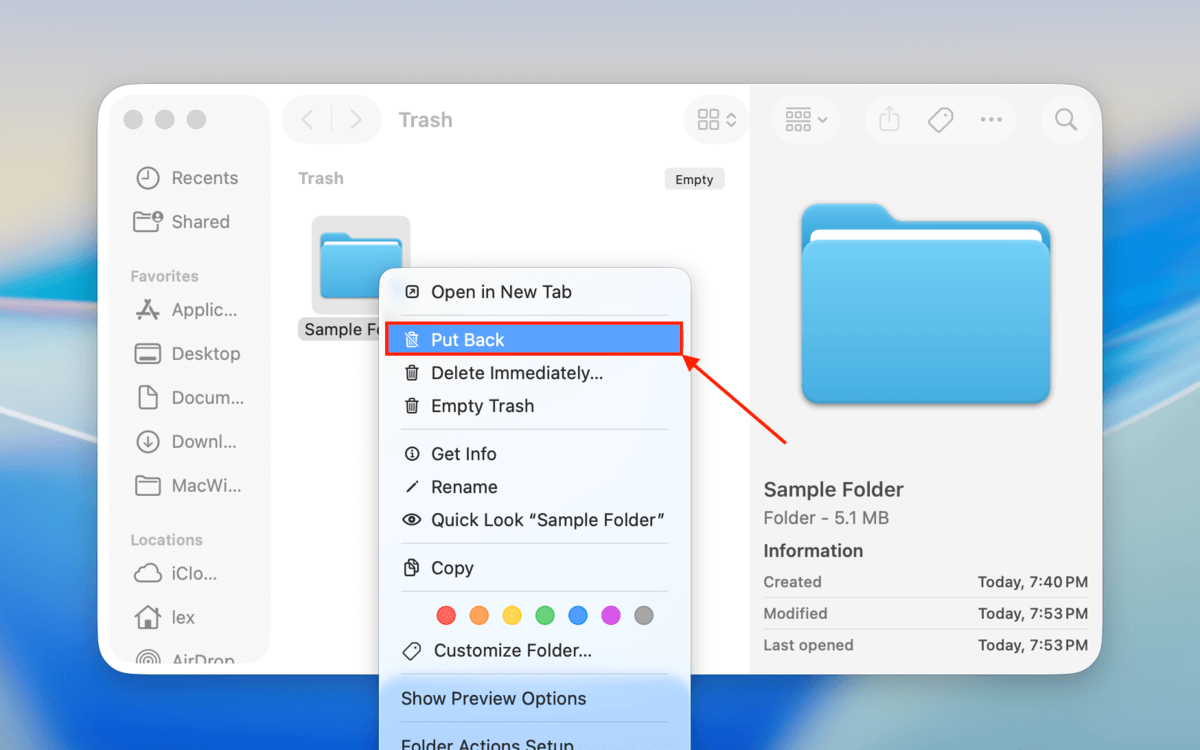
The deleted folder will be moved back to its original location, along with all files that were stored inside the folder.
Method 2. Recover Your Folder Using Terminal
Aside from moving files out of your Trash folder using Finder, you can also do it using Terminal commands. This option provides a lot of flexibility because you can add a variety of parameters to the command to get really specific with folder names.
That makes it extremely useful if your Trash folder is full of dozens or even hundreds of random files and folders. You can use a specially tailored command to find folders that have a specific keyword anywhere in their name (e.g., find all folders with the keyword “2026”) and move them to another location on your Mac. We’ll show you exactly how to do that in the guide below.
Step 1. Open the Terminal app from the Utilities folder in the Applications directory.![]()
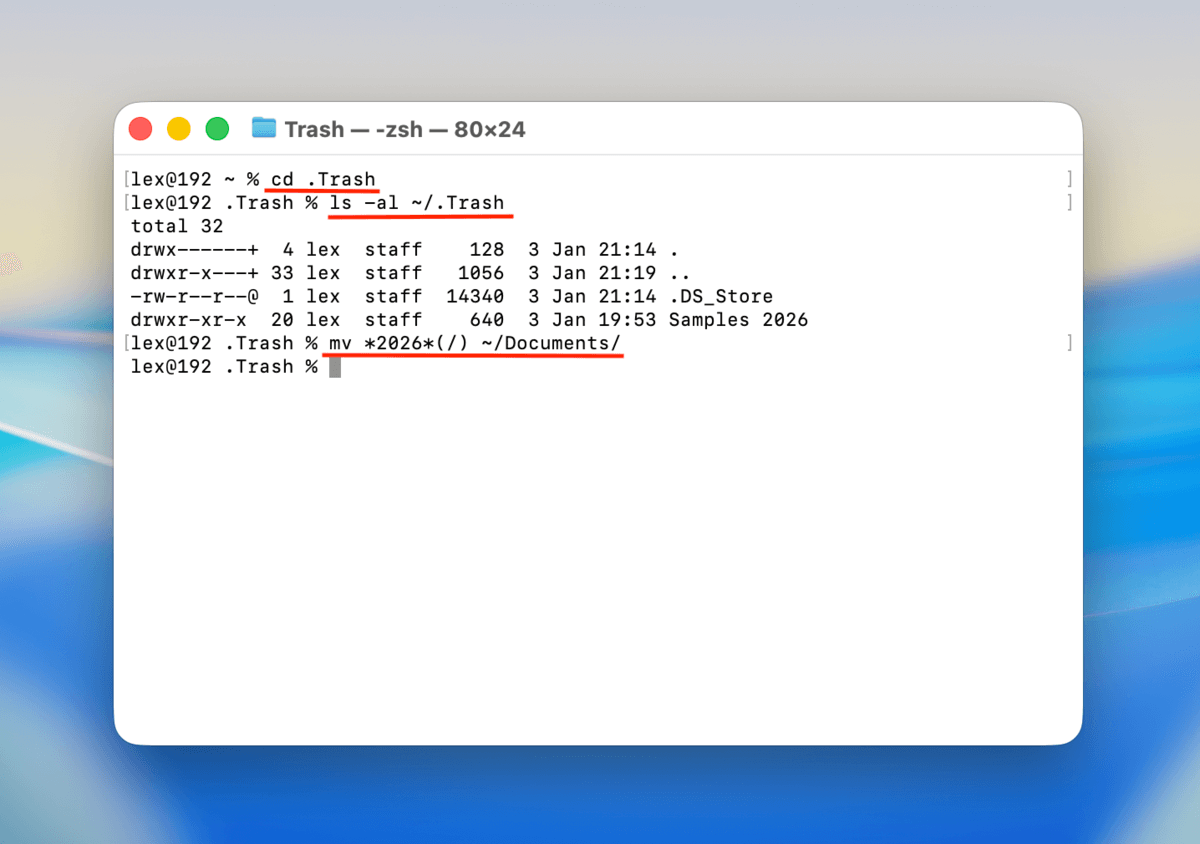
Step 2. First, to navigate to the Trash folder, type the following command and press Return:
cd .Trash
Step 3. Finally, to move all folders with the keyword “2026” in their names to the Documents folder, run the following command:
mv *2026*(/) ~/Documents/
Replace “2026” with the keyword you’re filtering for and ~/Documents/ with the location you want to move your folders to.
Method 3. Recover a Deleted Folder with Mac Data Recovery Software
If your folder is no longer in the Trash, the only way to get it back is by using data recovery software (unless you have a backup–see the next method). Data recovery software is a tool that can scan your drive for any data that remains of your folder.
There are several data recovery software programs that you can try, but we’ll be using an app called Disk Drill for this guide. We chose it because it’s one of the few data recovery tools that can restore files from Apple Silicon-based Macs, and it’s very good at restoring different file types (like video, audio, image, document, etc.).
Disk Drill also has an excellent preview tool, which can help you make sure that you’re recovering the right folder. Most importantly, it excels at restoring the original folder structure of your drive (in most cases), so you’ll have a much easier time finding what you need. You can scan your drive and preview your files as much as you want for free–you’ll only need to purchase the one-time license during the recovery stage.
Step 1. Download and install Disk Drill. If the missing folder you’re looking for was stored directly on your Mac, we recommend installing Disk Drill on an external storage device (like a USB drive) to avoid overwriting your data. You’ll also need the drive for storing the recovered folder.
Step 2. Launch Disk Drill and grant the necessary permissions (don’t worry, it’s safe!).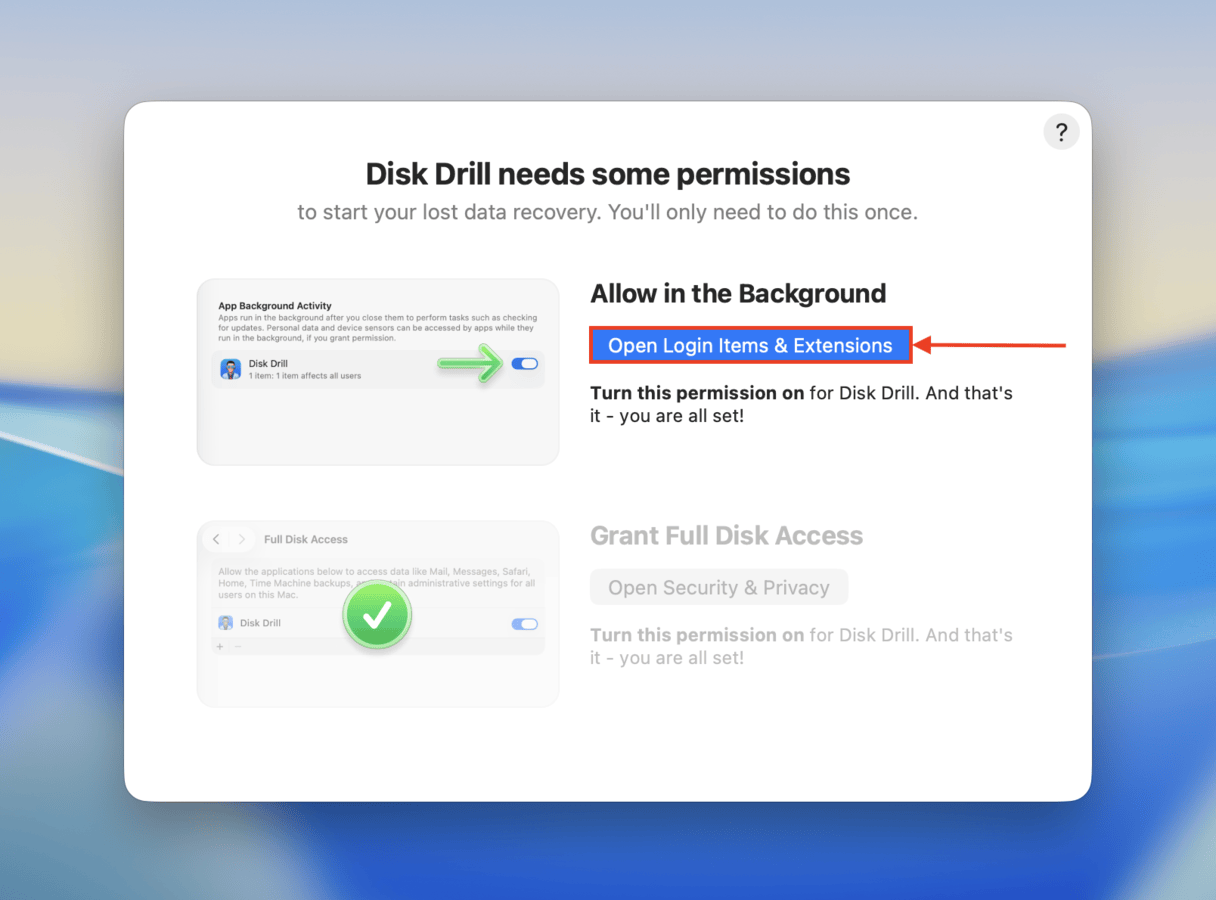
Step 3. Once you get to Disk Drill’s main menu, you will need to install Disk Drill’s Kernel Extension if you’re recovering data from your system drive. If not, move on to step 4.
Step 4. Select the drive your folder was stored in before it was deleted. Then, click Search for lost data. In the pop-up that appears, click Universal Scan. 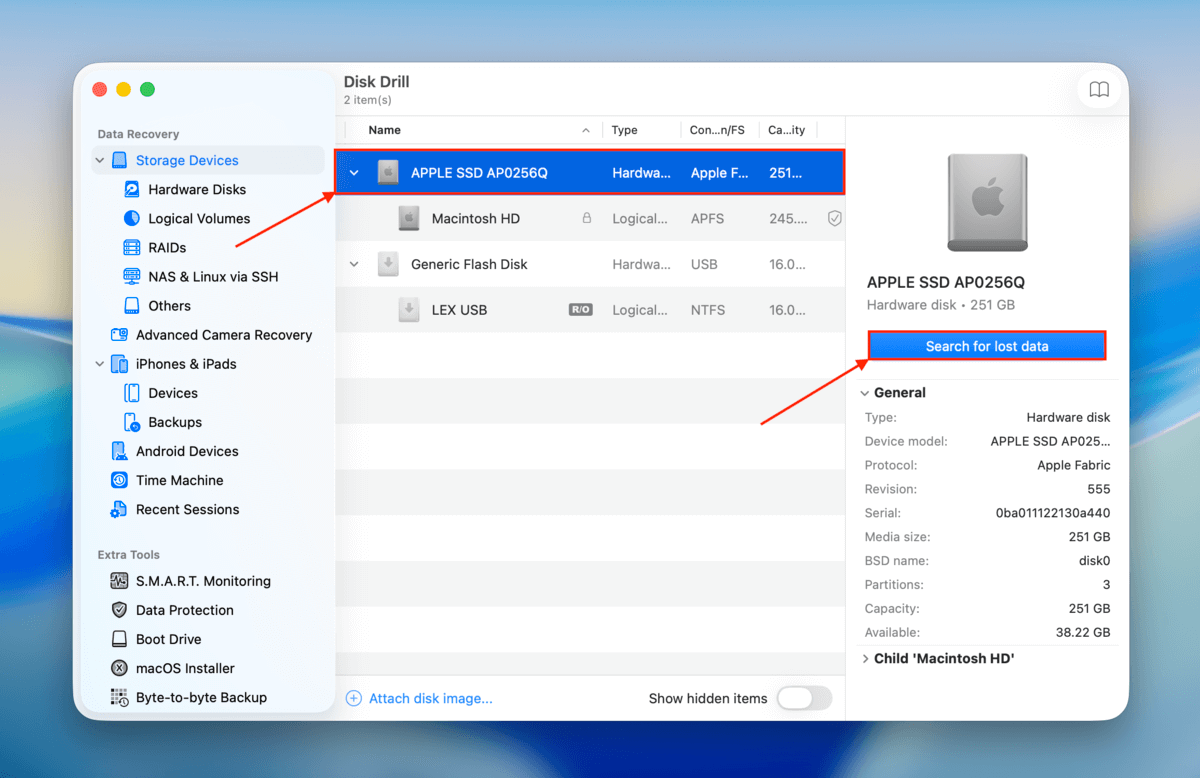
Step 5. Wait for Disk Drill to fully scan your drive so you get as much information as possible. Then, click Review found items.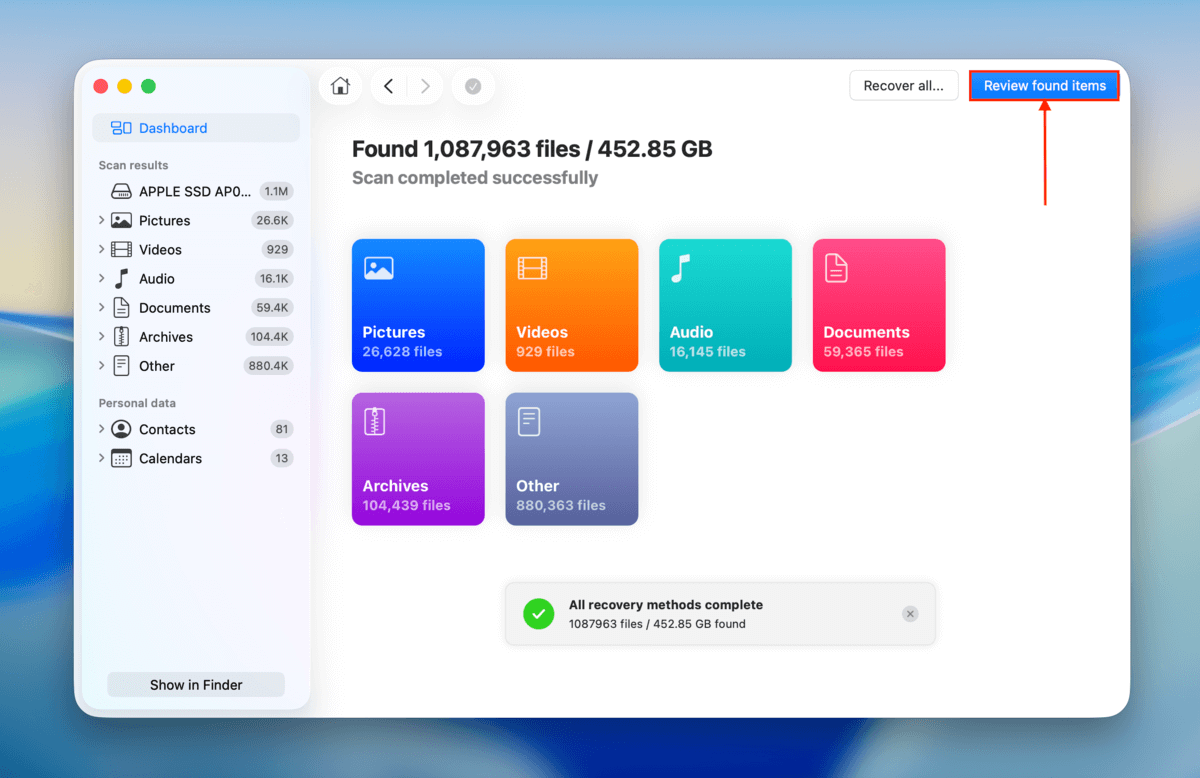
Step 6. If you remember the name of your folder, you can use the search tool to find it faster. Once you find your folder in the scan results, make sure to expand it and preview your files (by clicking each one once) to make sure nothing is missing or corrupted.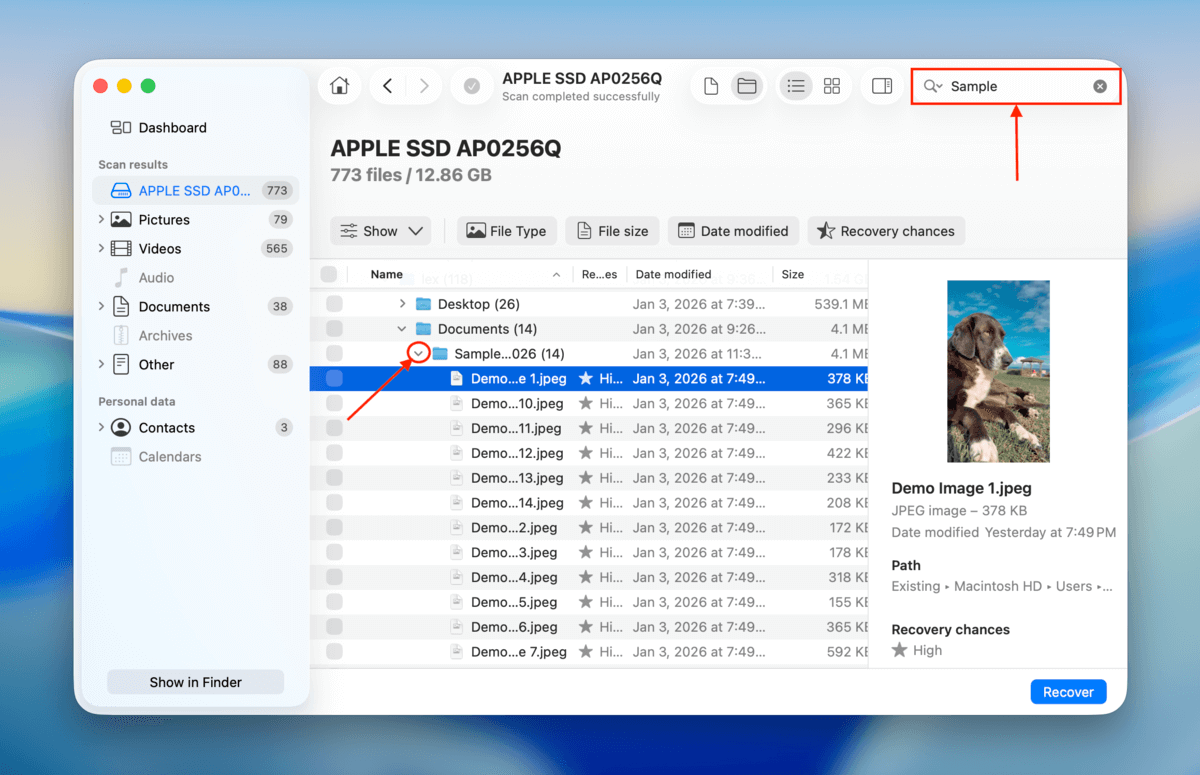
Step 7. Mark the box beside the folder you want to restore (which will also mark its enclosed files). Then, click Recover.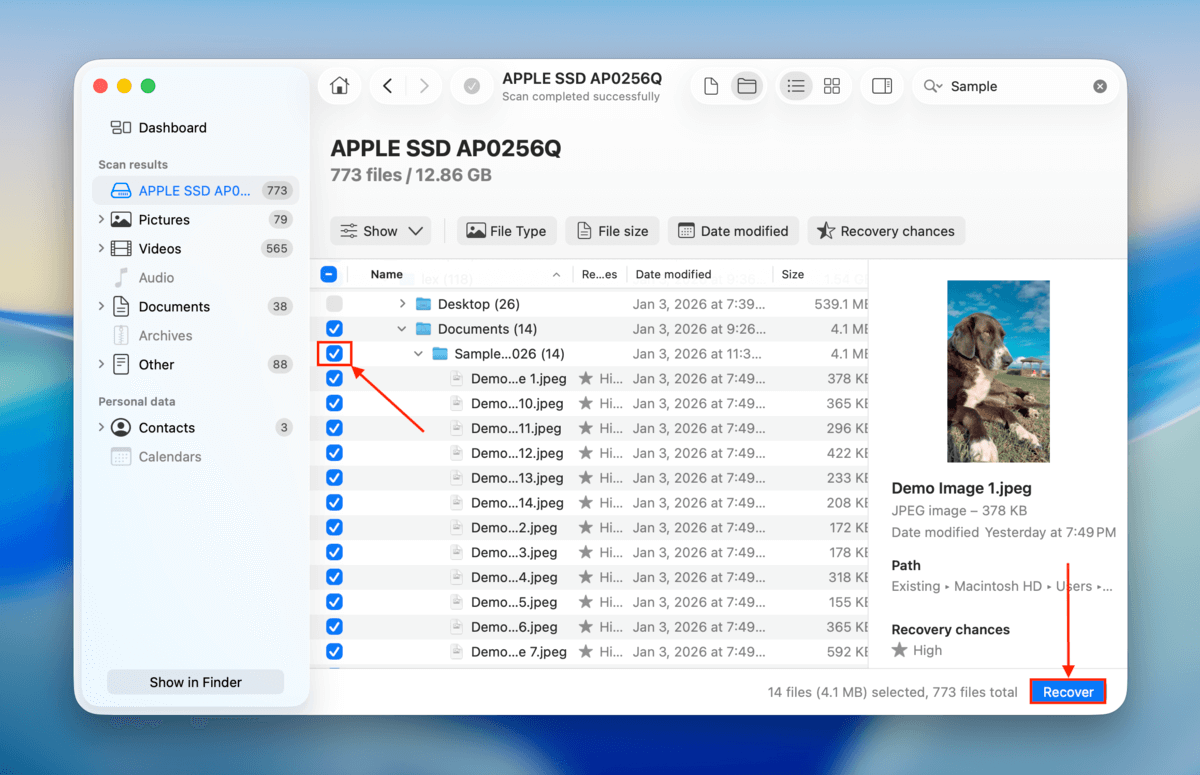
Step 8. Finally, choose a location on a different drive than where the folder was stored–this is to avoid overwriting the folder you want to recover. Then, click Next.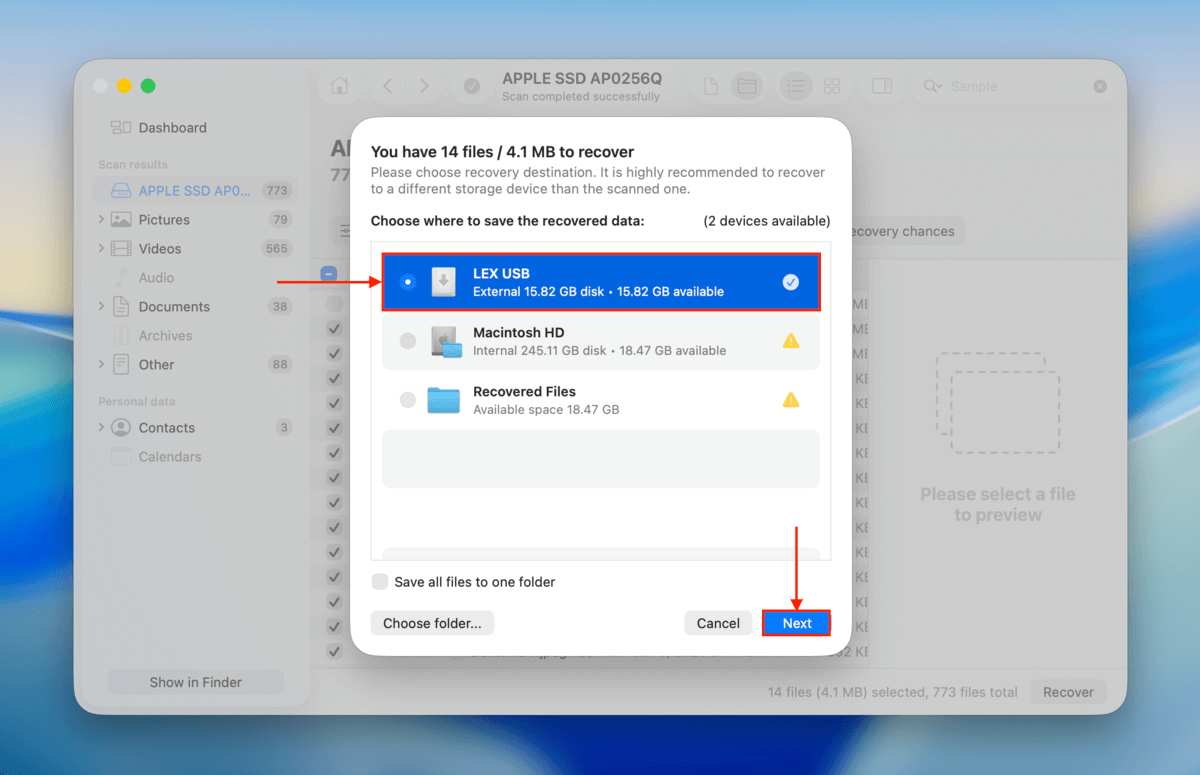
After restoring your folder, make sure to check its contents one more time in Finder to make sure everything is accounted for and opens without error. Then, turn TRIM back on using the same guide we linked above (see the note at the bottom of that section).
Method 4. Recover from a Backup (Time Machine)
Time Machine is a backup tool that comes preinstalled on all Mac systems. After setting it up once, it will automatically run every time you reconnect your backup drive. If you created a backup before your folder was deleted, you’ll be able to restore it.
As long as you have your Time Machine backup drive with you, this method is the most reliable way to get your folder back because it bypasses any risk of TRIM deletion or general overwriting.
Step 1. Securely connect your Time Machine drive (if you have it) to your Mac.
Step 2. On the Apple toolbar, click the Time Machine button and select Browse Time Machine Backups… If you don’t have this button on your toolbar, you can open Time Machine in the Applications folder or via Spotlight.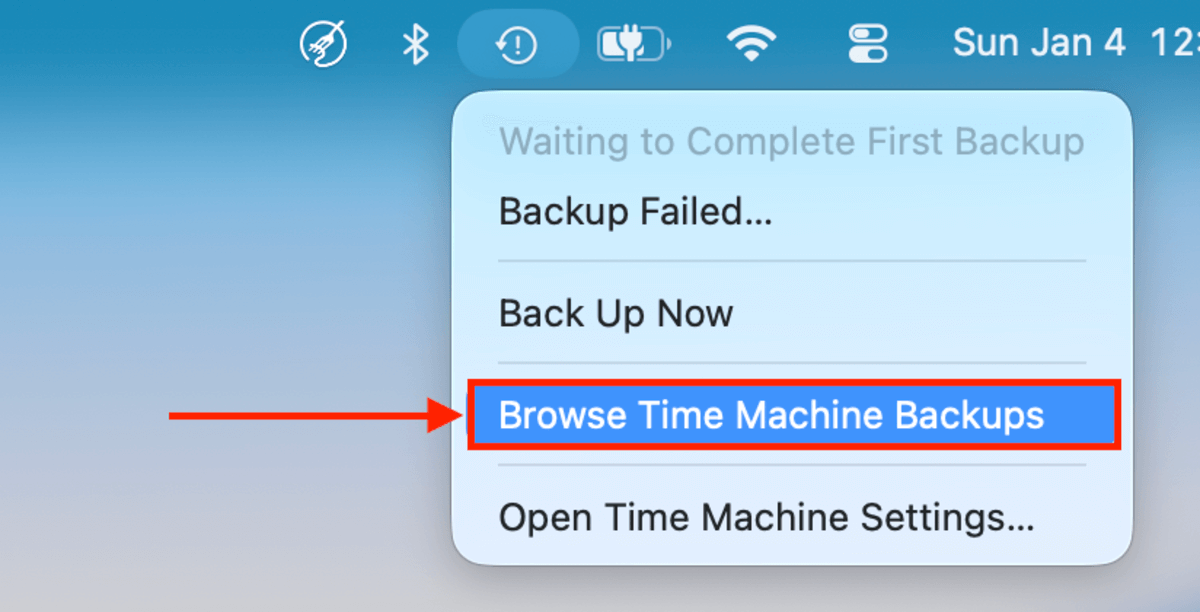
Step 3. Navigate to the location where your folder was saved before it was deleted. Then, use the arrows on the right-hand side to browse past instances of this location. Once your missing folder appears, click it once and click the Restore button.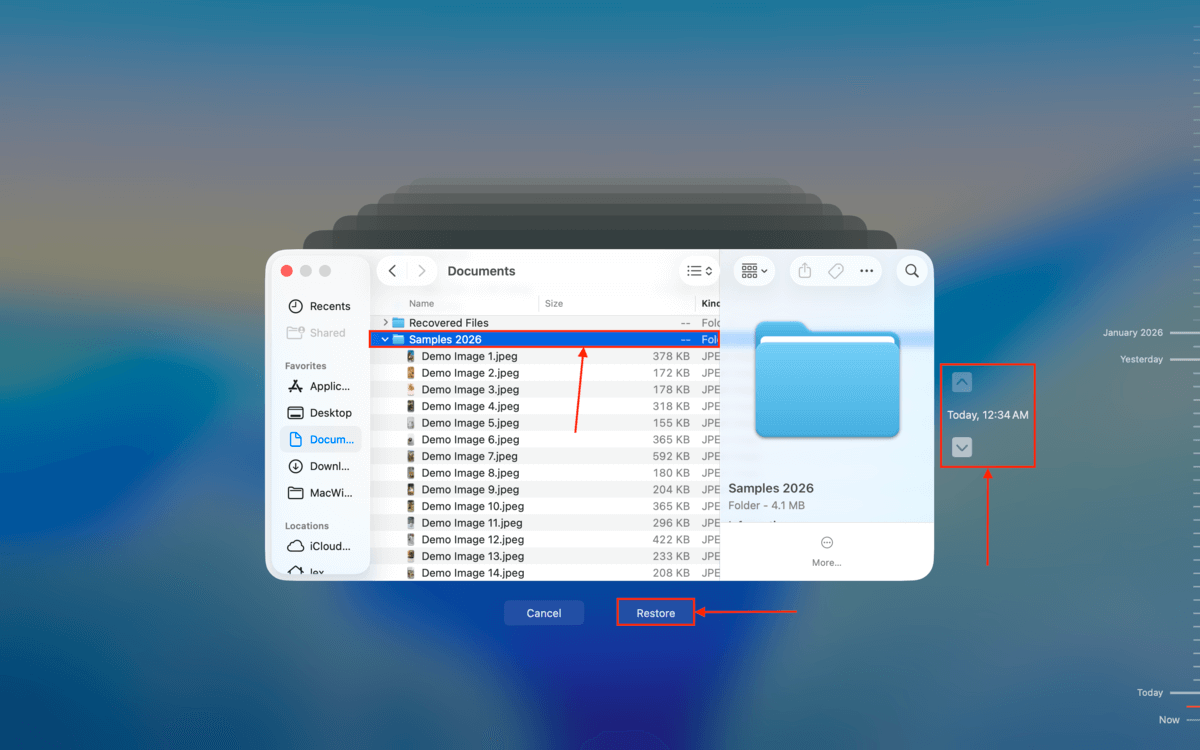
After restoring your folder through Time Machine, you’ll find it in its original location. Just make sure that the location in question doesn’t have an existing folder with the same name to avoid potential overwriting issues.
How to Find a Missing Folder on a Mac
A folder doesn’t necessarily have to be deleted to be missing. What sometimes happens is that Mac users move an important folder somewhere else on their computer without realizing it. Fortunately, macOS offers efficient tools like the search feature in Finder and Spotlight to locate missing folders in no time (as long as you remember their names).
To find a missing folder on a Mac using Finder’s search feature:
Step 1. Launch Finder.
Step 2. Click the search icon in the top-right corner.
![]()
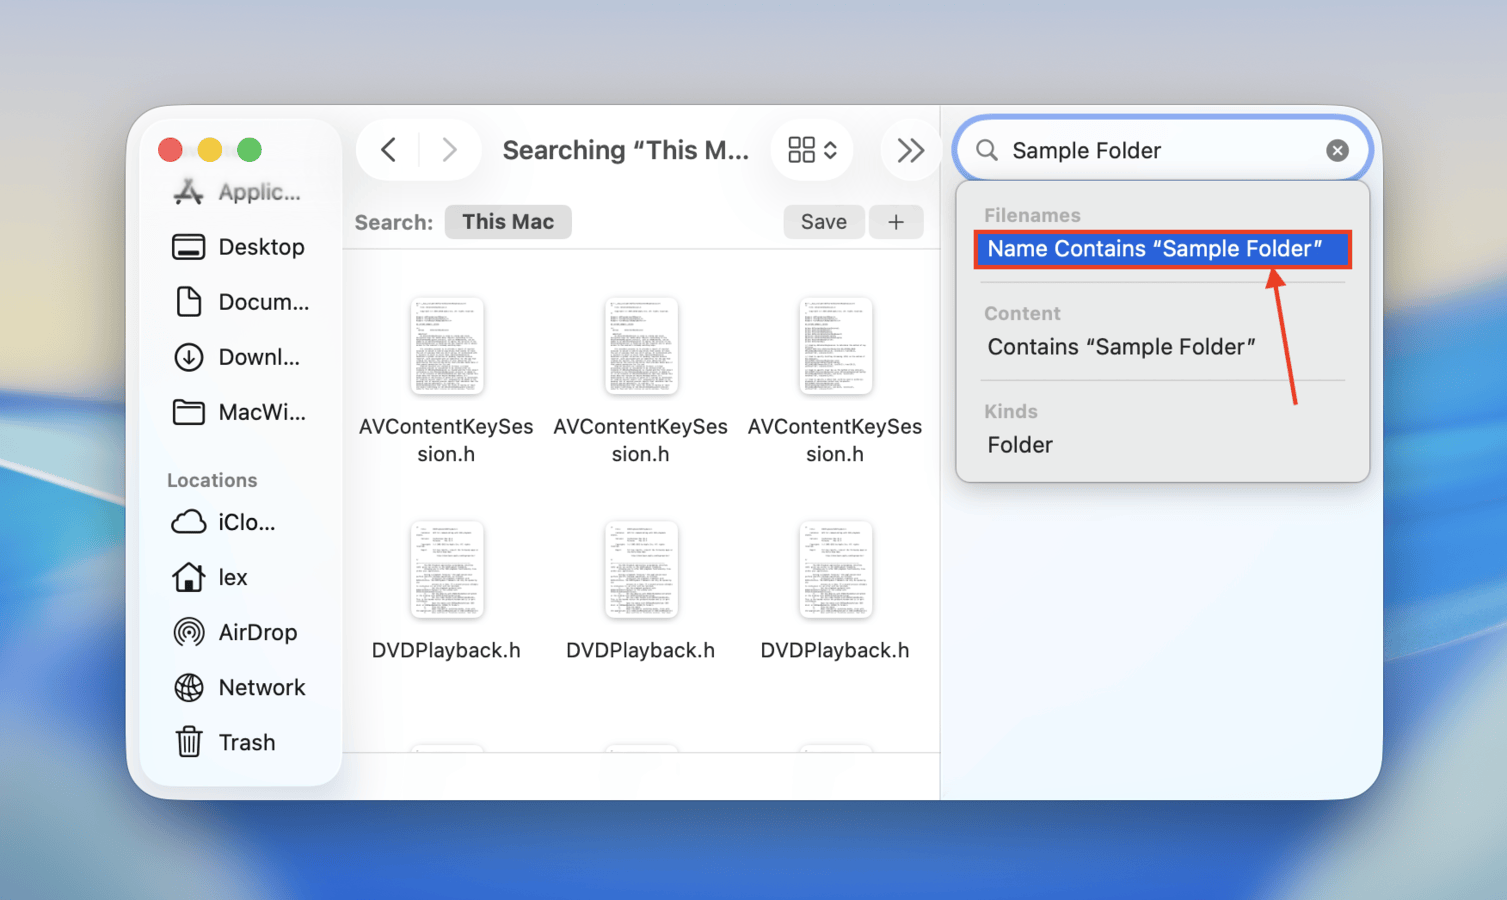
Step 3. Type the name of the missing folder in the search box but DON’T hit Return (Enter) on your keyboard.
Step 4. Click the Name Contains “XYZ” option.
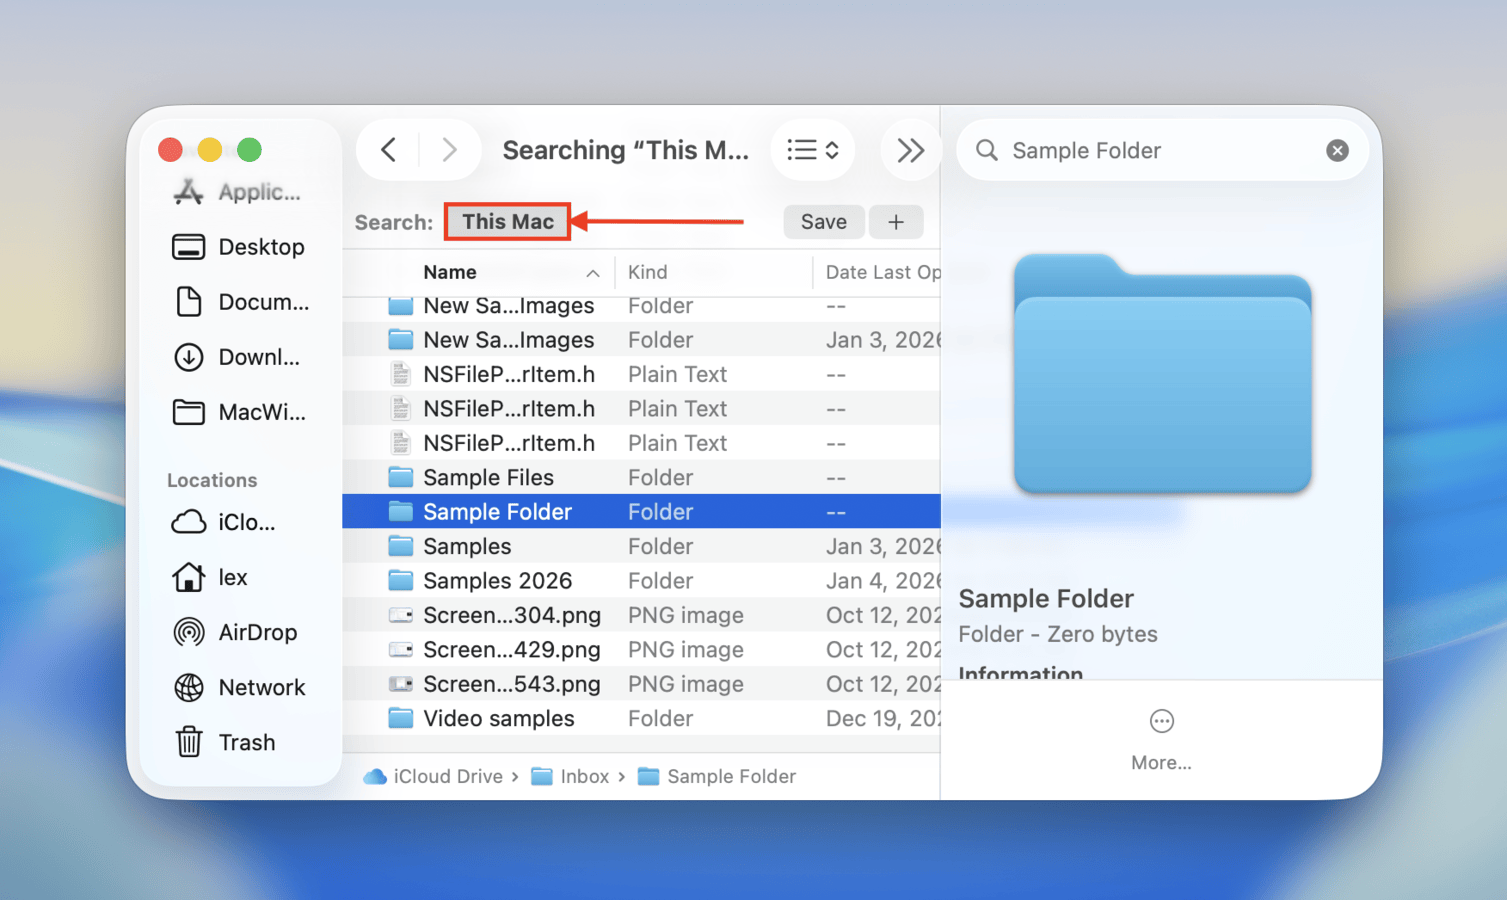
Step 5. Select “This Mac” search filter to search your entire Mac. You can now go through the search results and look for your missing folder.
To find a missing folder on a Mac using Spotlight:
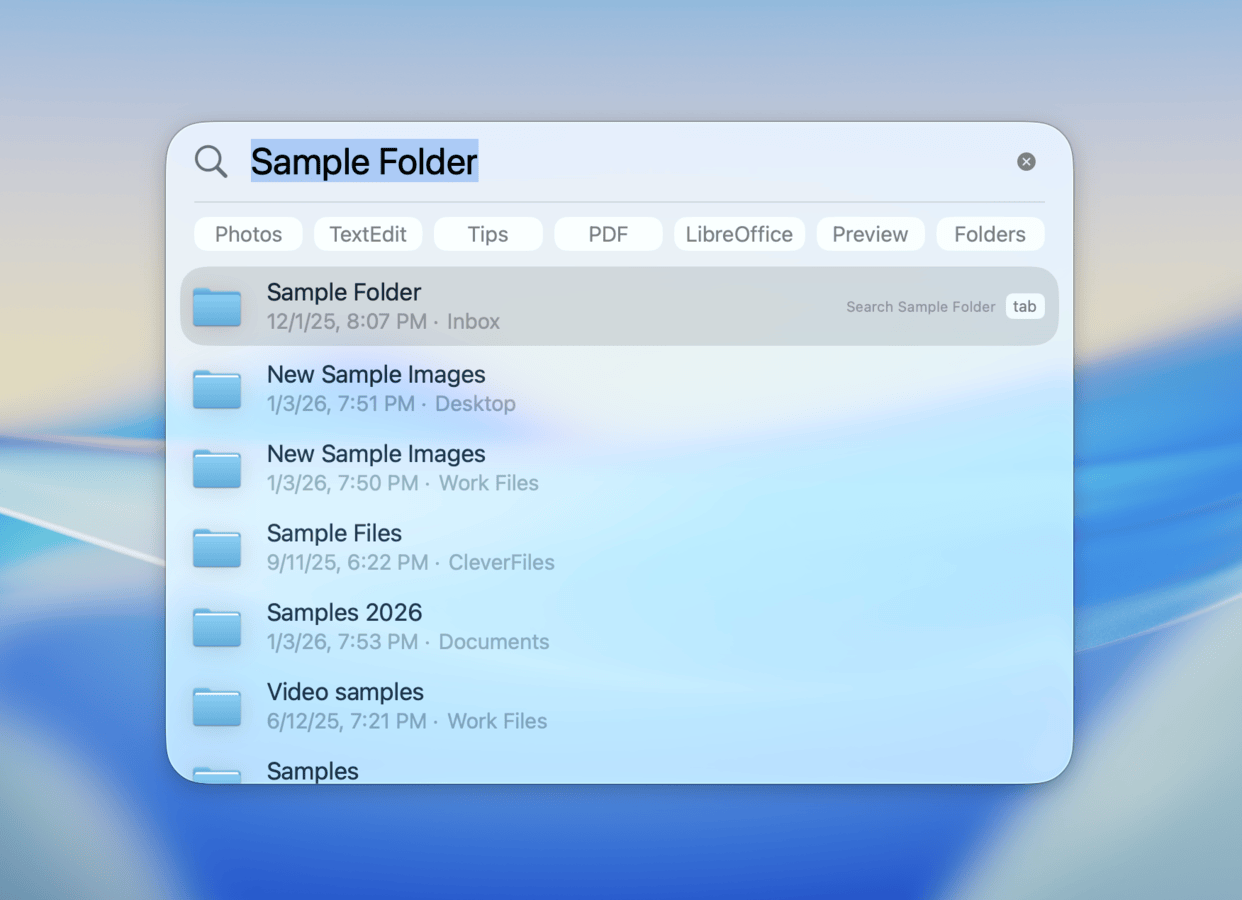
Step 1. Click on the magnifying glass icon in the top-right corner of your menu bar or press Command (⌘) + Spacebar.

Step 2. Type the name of the missing folder.
Step 3. Spotlight will display a list of results matching your query. You can scroll through these results to locate your folder.
Step 4. Press Return/Enter on your keyboard to open the folder in Finder.
Before You Go, Here Are Some Folder-Saving Tips
Aside from being extra careful whenever you clean up your files and folders, there are other simple ways to prevent permanently losing them. First, consider locking an important folder by right-clicking it, accessing the Get Info window, and enabling the Locked setting in the General section. This ensures macOS shows a warning whenever you attempt to delete it.
Second, disable access for other users (also using the Get Info window) if you share your Mac. Finally, make sure to back up important files and folders using Time Machine. Even if you can avoid deleting your data accidentally, corruption, virus infections, and simple hardware degradation can happen unexpectedly.
FAQ
There are 2 reliable ways to recover permanently deleted folders (if they aren’t in the Trash):
- Option 1: Restore a Time Machine backup (if you have one)
- Option 2: If you have no backups, restore your folder using data recovery software.
Note that data recovery software only works if your folder’s data still remains anywhere in the system. If your folder was partially or fully overwritten by new data, or permanently deleted by the TRIM function, only a backup can restore it.
Yes, it is! Mac computers come with a native backup and restore feature called Time Machine, and you can use it to restore any backed up folder to a previous version.
Recently deleted folders can be found in the Trash folder. To recover them from it, all you need to do is move them to a safe location.


