
Need to transfer or recover data from Mac hard drive to PC? There are different methods for both of these tasks – choosing the best one for your situation depends on the tools you have available. In this article, we provide step-by-step instructions for different methods of transferring or recovering your Mac data to a Windows PC.
Each method is accompanied by a short summary so you know exactly what you need and what you’re getting into before starting. Read on!
Table of Contents
What is the Problem with Transferring Files from Mac to PC
There are 2 reasons why transferring data from Mac to PC isn’t so straightforward: (1) macOS and Windows each support certain file systems only, and (2) the method of transferring files from an internal drive is different from that of an external drive.
First, let’s briefly talk about file systems. Here’s what you need to know:
- Only macOS supports HFS+ and APFS.
- On the other hand, only Windows supports NTFS.
- Both macOS and Windows support FAT32 and ExFAT.
Your operating system won’t directly recognize an incompatible file system. It may attempt to establish a connection if you plug your drive in, but it may result in nothing happening, getting file system errors, or being prompted by your OS to format the drive to make it accessible (don’t!).
The second challenge of transferring data from Mac to PC is physically connecting an internal drive to a computer. In the methods we outlined below, we’ll show you different ways to solve this.
How to Recover Data from Mac Hard Drive to PC
There are multiple situations where attempting to transfer files from Mac hard drive to PC causes data loss. For example: when you connect an incompatible drive to a PC, the Windows operating system may prompt you to format it. Unfortunately, it’s easy to mistakenly confirm the prompt if you don’t know what you’re doing.
Another example of potential failure is when your Mac hard drive doesn’t show up on your computer. This is an example of logical damage that could happen as a result of improper drive handling (e.g., failing to safely eject before disconnection) or abrupt interruptions during file transfer–which could happen to drives with either compatible or incompatible file systems.
Fortunately, recovery is still possible, even if your drive is corrupted, failing, incompatible, and even formatted using the methods in this guide. However, we recommend that you begin the process as soon as possible–the more time that passes, the lesser your chances of full recovery (especially if your hard drive is unstable).
Method 1: Connect to PC as External Drive and Use Data Recovery Software
If your Mac drive is already an external hard drive, you can simply plug it into your PC with the appropriate cable and adapter. But if it’s an internal drive, you’ll need to use additional peripherals like a docking station or internal PC connectors.
Once you’ve successfully connected your Mac drive to your PC, you can use data recovery software to scan it. Make sure to choose one that can recover files from a Mac hard drive with Windows–our guide uses Disk Drill because it can detect all the file system formats commonly used by both platforms. It can even restore files from a damaged file system, in case your drive was compromised during an initial transfer attempt.
You can use Disk Drill’s free trial (which is automatically baked into the download) to scan your drive and preview the files it managed to find. This is a great way to scope out which files are still recoverable and whether or not it’s worth it for you to continue.
- Connect your Mac drive to your PC and ignore or cancel any formatting prompts that appear.
- Download and install Disk Drill. Then, launch the app.
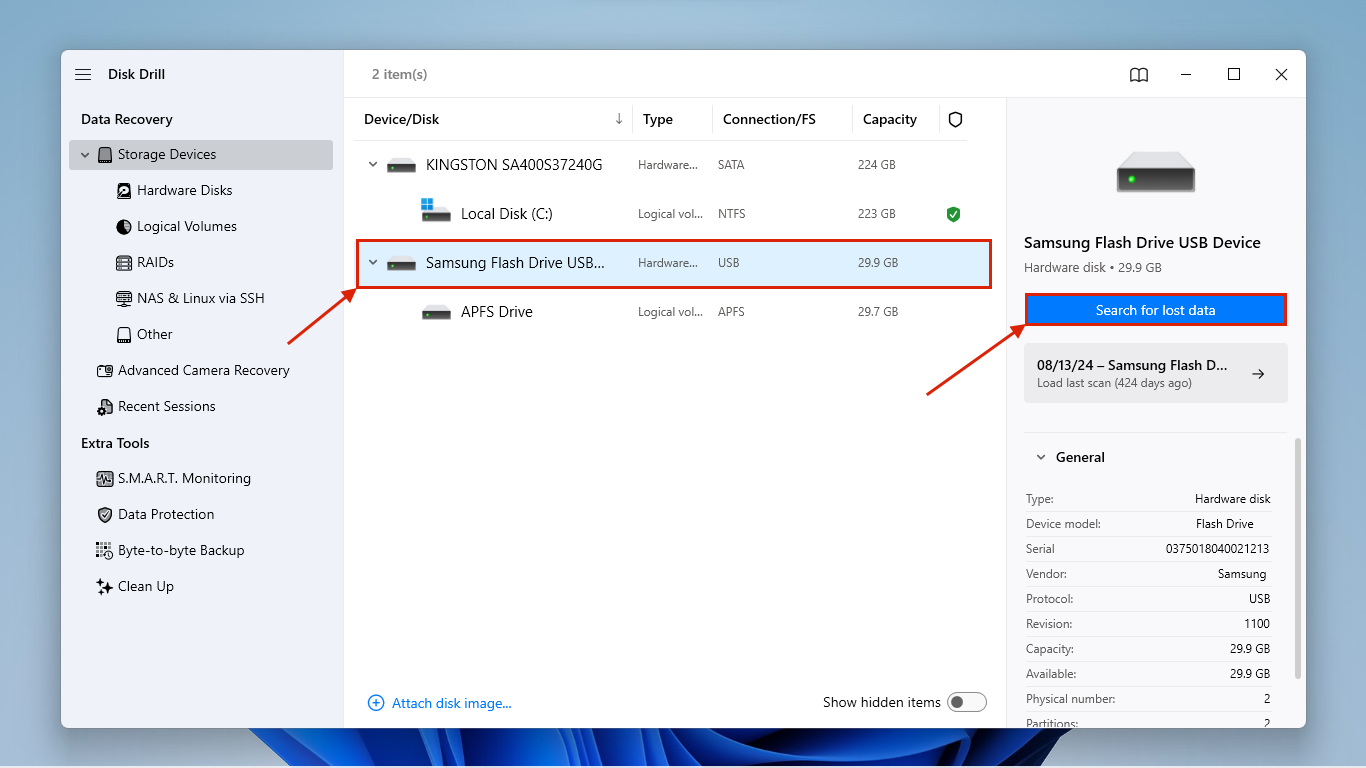
- Select your drive from the middle pane; note that if you’re using any sort of enclosure or adapter, it may have a generic USB name. Then, click Search for lost data.
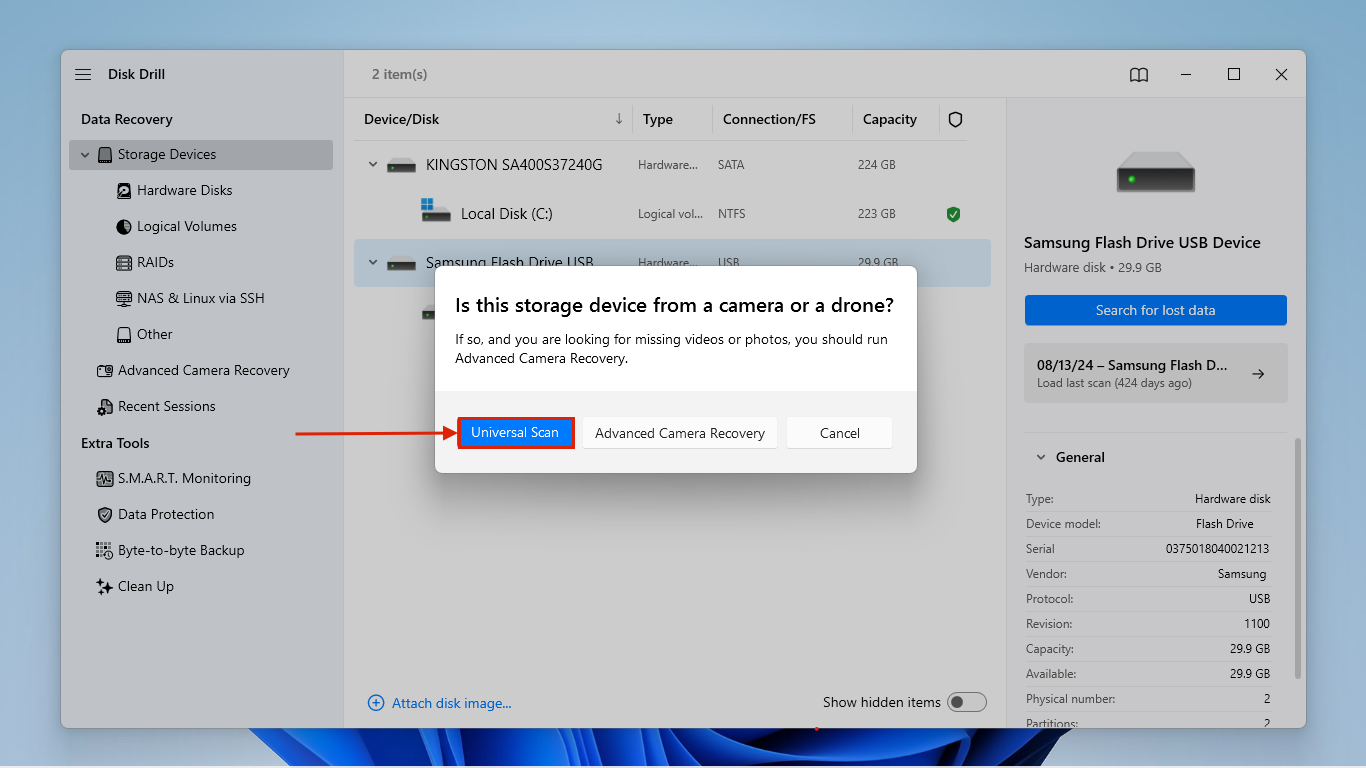
- You’ll be prompted to choose a scan type. Select Universal Scan.
- Once Disk Drill completes the scan, click Review found items.

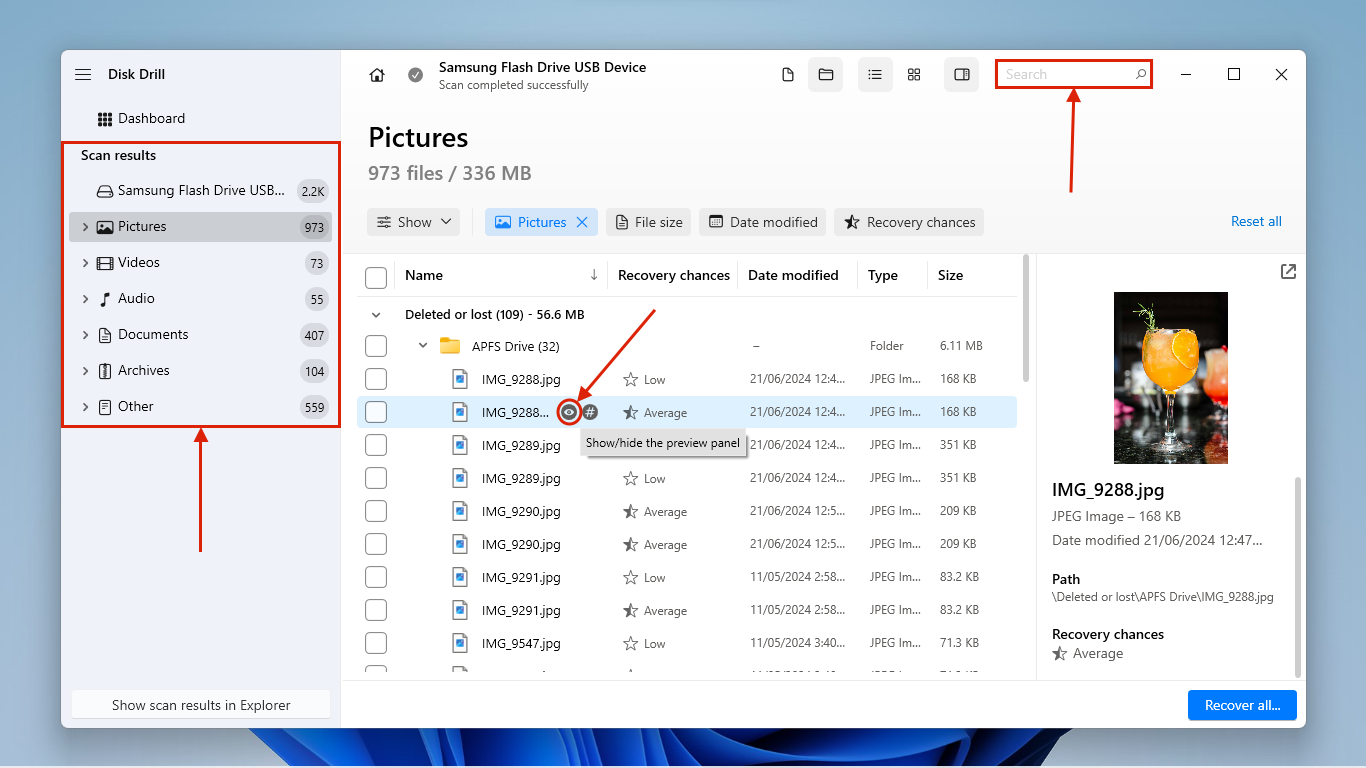
- If you only want to restore specific files, you can use the left sidebar to filter the data or use the search bar (click the magnifying glass) in the top-right corner. Toggle the preview of your files by hovering your mouse pointer beside them and clicking the eye button that appears.
- Select your files by clicking the boxes in the leftmost column or by clicking the select all box in the column header. Then, click Recover.

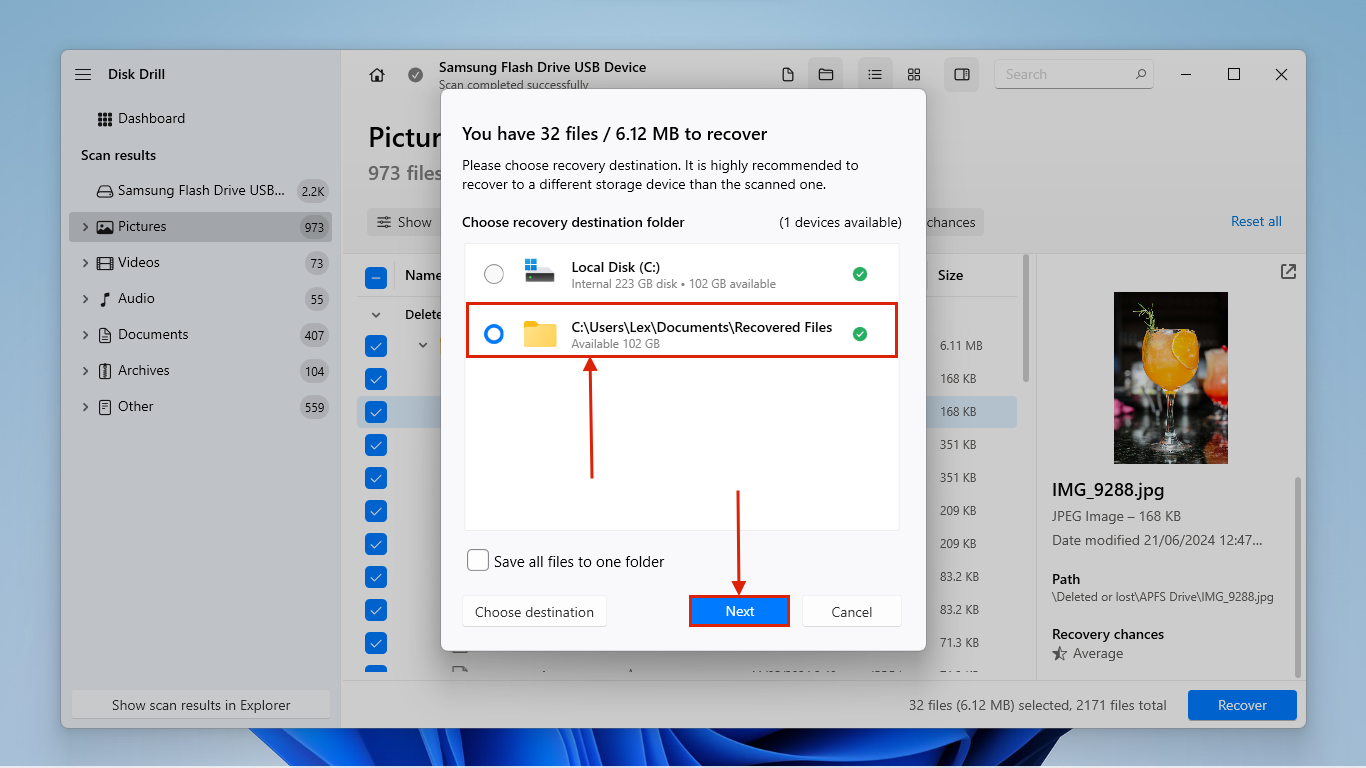
- Choose a location on your PC where Disk Drill will save the recovered files. Then, click Next to proceed with recovery.
Method 2: Recover From Time Machine Backup
If you created a Time Machine backup before experiencing problems with your drive, you can connect the Time Machine drive to a Windows PC (remember to ignore or cancel any formatting prompts!). However, to access the data, you’ll need third-party tools.
Depending on whether your Time Machine backups use the HFS format or the APFS format, we recommend using HFSExplorer or ApfsAware. Another option is to try using Disk Drill to scan your Time Machine backup drive, which works with any of the file systems used by macOS. Follow the instructions in Recovery Method #1 but select your Time Machine drive instead of your Mac drive (start at Step 4).
Method 3: Create an Image Backup and Scan It
If you can’t physically connect your drive to your Windows PC and you don’t have a Time Machine backup, you can still recover data using Disk Drill. However, we’ll need to do the extra step of creating a backup image that Disk Drill can scan instead.
Fortunately, Disk Drill has a really good backup tool that works perfectly with its recovery tool – so if you plan on using Disk Drill, we recommend using this feature.
And if your system won’t boot, preventing you from accessing your files through the OS, you can also boot Disk Drill in Recovery Mode without any pre-downloaded installer, as long as you have an internet connection! Check out the guide created by the developers themselves on how to launch Disk Drill in Recovery Mode.
On your Mac:
- Connect a USB or external drive with exFAT file system to your Mac, ensuring that it has enough space for the image file. Then, launch Disk Drill (Finder > Applications).
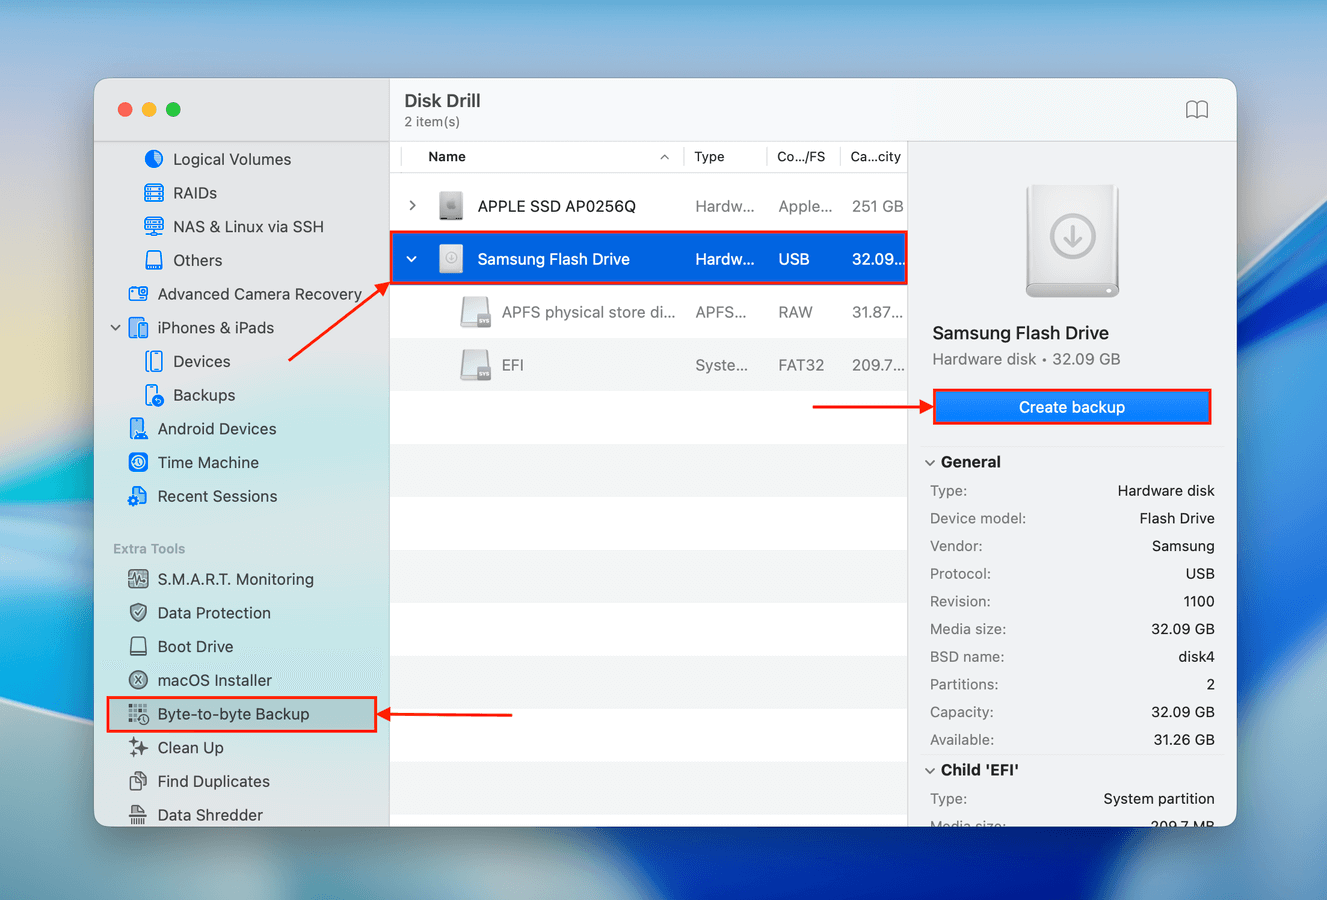
- On the left sidebar, click Byte-to-byte backup. Then, select your Mac drive and click Create backup. Note that if you’re trying to back up a system disk from a Mac that uses the T2 or M1-M4 chips, it won’t be recoverable due to its encryption.
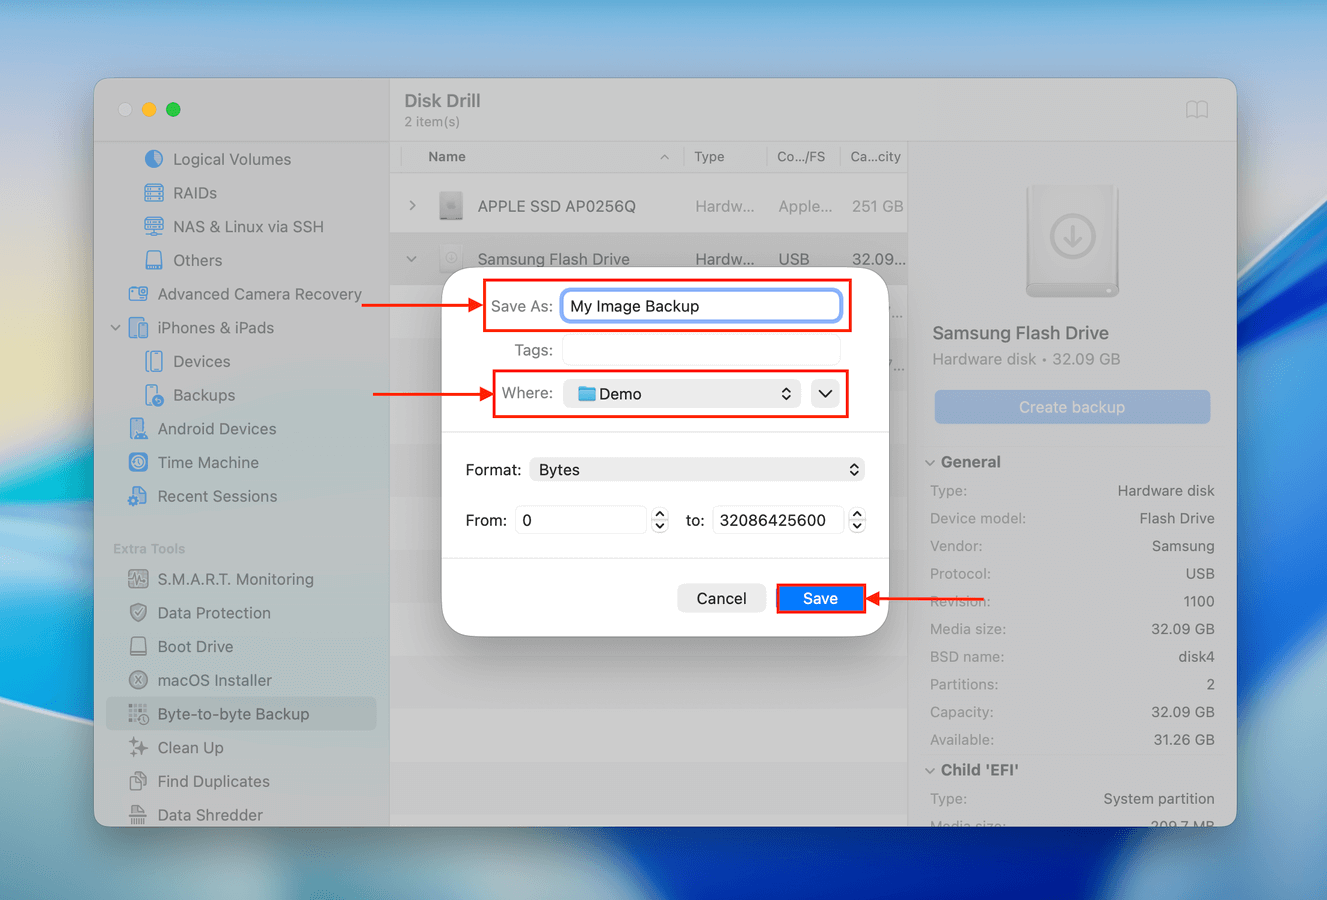
- Select a location on the external drive you connected in step 1, name your backup image file, and click Save.
On your PC:
- Connect the storage device (containing the image file) to your PC.
- Download and install Disk Drill, then launch the app.
- Click the Attach disk image… button at the bottom of the window and select the image backup file in the storage device we connected in Step 1.
- Disk Drill adds the image backup in the drive selection screen. Select it and click Search for lost data.
- Follow Steps 5-8 in Recovery Method #1.
How to Transfer Data from Mac Hard Drive to PC
If your data is intact and accessible on your Mac drive, you can directly transfer them between your machines instead of attempting data recovery. Below are 5 different methods you can use depending on your preference, tools, and budget.
Method 1: Use File Sharing on Mac
If you can boot your Mac and connect to the internet, you can transfer your data wirelessly. This section allows you to do the work on your Mac, while the next section demonstrates how to set it up on Windows.
For this method, we’ll use the File Sharing tool on Mac:
On your Mac:
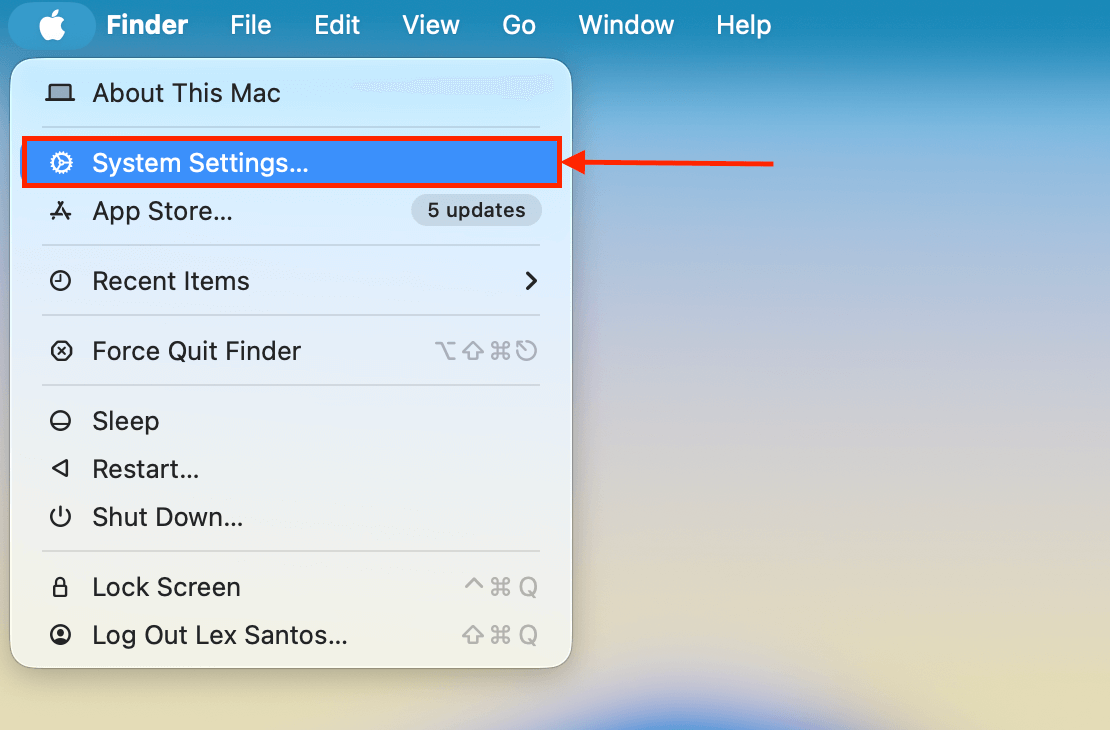
- Click the Apple menu button > System Settings.
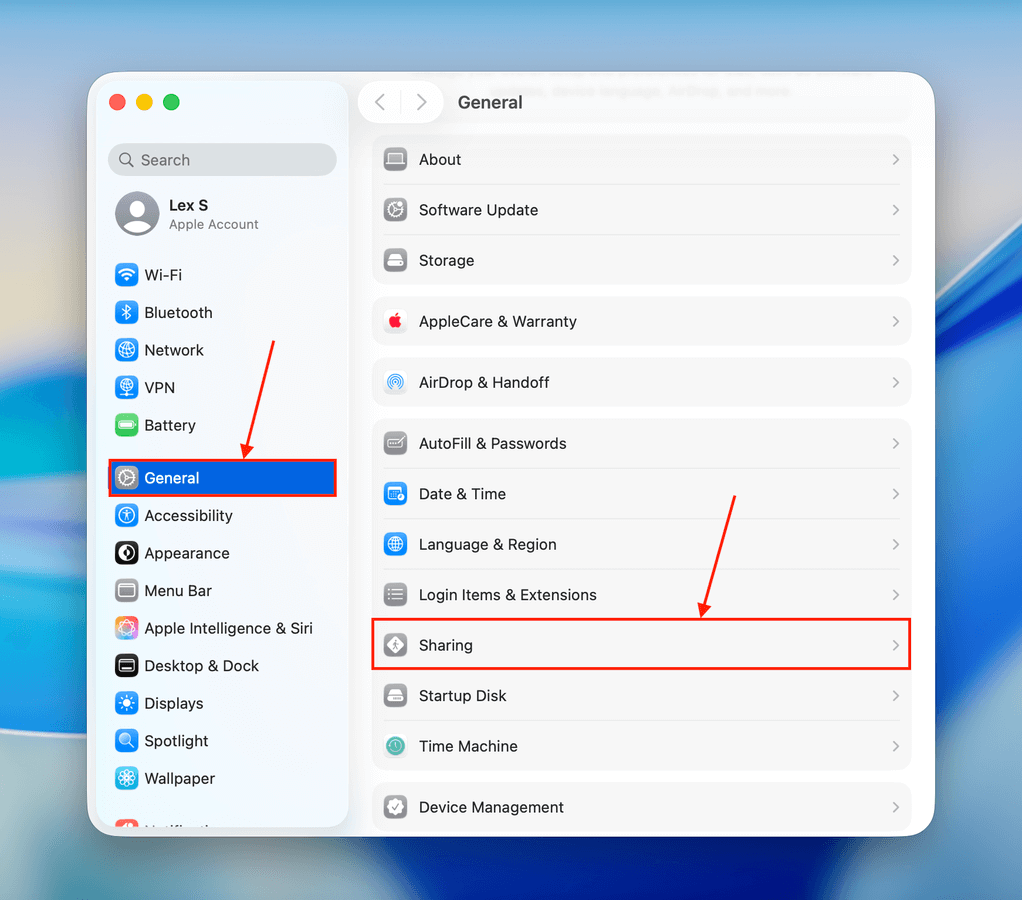
- Click General on the left sidebar and select Sharing.
- Turn File Sharing on by clicking the toggle to the right, then click the i button beside it.
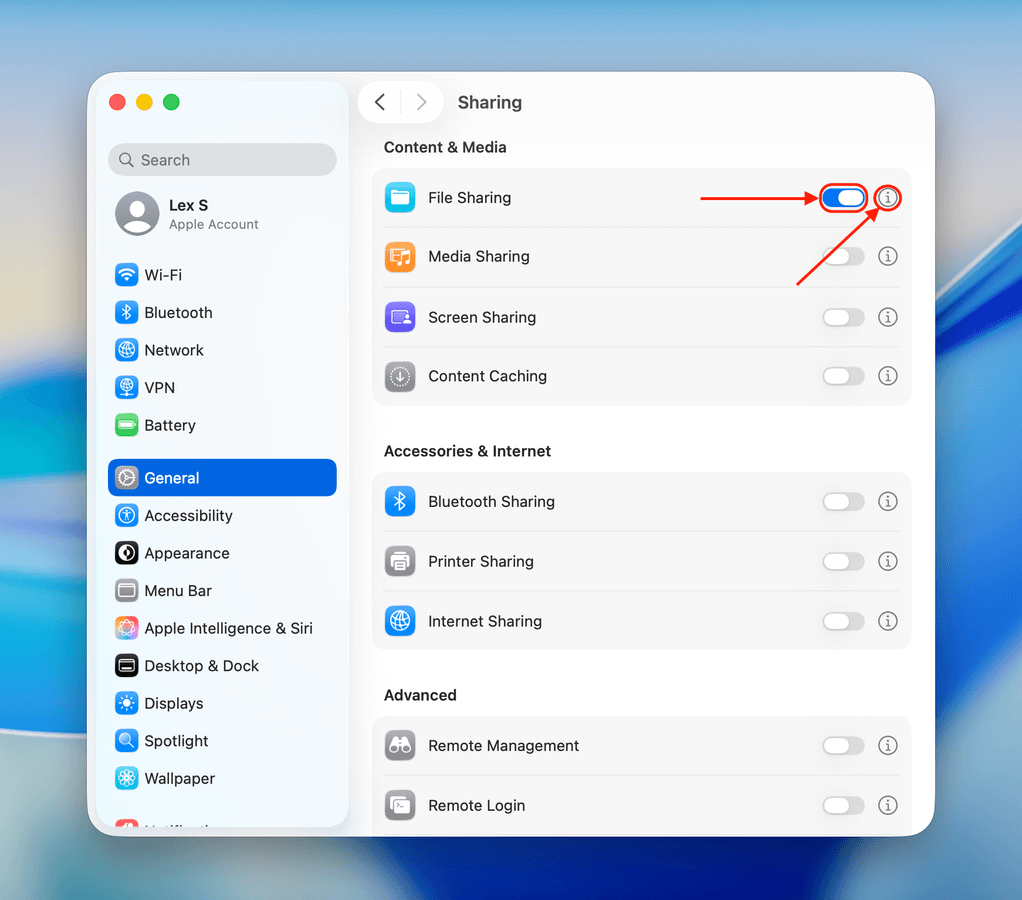
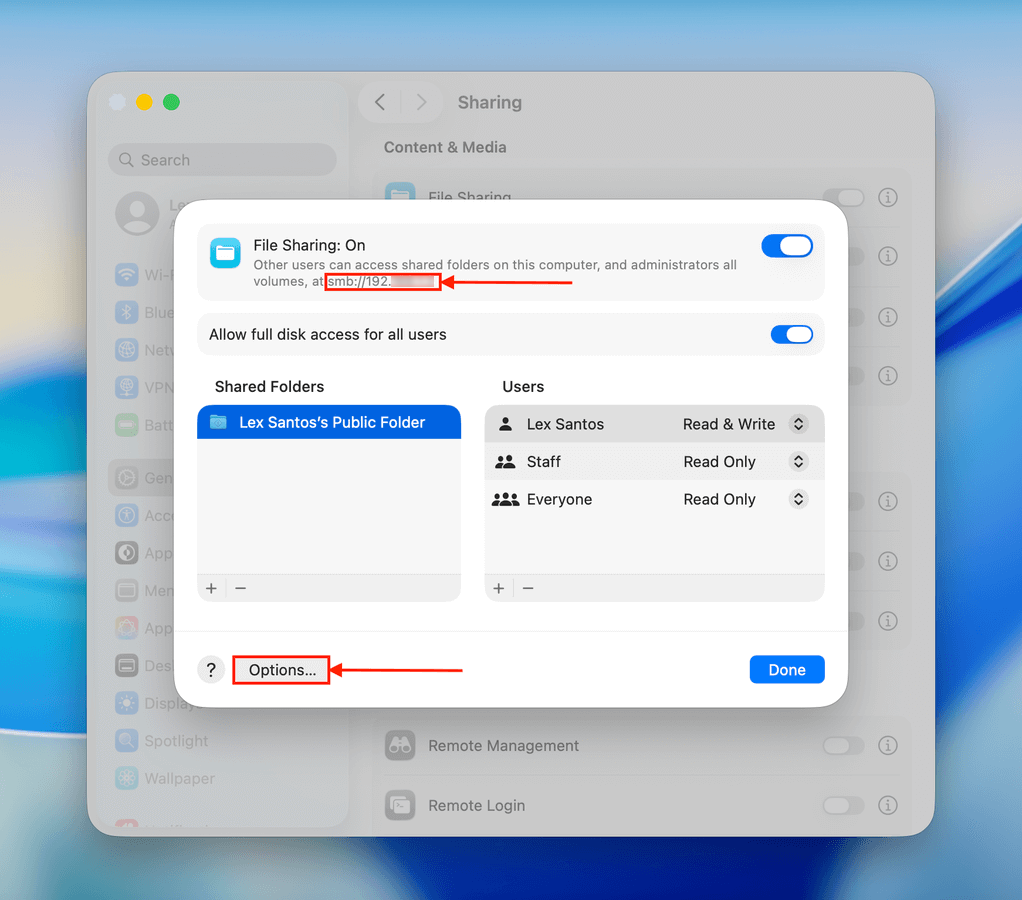
- First, take note of network address under File Sharing: On. You’ll need this later when you connect your Windows computer to your Mac’s network. Then, click the Options button and a new dialogue box will appear.
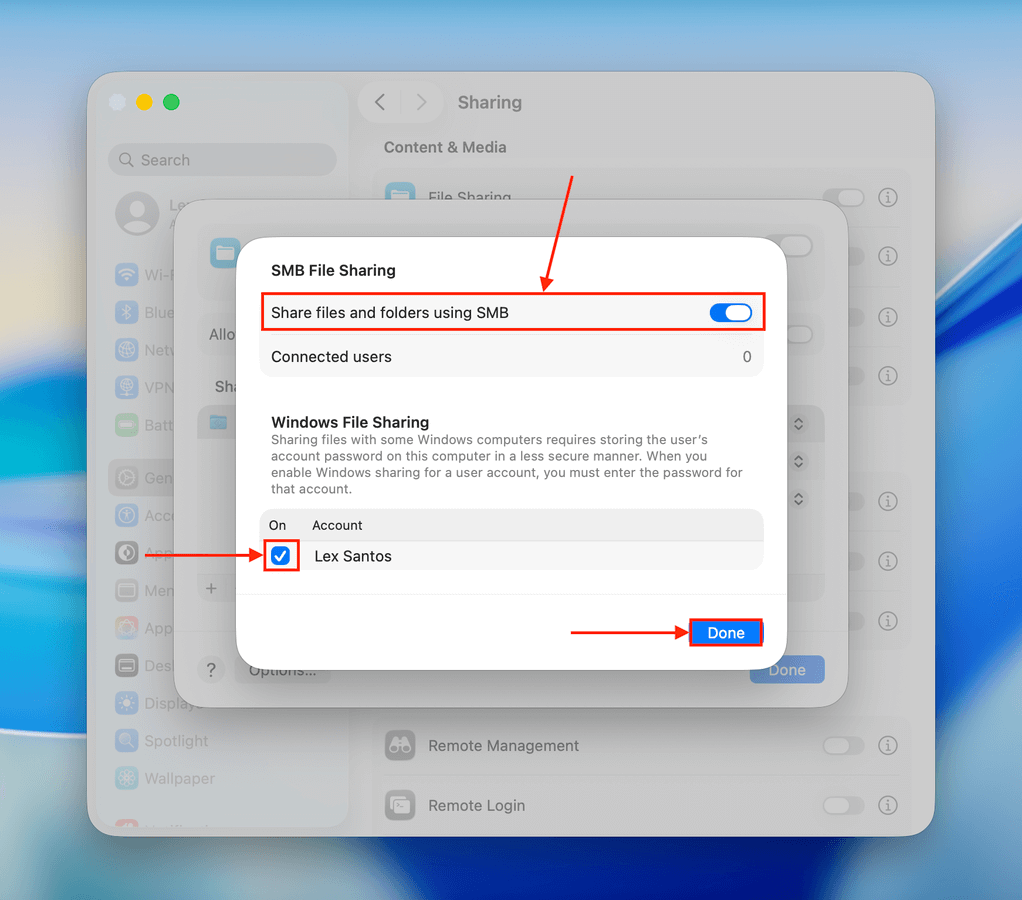
- Tick the boxes beside Share files and folders using SMB and beside your Mac user account. Then, click Done.
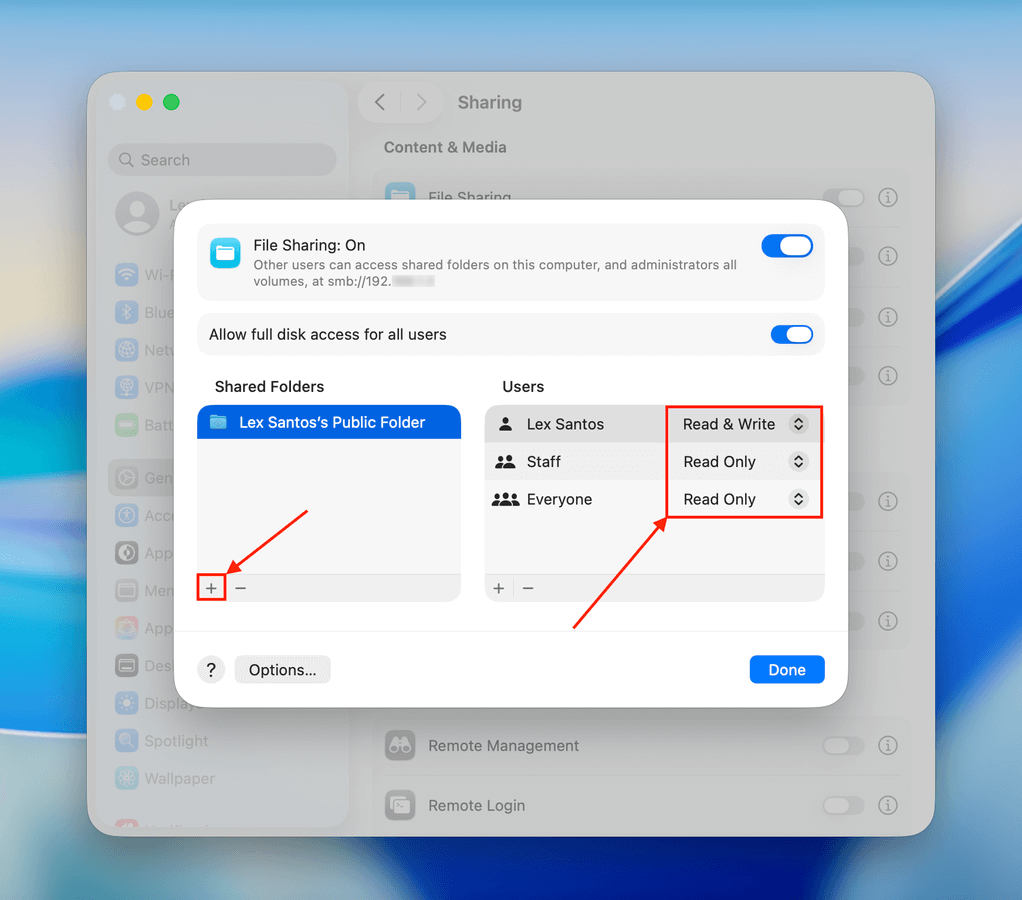
- You can use the default Public folder to transfer your files. To add a new folder to the network, click the + button. You can add multiple folders or consolidate your files into one “transfer” folder. You can also edit folder permissions from this window.
- Control + click the folder/s you want to share and click Advanced Options…
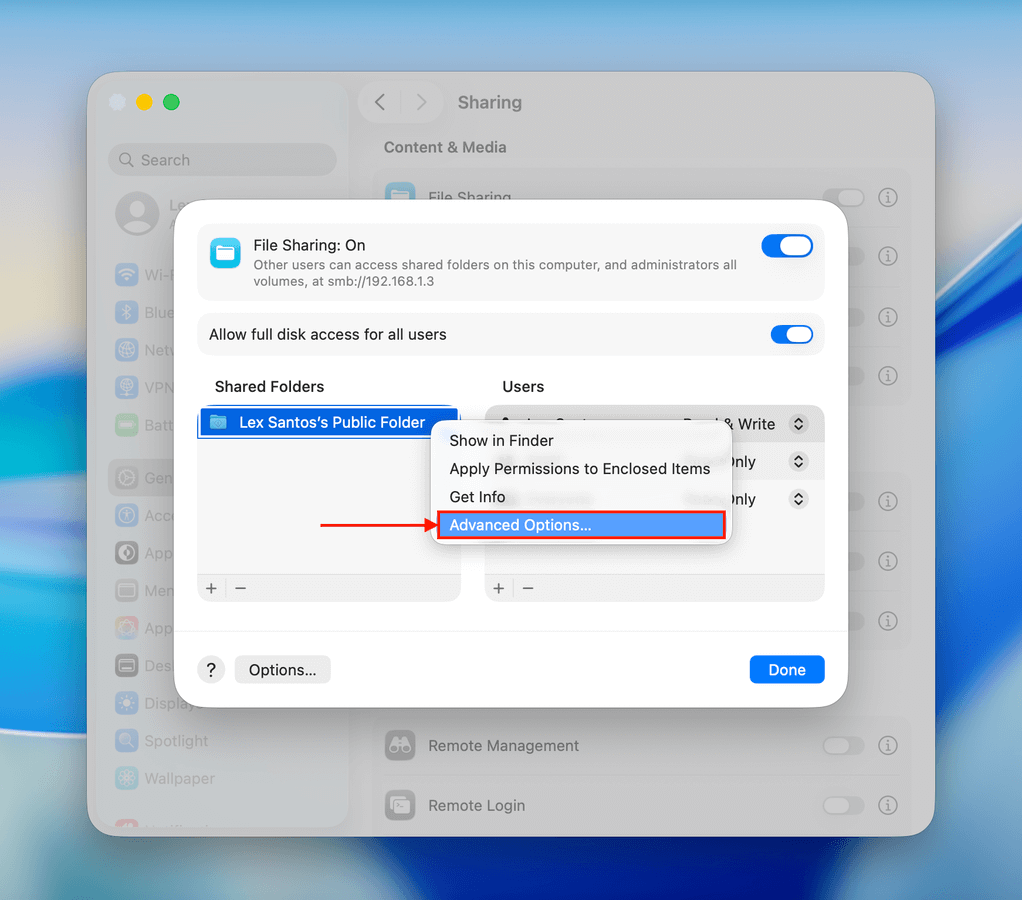
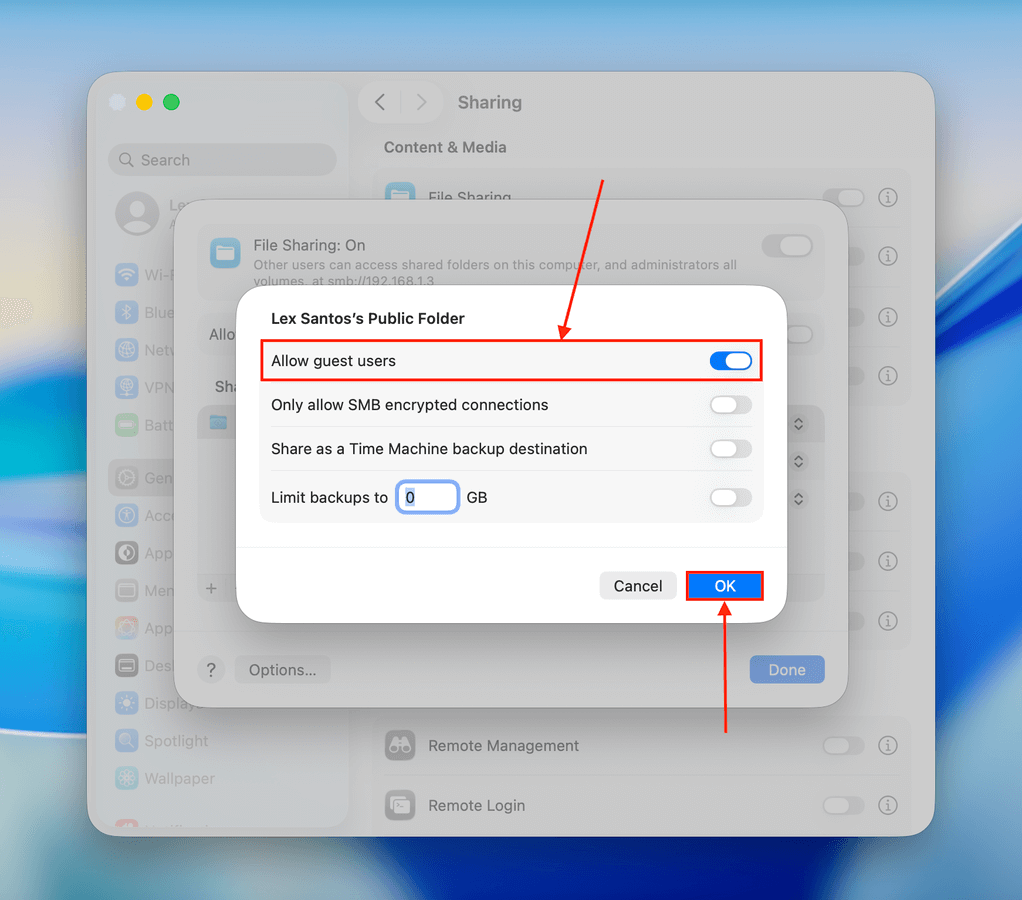
- Enable Allow guest users and click OK and then Done.
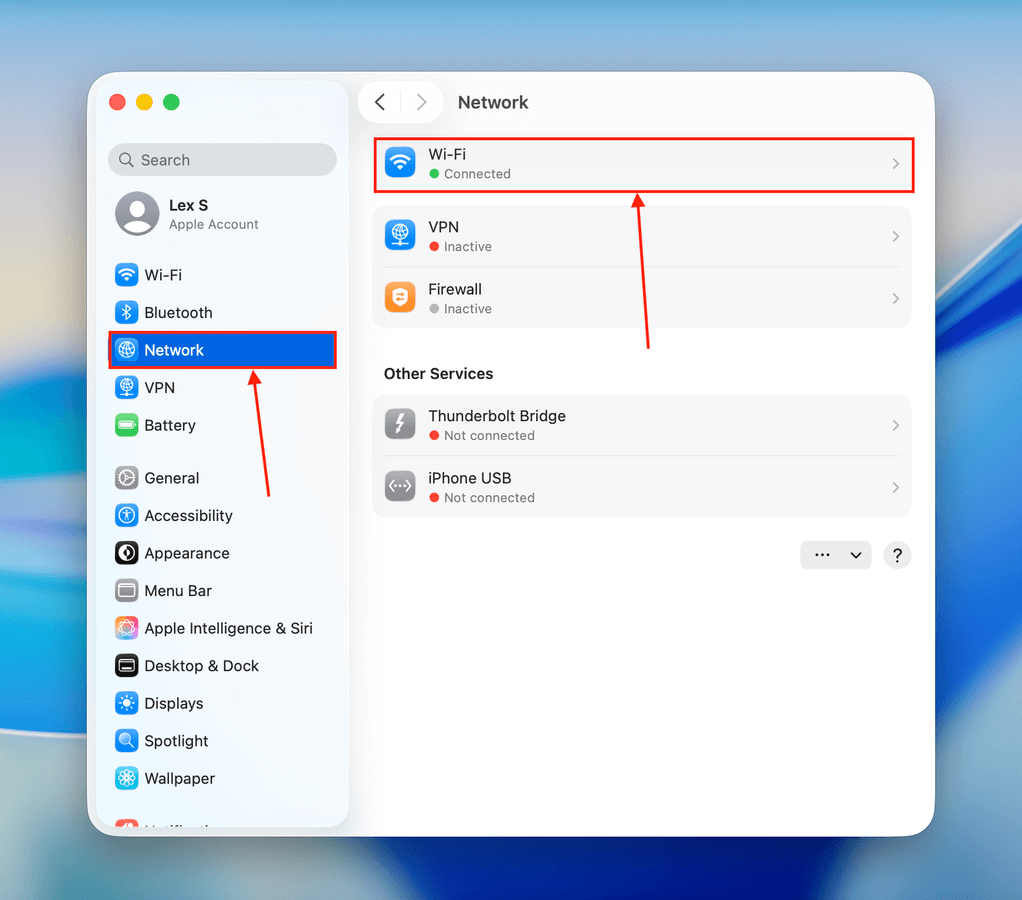
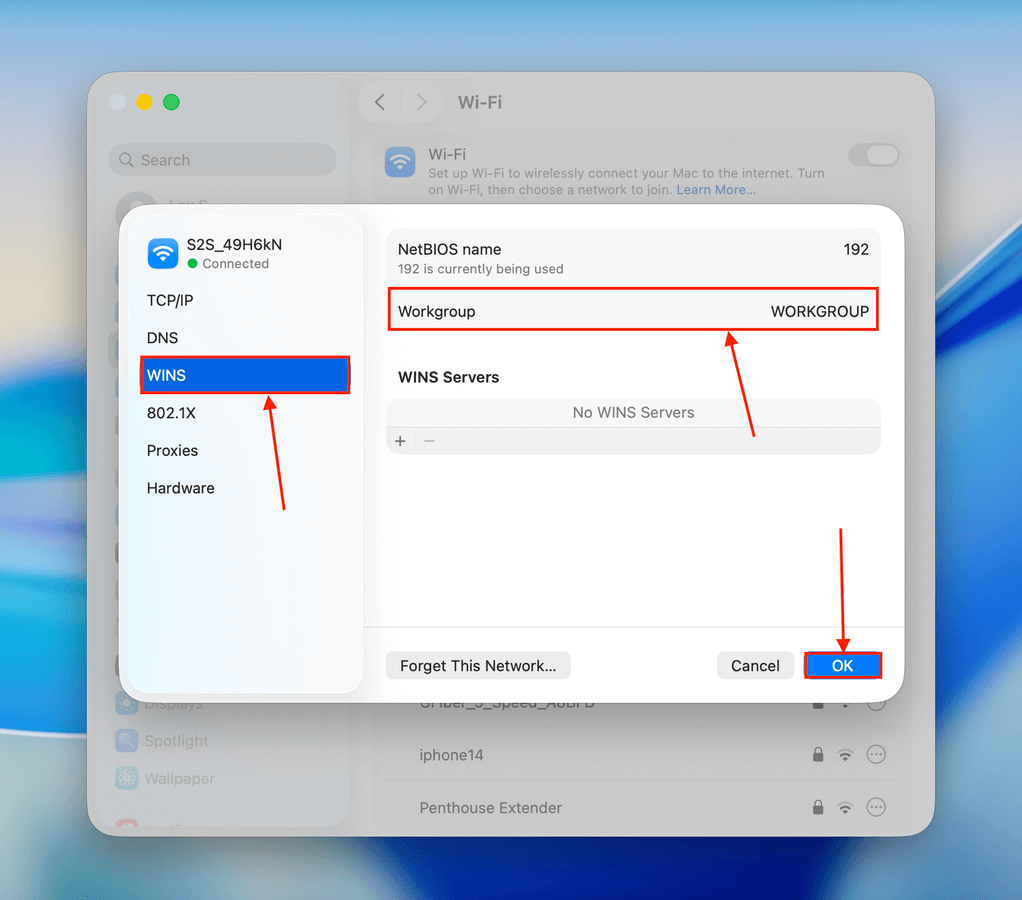
- Back in the System Settings window, click Network on the left sidebar and click Wi-Fi.
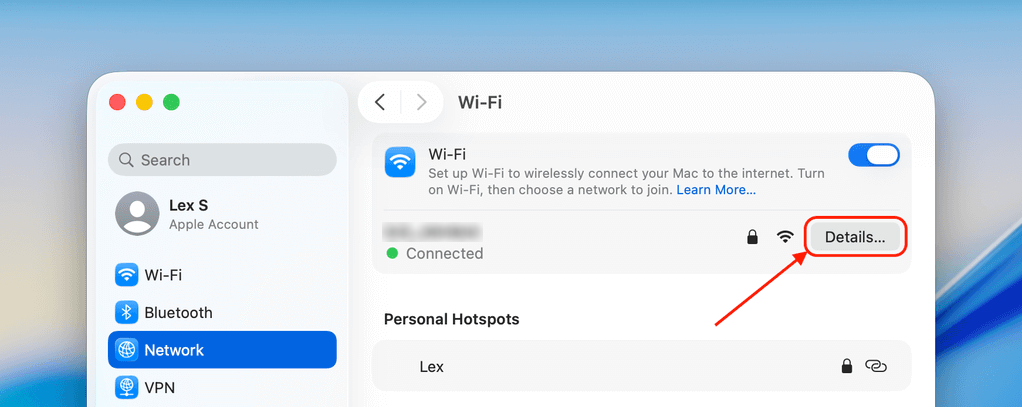
- Beside your network name and status, click Details…
- Select WINS on the left sidebar and type your Windows computer’s workgroup name. Then, click OK.
On your Windows computer:
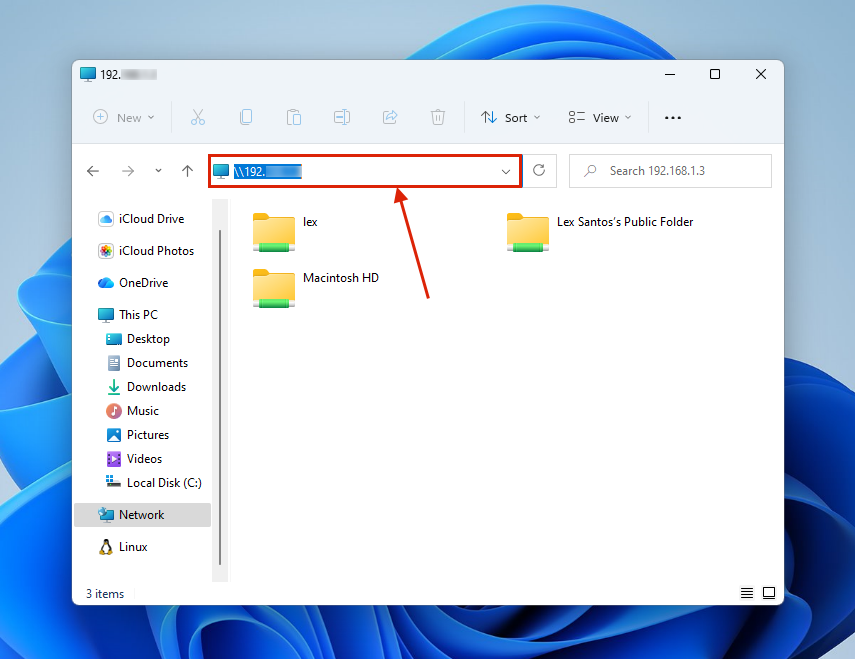
- Open File Explorer.
- In the search bar, type \\”Your.Mac’s.IP.Address” and hit Enter. You’ll be prompted to enter a username and password–make sure you use the right credentials.
Method 2: Create a Network Folder on Windows PC
If you prefer to set up file sharing from your Windows PC, you can create a network folder; a network folder and all its contents are accessible to computers on the same network. Here’s how to set it up:
On your Windows computer:
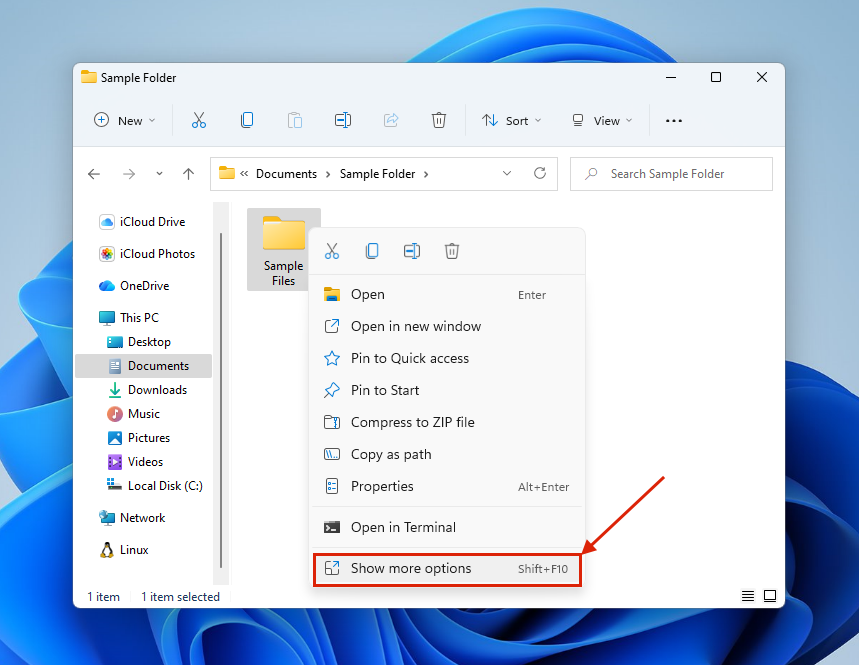
- Create a folder anywhere in File Explorer.
- Right-click the folder and select Show more options.
- Then, select Give access to > Specific people…
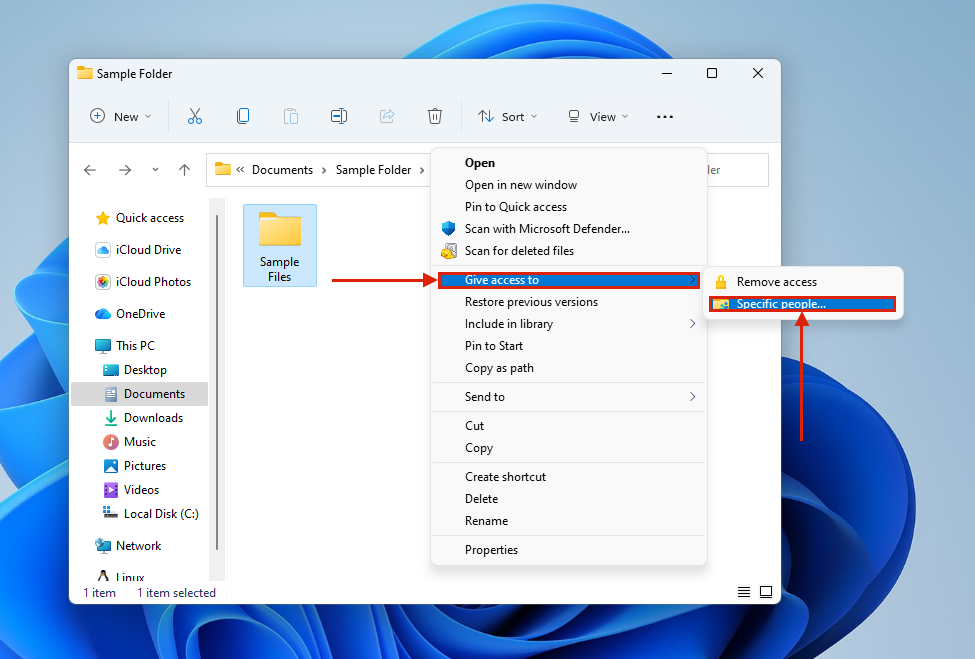
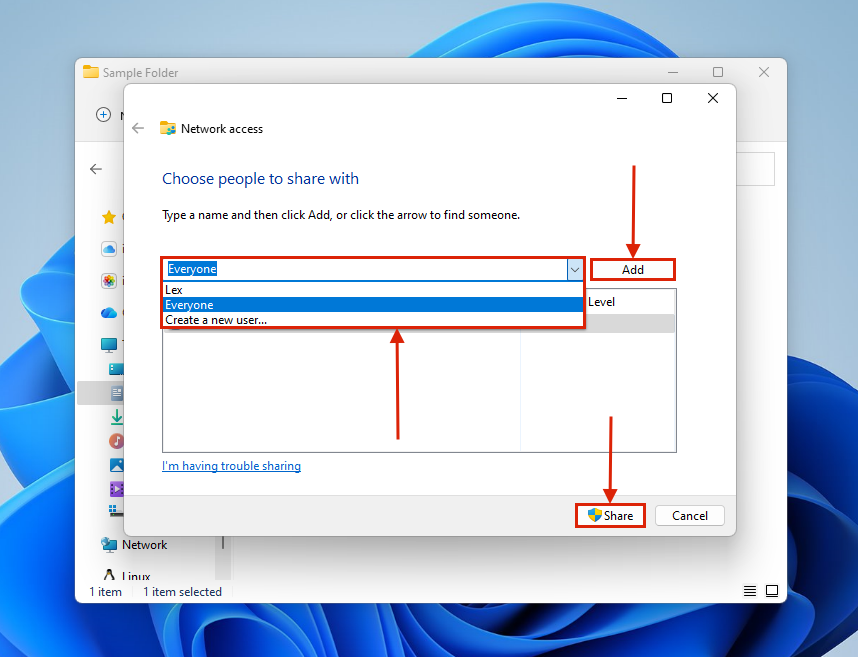
- Select Everyone. Then, click Add > Share and click Done once your folder has been shared.
On your Mac:
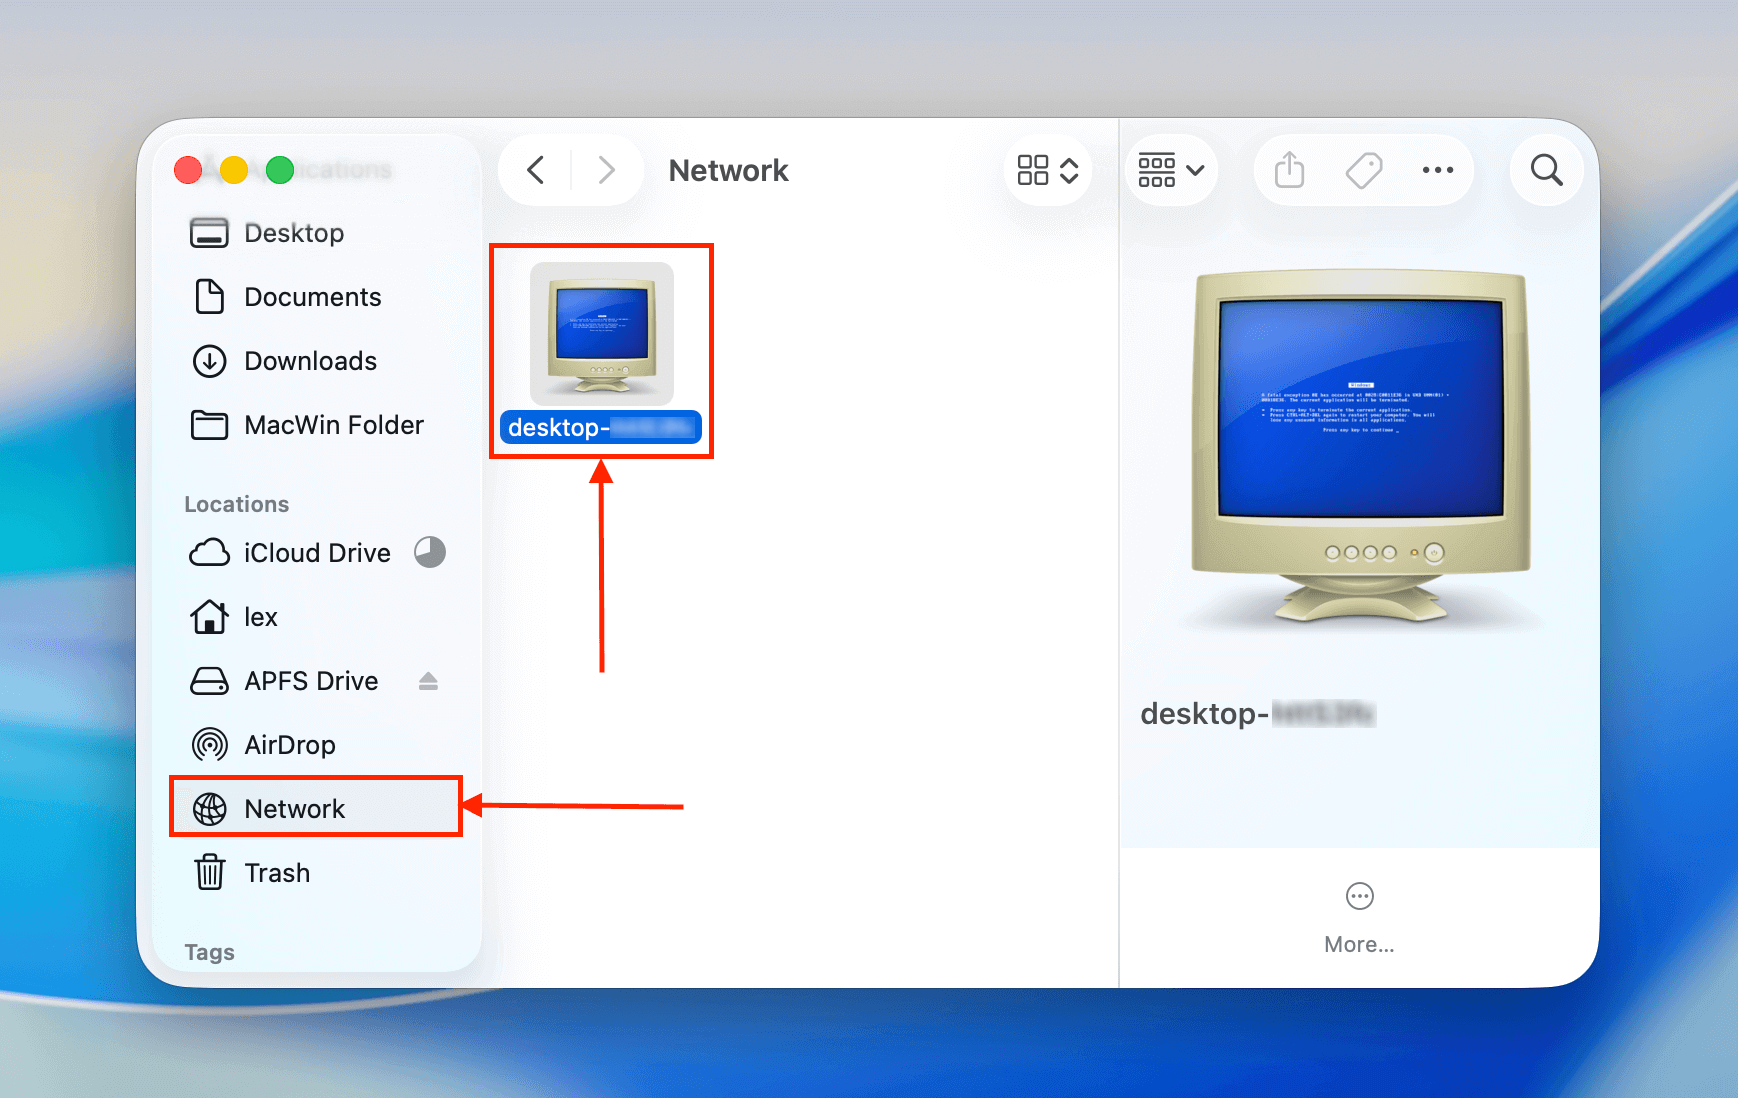
- Open Finder and click Network on the left sidebar. Then, double-click your Windows.
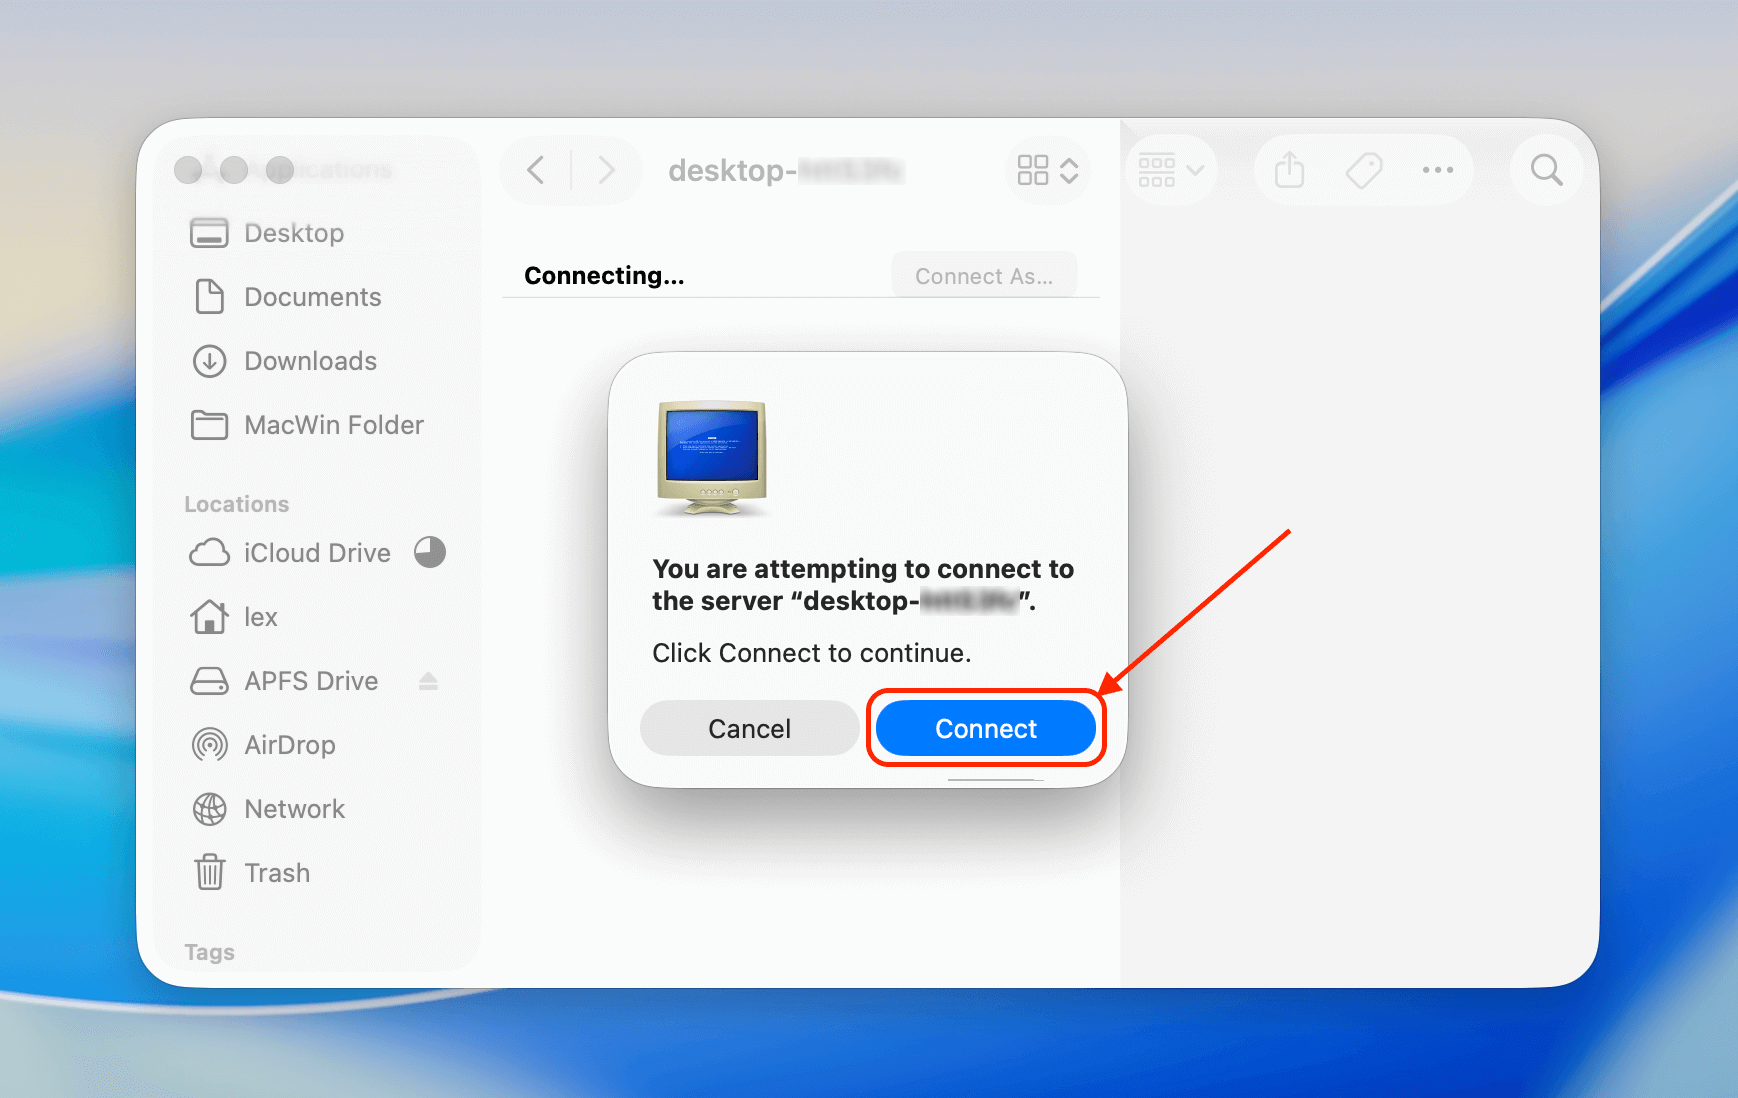
- On the top-right corner of the Finder window, click Connect As… (Click Connect again to confirm if prompted).

- In the confirmation dialog that appears, click Connect to proceed with accessing the machine folder.
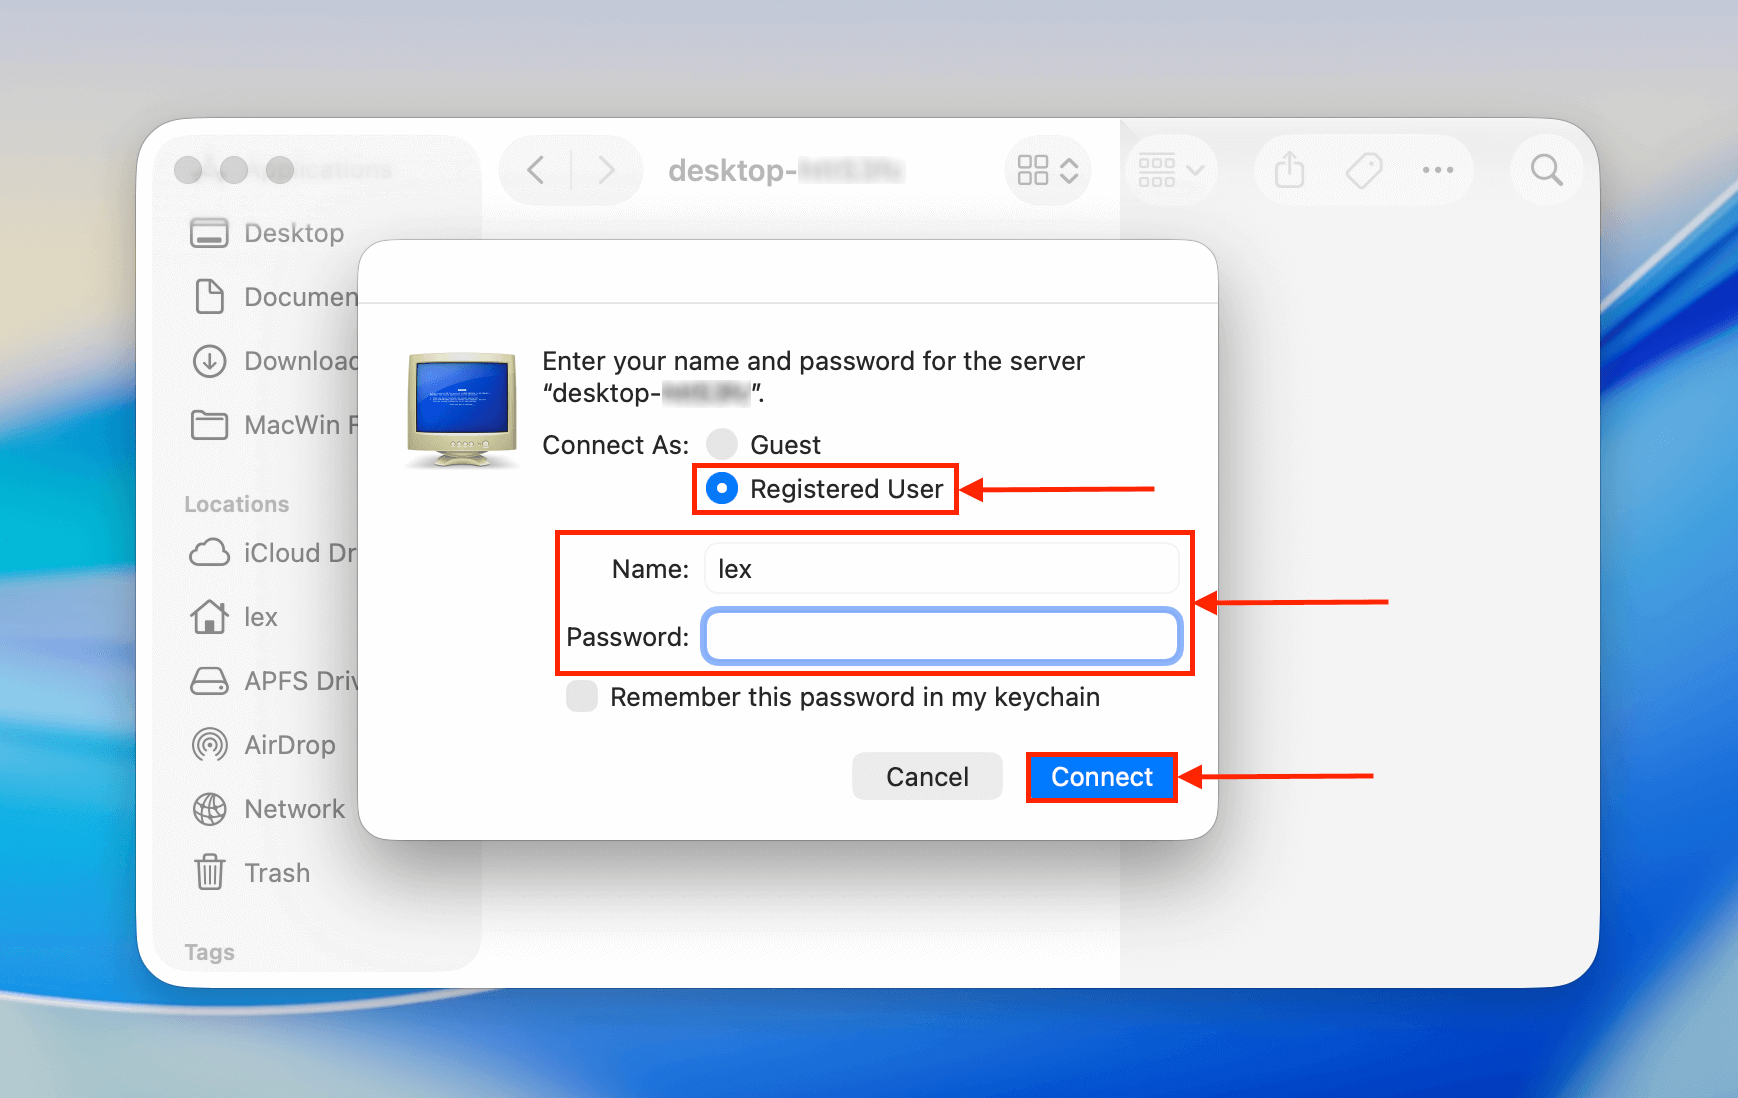
- Select Registered User and type in the Name and Password of your Windows PC. Then, click Connect.
You can now freely transfer files between your Mac and Windows machines by adding data to the shared folder.
Method 3: Transfer Data Using an ExFAT-Formatted External Drive
Transferring files from Mac to PC using an external hard drive is possible, but the drive has to be formatted with an ExFAT file system so it can be recognized by both macOS and Windows computers (Windows will not natively support a Mac-formatted external hard drive).
To format Mac drive to Windows, right-click your drive in File Explorer and select Format… from the popup menu.
Method 4: Use Third-Party Mac Drive Explorer Software
If you don’t have a stable network connection nor an ExFAT-formatted external drive, you can attempt to access your data directly through Windows. However, you’ll need third-party Mac drive explorer software to actually read the data.
Once you have the correct explorer software for your file system, you have a couple of options:
- Connect the drive. If your Mac drive isn’t soldered on, you can connect it to your PC. You have 3 options: (1) if a hard drive, use an enclosure, (2) if compatible, connect M2 SATA directly, or (3) use connectors.
- Create an image backup. Create an image backup Use Disk Utility to create an image backup of your Mac drive.
- Create a Time Machine backup. Create a Time Machine backup of your Mac on an external drive. (only works for HFS+; if using APFS, use Disk Drill to scan and recover it instead).
You can then read your drive, image backup, or Time Machine backup (HFS+ only) using the explorer software of your choice.
Method 5: Sync Machines Through Cloud Client
Cloud clients are like internet-based storage devices with 2 major advantages: (1) you can access your data from any computer as long as you have internet and (2) most clients can be installed and integrated into your file system.
For example, iCloud can be installed on both Mac and Windows PCs, which creates a special folder. In that folder, you can save all the data you want to share between your computers. Due to the “synchronization” feature all cloud clients have, any files you save to that folder on your Mac will also be available on your Windows PC.
Conclusion
Despite their incompatible file systems, there are many options to recover or transfer data from a Mac hard drive to a Windows PC. However, some of them require tools or extra preparations to work. We suggest you look into cloud storage options and back up your data regularly to an ExFAT-formatted external hard drive.
FAQ
To transfer files from Mac hard drive to PC, try the following methods:
- Use File Sharing on Mac.
- Create a network folder on Windows PC.
- Transfer data using an ExFAT-formatted external drive.
- Use third-party Mac drive explorer software.
To connect your drive to Windows, you have 3 options:
- If your drive is an external hard drive, you can simply connect it to your Windows PC using the appropriate cable and USB adapter.
- If your drive is a detachable internal drive, you’ll need to use a docking station or internal connectors
- If your drive is soldered to your Mac, your only option is to connect them via a network folder.
Note that your Mac drive must be using a compatible file system for your Windows PC to safely interact with it. You can use HFSExplorer or ApfsAware if it’s using one of the Mac-only file systems.
Yes, it’s possible to recover data from a Mac on a PC using these methods:
- Connect your Mac drive to your PC as an external drive and use data recovery software to extract your files
- Extract your data from a Time Machine backup created with your Mac (you may need to use third-party tools to access a macOS-based file system)
- Create an image backup of your Mac drive and scan it with data recovery software on your PC


