
If your partition, your hard drive, or Disk Utility’s own tools are greyed out, it’s a good indication that something is wrong. It may be as simple as an incompatible file system or a malfunctioning port. While fixing the root of the problem is pretty simple, it hinges on identifying the correct issue in the first place.
In this article, I’ll show you 6 ways to fix greyed-out elements in Disk Utility based on the specific issues that caused them with detailed breakdowns and step-by-step screenshots. Read on!
Table of Contents
How to Avoid Losing Your Data When Fixing Greyed-Out Partition
If you have important files stored on your greyed-out partition, we strongly recommend that you recover your data before attempting to troubleshoot. Data recovery tools can bypass Finder and access your files directly, in case you keep encountering errors when trying to read your drive. This gives you a chance to secure your data before troubleshooting, which can directly or indirectly cause permanent data loss.
For this demonstration, we’ll be using an app called Disk Drill. It’s a beginner-friendly data recovery tool that is very good at recovering data from malfunctioning drives (especially those that are inaccessible). Aside from having excellent session management that allows automatic reconnection, it also has a feature called Byte-to-byte backup, which allows you to create a total copy of your drive’s entire disk saved into a single file. You can scan this file and set aside your drive to protect it from further wear and tear.
Disk Drill is also very good at working with different types of file systems, including Windows-based formats like ExFat and FAT32 (which are common formats for external hard drives). It can even find lost partitions and allows you to review their data conveniently.
Step 1. Download and install Disk Drill.
Step 2. Open Disk Drill from the Applications folder and grant the necessary permissions.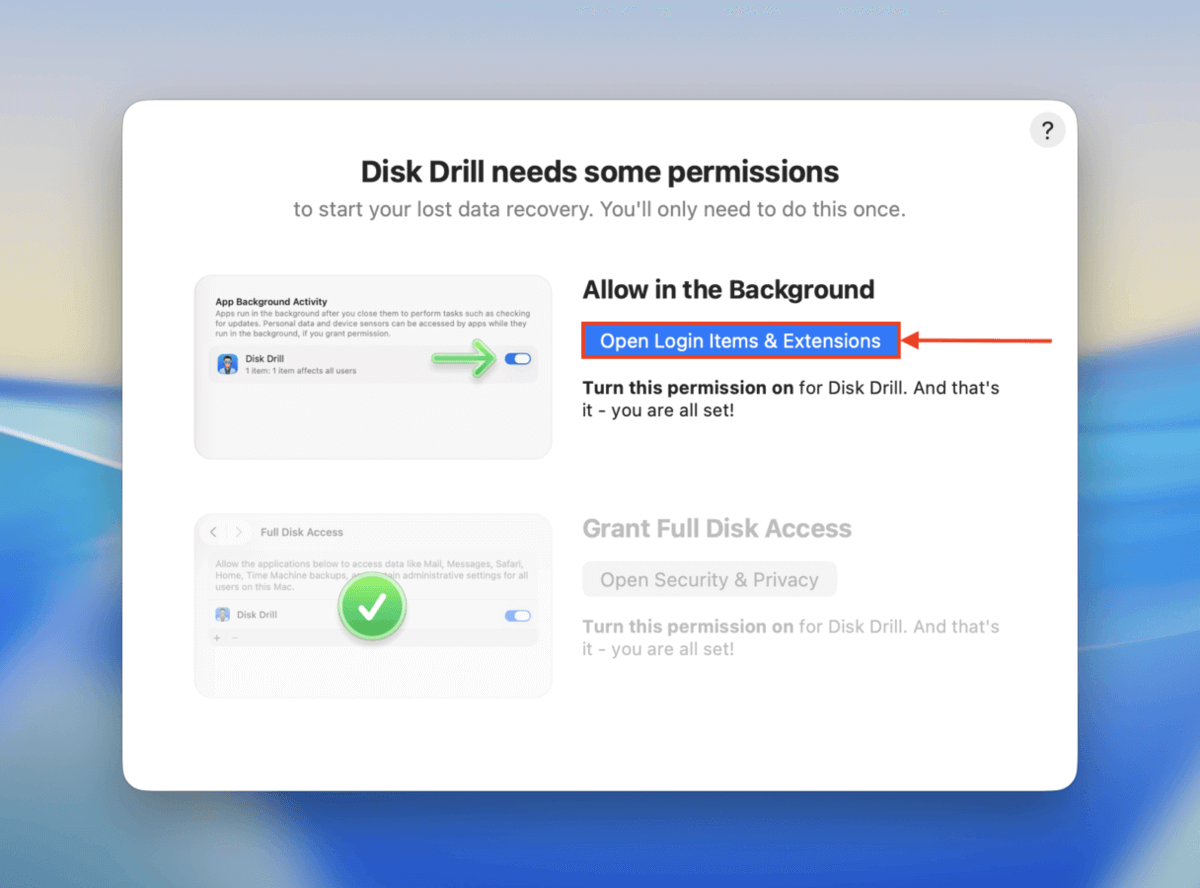
Step 3. On Disk Drill’s left sidebar (under Extra Tools), click Byte-to-byte Backup. Then, select your drive from the list and click Create backup.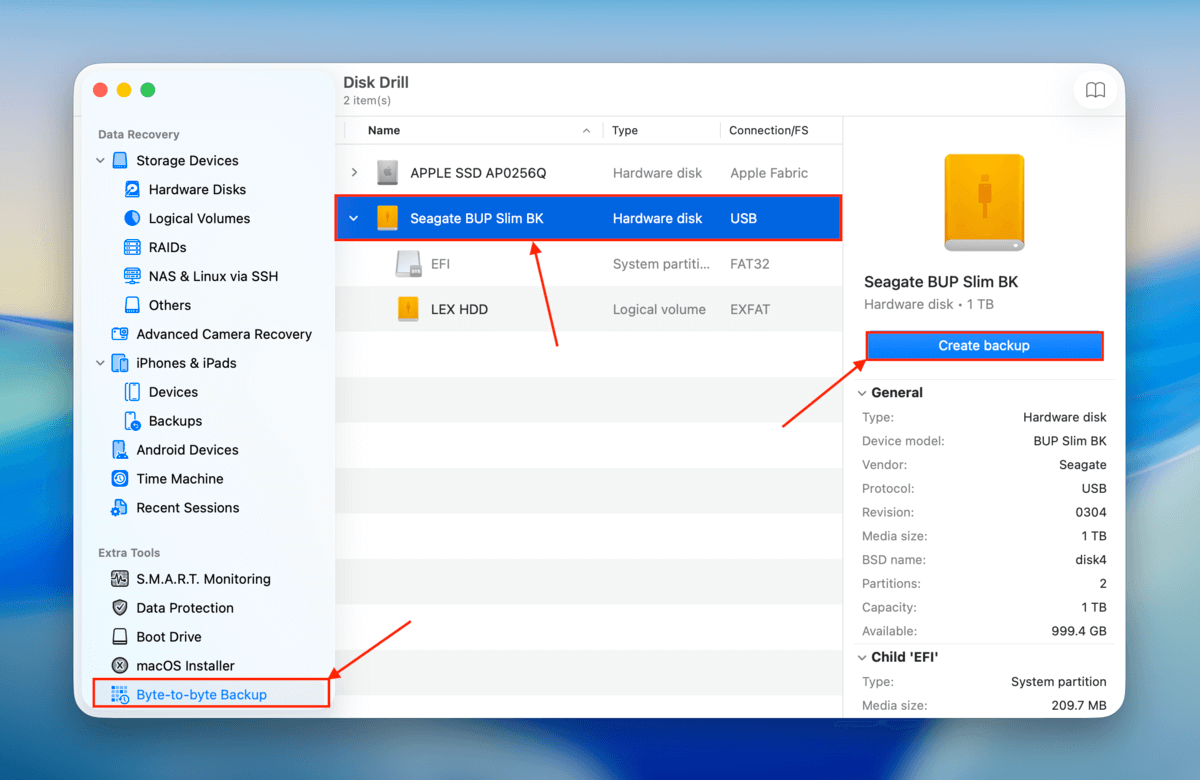
Step 4. Choose a file name and location for the image backup. Then, click Save.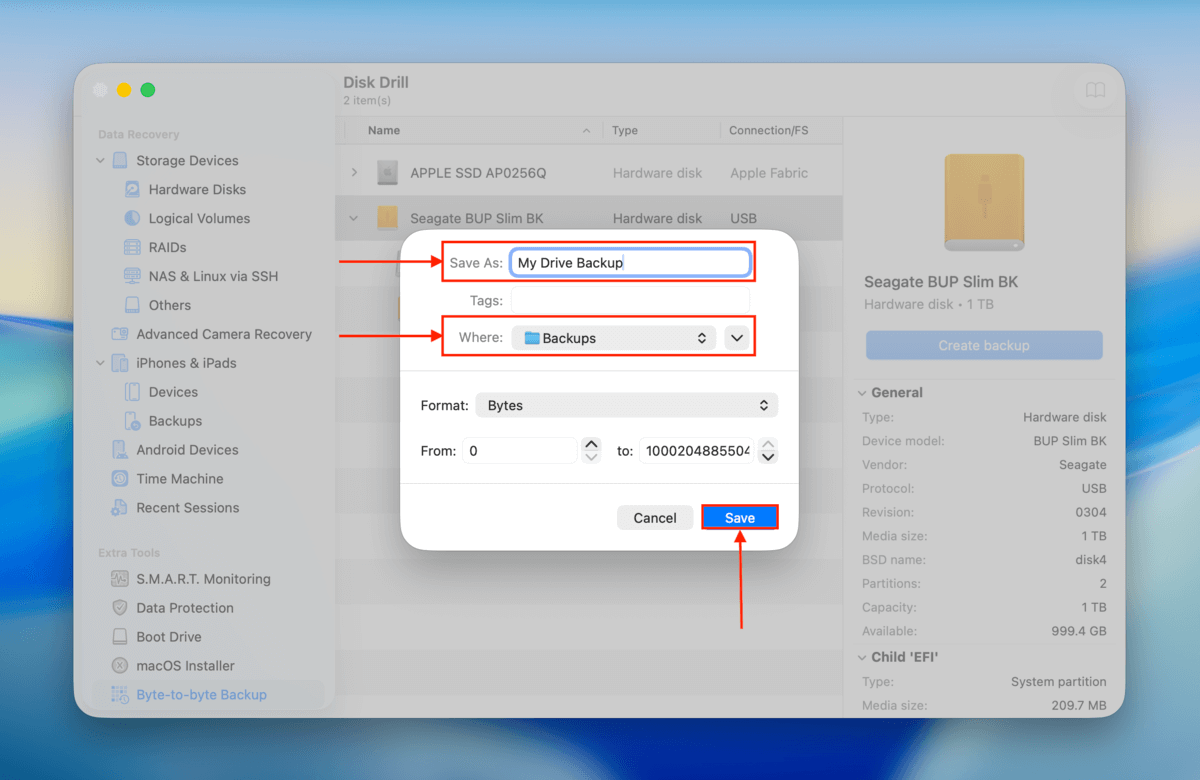
Step 5. In the left sidebar (under Data Recovery), click Storage Devices. Then, click Attach disk image at the bottom of the window.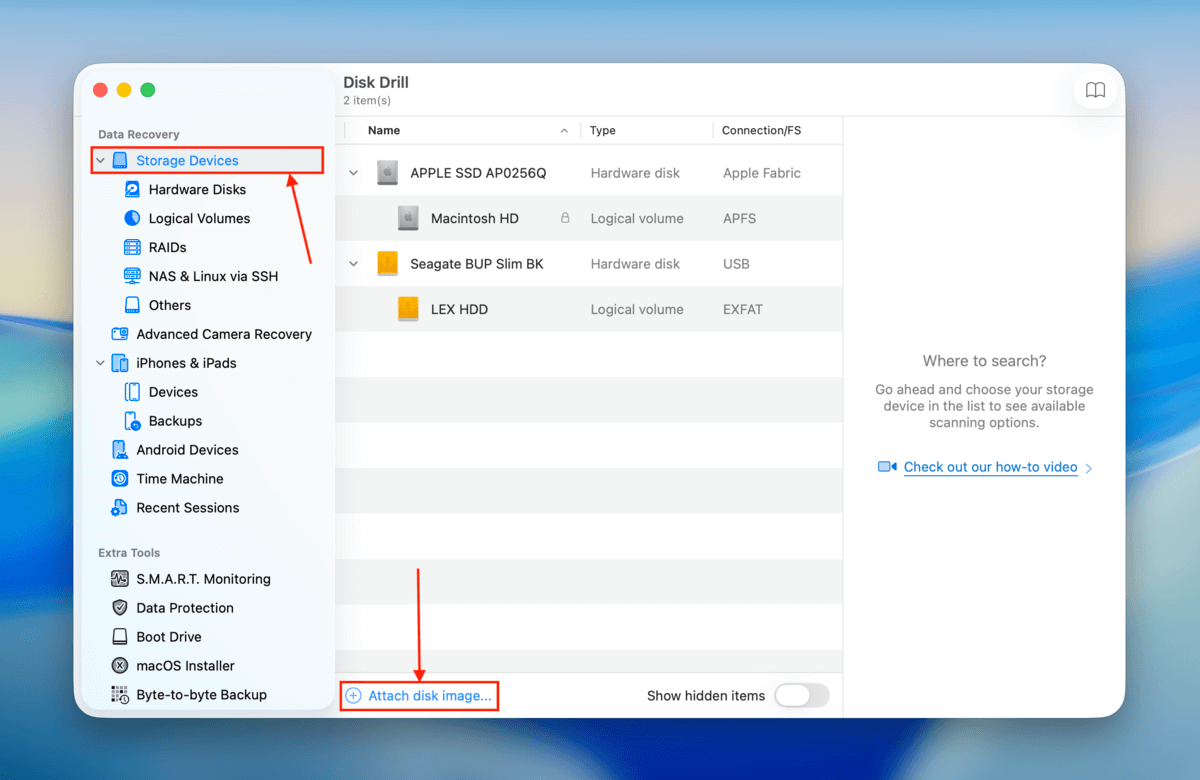
Step 6. Find and select the backup you created in steps 3 and 4. Then, click Attach.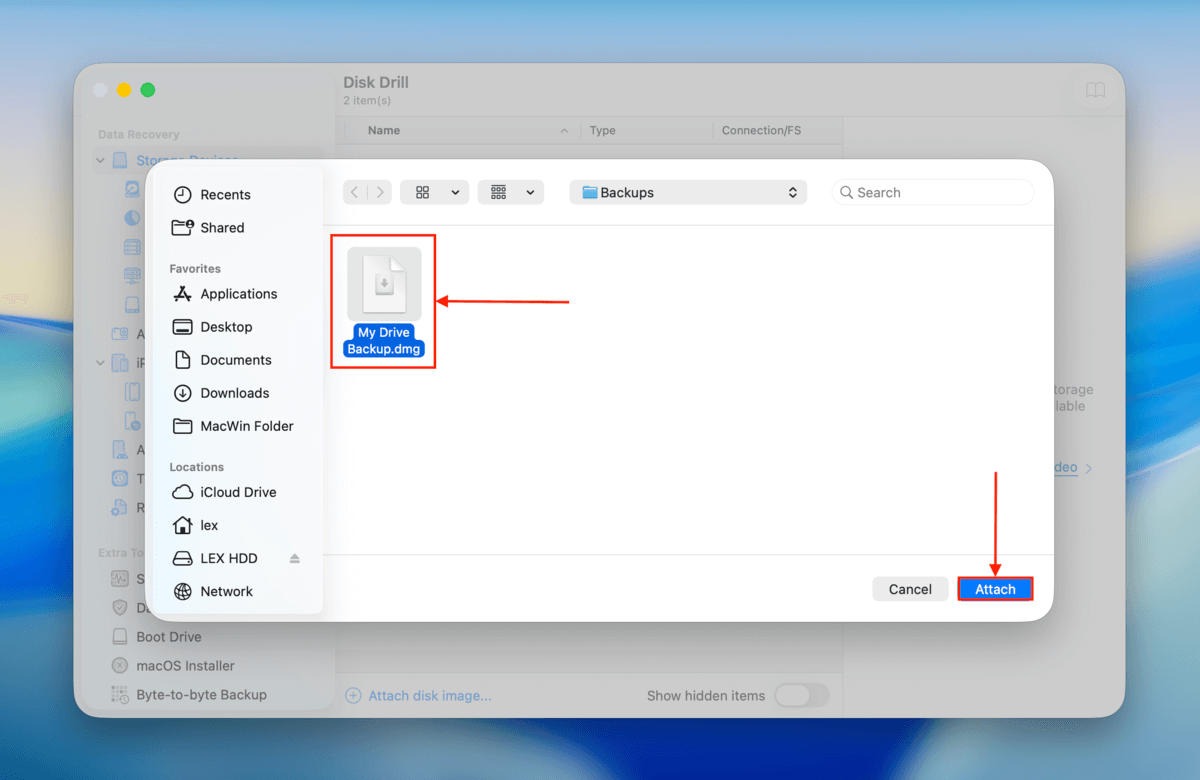
Step 7. Select your backup from the drive list, and click Search for lost data.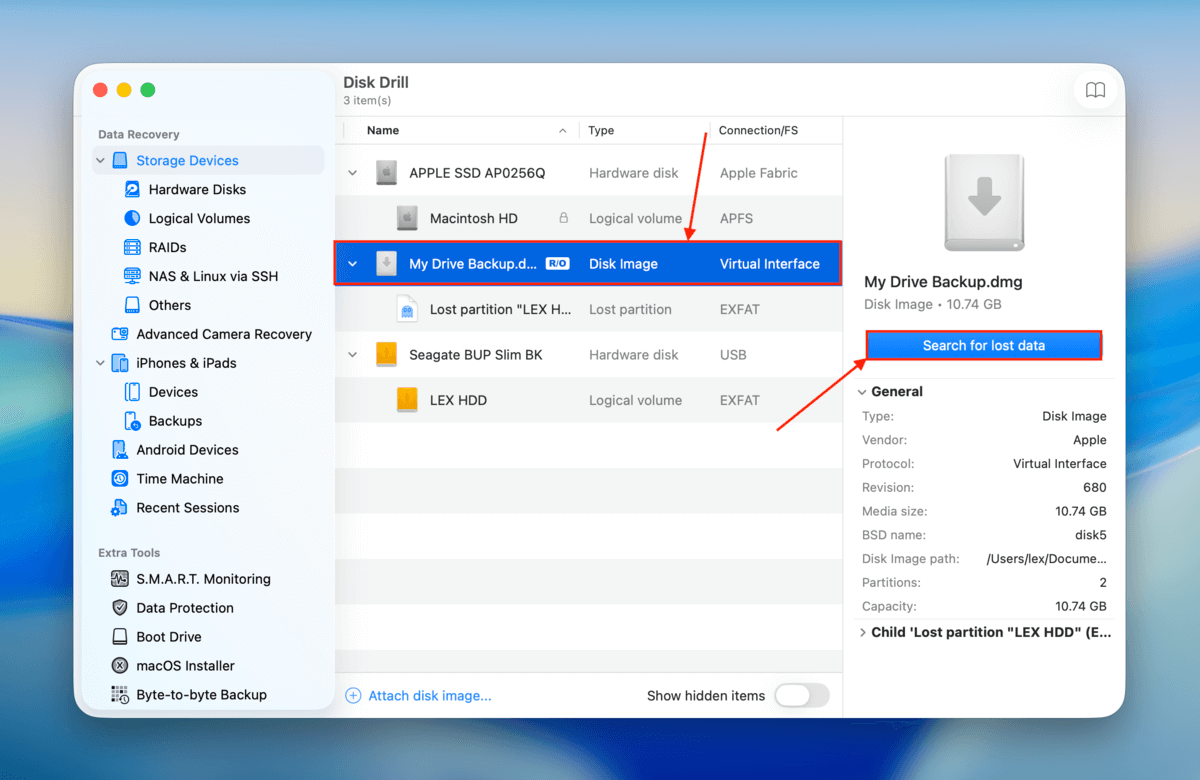
Step 8. Click Universal Scan in the pop-up.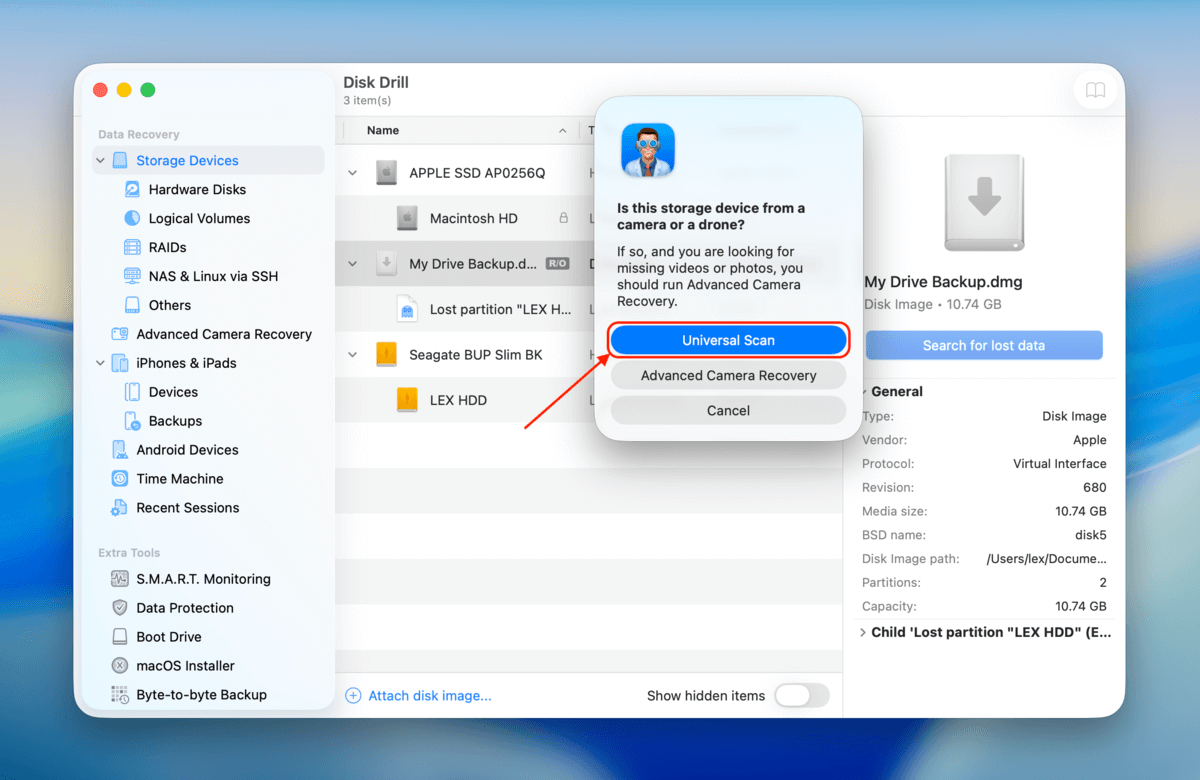
Step 9. Once Disk Drill is done scanning your drive, click Review found items.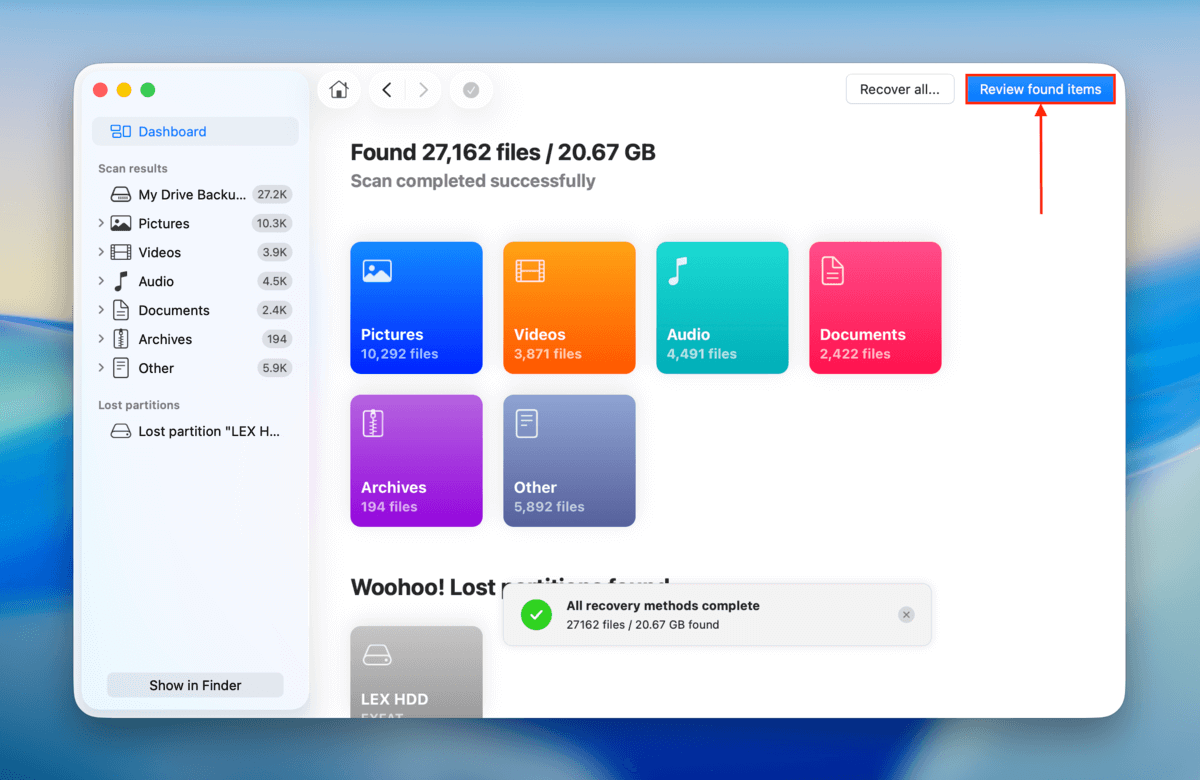
Step 10. On the left sidebar, you can filter the type of data you want to restore or access–if Disk Drill found a lost partition, it will be listed here as well. Alternatively, you can use the search tool in the top corner. Make sure to click each file you want to recover to display its preview.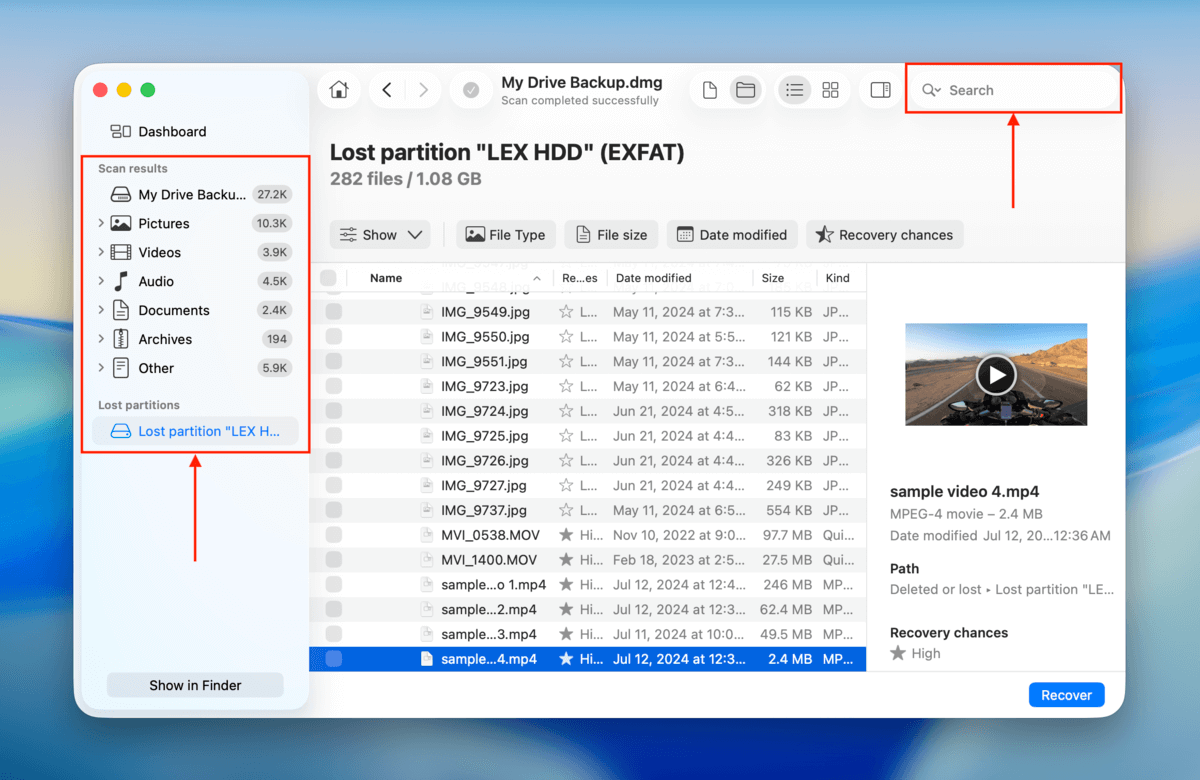
Step 11. Mark the boxes beside the files you want to restore. You can also leave them blank if you want Disk Drill to recover all the files it found. Then, click Recover (or Recover All).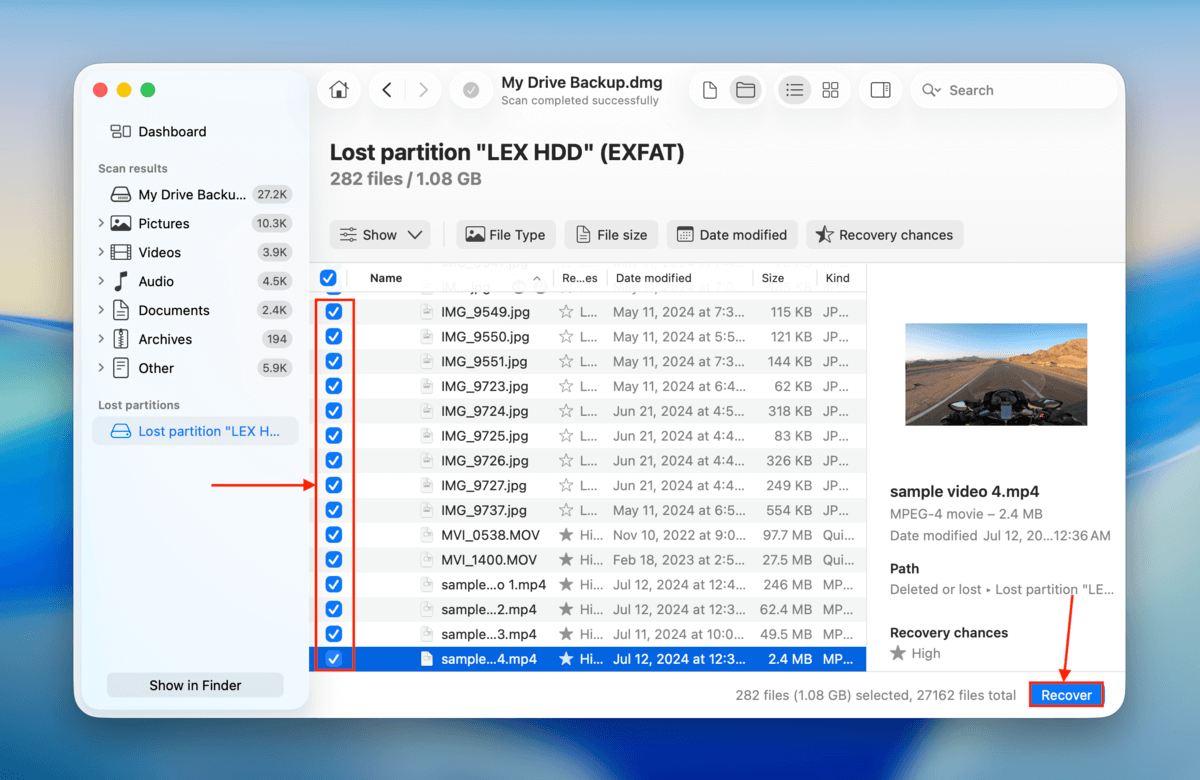
Step 12. Finally, choose a location on your Mac where you want Disk Drill to save the restored files. Do not save the files on the drive with the missing partition. Then, click Next.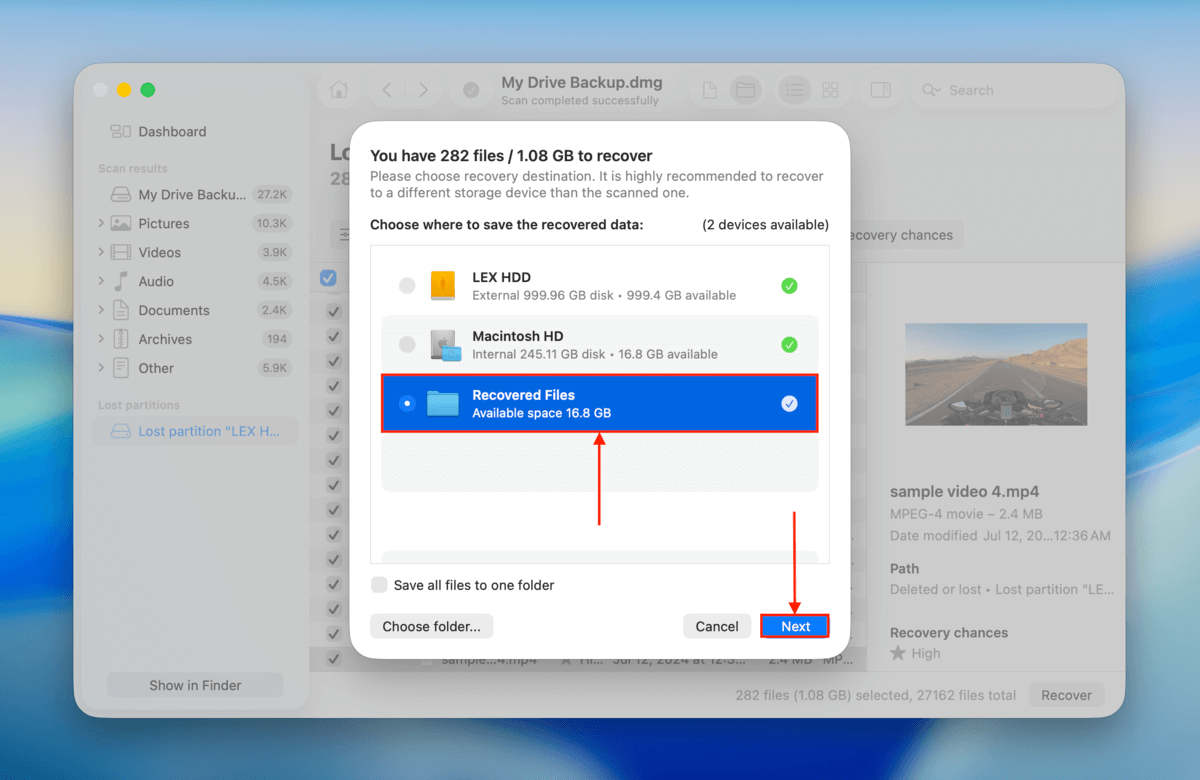
After restoring your data, you can proceed with troubleshooting your drive without the risk of permanent loss. Just make sure that you secure several copies of your important files (e.g., upload them to cloud storage) as soon as possible.
Common Fixes for Greyed Out Elements in Disk Utility
Aside from partitions, many users report other Disk Utility elements appearing as greyed out. While those may not directly prevent you from accessing your data (e.g. partitioning tool), they do indicate that something is wrong.
In the sections below, I’ll demonstrate 6 common and proven fixes for different greyed-out elements in Disk Utility.
Case #1: Partition is Greyed Out
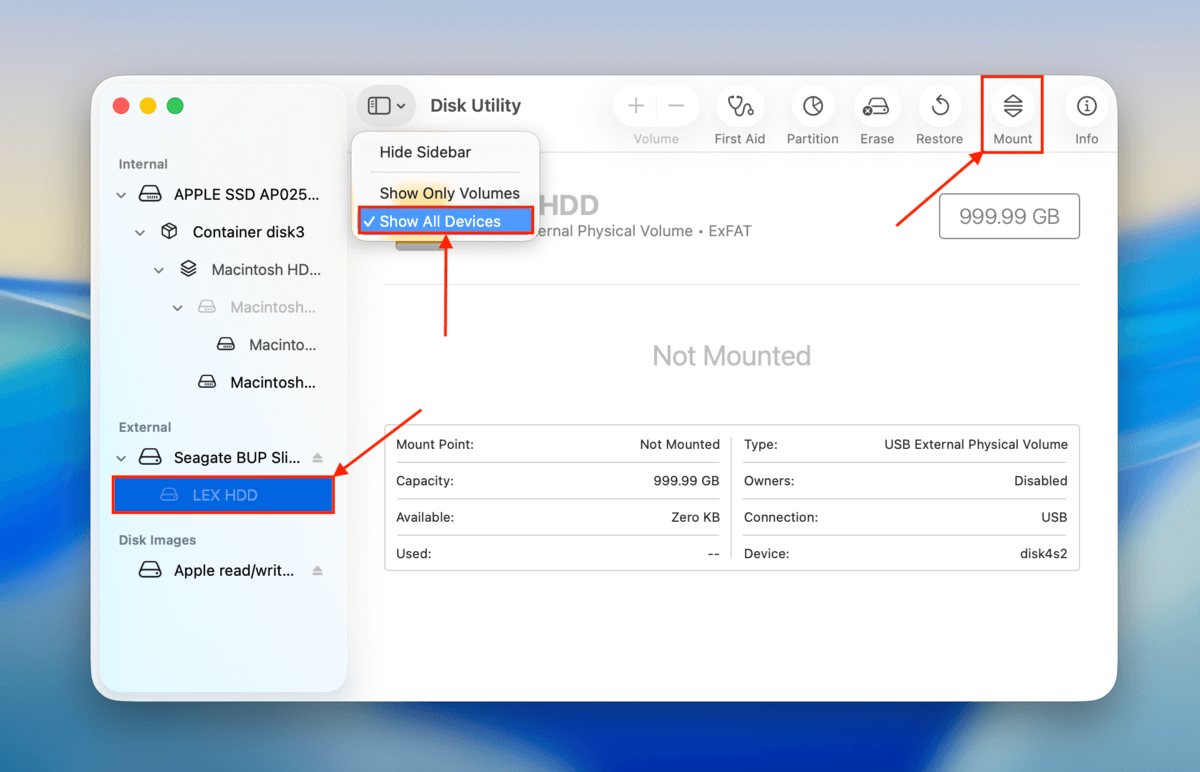
If your Disk Utility partition is greyed out when viewed on the left sidebar, that means it hasn’t been mounted. Possible causes of a drive not mounting include an interruption of macOS’ mounting system due to the lack of CPU resources. The solution is to mount your partition manually using Disk Utility’s Mount tool.
First, launch Disk Utility (Finder > Applications > Utilities). Then, select your partition from the left sidebar and click Mount.
Case #2: Mount Button is Greyed Out
If the Mount button is greyed out in Disk Utility, there are two possible reasons. First, you may have accidentally selected a non-partitioned drive. If this isn’t the case, the partition’s file format is likely incompatible with macOS. The solution is to format it to a Mac-compatible file system (like APFS or HFS+) using Disk Utility’s Erase tool.

Case #3: Volume +\- Option is Greyed Out
The Volume +\- button is a tool that allows users to easily create “volumes” (think of them as the resizable version of partitions) on a drive. This tool is only available for APFS partitions. If it’s greyed out, that means you’re using a different file system (such as HFS+, exFAT, FAT32, or NTFS) for which the tool is not available.
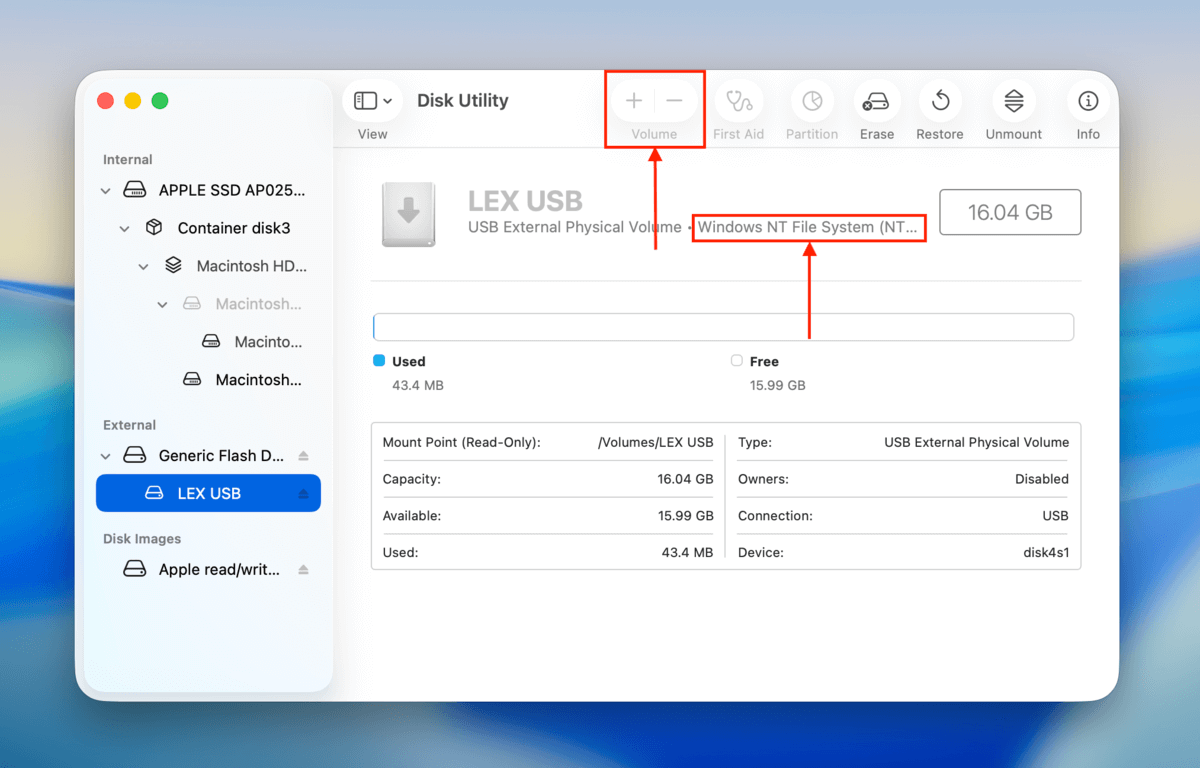
If you want to create a volume on your drive, you’ll need to format it to APFS. See Case #2 for instructions and warnings.
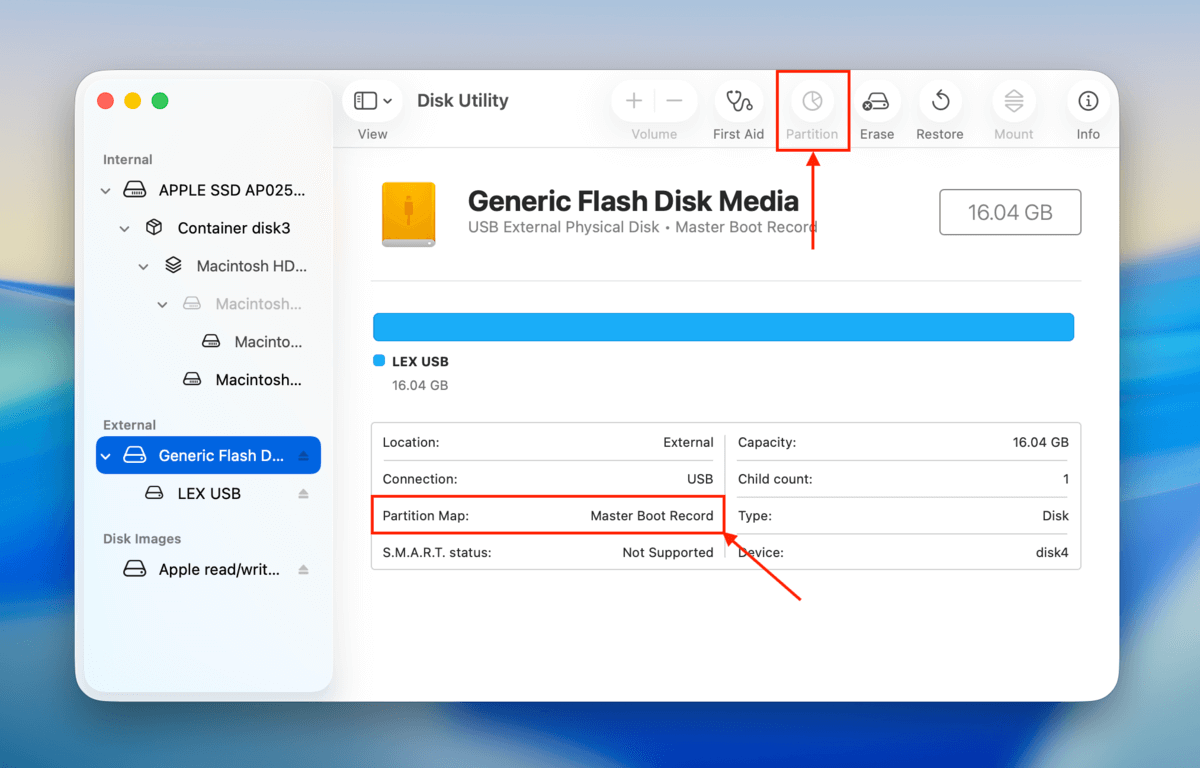
Case #4: Partitioning Function is Greyed Out
There are several possible reasons why the partitioning function in Disk Utility is greyed out, from accessibility issues to simple user error. Here’s a brief list of its potential causes, along with the appropriate solution for each error type:
- Your drive is formatted to MBR. Format your drive with Disk Utility and choose the GUID Partition Map scheme (see Case #2 for instructions and warnings).
- Your drive is at full capacity. You need to free up enough storage space on your drive to fit the partition or allow Disk Utility to proceed with partitioning at the expense of your data.
- You are selecting a partition, not a disk. You cannot create a partition on an existing partition. Make sure you are selecting your drive’s disk.
- Your disk or partition is encrypted. Encryption blocks the partitioning feature. Make sure to decrypt your disk or partition before attempting to create or modify a partition.
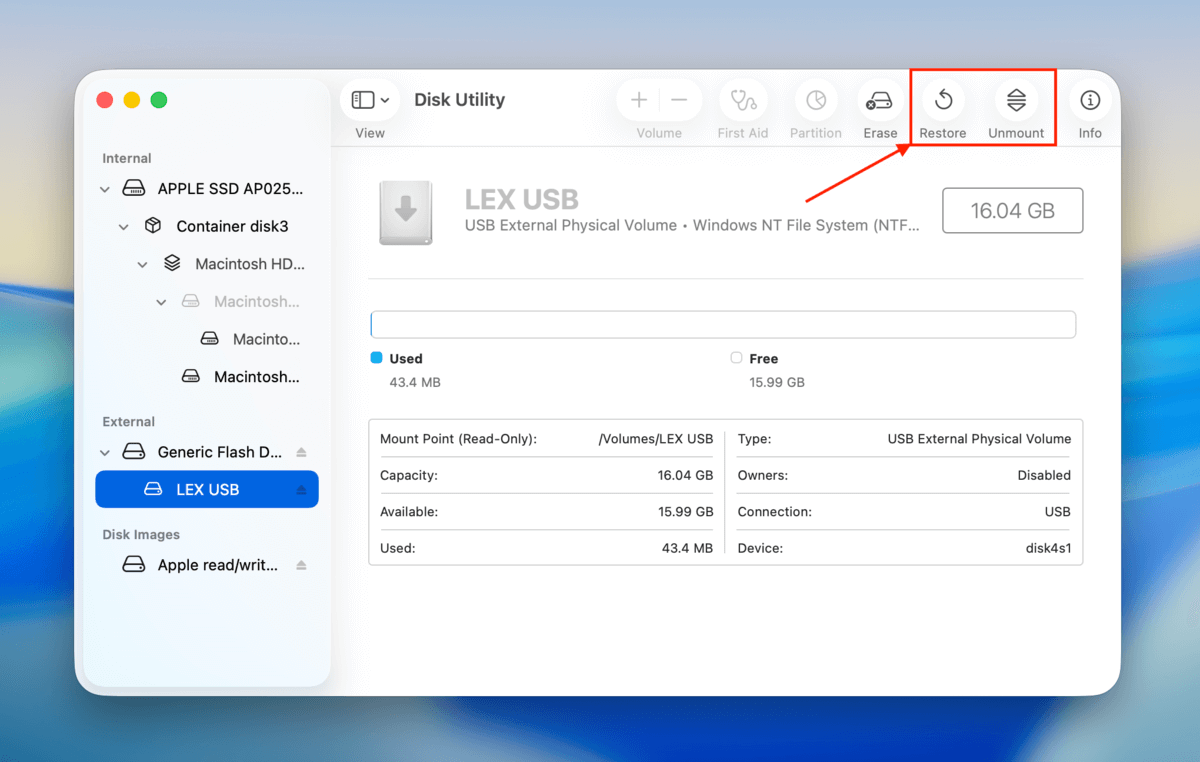
Case #5: Erase, Restore, and/or Unmount Buttons Are Greyed Out
The Erase, Restore, and Unmount Buttons are only available for non-system internal and external drives and partitions to protect users from affecting macOS. If Erase is grayed out in Disk Utility (or Restore or Unmount), you likely selected your system drive or partition, which is currently running macOS.

The solution when the Erase option is disabled in Disk Utility or if in Disk Utility all options are greyed out is to select a non-system drive from Disk Utility’s sidebar.
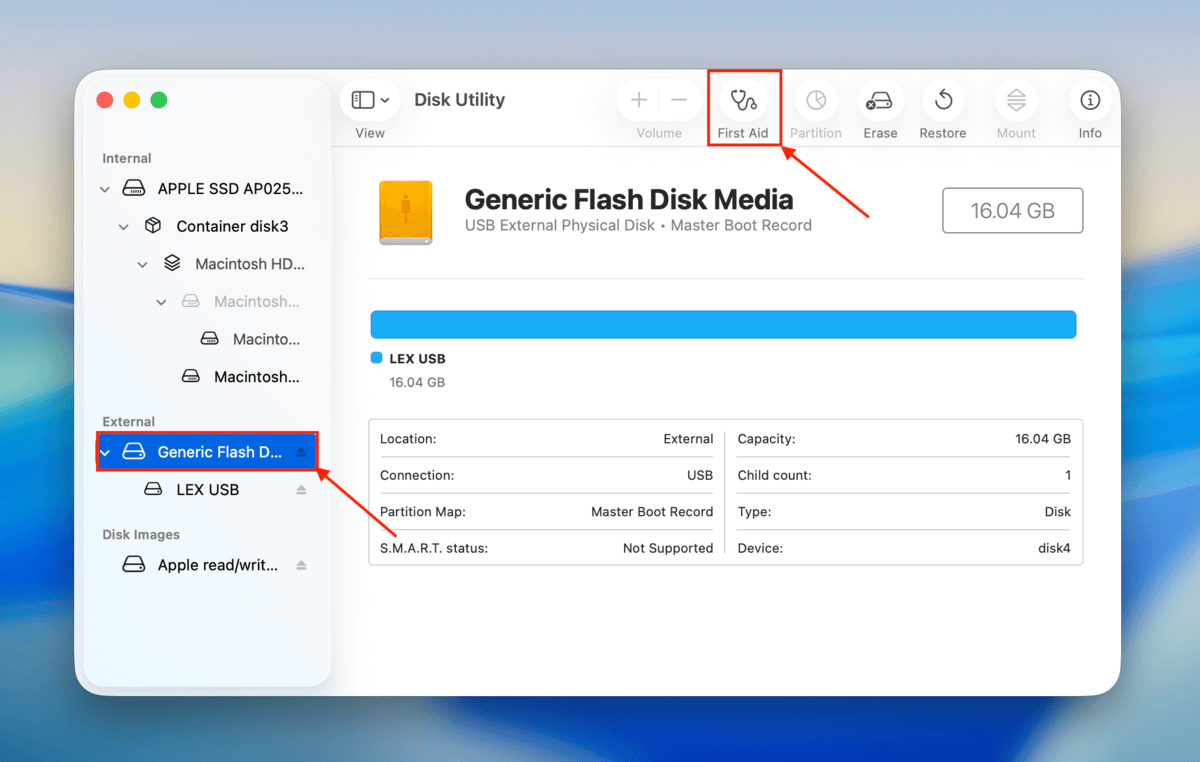
Case #6: First Aid is Greyed Out in Recovery Mode for System Drive
First Aid is greyed out for your system drive by design, as long as you’re attempting to do so while running a live instance of MacOS. This is because First Aid needs to unmount your drive before repairing it; it’s not possible to unmount a drive you’re actively using to boot and run your Mac.
If it’s still greyed out in Recovery Mode, you may be selecting a partition instead of your drive. Try running the First Aid tool on your entire drive instead.
Simple Tips to Avoid Greyed-Out Partitions
The issues that lead to greyed-out partitions can’t always be avoided. However, there are ways to decrease their likelihood of happening. First, make sure to always safely eject your drive before disconnecting it from your computer to avoid interrupting data transfer processes.
Second, never perform disk operations if your MacBook’s battery level is close to 20%; if Low Power Mode kicks in while you’re reading or writing data, it can leave your partition in an “incomplete” state, which leads to errors. Finally, avoid using USB hubs for heavy transfers where possible–this simply eliminates an additional potential failure point.
FAQ
There are multiple possible reasons why you can’t partition your hard drive:
- The partitioning tool is greyed out on Disk Utility, which indicates a mounting issue
Your hard drive has an incompatible file system (Mac only supports APFS, HFS+, ExFAT, and FAT32) - You’re trying to partition your system disk while macOS is currently running
- Your hard drive is encrypted and you haven’t provided the password
- You selected a volume instead of a disk
- You don’t have the necessary permissions to modify the drive
- The hard drive is currently in use by another process or application
- Your Mac doesn’t have enough RAM to perform the action (try rebooting)
There are actually multiple ways to open Disk Utility on your Mac, depending on your preference:
- Double-click the Disk Utility icon in the Finder > Applications > Utilities folder
- Hit the Command + Space keys to launch Spotlight Search. Then, type “Disk Utility” and hit Return.
- Open Launchpad from the Dock and browse its pages or search for Disk Utility
- Use the Terminal app and use the diskutil command to launch the command-line version of Disk Utility
If your hard drive is greyed out in Disk Utility, the drive is either not mountable or a specific issue is preventing it from being managed. Here are the common reasons why it happens and how to fix it:
- Your drive’s file system is corrupted. See if you can use Disk Utility’s First Aid tool on the drive. If that doesn’t work, you may have to use a third-party disk repair tool.
- Your drive isn’t being recognized. Try using another cable, port, or even another Mac.
- Your drive has an incompatible file system. Connect it to a computer that runs an operating system that can support your hard drive’s file system. Then, save your data and format it to a macOS-compatible format. Alternatively, use data recovery software to secure your data and format the drive using Disk Utility.
- Your drive is encrypted. Unlock it using the password.
- You don’t have the necessary permissions. Use the Get Info menu (right-click your drive) to alter permissions for your user account.
- The drive is set is set to read-only. Check your drive for physical switches or use the drive’s software to remove write protection.


