
Can you merge partitions without losing data? By the nature of its process, merging partitions WILL directly cause data loss. You can’t negate this effect – but you CAN work around it. However, you have to follow a specific process (that includes tasks other than partition management) in order to ensure that your data is safe.
We created this guide to give users like you a step-by-step tutorial on the fastest, safest, and most reliable way to merge partitions on a Mac without losing data.
Table of Contents
Data Loss-Related Challenges of Merging Partitions (a.k.a. Why You Need This Guide)
Well, if you only combine the partitions without doing the necessary preparations, the risk of data loss is very high. Here’s why:
- Full partition wipe. “Merging” partitions actually means deleting one or more partitions and expanding the remaining partition. When you delete those partitions, you’re deleting their data too.
- Potential corruption or conflict. This whole process has a lot of moving parts – from basic partition management to data recovery. Along the way, you might encounter software errors, electrical or mechanical issues, or even hardware failure (if you’re using old equipment). Any of these factors may corrupt the partitions you’re attempting to merge.
- Moving system files or app files. If the partition/s you plan to delete store app data, you can either: (1) uninstall any apps that utilize those partitions and reinstall them AFTER you merge the hard drive partitions or (2) make sure that the partition with app and system is the primary partition and use Option A in Step 2.
So technically, you can’t merge partitions on your Mac without deleting the data on the non-primary partitions. However, you can make preparations beforehand to protect your data from deletion. More on this in the guide section next up.
A Step-by-Step Guide on How to Merge Partitions on Your Mac Without Losing Data
We divided this process into three steps, which is reflected in the way we structured our guide. While our other articles allow you to jump from method to method, it’s CRITICAL in this situation to follow the intended order to protect your data.
In other words, start with step 1.
Step 1: Secure Your Data FIRST!
We already established that data loss is inevitable during the process of merging partitions. The key to preserving your files, then, is to copy them before you attempt to merge partitions.
In the guide sections below, we’ll show you two ways to do it.
Option A: Use Disk Utility to Create an Image Backup
Our preferred way to copy a large body of files is to “image” the drive they’re stored in. “Imaging” a drive means creating an exact copy of the whole disk, down to the last byte. Then, the copy of your data gets compressed into a .dmg file we can mount later (in step 3).
We prefer this method for copying our files because it perfectly preserves folder structure, permissions, as well as other metadata. It can also grab hidden files you might otherwise miss. And since the data is compressed, this method saves more space compared to copying your data manually.
The built-in Mac disk management app, Disk Utility, has a disk image feature that is more than suitable for this task.
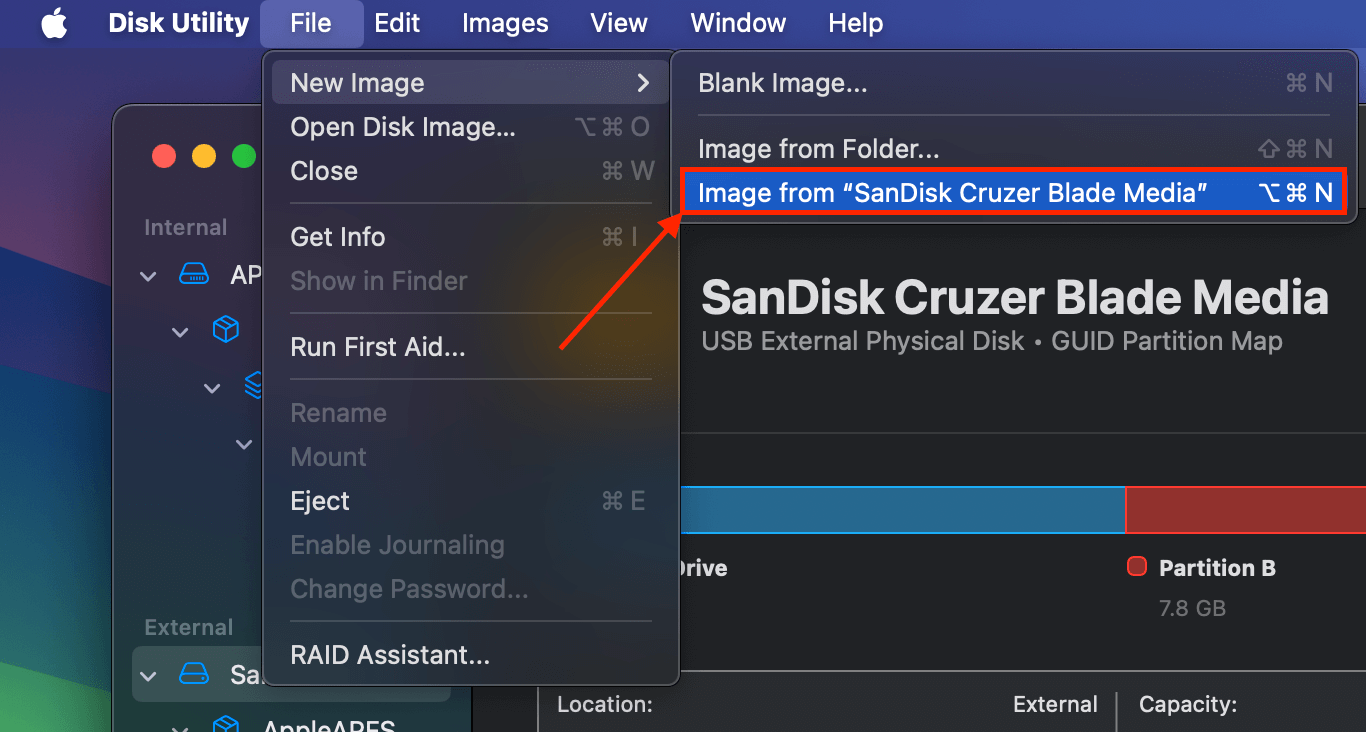
Step 1. Open Disk Utility (Finder > Applications > Utilities).
Step 2. On the left sidebar, select the drive whose partitions you want to merge. Then, click File > New Image > Image from “Device Name” (Device Name is whatever your drive is named).
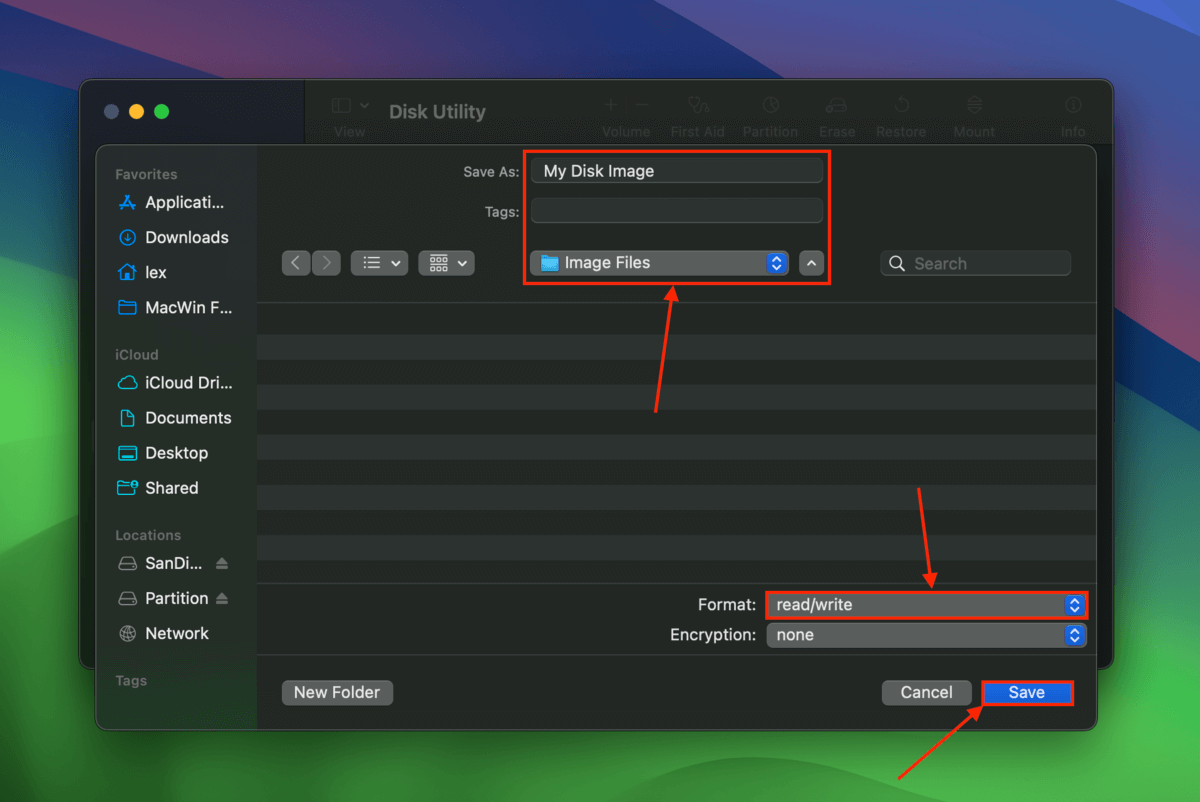
Step 3. Navigate to a location where you want Disk Utility to save the image file. Then, change Format to read/write. Finally, click Save.
Option B: Manually Copy Your Files to Another Drive
If the partition you want to delete has no hidden files, system files, app files, etc., you can simply copy the files to another location using Right-click > Copy or dragging them with your mouse.
Once you’ve merged the partitions on your storage device, you can copy the data to the expanded partition.
Step 2: “Merge” Partitions Using Mac’s Disk Utility
As you might have surmised, you can’t actually “merge” or “combine” disk partitions on your Mac. You can only delete partitions and either expand the primary partition (Option A below) or create an entirely new single partition on a disk by formatting it (Option B.)
Pro tip: If you have app or system files in your primary partition, stick with Option A.
Option A: Delete Non-Primary Partitions and Expand Primary Partition (Retains Primary Partition Data)
Disk Utility has a great built-in partitioning tool that is simple to use and more than capable of deleting and resizing partitions. It visualizes disk partitions using a pie chart, which makes it easier to identify each partition.
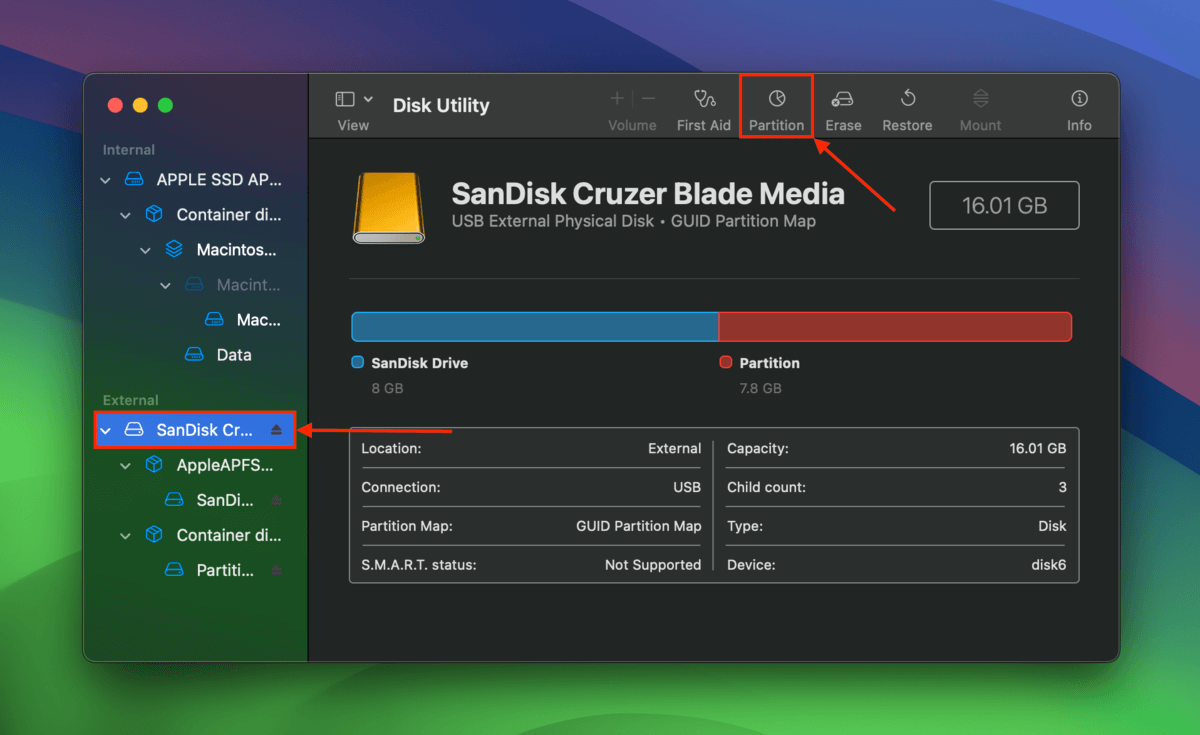
Step 1. Open Disk Utility.
Step 2. On the left sidebar, click the drive containing the partitions you want to merge. then click the Partition button.
Step 3. In the pie chart, click on the partition you don’t want to retain. Then, click the – button underneath.
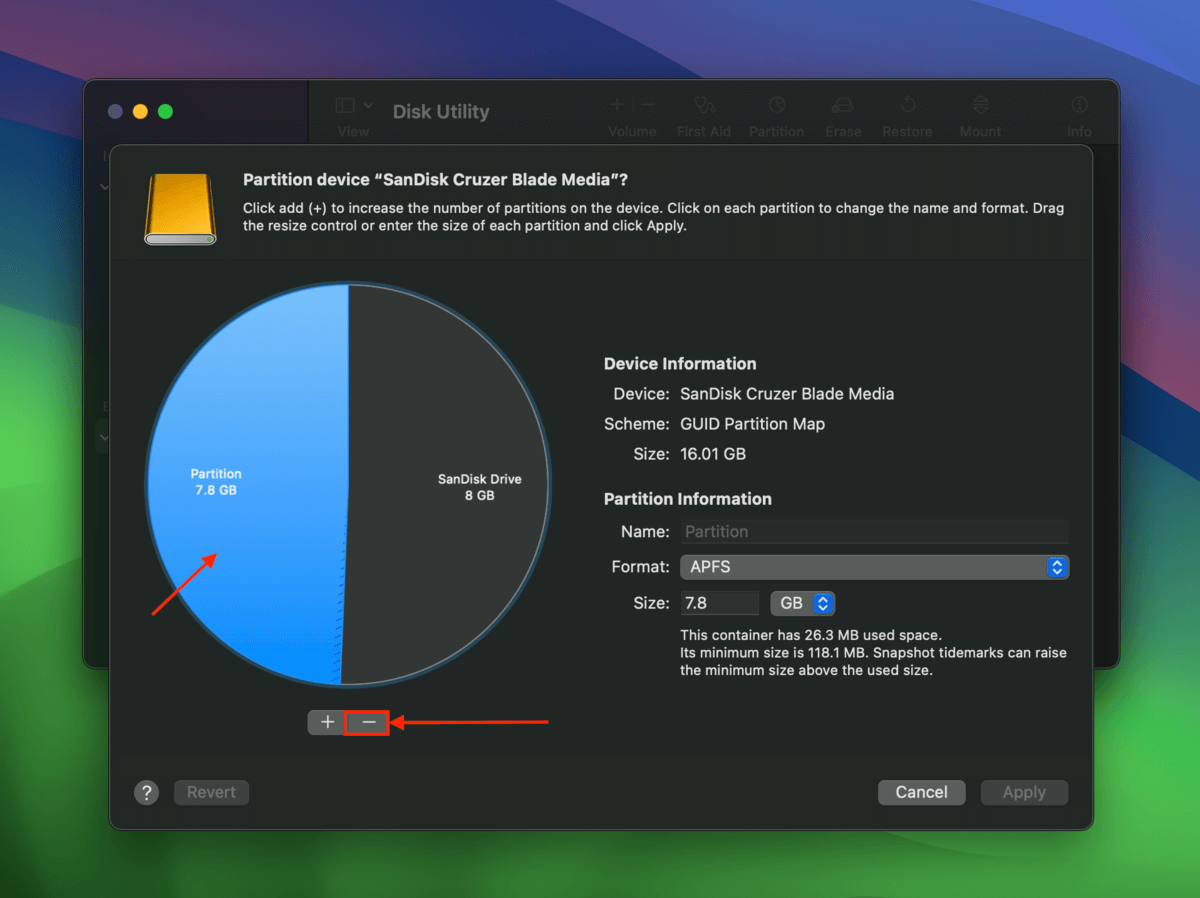
Step 4. The remaining partition should automatically expand and take up the space left behind. To finalize these settings, click Apply.

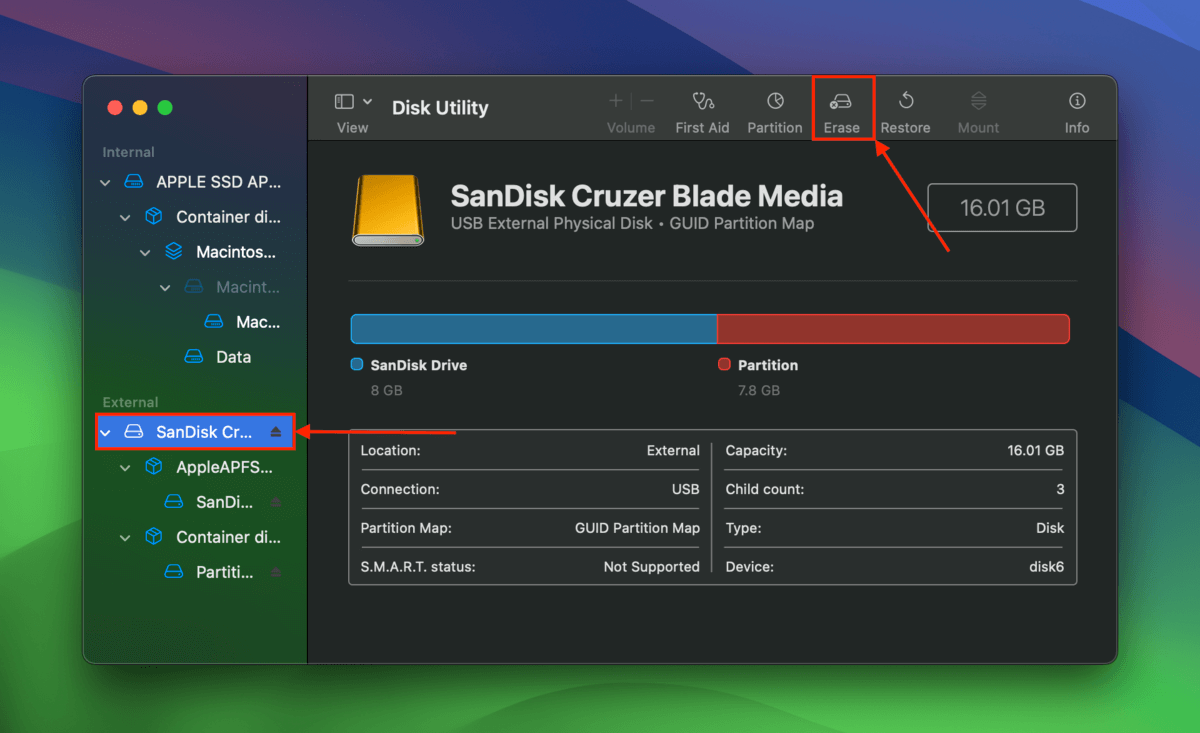
Option B: Format Your Drive (Wipes Data on Primary Partition)
Disk Utility also has a formatting tool called Erase. Using Erase, you can format your drive and completely wipe out all of its partitions. However, note this method will completely wipe your personal data on all partitions as well.
Step 1. Open Disk Utility.
Step 2. On the left sidebar, select the drive containing the partitions you want to merge. Then, click Erase.
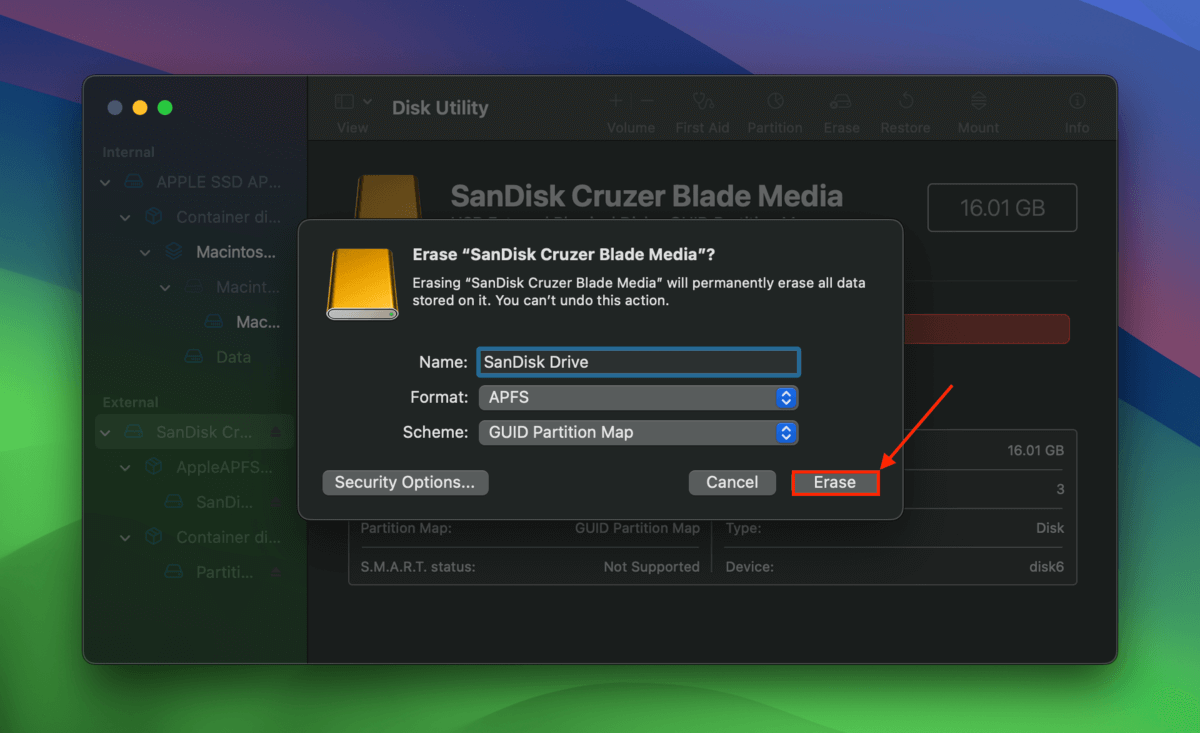
Step 3. Choose a name, format, and scheme for your drive. Then, click Erase.
Step 3: Restore Your Data to the Remaining Partition
Once you’ve successfully merged the partitions on your drive, the final step is to restore the data you saved from the deleted partitions. If you created a disk image by following the instructions in the Step 1 guide, you can now mount it in Finder and copy its data to the newly expanded primary partition.
Step 1. In Finder, navigate to the location where the Disk Image file you created in this guide is stored. Once you find it, double-click the image file to mount it.

Step 2. You should now find the image in the left sidebar of Finder as if it were a physical drive you connected. You can safely transfer your files to the expanded partition.
What if your partition becomes damaged or corrupted?
There’s always a slim possibility that some error or malfunction will cause your expanded partition to get corrupted (during or after the merging process).
Don’t worry! We have guides for all partition-related errors, including the errors “Couldn’t modify partition map” and “Problems were found with the partition map”, as well as greyed-out partitions.
Good luck!


