 A couple of weeks ago I switched my TV and Internet to AT&T’s U-Verse service. If you’re not familiar with AT&T U-Verse, they provide TV, Telephone, and Internet services. I just went with TV and Internet. I enjoy both services however, U-Verse would not allow me to place my Time Capsule in front of their Home Router. Their router wants to be the dominant router. This would be fine in any other circumstance, however, I use Back to My Mac, and I need my Time Capsule to be the dominant router. The other reason why this is an issue is because the U-Verse Router does not support uPNP at all. To get Back to My Mac working you need an Apple Router, or a router that supports uPNP. So you can see my dilemma.
Since I had my new service installed I haven’t been able to use Back to My Mac. I had contacted AppleCare, and they were somewhat helpful. However, they are not fully familiar with AT&T’s equipment, so they could only go so far with their support. At this point I didn’t even bother with AT&T’s support. Well, I decided to hold off since the weekend was over, and I didn’t have time to mess with it. I got it working, but not the way I originally had it.
This past weekend I had extra time, so I Googled my issue and I found some great articles on how to resolve my issue. After doing my research, I’m happy to say that I now have Back to My Mac working again. So I’m going to do a layout for you on how to get Back to My Mac working for you if you have AT&T’s U-Verse Internet.
Let’s Begin
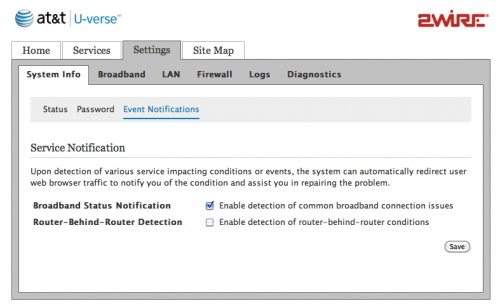
You will want to go into your U-Verse Router. If your not aware how to do this, simply open Safari and type in http://192.168.1.254 in the address field. Next follow these steps:
- Click on the Settings Tab
- Click on System Info
- Click on Event Notification
Your screen should resemble the one below:
If your screen is different, match what I have below, and then click on the Save button.
Configuring Time Capsule
Now you will access your Time Capsule. By the way these following settings will also work if you have an AirPort Base Station, or an AirPort Express. For the sake of this documentation I will be using the Time Capsule. To access the Time Capsule perform the following steps:
- Click Applications
- Click Utilities
- Click AirPort Utility
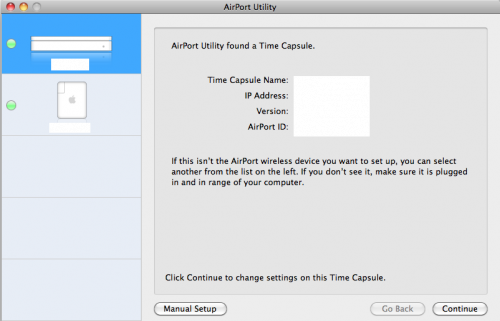
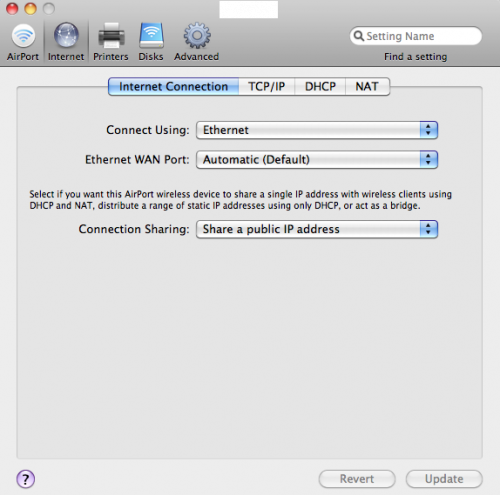
Once in the AirPort Utility double click on your Time Capsule; then, click on the Internet tab. Now you will want to select “Share a public IP address” under the Connection Sharing field as pictured below:
Now click on the TCP/IP tab. You should use DHCP since you will be receiving your public IP address from AT&T. I have masked out the IP address settings from AT&T, and the OpenDNS.com addresses. Your TCP/IP tab should look like the picture below.

A side note I would like to bring up is the use of opendns.com as your DNS. I have been using them, and their DNS servers are super fast. You can visit OpenDNS.com to register for free with them and get their two DNS addresses. Once you get the DNS addresses you can enter them in the “DNS Server(s)” fields. In addition to providing free DNS servers they also provide free of charge Internet filtering. This is good if you want filter content for your children, so they don’t go to websites that are not appropriate.
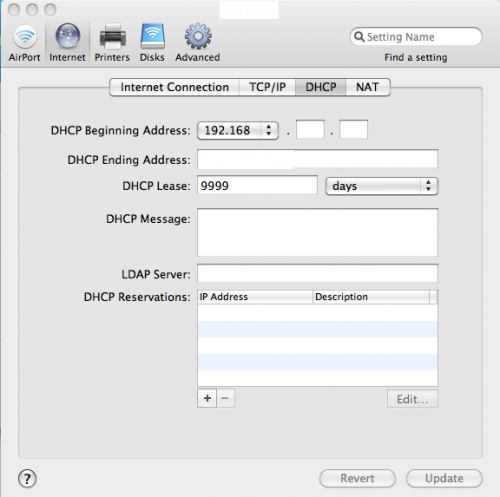
Next you will want to click on the DHCP tab. You will choose your own subnet. For example you can go with .1, or .2; whichever your prefer. For the Beginning Address you can use 192.168.2.101. As for the ending DHCP you can also set that to something low. For example you can use 192.168.2.150. Your screen should look like the picture below:
Finally, you will want to click on the NAT tab. This tab is important because this Back to My Mac uses NAT Port Mapping, so that you can connect to your Mac when you are away. It will autofill with whatever subnet you chose for example if you chose 192.168.2.253. Your screen should look like the picture below:
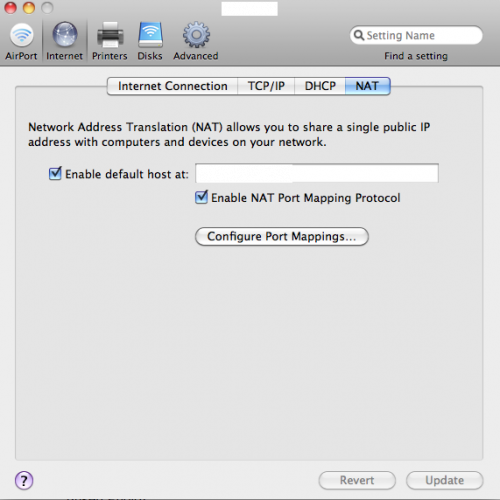
Now you you are going to click on the “Update” button in the lower right hand corner. This will update your Time Capsule with the settings you have changed. However, if you changed your IP addresses third octet you will not see your U-Verse router. The third octet is the “x” in the following example 192.168.x.150. Each set of numbers is an octet going from left to right. If you did this then you will want to unplug your Mac from the Time Capsule and plug it into the U-Verse Router. You will want to plug it into the four port switch on the back of the Router. However, If you did not change the third octet and left it with .1 you will not need to unplug from your Time Capsule.
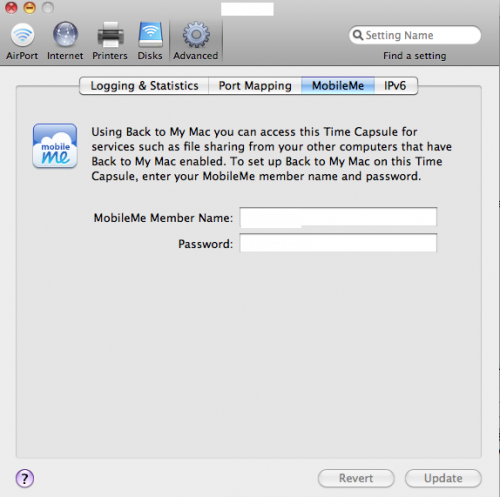
Before I forget, the Time Capsule supports MobileMe accounts. This is mainly for accessing the Time Capsule’s internal hard drive, and any other hard drives that are connected to the Time Capsule. In here you will want to enter your MobileMe credentials. Your screen should look like the photo below:
Configuring AT&T U-Verse Residential Gateway Router
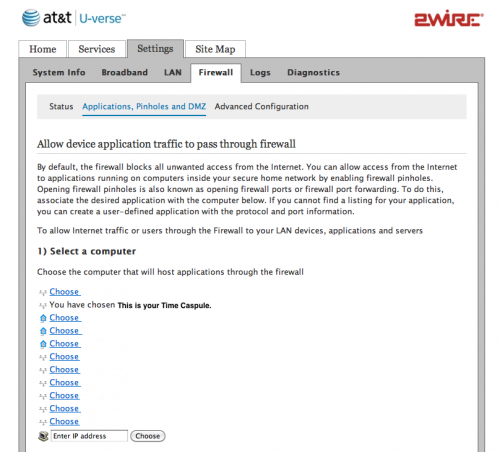
The final step to get all of this working like a fine oiled machine, you will need to connect back to the U-Verse Router by typing into Safari http://192.168.1.254. Once you’re in you will want to follow these steps:
- Click Settings
- Click Firewall
- Click Pinholes and DMZ
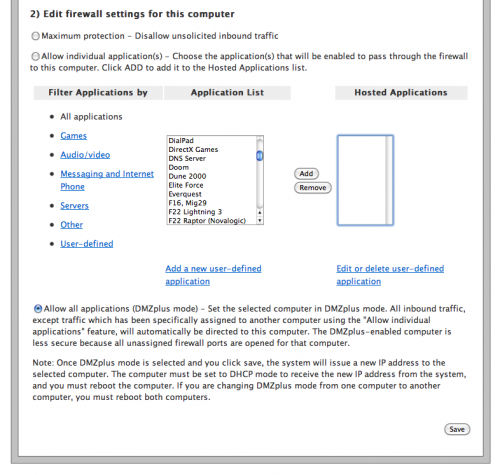
From here you will want to select your Time Capsule. Then you will want to scroll to the very bottom, and click on the “Allow all applications (DMZplus mode)”. Finally, you will want to click on the “Save” button. If you are concerned about placing your Time Capsule in the DMZ, don’t be. Just as long as you are using NAT and wireless encryption on your Time Capsule you will be fine against outside attacks. Your U-Verse configuration screen should look like the picture below:
So, folks that’s it. You can now test Back to My Mac. Hope this helps you out in restoring Back to My Mac with your setup.
Photo Credit: AT&T U-Verse 2


