
Whether your Mac partition disappeared after partitioning attempts or due to some unexpected errors, its recovery (or at least the recovery of the data stored on it) is often possible with the right approach. In this guide, I’ll walk you through three reliable methods to recover deleted or lost partitions on your Mac so that you have multiple options to choose from based on your specific situation.
Table of Contents
When Is It Possible to Recover a Deleted Mac Partition?
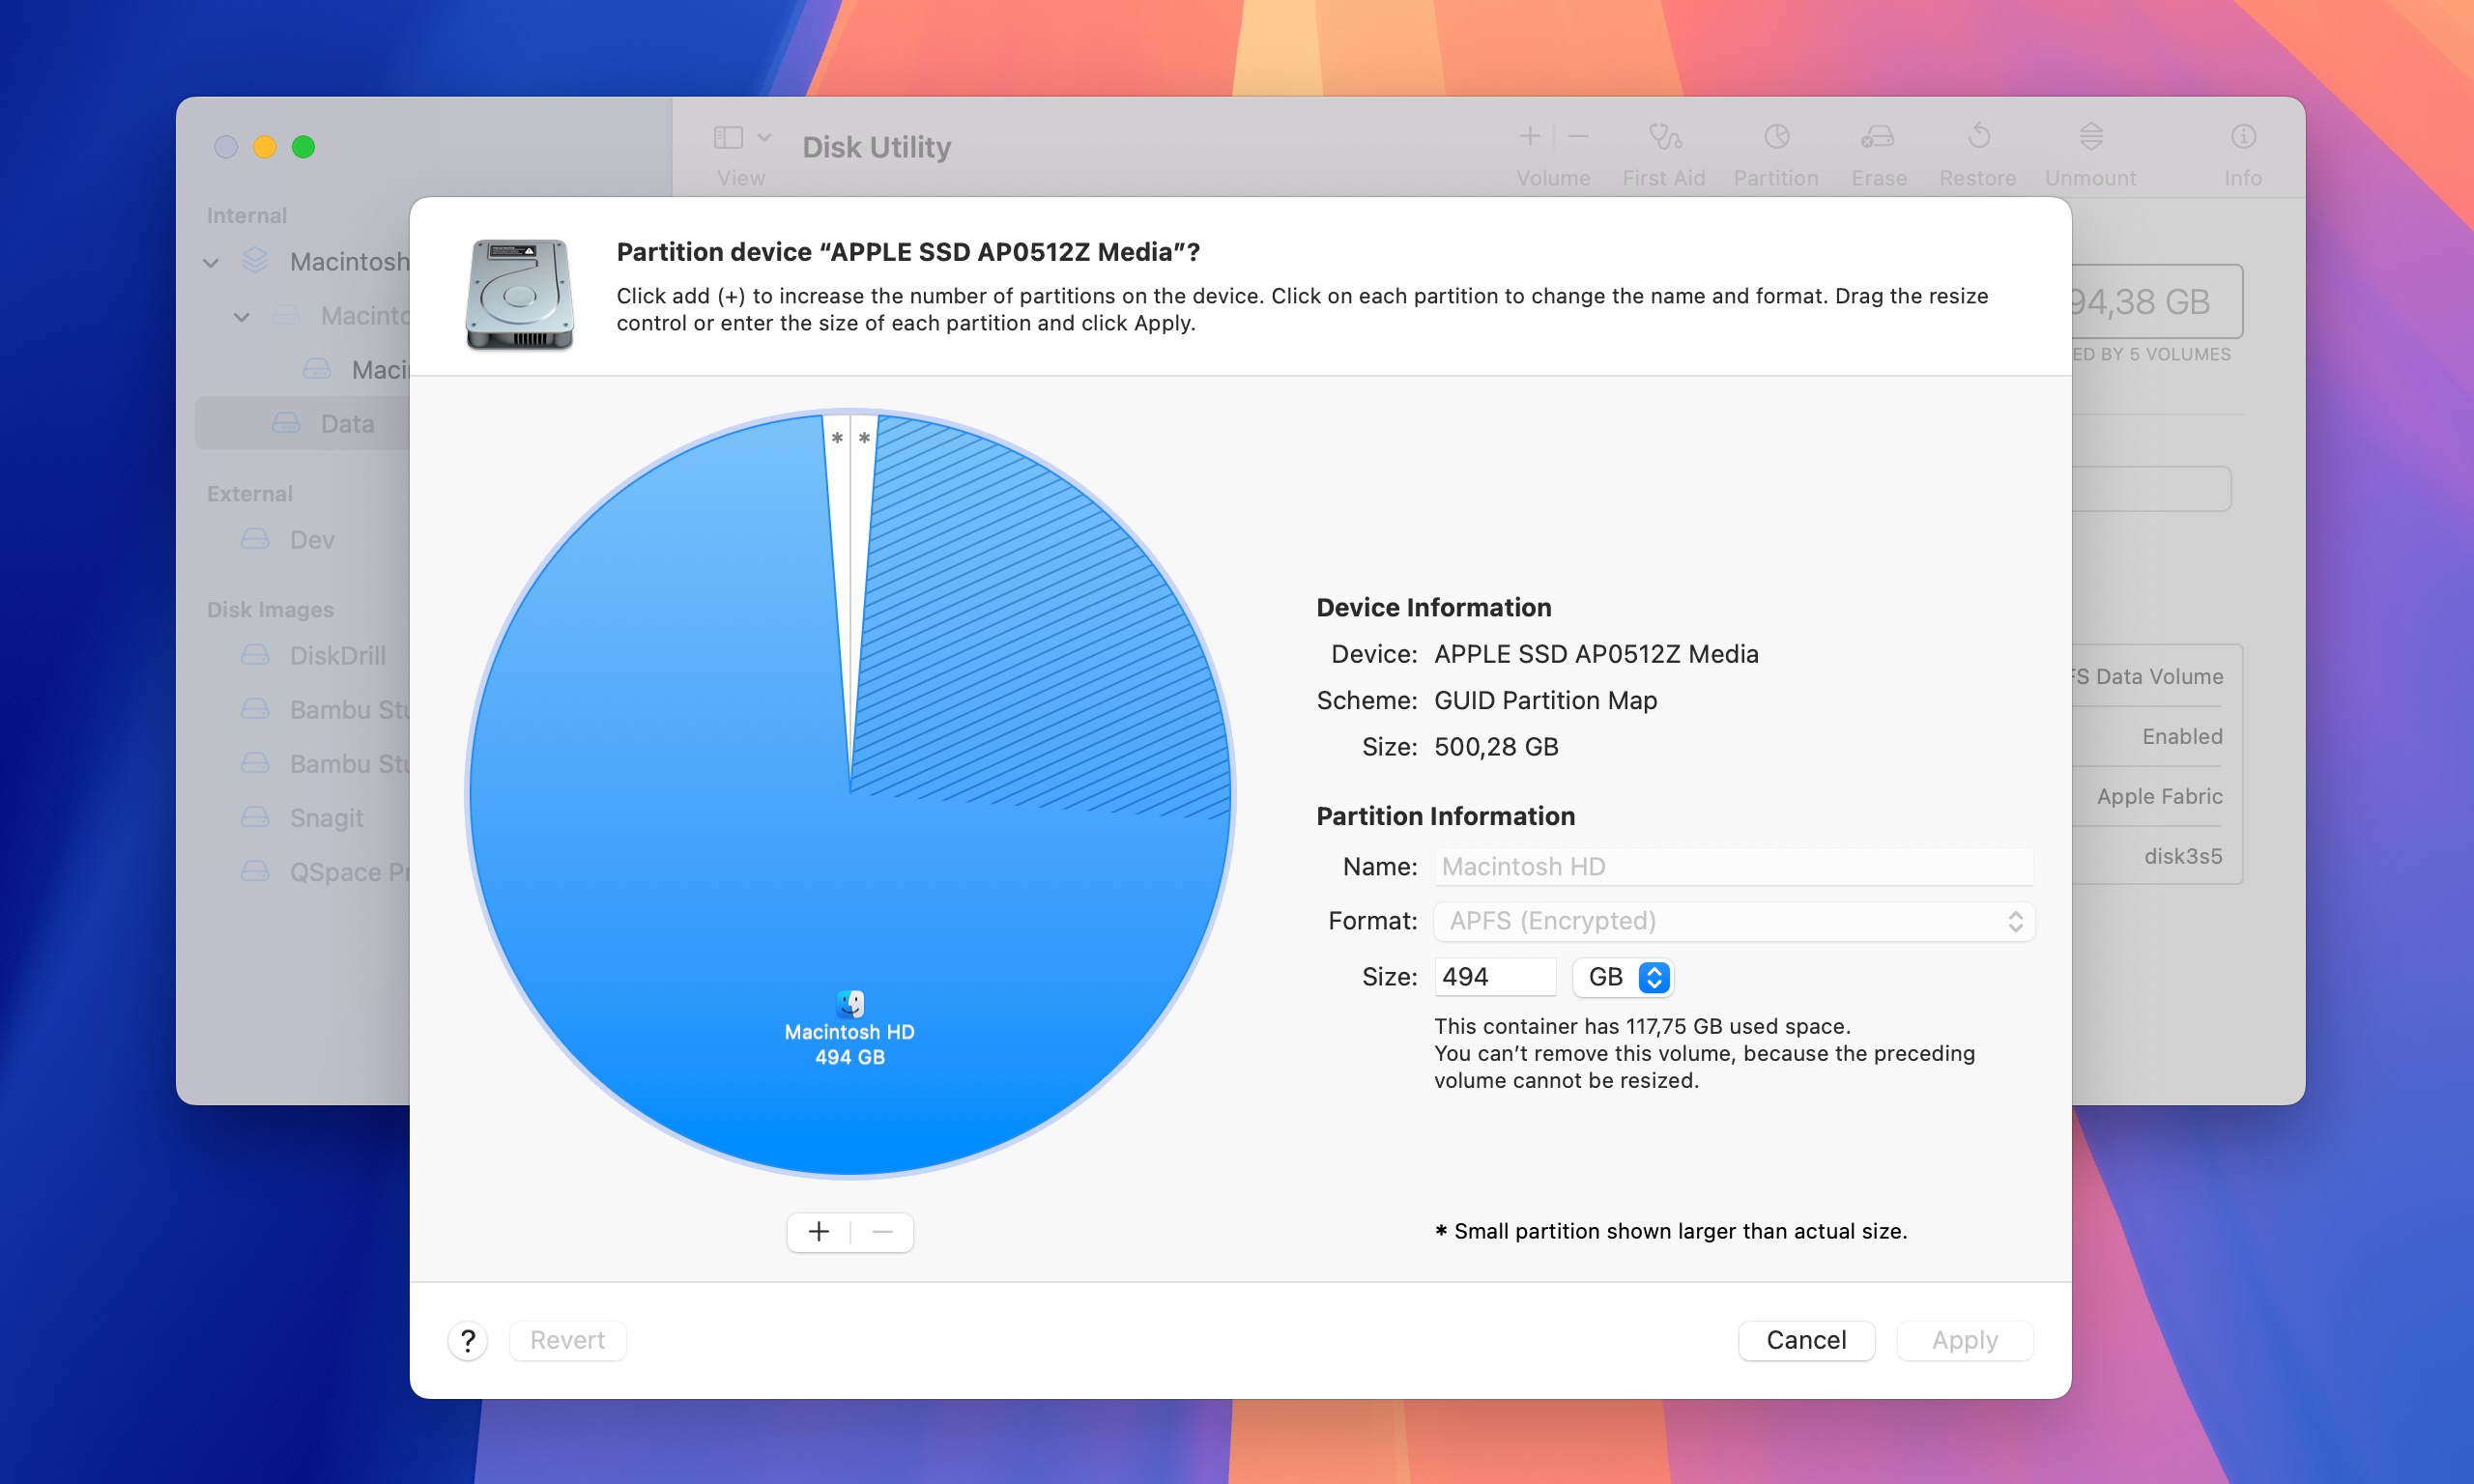
First, let’s clear something up: when Mac users (like you) search for partition recovery solutions, they usually mean volumes.
On modern Macs running APFS (Apple File System), volumes are more flexible than traditional partitions because they can share space dynamically and even grow or shrink as needed. This is quite different from the old HFS+ system where partitions had fixed sizes.
I’m still using the term “partition” throughout this guide because, well, that’s probably what you searched for to find this article (see, it worked!). But now you know we’re really talking about volume recovery.
Now, I’ve got good news and bad news about partition recovery on Mac.
The bad news is that you probably won’t be able to recover the partition structure itself. Why? Because when you delete a volume in APFS, macOS immediately updates its internal structures to reflect this change.
The good news? Even though the partition structure might be gone, you can often recover the data that was stored on it. I say “often” because the success of data recovery depends on a few factors:
- If your drive is encrypted (like a system drive with FileVault enabled), recovery is unfortunately impossible.
- If you’re using an SSD with TRIM enabled (which is the default for most modern Macs), your chances aren’t great. TRIM automatically wipes freed space to improve performance, usually within hours of deletion.
- But if you’re working with an unencrypted drive (like an external hard drive) and TRIM isn’t a factor, your chances are actually pretty good! As long as the original data hasn’t been overwritten by new files, recovery tools should be able to find and restore your lost files.
So while you might not get the partition back exactly as it was, there’s a good chance you can rescue what matters most—your data.
3 Ways to Recover a Deleted Partition on Mac
Based on my experience helping Mac users recover their lost partitions, I’ve found three solutions that can deliver results (as long as the conditions described in the section above are met).
Method 1: Disk Drill
Disk Drill is my go-to solution for Mac partition recovery because it delivers the best results of all the partition recovery tools I’ve tested over the years while being remarkably user-friendly.
Disk Drill’s excellent partition recovery results can be attributed to its support for multiple file systems (HFS+, APFS, FAT32, NTFS, or even EXT3/EXT4 are all supported) and the ability to work with RAW drives (it’s common for drives to become RAW after partition loss).
Plus, Disk Drill recognizes over 400 file formats, so it’s highly versatile in retrieving everything from documents to images, videos, and more. This means that even if your partition table is completely destroyed, your files aren’t necessarily lost. The software’s Deep Scan algorithm can piece together fragmented files, while the preview feature lets you verify files before recovery
Here’s how to recover your lost partition using Disk Drill:
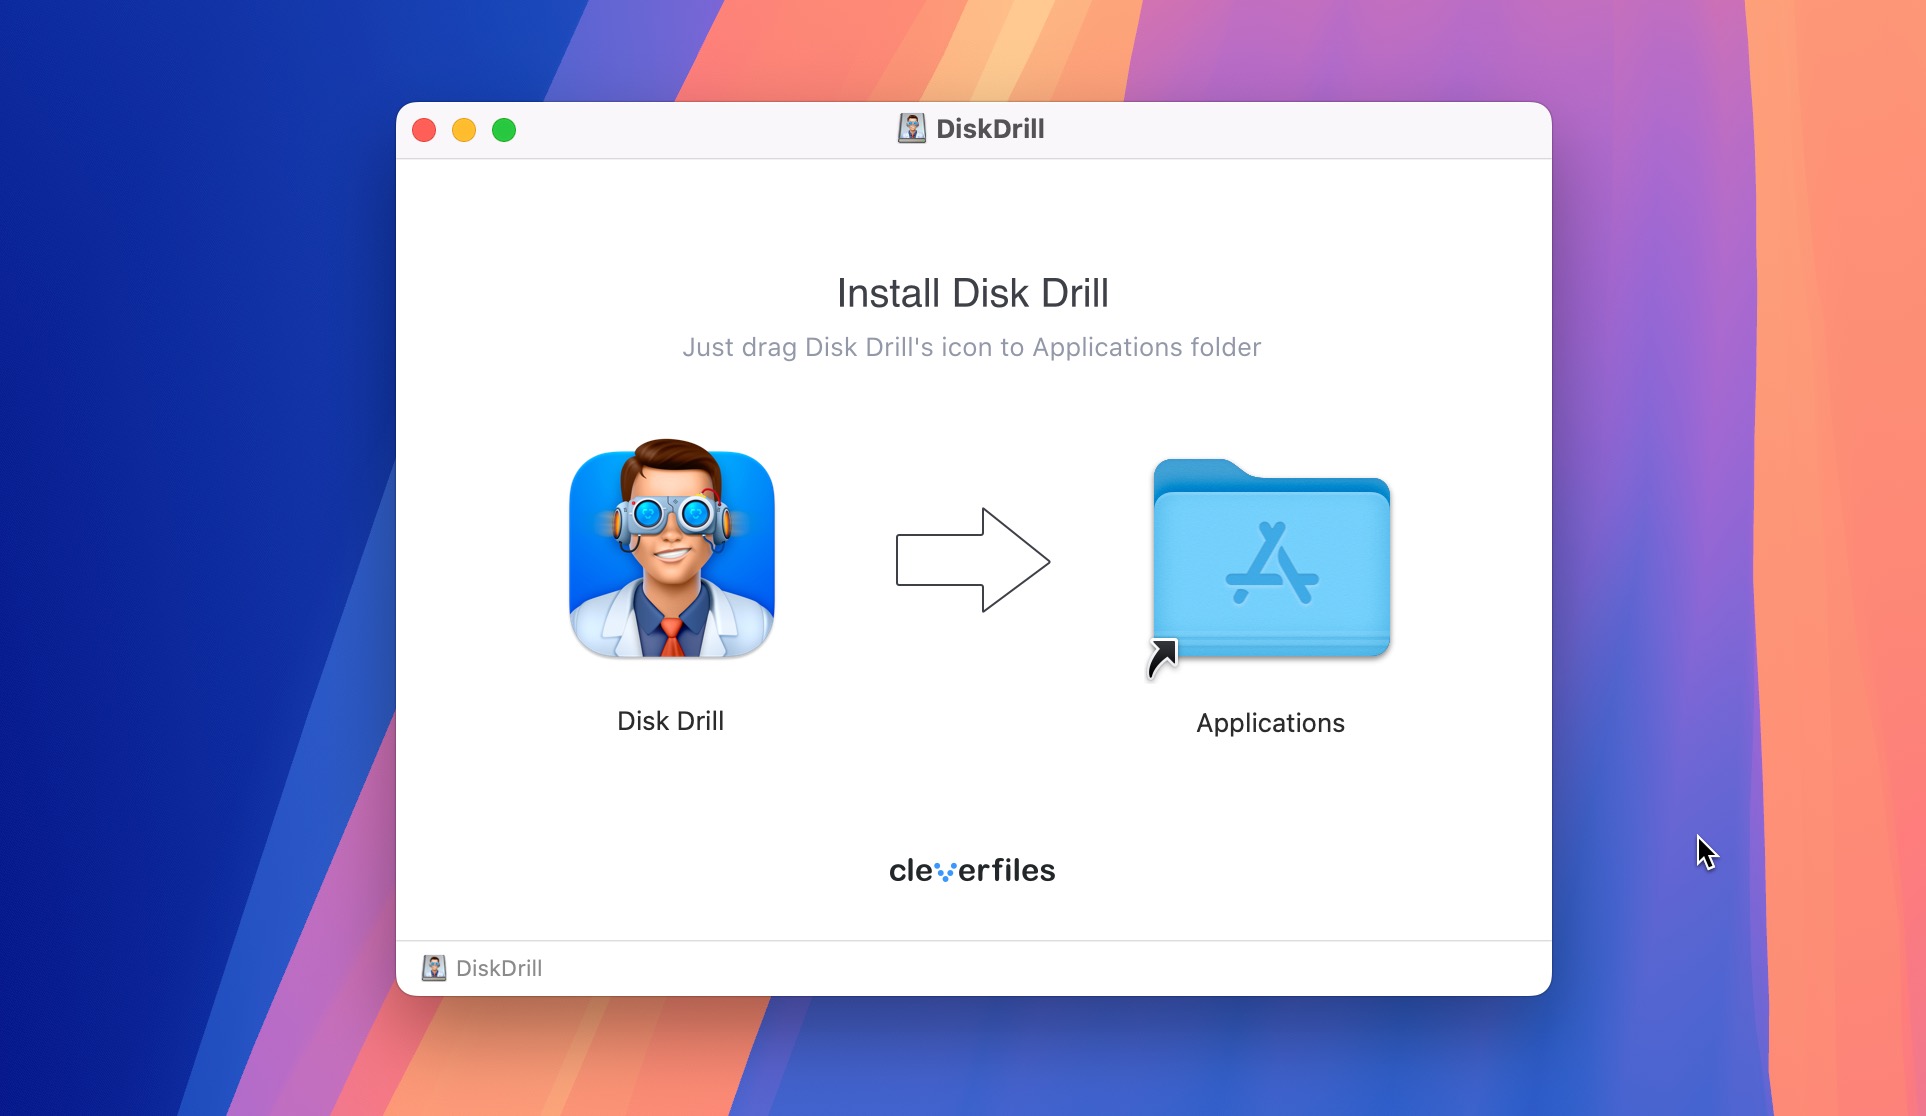
Step 1. Download Disk Drill from the official website and install it on your Mac. Make sure to install it on a different drive than the one containing your lost partition. Installing it on the same drive could overwrite your deleted data, reducing your chances of successful recovery.
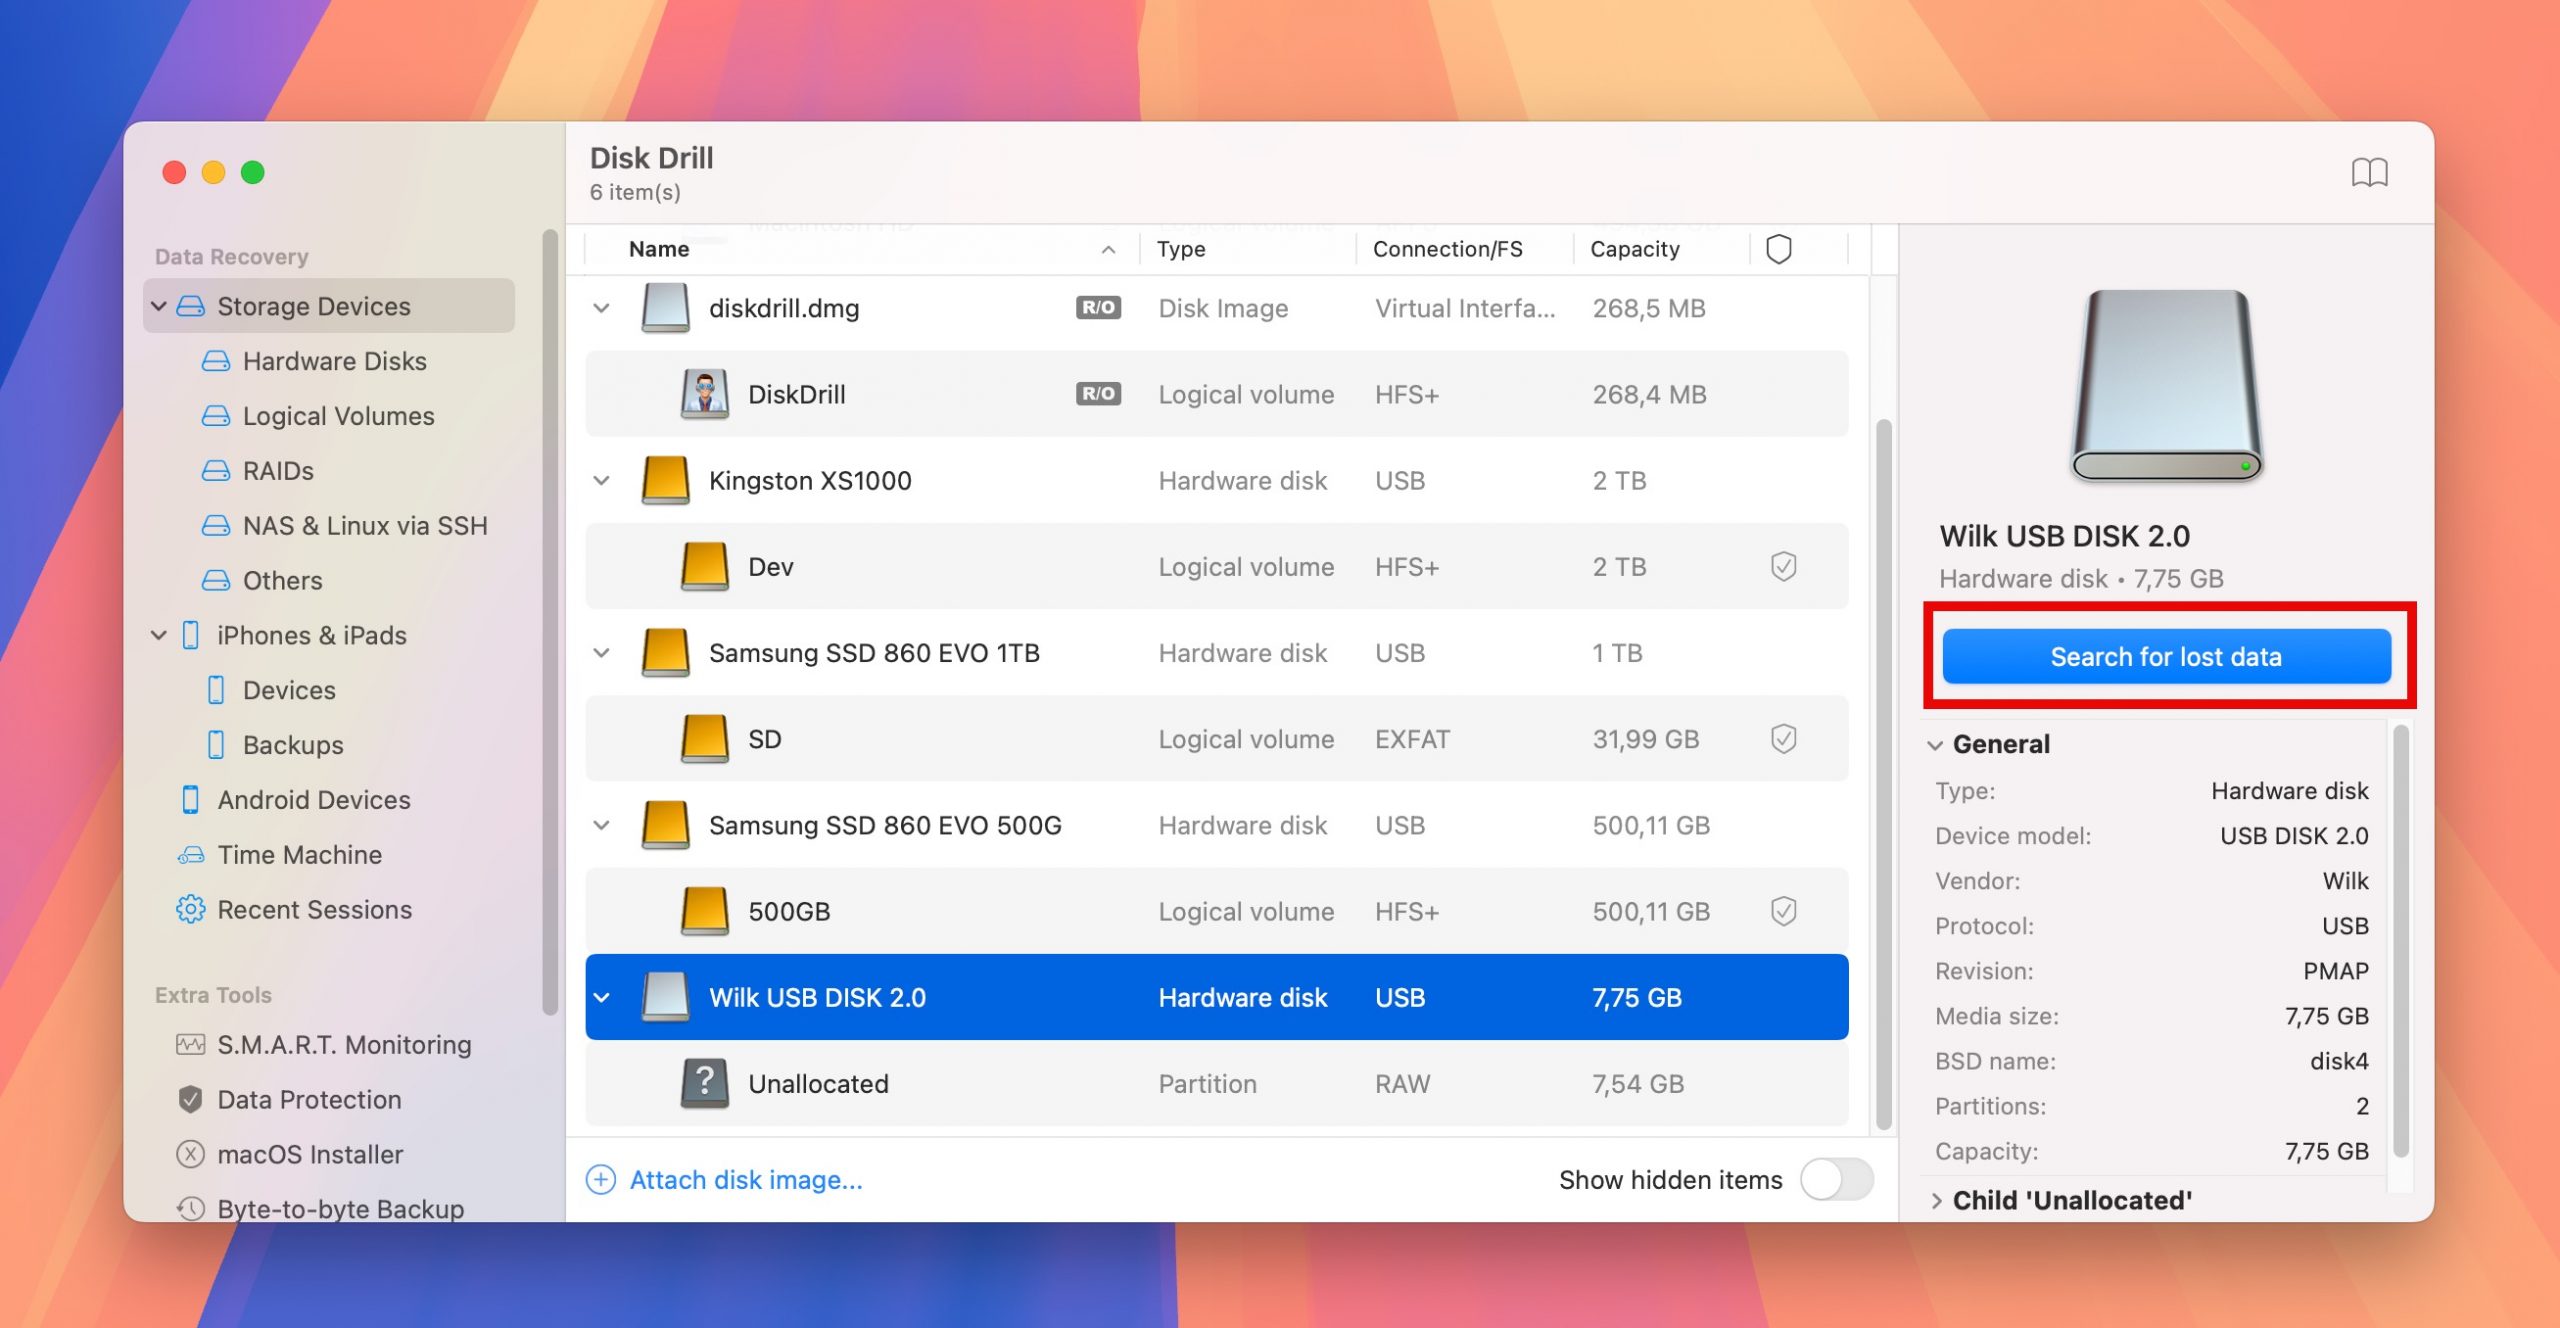
Step 2. Launch Disk Drill and let it list all available drives. If your lost partition was on an external drive, connect it now. Select the physical drive (not a partition) where your lost partition was located and click the Search for lost data button to start scanning.
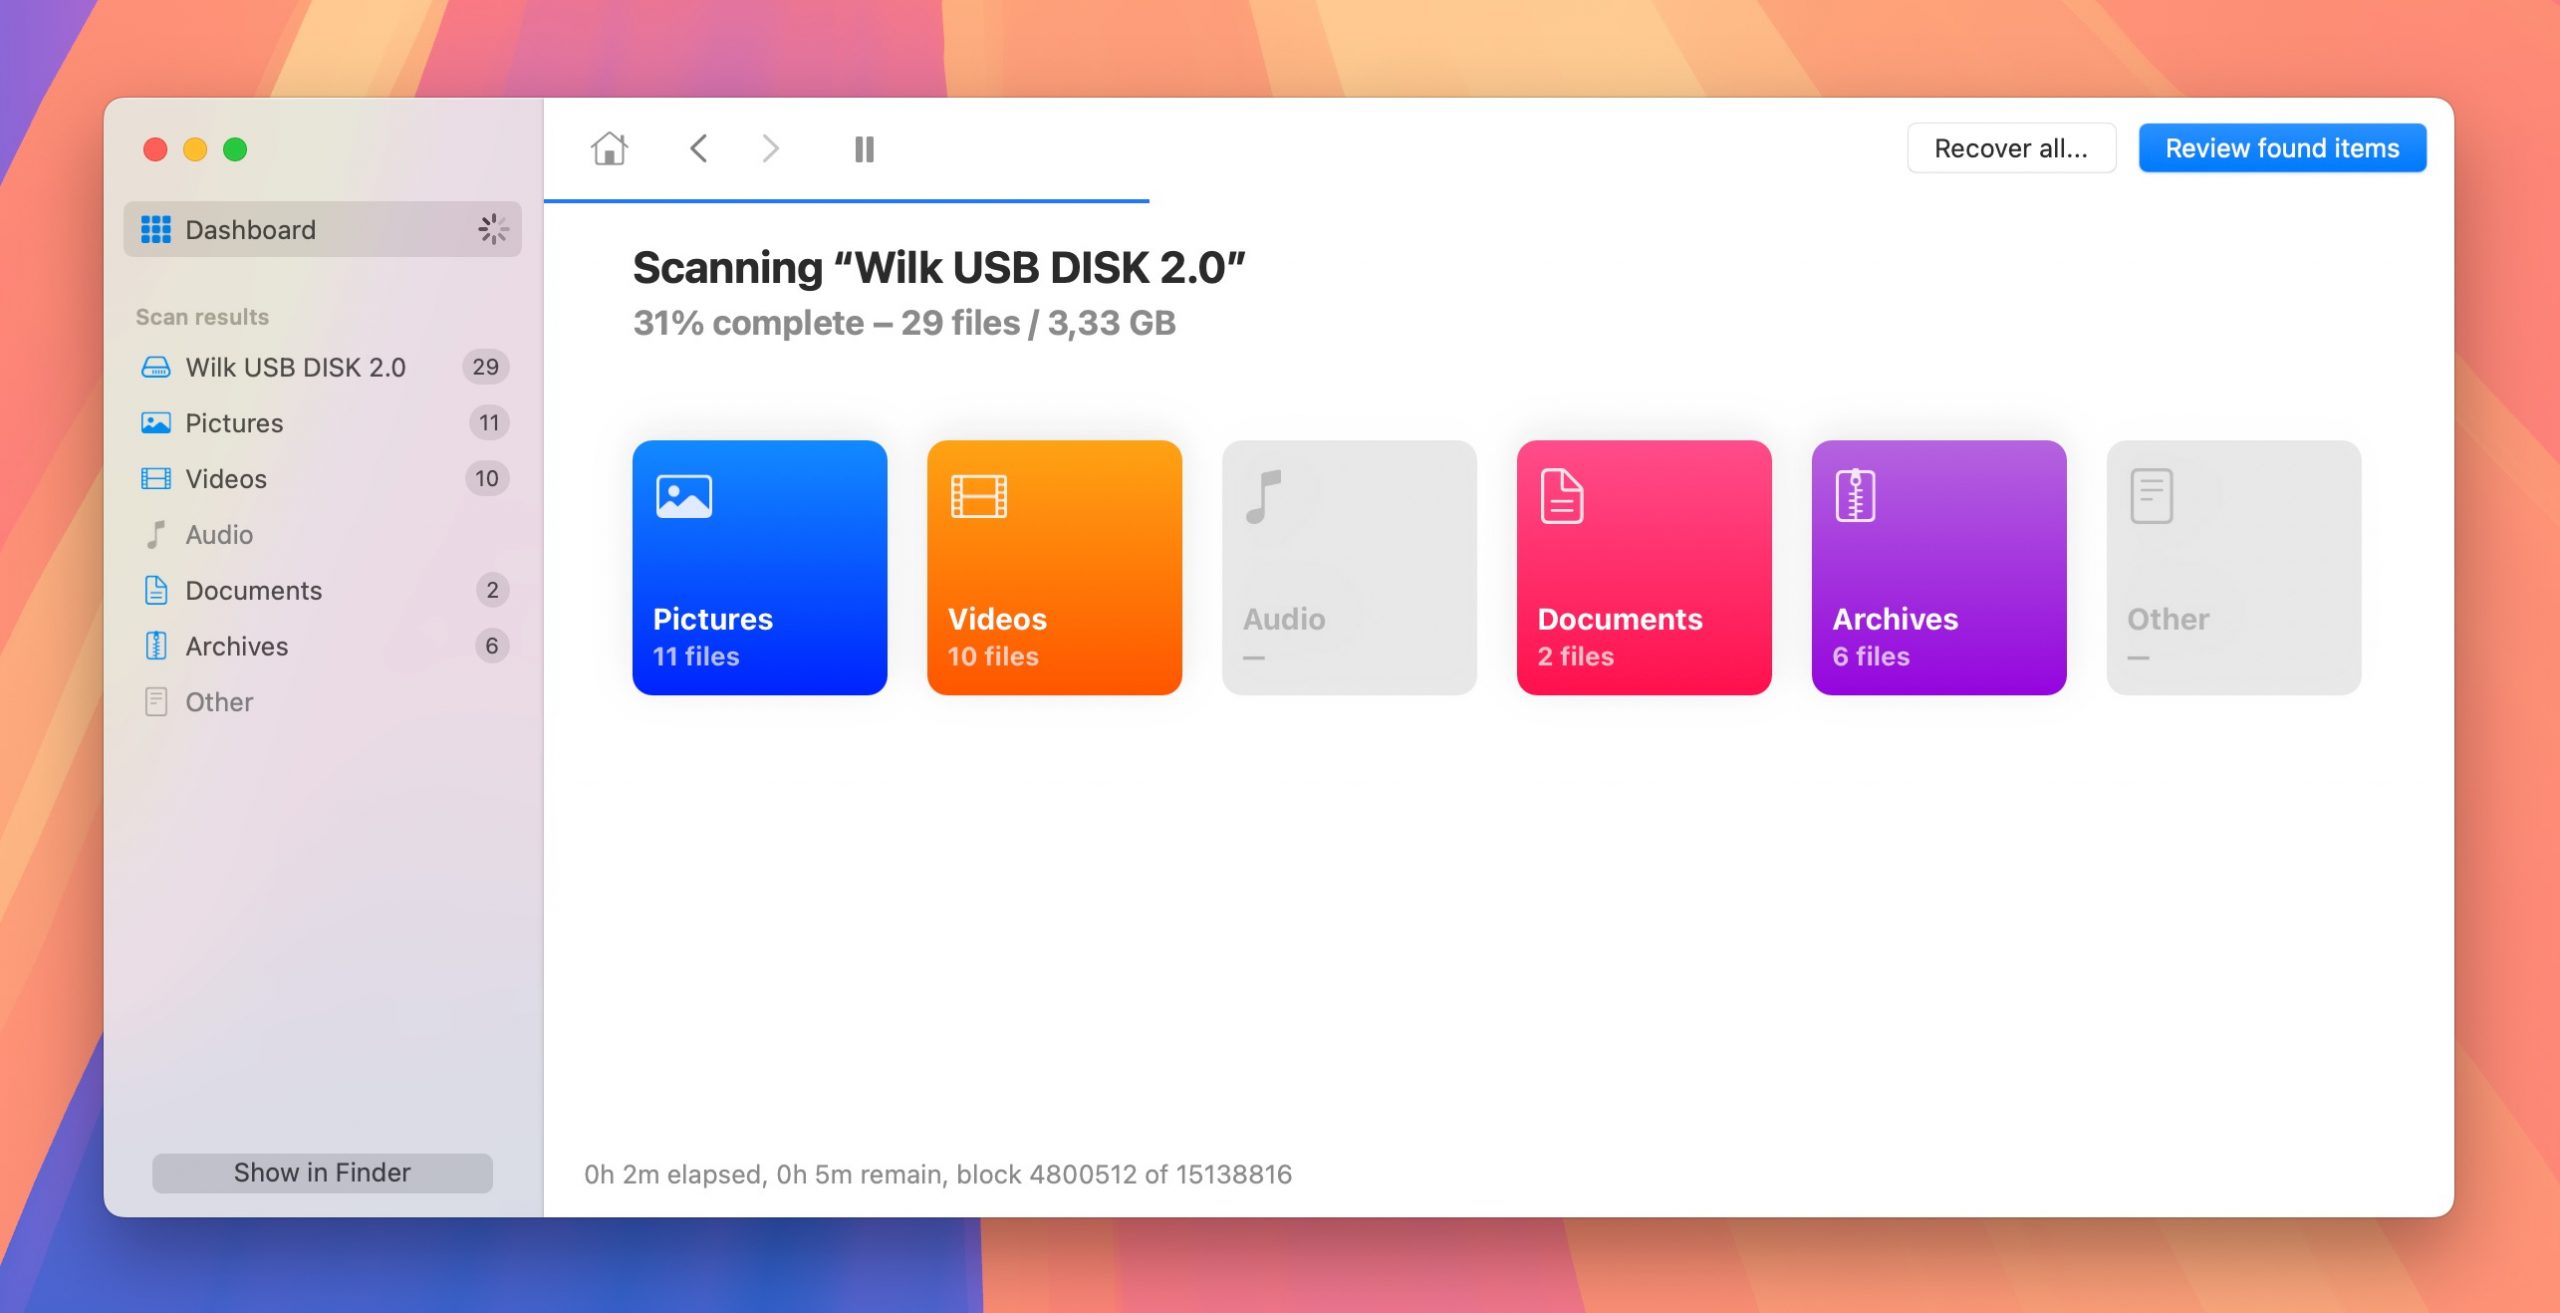
Step 3. During the scanning process, Disk Drill will display any found partitions directly in the scan results interface. These found partitions appear below the overview of recoverable files. You can click on any discovered partition to view all recoverable files within it. Even if Disk Drill doesn’t immediately show your partition, don’t worry and let the scan complete. Your files might still be recoverable from the Deleted or lost or Reconstructed sections.
Step 4. Now you need to select all files from the lost partition that you want to recover. Take advantage of the preview feature to verify you’ve found the right files. If you’re looking for specific items, the search function can be really helpful. Once you’ve identified your files, select everything you want to recover and click the Recover button.
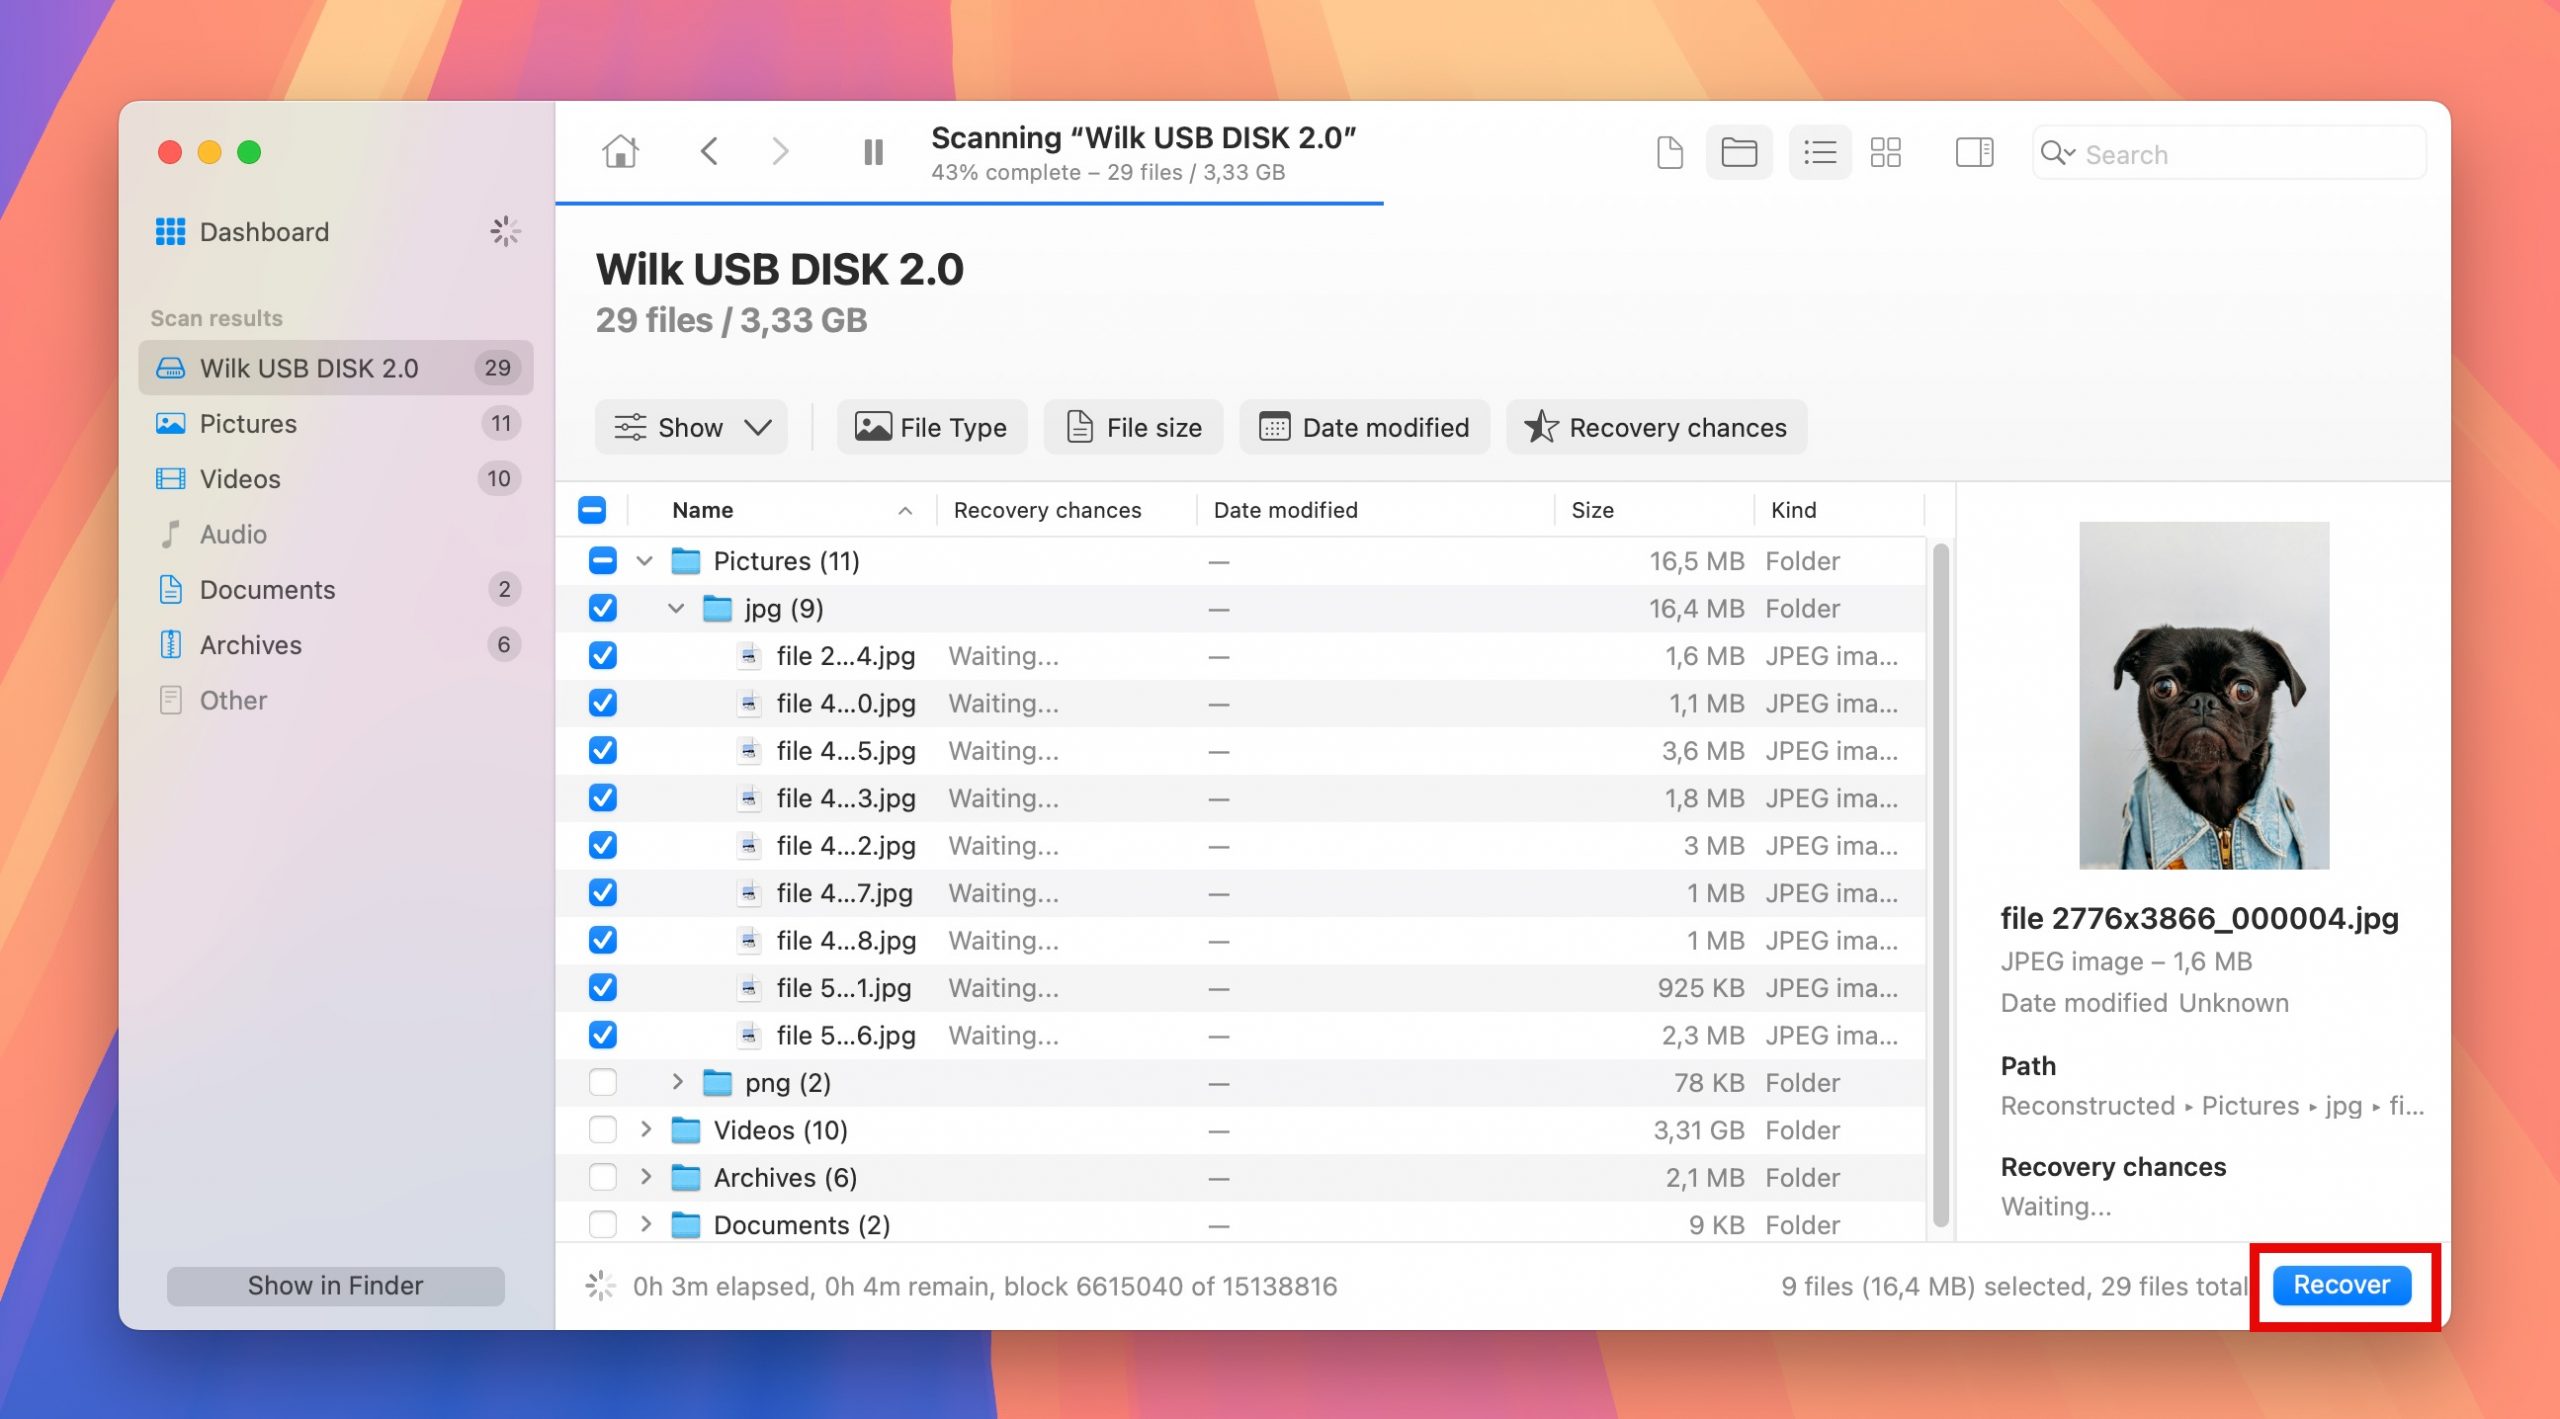
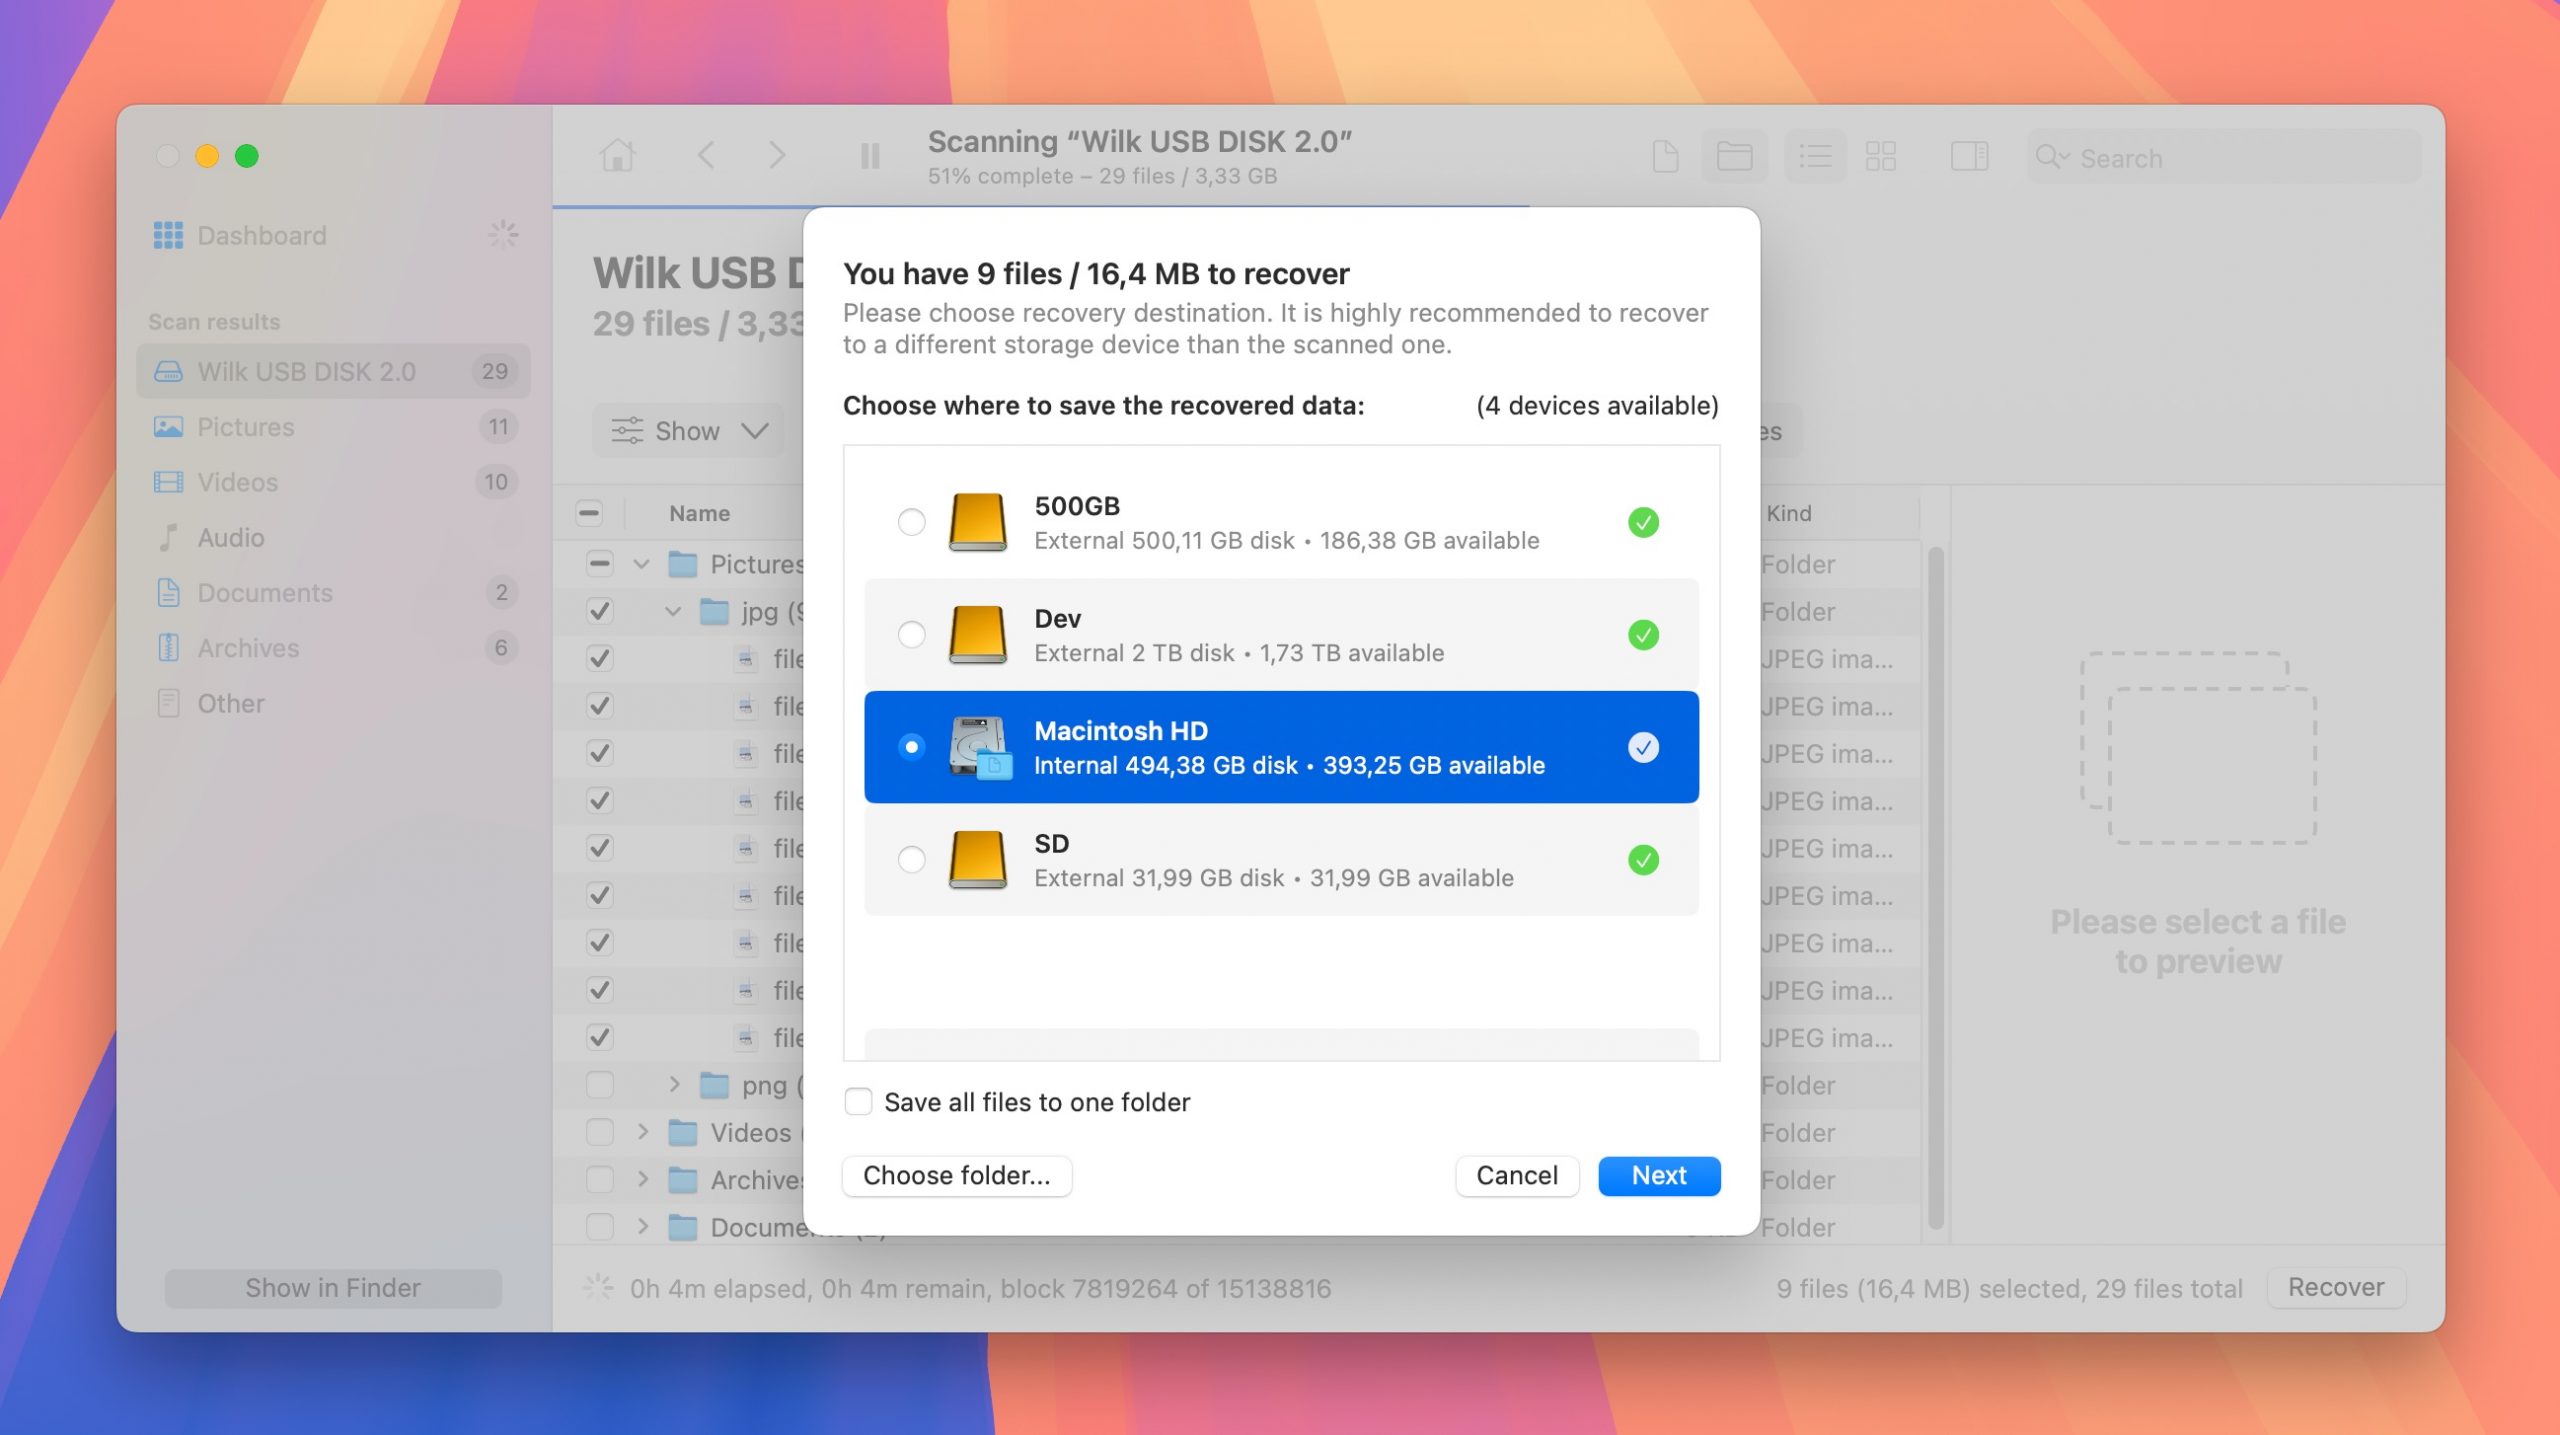
Step 5. Choose a recovery destination. It’s important that you never recover files to the same drive you’re recovering from. Confirm your choice and you’re done.
Method 2: TestDisk
TestDisk is an open-source partition recovery software that can fix partition tables, restore boot sectors, and do a lot of things to recover lost partitions and/or make non-booting disks bootable again.
The list of file systems supported by TestDisk includes APFS (Apple’s latest file system), HFS, HFS+ and HFSX (Apple’s legacy file systems), FAT32 and exFAT (commonly used on external drives), and NTFS (for Windows partitions). In other words, it can handle just about any file system Mac users commonly encounter.
Unfortunately, TestDisk doesn’t have a graphical user interface, so it’s nowhere near as easy to use as Disk Drill. On the other hand, the application doesn’t cost anything at all, so there’s nothing stopping you from giving it a try.
Step 1. Arguably the easiest way to install TestDisk on a Mac is with Homebrew, a free and open-source software package management system that simplifies the installation of software on macOS.
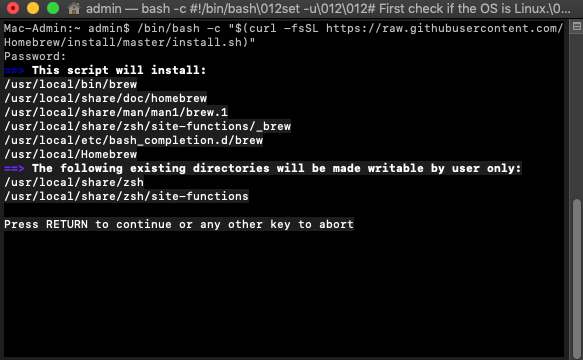
To do so, paste the following command in Terminal:
/bin/bash -c "$(curl -fsSL https://raw.githubusercontent.com/Homebrew/install/master/install.sh)"
Next, open Terminal and type brew install testdisk and hit Return to install TestDisk.
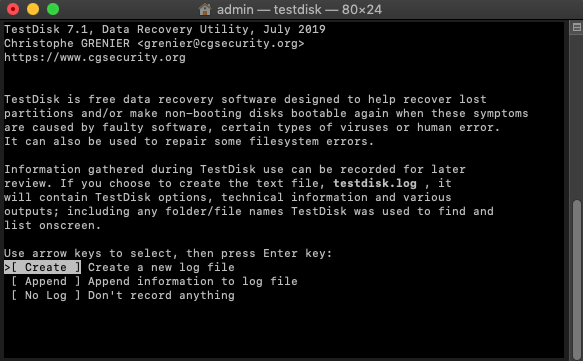
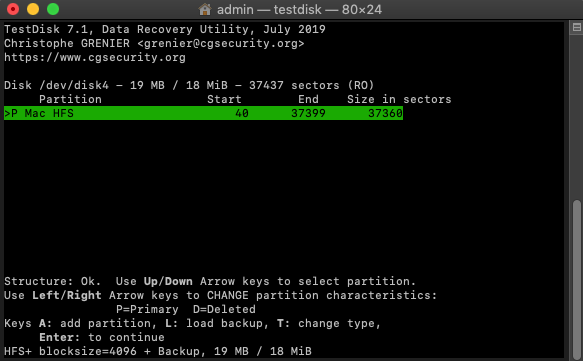
Step 2. To launch TestDisk, type “sudo testdisk” in Terminal and hit Return to launch TestDisk as root. Once running, TestDisk will ask you to choose if you want to create a log file. We recommend you hit Return to create a new log file. Next, select the drive you want to scan and specify the partition table type. TestDisk will automatically suggest the right option, so feel free to just hit Return. On the next page, choose to analyze the current partition structure and search for lost partitions. Finally, press Return to begin Quick Search.
Step 3. Once Quick Scan is done, TestDisk will display all recoverable partitions. Check if the partition you want to recover is among them and hit Return to continue. If the partition you want to recover is found, you can choose the Write option to save the partition structure. If it wasn’t found, highlight the menu Deeper Search and hit enter to proceed with a more comprehensive scan. You will then be presented with another list of recoverable partitions and the option to change their characteristics from deleted to Logical, Primary, or Bootable (here’s an explanation of what that means).
Method 3: First Aid
First Aid is a built-in Mac tool that can’t recover truly deleted partitions but is surprisingly effective at fixing partitions that appear to be “lost” due to file system corruption, directory errors, or other disk issues.
The reason why I recommend trying First Aid only after Disk Drill and TestDisk is that repair attempts can sometimes overwrite data that could have been recovered. When First Aid fixes file system structures, it writes new data to your drive. If your partition contains deleted files you want to recover, these writes could potentially overwrite them and make recovery impossible. That’s why it’s always safer to first try data recovery tools that work in read-only mode, then move on to repair tools if recovery isn’t successful.
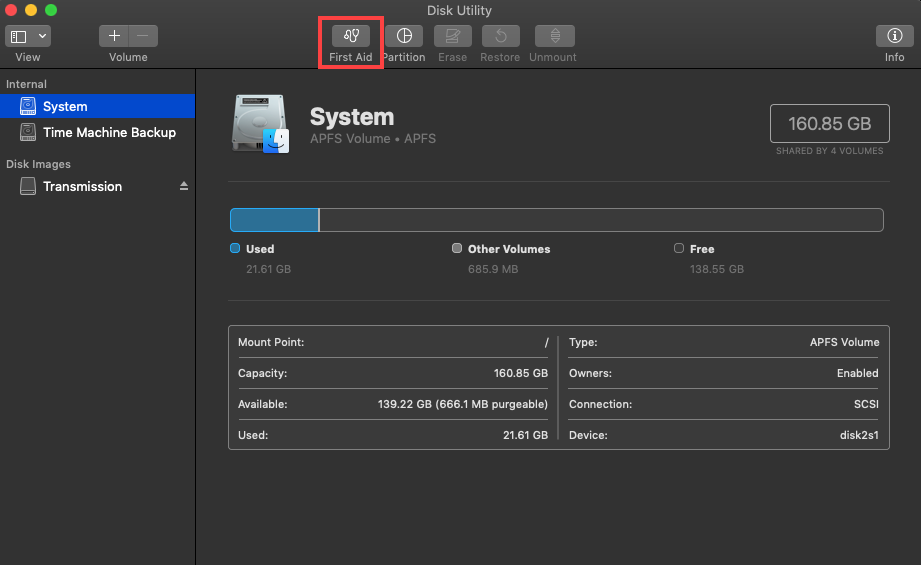
Step 1. Go to Finder > Application > Utilities and launch Disk Utility. If you want to repair the same partition on which your operating system is installed, you should boot into macOS Recovery mode and launch Disk Utility from there.
![]()
Step 2. Select the partition you want to repair from the list on the left and click the First Aid button.
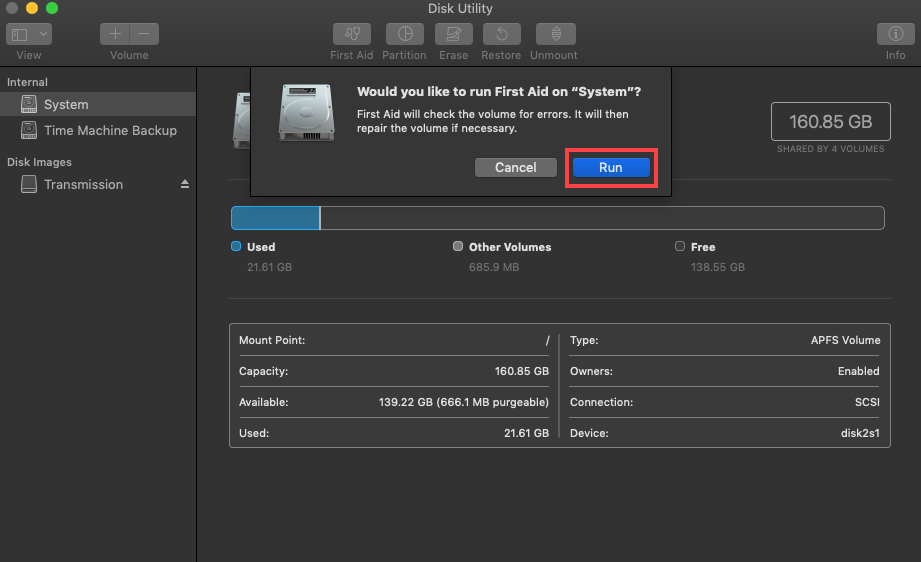
Step 3. Confirm that you want First Aid to check the partition for errors. If it detects any problems, it will automatically attempt to repair them.
Alternatively, you can use Disk Utility from Terminal:
Step 1. Go to Finder > Application > Utilities and launch Terminal. Again, boot into macOS Recovery mode and launch Terminal from there if you want to repair the same partition on which your operating system is installed.
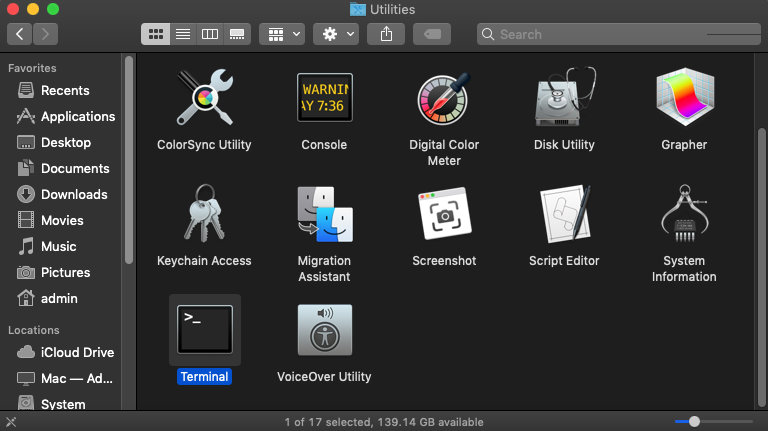
Step 2. Type “diskutil list” to list all available partitions and hit Return. Remember the identifier of the partition you want to repair.
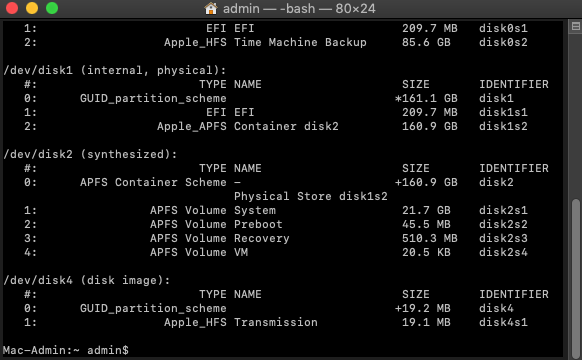
Step 3. Type “diskutil verifyVolume ID” and hit Return. Make sure to replace the word ID with the identifier from the previous step.
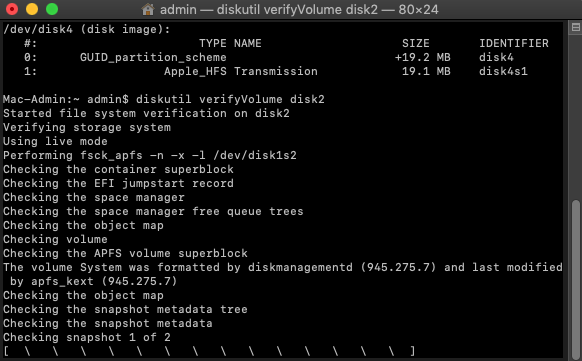
Step 4. If diskutil determines that your partition needs repairing, type “diskutil repairVolume ID” and hit Return.
Repartition Your Drive After Data Recovery
If you’ve successfully recovered your important files using one of the methods above but couldn’t restore the partition structure itself, you might want to recreate the partition so you can use that space again.
Fortunately, this is a straightforward process using Disk Utility. The only problem is that repartitioning will erase all data on the drive, so make sure to back up anything important before proceeding. Also, if your goal is to repartition your system drive, you will need to boot into macOS Recovery mode first because you can’t modify the partition of a disk that’s in use, especially when it’s the one hosting your operating system.
Once you have your data backed up, you can follow these instructions:
Step 1. Open Finder, navigate to the Applications folder, proceed to Utilities, and launch Disk Utility. Should your objective be to mend the partition where your OS resides, you’ll need to restart your Mac in macOS Recovery mode before starting Disk Utility.
Step 2. Select the drive you wish to repartition from the sidebar in Disk Utility.
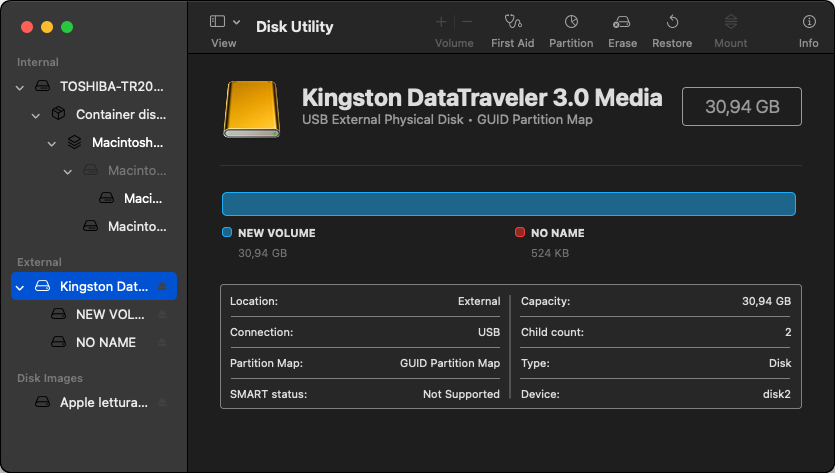
Step 3. Click the Erase button. Select the desired file system (APFS for storage devices used exclusively with Mac computers and ExFAT for storage devices shared with Windows and Linux computers) and the partition scheme (Apple Partition Map for storage devices used exclusively with Mac computers and GUID for storage devices shared with Windows and Linux computers).
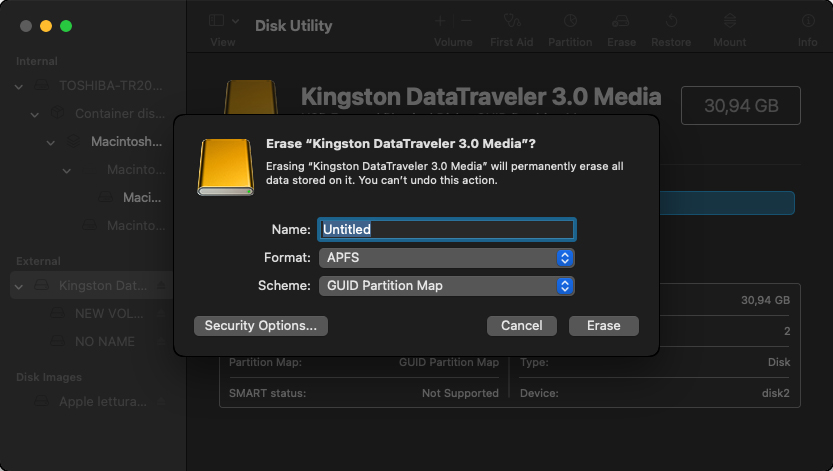
Step 4. Click Erase again to start the reformatting process and wait.
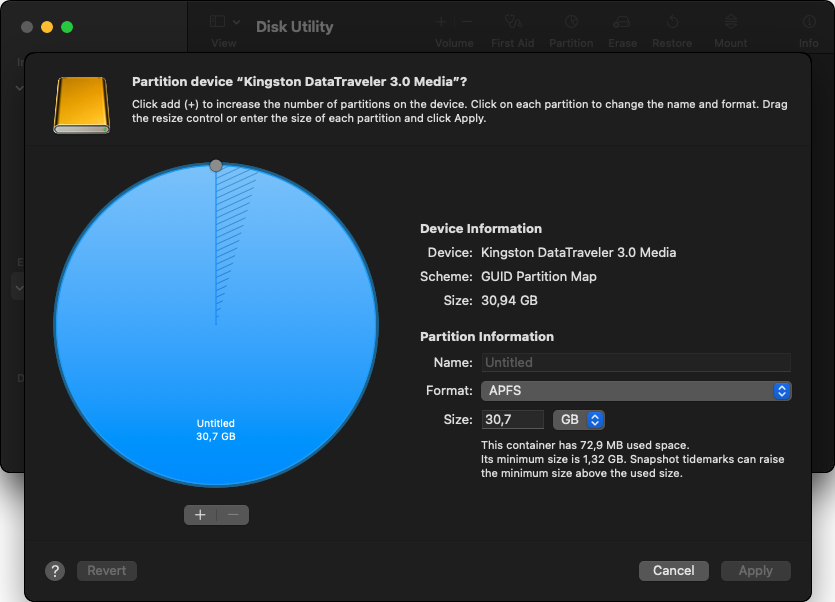
Step 5. With your device reformatted and blank, you can click the Partition button in the toolbar and create add a new partition by clicking the Plus button so that your storage device is partitioned just the way you want it to be.
How to Prevent Hard Drive Partition Loss?
Now that we’ve answered the question of “how do I restore a Mac partition,” it’s time to talk about partition loss prevention because your goal should always be to avoid data loss. Here are five ways to keep your partitions from disappearing.
- ⏪ Back up your data: Only backups can prevent hard drive partition loss in the event of a natural disaster, physical damage, or theft. That said, not all backups are created equal, and it’s important that you implement a reliable backup strategy, such as the 3-2-1 method. In practice, this could mean a weekly byte-to-byte backup of your entire hard drive combined with a real-time cloud backup service like iCloud, OneDrive, Google Drive, or Dropbox.
- 🛡️ Use antivirus software: It’s true that Mac users don’t have to worry about viruses and other malware nearly as much as Windows users, but a new dangerous strain of Mac-specific malware appears once in a while, such as the recently discovered malware called EvilQuest, which combines ransomware and spyware capabilities into one package. To protect your partitions, and the data stored on them, from EvilQuest and other Mac malware, you should use a reliable antivirus software solution capable of detecting and eliminating the latest cyber threats in real time. One great option is Malwarebytes, and this article lists many others.
- 🚨 Be careful during partitioning: A lot can go wrong during partitioning, especially if your experience with it is limited. To avoid partition loss, make sure you know what you’re doing and always double-check everything before you go ahead and partition your drive. When in doubt, consult online partitioning tutorials or ask more experienced users for help on sites like Stack Exchange and Reddit.
- 🍎 Avoid multi-booting: Multi-booting is the process of installing two or more operating systems on a single computer to gain the ability to switch between them during boot. Mac users often use multi-booting to install macOS and Linux on a single machine because Boot Camp can only install Windows. The problem with multi-booting is that Apple doesn’t officially support it, so things can easily go wrong in a catastrophic way, often leading to complete partition loss. Instead of multi-booting, consider installing Linux inside a virtual machine using VMware or VirtualBox.
- 💿 Store your data separately from the OS: It’s a good practice to store data separately from the operating system, either on a different partition or, better yet, a different storage device. This greatly reduces the chance of data loss when something goes wrong with your operating system, such as a bad update or malware infection.
Conclusion
With tools like Disk Drill, TestDisk, and First Aid, you’re well-equipped to tackle even the most challenging cases of Mac partition loss at home. Just remember that prevention is always better than cure. Adopting good habits like regular backups, using antivirus software, being cautious during partitioning, and more can significantly diminish the risk of partition loss.
FAQs
To recover a deleted partition on a Mac, you can use a special partition recovery tool like Disk Drill for Mac or TestDisk. Even if you don’t manage to recover the partition itself, you have a fighting chance to recover most or all of your files as long as you act quickly and follow the right recovery procedure.
Fixing a corrupted Mac partition may be possible using Disk Utility’s First Aid feature, which can check and repair file system errors. If you can boot into macOS, you can run this tool directly. Otherwise, you should start your Mac in Recovery Mode to access Disk Utility and repair the partition. You can also try a third-party tool like TestDisk, which can rebuild corrupted partitions, or you can always format the partition and start from scratch (only if it doesn’t contain any important data!).
A hard drive partition may not show up on your Mac for several reasons: it could be due to a connection issue, file system corruption, or the drive may be failing. Start by checking the connections and trying a different port or cable. If that doesn’t work, use Disk Utility to see if the partition appears there; if it does, but it’s greyed out, you may need to run First Aid to repair it. If it can’t be repaired, then you should recover as much data from it as you can before it’s too late.


