
Dashcam videos are especially prone to corruption due to the circumstances surrounding their usage. It’s easier to run out of memory during a long drive, recording may shut down if the car battery dies, and vehicular accidents are typically unavoidable when they do happen. On top of dashcam-related issues, memory cards themselves are also vulnerable to corruption.
When we wrote this guide, we made sure to account for all possible scenarios. This allowed us to provide solutions that covered every type of corruption users might encounter on dashcam videos.
Table of Contents
How to Improve Your Chances of Fixing Your Dascham Video
Because of the sheer variety of corruption that may occur on dashcam videos, not only is it hard to guarantee successful repair, but you may even encounter further corruption if you don’t handle your memory card and data correctly.
To maximize your chances of successfully repairing your video, note the following tips:
- Immediately stop recording footage with your dashcam. The data of the new footage may overwrite the data of the corrupted video, which makes repair and recovery way more difficult.
- Safely eject your memory card from your dashcam. how you do it depends on the model of your device. Safely ejecting your memory card will ensure that the proper shutdown protocol is followed, preventing further corruption.
- Make an “image backup” of your dashcam memory card. An image backup is a total copy of your SD card’s disk. This ensures that every bit of its data is preserved so that future attempts of repair and recovery have the best chance of success.
4 Free and Easy Fixes to Repair a Corrupted Dashcam Video on Mac
In this section, we’ll cover 4 different ways to fix corrupted dashcam videos. To parallel the variety of their occurrences, the solutions we provided in this guide address different types of corruption in unique ways.
In other words, you can try each method (starting with Method 1) without feeling like you’re brute-forcing the same type of fix over and over again. We also made sure to feature easy-to-use tools that are either free or offer solid free options.
Fix 1: Fix Your Dashcam Video Using Online Repair Tool
The most convenient way to repair corrupted dashcam videos is by using online video repair tools. These are websites that host online utilities that can fix corrupted videos that are uploaded to the page.
For this particular demonstration, we’ll be using Clever Online Video Repair. It’s 100% free for video up to 5 GB and it recognizes a wide range of video file formats – such as MP4, MOV, AVI, MPEG, etc.
It’s also a great choice for dashcam videos in particular, because it’s designed to fix video files that lack a Moov Atom. The Moov Atom is a critical part of the file that is commonly lost when recording is interrupted (e.g. a car crash).
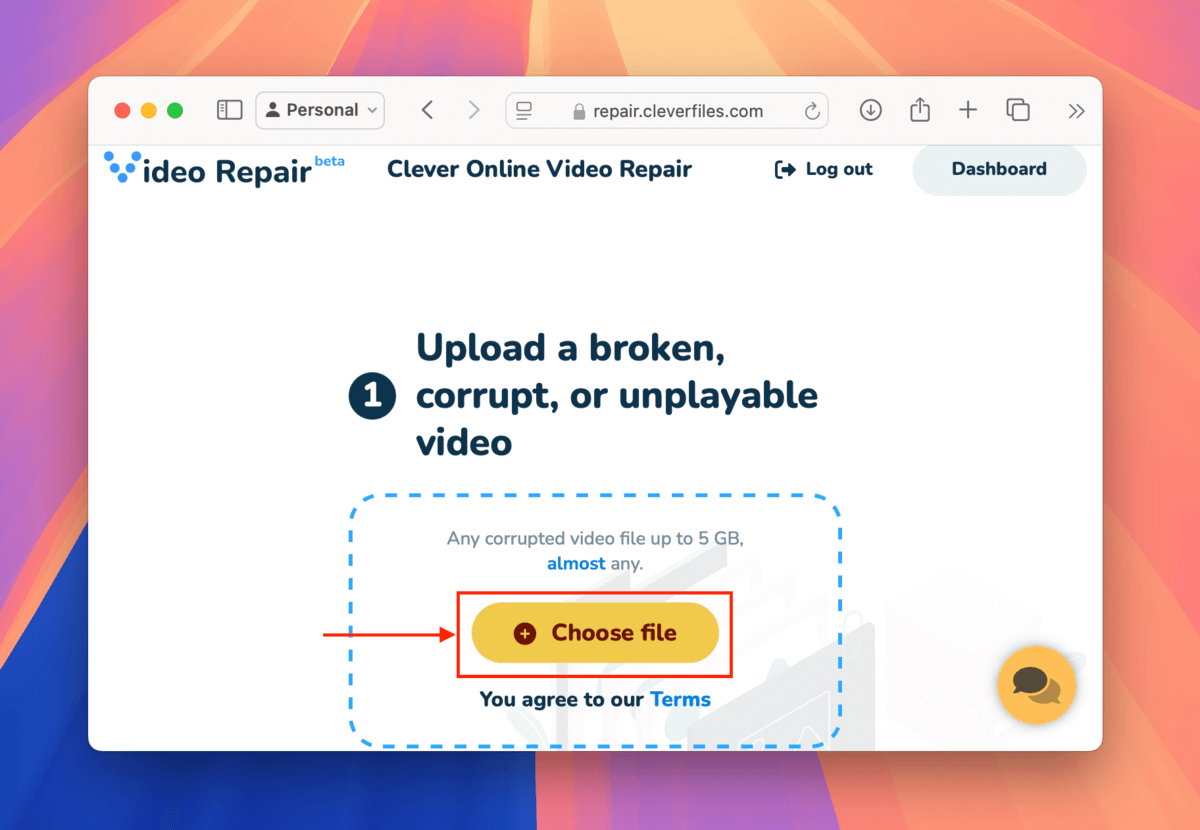
Step 1. Open up a browser and go to the repair.cleverfiles.com website.
Step 2. Click Choose file.
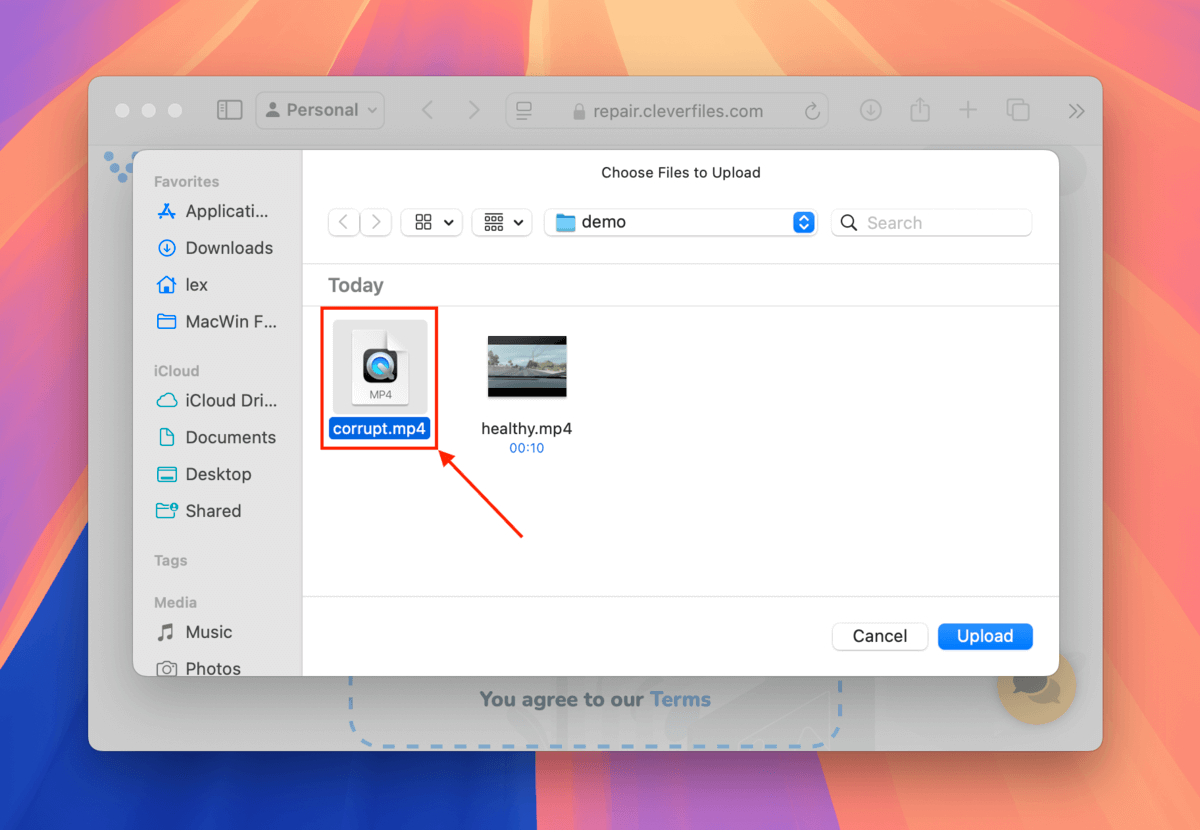
Step 3. Navigate to the folder containing your corrupted video file. Then, click the Upload button.
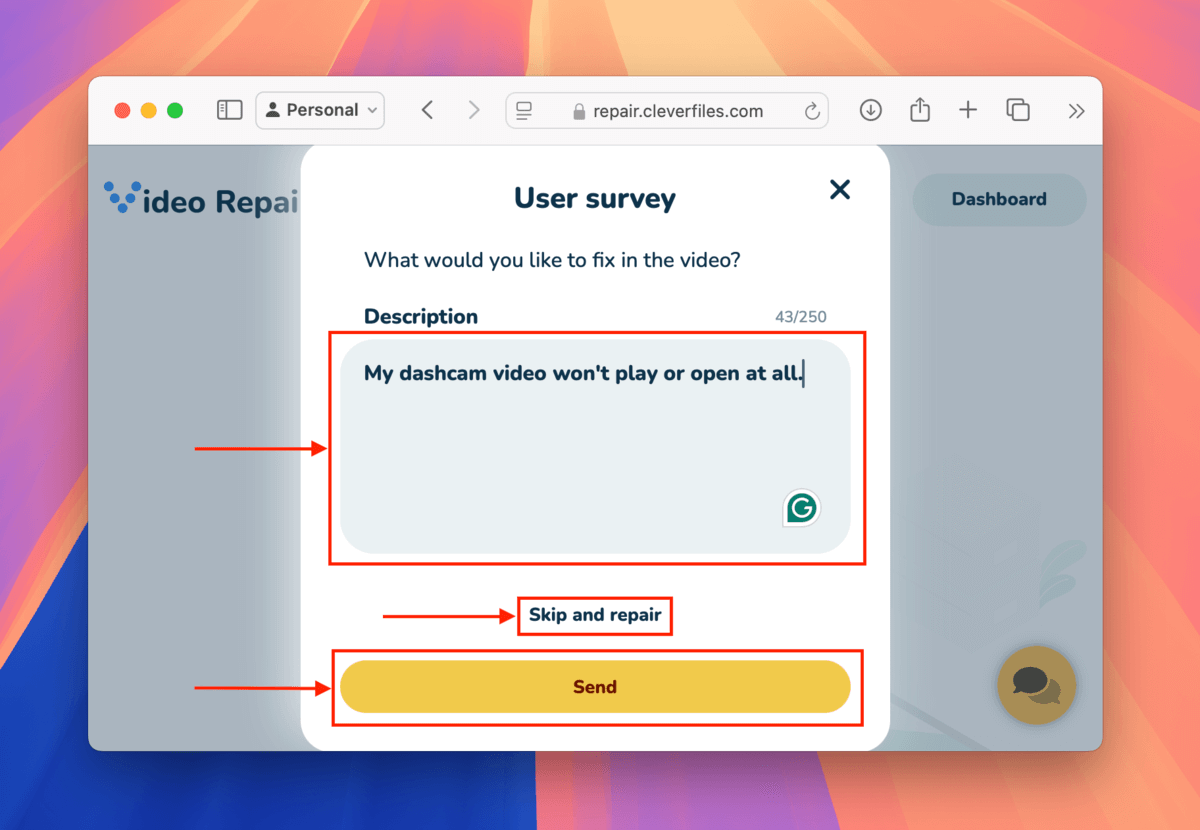
Step 4. In the window that appears, describe what happened leading up to the corruption of your video file. Then, click Send. If you prefer not to share any details, click Skip & repair.
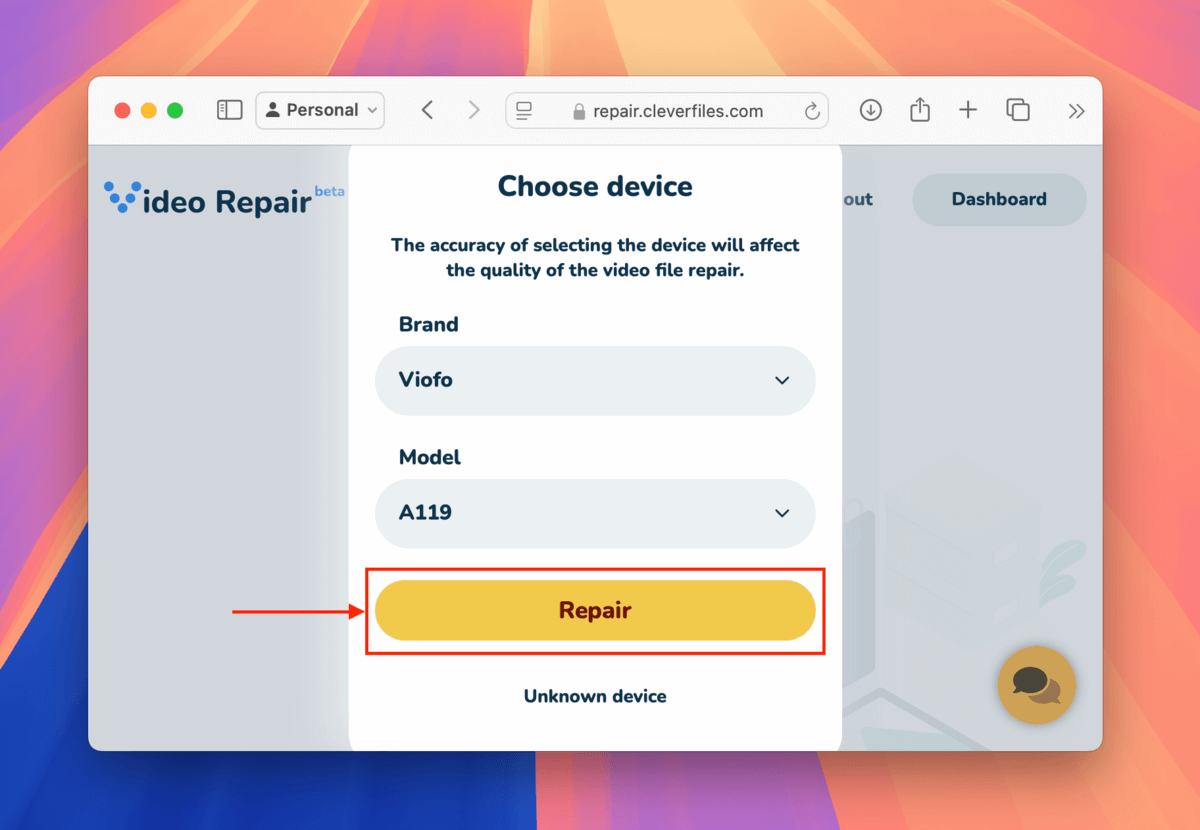
Step 5. Use the dropdown menus to choose your dashcam’s brand and model. Some cars have built-in dashcams so you can find this information in your vehicle’s manual. For third-party devices, you should find it on the dashcam’s body, box, or manual. Then, click Repair.
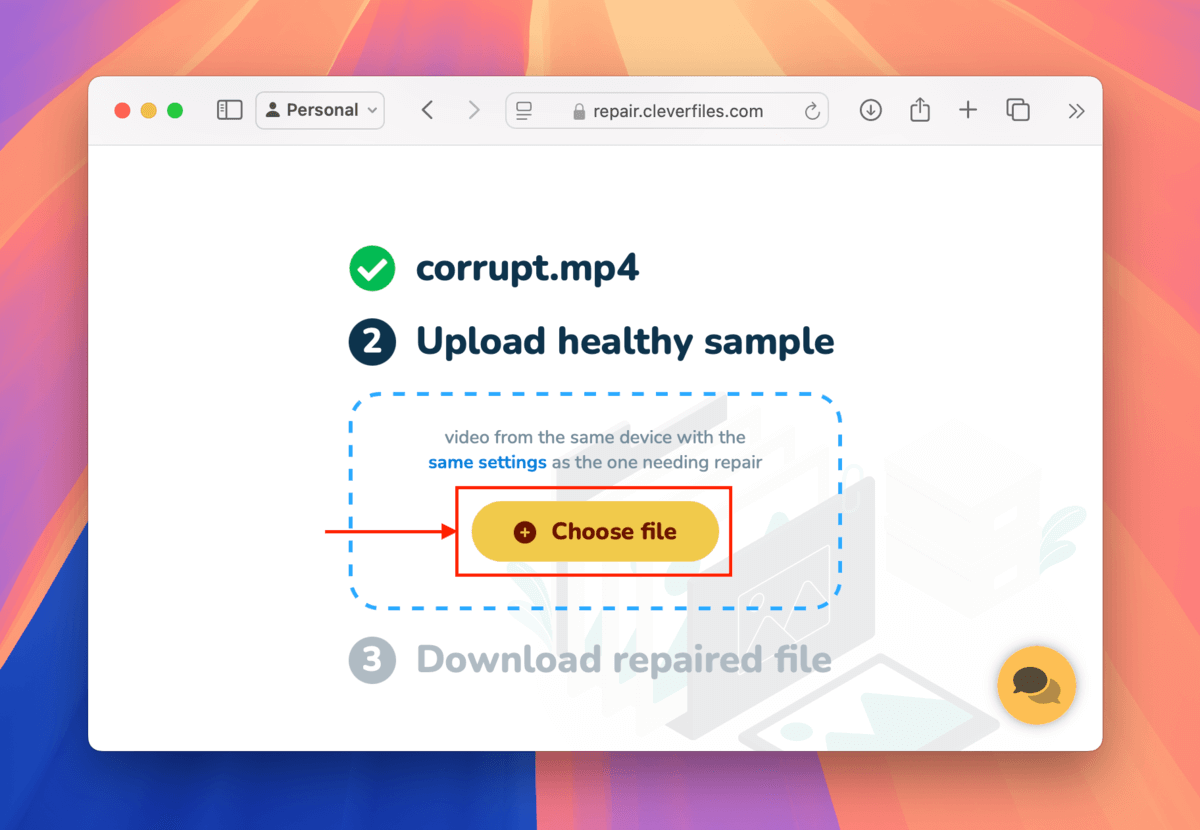
Step 6. Once your corrupted dashcam video has been uploaded to the web app, click the new Choose file button.
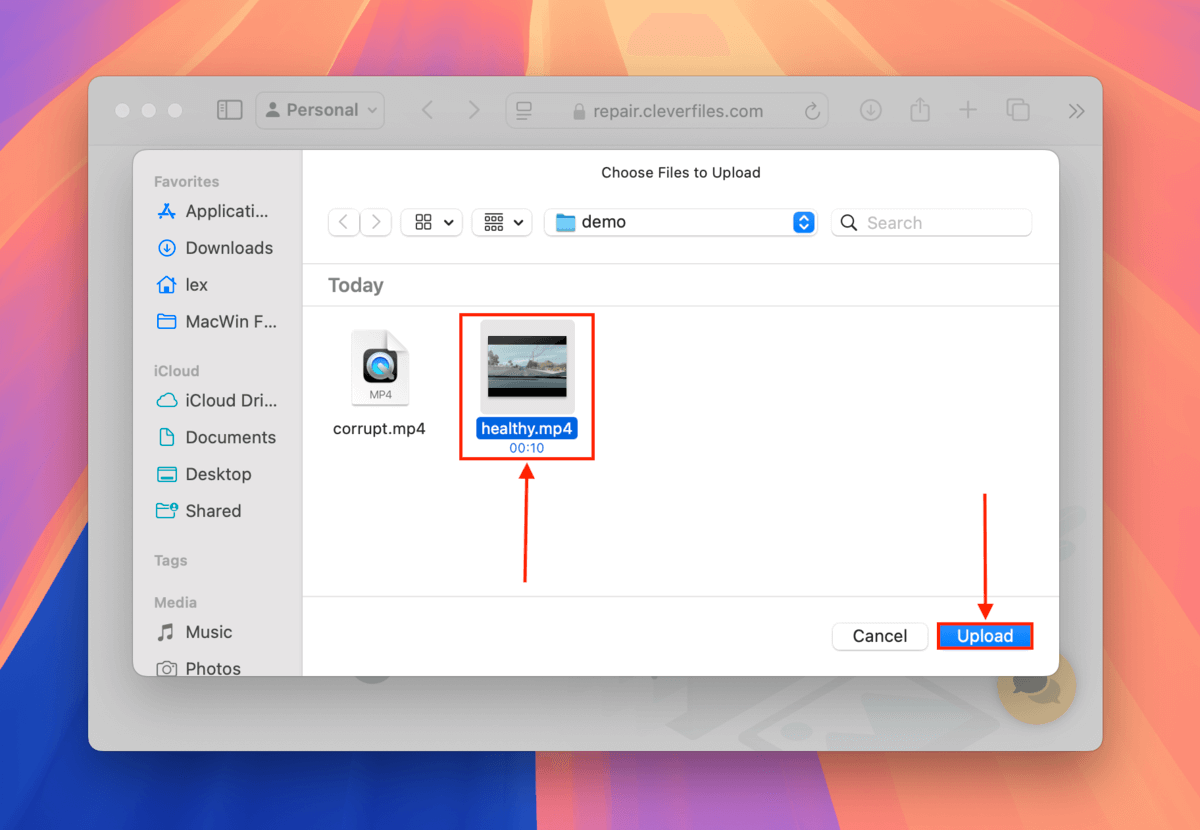
Step 7. Select a working file sample and click Upload. Again, a healthy file sample is a video that was taken with the same device and settings as the corrupted video.
Step 8. You can preview the video file by clicking the screenshots provided by Clever Online Video Repair. If you’re satisfied with the results, click the Download button.
You’ll find the repaired video in your Downloads folder. Try opening it with a compatible media player to check if it works.
Fix 2: Use VLC Media Player’s AVI Repair Tool (Works With Other Formats)
VLC Media Player is a free and popular multimedia app. It has a built-in auto repair tool that can fix minor cases of corruption on AVI files, such as indexing errors. And while most dashcam videos are captured in the MP4 or MOV formats, you can still utilize VLC’s repair tool simply by replacing its file extension. When you attempt to open it, VLC will treat it as an AVI file and try to fix it.
In the guide below, we’ll demonstrate how to enable and use VLC’s AVI auto-repair tool and how to easily replace your file’s extension so it triggers the process.
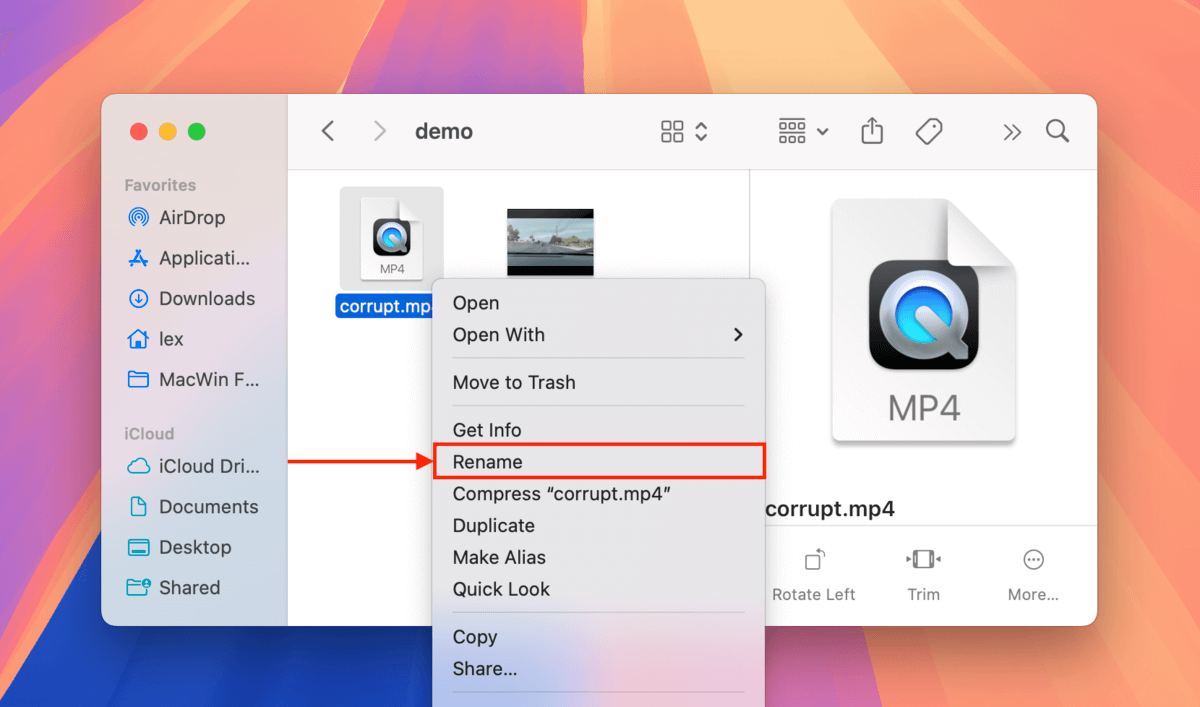
Step 1. Locate your corrupted video file in Finder. Then, right-click the file and click Rename.
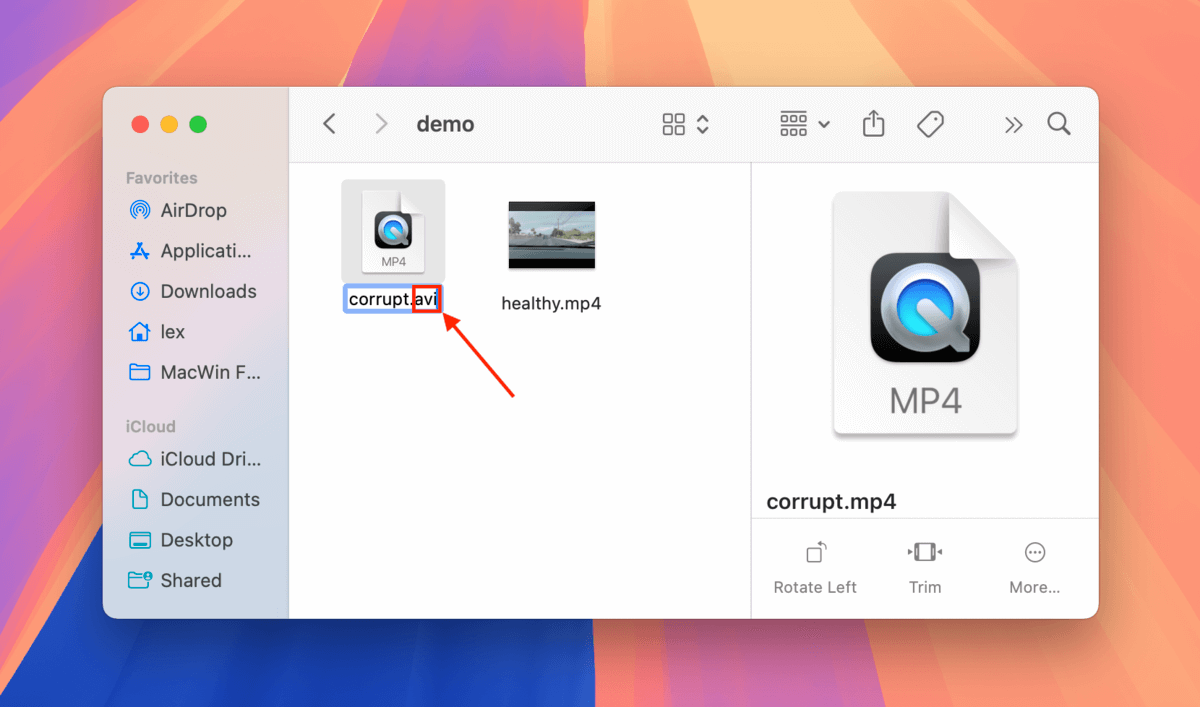
Step 2. Change your file extension (the characters that come after the period) to avi. Click Use .avi if macOS asks to confirm.
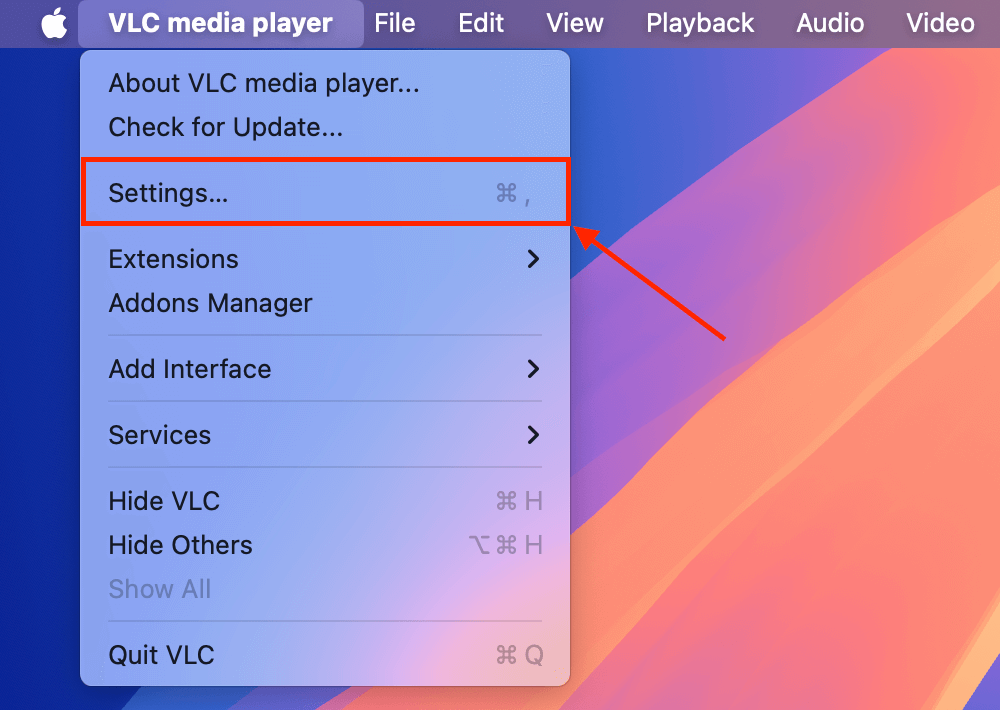
Step 3. Download and install VLC Media Player, then open the app. On the menu bar, click VLC Media Player > Settings…
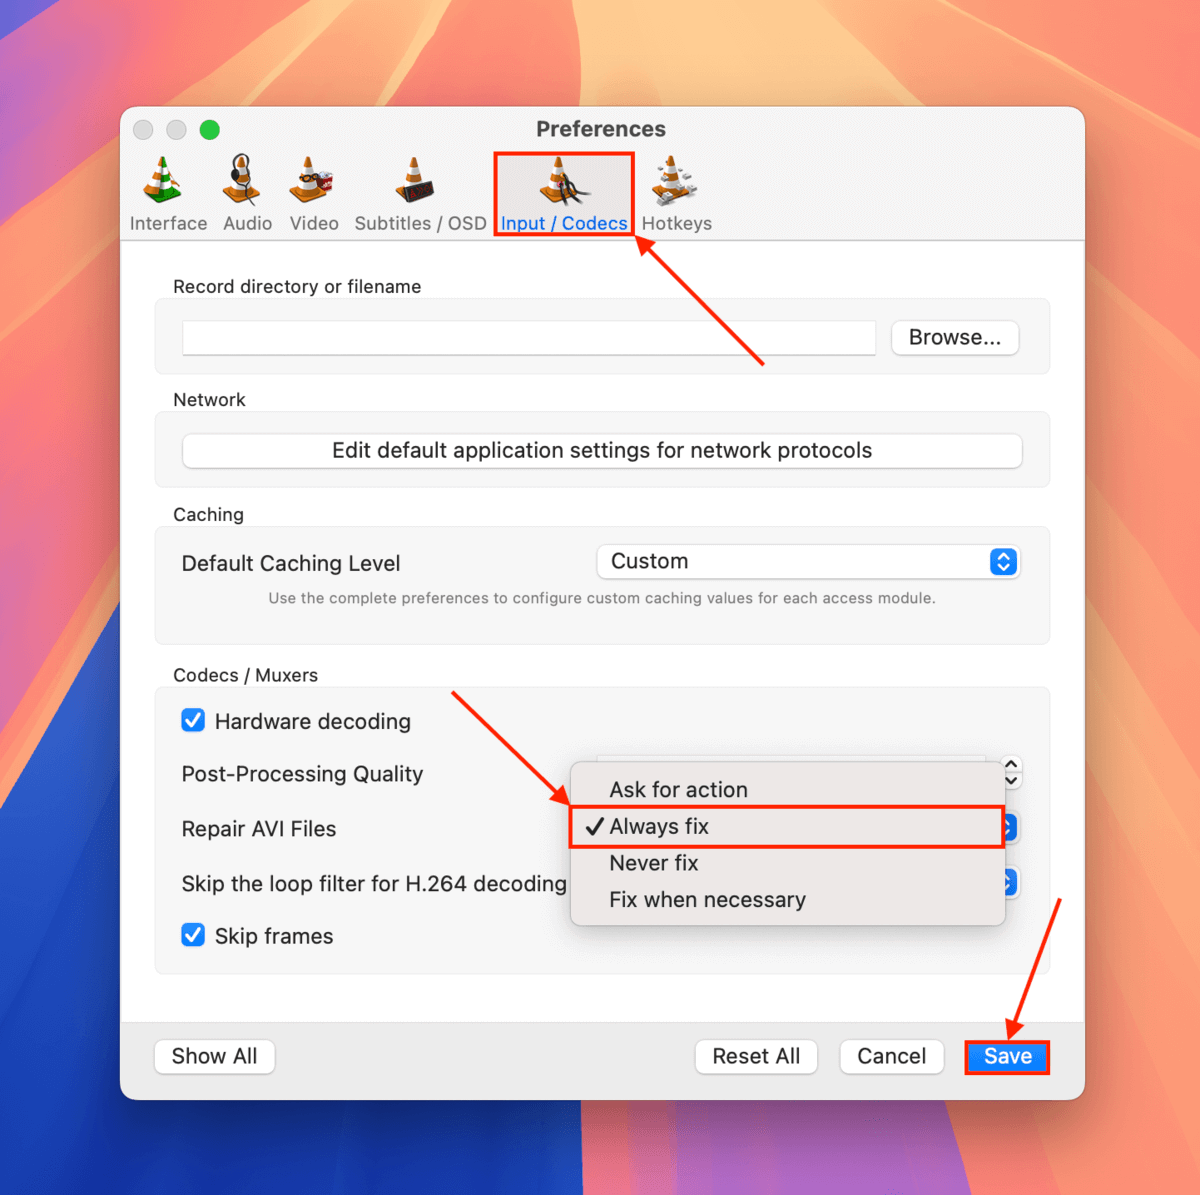
Step 4. Navigate to the Input / Codecs. Beside Repair AVI files, click the dropdown menu and select Always fix. Then, click Save at the bottom of the window.
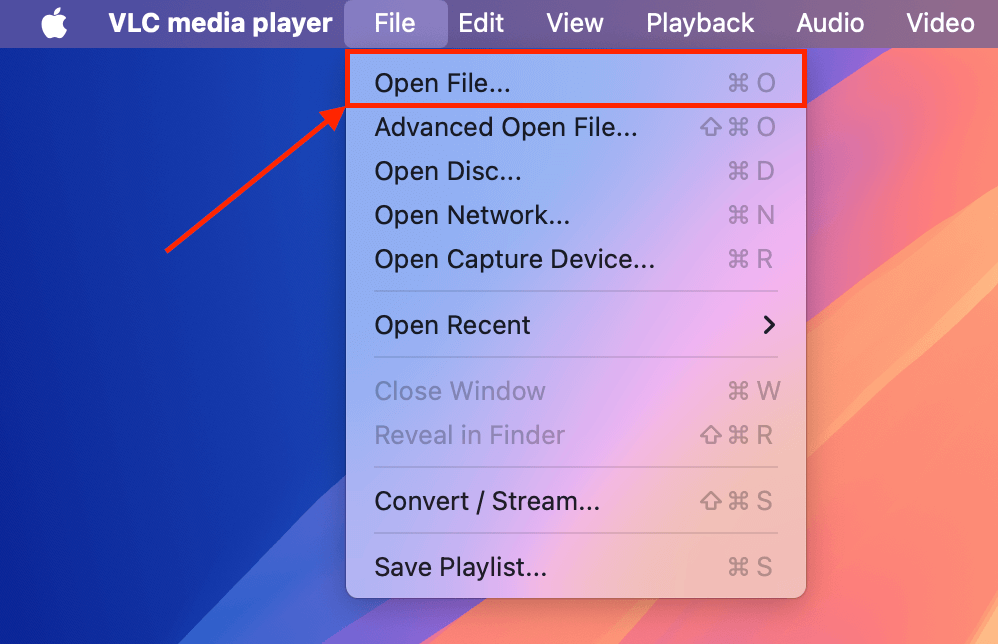
Step 5. On the menu bar, click File > Open File…
Step 6. Finally, navigate to the folder where your “avi” video is stored. Select the video and click Open.
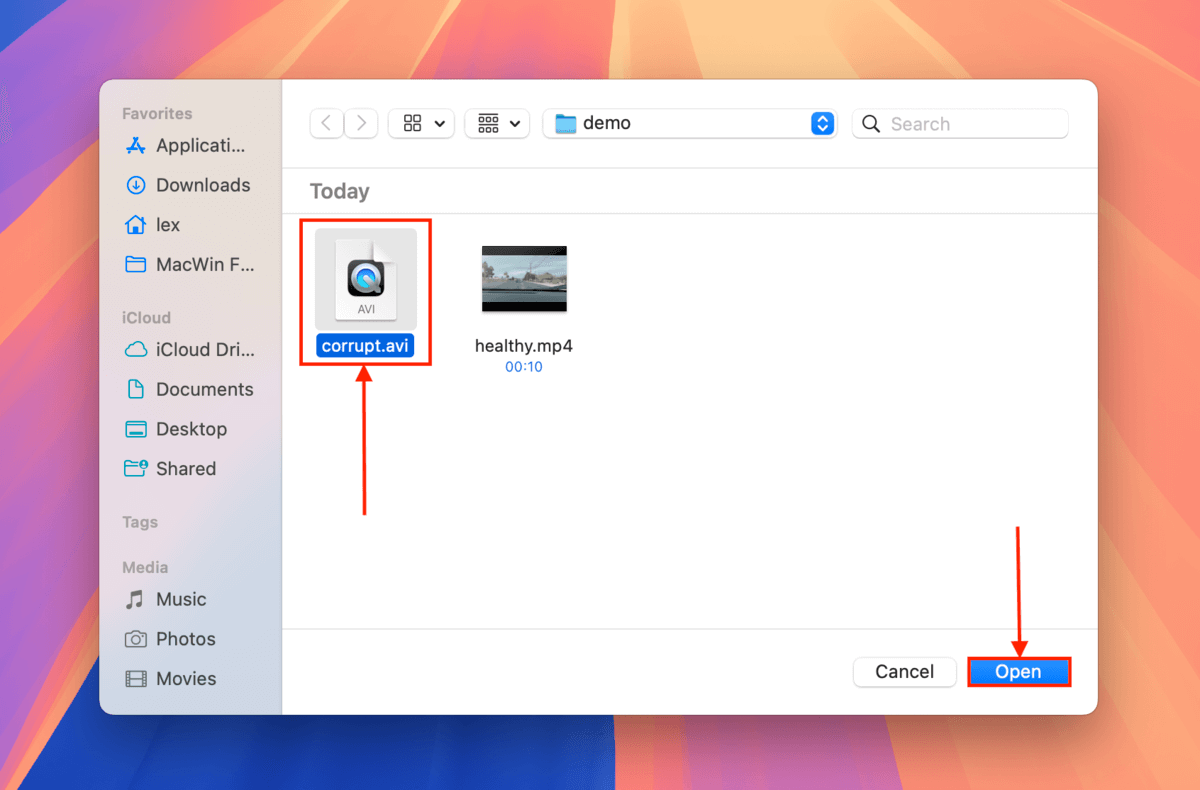
Once you attempt to open your video file using VLC Media Player, the app will automatically try to repair it thanks to the setting you enabled in step 4.
Fix 3: Convert Your Video to Another File Format
Properly converting your video from one file format to another can fix instances of corruption that mostly affect the “container” of the video. This is the part of the file that acts like a “wrapper” for the video stream, audio, subtitles, and other data and information.
There are two ways that we recommend you use to convert your video file, based on your preferences, budget, and video file size.
Option A: Online Converter (Zamzar)
The easiest way to convert a video is by using an online file converter. Similar to online file repair tools, online file converters are capable of changing your video’s file format entirely from within the web page.
This means that fixing your video can be as easy as dragging your file and clicking a few buttons. You also don’t have to install software on your Mac.
There are many file converters to choose from online, but we usually recommend Zamzar.com or CloudConvert.com – they offer free conversion with generous limits.
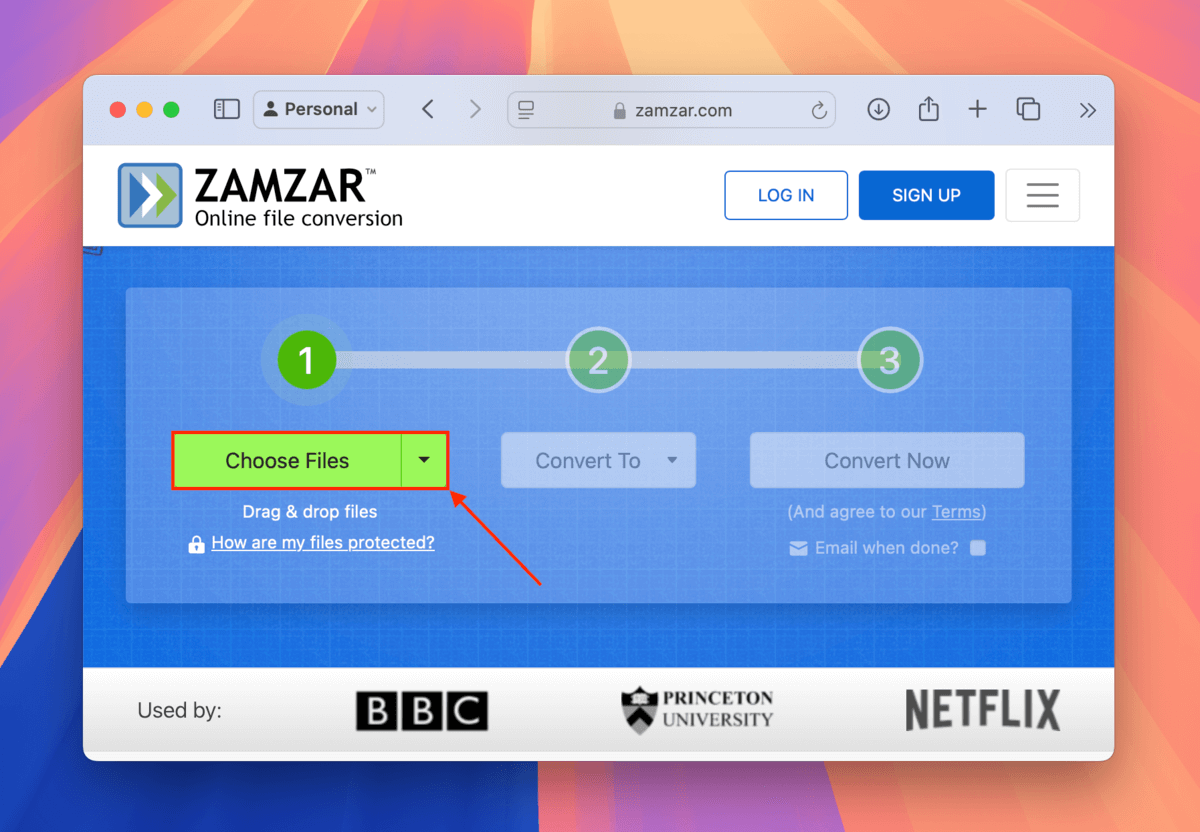
Step 1. In any browser, open zamzar.com. Click the Choose Files button.
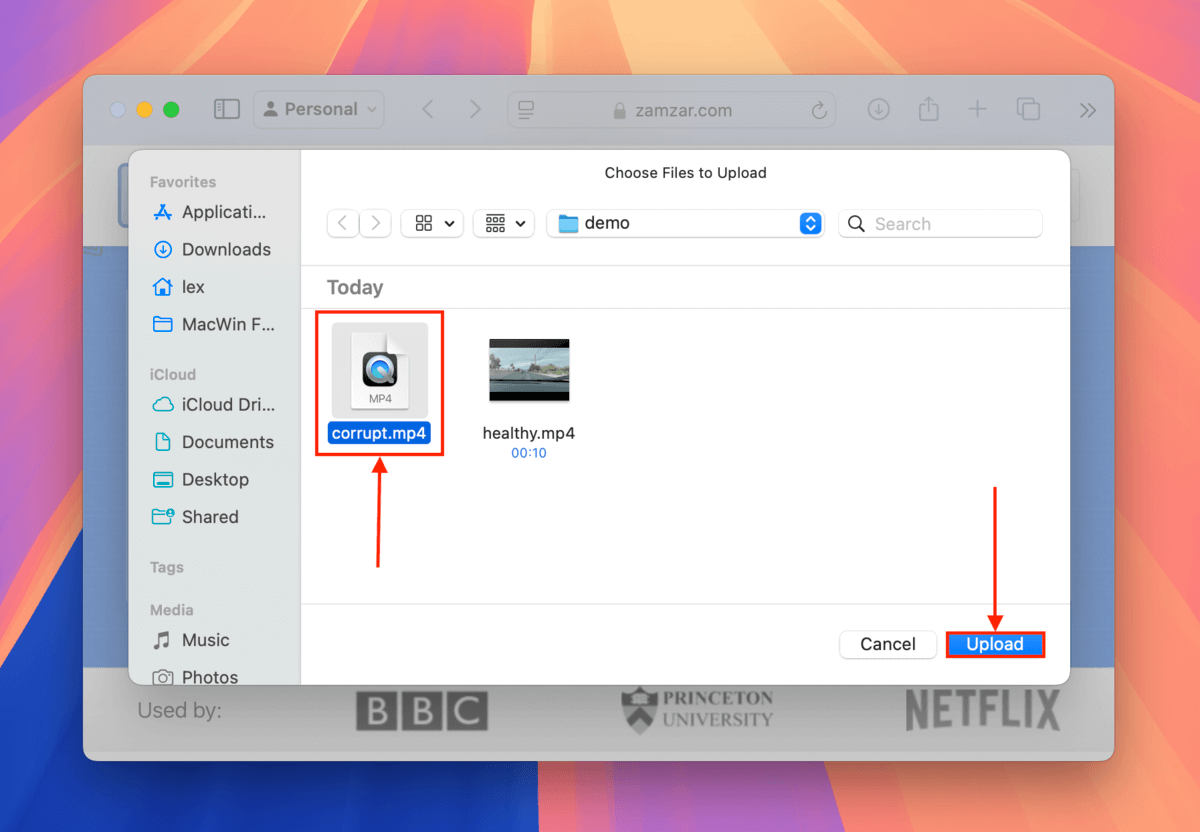
Step 2. Locate your corrupted dashcam video. Select it and click Upload.
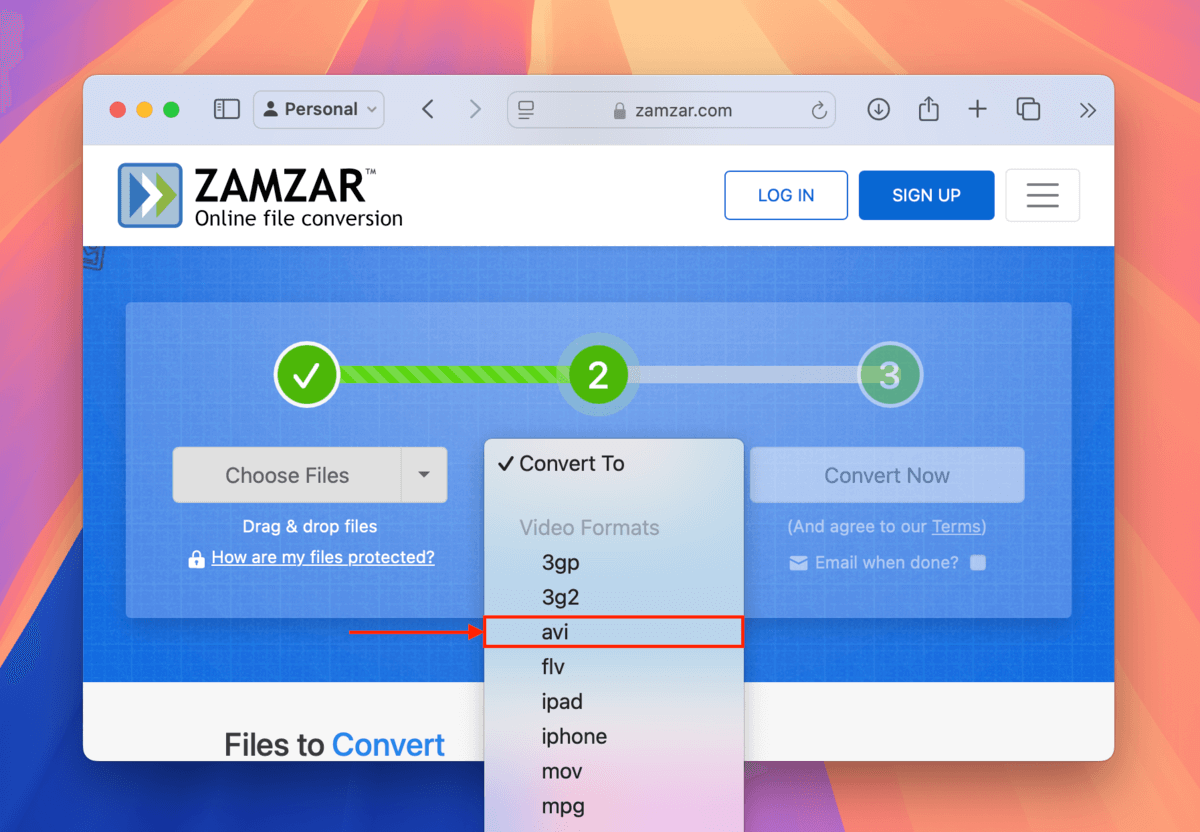
Step 3. Click Convert To and select the file format you want to convert your video to.
Step 4. Once you’ve selected your video’s new file format, click Convert Now.
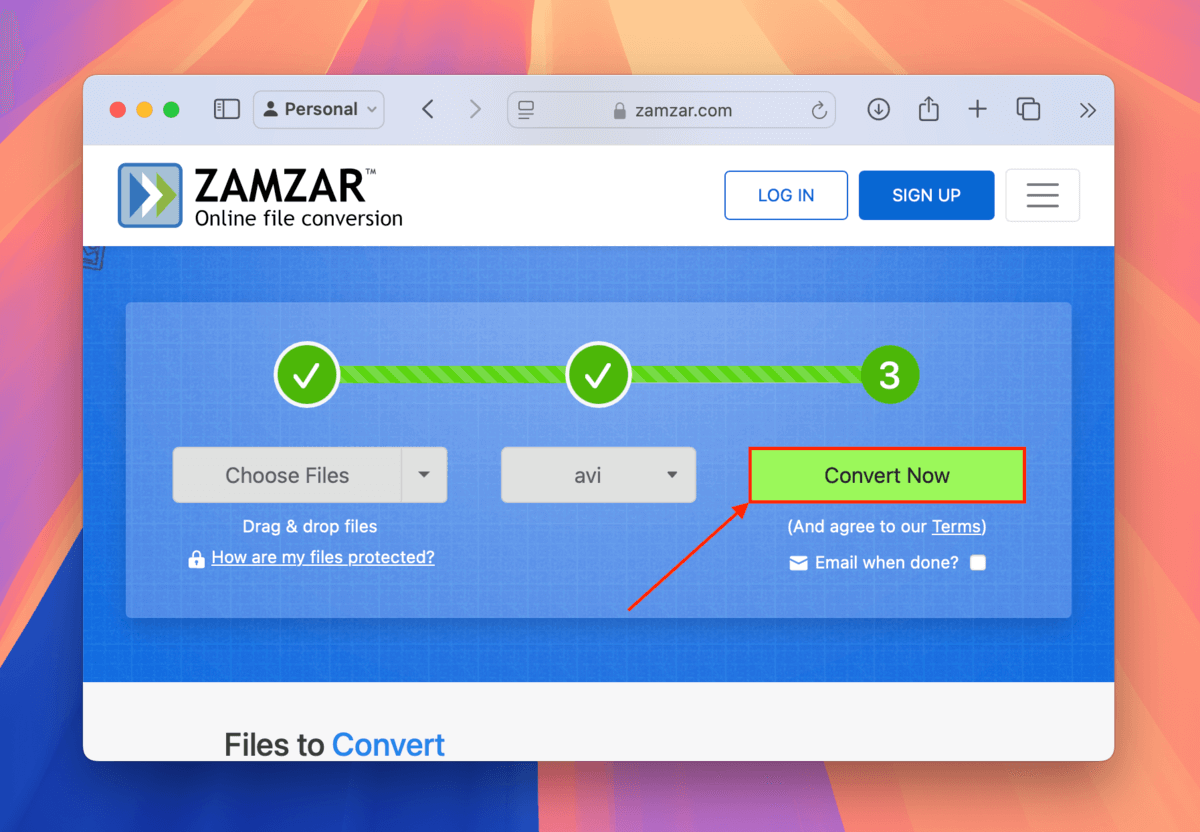
Once the web app is done converting your video, you’ll be able to download it. Try opening it with a media player to see if the conversion was successful in repairing your video.
Option B: VLC Media Player Convert Tool
If your video’s file size is larger than 200 MB and you don’t mind installing a well-known app on your computer, then you can use VLC Media Player’s built-in converter tool.
While this method adds more steps, it’s 100% free to download and you can use it for videos of any file size – you’ll also have more control over conversion parameters, should you desire it. We’ll show you the simplest and easiest way to convert your video using VLC.
Step 1. Download and install VLC Media Player.
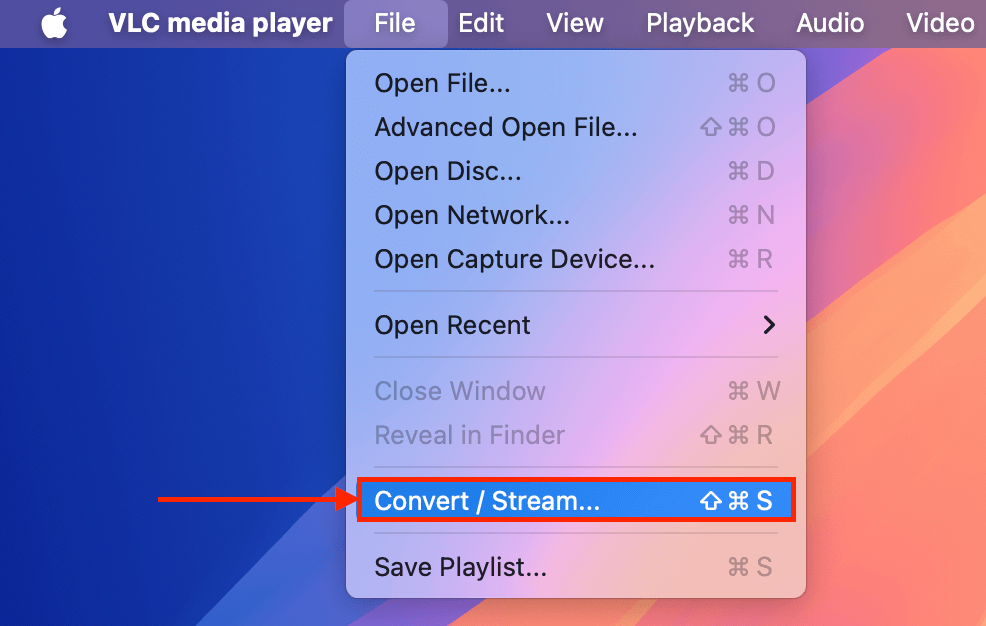
Step 2. Open VLC Media Player. Then, on the Apple menu bar, click File > Convert / Stream…
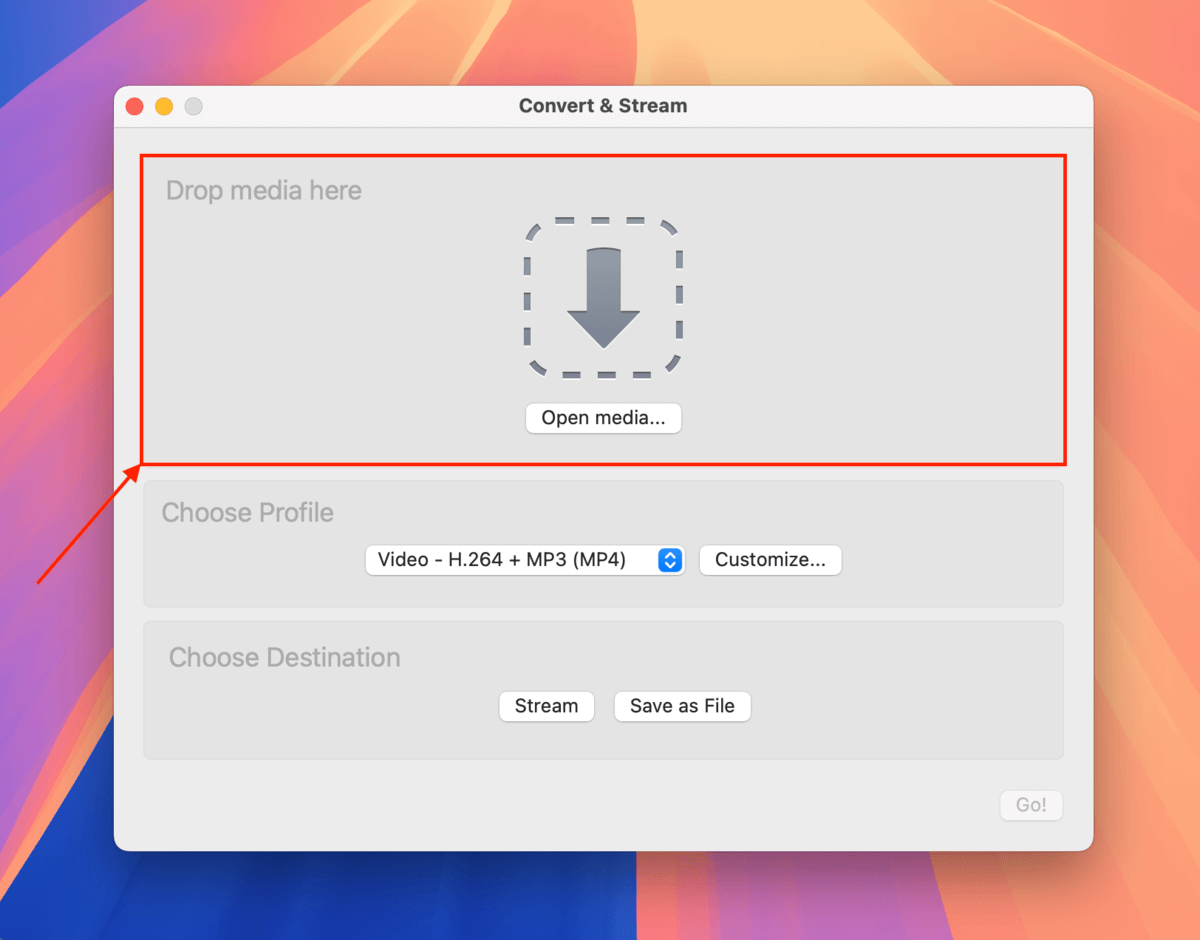
Step 3. Drag your corrupted video into the Drop media here box.
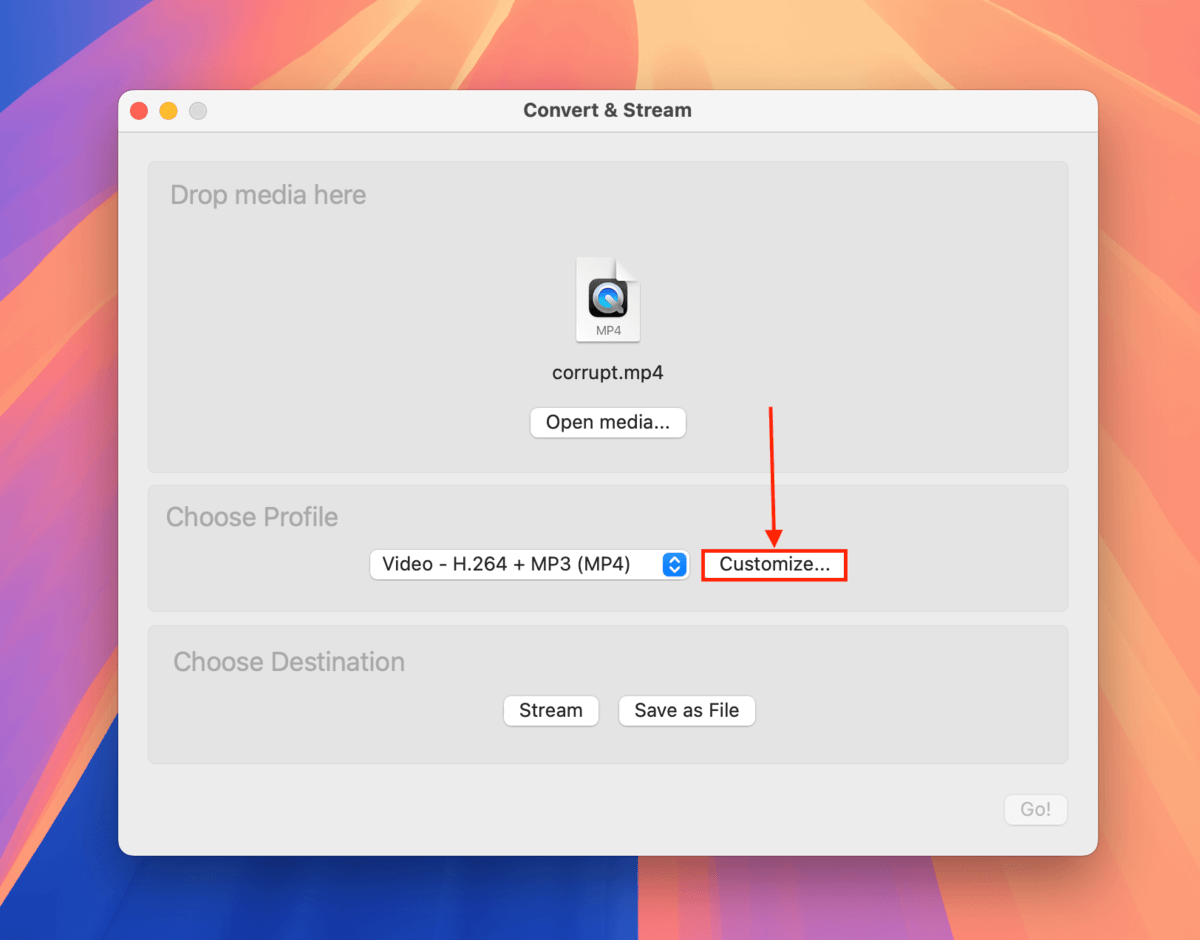
Step 4. Click Customize…
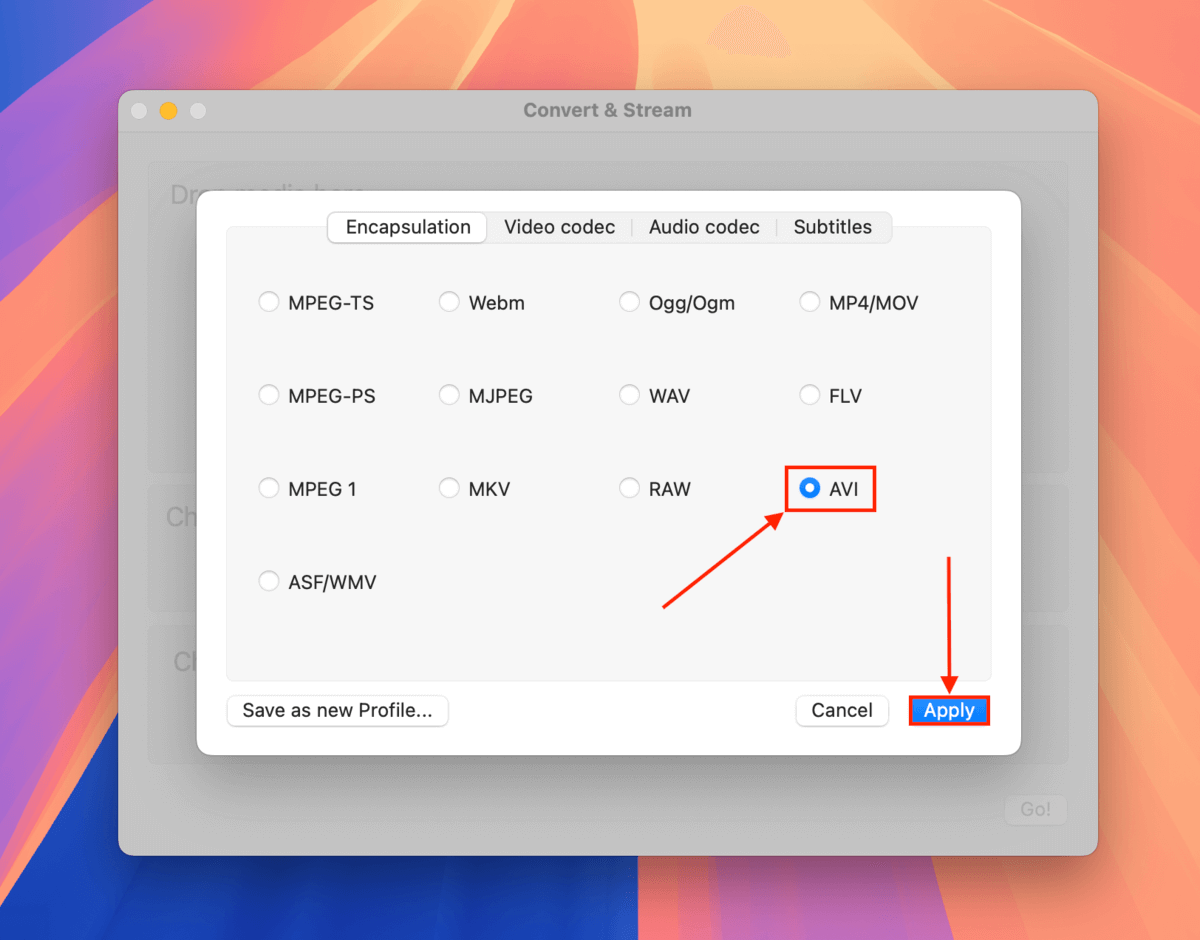
Step 5. In the Encapsulation menu, select the file format you want to convert your video to. Then, click Apply.
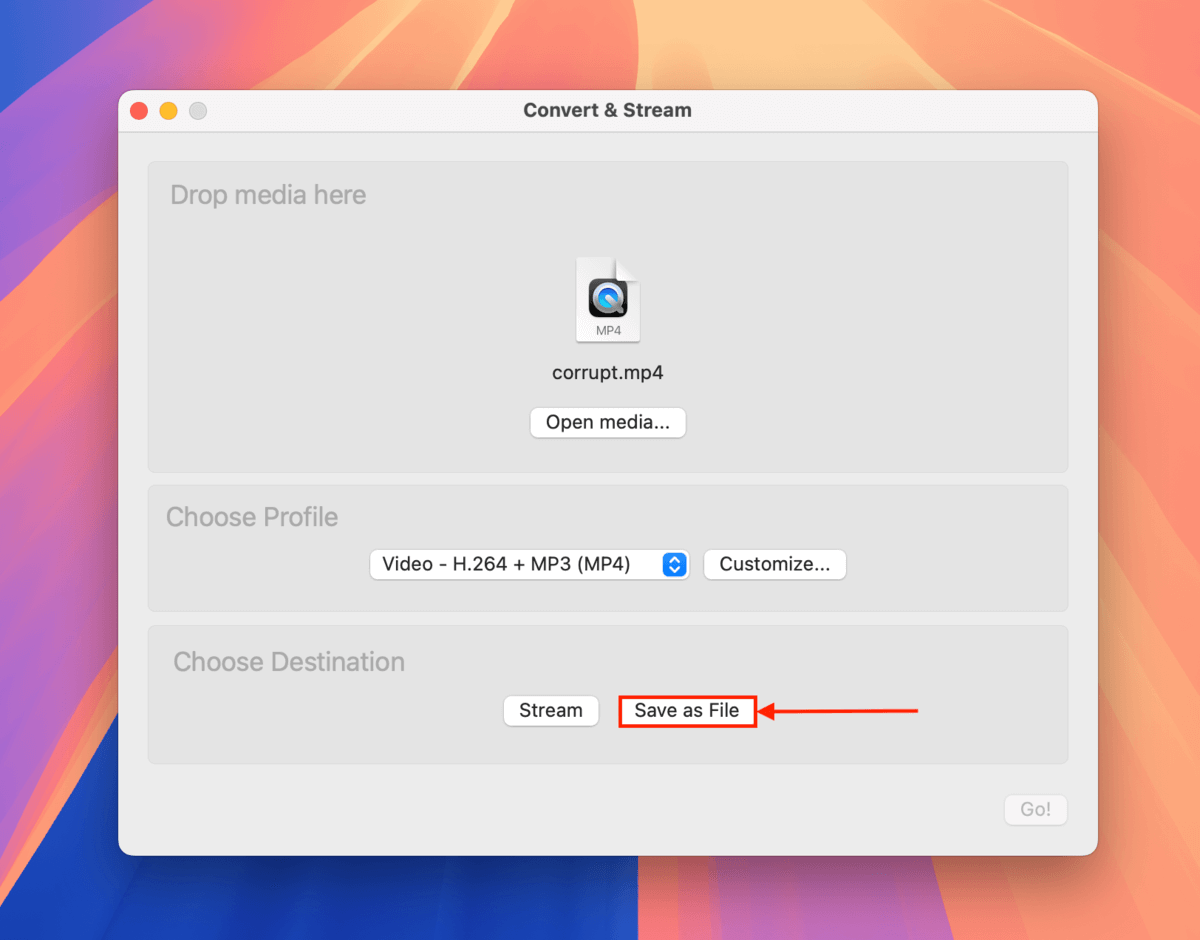
Step 6. Click Save as File.
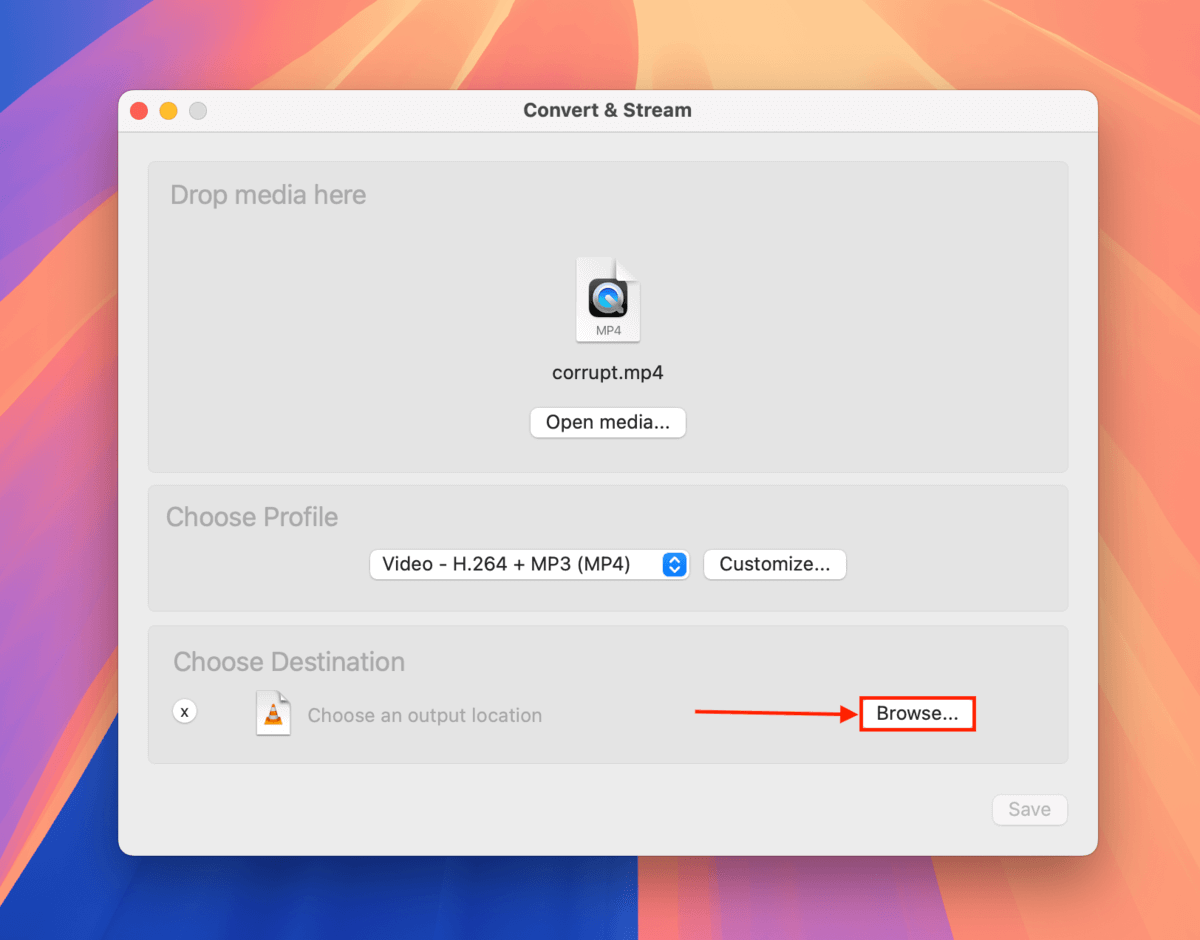
Step 7. Click Browse…
Step 8. Give your converted file a name, tags, and save location. Finally, click Save.
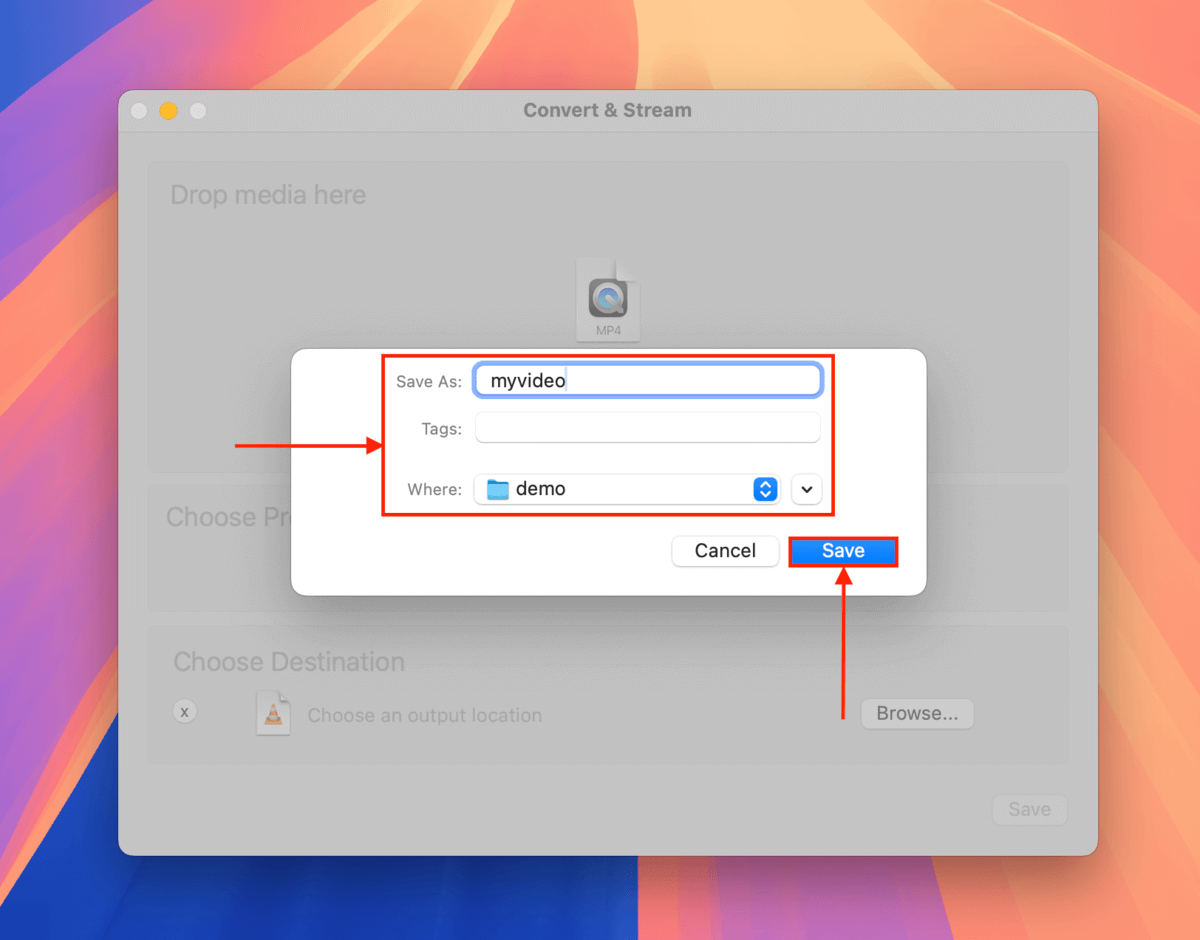
Once you save your file, VLC will commence with the conversion process. You’ll find your newly converted file in the folder you specified in step 8. You can try opening it with VLC.
Fix 4: Re-encode Your Video Using Handbrake
Re-encoding your dashcam video is a similar but more in-depth solution than converting it. While converting a video simply replaces its container (in most cases), re-encoding means that a completely new file will be generated from the raw video and audio streaming data. In other words, it can fix a wider and deeper range of corruption events – such as missing headers and footers, damaged video frames, and synchronization issues.
There are many transcoders you can choose from, but we’ll be using Handbrake for this guide. It’s free, open-source, and has a decent GUI so even beginners can quickly get started re-encoding videos.
Step 1. Download and install Handbrake.
Step 2. Open Handbrake. Then, select your corrupted dashcam video and click Open.
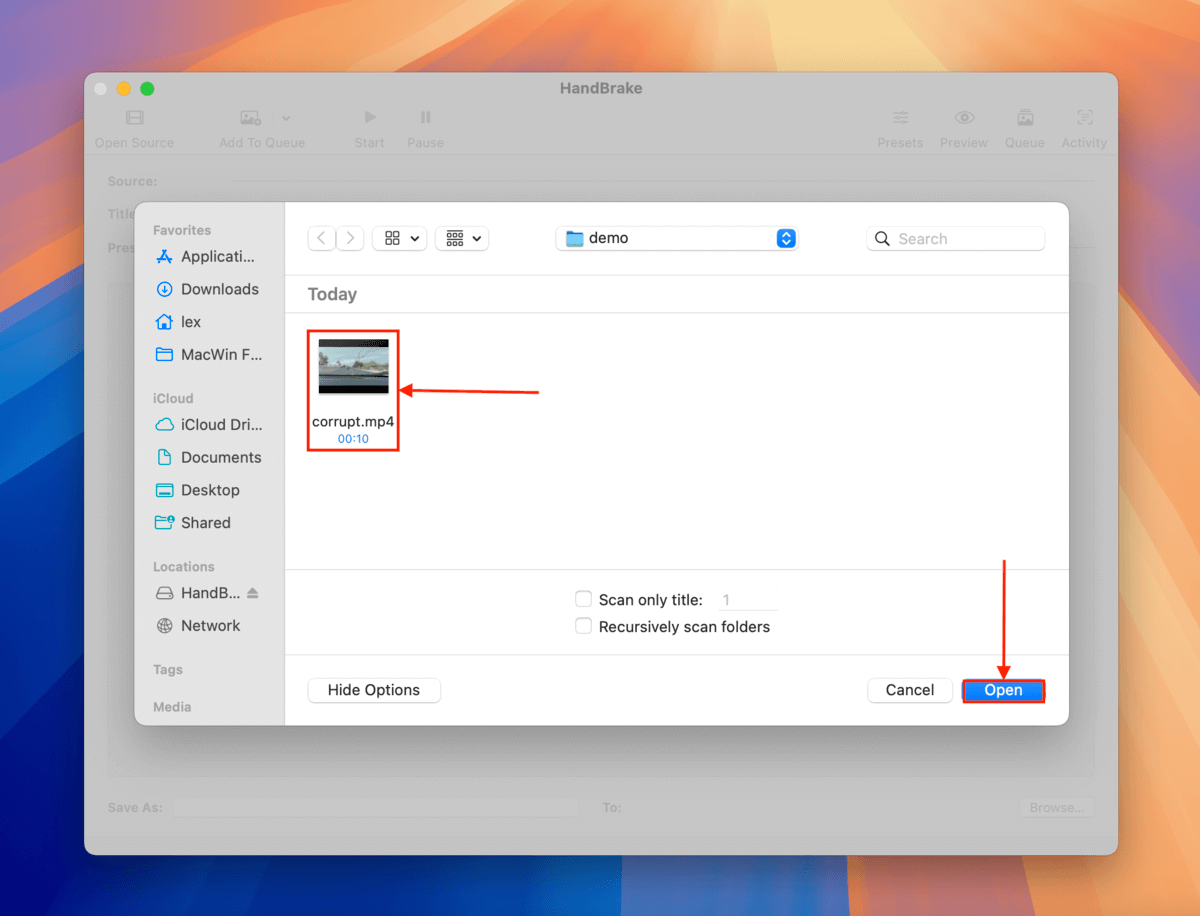
Step 3. Select your file and click Open.

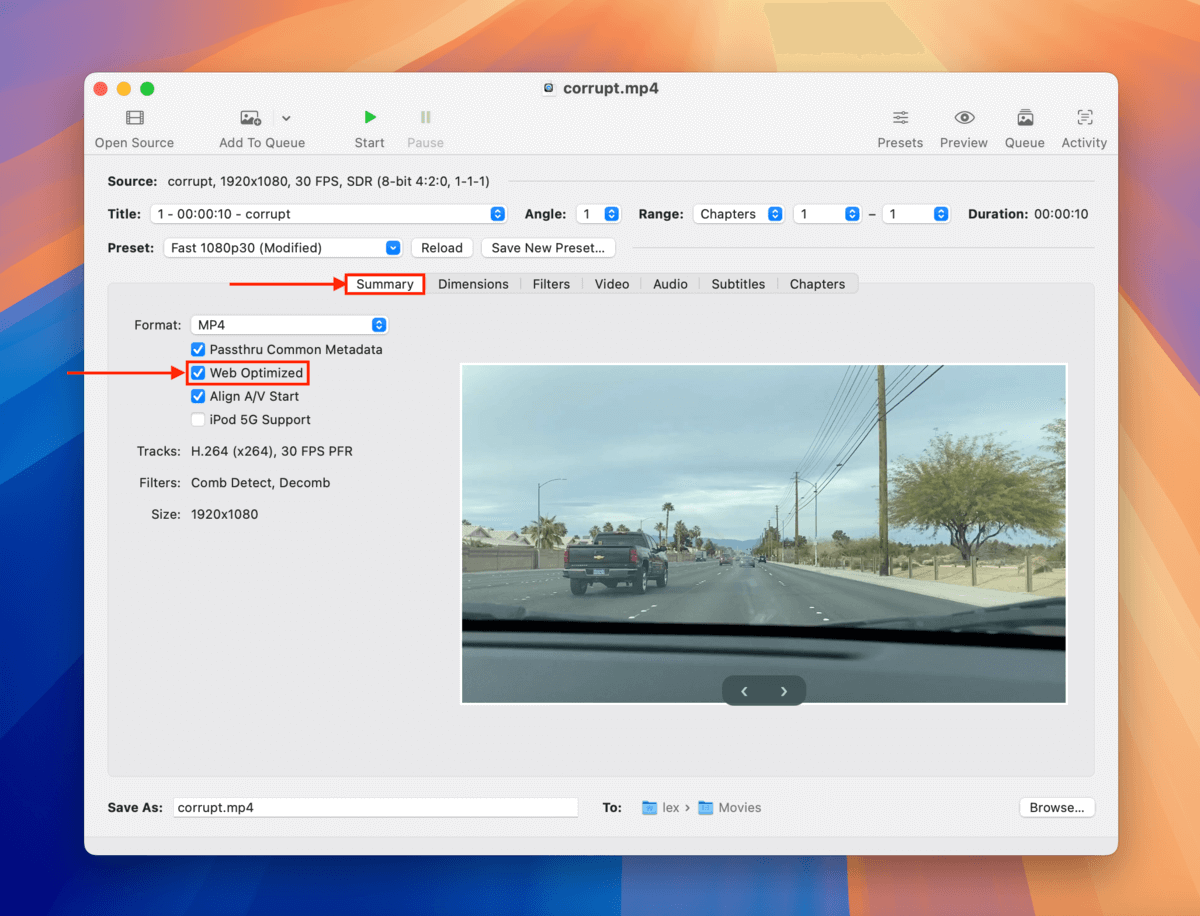
Step 4. In the Summary menu, enable Web Optimized.
Step 5. Navigate to the Video tab. Beside the Video Encoder parameter, click the dropdown menu and choose H.264. Then, click the Browse… button.
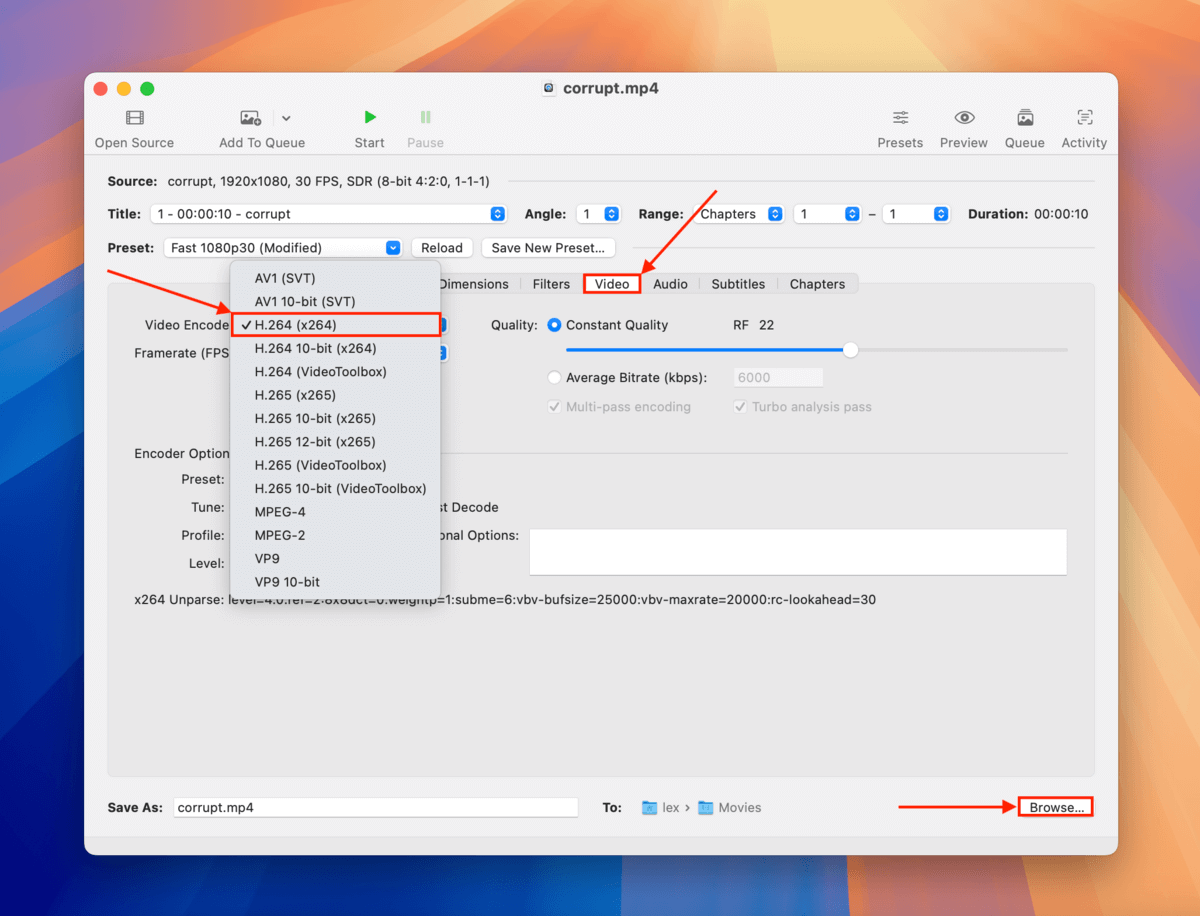
Step 6. Choose a save location for the file once the encoding process is done. Anywhere on your Mac is fine – but you can’t choose the same folder where your corrupted video is stored. Once you’ve made your selection, click Choose.

Step 7. Finally, click Start.
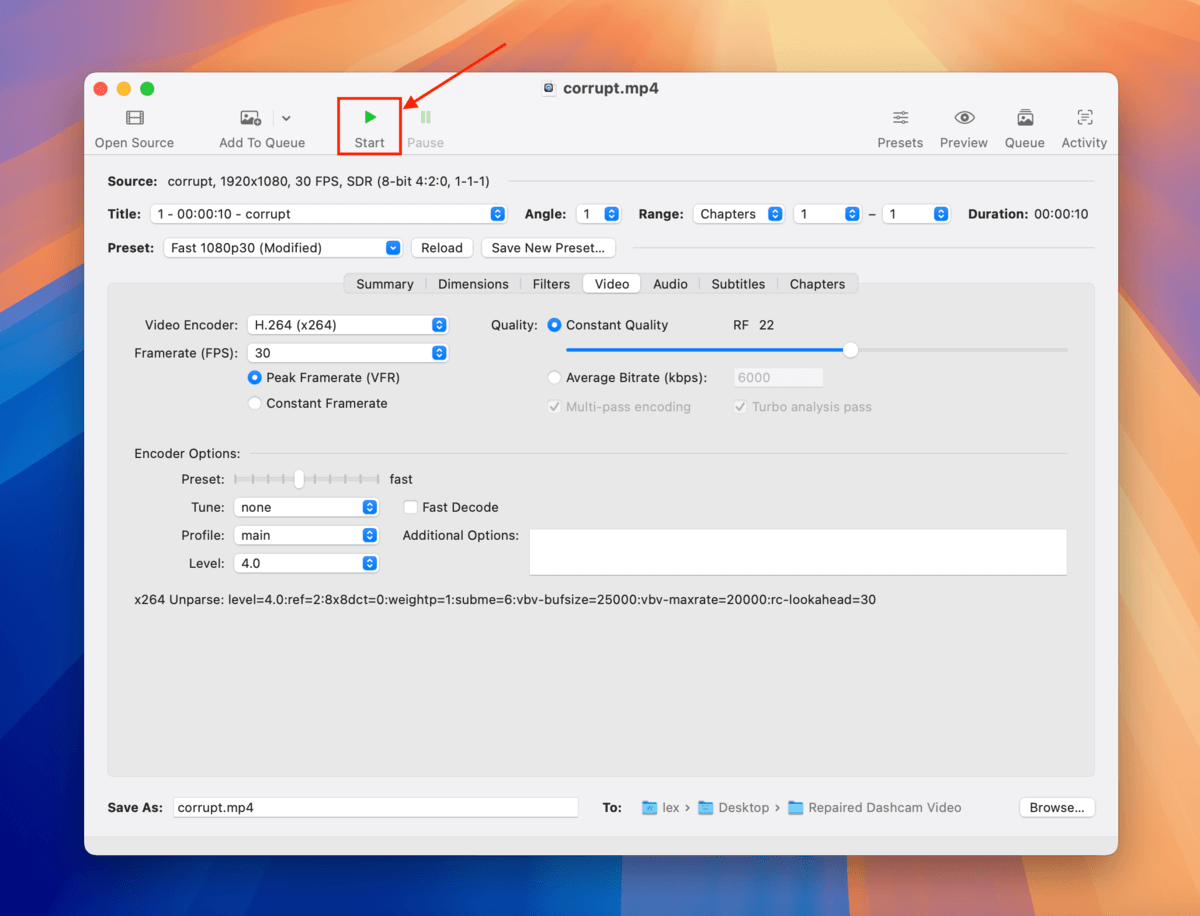
Once Handbrake is done re-encoding your video, you can find the file in the location you selected in step 6. Try opening it with a media player.
Before you go, take these tips with you…
We want to remind our readers how important it is to be aware and mindful of dashcam video corruption. Aside from how easily it happens and how tedious repair can be, dashcam videos can be crucial evidence in case you get into a situation where you need to prove something like a car accident.
With this in mind, try to develop the habit of checking your memory card every time you drive a certain distance (well before storage space runs out) and backing up your dashcam videos as often as you can.


