
Blurry photos are largely unavoidable, especially if you like to take photos of action and moving subjects. Fortunately, even if you were only able to take blurry photos of a specific subject, you don’t have to delete them just yet.
There are different (free) ways to “fix” blurry photos by making them clearer using native features on your iPhone and Mac, as well as third-party apps. This guide will show you how.
As a bonus, we’ll also share some basic tips on how to set up your camera and take photos that minimize blur as much as possible.
Table of Contents
Why are iPhone Photos Blurry
Despite the iPhone’s amazing camera, its technology still has some limitations. For example, it can’t really make up for the lack of good lighting or fully capture a subject that’s moving way too fast.
And there are settings and features that make it possible to capture photos of amazing quality, but also make blurry photos more likely in certain situations. We listed down the most common reasons for blurry photos on your iPhone below:
| Reason | Description |
| 📱 iPhone movement | Cameras also capture light when taking a photo and movement can cause light to hit different parts of the sensor. This results in a blurry photo due to differences in exposure. |
| 💡 Insufficient lighting | Cameras need good light to capture a clear and detailed image. Insufficient lighting can result in a blurry or “noisy” picture. |
| 💫 Motion blur | Motion blur occurs when a subject is moving too fast for the camera’s shutter speed. As in, the subject will already be in a different position before the camera can capture it fully. |
| 🔎 Zoom | When you zoom your iPhone’s camera (or zoom in on a picture), it crops the image to the focus area and artificially enlarges it by using software to add new pixels. While these pixels are based on the original image, it lacks authentic detail – this is why the iPhone camera is blurry when zoomed in. |
| 🎯 Focus issues | The focus tool ensures that the subject’s lighting is perfectly captured by the camera’s sensor, which will enable it to capture all the small details that result in a sharp photo. Improper focus results in a blurry photo. |
| 📷 Dirty lens | A dirty camera lens may capture the dirt instead of the intended subject or may cause the camera to focus on the wrong thing, which causes blur. |
| 🔢 Burst mode | Burst mode captures multiple photos in quick succession. Slight variations may occur between shots, resulting in blur. Users also need to hold down the shutter button to use Burst Mode, which increases the likelihood of camera movement during shots. |
| 🔁 Data transfer | Depending on the app you use to send or receive photos, it may automatically compress your images to make it smaller (which makes it easier and faster to send and consumes less internet data). This usually means a decrease in quality, which is why some users end up receiving blurry pictures on their iPhone. |
| 📸 Shutter speed | If you shoot with a low shutter speed, there are more chances for changes to occur in the image (light hits differently, subject moved, etc.) before the shutter process is complete. This prevents your camera from fully capturing a single, crisp image. |
| 📼 Low camera resolution | If you’re using an older iPhone, it lacks the technology that modern devices use to capture high quality photos. |
| 🕷️ Bugs | Software issues on your iPhone can cause issues with image processing. |
How to Fix Blurry Photos on iPhone
You can unblur a picture on an iPhone by “sharpening” it. Sharpening an image boosts its edges and fine details, which makes the human brain interpret the photo as “clearer.” There are 3 ways you can fix blurry photos on an iPhone by sharpening them – we’ll go through each method below.
Method 1: Use the Photos App
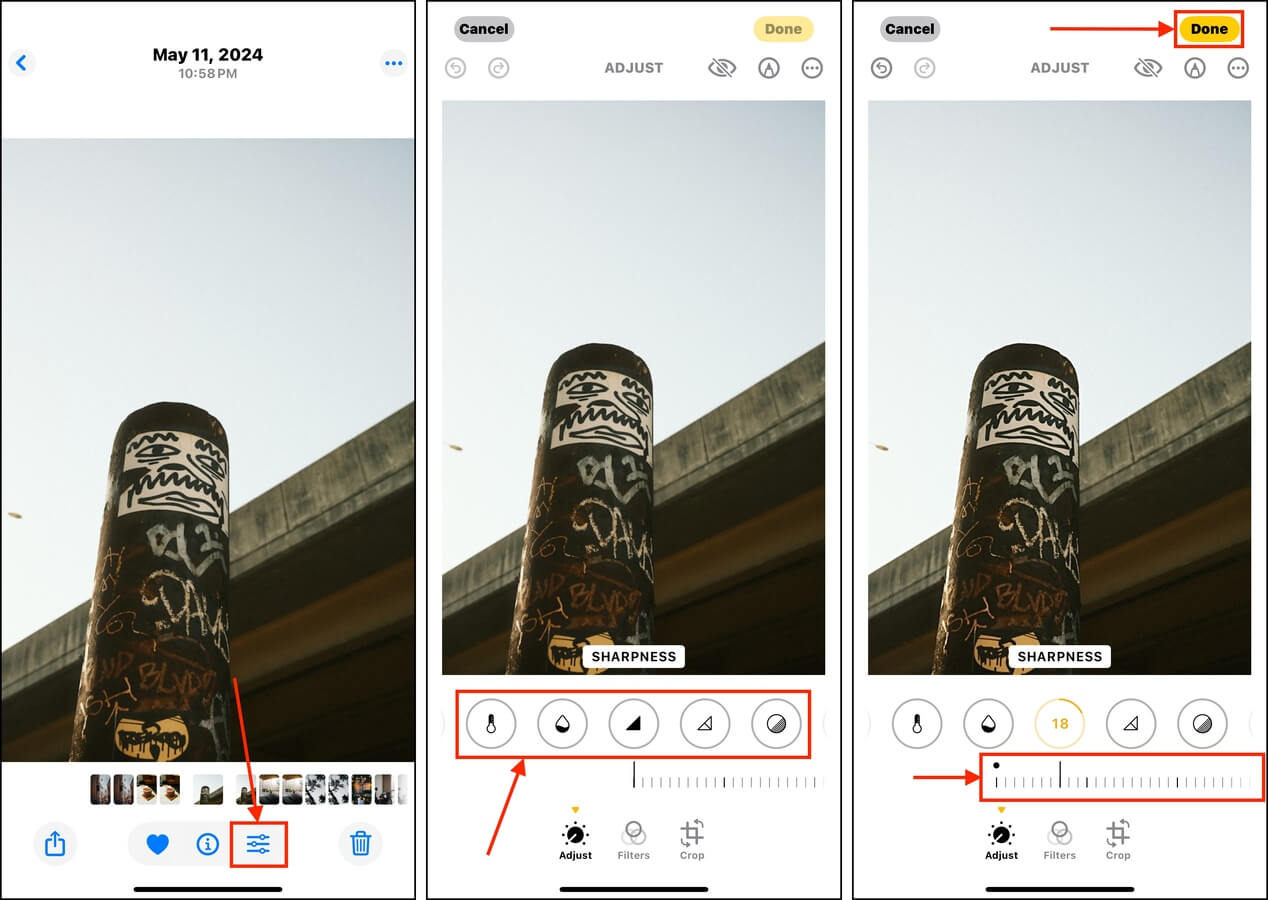
The easiest way to sharpen an image is to use the native Photos app, which has its own dedicated sharpening tool. We’ll show you how to use it step-by-step in the guide below.
To fix blurry photos on your iPhone using the Photos app:
Step 1. Open the Photos app and locate the blurry image you want to fix. Then, and tap the edit button.
Step 3. Swipe left on the editing tools (the round icons below the image) until you select the SHARPNESS tool.
Step 4. Adjust the slider below it to increase the sharpness of your image. Once you’re satisfied with the results, tap Done.
Method 2: Use a Third-Party Photo Editing App
If the native Photos app editor does not provide the results you want, consider using third-party photo editing apps. There are dozens on the App Store that provide sharpening tools, filters, and enhancers that might perform better than the native app (depending on the original photo).
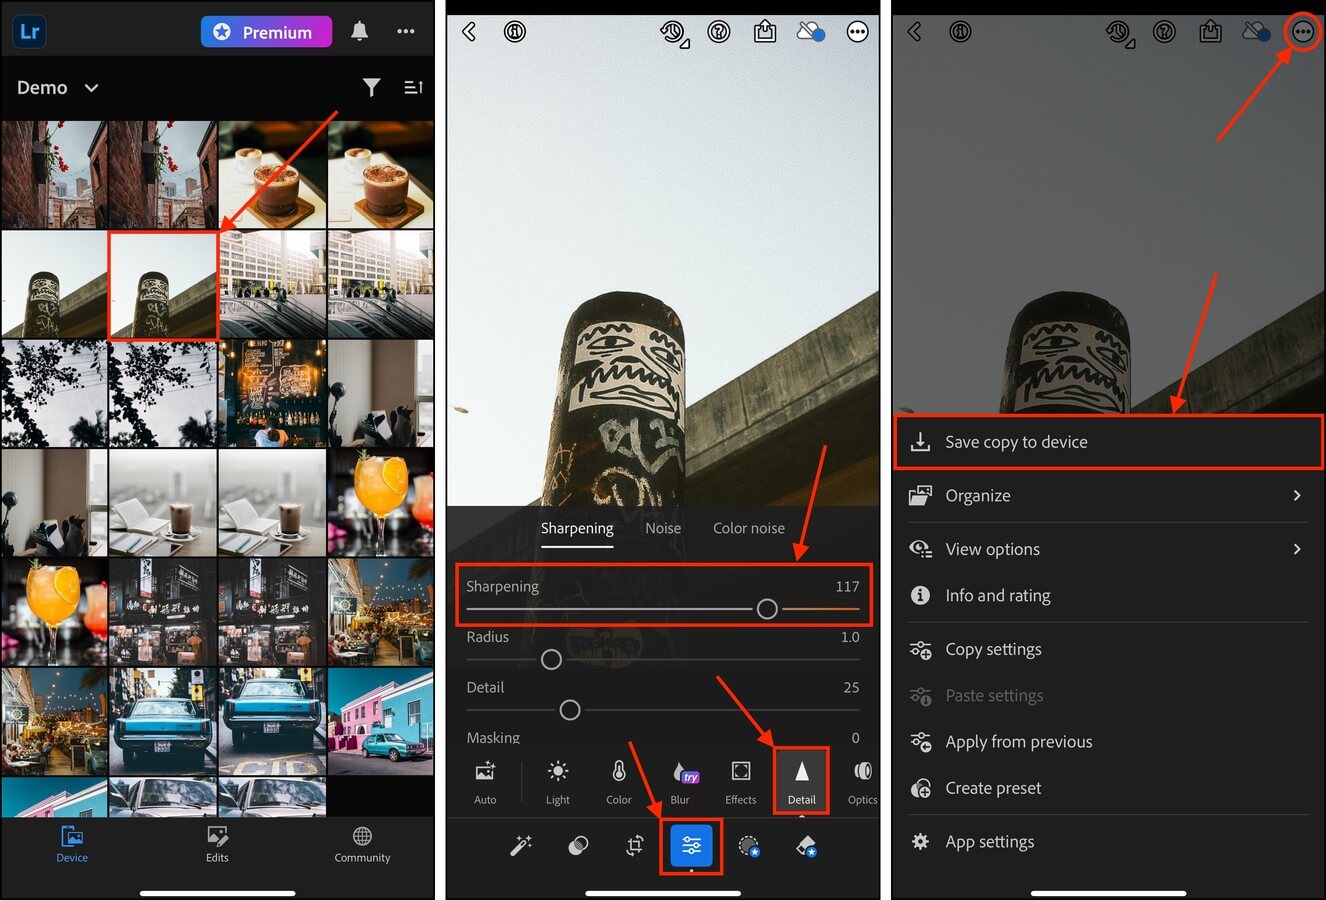
We’ll be using Adobe Lightroom for this demonstration. It’s well-known, easy to use, and the free version provides full access to the sharpening tool without having to subscribe to a trial.
Step 1. Download Adobe Lightroom from the App Store. Then, open it and permit Full Access to your library (feel free to skip the free trial—you won’t need it to sharpen images). Once Lightroom loads all your images, tap one you want to sharpen.
Step 2. In the bottom menu, tap the Edit button and select Detail. The Sharpening tool will be selected by default—drag the slider until you achieve the level of sharpness you want.
Step 3. Finally, tap the kebab menu button in the top right corner of the screen and select Save copy to device.
Adobe Lightroom is super well-known, but it’s not the only photo editing app that can achieve this effect with their own unique features.
Method 3: Fix Your Pictures on Mac
Just like the iPhone, Mac also has its own native Photos app (which is technically the same program). It provides a sharpening tool as well, which is further improved by the AUTO feature – with a click of a button, macOS will automatically set your image’s sharpness parameters to optimal levels and try its best to remove blur. We’ll show you how to use it.
To fix blurry iPhone photos using the Photos app on Mac:
Step 1. On your Mac, launch the Photos app (Finder > Applications).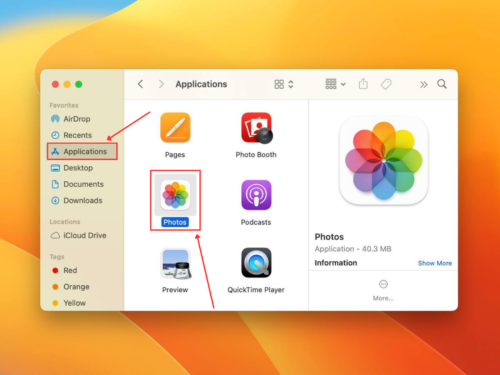
Step 2. Double-click the blurry photo you want to edit. Then, click Edit.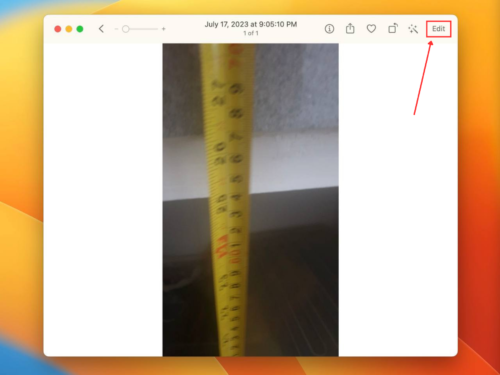
Step 3. On the right sidebar, scroll down to the bottom of the ADJUST menu and the expand Sharpen tool.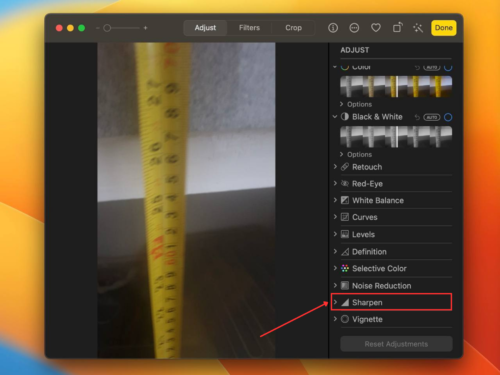
Step 4. Adjust the parameters to increase the sharpness of your photo until you’re happy with the results. Alternatively, you can click the Auto button beside Sharpen to have Apple automatically optimize the parameters for you.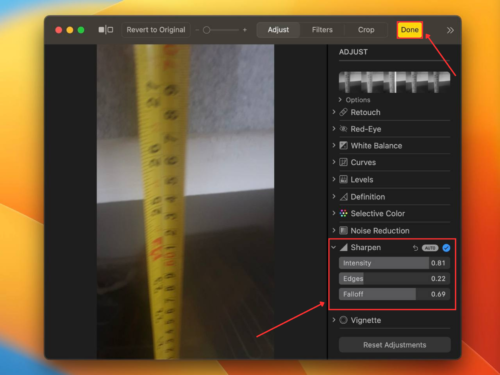
How to Remove Blurry Photos From Your Library
It’s common to have several blurry photos as part of a set when you’re taking multiple rapid shots of the same subject. For example: out of 10 shots, there may be occurrences of motion blur, iPhone movement, or focus issues.
After using the methods in the last section to sharpen the best photo out of the set, the next step is to get rid of the rest of the blurred photos. You can do this manually, but if you have a lot of photos to clean up, we recommend using a third-party app.
Unfortunately, even if you tried to capture the same subject, blurred photos are not flagged by iOS as duplicates. This is why third-party cleaner apps might be better—because these apps use their own algorithms, which are designed to identify similar photos, even if they aren’t exact duplicates (E.g., blurred photos of the same subject).
Step 1. Download Clever Cleaner: AI Cleanup App from the App Store on your iPhone. Open it and grant full access to your library. Once Clever Cleaner is done scanning your device, tap Similars on the bottom menu. Then, tap a set of similar photos you want to review.
Step 2. The app will automatically select the best photo for you and mark the others for deletion, but you can modify the selection manually. Then, tap Move to Trash.
Step 3. Finally, tap Empty Trash in the pop-up at the bottom of the menu to permanently delete the selected photos.
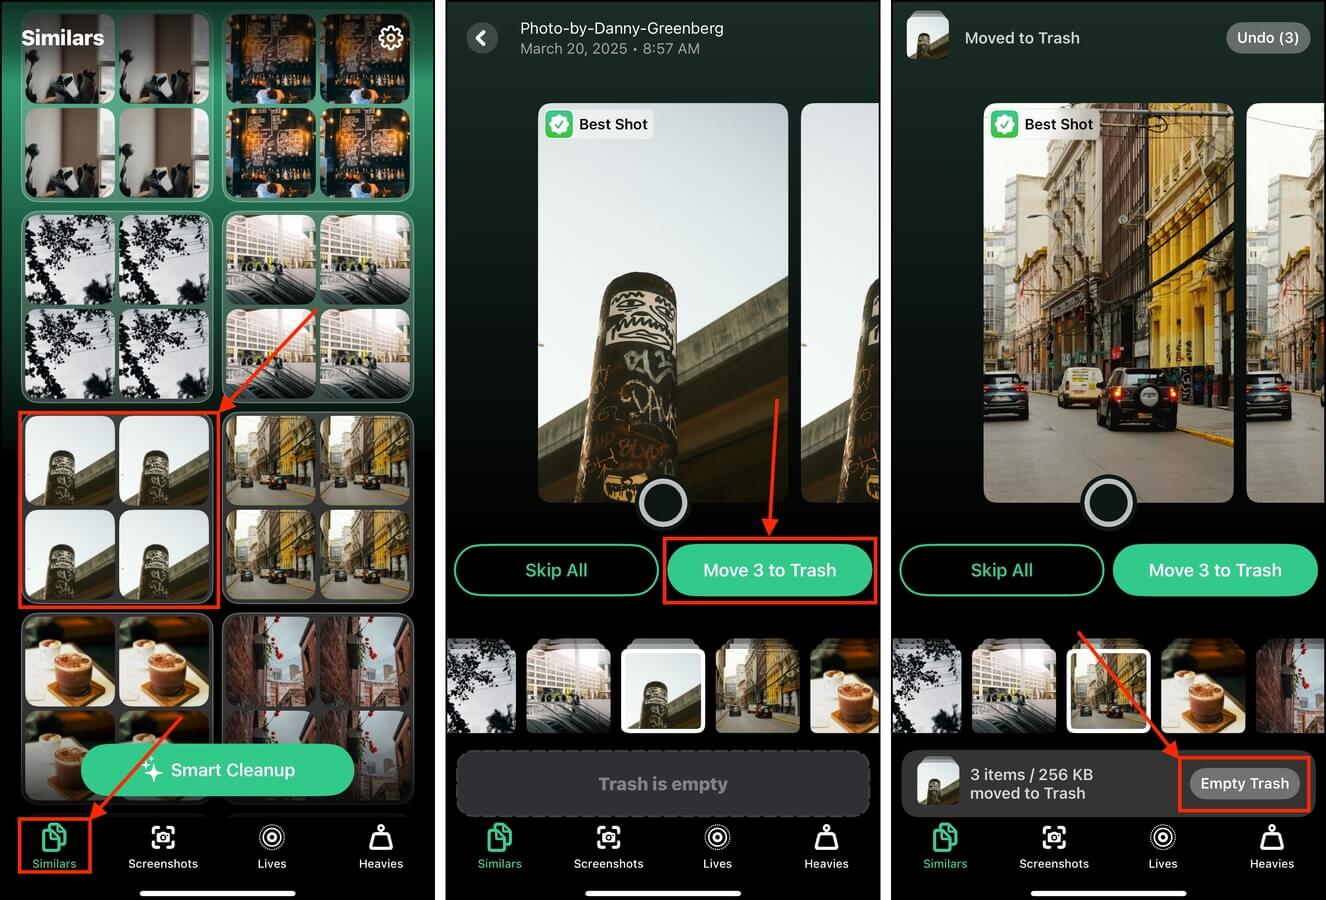
If you want to review the photos in the Trash menu before deleting them permanently, tap the pop-up itself (avoiding the Empty Trash button).
How to Take Clear Photos on iPhone
There are 2 ways to ensure that the iPhone photos you take in the future are always clear and high in quality: (1) use the right settings and (2) learn basic good practices for taking photos.
We’ll walk you through both of these topics in the sections below.
Useful iPhone Camera Settings
You can make huge improvements in the quality of your photos just by enabling the right settings on your iPhone. These settings are located inside the camera app and are available while you are shooting. Try to experiment to find the combination of settings that is just right for you.
- Focus: iOS automatically attempts to focus the correct subject, but you can manually set focus by tapping on your subject on the screen. Focus is an easy way to quickly get rid of blur.
- Exposure: Tap on the screen and slide your finger up and down to manually adjust your iPhone camera’s focus.
- HDR (High Dynamic Range): HDR captures more light and shadow details, especially in undesirable lighting conditions. This results in a much clearer image.
- Grid: Enabling the grid feature displays grid lines on-screen while shooting. This is super helpful for composing your shots.
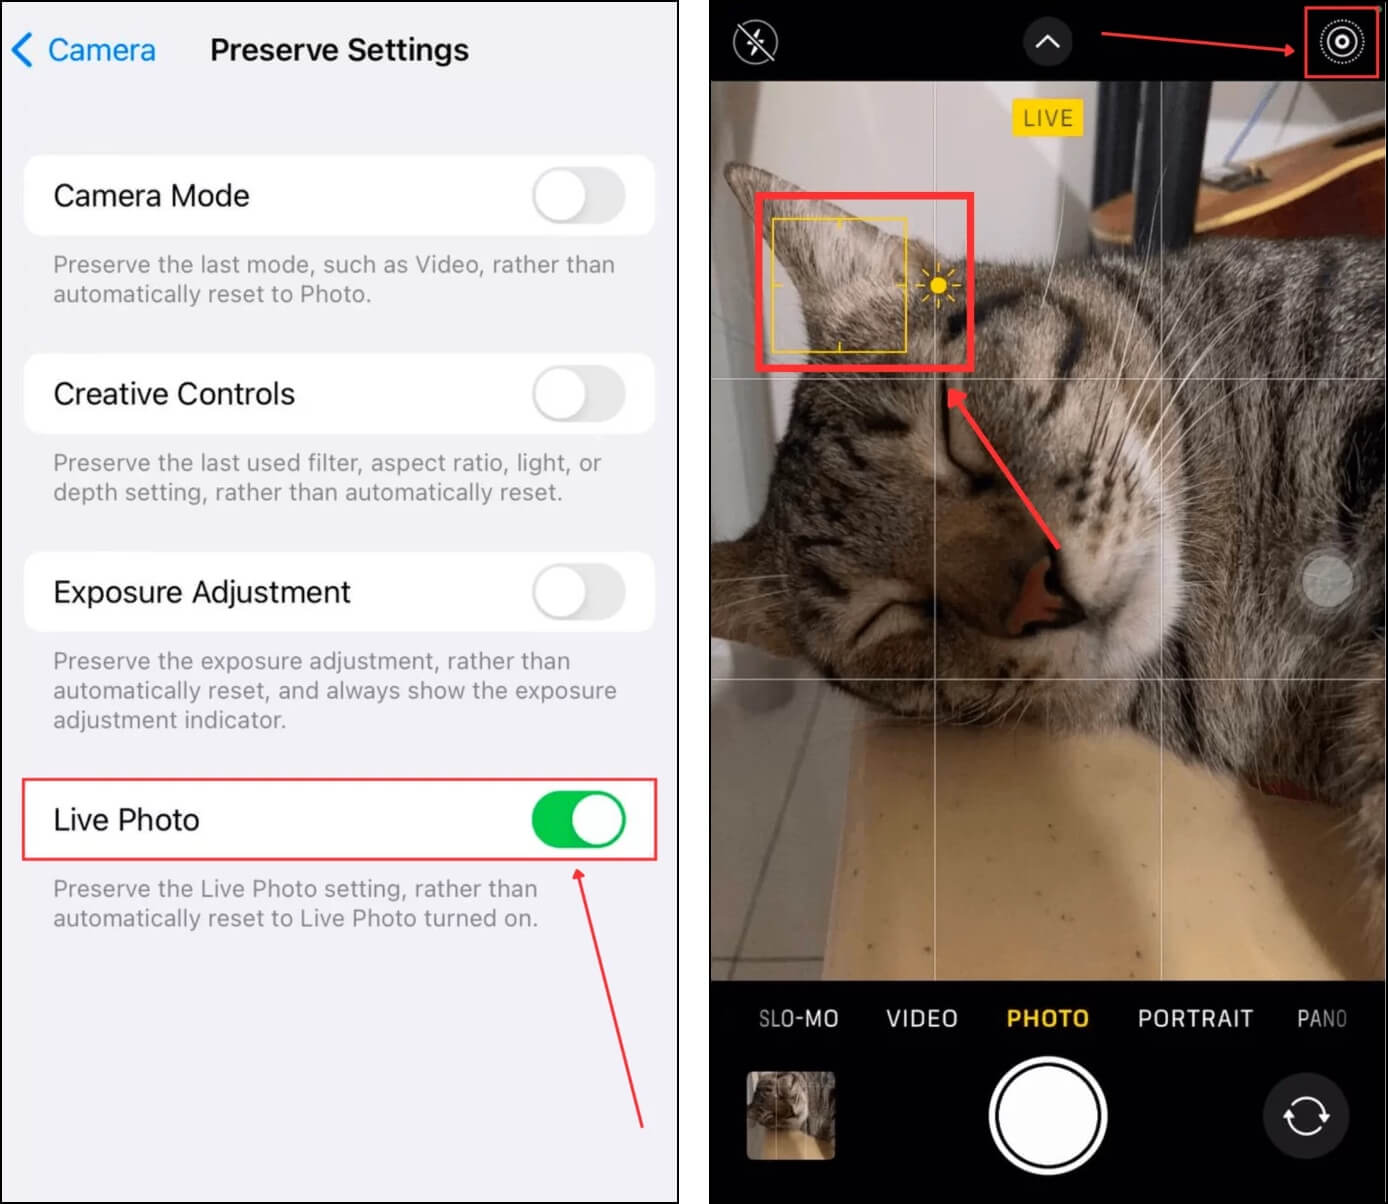
- Live Photo: Live Photos can help you produce much clearer images because (1) it uses image stabilization techniques, which helps reduce blur and improve low lighting environments, and (2) you can pick and choose the best photo from a set of photos.
- Portrait Mode: Portrait mode sharpens your photos by creating a separation between your subject or focus point and the background. It may also blur the background slightly to bring your subject further into focus.
- Image Format: Default iPhone image formats are HEIF and JPEG. HEIF is typically higher in quality, but it’s less compatible with other devices compared to JPEG.
How to Take Good Photos
Aside from using your iPhone camera’s advanced settings, your actual shooting technique greatly affects the quality of your photos. You don’t need pro skills to snap clear pictures, but there are a few simple steps you can take to make sure you consistently crisp images.
These steps are the VERY basic (for reasonably crisp photos), so use them as a foundation for learning more iPhone photography techniques.
To take clear and high quality on your iPhone:
Step 1. Before taking out your iPhone, make sure you’re in a place with good lightning.
Step 2. Enable Live Photo in the Preserve Settings menu (Settings app > Camera > Preserve Settings).
Step 3. Open the Camera app and point your iPhone’s camera to your subject. Tap the screen on your focal point and drag your finger up and down to adjust the photo’s exposure. Then, hit the shutter button without moving the iPhone.
Is Burst Mode Creating Too Much Clutter?
Burst Mode can be a massive contributor to blurry photos in your library. Even if it captures photos really fast, micro-movements from the subjects or the camera person can cause blur in some of the shots. If Burst Mode is creating more troubel than it’s worth for you, we recommend disabling it.
This can be a bit more confusing than it should be because Burst Mode can be set up and disabled in different ways depending on your own camera settings. To help you, we wrote a guide on the different ways to turn off Burst Mode on an iPhone–which also includes a section on how to get rid of Burst photos efficiently.
FAQ
To get better quality photos on your iPhone 13, here are 4 basic tips:
- Maximize the camera app’s features and settings. Experiment with them and find the best combinations for your preferences.
- Make sure that you have a lot of good quality lighting. Natural lighting is always best.
- Keep a steady hand when taking pictures – better yet, use a tripod.
- Use a photo editing app or a photo enhancer app to improve your photo’s quality once it has been captured and saved.
To unblur a screenshot on your iPhone 11/12/13, you have 3 options:
- Enhance a blurry photo on your iPhone using the sharpening tool in the Photos app.
- Fix blurry iPhone photos by using the sharpening tool in your Mac’s Photos app.
- Use a third-party app to fix blurry pictures.


