
Ejecting a hard drive from Mac seems straightforward, but there are a couple of things you should know. First, there’s a right way to do it – there are a few right ways, actually. But doing it the wrong way seriously risks your data.
Second, there are certain cases where you’ll be unable to eject it. You still can’t just yank it out, because that might corrupt your data. Instead, we compiled a list of proven methods to fix this problem as safely as possible. Third, if you already lost data, there’s still hope if you act fast. Follow our data recovery guide below.
Table of Contents
What Does Eject Mean on Mac
To eject is to safely unmount your external drive to protect your data and the drive itself. When you eject your drive, you tell the operating system to finish any read or write operations (and post-operations) and to prepare the drive for safe removal.
Why is this important?
When transferring data, macOS uses a feature called “write cache” where it first saves the data to memory and continues with the transfer in the background. This means that a completed “write” process doesn’t always mean a completed transfer.
When that gets interrupted, corruption isn’t just possible… It’s likely. This is why proper ejection is crucial.
Why Does Message “Disk Not Ejected Properly” Appear
If, for some reason, your drive wasn’t ejected properly, macOS will prompt you with the error: “Disk Not Ejected Properly.” You can usually attribute this error to one of these 4 possibilities:
- Human Error. You forgot to eject your drive when you disconnected it, or you unplugged it too early.
- Drive running in the background. A program or an application may be running your drive or any of its stored files. For example, you left a Word document open, your operating system may be indexing files, or you may be saving your backup to your external drive.
- Logical damage. Malware infection and corruption may cause your drive to behave in unpredictable ways.
- Random self-ejection. Defective external drive cables and ports, deteriorating external drive, or faulty power supply could randomly eject your drive from your Macbook.
- Mechanical issues. Your external drive’s cable may be loose in the drive’s port or your PC’s port, which may cause your drive to disconnect itself suddenly (even without being ejected). Try using another cable or PC port.
- Physical damage. Your hard drive may be physically damaged, causing it to act unpredictably. In this case, we strongly recommend that you send it to a professional data recovery service. They have special tools and facilities that allow them to recover files from physically damaged storage devices without further damaging the data.
What is the Eject Media Button and How Does it Work?
The Eject Media button is a physical button found beside the F12 key on 2012 MacBook Pros – and earlier models – that had a built-in optical drive.
There is no media eject button in the MacBook Air M2 or any other MacBook version without built-in optical drives. There is also no eject button on MacBook Pro touch bars, which were released after optical drive Macs were discontinued.
The purpose of the Eject Media button is to push the optical drive’s tray outside the MacBook’s body so users can place or remove CDs and DVDs.
Unfortunately, the Eject Media button was never designed for ejecting hard drives and there is currently no official way to make it do that.
How to Eject External Hard Drive on Mac
If you don’t safely eject the hard drive from Mac, you can disrupt any ongoing processes in the background–which can corrupt the file system of your drive itself. When this happens, you may need to format your drive to return it to a usable state. To safely eject hard drive from Mac, you can use any one of the methods below:
Method 1: Eject Disk From the Desktop
If you set your MacOS to display external drives on the desktop (Finder > Preferences), you can eject your drive from there. Here’s how:
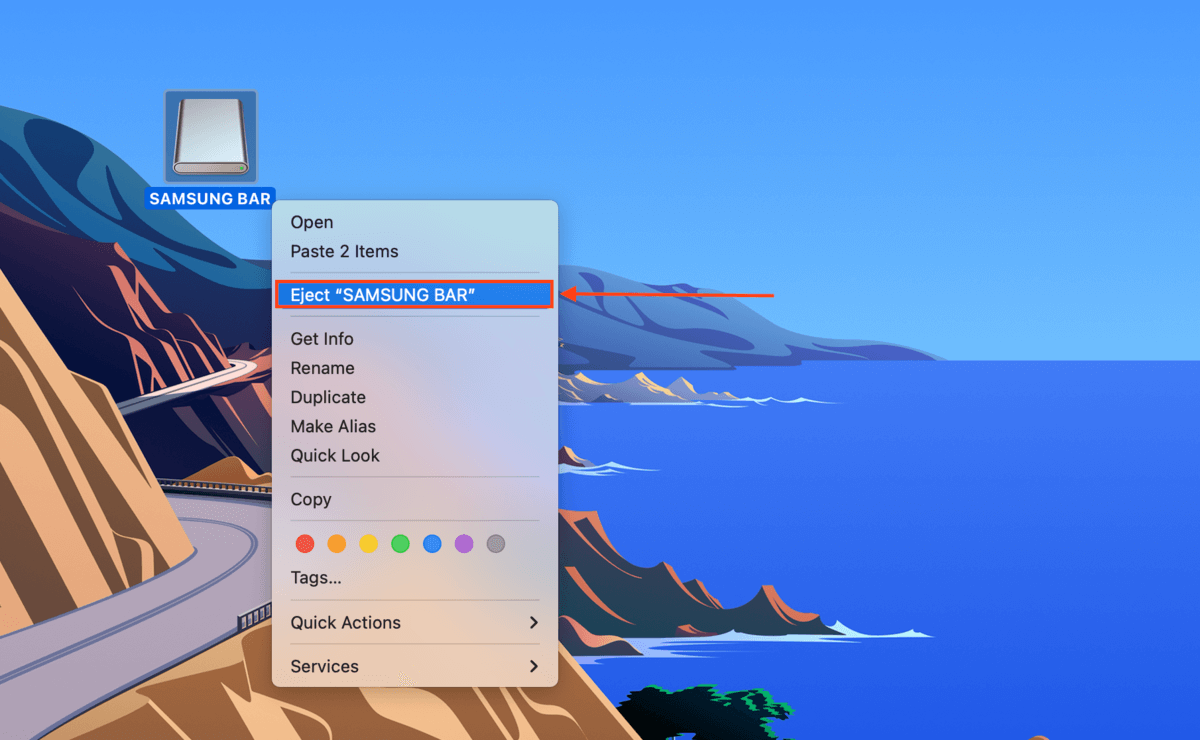
Step 1. Right-click your drive on your desktop.
Step 2. Choose “Eject (Drive Name)” and wait for the icon to disappear from your desktop before you disconnect your drive.
Method 2: Drag External Hard Drive to Trash
The Trash icon on your Mac’s dock also acts as an eject button – it actually changes its appearance once you start dragging a drive towards it.
To do it, simply click and drag your drive from the desktop towards the Trash icon on your dock, which should now look like an eject button.
![]()
Method 3: Use Command + E
For those who love their keyboard shortcuts, you can also hit (CMD + E) to eject your drive. Just wait for the drive to disappear from your desktop or from Finder before disconnecting it physically.
Method 4: Eject Device From Finder
If you haven’t enabled or don’t prefer to display your external drive on the desktop, you can eject your drive from Finder. On the left sidebar, simply click the eject button next to your drive.

Method 5: Eject Device Using File Menu
If you don’t allow macOS to display your drive in the Finder sidebar, you can still use Finder’s File Menu to eject it. Here’s how:
Step 1. Select your drive on your desktop
Step 2. Open Finder and click “File” on the Apple menu bar.. Then, select “Eject” and wait for the USB icon to disappear.

What to Do if You Can’t Eject the Drive Safely
If the disk wasn’t ejected after trying the methods in the preceding section, your last (and drastic) resort is to force eject your external drive on Mac. There are a couple of ways to do this:
- Close all applications using the disk. If an application is using your drive (ex. Time Machine is backing up your files to your drive), macOS will not allow you to eject the backup drive from Mac to protect your data. Wait for the app to finish before closing it unless you’re sure it’s lagging.
- Log out and in of your Apple Menu. When your disk won’t eject, Mac will unmount your external drives, except the boot volume, as you log out of your Apple.
- Reboot your Mac. If you can’t eject disc from Mac by logging out, shutdown and force quit features will also automatically unmount your external drives – even those not directly connected to your Mac.
- Use terminal command. You can force eject external hard drive on Mac by using the following command in the Terminal app (Finder > Applications > Utilities):
diskutil list external
Note your disk’s name. For ex. “Disk4”
Then, type the following command and hit enter:
diskutil eject disk4
How to Recover Data Lost During Disk Ejection
If you can’t or were unable to eject your external hard drive safely, any write processes still occurring when the drive is disconnected will be interrupted. This very often leads to data loss. But as long as you act quickly, you can use a tool called data recovery software to restore lost files by physically extracting their data from your external drive’s disk.
For this article, we’ll be using a data recovery software called Disk Drill. Disk Drill is a beginner-friendly yet powerful recovery app with a few key features that make it suitable for external HDD recovery. It recognizes all common HDD file systems, including exFAT, HFS+, and APFS. It uses multiple scan types that can quickly sweep your drive to restore as many deleted files as it can as soon as possible (while running more complex scans simultaneously).
Finally, it recognizes a wide variety of file types, including documents, photos (including RAW), and videos. This reflects the often varied contents of external hard drives. We’ll show you how it works.
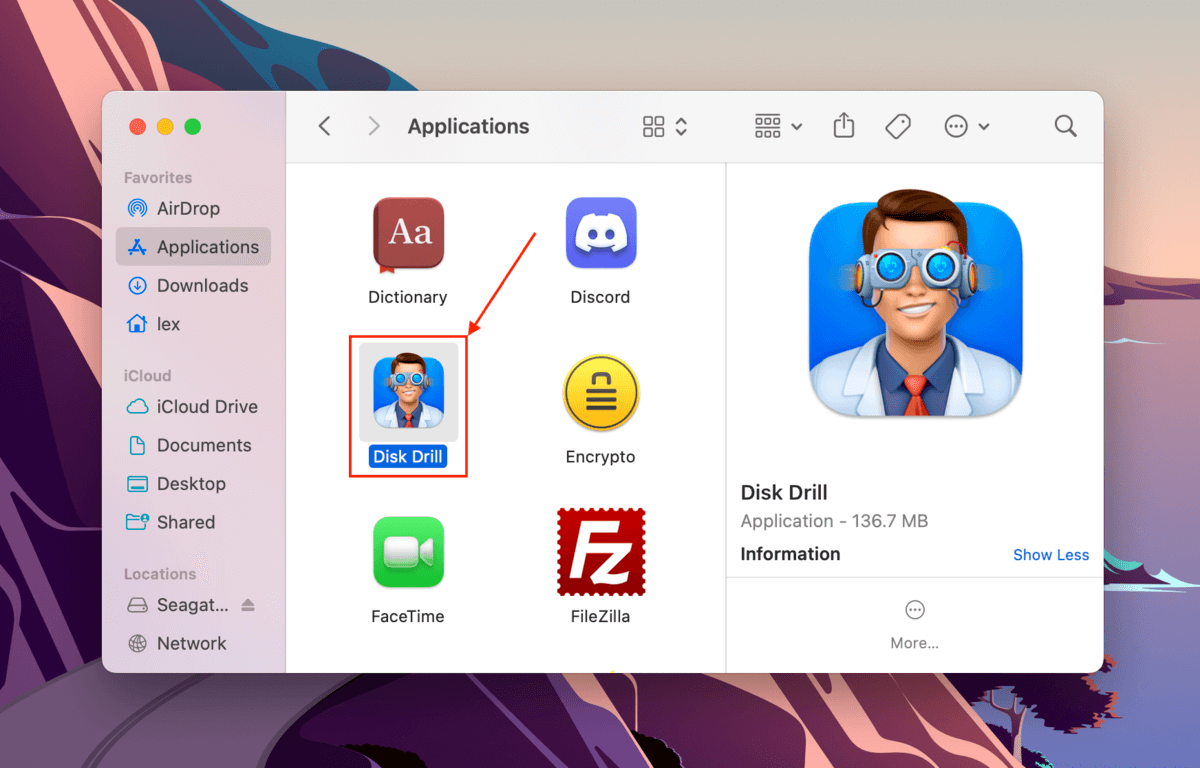
Step 1. Download and install Disk Drill on your Mac.
Step 2. Launch Disk Drill (Finder > Applications).
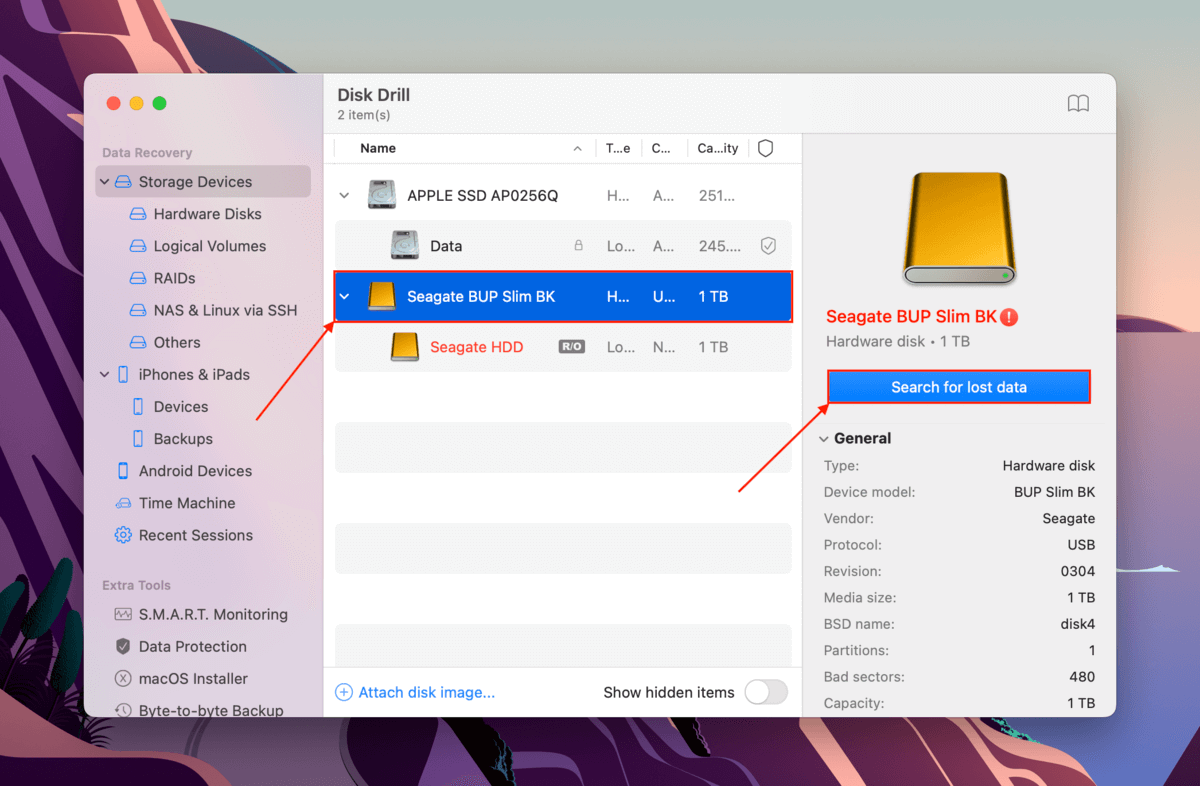
Step 3. In the source selection menu, click your external hard drive and click Search for lost data.
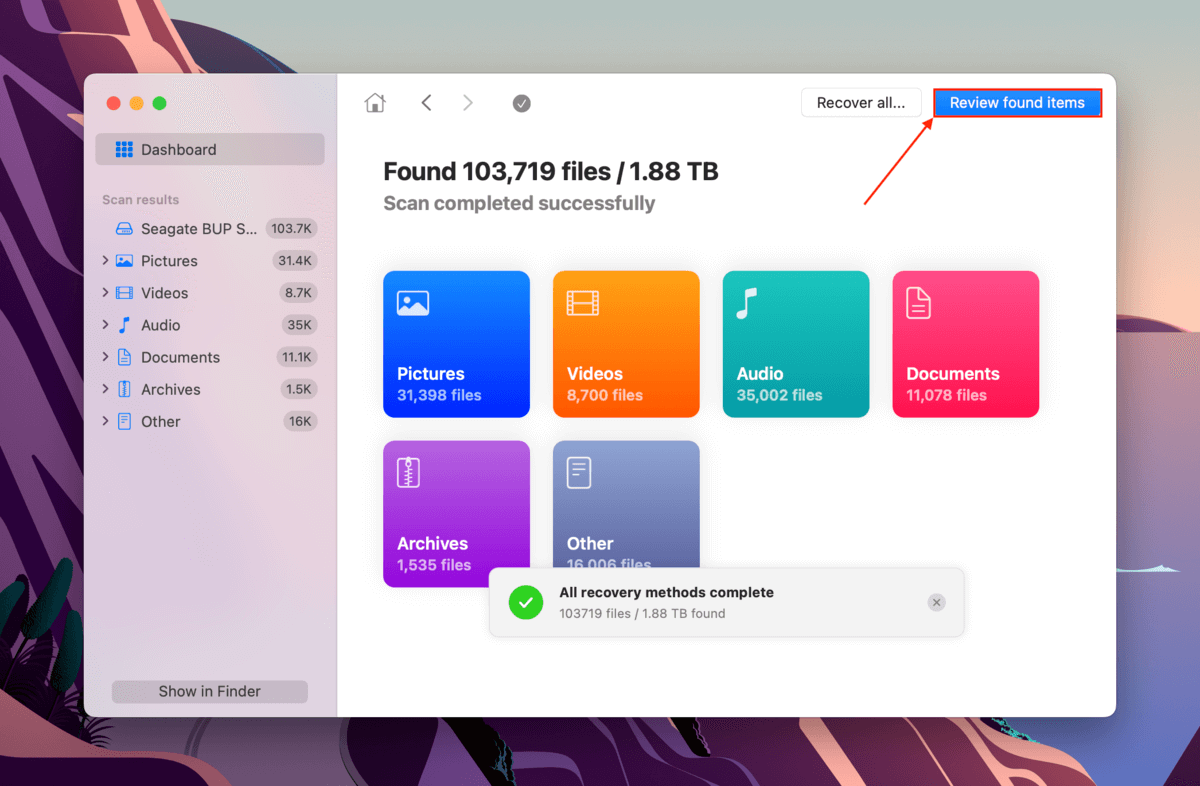
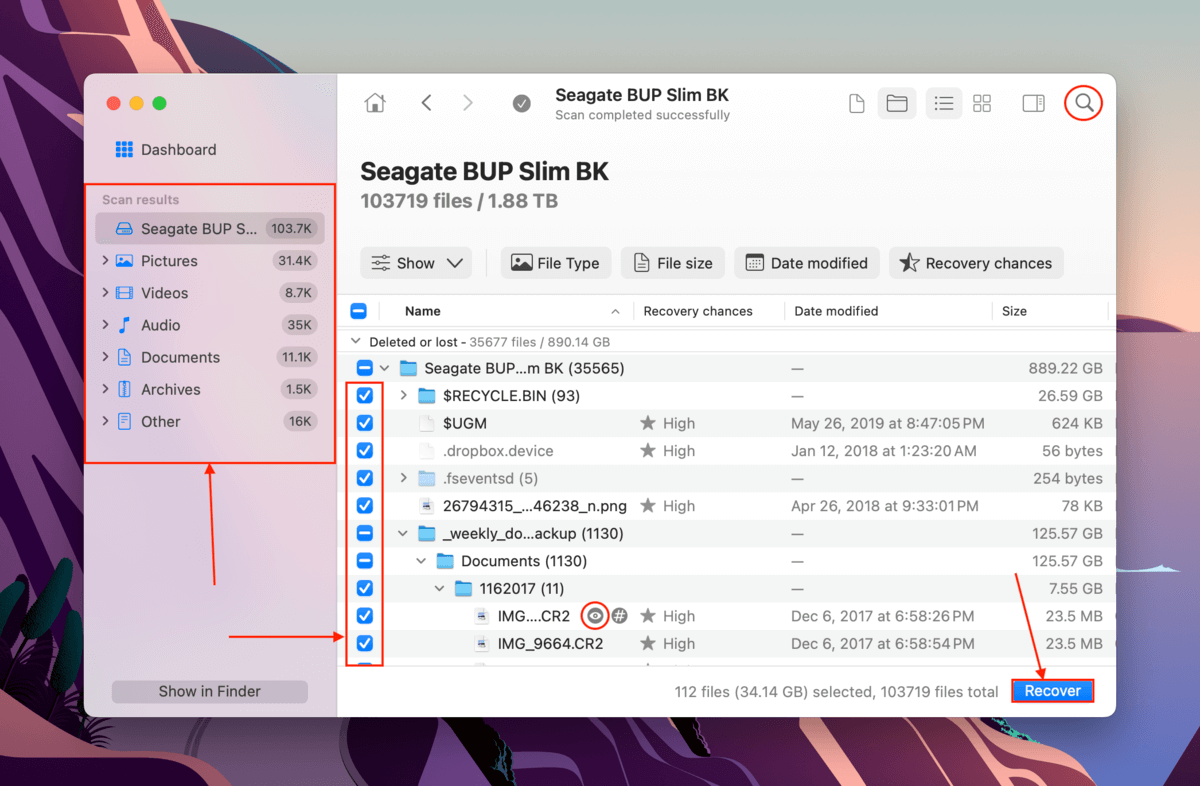
Step 4. Once Disk Drill is done scanning your external drive, click Review found items.
Step 5. If you only want to restore specific files, you select a file type from the filters on the sidebar or enter a file name or file extension in the search box. You can preview files by hovering your mouse pointer beside them and clicking the eye button that appears. Mark the boxes beside the files and folders you want to restore and click Recover.
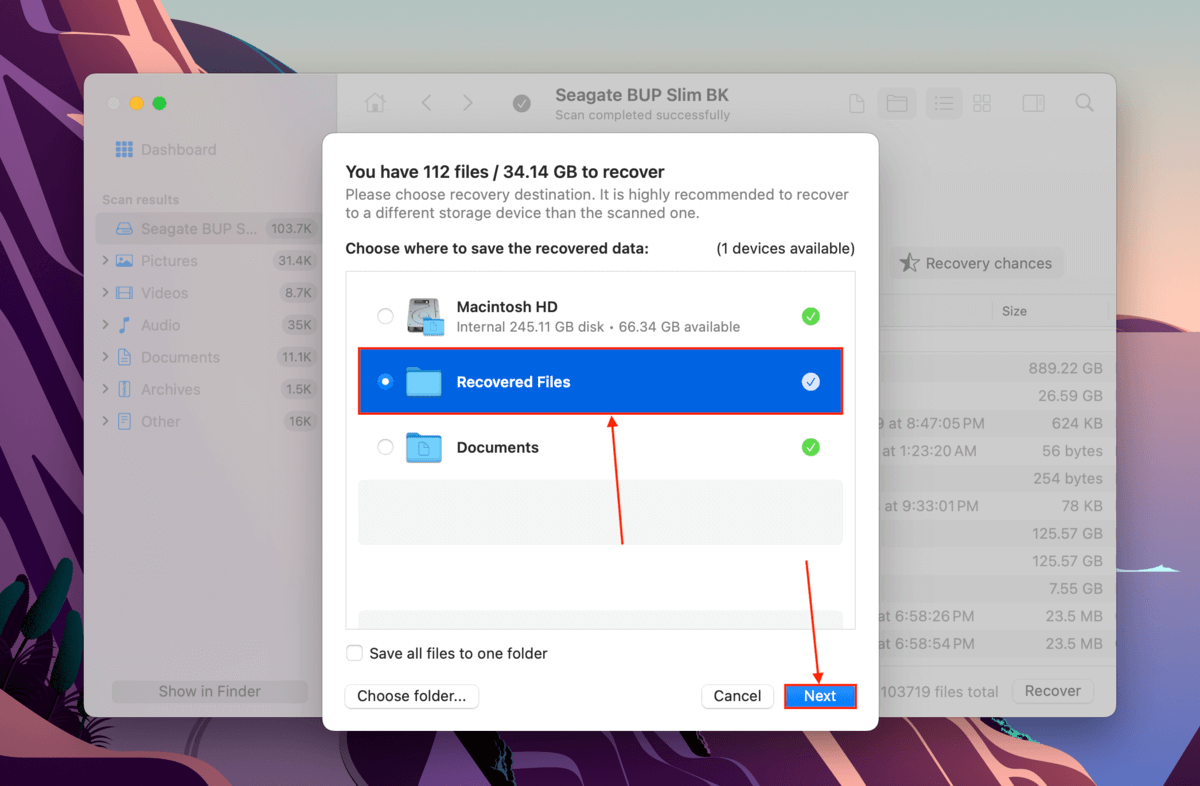
Step 6. Select a location on your Mac where Disk Drill will save the recovered files. Then, click Next to proceed with recovery.
Wait, What’s Wrong With Your External Hard Drive?
If your external hard drive is working properly, it should be easy to eject it from your Mac. If it keeps disconnecting by itself or you consistently struggle to eject it safely, your hard drive is likely damaged or corrupted in some way.
Even though you’ve successfully recovered your data, make sure to fix your corrupted hard drive before using it again. We also recommend regularly backing up your storage devices because they become harder to recover as they age; storage devices with a history of errors are also more likely to malfunction again down the line.


