
Do you have important data on a corrupted SD card? It’s a common problem; fortunately, it’s still recoverable – but don’t touch your memory card until you read this article, as you risk permanent data loss.
We prepared the ultimate guide on how to recover a corrupted SD card on a Mac, how to fix a corrupted SD card, and what to do if your SD card won’t even show up on your computer. Read on!
Table of Contents
What to Do if SD Card is Unreadable by Mac
If your SD card is unreadable by Mac, there is either something interfering with the connection or preventing your Mac from mounting its disk. If your SD card is not showing up on your Mac, we can’t repair the corruption. Here are some things you can try to fix an unreadable SD card on your Mac:
- Try another Mac or PC (or different ports): Dust, debris, and/or wear and tear of your Mac ports may be blocking the connection with your SD card. If you’ve exhausted all ports (and tried a different card reader), try connecting your SD card to another Mac or PC.
- Restart MacBook: If you have a lot of applications running in the background, your Mac may not have enough resources to mount the SD card. Reset your computer to refresh its resources.
- Check SD card for physical damage: Physical damage from water, extreme temperatures, breakage can cause severe corruption and data loss, as well as other unpredictable behavior. In this scenario, your best option is to send your SD card to a professional data recovery service.
- Force mount SD card from Disk Utility or Terminal: Mac needs to mount external drives so the devices can properly communicate. If your SD card won’t mount automatically (e.g. due to third-party apps), try mounting it manually using Disk Utility or the Terminal app.
How to Recover Data from Corrupted SD Card on Mac
If your corrupted SD card contains any important files, we strongly recommend that you recover its data before attempting to fix it. Even successful repair attempts can cause partial or even full data loss, depending on which method you use–and in such cases, that data loss is permanent. Here are the available options for recovery:
Method 1: Use Data Recovery Software
Even if your SD card is corrupted, your files might still be on it (especially if you haven’t used it since the corruption). Your data just isn’t accessible through Finder. Data recovery software is a type of tool that bypasses the need for Finder and scans your SD card directly for your missing data–so drive corruption doesn’t affect its effectiveness.
For this guide, we’ll be using an app called Disk Drill, which is a popular and very beginner-friendly data recovery tool. It has a great recovery success rate for SD cards, and it has several features that make the whole process safer and more effective.
First, it has a feature called Advanced Video Recovery, which is designed to repair video files as they are recovered (in case you’re restoring a camera memory card). The next useful feature is called Byte-to-byte backup; it can create image backups of your entire SD card that you can scan, which allows you to set aside your actual SD card. Finally, it has an excellent preview feature that works for almost any file type–including RAW photos, videos, and even documents.
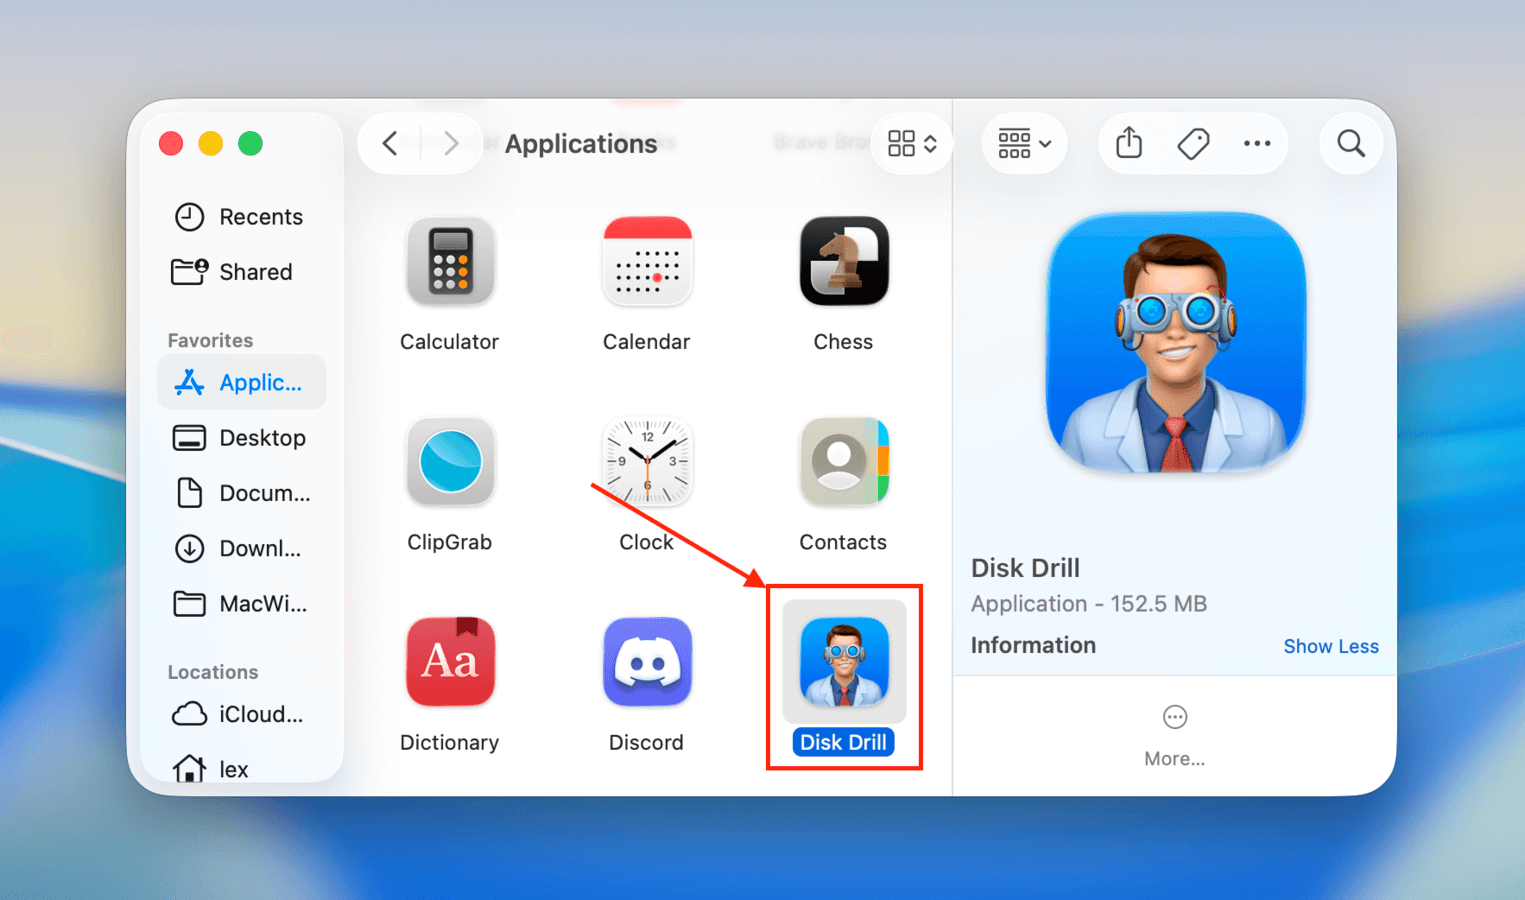
Step 1. Download and install Disk Drill.
Step 2. Connect your SD card to your Mac using a card reader, then launch the Disk Drill app (Finder > Applications).
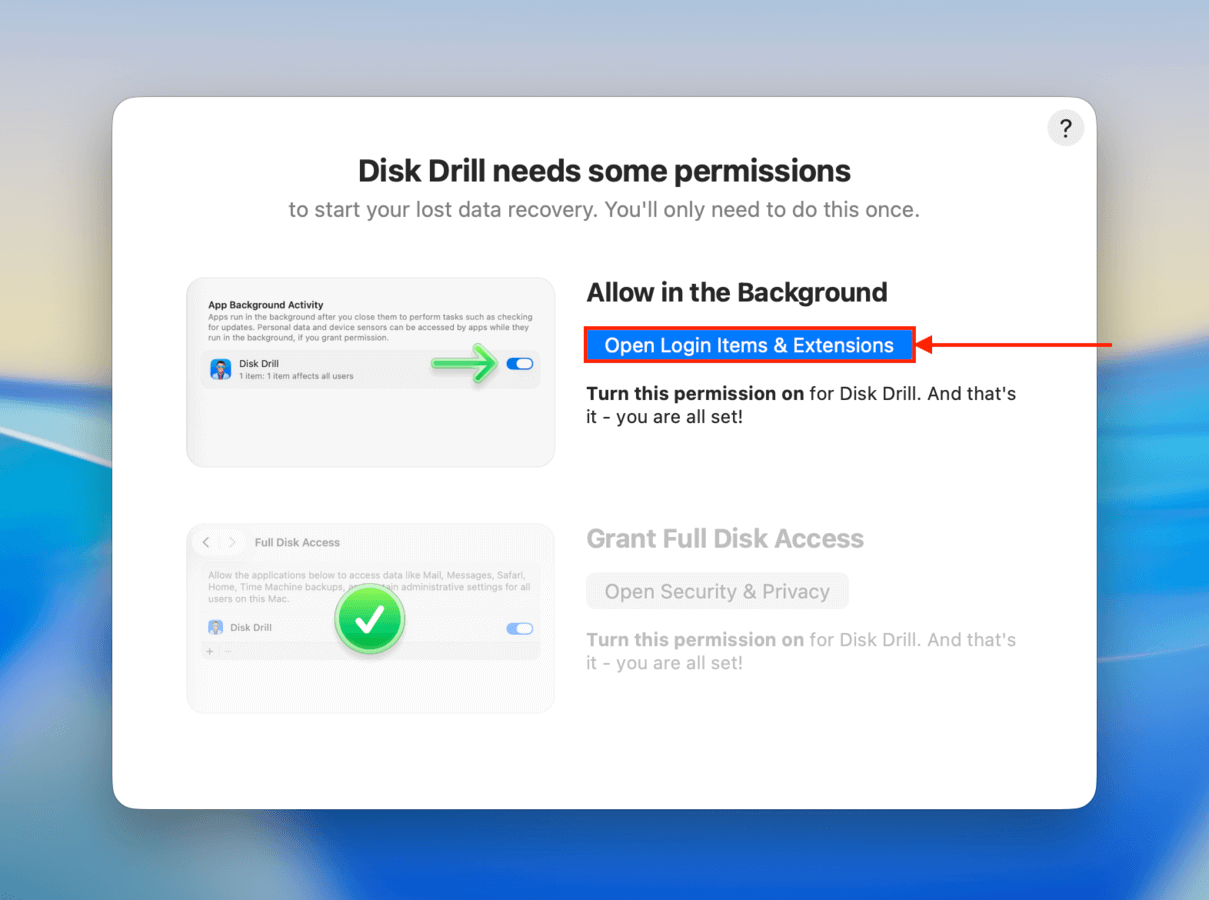
Step 3. Grant Disk Drill the neccessary macOS permissions by following the wizard’s instructions (don’t worry, it’s safe!).
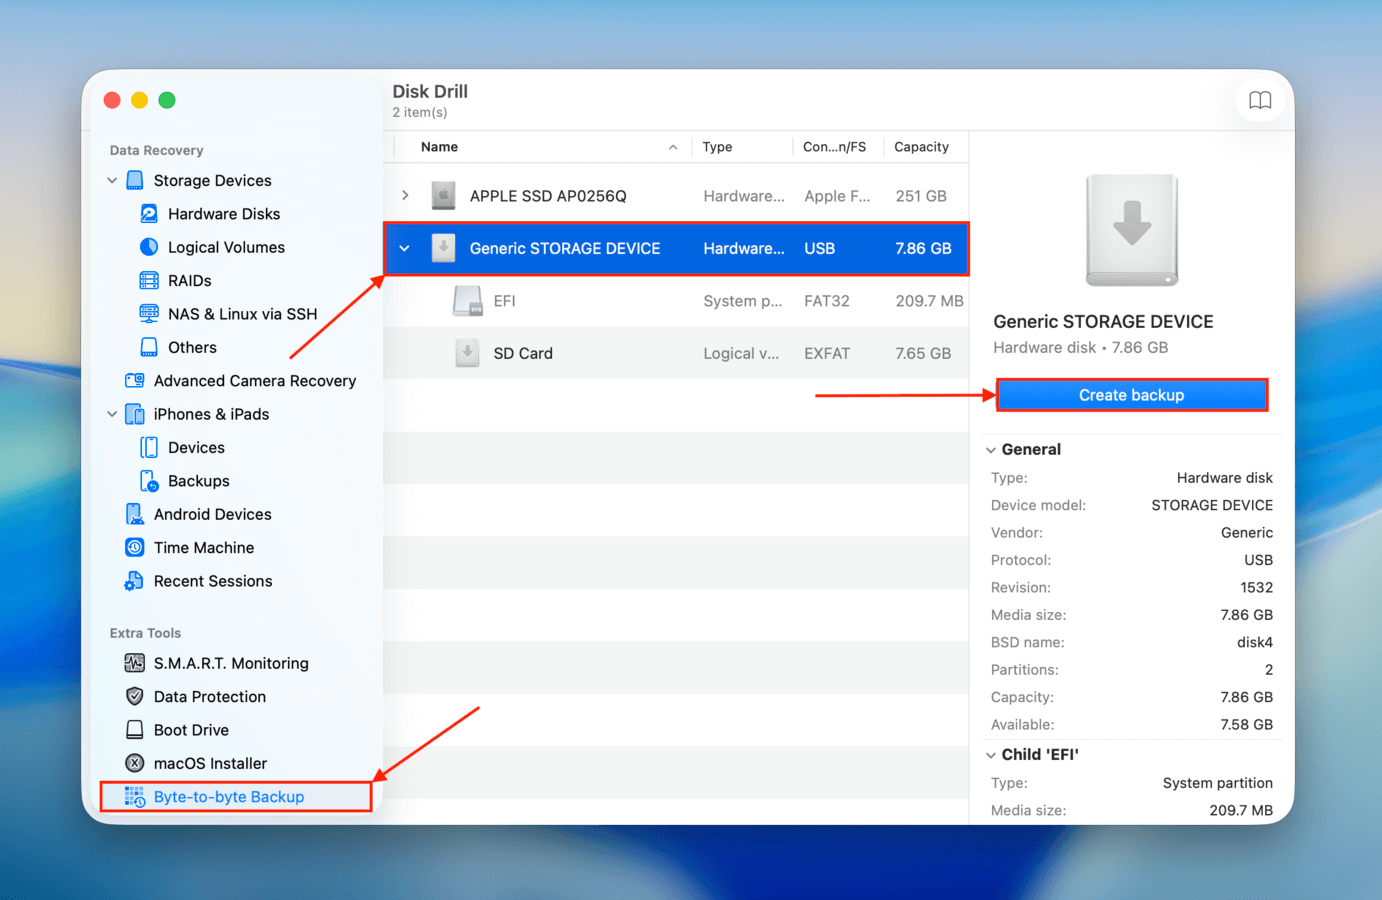
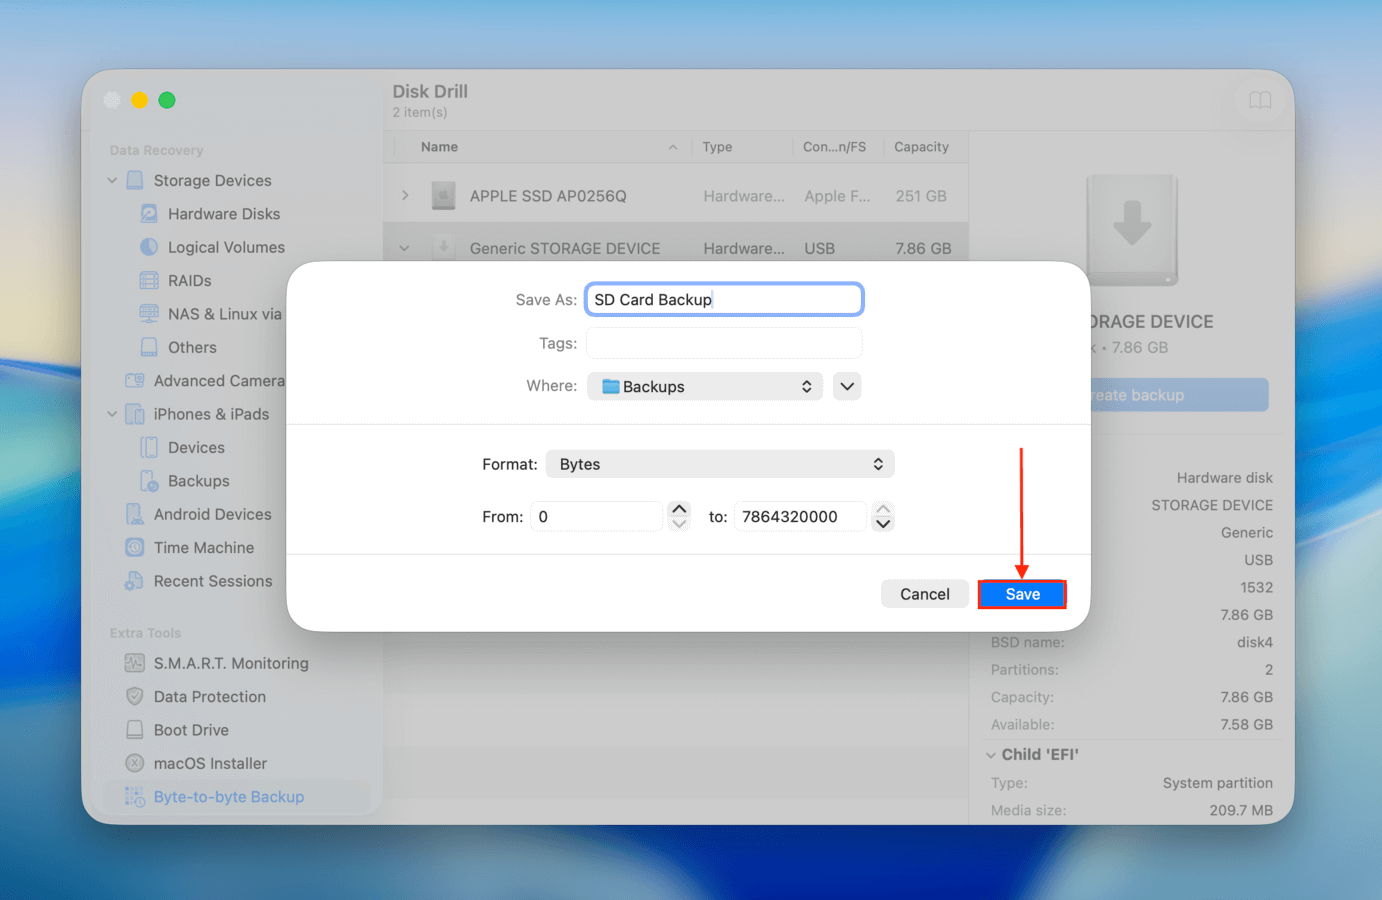
Step 4. On the left sidebar, click Byte-to-byte Backup. Then, select your SD card from the drive list (it may appear as “Generic Storage Device” if you’re using a card reader or USB hub) and click Create backup.
Step 5. Name your backup image and select an easy-to-find location on your Mac as the destination for the image backup file. Then, click Save.
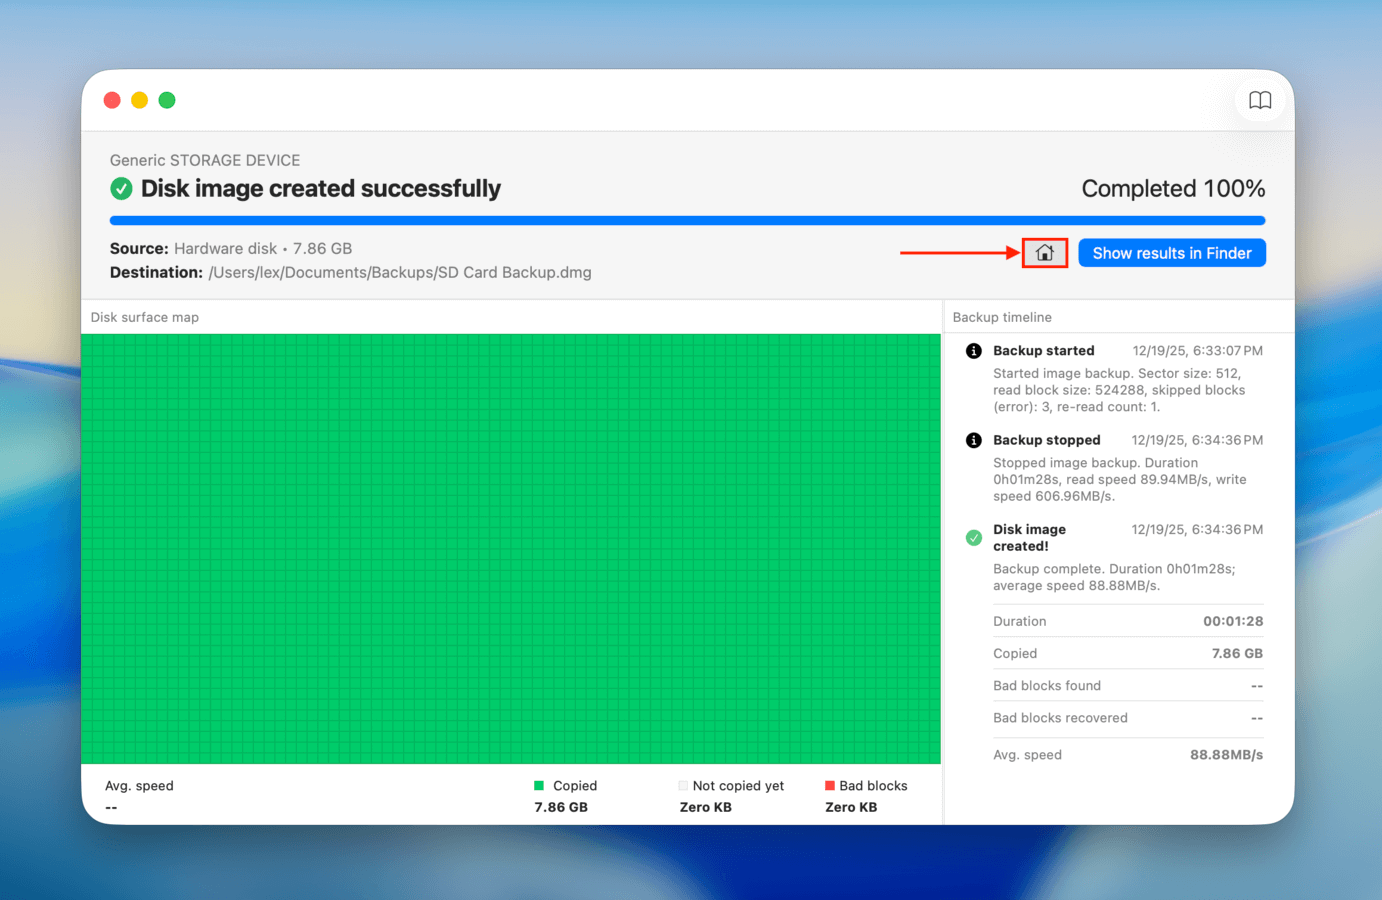
Step 6. Once the backup has been created, return to Disk Drill’s main window.
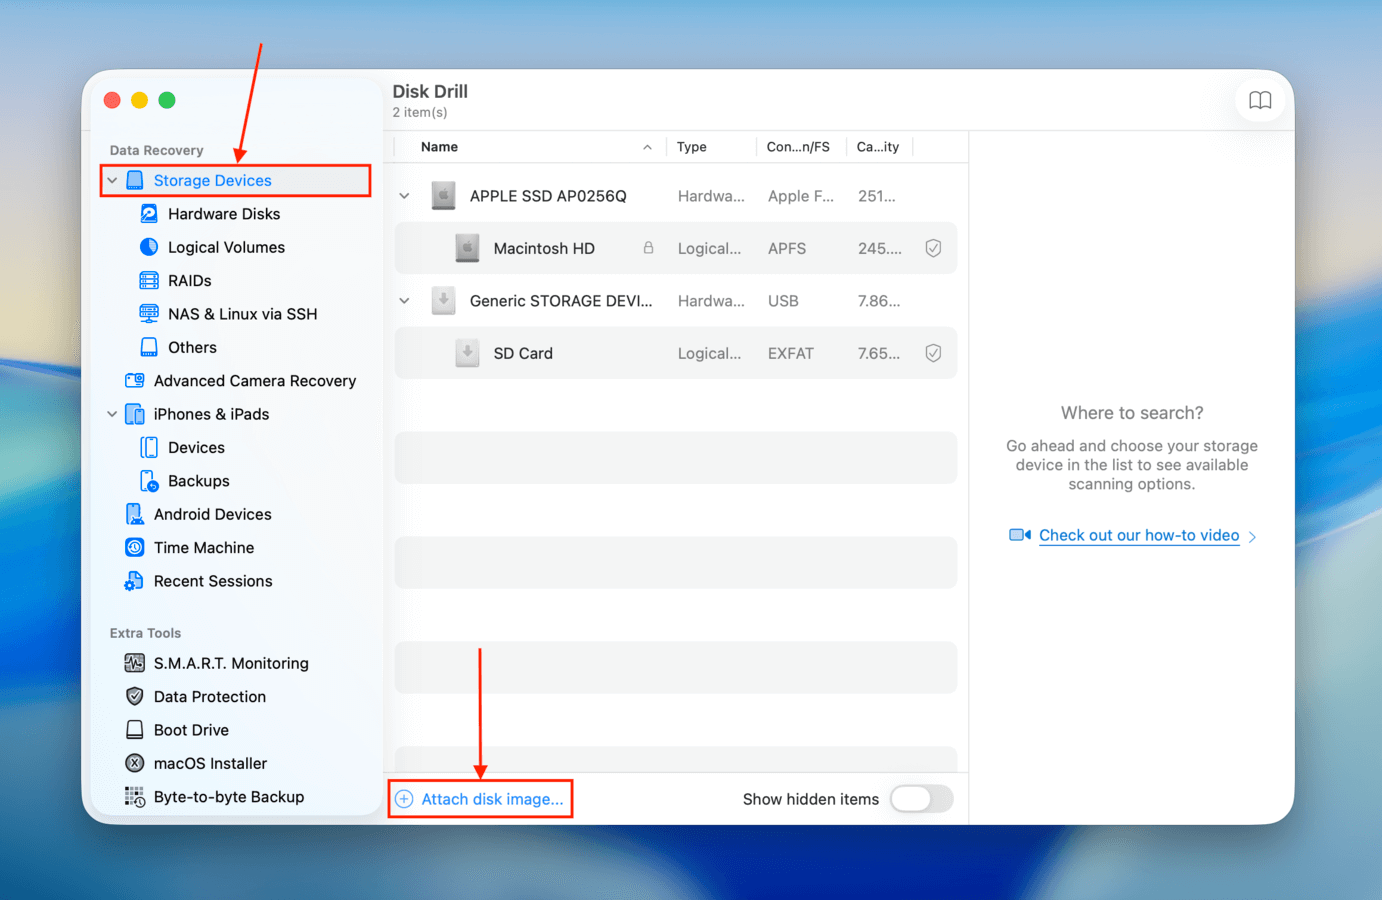
Step 7. On the left sidebar, select Storage devices and click Attach disk image… at the bottom of the window.
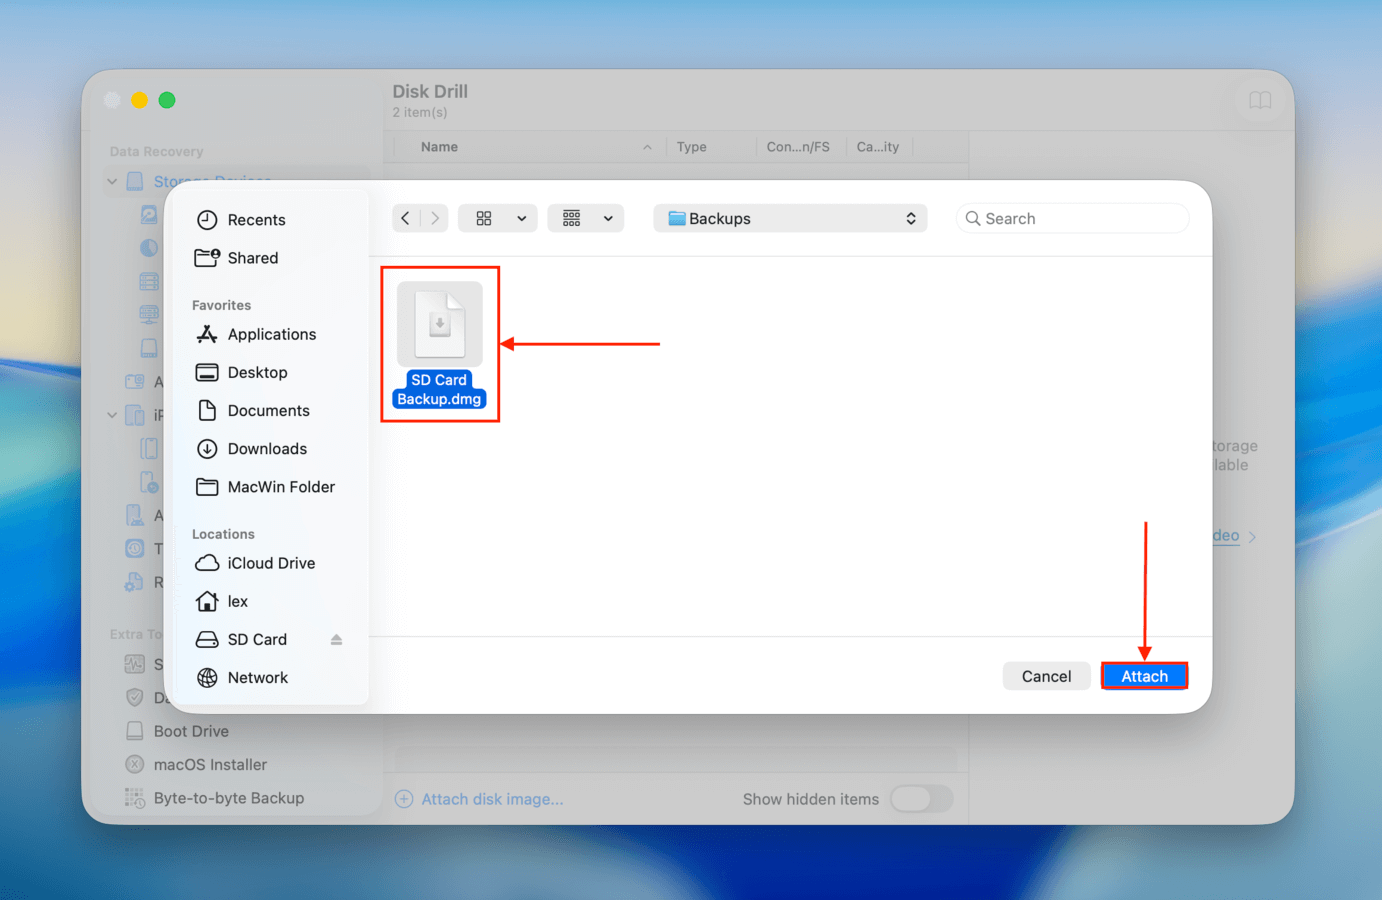
Step 8. Select the backup image we created in Step 4 and click Attach.
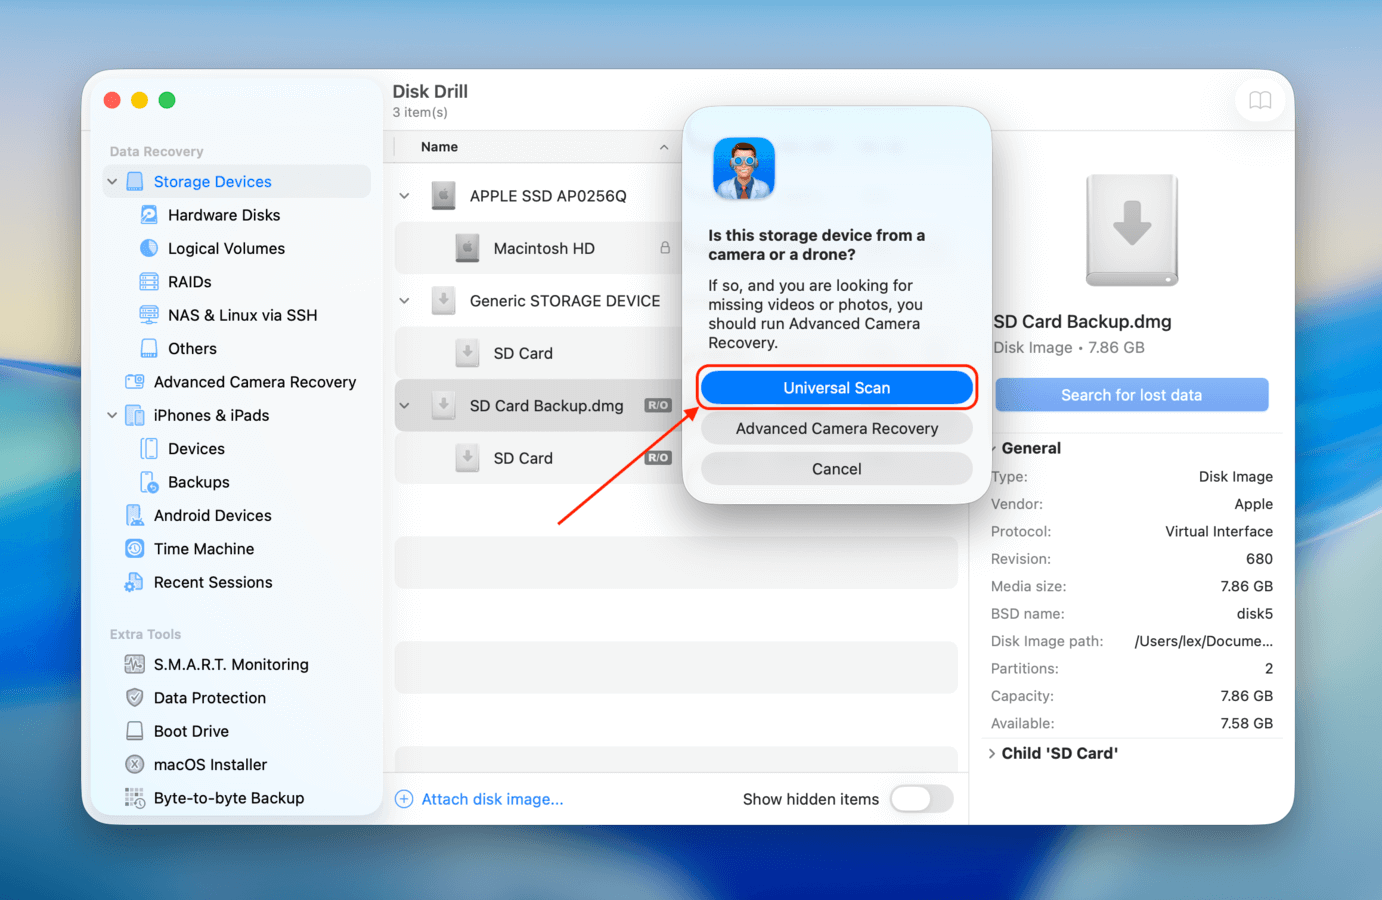
Step 9. Select the SD card backup image that has now appeared in the drives list (it should have R/O beside its name and is a DMG file type). Then, click Search for lost data.

Step 10. You’ll be prompted to choose a scan type. We recommend using Universal Scan Type first, because it has a better chance of restoring all your data. If you attempt to restore a video file, and it turns out unplayable, run the scan again using Advanced Camera Recovery.
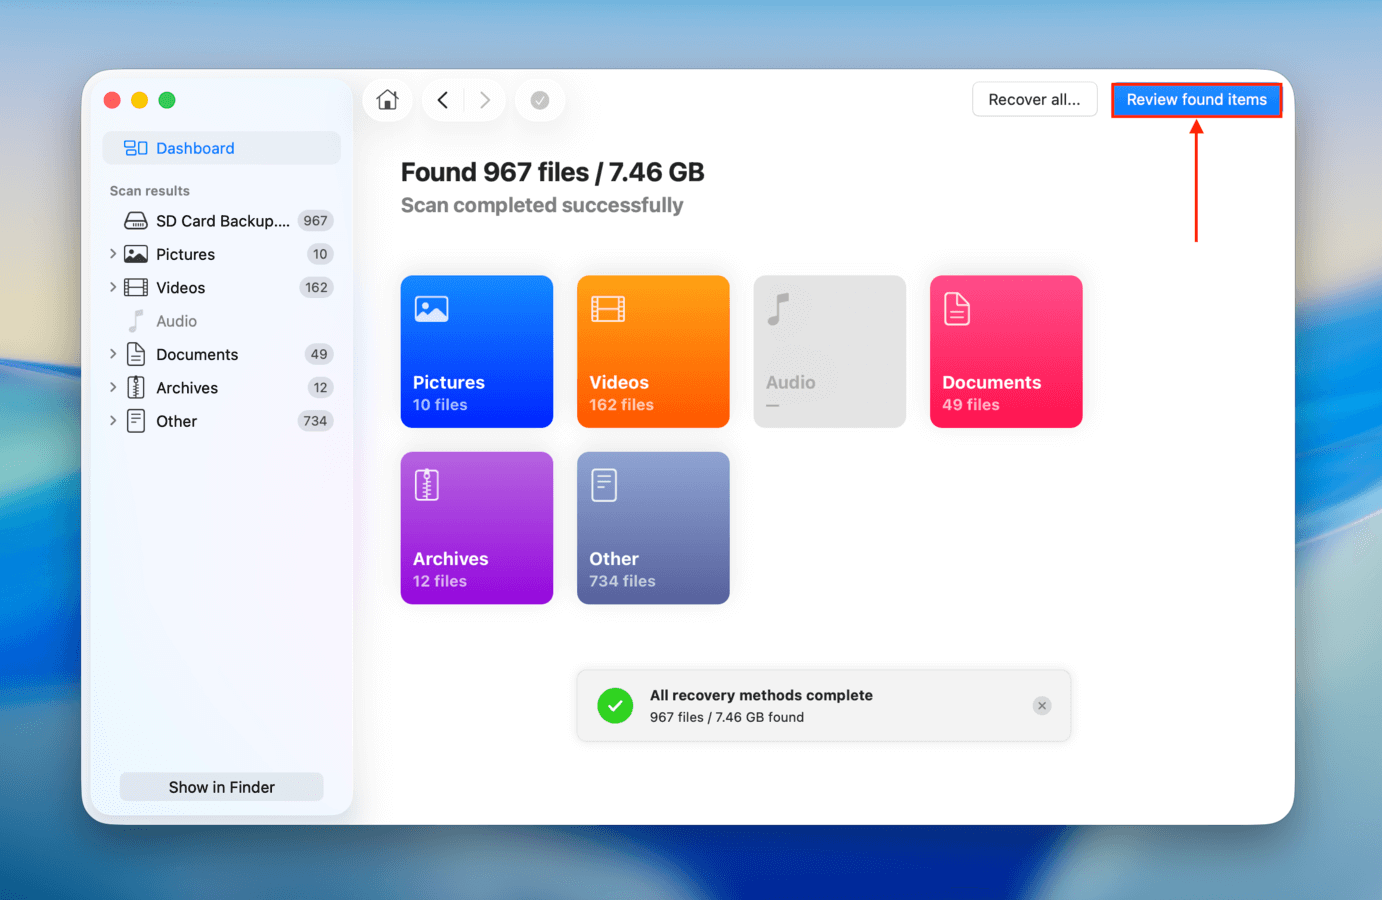
Step 11. Once the scan is complete, click Review found items.
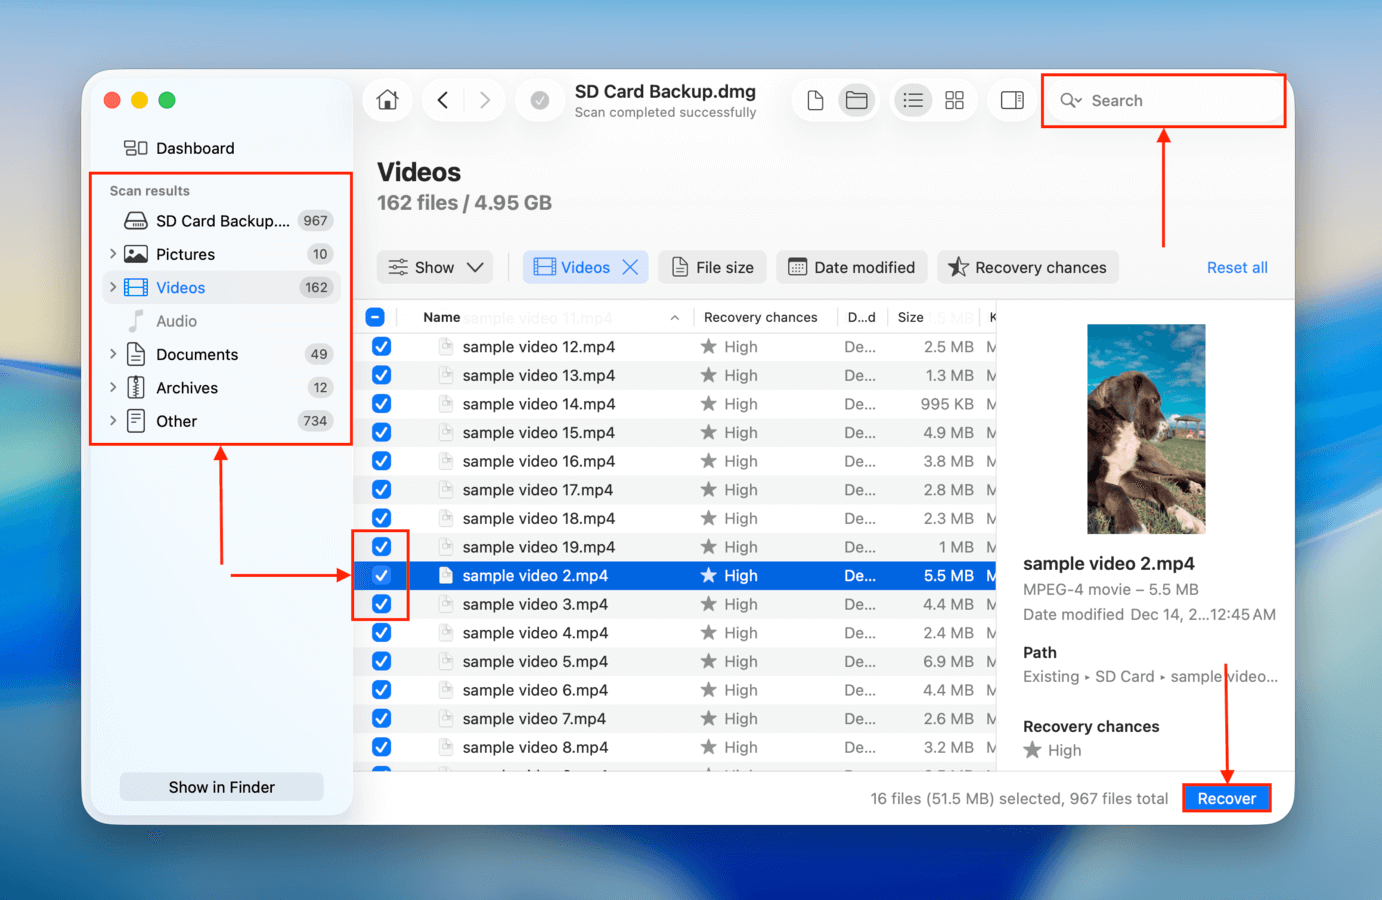
Step 12. Use the search tool or the filters in the left sidebar if you want to locate specific files or browse specific file types. Make sure to preview your files by clicking on them once. When you locate the files you want to restore, mark the boxes beside them and click Recover (you can also leave all boxes blank and click Recover All).
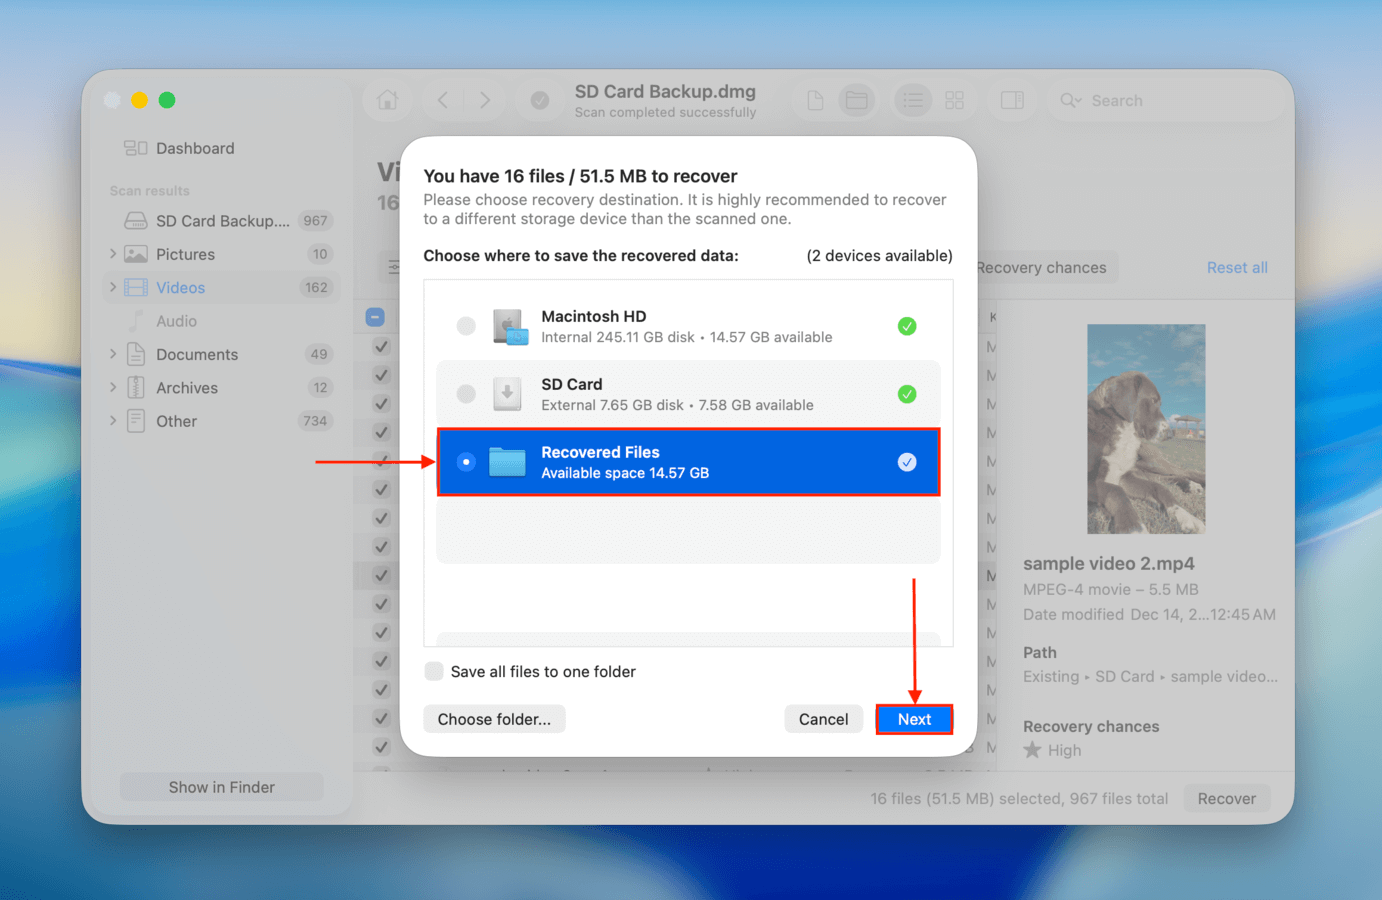
Step 13. Select a destination folder on your Mac where Disk Drill will save the recovered files. Then, click Next.
After restoring your data, open your files on your Mac to make sure they work. Once your data is secure, you can safely attempt to repair your SD card.
Method 2: Utilize Data Recovery Services
Data recovery services are made up of teams of specialists that are trained to restore files from drives that are in various states of disrepair. They have advanced equipment, facilities, and software, and so have a much higher success rate than DIY solutions–especially when it comes to physically damaged drives.
If you notice evidence of physical damage on your SD card, data recovery services provide the lowest risk of permanent total data loss. Alternatively, you can also opt for this method if you don’t feel confident attempting recovery on your own, or if you don’t have time to figure it out yourself.
- No data – no charge guarantee: Try to find a company that offers this guarantee: if they don’t recover the data you’re looking for, you don’t have to pay anything.
- Free estimate: Some companies will give you a free estimate over the phone after you explain your situation.
- Class 100 Clean Room: Ensure that the company has a Class 100 Clean Room, which is a sterile laboratory that ensures that storage devices aren’t damaged by small particles when the specialists take them apart for recovery purposes.
- Turnaround time variance: Some companies have faster turnaround times than others (which are usually found on their website). If you need data ASAP, you may want to consider companies that offer rush services–just be prepared for a higher fee.
- Miscellaneous discounts: Depending on your location, you may find companies that offer free or discounted inbound shipping, storage devices (for the recovered data), or spare parts (in case it’s required to repair the disk enough to access its data).
How to Fix Corrupted SD Card on Mac
In this section, we’ll show you different ways to fix a corrupted SD card using your Mac (or repair your Mac’s ability to communicate with the SD card). While all of these methods have the potential to make your SD card operational again, we still recommend that you format it (Method 4) if you still intend to use it for a long time or for an important event.
Method 1: Run First Aid On Your SD Card
The native Mac app Disk Utility has a feature called First Aid. It’s capable of automatically detecting and fixing disk errors on storage devices (including SD cards), which is a common cause of corruption.
Step 1. Connect your card securely to your Mac using a card reader.
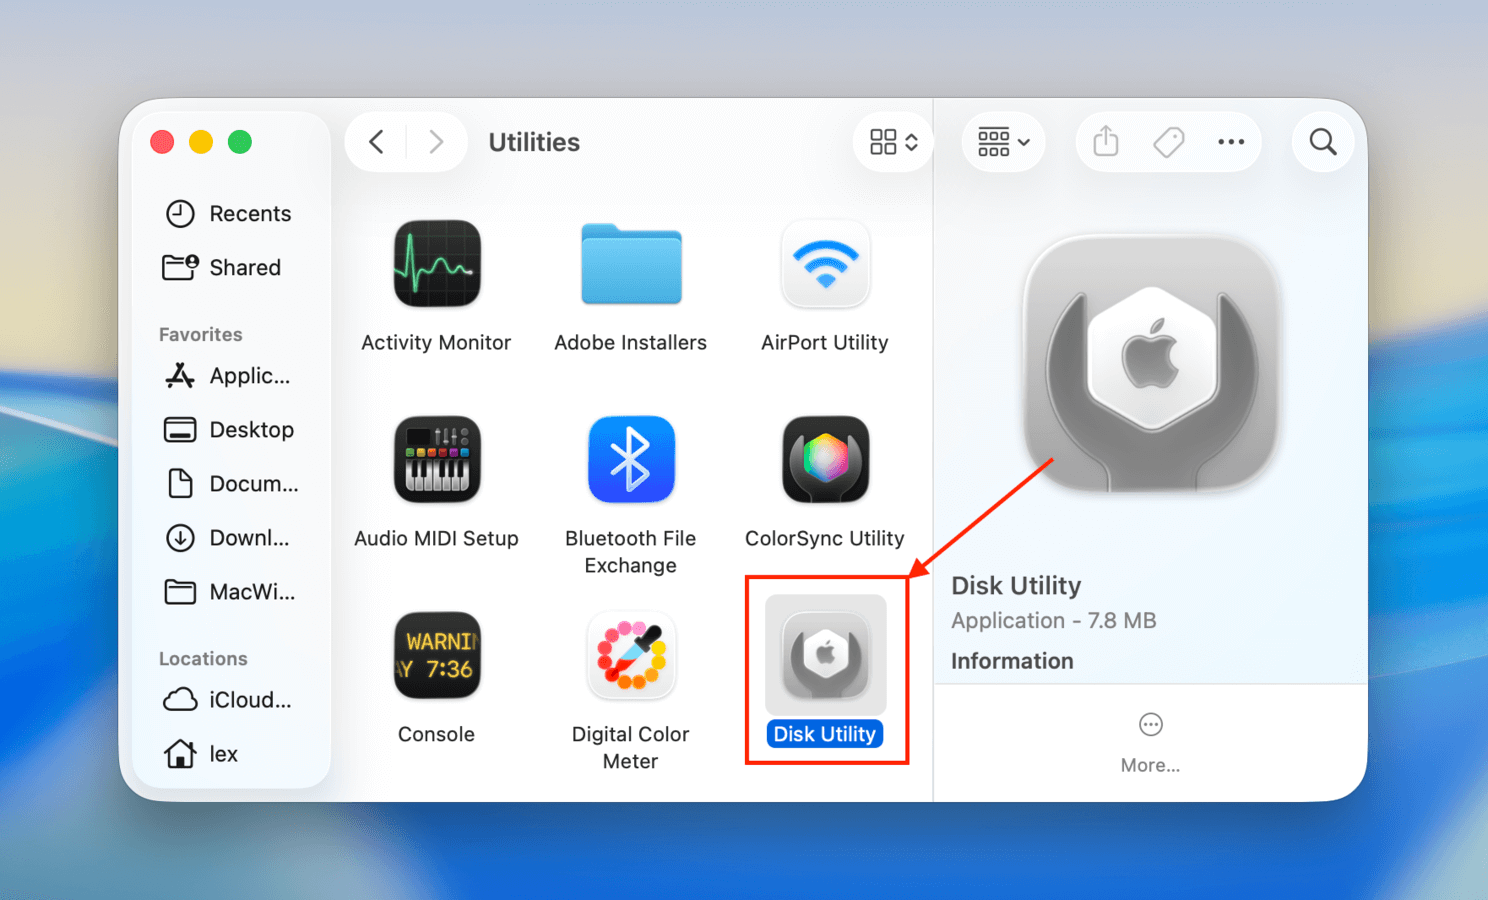
Step 2. Launch Disk Utility (Finder > Applications > Utilities).
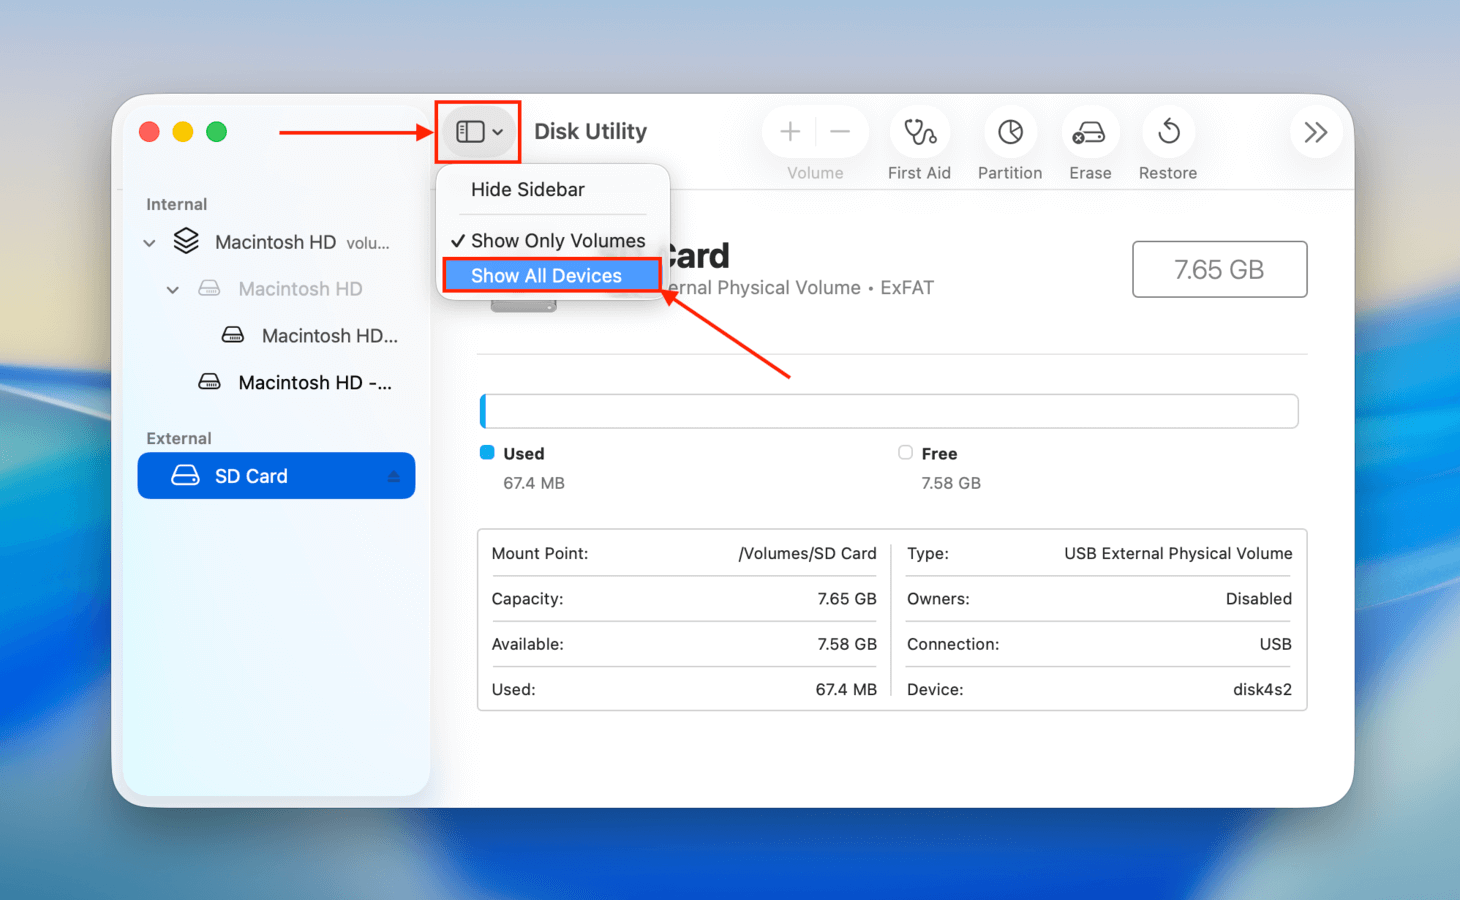
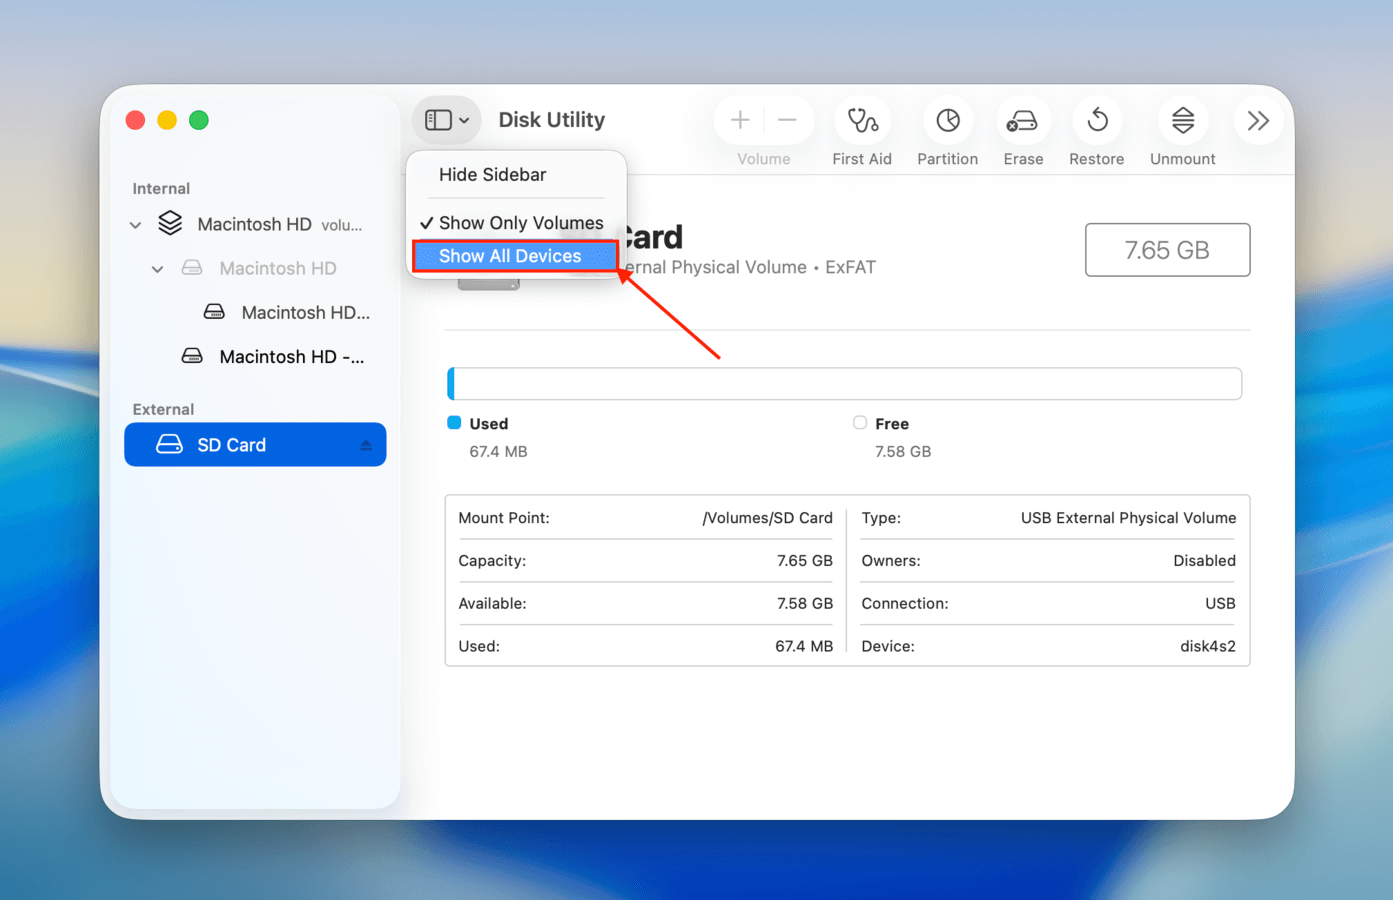
Step 3. Click the View button and choose Show All Devices.
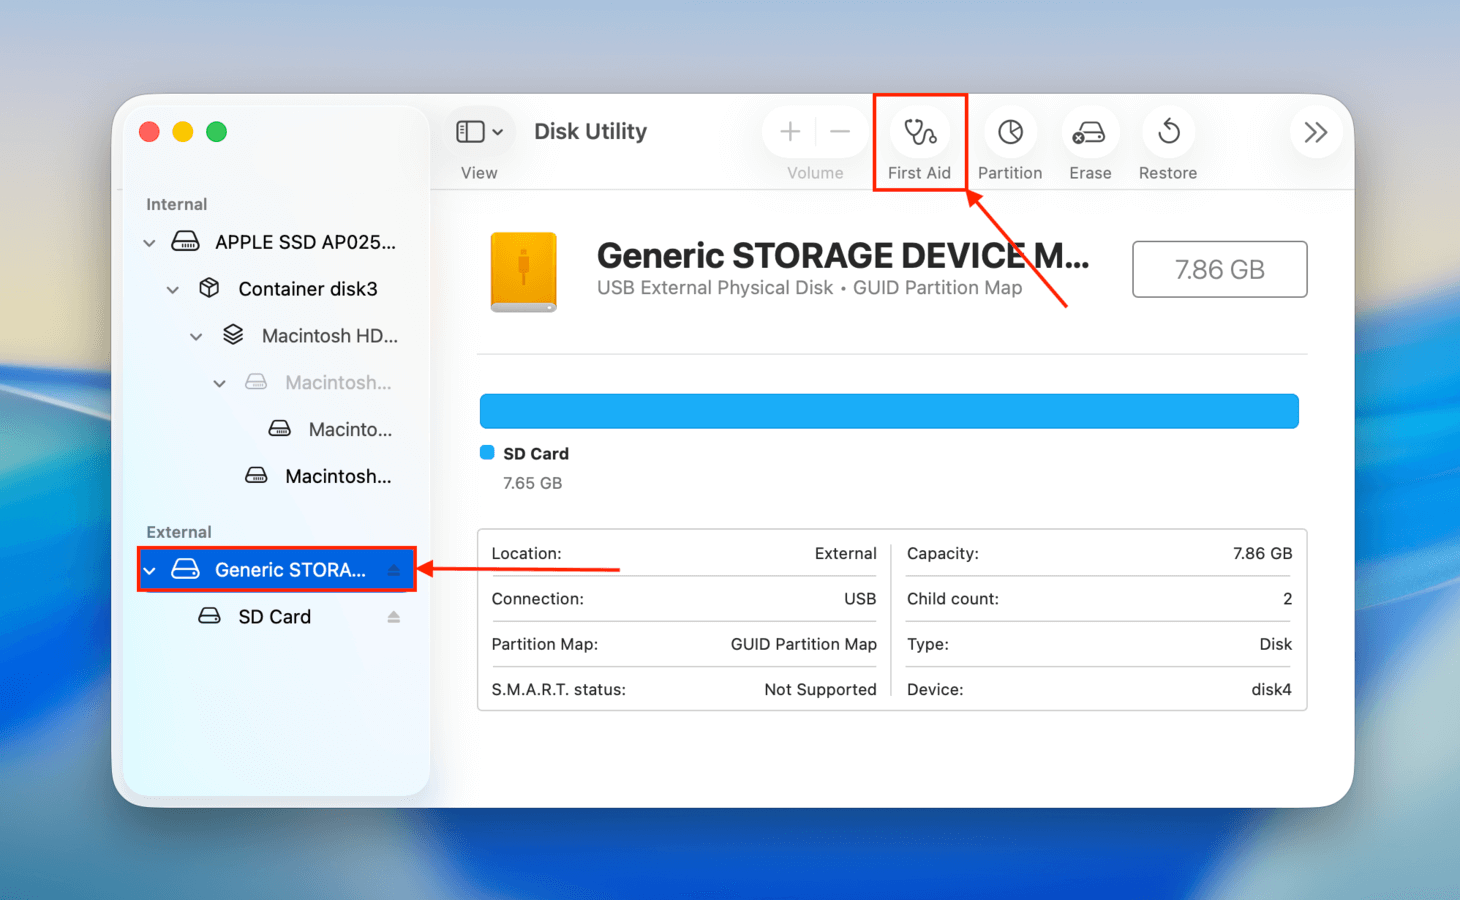
Step 4. Select your SD card from the left sidebar and click the First Aid button at the top of the window.
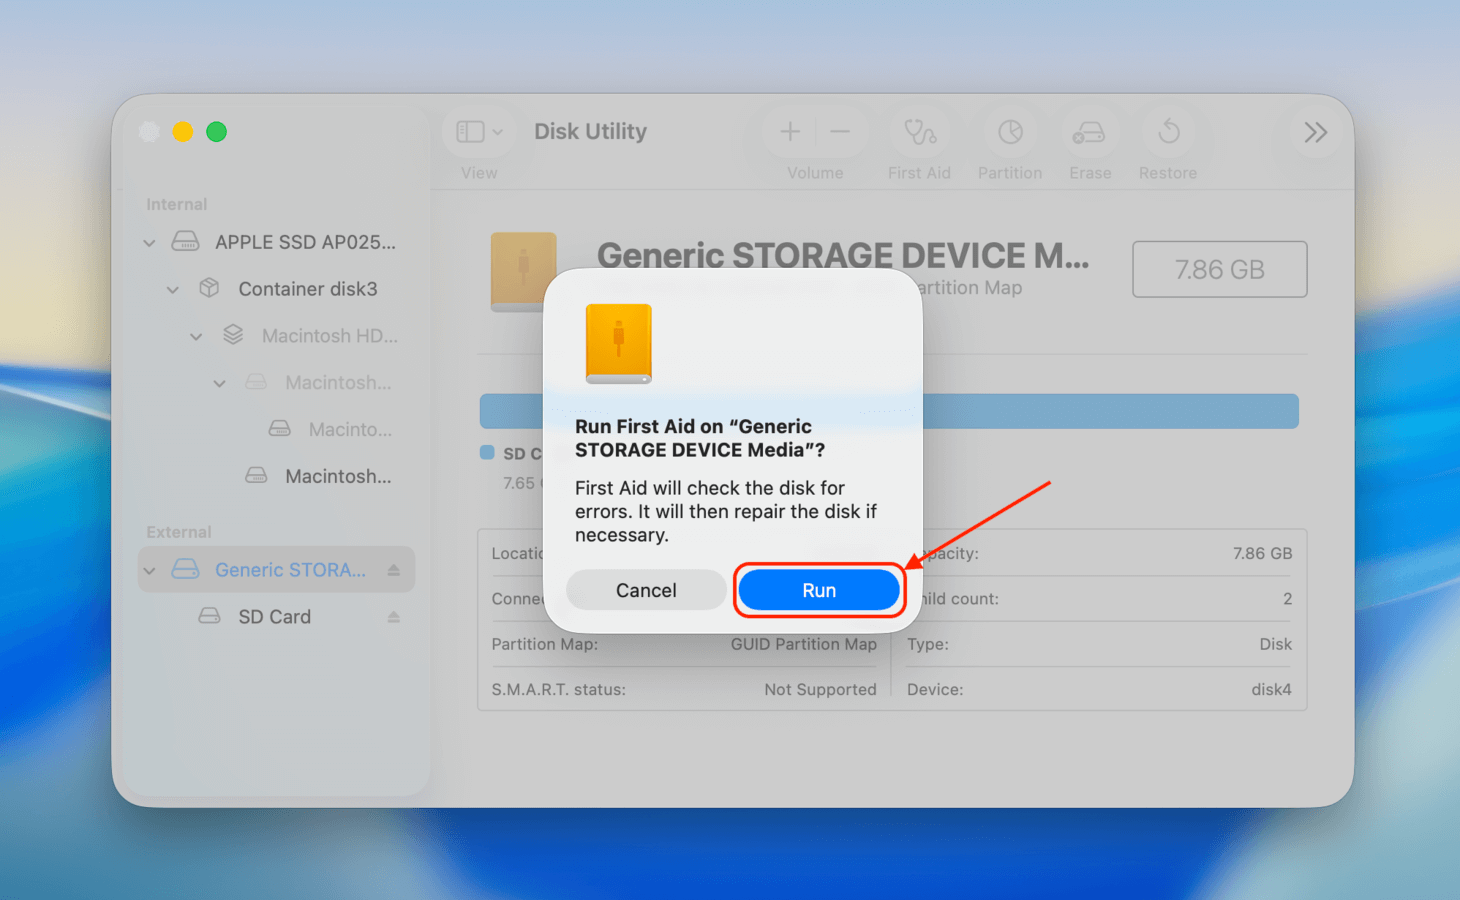
Step 5. When asked to confirm, click Run.
After running First Aid, safely eject your SD card, then reboot your Mac. Once your Mac has fully rebooted, try connecting your SD card again to see if it works. This removes any leftover warning “flags” from the SD card (which may cause your Mac to show an error). This also stops any background processes that may have gotten stuck while reading your SD card.
Method 2: Use TestDisk to Restore Missing Partitions
TestDisk is a free and open-source software tool that has the ability to restore missing partitions and partition tables. This is a common reason for SD cards appearing as RAW or Unallocated, as they’re missing critical system data your computer needs to establish a connection.
TestDisk can be intimidating as it lacks a modern interface, and you can only use your keyboard to navigate. But you should be fine as long as you closely follow the instructions below:
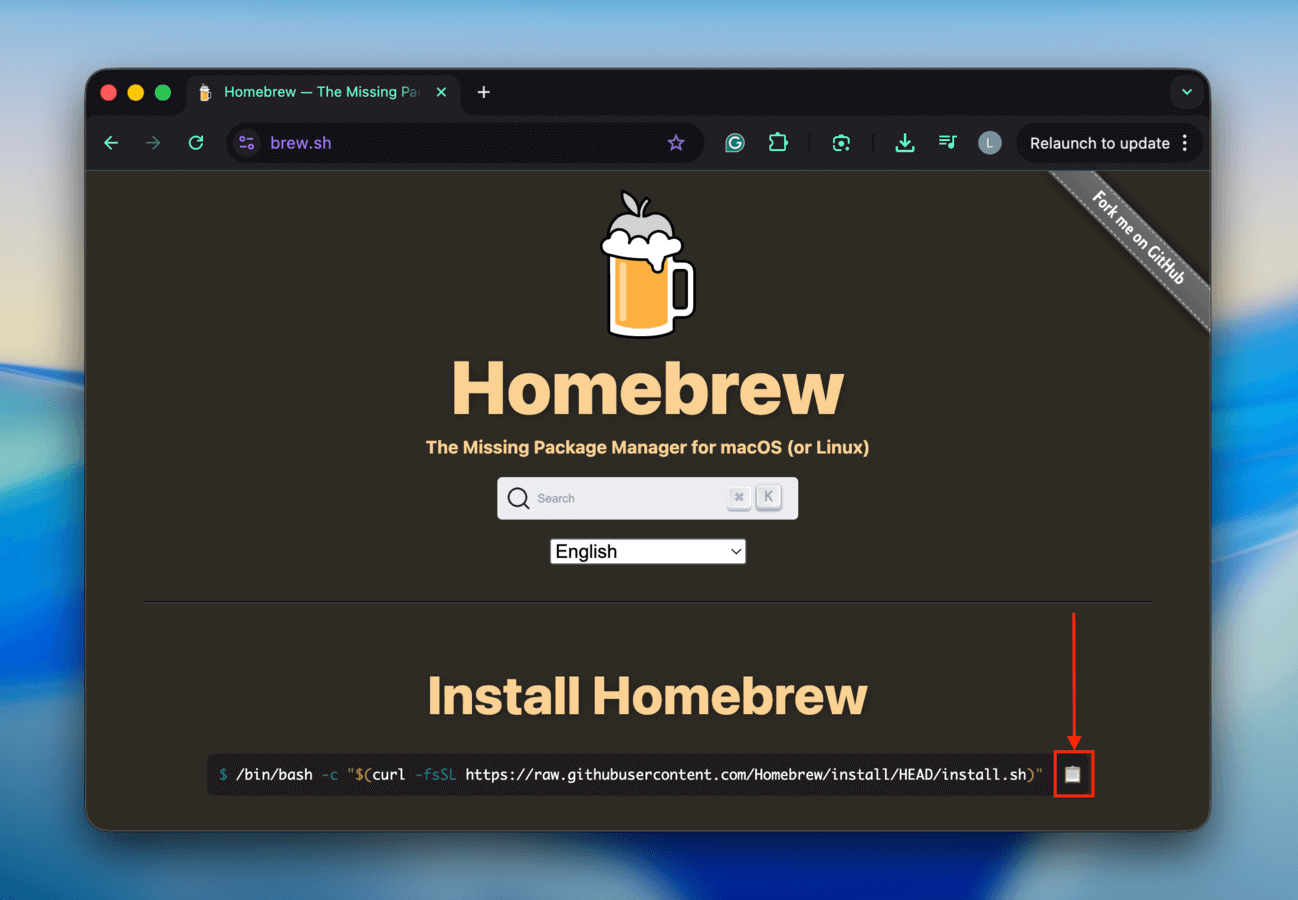
Step 1. Open a browser and navigate to brew.sh. Then, click the notepad icon beside the string of code.
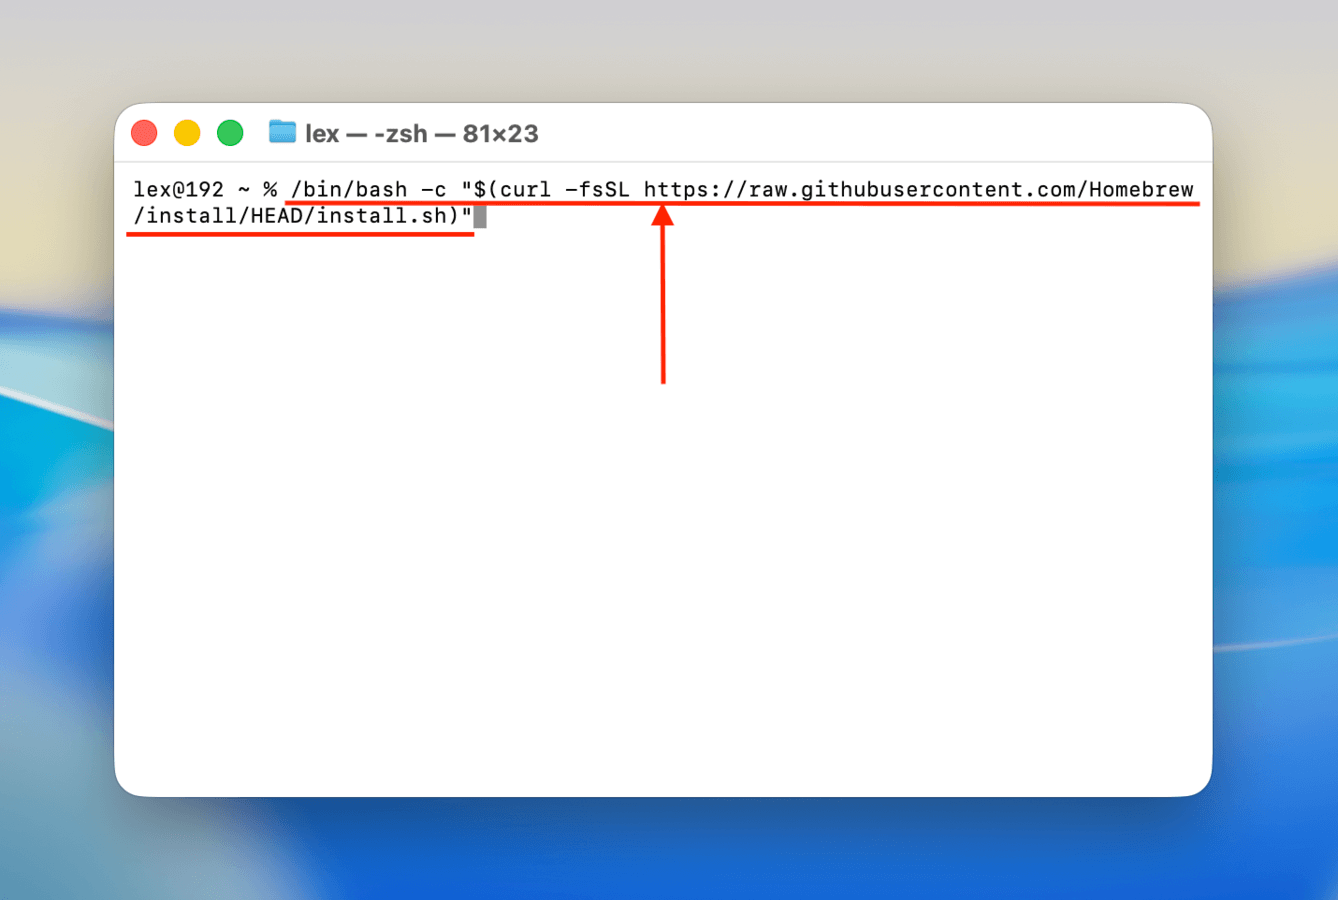
Step 2. Launch the Terminal app, then paste the string you copied in step 1 and press Return. This will install Homebrew on your Mac.
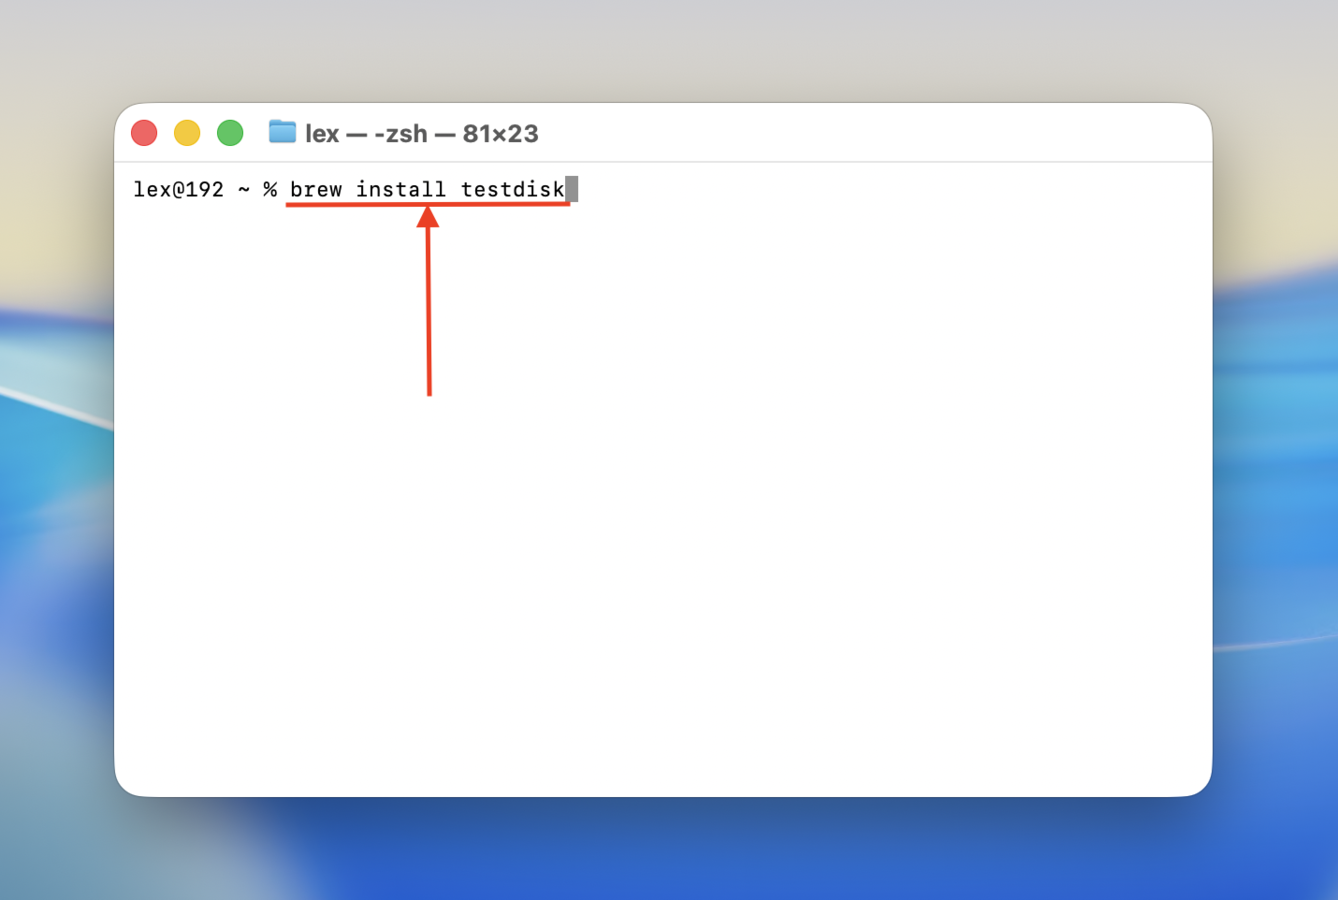
Step 3. Terminal will let you know once Homebrew is fully installed on your computer. Then, execute this command to install TestDisk via Homebrew:
brew install testdisk
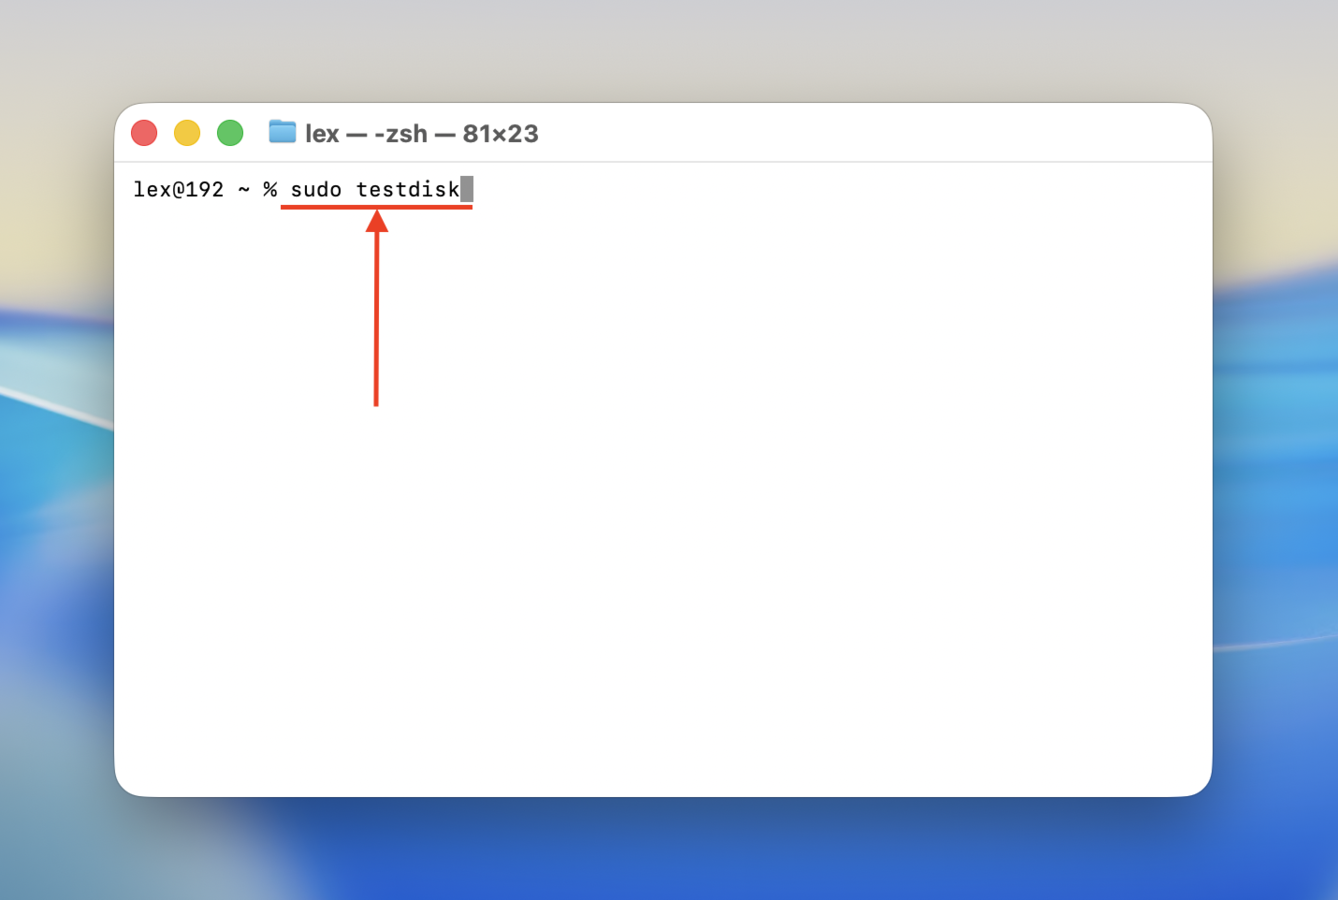
Step 4. After installing TestDisk, you can launch it from the Terminal app with this command:
sudo testdisk
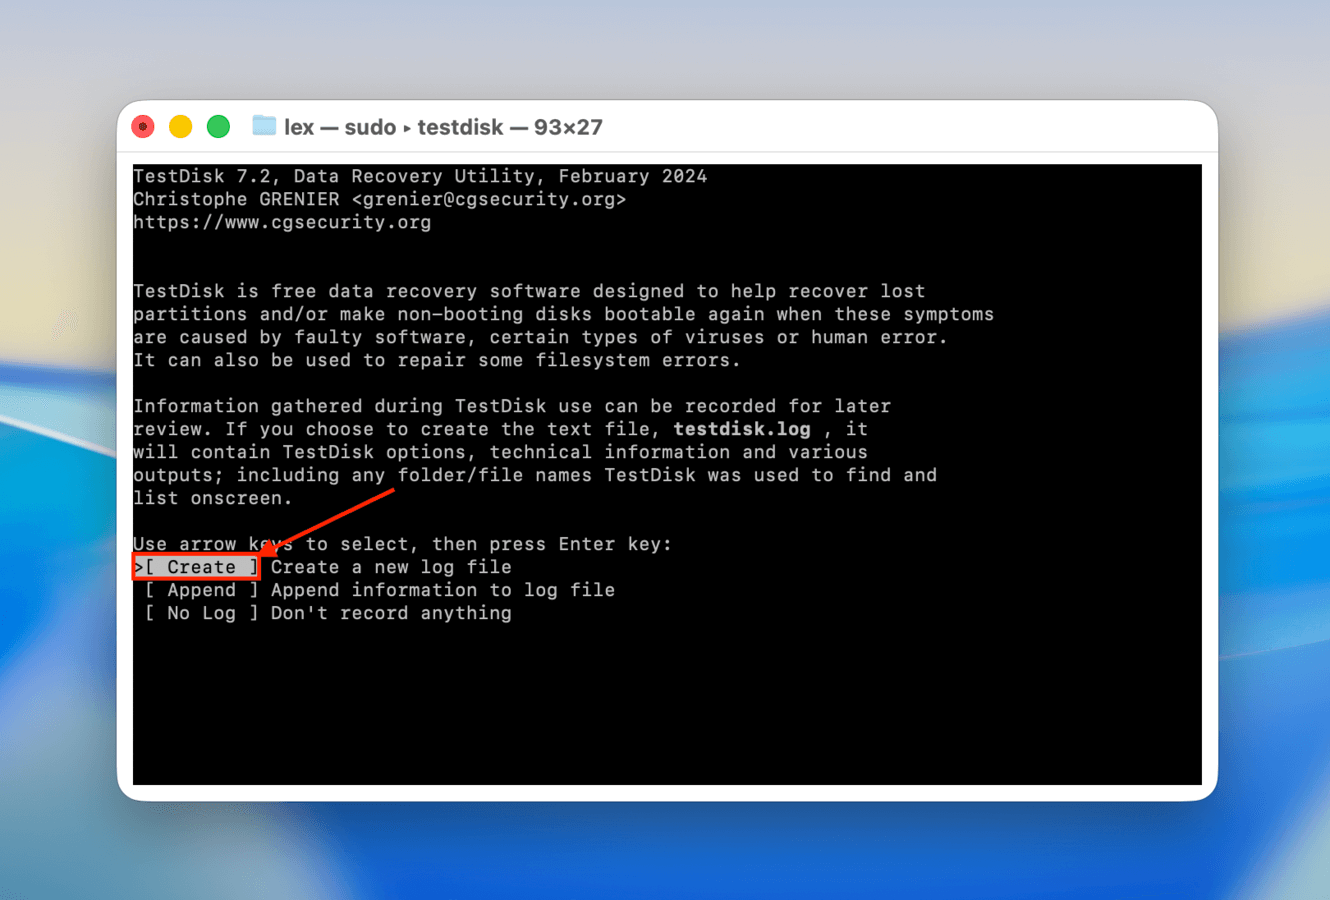
Step 5. Once you see TestDisk’s main menu, use your arrow keys to select Create. Then, press Return.
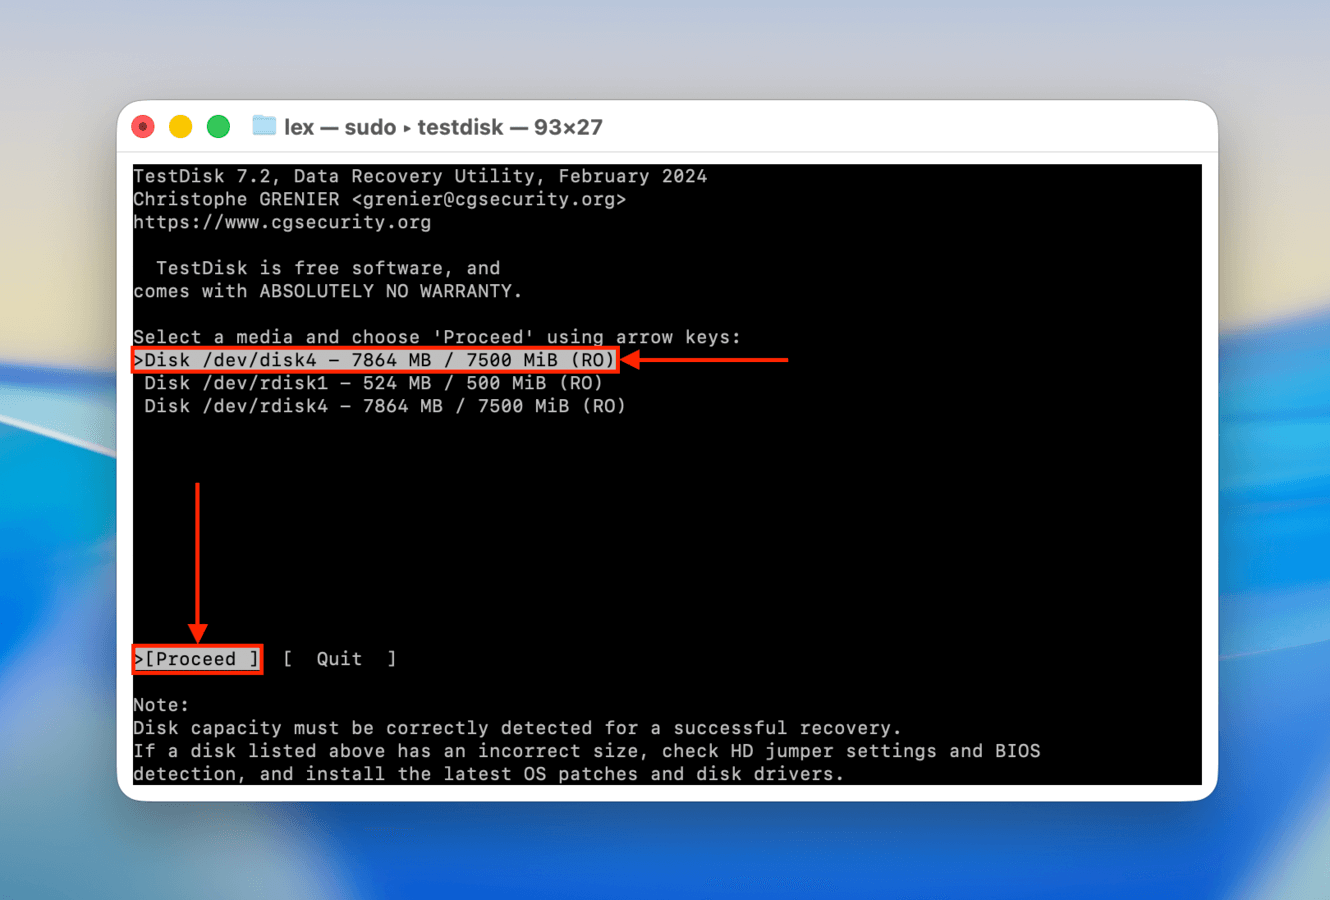
Step 6. In the next menu, use your arrow keys to select your SD card from the drive list. Then, select Proceed and press Return.
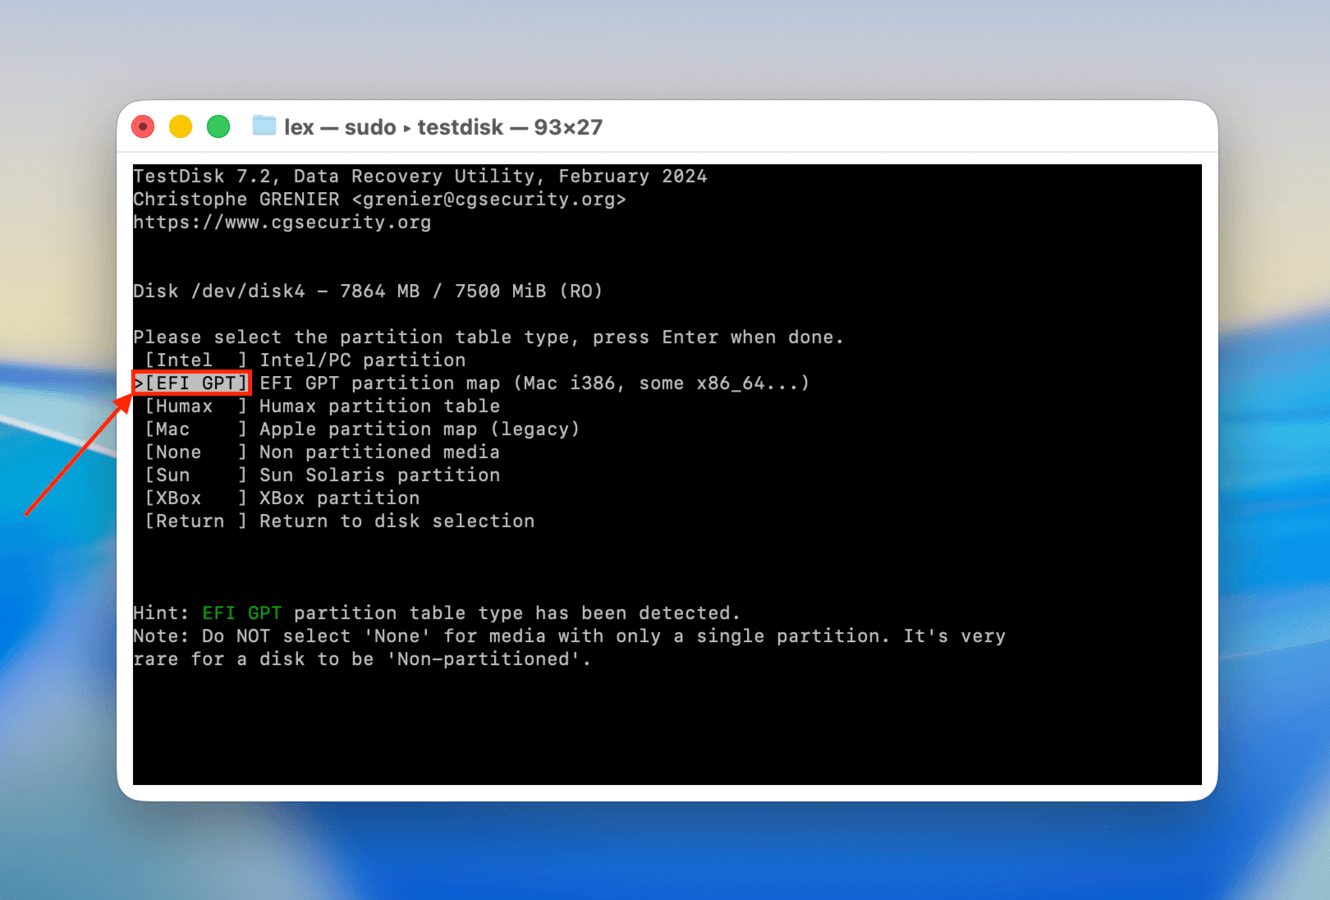
Step 7. Then, select your SD card’s partition type and press Return. TestDisk will automatically try to select the correct partition table, and it’s usually correct (in our experience).
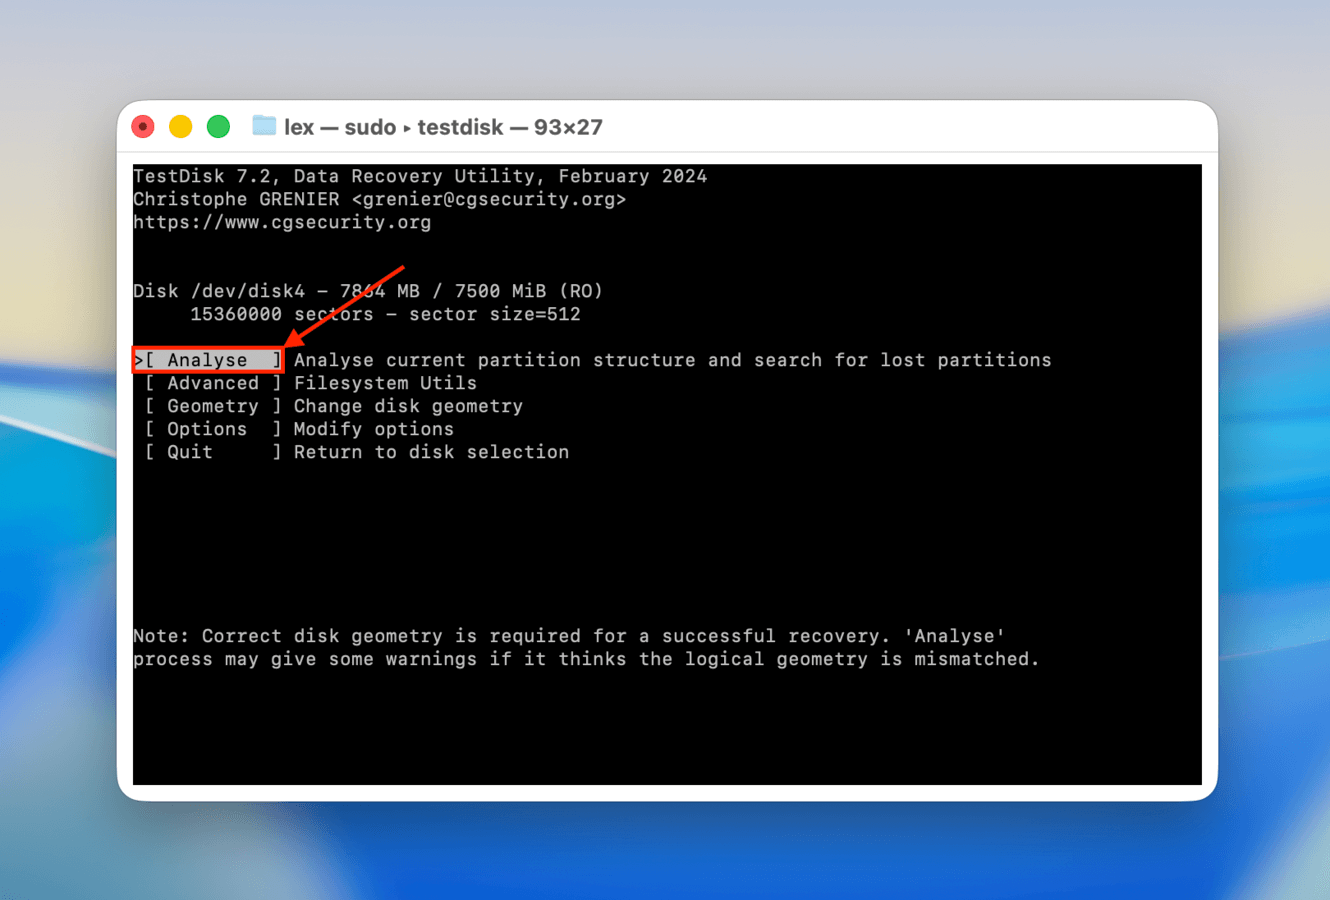
Step 8. Select the Analyse option, then press Return.
Step 9. Choose Quick Search and press Return.
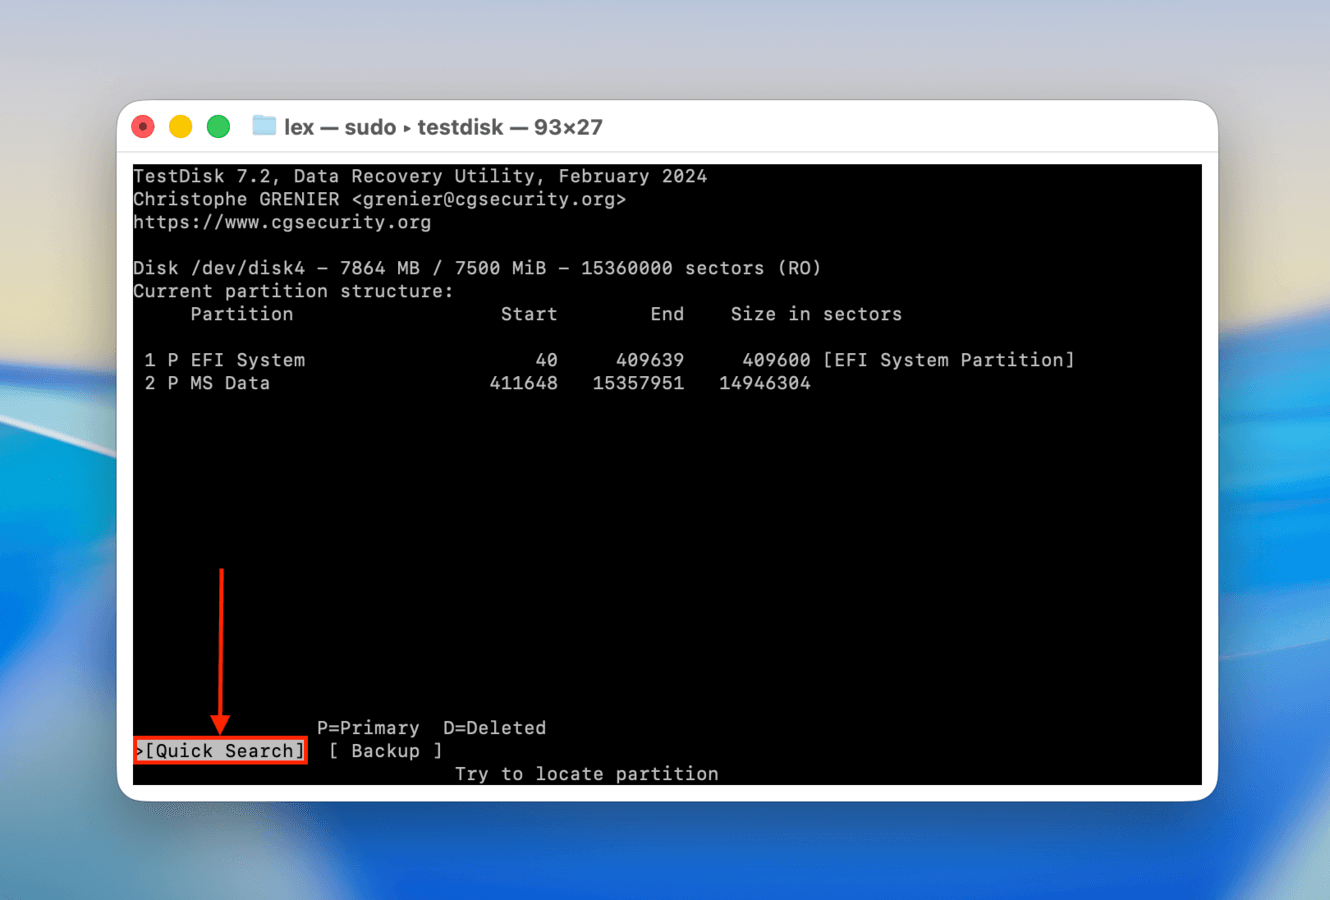
Step 10. Select the partition that TestDisk found that you want to review. You can press P to list its files so you can verify if it’s the partition you’re looking for. If it is, highlight the partition and press Return.
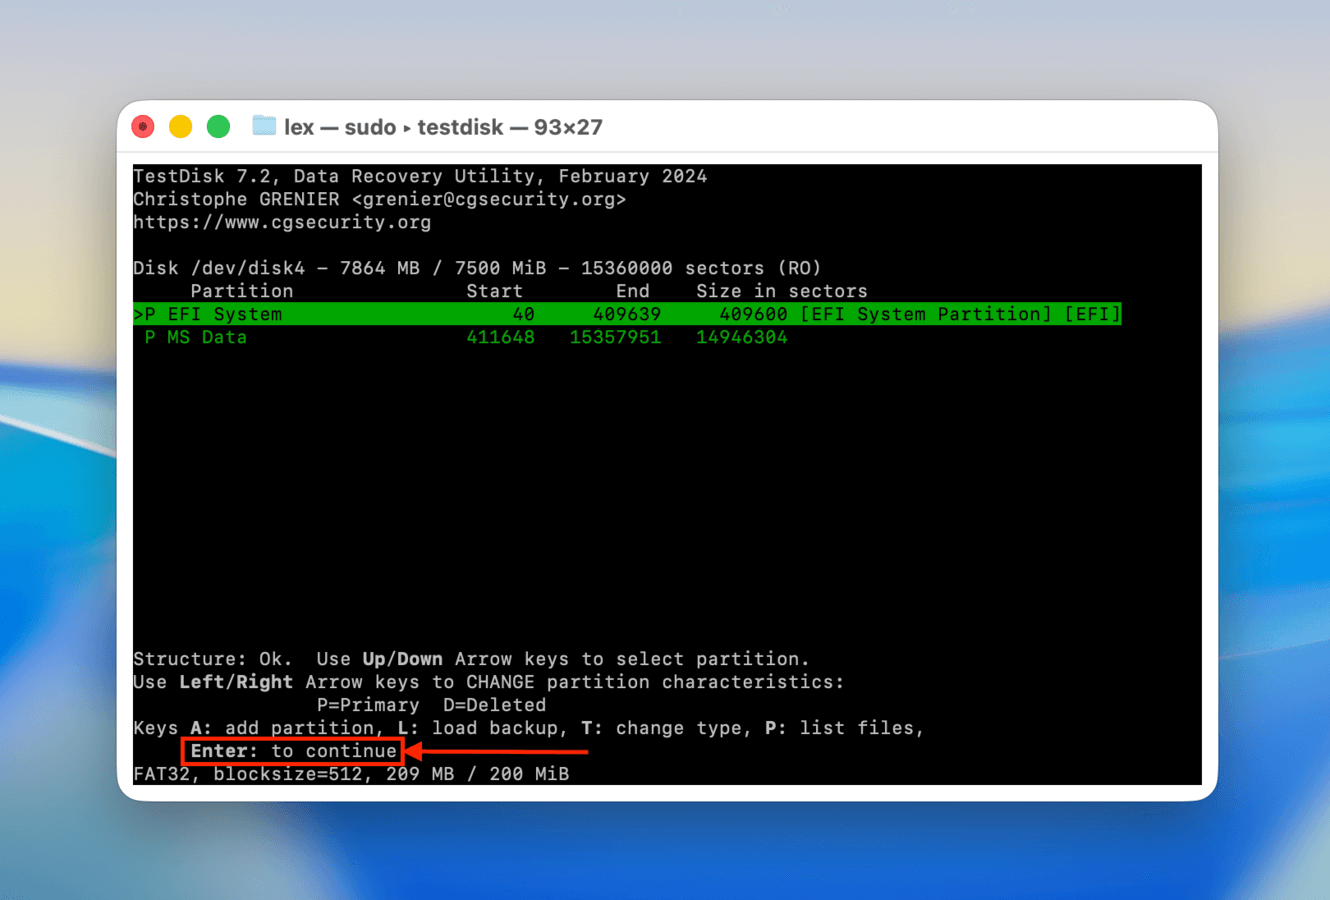
Step 11. Finally, select Write for TestDisk to add the partition back to your SD card’s disk.
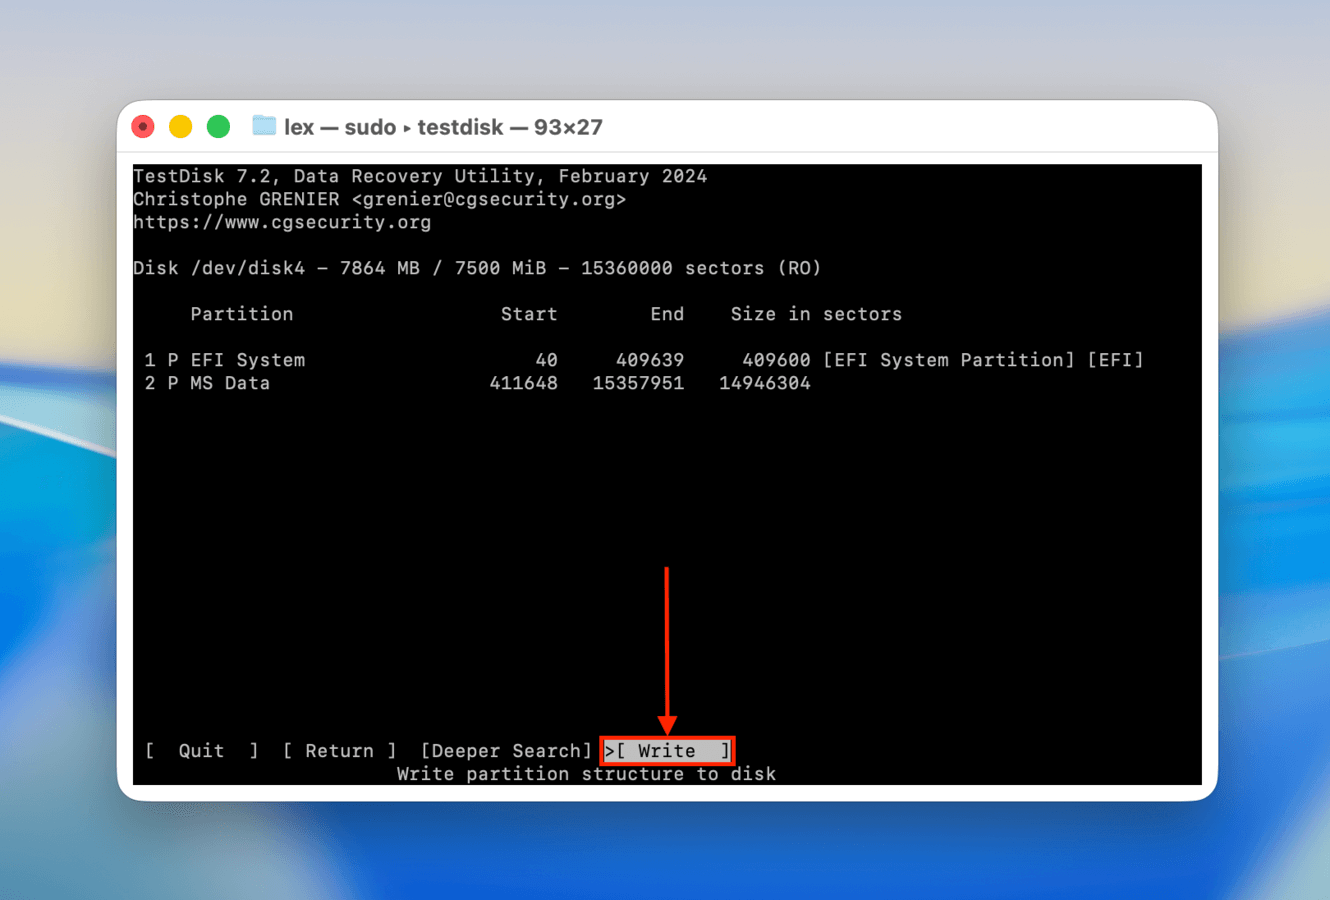
After using TestDisk, safely eject your SD card and plug it back in. This allows your Mac to establish a new connection with your memory card.
Method 3: Reset Your Mac’s NVRAM and SMC
The SMC (System Management Controller) manages the communication between your Mac and storage disks, while the NVRAM is responsible for storing system settings–including disk selection. Any glitches or errors that affect either of these components can prevent your computer system from properly communicating with your SD card. We’ll show you how to reset both.
To reset NVRAM:
Step 1. Shut down your Mac.
Step 2. Turn on your Mac and press and hold the following keys for 20 seconds: Option + Command + P + R.
Step 3. Once your Mac starts back up again, retry connecting your SD card.
To reset SMC:
Step 1. Shut down your Mac.
Step 2. Press and hold the following keys: Left Control + Left Option + Right Shift.
Step 3. Without letting go of the first 3 keys, press and hold the Power Button for 10 seconds.
Step 4. Release the keys. Ensure your Mac is completely turned off, then press the Power Button to turn it on.
For Desktop Macs:
Step 1. Shut down your Mac.
Step 2. Unplug your power cord from the socket it’s connected to. Then, wait for 15 seconds.
Step 3. Plug your Mac back into its original power source. Then, wait for 5 more seconds.
Step 4. Press the Power Button to turn your Mac on.
Method 4: Format Your SD Card
Formatting your SD card is the “cleanest” way to repair corruption, as it completely wipes everything and rebuilds the file system from scratch. It won’t have any “leftover” corrupted data that can break your memory card down the line. However, note that it also means that all the files stored on that card are getting wiped too.
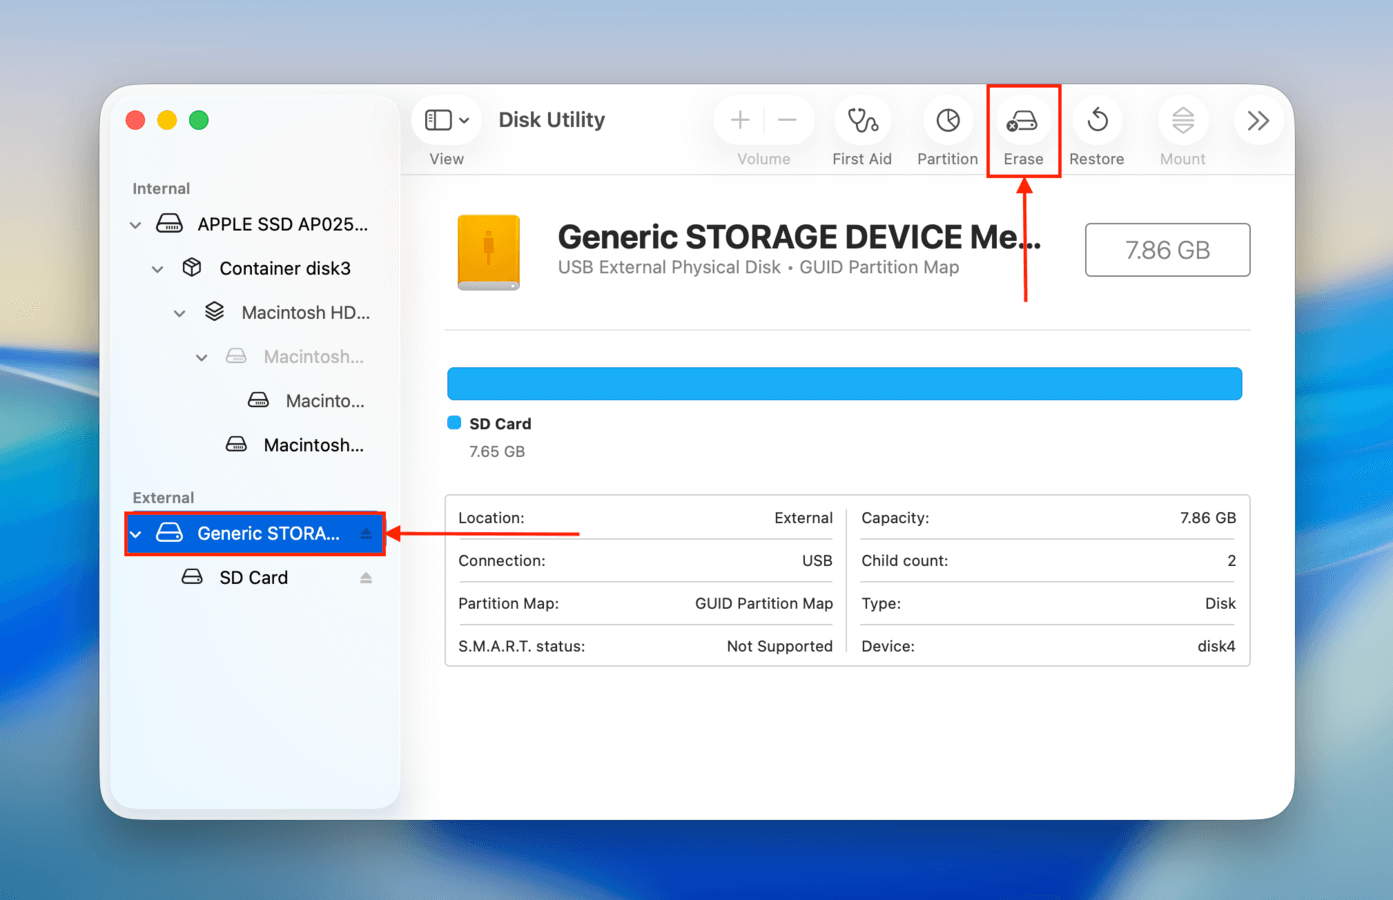
Step 1. Connect your SD card to your Mac.
Step 2. Launch Disk Utility (Finder > Applications > Utilities).
Step 3. Click the View button and select Show All Devices.
Step 4. Select your SD card from the left sidebar and click Erase at the top of the window.
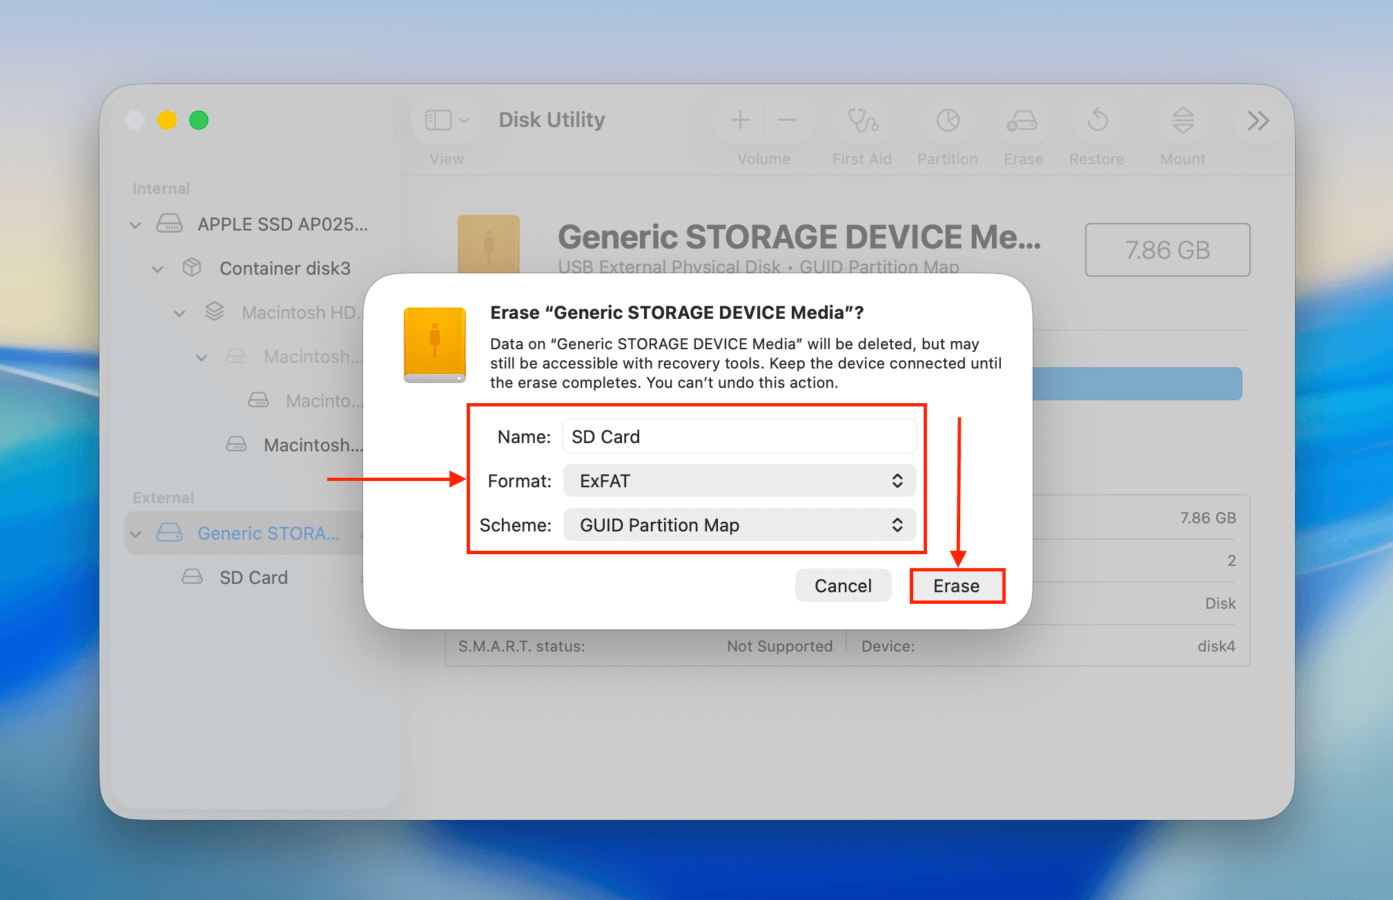
Step 5. Choose a name, format, and scheme for your SD card. We suggest the ExFAT format and the GUID Partition Map scheme for compatibility with Windows, Mac, and Linux computers. Then, click Erase.
If you use your SD card with a smartphone or camera, we recommend formatting it again with that device before using it. This allows the proper directories to be constructed before having to deal with storing new data.
Why SD Cards Get Corrupted and Simple Tips to Avoid It
SD cards usually get corrupted due to interruption during the read and write process (e.g., battery suddenly dies while copying files), physical damage, extreme temperatures, and virus infections. It’s also possible to purchase counterfeit cards by mistake, which are usually not designed to last as long as the original versions.
While it’s impossible to prevent corruption completely, there are a few best practices you can follow to lessen potential points of failure:
- Avoid counterfeit memory cards, which break more easily
- Always safely eject your SD card before physically removing it
- When not in your device, keep your SD card in a secure hard case away from extreme temperatures
- Never interrupt the read and write process (e.g., removing your SD card while it’s copying data); this also means ensuring your device has sufficient battery power
We still strongly recommend that you back up your data regularly and always have a spare card on hand during important shoots.
Are Your SD Card Videos Corrupted?
Repairing corrupted SD card videos is completely different from fixing a corrupted SD card. If your videos won’t play or you get errors when trying to open them, check out our guide on how to repair corrupted video files from an SD card using completely free tools. We provide several methods that work for a variety of SD card corruption cases.
FAQ:
PhotoRec is a free tool that you can use for SD card recovery. However, note that you’ll need to filter through the recovered data manually after the recovery process (as you can’t preview files during).
- Download and install PhotoRec onto your Mac.
- Launch the application.
- Use the command-line navigation to select the SD card storage device.
- Select the partition that will be recovered.
- Supply parameters to control the application’s settings.
- Select the type of files to be recovered.
- Choose the filesystem type.
- Select a location for the storage of recovered files.
- Perform the recovery.


