The Apple vs. Flash war is still raging, with Apple shipping the new MacBook Airs sans Flash plugins. Adobe is fighting back by working with smartphone manufacturers to create mobile, Flash-enabled devices. What are everyday Mac users to do, stuck in the crossfire?
We at Macgasm say go Flash-free! There are significant performance and battery life gains to be had by forgoing the finicky Flash plugin in OS X. To help y’all out, we’ve created the below how-to guide to accomplish just that. Viva la revolution!
“IT WAS GREAT WHEN IT ALL BEGAN…”
Apple CEO Steve Jobs famously stated in his “Thoughts on Flash” manifesto, “We know from painful experience that letting a third party layer of software come between the platform and the developer ultimately results in sub-standard apps and hinders the enhancement and progress of the platform.”
Jobs is referring to Adobe and their rich Internet application plugin, Flash. The Flash plugin allows your Internet browser to display “rich” content such as video, rollover site features, and the most annoying of all, animation-based Flash websites. However, Flash is very good at crashing Safari, Apple’s Internet browser. (And if you’re like me, you refuse to use any other browser because you’re in love with Safari’s multitouch features.)
Adobe, once one of Apple’s dearest busom buddies, has now taken on the role of the Cupertino company’s estranged wife. Citing Adobe for catering to developers writing cross-platform applications as opposed to exclusively in Apple’s native Objective-C, “Thoughts on Flash” is a decided vendetta, swearing off any future contact with Adobe plugins. It’s no wonder that the new MacBook Air line ships without a Flash plugin installed.
With the advent of Flash-less Macs, it’s high time for all OS X users to go footloose and Flash-free. The step-by-step is below. Allons-y!
READ THIS FIRST: HOW TO SEE YOUR HIDDEN SYSTEM FILES
Most Mac users don’t go beyond checking email, listening to music, surfing the Internet, and perhaps writing the occasional document. Apple realized this, and forced OS X to hide system files by default. It’s a good safety precaution, preventing users from accidentally deleting a vital system file.
If you want to go Flash-free, though, you’re gonna have to get your hands a little dirty and do some work in the OS X Terminal.
Terminal is a text-based program that allows you, the user, to send direct commands to the operating system. It’s great for doing system administration, inspecting network traffic, etc. (If you’re interested in learning how to use Terminal extensively, I recommend this guide.)
Steps to Showing Hidden Files:
- Open the Finder.
- Under Places, click on Applications.
- Open the Utilities folder.
- Scroll down, and double-click on the Terminal icon.
- Type the following command, and press Enter: defaults write com.apple.Finder AppleShowAllFiles YES

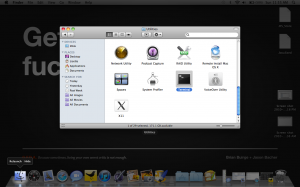
- For this change to take effect, you’ll need to relaunch Finder. Hold down the Option key, and click the Finder icon in the Dock. A contextual menu will appear. Click “Relaunch,” and Finder will restart:
- You’re done! You can quit Terminal.
Note: You will see lots of files where you didn’t see them before, particularly one named .DS_Store in every directory. Rule of thumb: if you don’t know what a file is, don’t touch it! You can also re-hide your system files by using the above Terminal command; just switch YES to NO, and relaunch Finder.
OK, COOL. WHAT DO I DO NEXT?
Rock on. Now that we’ve enabled our Macs to show all system files, we can start the process of disabling Flash. I’m going to first go over creating a Flash-free Safari. After that will be some notes on Flash and Google Chrome.
HOORAY! LET’S DISABLE FLASH!
- Open the Finder.
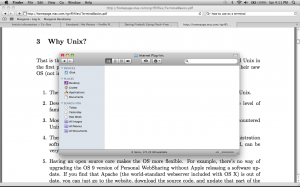
- You’re going to access the Internet Plugins in your system’s Library. If you try to access the Internet Plugins folder through your user account, you won’t see any files in the folder:
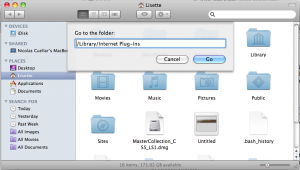
- So, once in the Finder, hit command + shift + g on your keyboard.
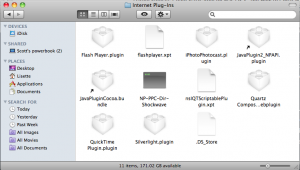
- Enter the following path into the dialogue box: /Library/Internet Plug-Ins. This will show you all installed plugins in your system:
- Disabling Flash is super simple. In your Library folder, create a new folder called “Internet Plug-Ins Disabled.”
- Drag “Flash Player.plugin” and “flashplayer.xpt” into your new Disabled folder.
- Log out of, and then back into your user account for the changes to take effect.
- Voilà! Flash is now disabled. Now we can install a new, non-Flash plugin.
You’ll begin to see the immediate benefits of disabling Flash. For example, websites with animated ads will now display them as static images- a small victory in our worlds, which are full of visual noise and disturbance.
INSTALLING CLICKTOFLASH FOR SAFARI
John Gruber over at Daring Fireball recommended installing ClickToFlash as a Flash-less alternative for Safari browsers. ClickToFlash is a browser plugin, and can be found here.
ClickToFlash is a clever workaround. When you visit a site with Flash features, ClickToFlash lies to that website. It’s saying “Yes, I do indeed have Flash installed! Gimme your video content!” So, the webpage you’re visiting will have a nice little Flash logo on top of its video player. Clicking the Flash logo will make ClickToFlash hand over the content to your disabled Flash plugin, and the content will then play. Slightly cyclical, but workable nonetheless.
Gruber’s article actually recommends disabling ClickToFlash and just installing the YouTube5 Safari Extension. The YouTube5 extension forces embedded YouTube content to play back using HTML5 tags. This works because all YouTube videos are encoded in H.264.
However, I recommend using both, especially if you’re into watching online content on websites such as Hulu.
I USE GOOGLE CHROME. HOW DO I GO FLASH-FREE?
Unfortunately, no HTML5 alternative exists for Google Chrome. Note here that Chrome will always play back Flash content, even if your Flash plugin is disabled as outlined in the steps above.
Gruber recommends opening Flash-laden webpages in Chrome, and then exiting Chrome when you’re finished with that webpage. Meaning, Chrome will have to be your secondary browser if you want to otherwise be Flash-free.
You can set Safari to open your current webpage in Chrome via a keyboard shortcut:
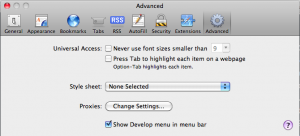
- Open the Advanced panel in Safari’s Preferences.
- Check the “Show Develop menu” checkbox:
- This will show the Develop menu. Click that, and then “Open Page With.” It’ll show all other browsers installed on your system. Select Chrome.
- Using Keyboard Shortcuts under System Preferences, create a keyboard command that will open the webpage you’re currently viewing in Chrome. Be sure to use “Google Chrome” or “Google Chrome.app” when prompted for a menu item.
- You’re done! Be sure to quit out of Chrome when you’re done viewing Flash content, so the plugin doesn’t keep running in the background.
Note: Personally speaking, opening a second browser just to view Flash content seems a little nonsensical. Why drain system resources by operating two browsers simultaneously just to watch Flash content, another notorious resource hog? I suppose, however, different strokes, different folks, etc. Do what makes you happy!
ONWARD AND UPWARD
So, there you have it. A guide to going mostly, if not 100% Flash-free. There are significant improvements to performance and battery life by taking these steps, and your Macintosh will thank you for it.
Have you gone Flash-free in the OS X environment? Let us know in the comments!
Article Via Daring Fireball
Photo Credit: Apple/Flash graphic, 9 to 5 Mac. Screenshots, Lisette Voytko.

