Performing a factory reset on your iPhone only to realize you’ve just wiped important data can make your stomach drop since all user-created stored data is deleted during the process. But here’s the good news: recovering your data might be possible, depending on your situation. In this article, I’ll walk you through your options for getting your data back.
| Method | Description |
| 💻 Use Data Recovery Software | Scan and extract data from existing backups using specialized recovery tools. |
| 🎵 Restore from Finder/iTunes Backup | Recover your data from local backups stored on your computer through iTunes or Finder. |
| ☁️ Restore from iCloud Backup | Access your latest backup from Apple’s cloud storage. |
Table of Contents
Is it Possible to Recover Data After Factory Resetting iPhone?
When you perform a factory reset, your iPhone wipes all data and settings, including the encryption key that protects your information. This process essentially returns your device to the same state as when it first came out of the box.
iPhone users typically create backups in several ways (sometimes without realizing it):
- Finder/iTunes backups on your computer store complete snapshots of your device.
- iCloud automatically backs up your device when it’s charging and connected to Wi-Fi.
- Users also sometimes create copies of important files manually, especially when sharing them with others.
To retrieve your files from these backup locations, you can either:
- Check the locations one by one, which can be time-consuming and error-prone.
- Use iPhone recovery software to scan all these locations at once, saving hours of manual searching and significantly increasing your chances of finding what you need.
In the next section, I’ll walk you through both recovery methods step by step.
Quickly Recover Data After Factory Reset Using iPhone Recovery Software
After testing countless tools, Disk Drill is my top recommendation for iPhone data recovery software.
What makes it so special? First, Disk Drill takes a comprehensive approach to finding your lost iPhone data. It automatically searches through your local Finder/iTunes backups on your computer, saving you from the tedious process of checking each backup manually (support for iCloud backups is in the works).
Disk Drill also impresses with its usability. The software automatically organizes all found files into neat categories, and its preview feature lets you check files before recovery, so you’re not wasting time recovering data you don’t actually need.
Here’s how to use Disk Drill to recover lost iPhone data after a factory reset:
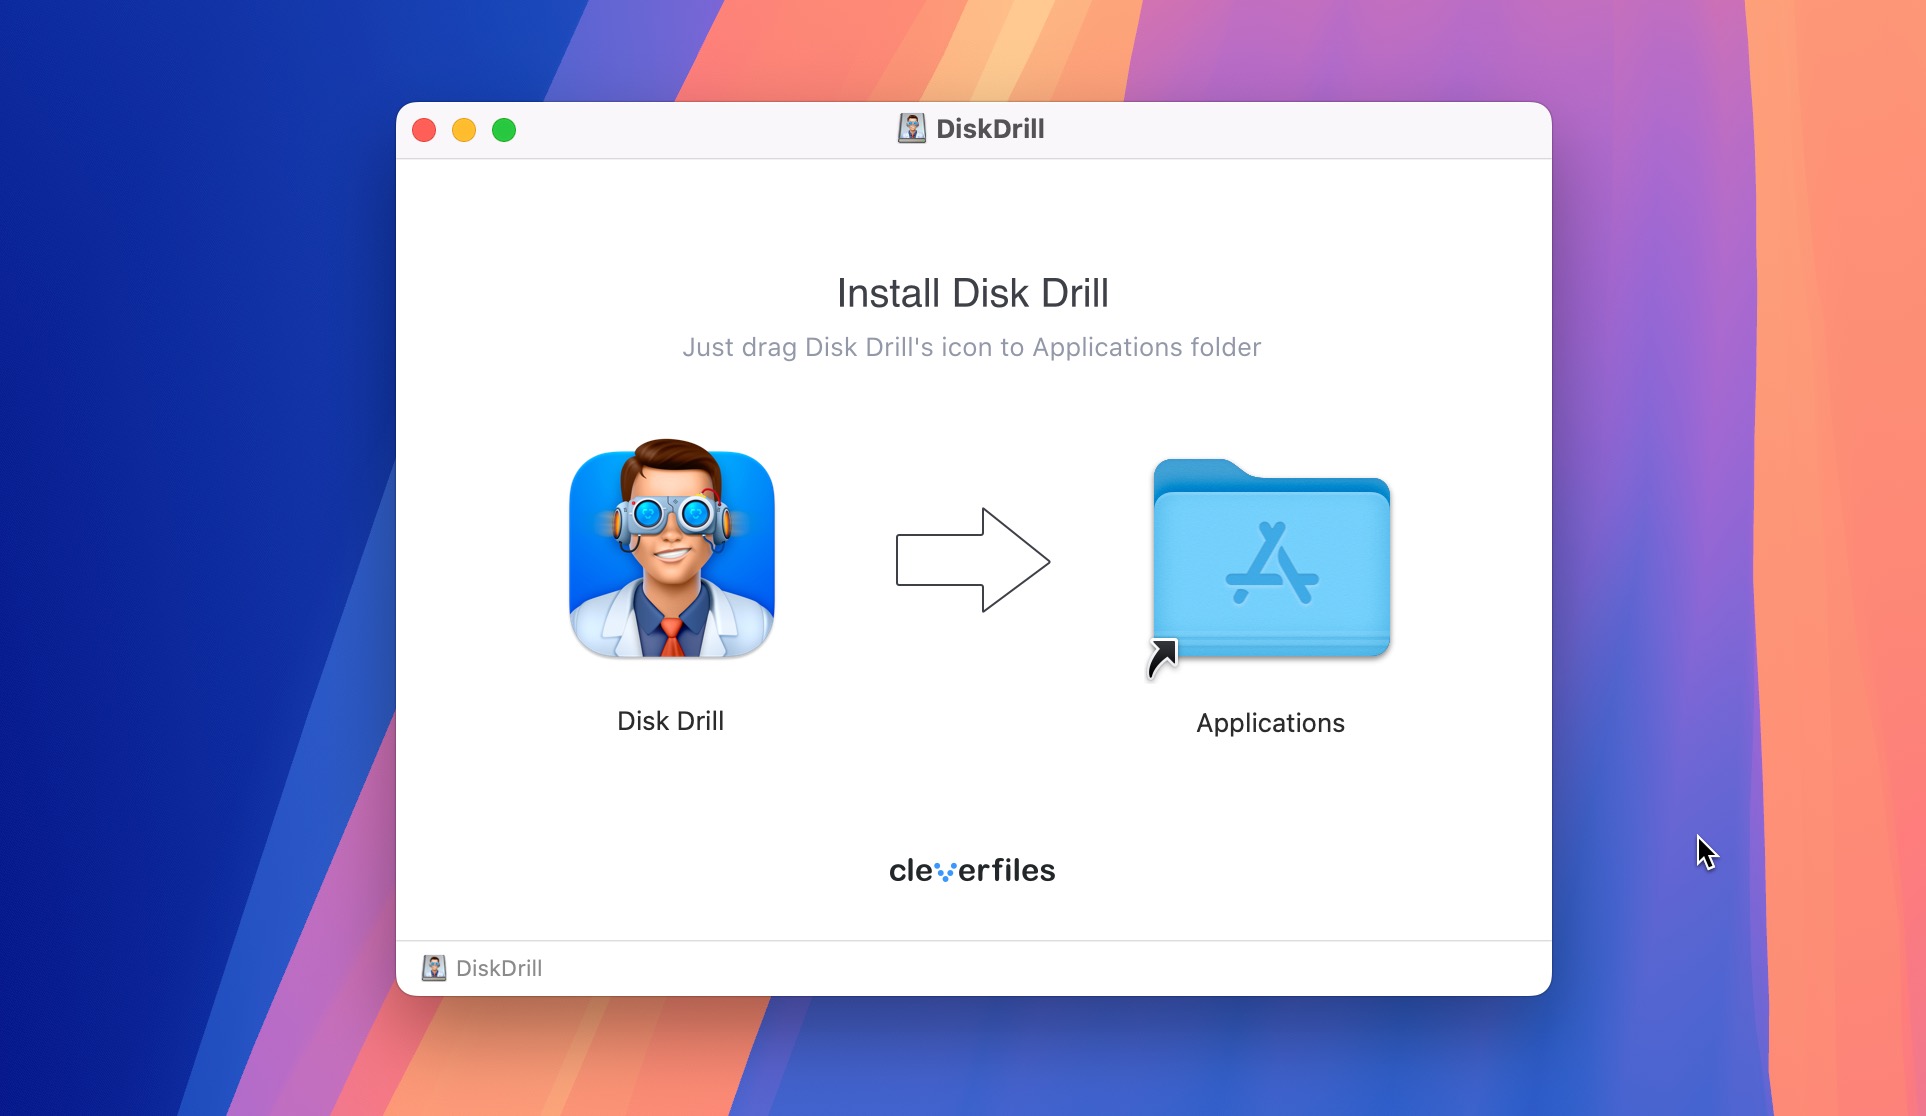
Step 1. Download and install Disk Drill on your Mac. Then, connect your iPhone and launch Disk Drill.
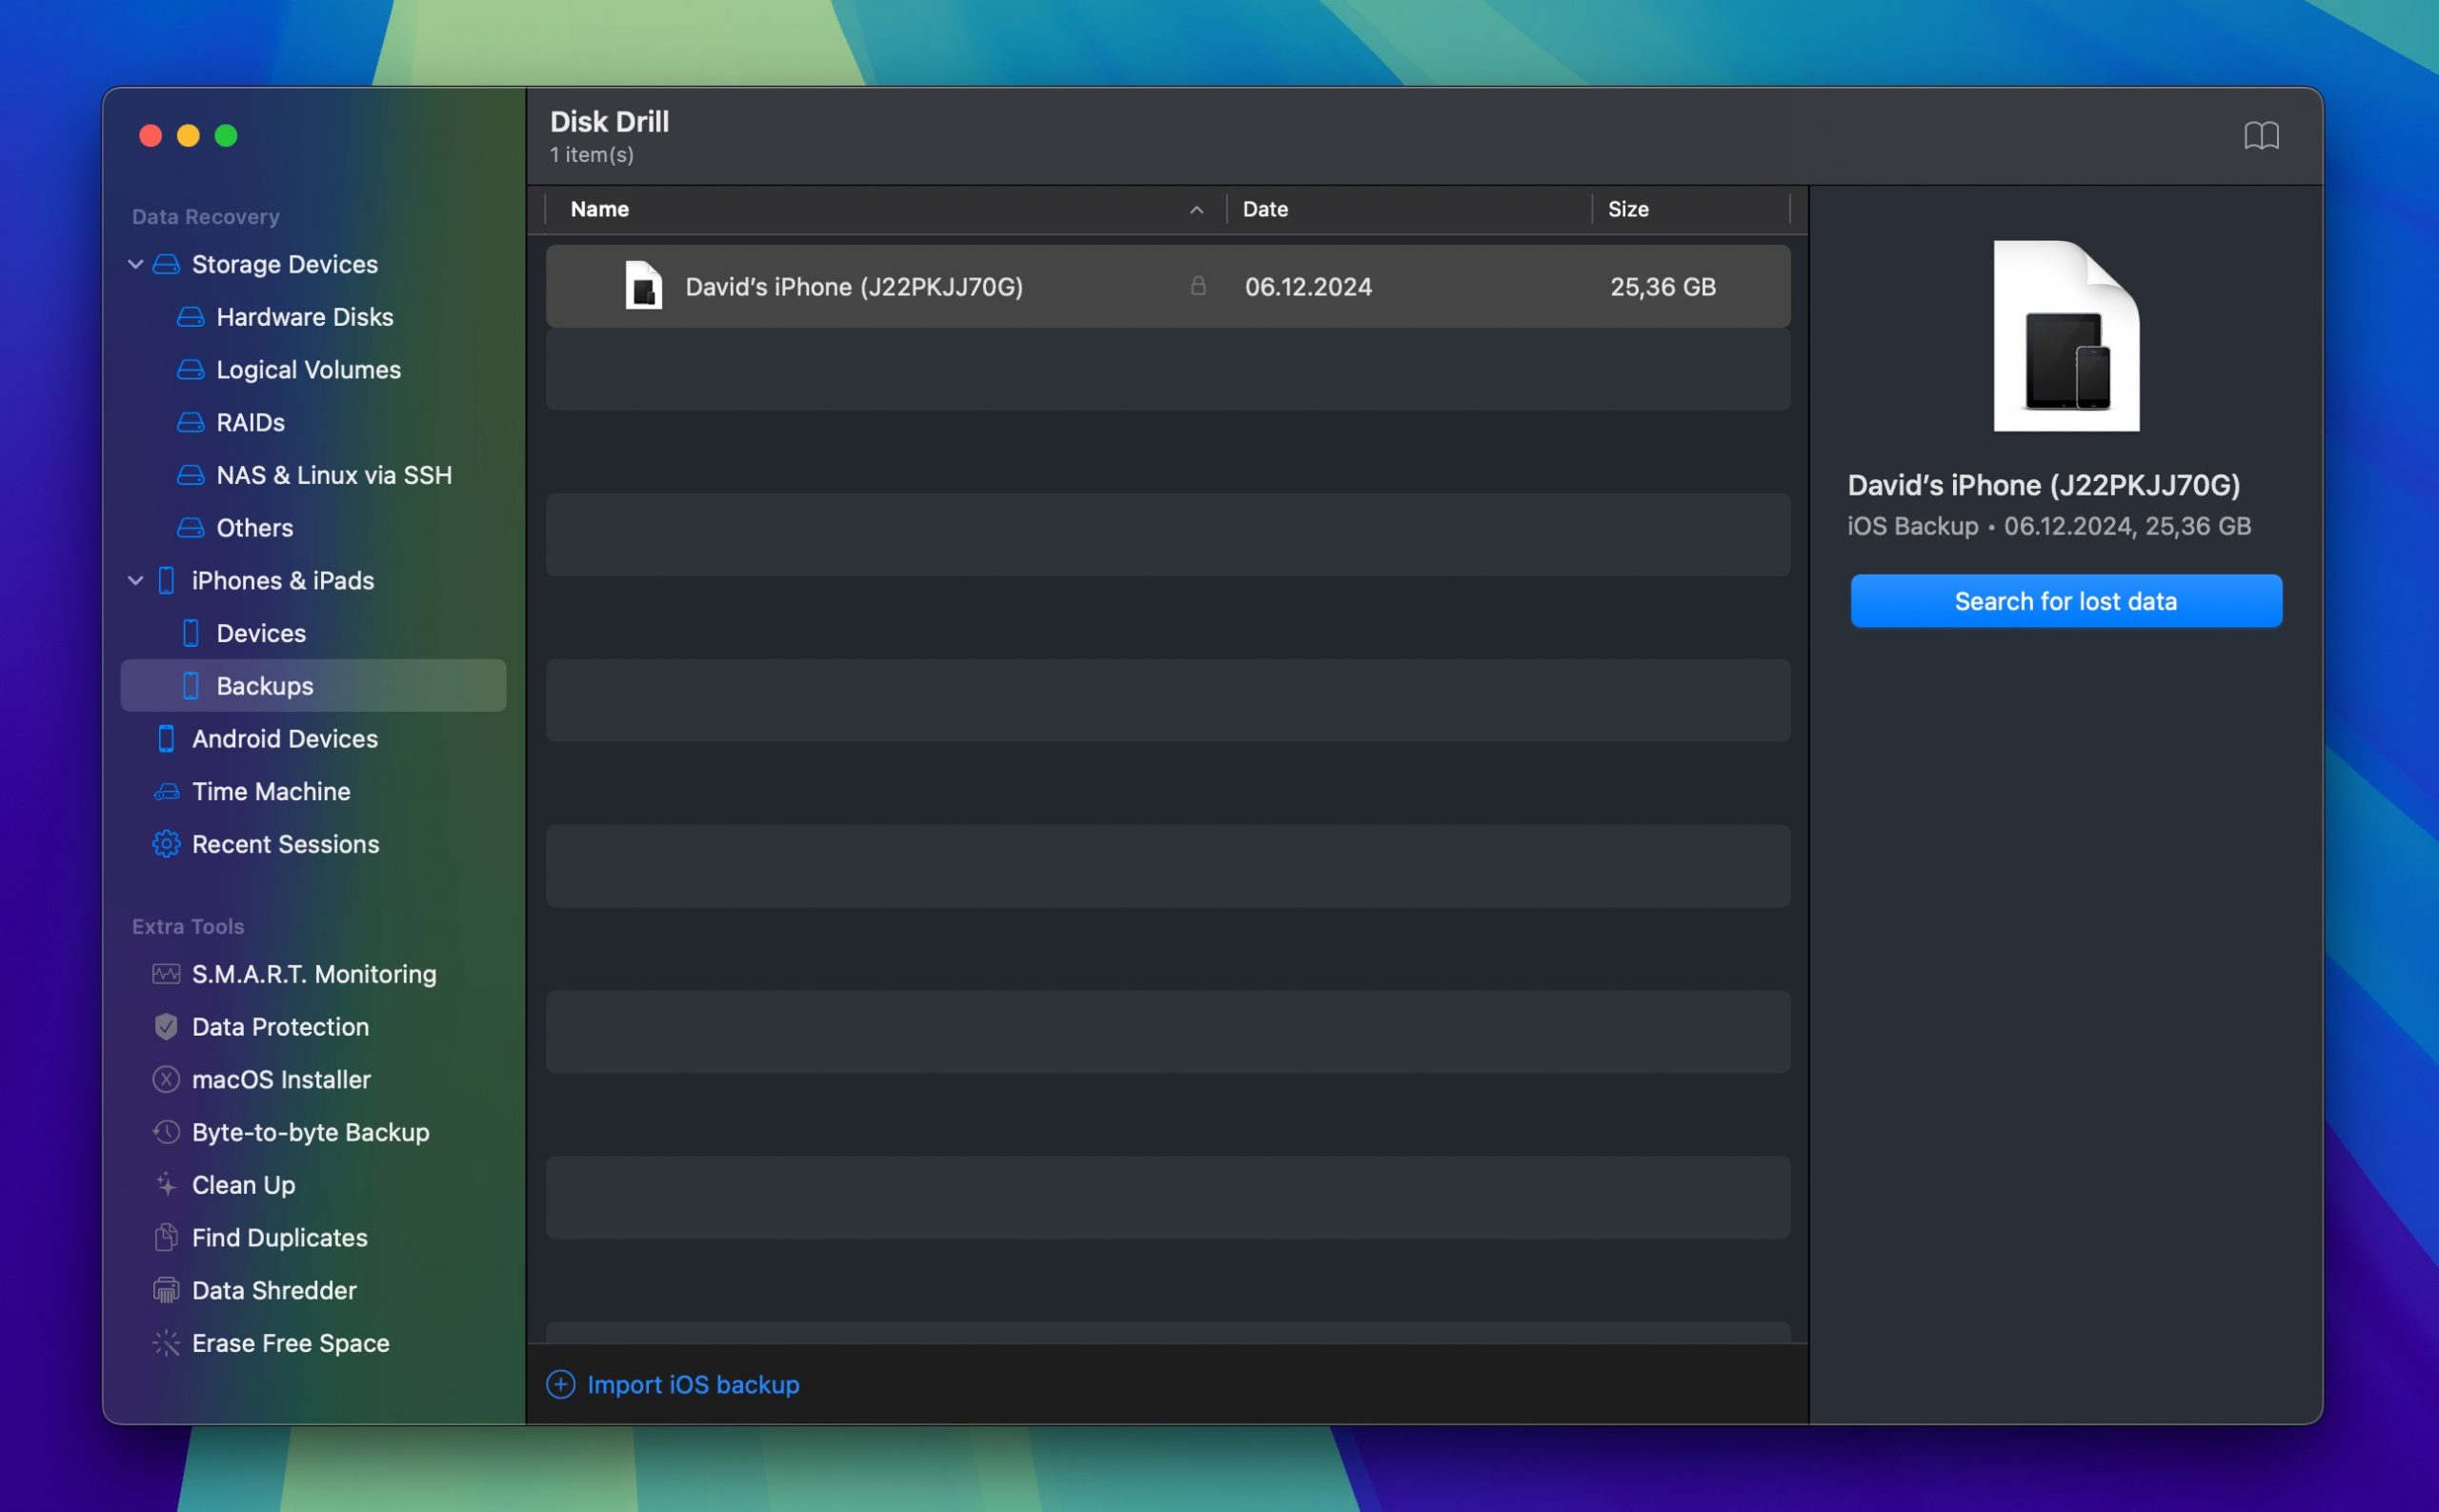
Step 2. Navigate to the iPhones & iPads section and select your backup. Click the Search for lost data button.
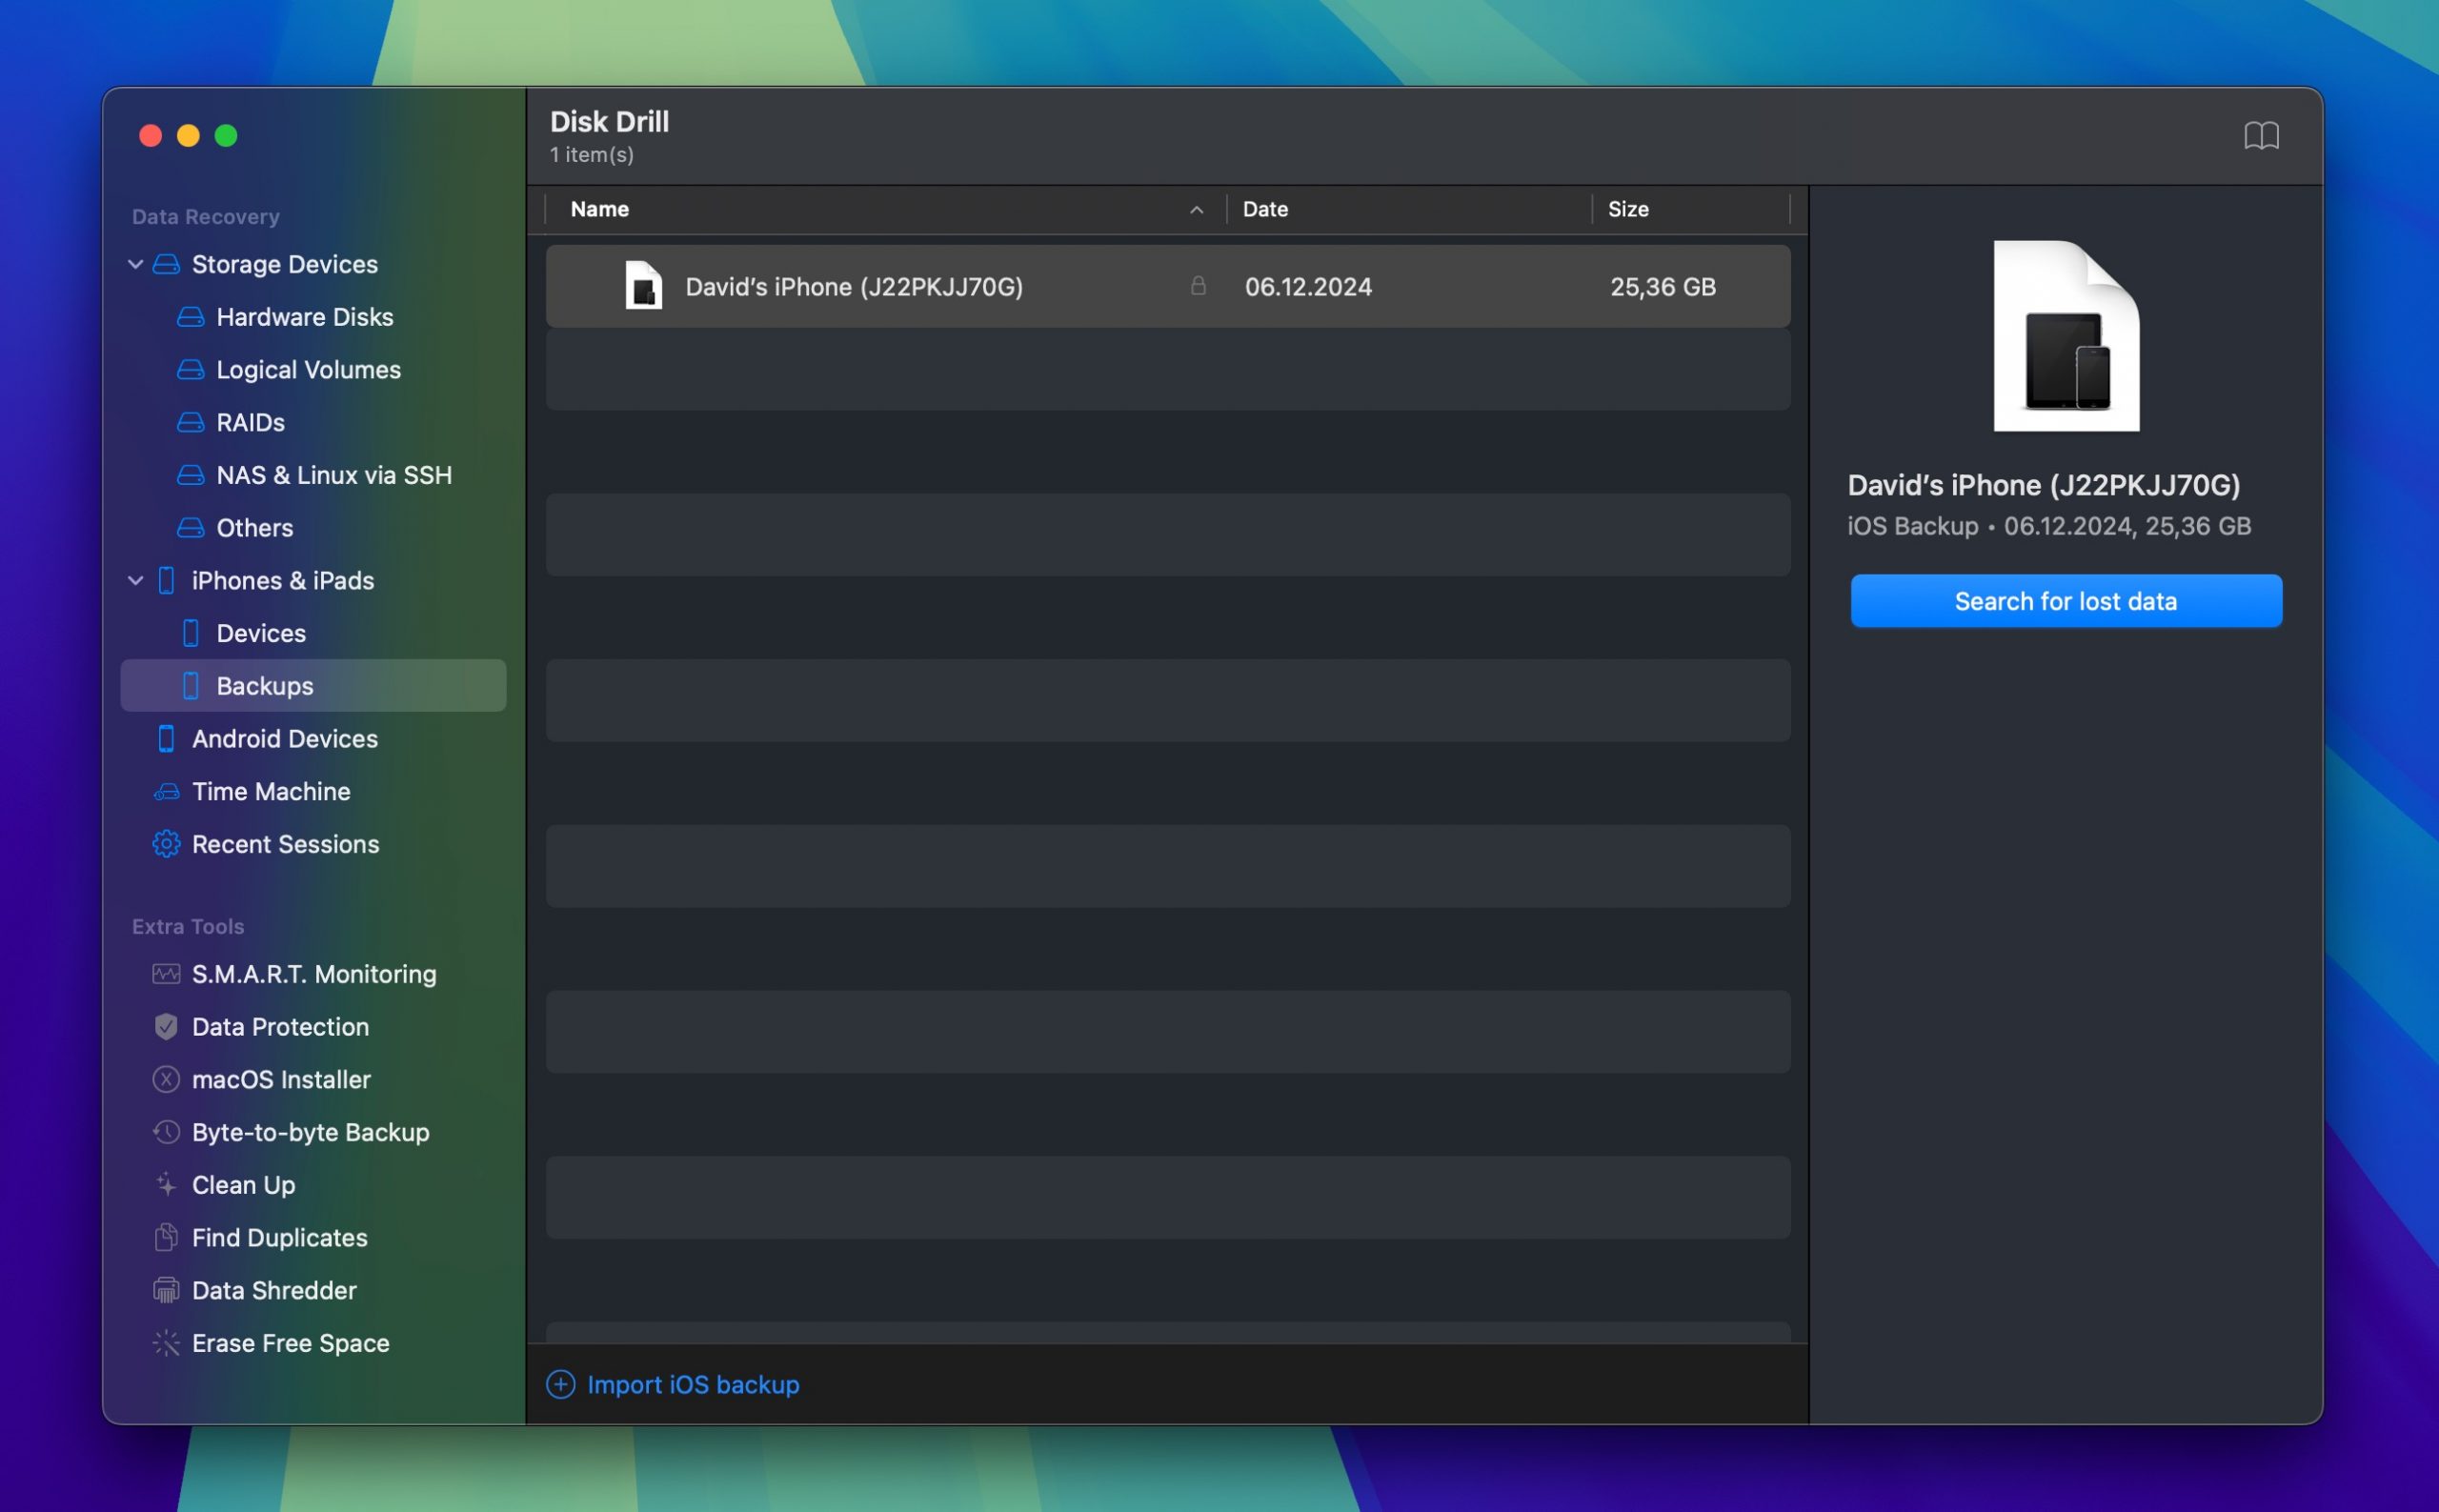
Step 3. Enter the passcode on your iPhone when prompted to do so. and let Disk Drill analyze the backup for your recoverable data.
Step 4. Browse through the found files categorized by type. Use filters to find specific types of data, such as photos, messages, or contacts. Preview files to check if they’re intact, then select what you want to recover.
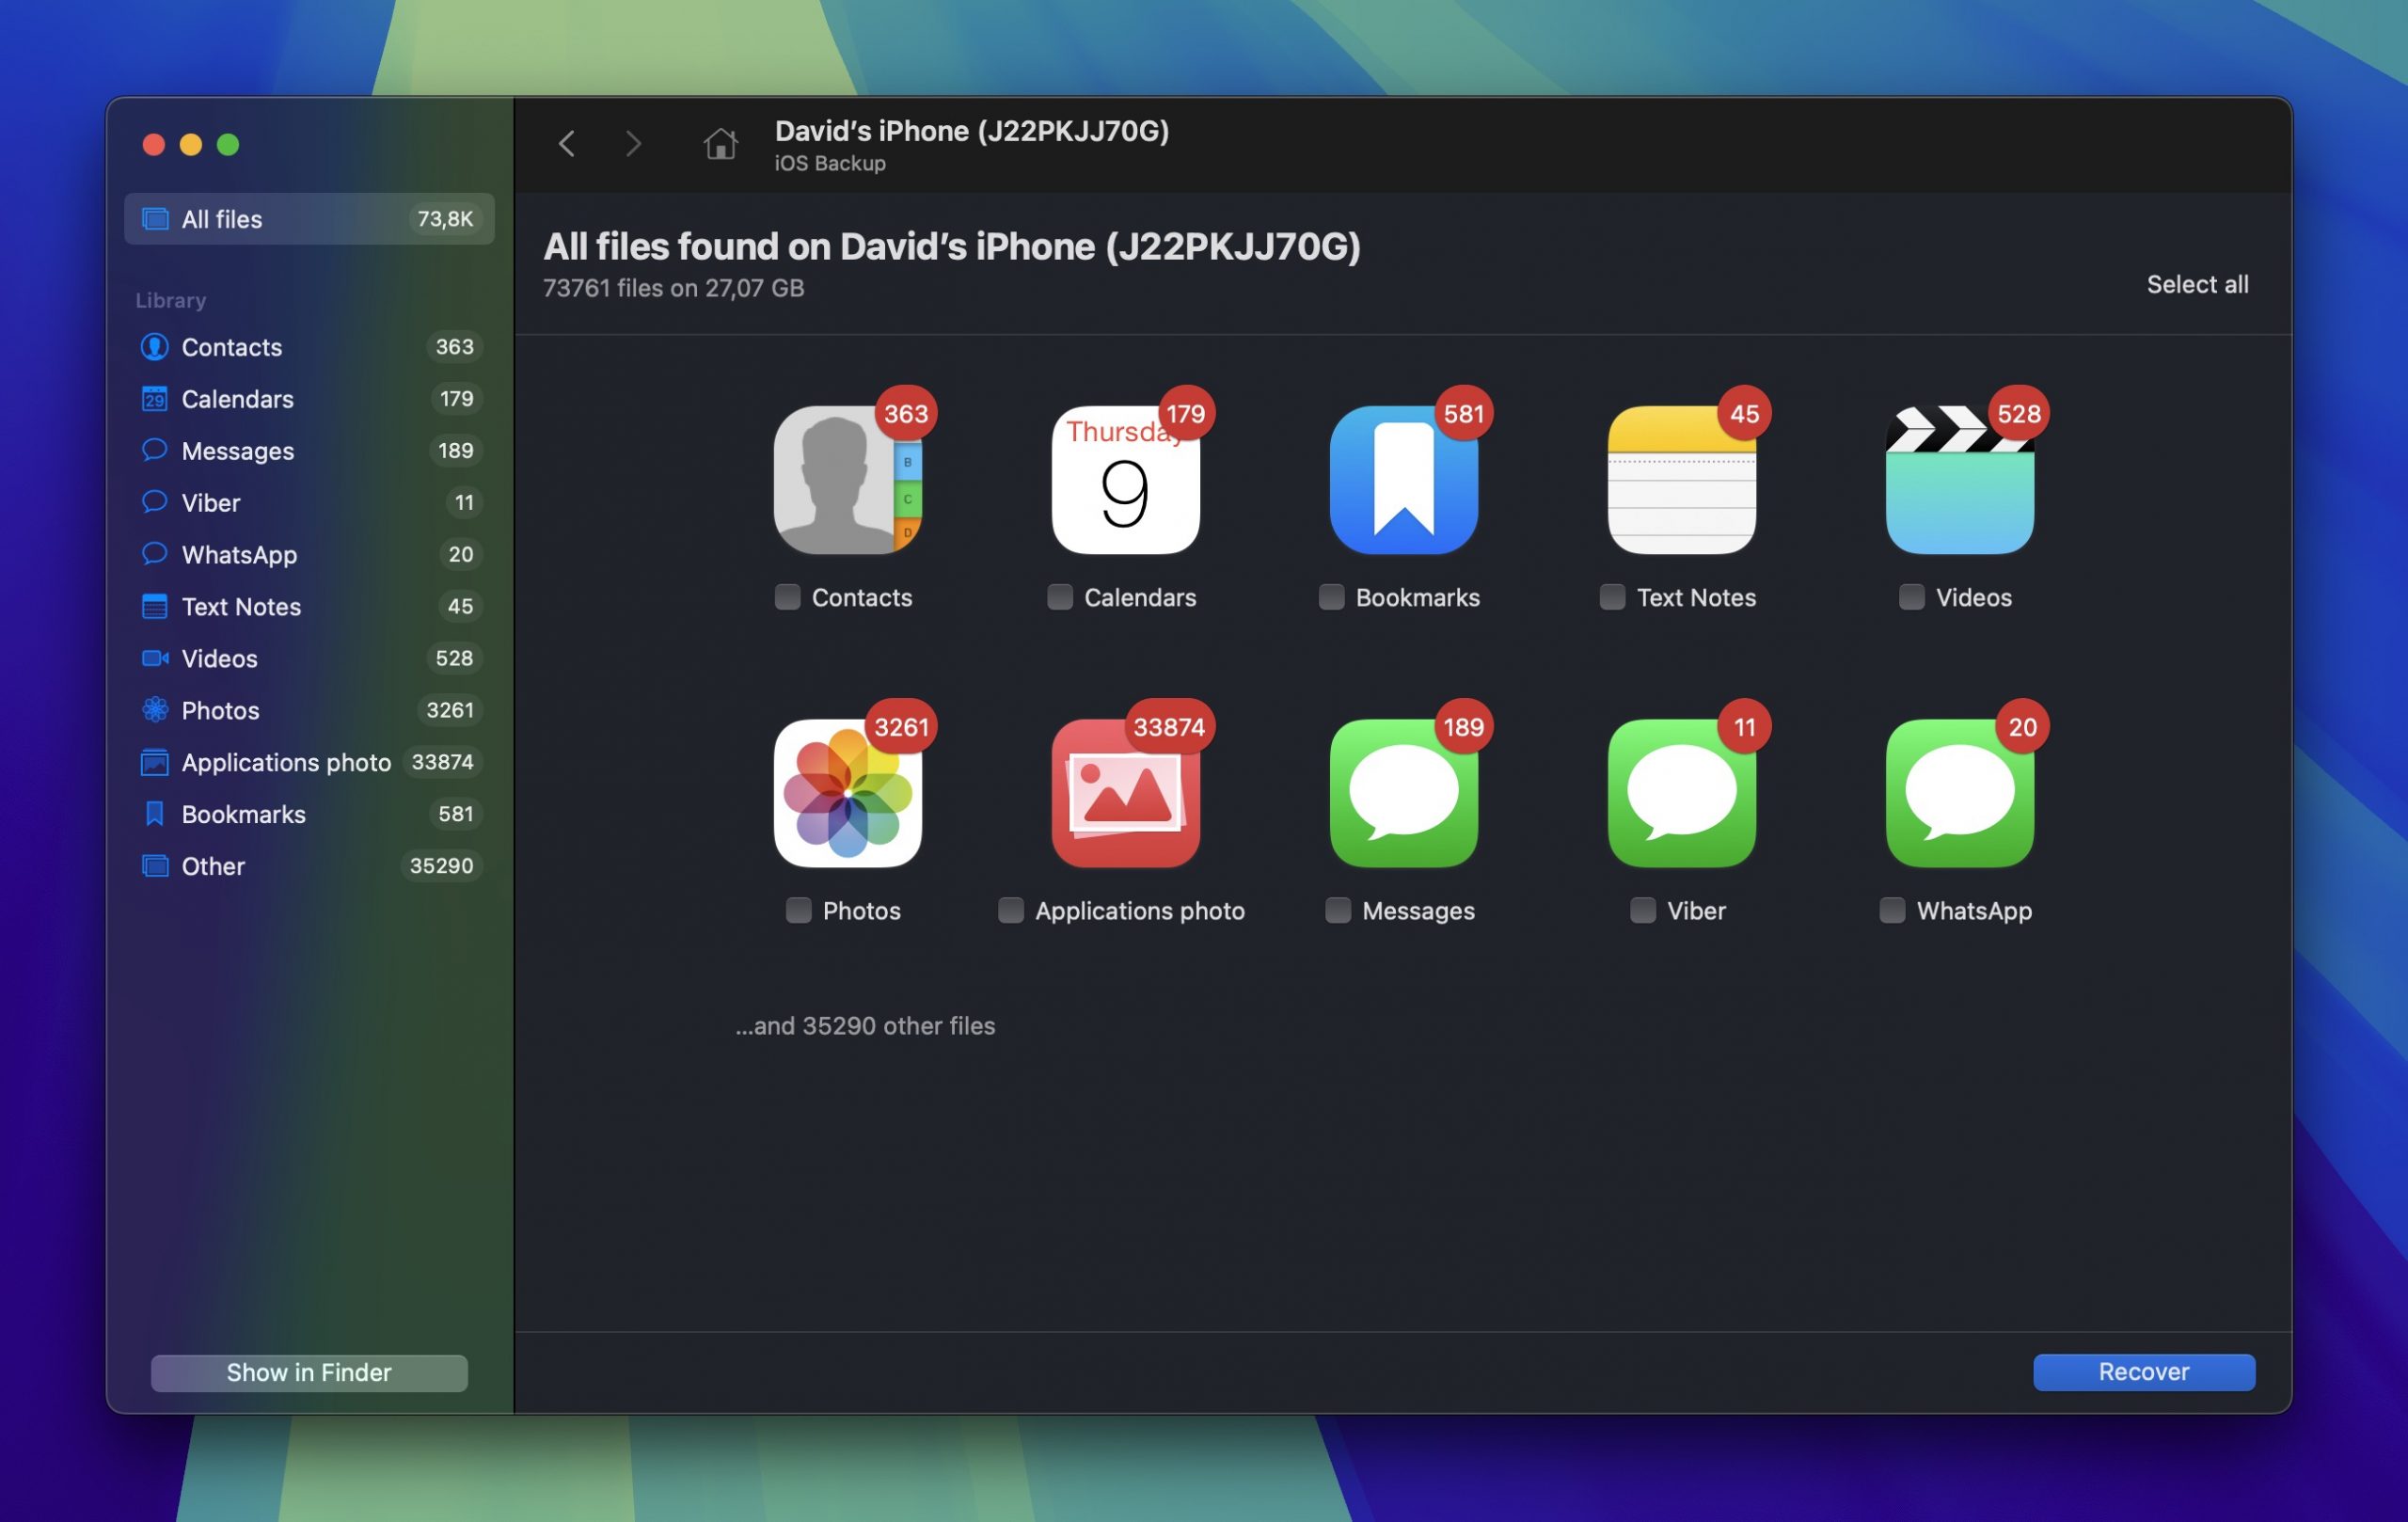
Step 5. Finally, click the Recover button and choose where to save your recovered files.
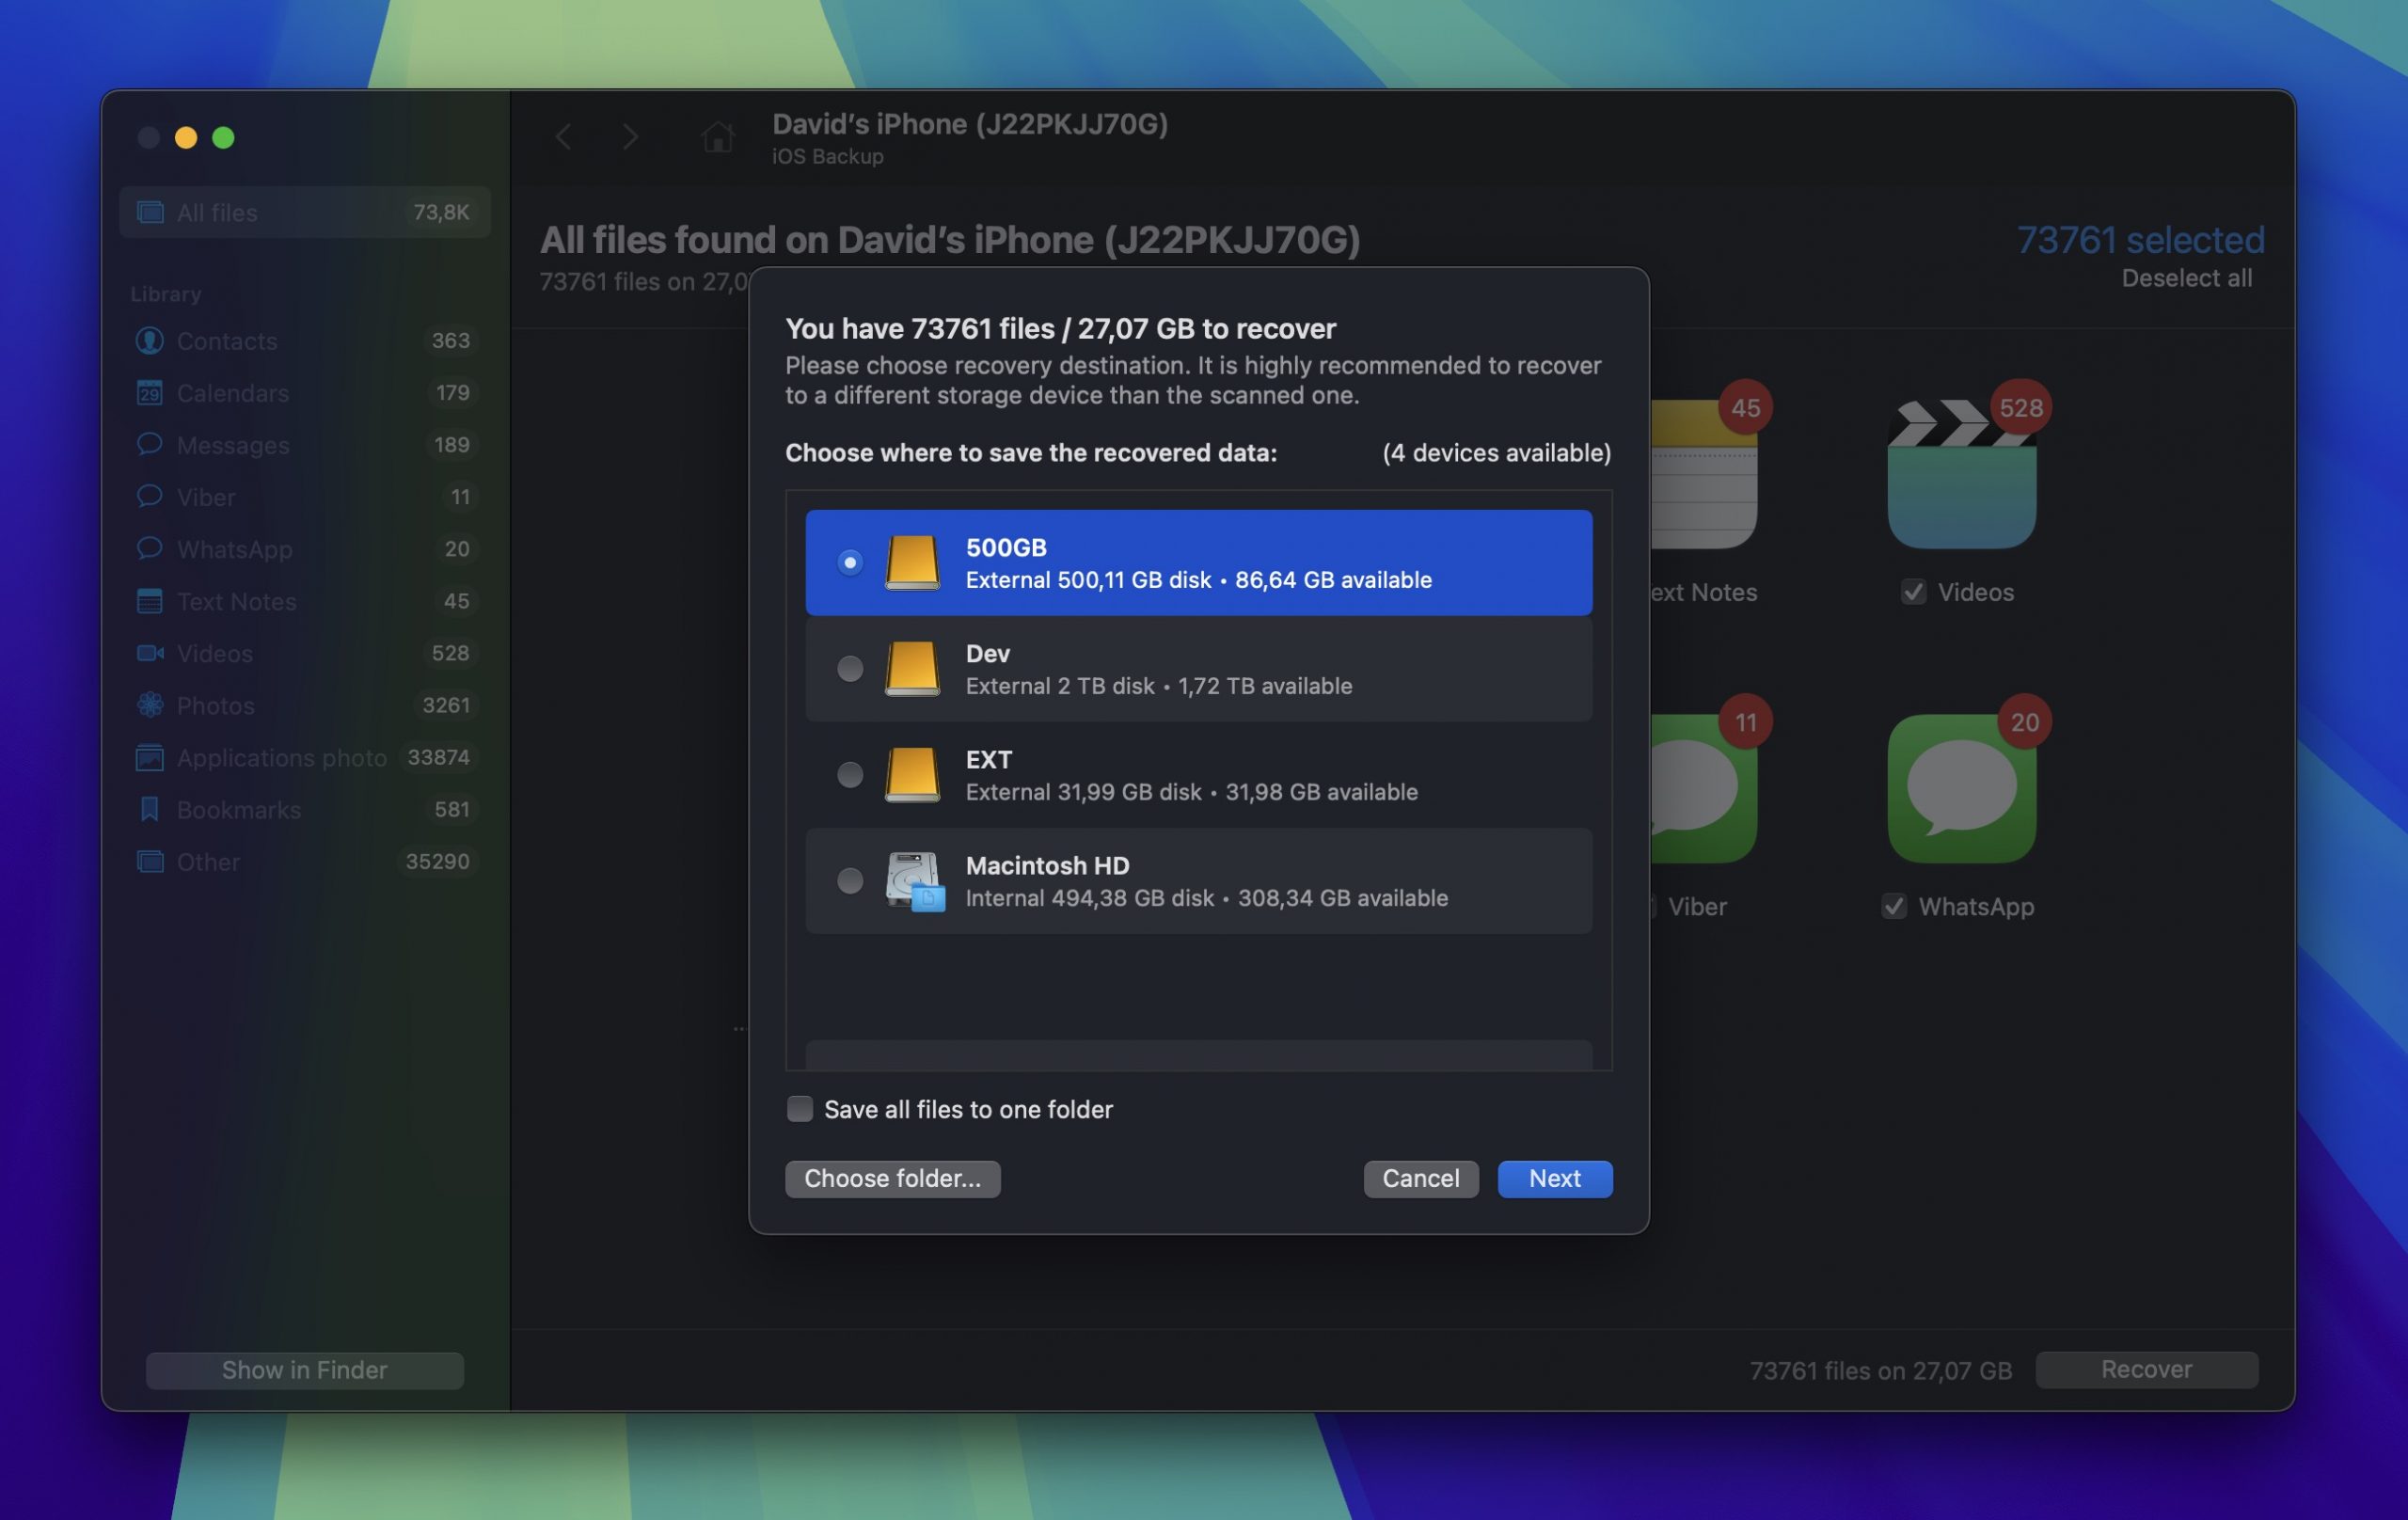
While you can preview all recoverable files with the free version, you’ll need the Pro version to actually save them. But here’s what I love about Disk Drill: instead of trapping you in an endless subscription cycle like many other recovery tools, they offer a one-time purchase option. Plus, I’ve got a special discount for you:
🎁 Use coupon code “DD-FACTORY-50” at checkout to get Disk Drill PRO Lifetime (Mac edition) at 50% off
Manually Recover Data After Factory Reset from Backups
If you prefer to handle the recovery process yourself without using third-party software, you’ve got two built-in options from Apple: iTunes/Finder backups and iCloud backups. While these methods take a bit more time and require you to restore your entire backup (rather than selecting specific files), they’re easy to follow.
Method 1: Restore iPhone Using iTunes
Let’s start with restoring from a local backup on your computer. On modern Macs running macOS Catalina or later, you’ll use Finder for this process. If you’re on an older Mac, you’ll use iTunes instead (the steps are similar, just in a different app).
Here’s how to restore your iPhone from a local backup:
Step 1. Connect your iPhone to your computer using a USB cable. If your iPhone shows a Trust This Computer prompt, tap Trust and enter your passcode.
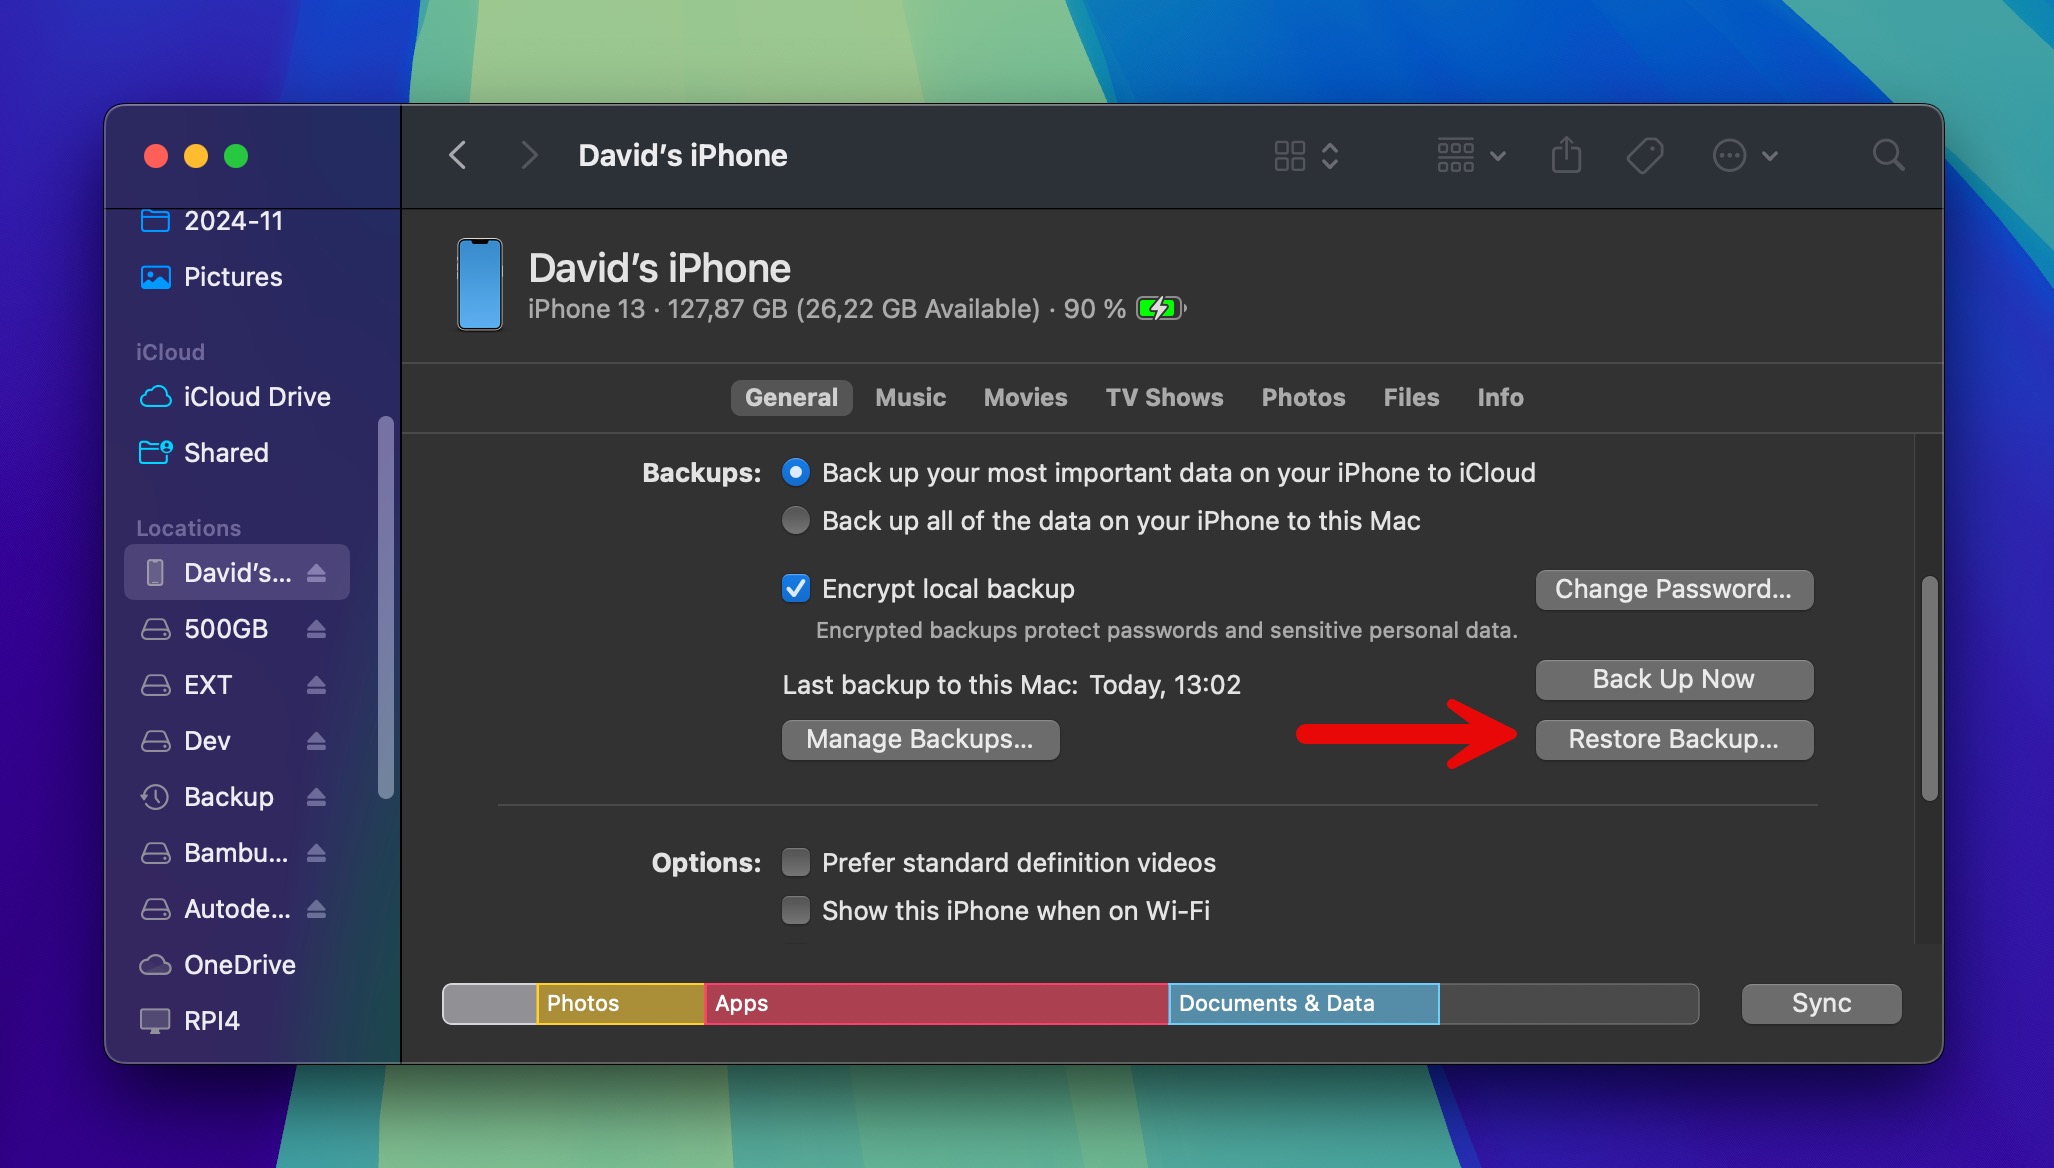
Step 2. Open Finder and select your iPhone from the sidebar under Locations. If you’re using iTunes, click the iPhone icon in the top-left corner.
Step 3. In the General tab, click Restore Backup.
Step 4. Look through the available backups and pick the most recent one (or the one from before you lost your data). If your backup is encrypted, you’ll need to enter your backup password.
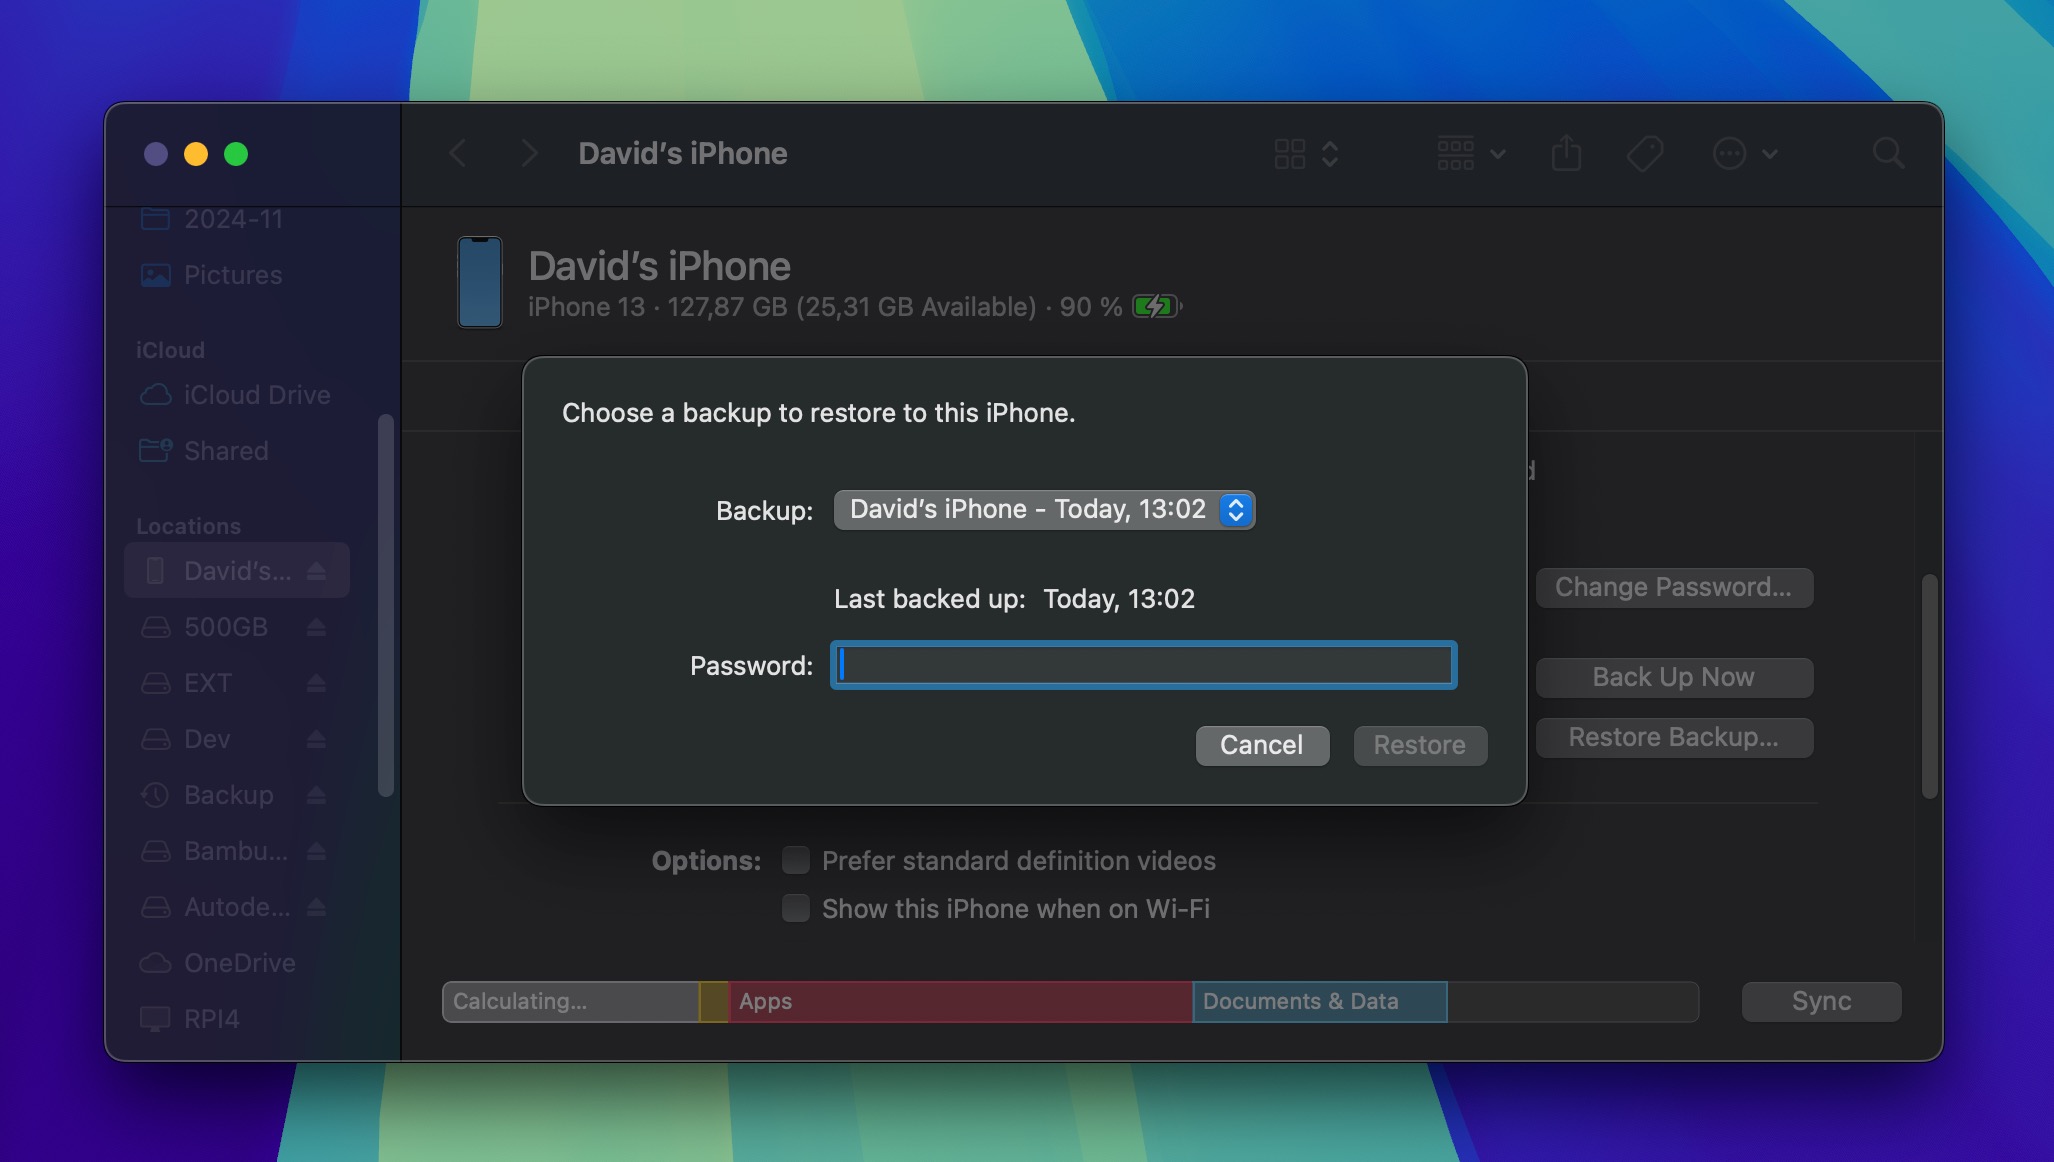
Step 5. Click Restore and wait. The process can take anywhere from a few minutes to an hour, depending on how much data you’re restoring. Keep your iPhone connected until it’s done!
Method 2: Restore iPhone from iCloud
If you’ve got an iCloud backup (and there’s a good chance you do since it’s on by default), you can restore your data right from Apple’s servers. This method might take longer than a computer backup since it depends on your internet speed, but it’s super convenient if you don’t have access to your computer.
Follow the steps below to restore your iPhone from iCloud:
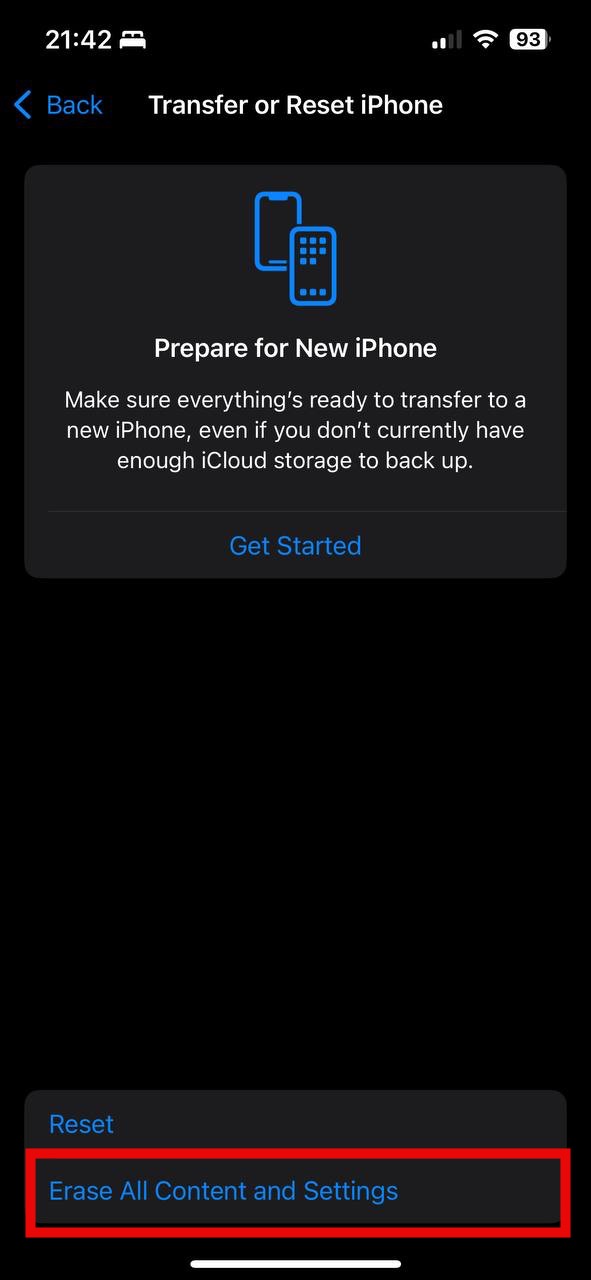
Step 1. Start with your iPhone at the Hello screen. If you’re already past that, go to Settings > General > Transfer or Reset iPhone. There, select the Erase All Content and Settings option.
Step 2. Follow the initial setup steps until you reach the Apps & Data section. Then, tap the Restore from iCloud Backup button.
Step 3. Sign in with your Apple ID. This must be the same account you used to create your backup.
Step 4. Choose which backup to restore (the dates and sizes can help you pick the right one—usually the latest backup available).
Step 5. Keep your iPhone connected to Wi-Fi and power as you wait for the restoration to finish.
How to Safely Factory Reset Your iPhone
Factory reset is useful in many situations, such as selling your iPhone and needing to wipe your personal data, or troubleshooting persistent software issues that regular restarts won’t fix. To perform it safely, you must back up your data first, and Apple makes it very easy.
Create a Local Backup Using Finder
The most reliable way to create a complete backup of your iPhone is through your Mac. Here’s how:
Step 1. Connect your iPhone to your Mac with a USB cable.
Step 2. Open Finder and select your iPhone from the sidebar.
Step 3. In the General tab, you’ll see a section called Backups.
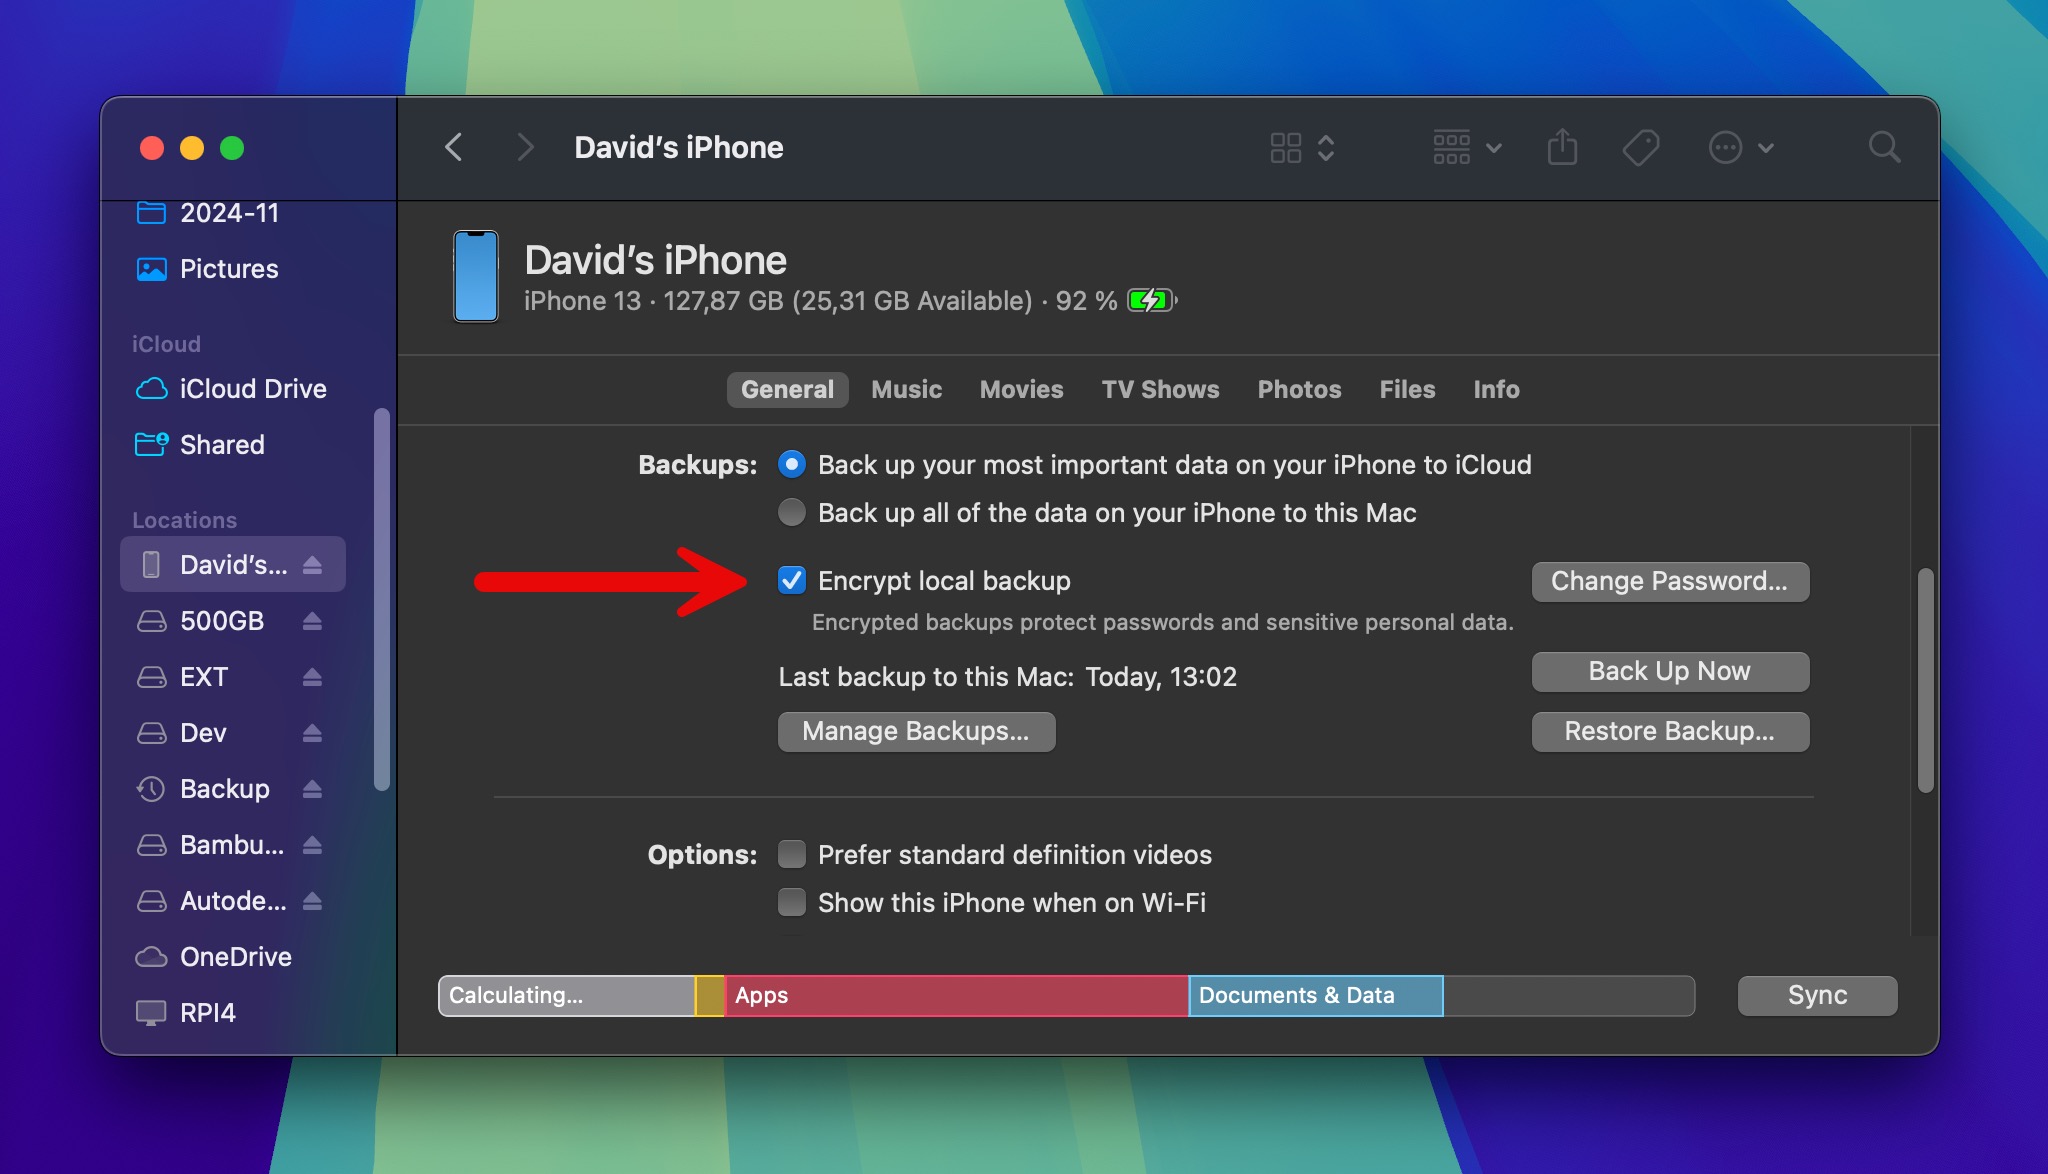
Step 4. Check the Encrypt local backup option so that even sensitive information is backed up.
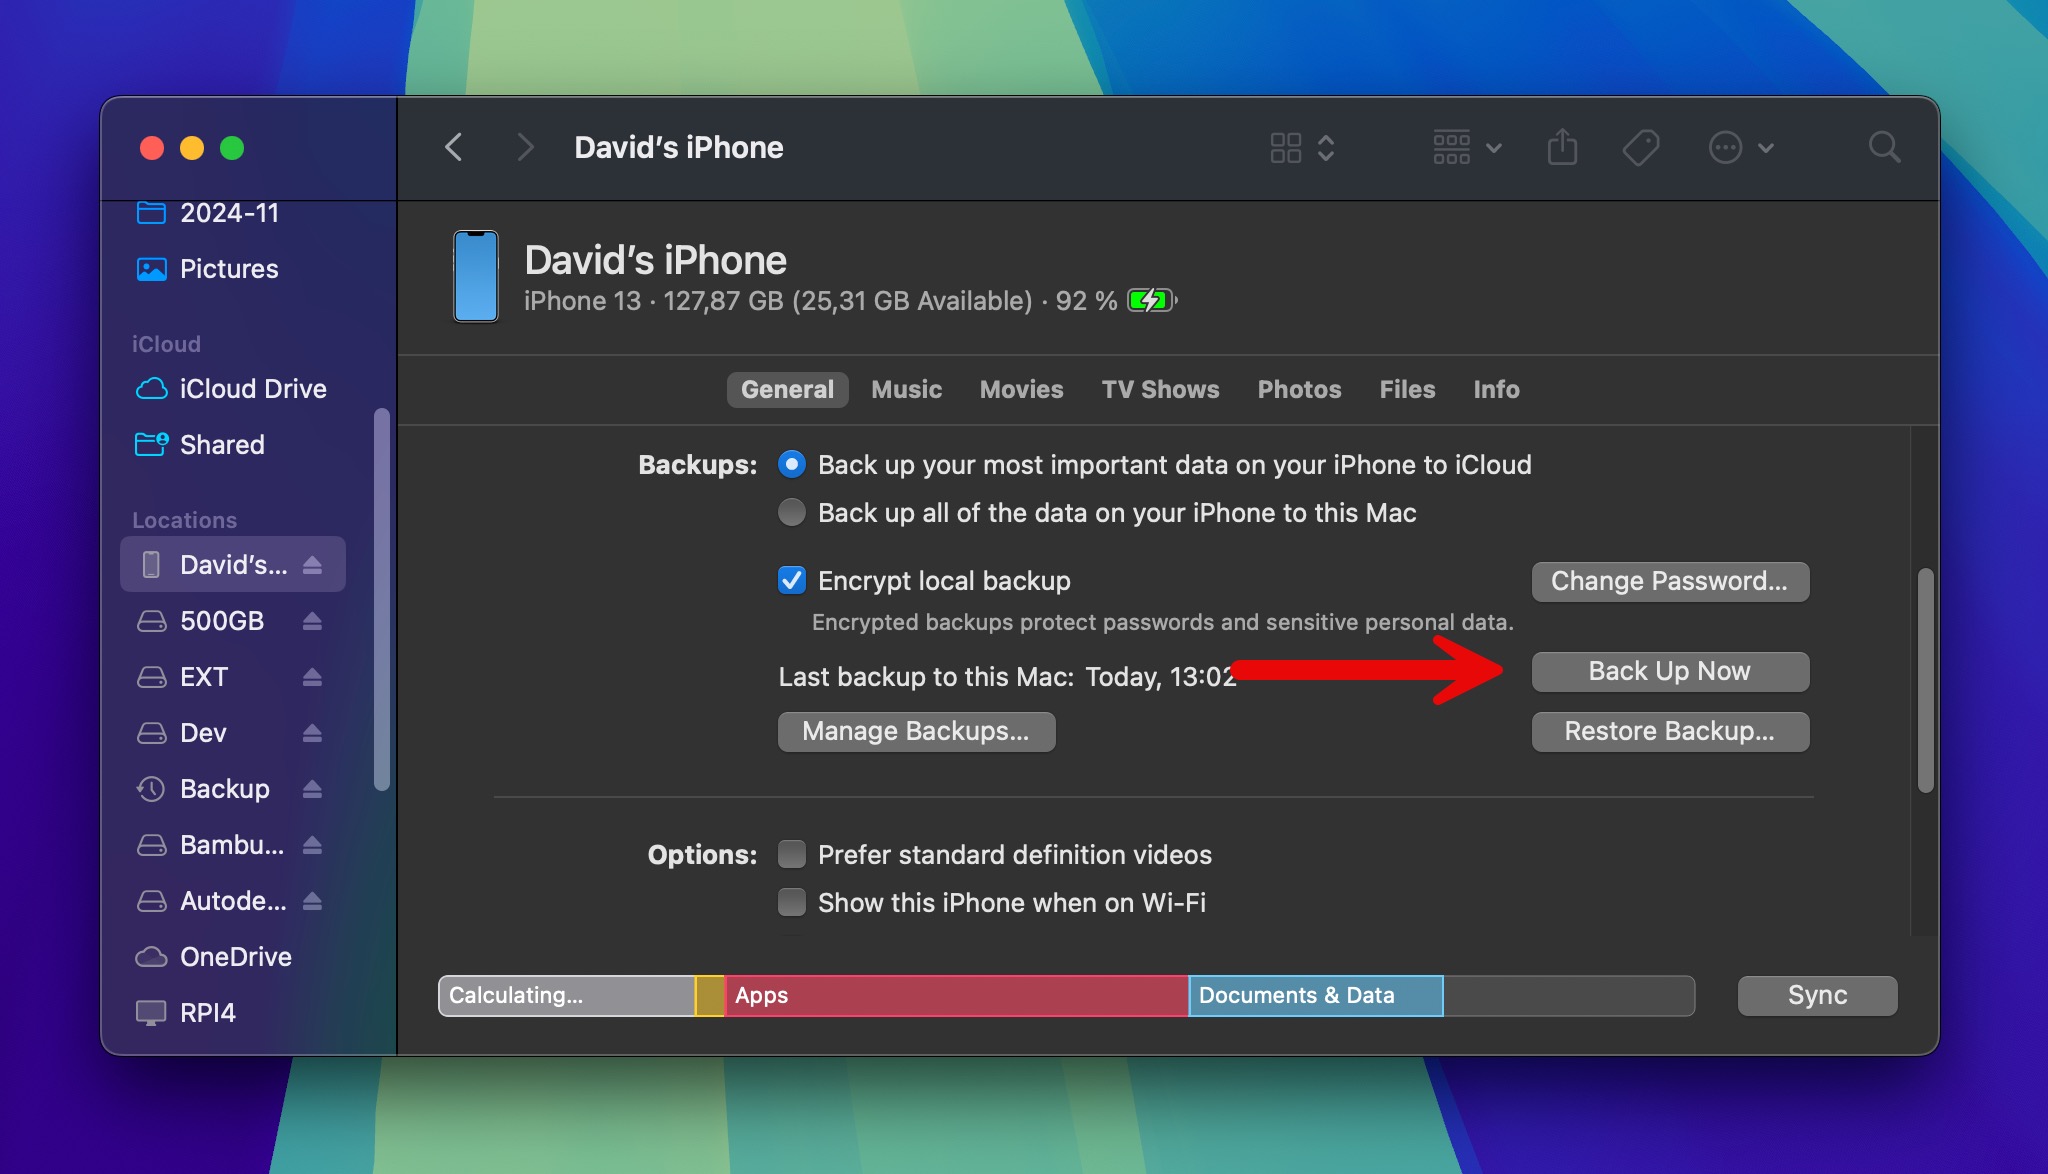
Step 5. Click Back Up Now and wait for the process to complete.
Back Up Your Data to iCloud
iCloud backups are fantastic because they happen automatically when your iPhone is charging, locked, and connected to Wi-Fi. What’s more, they are stored on Apple’s servers, so you can use them to restore your data regardless of where you happen to be located. Here’s how to set them up:
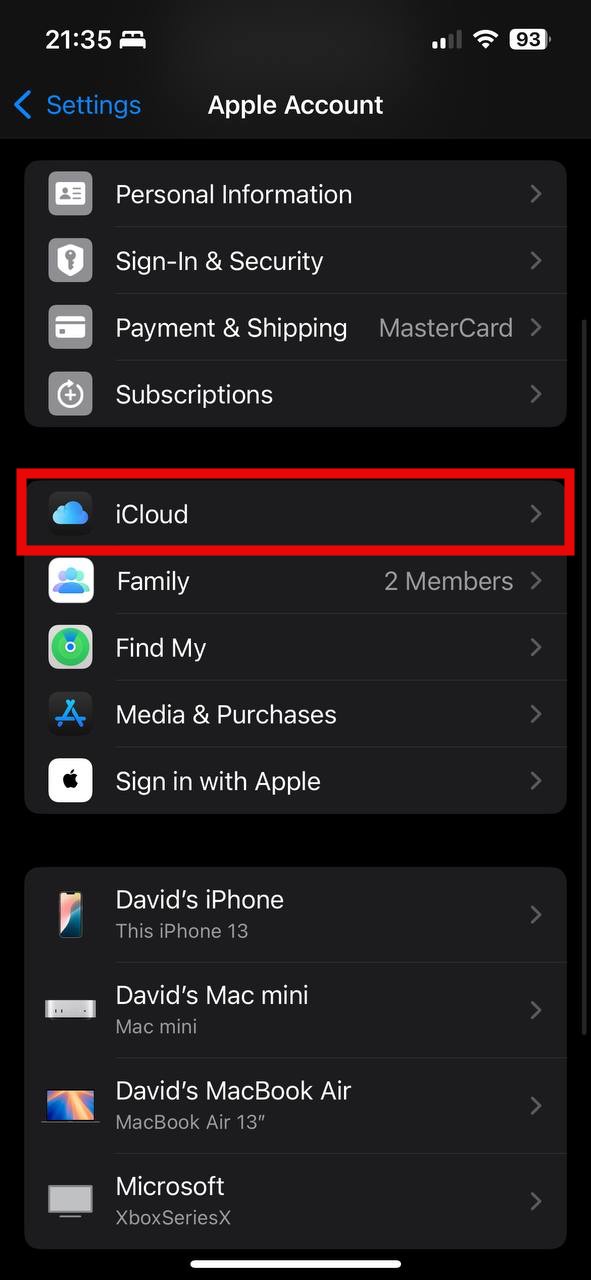
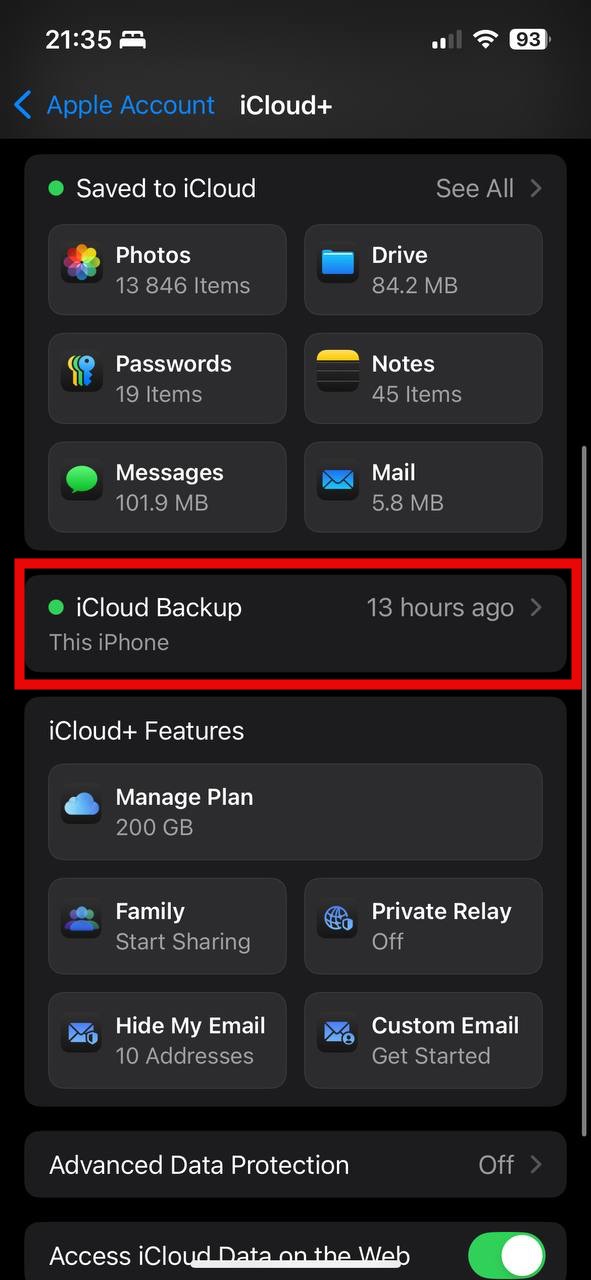
Step 1. Go to Settings > tap your name at the top > iCloud.
Step 2. Scroll to iCloud Backup and tap it.
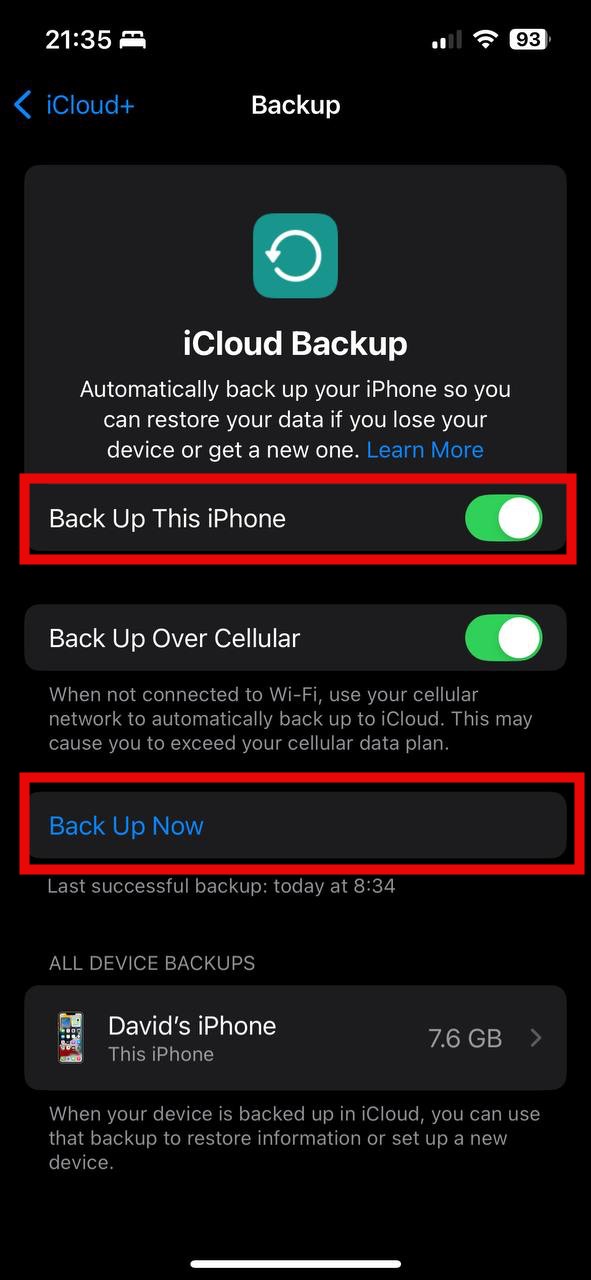
Step 3. Toggle on Back Up This iPhone and tap Back Up Now for your first backup.
Conclusion
The good news is that data lost to a factory reset can be recovered from your backups, and you can choose to restore your backups manually through iCloud and Finder or use specialized iPhone recovery software to search through all your backup locations at once. I personally always start with iPhone recovery software because it can save a lot of time and effort. Only when it doesn’t find what I need do I start checking my backups manually.
FAQ:
To restore your iPhone to factory settings while keeping your personal data, you need to go through the following steps:
- Go to Settings > General > Transfer or Reset iPhone > Reset.
- Tap Reset All Settings. If prompted, enter your passcode.
- Confirm by tapping Reset All Settings again.
When you restore an iPhone, it erases all content and settings, returning the device to factory conditions. This includes removing all personal data (photos, messages, contacts), downloaded apps, media files, and custom settings. Finally, the latest compatible version of iOS will be installed.
The only way to truly reset your iPhone while keeping your data is to back up first, then reset, and finally restore from that backup. Create a backup using either iCloud (Settings > your name > iCloud > iCloud Backup) or your computer via Finder, perform the factory reset, and then during the setup process, choose to restore from your backup.


