
Thanks to the macOS version of Microsoft Office, it’s possible to view and edit PowerPoint files on Mac computers, but is it also possible to recover them? Yes, it is! In fact, there are multiple ways to recover PowerPoint files on Mac, and we cover them all in this article.
Table of Contents
Where Are PowerPoint Presentations Stored on Mac Computers?

You would be surprised just how many users spend hours and hours trying various recovery PowerPoint techniques for Mac just to discover that their PPT files were not deleted at all—they were simply hidden in some random folder.
This typically happens when users look for missing PPT files only in the main document folder:
/Users/username/Documents
However, PowerPoint users who also use OneDrive should check it as well because that’s where PPT files are saved by default when the two Microsoft products are connected. Since the default local save location can be changed at any time just by clicking on a single checkbox, it’s a good idea to search the entire computer.
If you remember how the PPT files you can’t find were called, you can easily search for them using Spotlight:
- Launch Spotlight by pressing Command + Space.
- Enter the name of any missing PPT file and give Spotlight a few seconds to gather results.
- You should see the missing PPT file under Presentations.

If you don’t remember how any of your missing PPT files were called, you can search for all PPT files stored on your Mac:
- Launch Finder.
- Click the Search bar and enter: kind:ppt
- Hit Return on your keyboard and give Finder a short while to display the results.
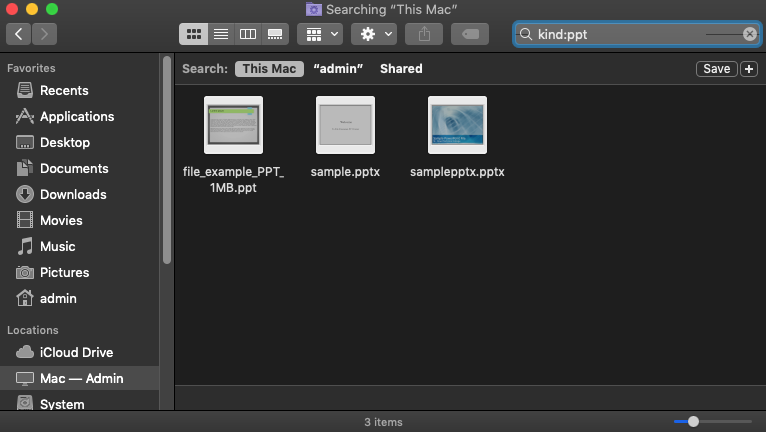
If you haven’t found anything by searching your Mac, then it’s time to search the Trash folder. That’s because files in the Trash are not indexed, which means they don’t appear in search results.
- Open the Trash folder.
- Click the Search icon in the top-right corner and enter: kind:ppt.
- Make sure to select the Trash location.
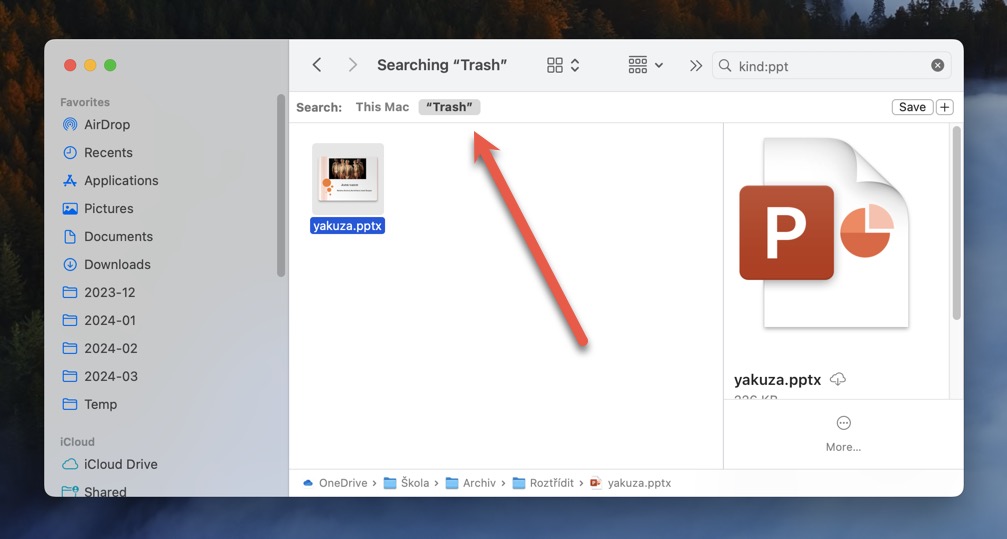
Still no luck finding your PowerPoint presentations? In that case, they’re either deleted or haven’t been properly saved in the first place. The good news is that there are several other PowerPoint recovery solutions and techniques for Mac that you can try, starting with data recovery software.
How to Recover a Deleted PPT File with Data Recovery Software
Data recovery software can find PowerPoint presentations that macOS can no longer see because they’ve been deleted. There are many data recovery software solutions that you can use to find PPT files without paying, and many of them are so intuitive and well-designed that even regular Mac users can figure them out with little to no help.
For example, here’s how PPT recovery works with Disk Drill, one of the most popular data recovery software apps for Mac:
Step 1. Download and install Disk Drill for Mac.
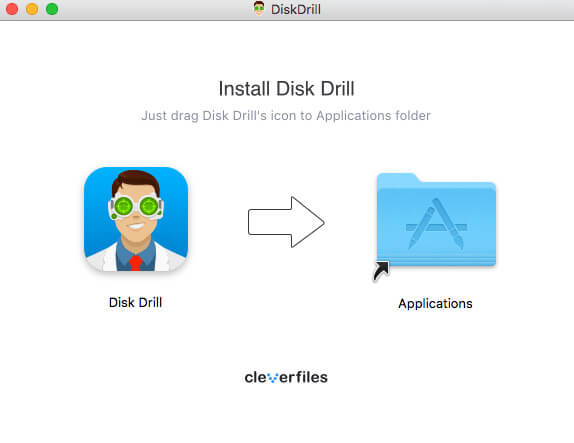
First, you need to download Disk Drill and install it on your Mac by dragging the app into the Applications folder. Disk Drill is a small application, so it doesn’t require much storage space.
Step 2. Scan Your Mac for deleted files.
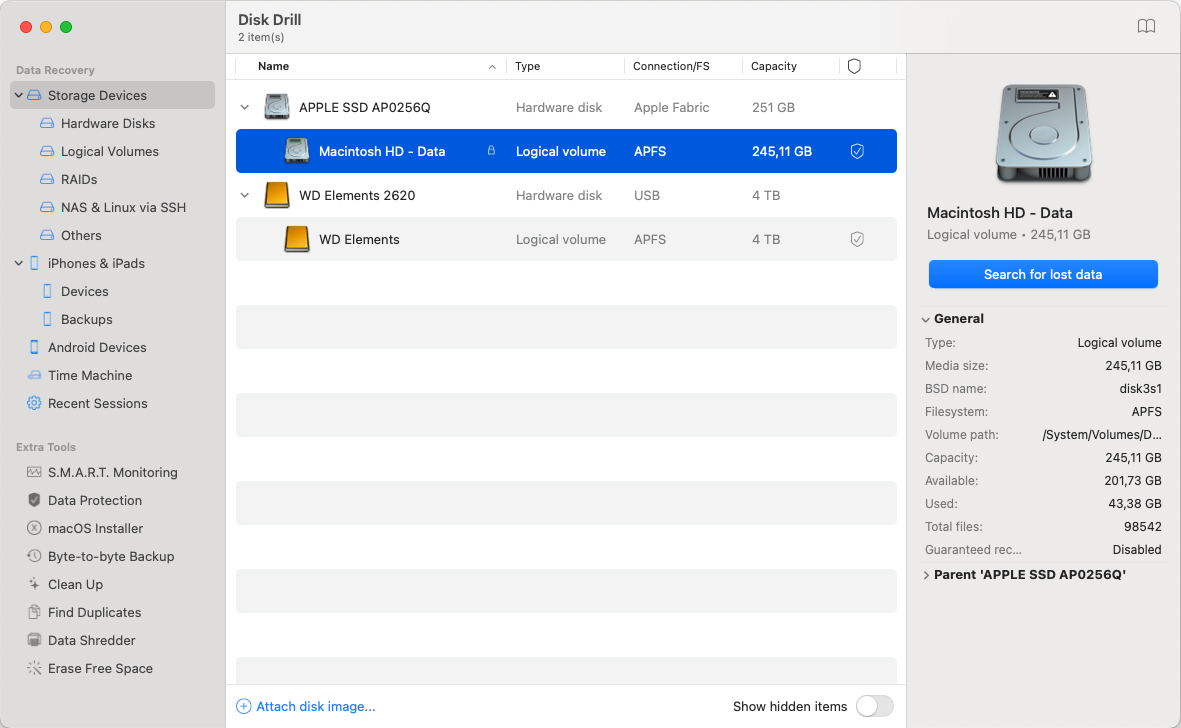
Next, launch Disk Drill and give it a second to recognize all storage devices connected to your Mac. Click the recover button next to the storage device on which your PPT files were stored to begin a scan.
Step 3. Filter the Scan Results.
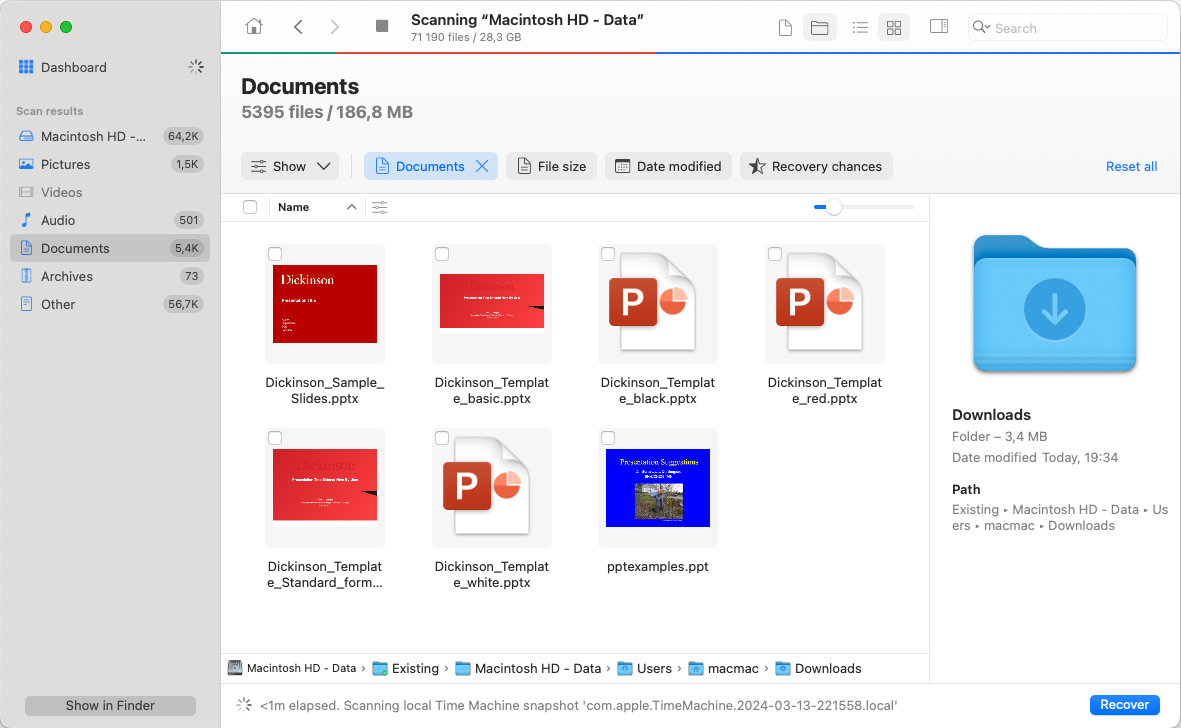
When Disk Drill is finished scanning the storage device, you can filter the scan results to display only documents. You can further narrow down the scan results by displaying only files of a certain size or files that have been deleted within the last X days, weeks, months, or years.
Step 4. Select Your Powerpoint Files.
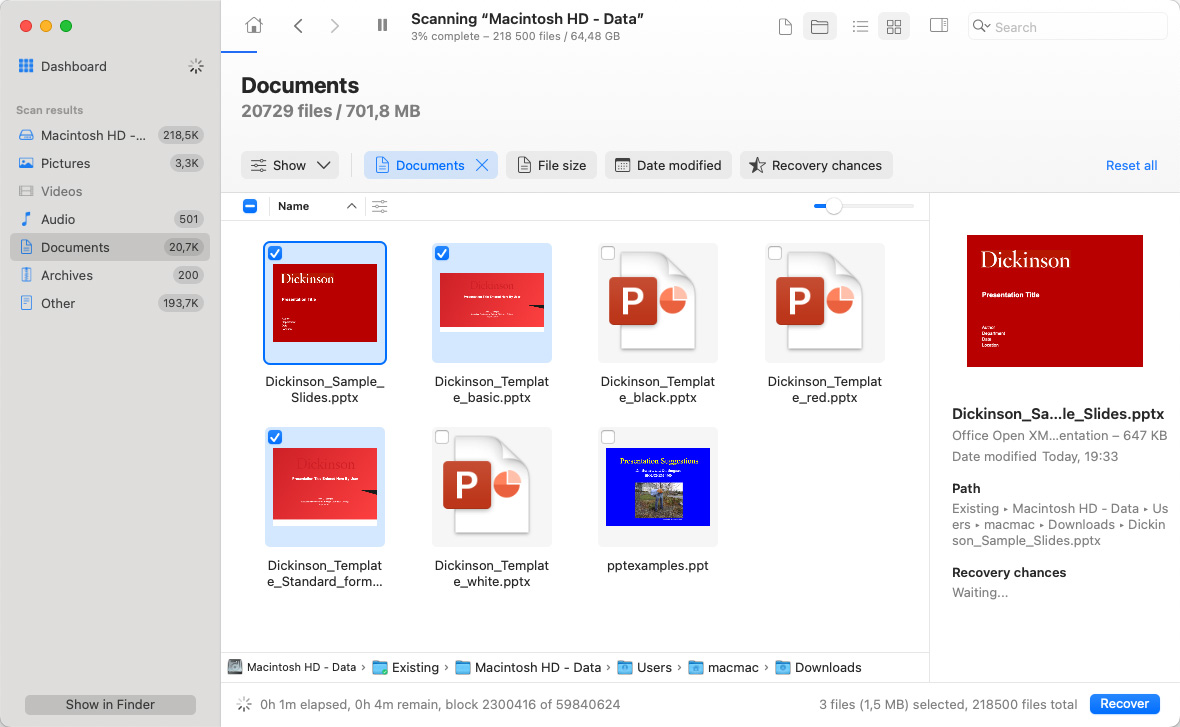
If you’re working with PowerPoint files on a regular basis, it’s very likely that Disk Drill will find a very large number of them, including corrupted PowerPoint files, AutoRecover PowerPoint files, and more. Instead of recovering them all, you can use preview and select only the PPT files you actually want to get back.
Step 5. Recover the Selected Powerpoint Files.
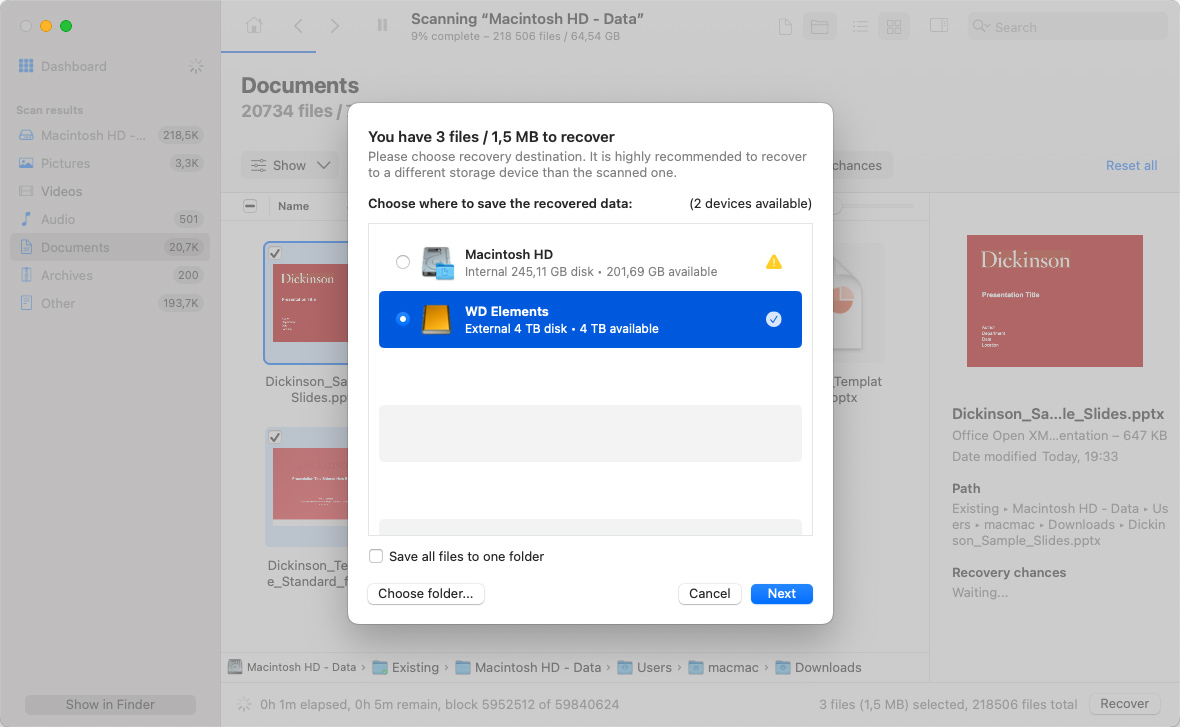
With all missing PPT files selected, you can click the Recover button and specify the recovery directory. For best recovery results, select a directory located on a different storage device than the one from which you’re recovering the deleted PPT files.
How to Recover a PPT File that Was Not Saved on Your Mac
Data recovery software is great for recovering permanently deleted PowerPoint presentations that are no longer in Trash, but even the best data recovery app won’t help you recover unsaved PowerPoint files on Mac.
To do that, you can take advantage of the AutoRecover feature or look for your unsaved PowerPoint presentations in the temp folder.
Solution 1: AutoRecover Feature
All Microsoft Office applications come with a handy feature that makes it possible to recover unsaved files that were lost after a system crash or sudden shutdown. The best thing about this feature is that it works completely automatically, presenting itself during the first PowerPoint launch after the data loss incident. All you need to do is open the recovered document and save it to your Mac.
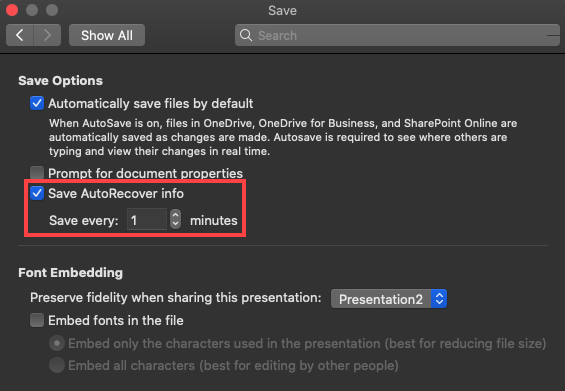
By default, AutoRecover is set to save your presentations every 10 minutes, but you can change this frequency in Preferences:
- Open the PowerPoint menu and select Preferences.
- Click Save.
- Enter how frequently you want the program to save documents in the Save AutoRecover infobox.
Where are AutoRecovery files stored?
Office 2008:
/Users/username/Library/Application Support/ Microsoft/Office/Office 2008 AutoRecovery
Office 2011:
/Users/username/Library/Application Support/ Microsoft/Office/Office 2011 AutoRecovery
Office 2016 & 2018:
/Users/Library/Containers/com.Microsoft.Powerpoint/Data/Library/Preferences/AutoRecovery
Solution 2: Temp Folder
Even though it’s rare for PowerPoint files to end up in a temp folder, it’s still worth taking a look macOS temp folders since it takes just a couple of seconds.
If you don’t know, the temp folder is a special folder on your Mac where the operating system and applications store temporary files. In most cases, files are deleted from the temp folder automatically, but it’s not unheard of for them to end up stuck in the folder after a sudden shutdown or critical system error.
Here are three temp folders where you should look for your PowerPoint presentations:
- /tmp
- /var/tmp
- TMPDIR
The last temp folder can be opened by entering the following command in Terminal: open $TMPDIR

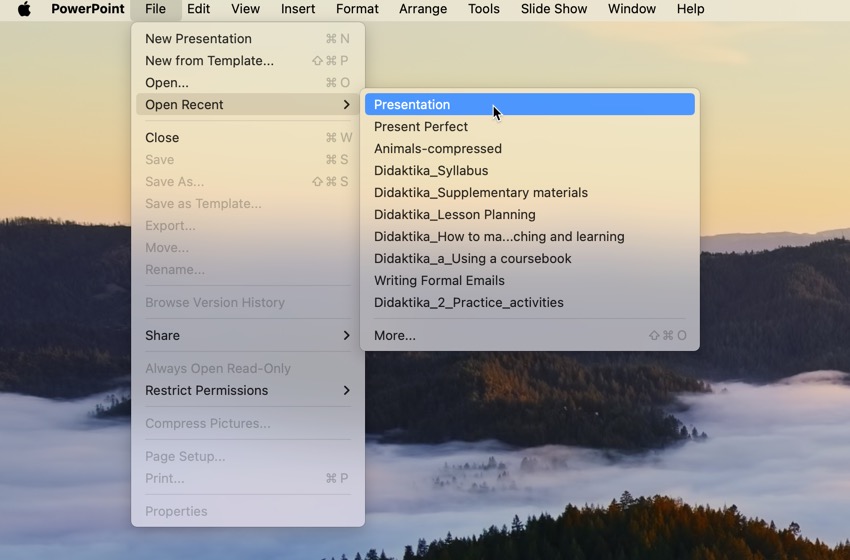
Solution 3: Open Recent Files
If you forgot to save your PowerPoint presentation before closing the app or didn’t have the time to save it due to some unforeseen challenges, you can try opening the recent files to recover your unsaved work.
Unfortunately, this method requires AutoSave or AutoRecover to be enabled, and it won’t help you if these features were turned off at the time of the incident.
To open a recently edited PowerPoint presentation:
- Launch PowerPoint.
- Go to the File menu.
- Select Open Recent to see a list of recent presentations.
- Click on the presentation you want to open.
Common Reasons Behind PPT Loss and Saving Issues
PowerPoint has been around for multiple decades, so Microsoft had plenty of time to polish the application and make data loss a very rare issue. Still, there are some potential causes of data loss that even Microsoft can’t fully protect its users against, including:
- Malware: The claim that Mac users are immune to viruses and other malware is simply not true. Yes, there’s not nearly as many strains of malware that target Mac computers as there are strains of Windows-specific malware, but one infection can be enough for you to lose all your PowerPoint presentations.
- Accidental deletion: Most Mac users don’t like to admit it, but accidental deletion is someone that nearly everyone has done at some point. If you notice in time, you should still be able to recover your PowerPoint presentation from Trash. But if you don’t notice in time, data recovery software is your only option.
- Formatting: It’s important to be extra careful when formatting a storage device because all it takes to wipe out gigabytes worth of data is one wrong click. Just like with accidental deletion, files from a formatted storage device can usually be recovered with the help of data recovery software, but you need to hurry up and don’t let them become overwritten.
- Corruption: Unfortunately, even modern storage devices are not 100% reliable, which is why PPT files sometimes become corrupted and unreadable. In extreme cases, they may even disappear from the storage device altogether.
- Application conflicts: The latest version of PowerPoint comes with a useful feature called AutoSave, which does exactly what the name suggests. However, you should never completely rely on this feature because all it takes for it to stop working is a conflict with another application installed on your Mac.
Keep these common reasons behind PPT loss in mind when creating and editing PowerPoint presentations, but always remember that only a proper backup strategy offers truly reliable protection against data loss.
Don’t Forget to Back Up Your PowerPoint Presentations
In this article, we’ve explained several methods that can be used to recover unsaved and lost PowerPoint presentations, but such methods should always be your very last resort. Ideally, you should have at least one backup of each important PowerPoint presentation so that you can easily recover it in case you experience a data loss incident.
Fortunately, macOS and PowerPoint itself make it very easy to create backups of important PPT files since they both include a useful backup feature.
Enable Time Machine in macOS
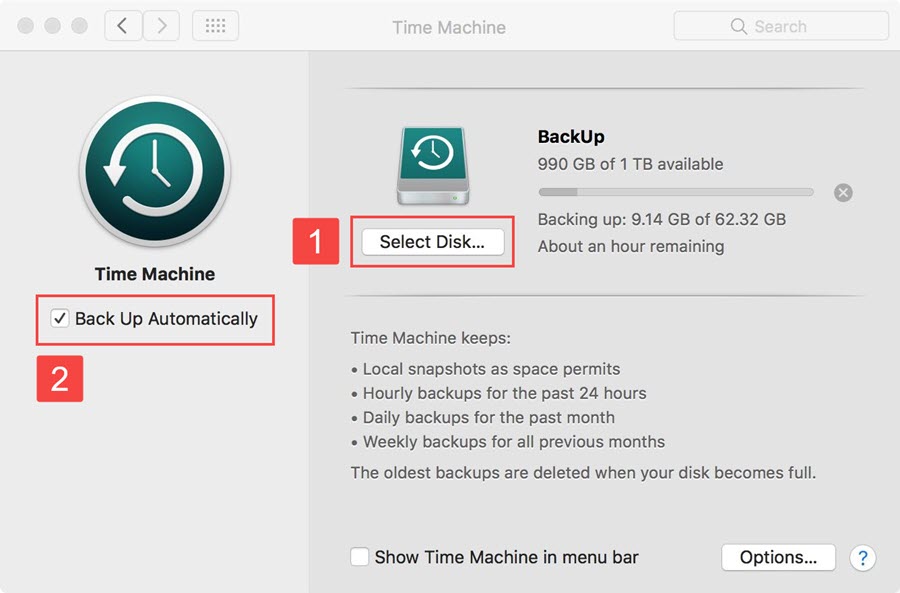
Time Machine is Apple’s real-time backup app, and it’s included in all recent versions of macOS. When enabled, it monitors files on your hard drive and automatically backs them up as soon as they’re created or modified. To enable Time Machine:
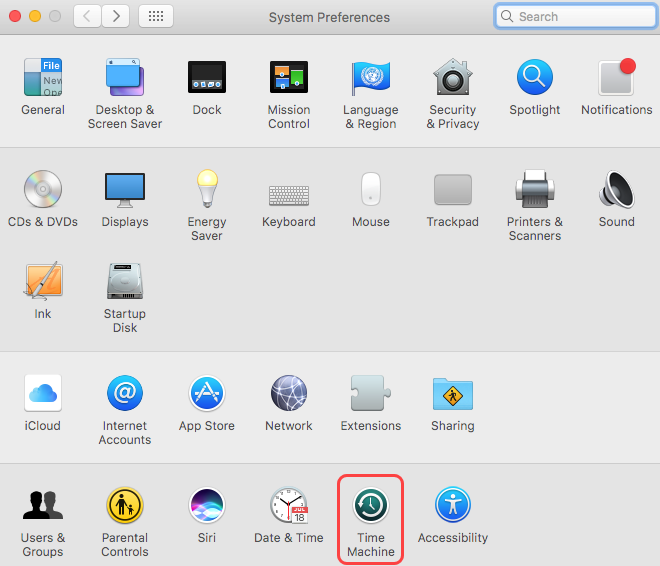
- Open the Apple menu and select System Preferences.
- Choose Time Machine.
- Click Select Backup Disk and add a suitable disk.
- Check the Back Up Automatically box and close the Time Machine window.
AutoSave PowerPoint Presentations to OneDrive
If you don’t have a backup disk for Time Machine or would like to access your PowerPoint presentations from anywhere, you should enable the AutoSave PowerPoint feature. This feature is available to Microsoft 365 subscribers, and it saves your work automatically every few seconds to OneDrive, Microsoft’s cloud storage solution. To enable AutoSave:
- Open PowerPoint.
- Sign in with your Microsoft account.
- Create a new PowerPoint document.
- Click the AutoSave button in the top-left corner.

- Name the PowerPoint presentation and click Save.

Conclusion
Recovering lost or unsaved PowerPoint files on a Mac is possible, and there are multiple methods to do so. We recommend you start with the simplest possible solutions, such as searching for the missing files using Spotlight or Finder. If the files are not found, you can use data recovery software like Disk Drill to scan your storage device and recover deleted files.
FAQ
Use the following procedure to attempt to recover a PowerPoint file from the temp folder.
- Launch the Terminal app on your Mac.
- Type open $TMPDIR and hit Enter to continue.
- Navigate to the TemporaryItems folder.
- Locate the unsaved PowerPoint presentation. Copy it to the desktop and rename the file.
- Change the extension from .tmp to .ppt and open the file in PowerPoint.
Yes, it does. By default, PowerPoint automatically saves the presentation you are working on every ten minutes. You can modify this setting or turn it off if desired using the following procedure.
- Open the PowerPoint application.
- Click on the File menu.
- Select Options and then Save.
- Make sure the Save AutoRecover information every (X) minutes option is checked. Change X to the number of minutes you want between each autosave.
Depending on which version of PowerPoint is installed, the autosave files will be stored in the following locations:
- For Office 2008: /Users/username/Library/Application Support/ Microsoft/Office/Office 2008 AutoRecovery
- For Office 2011: /Users/username/Library/Application Support/ Microsoft/Office/Office 2011 AutoRecovery
- For Office 2016 & 2018: /Users/Library/Containers/com.Microsoft.Powerpoint/Data/Library/Preferences/AutoRecovery


