
Here is the most complete, up-to-date, and beginner-friendly guide on how to recover lost PDF files from your Mac computer. And in case you want to reverse any unwanted changes, we also demonstrate different ways to restore previous versions of your PDF document.
We’ll even tell you how to fix your PDF if it gets corrupted post-recovery.
All possible methods for each of these tasks are covered in this guide – screenshots included. Just make sure to act fast! The earlier you attempt recovery, the better your chances of getting your PDF file back.
Table of Contents
6 Methods to Recover Lost PDF Files on a Mac
In this section, you’ll find guides for 6 different methods to recover unsaved PDF files on your Mac, as well as deleted ones. We wrote them in order of difficulty and intrusiveness, so feel free to start with Method 1 and work your way down.
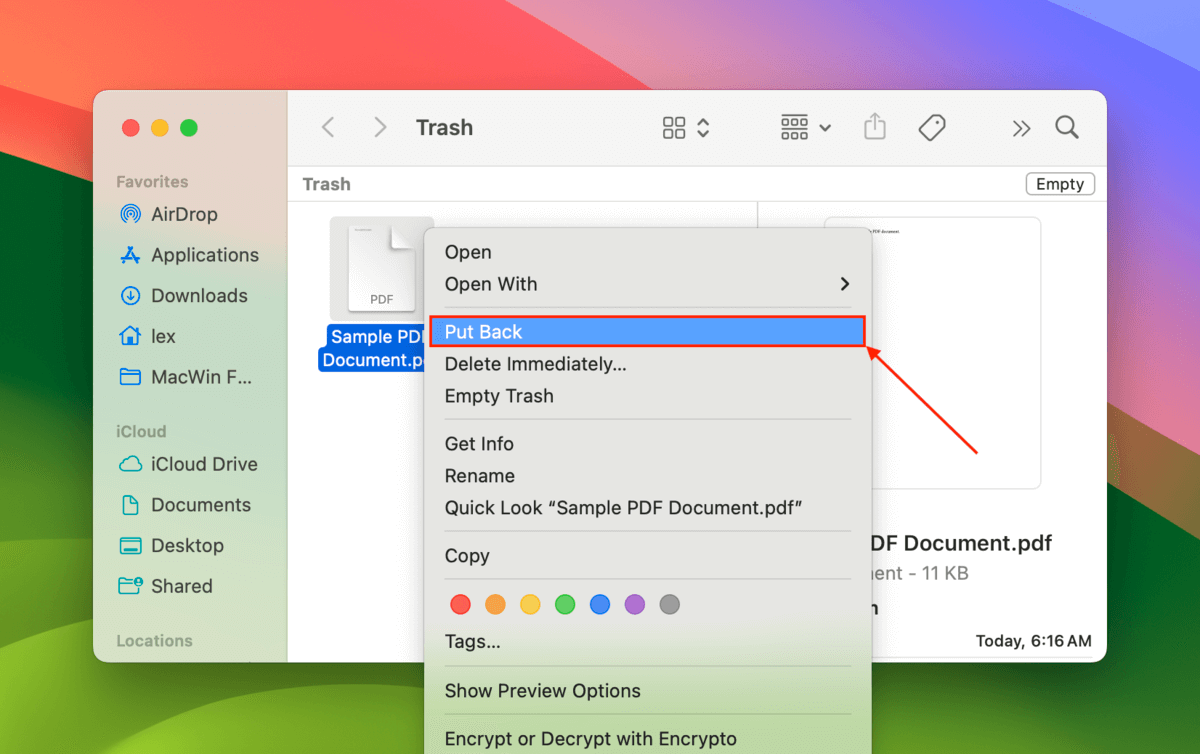
Method 1: Recover Your PDF from the Trash Folder
When you deleted your PDF file, it wasn’t immediately removed from your computer. Instead, it was moved to the Trash folder, where you can choose to restore the file or delete it permanently. Here’s a quick demo:
Step 1. Open the Trash folder on your Mac. You should see its icon on your dock.
Step 2. Right-click your PDF file > Put Back.
Method 2: Utilize Adobe’s AutoSave Feature
Adobe Acrobat has a built-in autosave feature that preserves PDF documents in case the app suddenly closes (e.g. improper shutdowns, crashes, etc.).
If autosave managed to recover your document, you should automatically receive a prompt the next time you start Acrobat.
Simply click Yes to recover the unsaved Adobe Acrobat file on your Mac. Acrobat will then try to open the PDF file – make sure to save it somewhere safe!
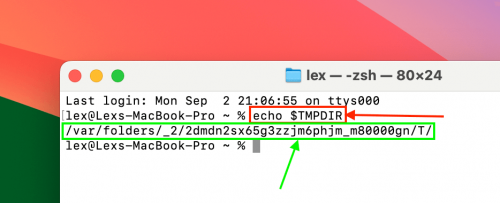
Method 3: Check Your Mac’s Temp Folder
The temporary or “Temp” folder on your Mac serves as an interim storage container for apps to dump files for a short period of time. This functionality is utilized by certain apps to operate more efficiently.
A version of your PDF document might still be in the Temp folder – you can access the directory using a command in the Terminal app.
Step 1. Open the Terminal app.
Step 2. This command (red) will output the exact folder path of the Temp folder (green). Make sure to copy the folder path for step 3.
echo $TMPDIR
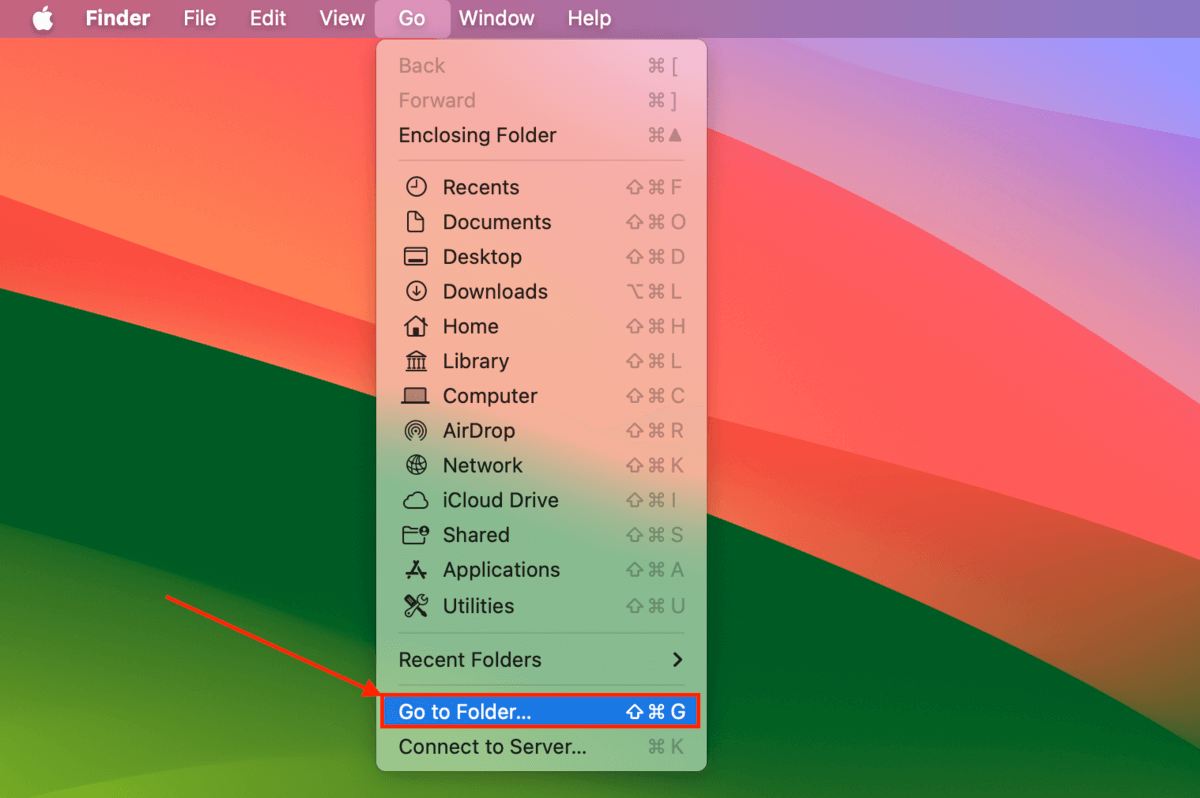
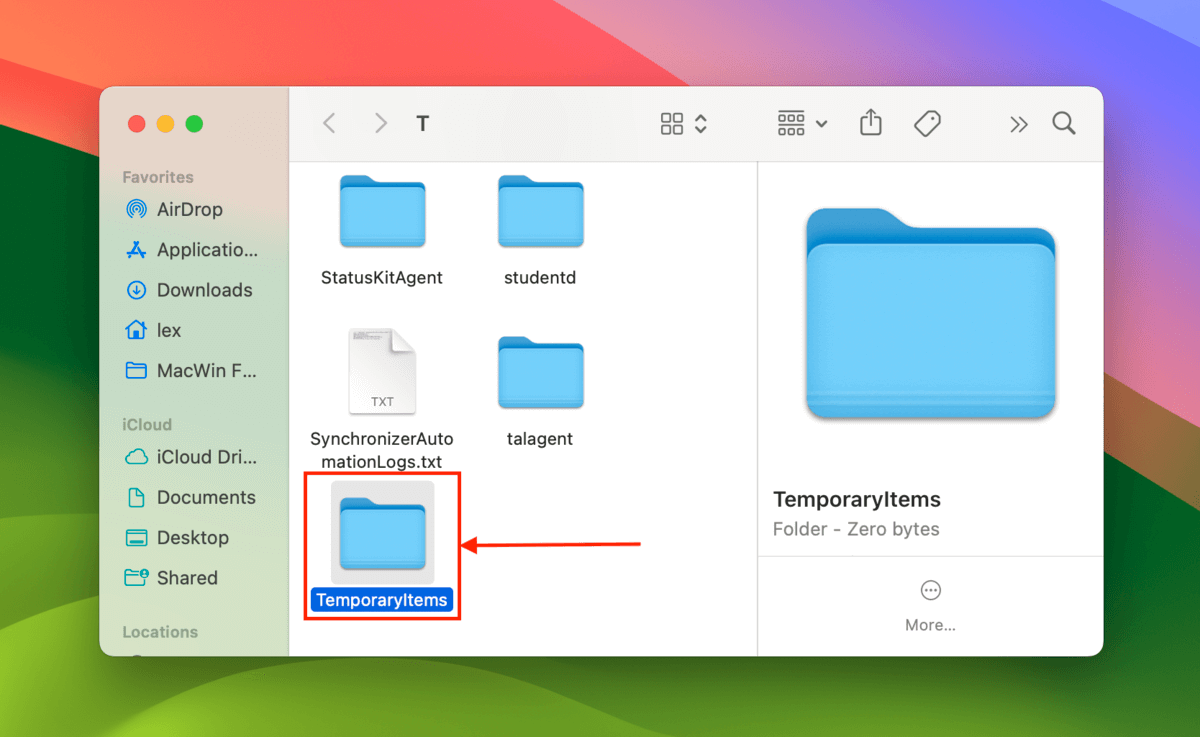
Step 3. Open Finder and click Go > Go to Folder.
Step 4. Paste the folder path you copied in step 2 and hit Return to open it.
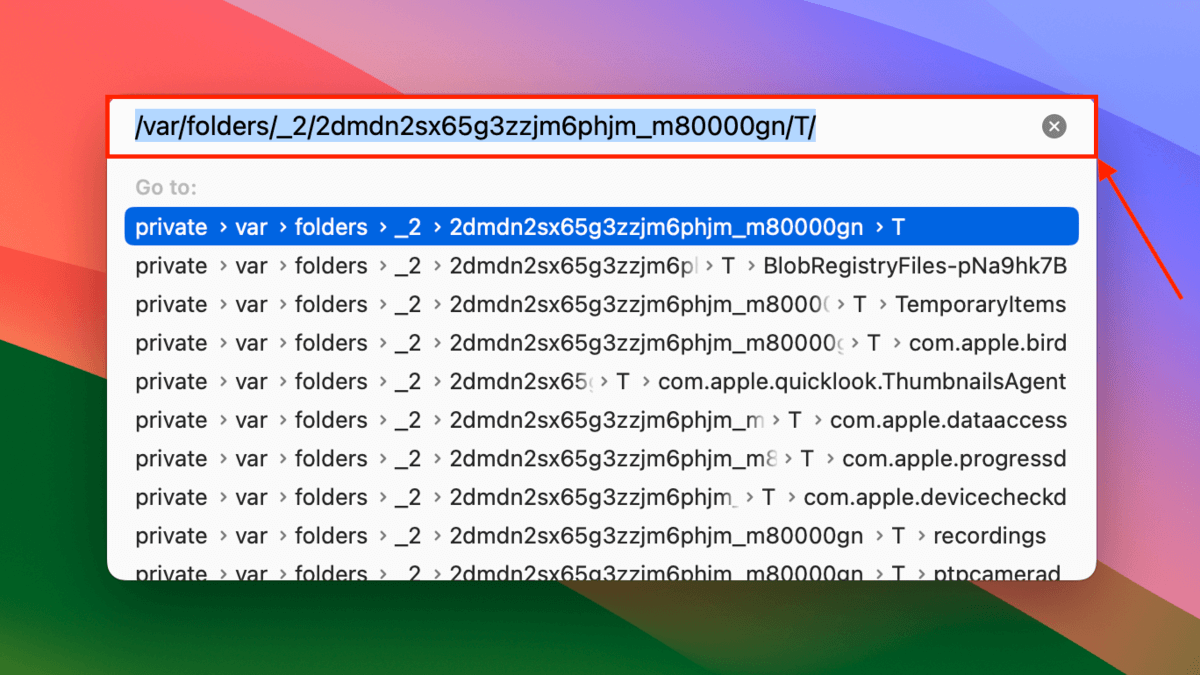
Step 5. Check if your PDF file is in the output location or in the TemporaryItems folder.
Method 4: Restore a Time Machine Snapshot of Your PDF File
If you enabled Time Machine on your Mac before your PDF file went missing, there’s a good chance that your backup has a copy or “snapshot” of it.
You can use Time Machine to restore the snapshot of the PDF document.
Step 1. If you have it, connect your Time Machine drive to your Mac.
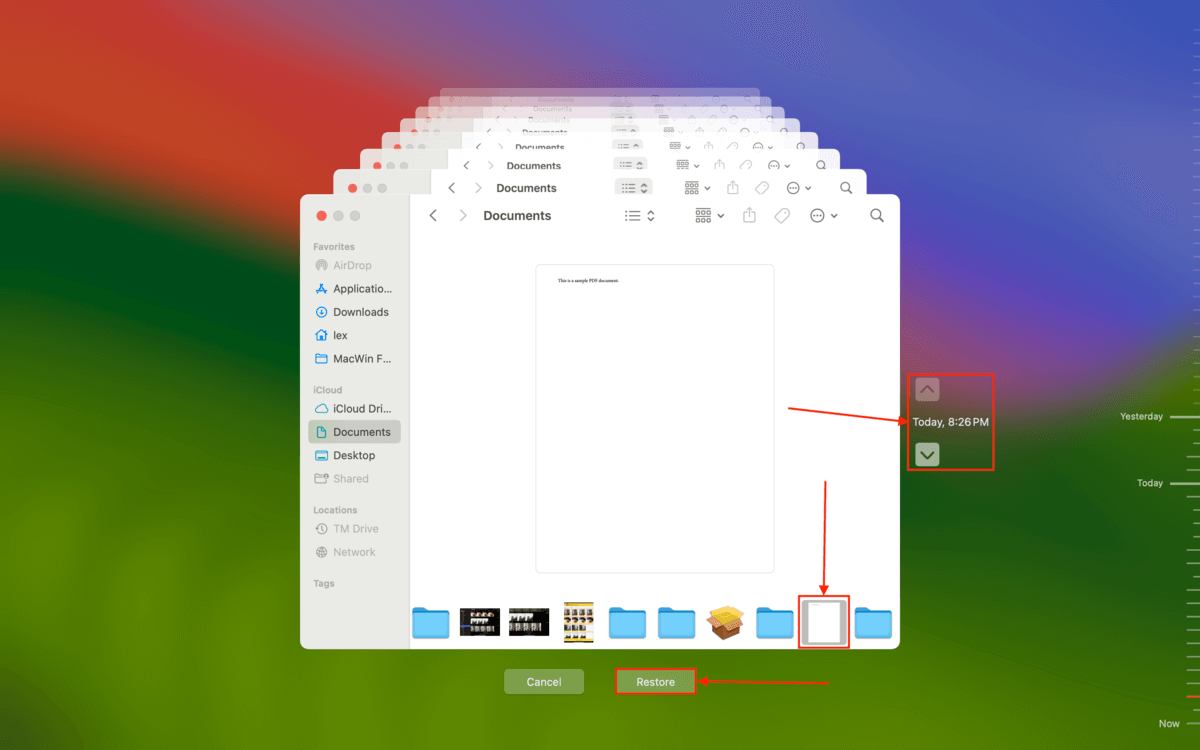
Step 2. Open Finder and navigate to the folder where your PDF file was stored. Then, click the Time Machine button > Browse Time Machine Backups.

Step 3. Use the arrows on the right to move backward in the folder’s timeline. Once your PDF file appears, select it and click Restore.
Method 5: Use Data Recovery Software To Restore Your PDF File
If your PDF file isn’t in Trash or Temp, you have no backups, and Adobe’s autosave didn’t work, the next best option is to use data recovery software.
There are dozens of data recovery software you can choose from online, but we’ll be using an app called Disk Drill for the sake of this demonstration.
It excels at restoring data from all standard file systems, including HFS+ and APFS (for Mac internal drives) and ExFAT, FAT32, and NTFS (Windows-based file system format commonly used with external drives).
Disk Drill also fully supports a large number of document file types, including PDF. You can even preview the contents of your file to make sure it’s recoverable.
Step 1. Download and install Disk Drill.
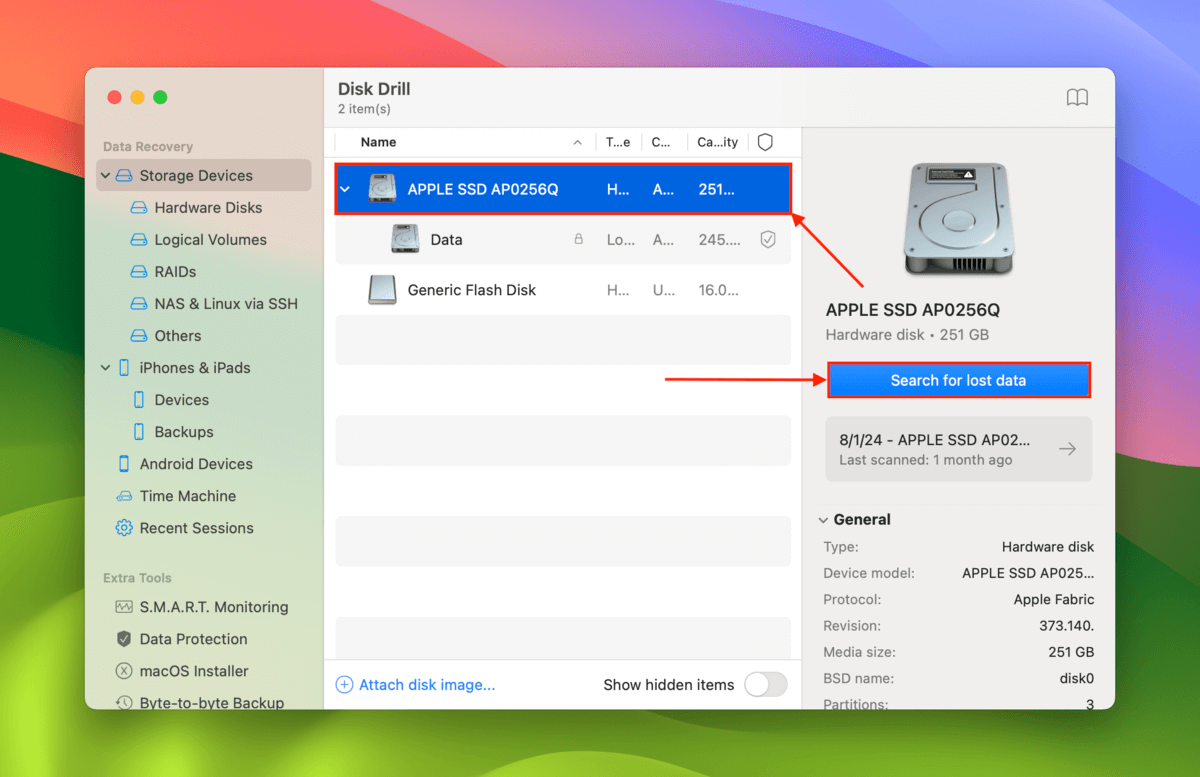
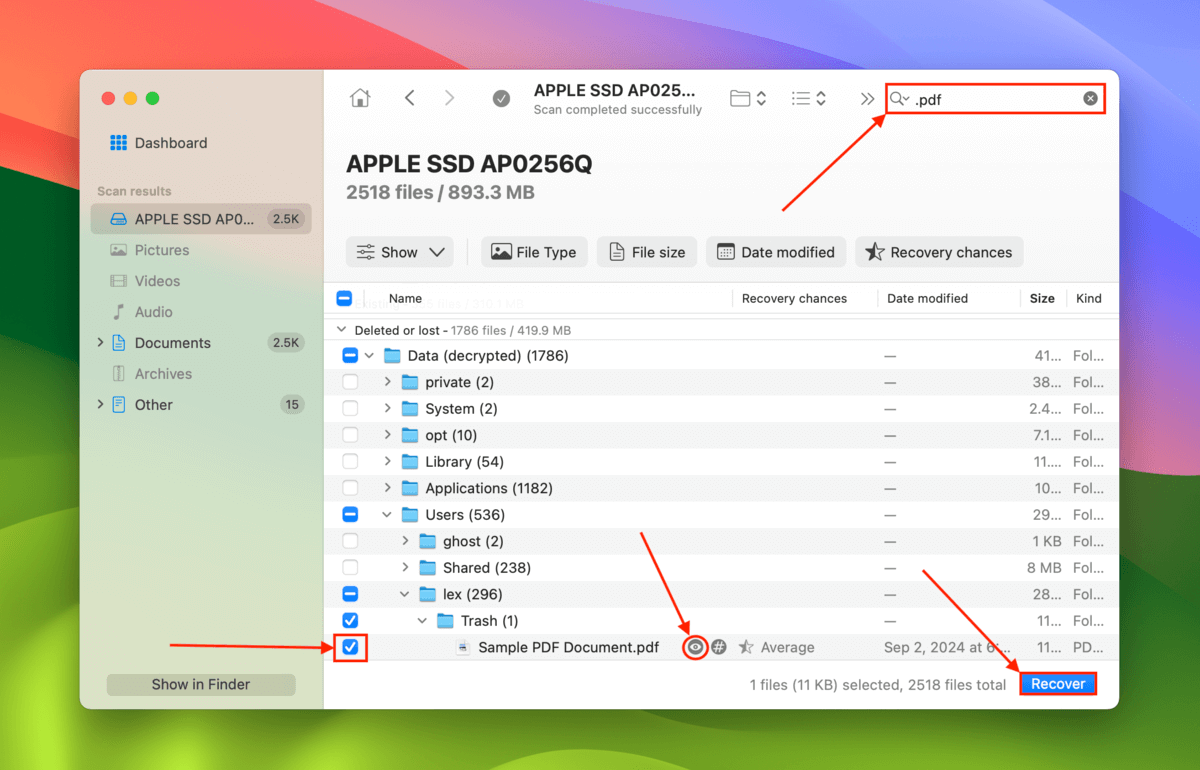
Step 2. Select the drive where your PDF file was stored and click Search for lost data.
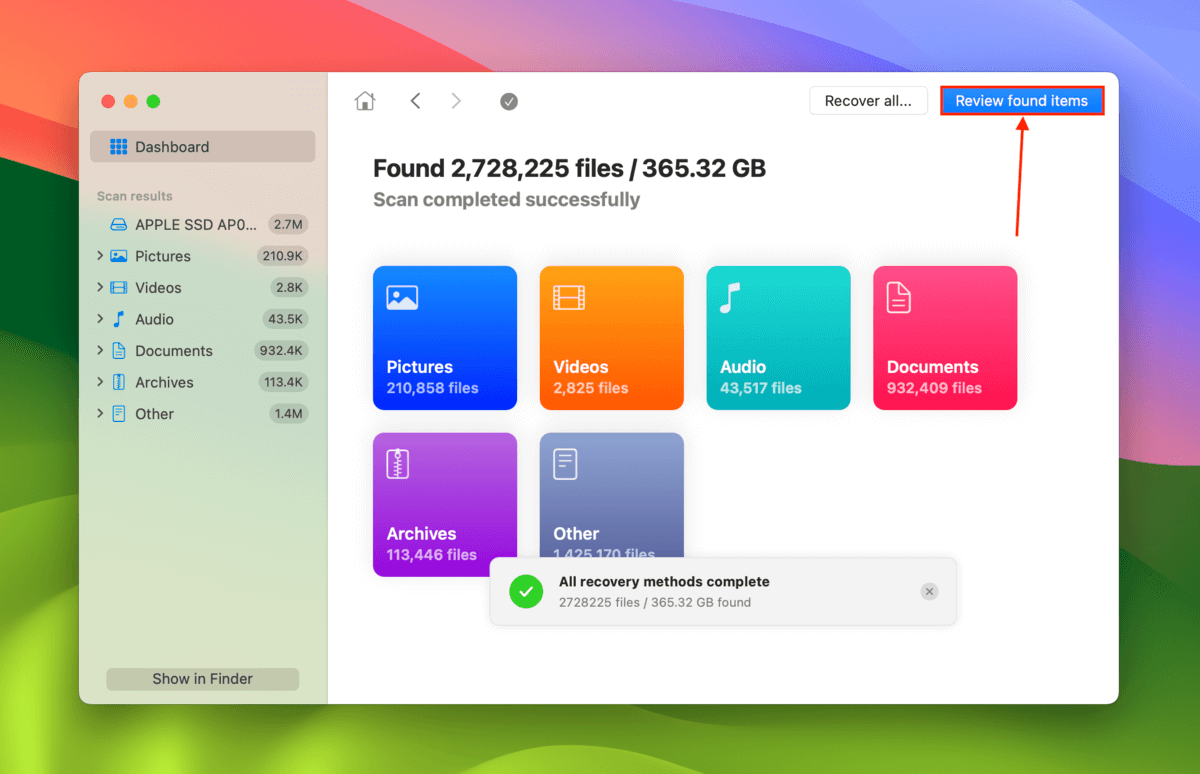
Step 3. When Disk Drill notifies you that the scan is complete, click Review found items.
Step 4. Click the magnifying glass in the top-right corner of the app to open the search tool. Type .pdf to filter the scan results. Then, hover your mouse on the PDF file you want to restore and click the eye button. This allows you to preview the file, ensuring its recoverability. Once you’ve successfully previewed the PDF document, fill in the box beside it and click Recover.
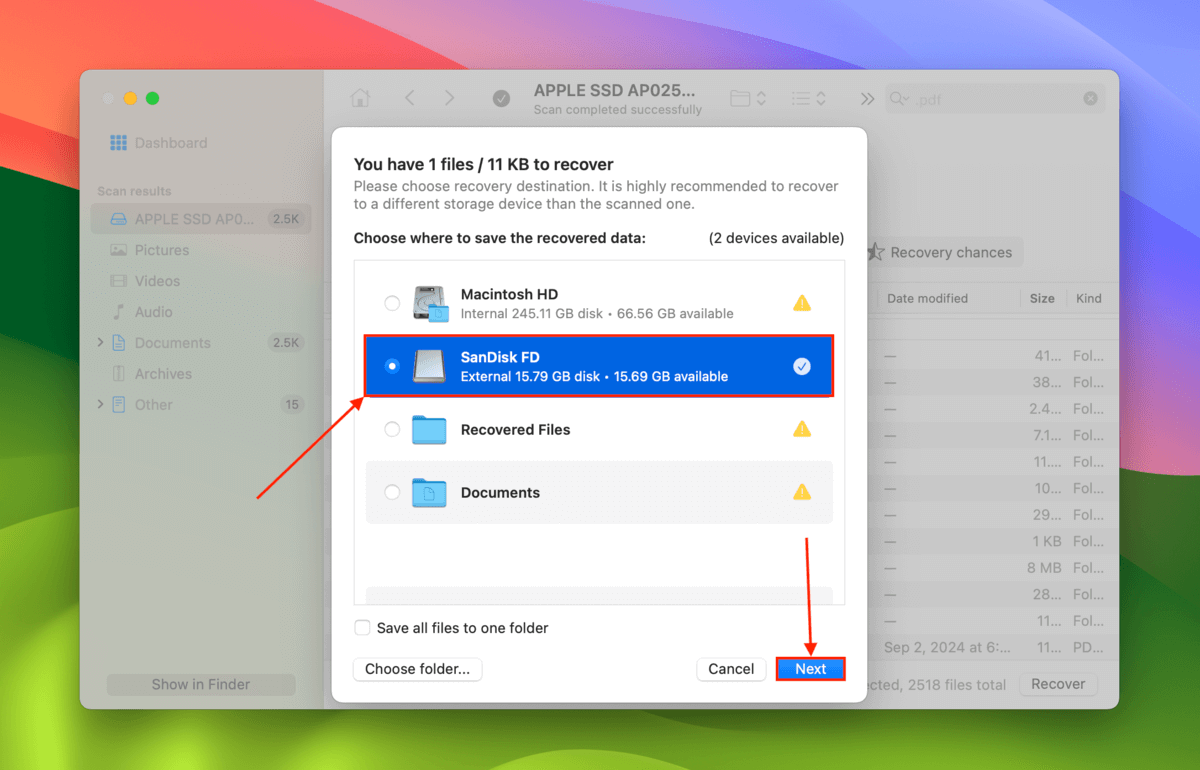
Step 5. Select a folder that is NOT in the same location where the PDF file was originally stored. Then, click Next to start the recovery operation.
Method 6: Send Your Drive (or Mac) to a Professional Data Recovery Service
If you absolutely need the highest recovery success rate possible, you may want to consider using professional data recovery services. They cost more than DIY solutions, but they have more advanced tools, facilities, and expertise that can greatly improve your chances.
Like data recovery software, there are dozens of professional data recovery services to choose from – many of them even have over 100 locations around the globe. The “best” shop truly depends on where you live (or how much you’re willing to pay for shipping). At the very least, try to look for services that have the following:
- No data – no charge guarantee Most of the top recovery shops offer a “no data – no charge” guarantee, which means that you only pay if they manage to restore the files you need.
- Good reviews User reviews are the best way to gauge service quality. Make sure that you’re checking reviews that are recent and that feature the actual branch you’ll be using.
- Cleanroom (Optional) Cleanrooms are special facilities that filter out dust particles, which can damage a drive’s internal components. They aren’t really necessary for simple data loss cases like accidental deletion, but they do indicate that the company is well-equipped for all scenarios.
3 Ways to Recover a Previous Version of Your PDF File
In this section, we covered methods to restore an earlier version of your PDF document. Rather than recovering a lost file, these methods help you revert unwanted changes.
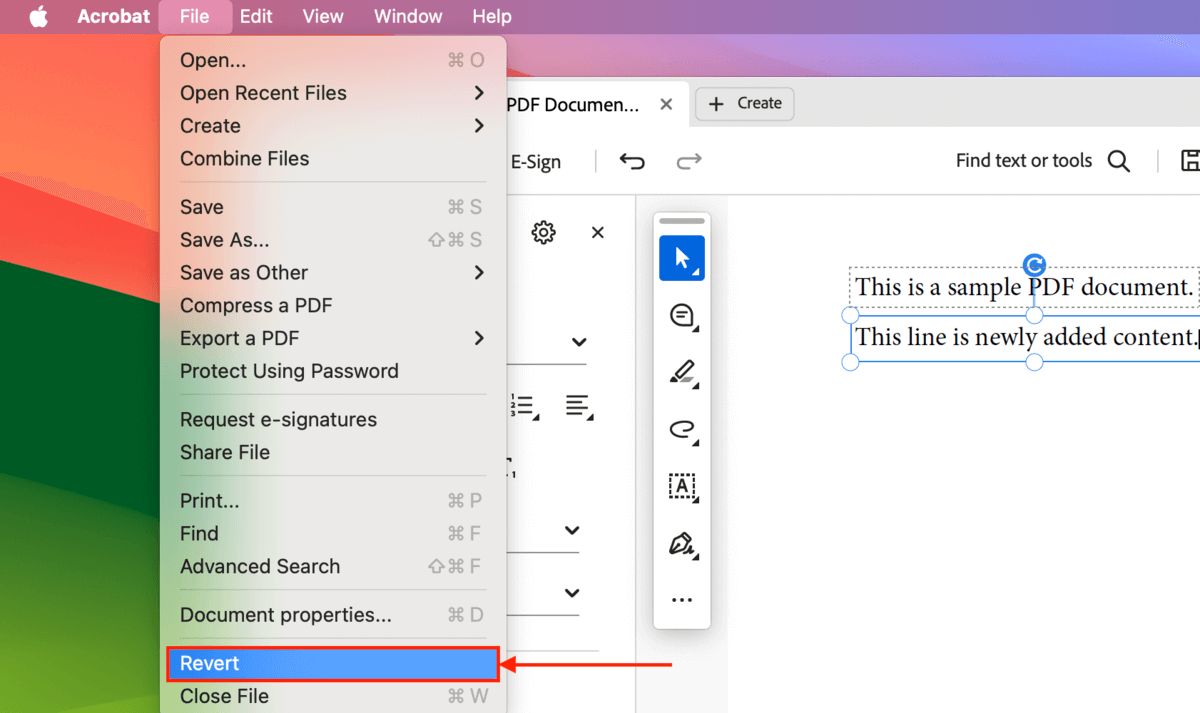
Option A: Use Adobe Acrobat’s Revert Tool
Adobe Acrobat has a built-in Revert tool that can restore your PDF file to its exact state the last time it was saved. That means all changes since its last save state will be discarded, as compared to the one-step-forward, one-step-back changes of the Undo and Redo features.
Step 1. Open your PDF document in Adobe Acrobat.
Step 2. Click File > Revert.
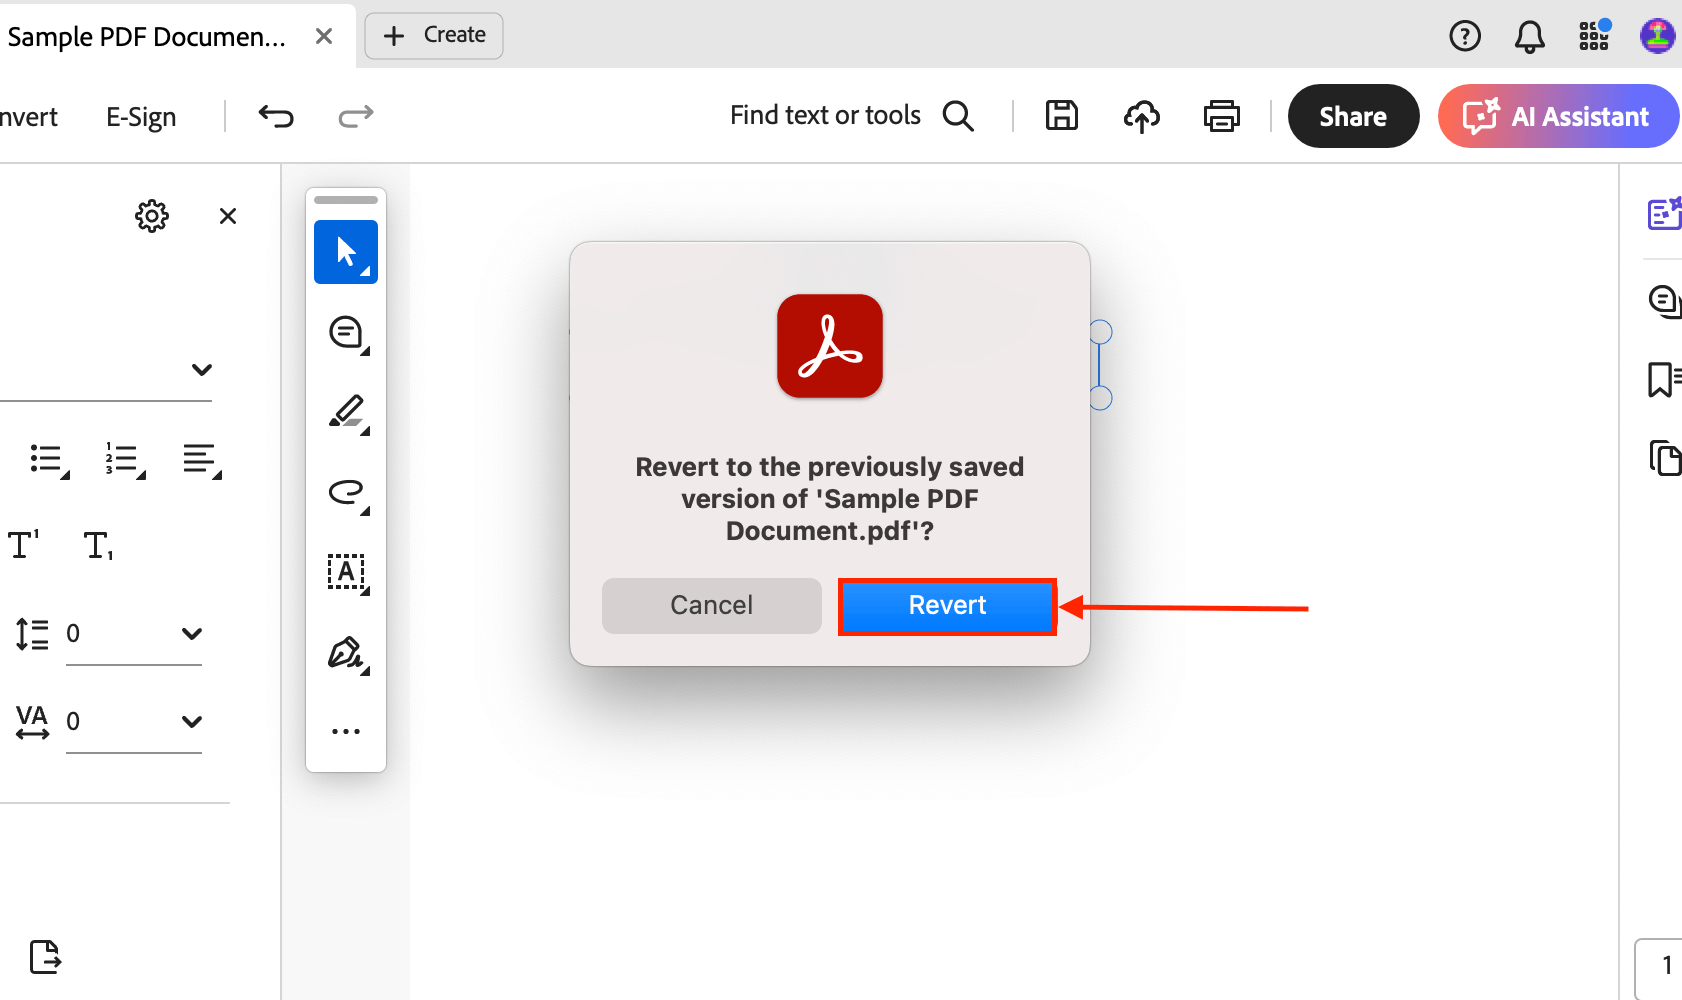
Step 3. Click Revert again when prompted to confirm the action.
Option B: Restore a Time Machine Snapshot
Time Machine doesn’t just create copies of your files and folders, it incrementally saves each new version of your file and folder every time it gets modified.
In other words, if you had Time Machine enabled before you modified your PDF file, it should have saved a version of the document earlier in the timeline.
See this section for a guide on using Time Machine.
Option C: Utilize Your Cloud Storage’s Past Versions Feature
Some cloud storage services, like Dropbox, utilize their own version history feature. However, it only comes into play when you edit and save the file with that cloud service.
We’ll demonstrate how Dropbox does it, but you can find how other cloud apps handle file versioning by checking their website’s support resources.
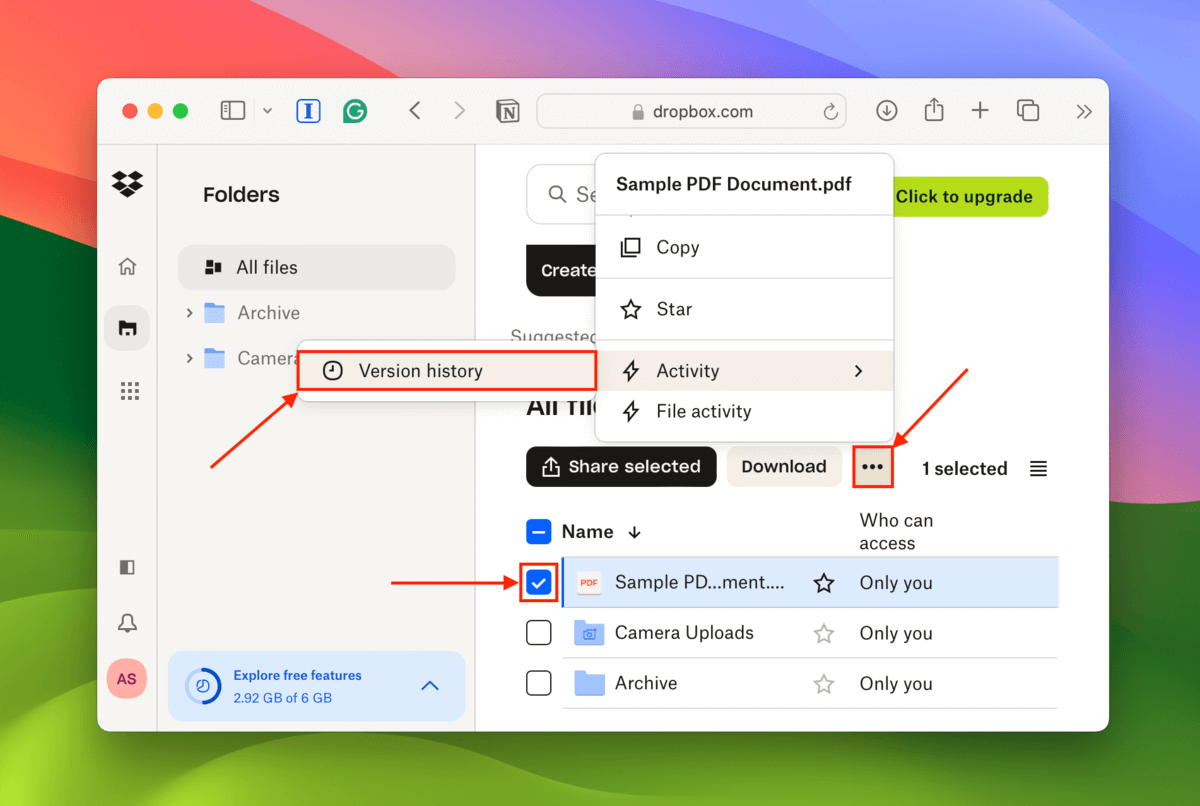
Step 1. Open the browser of your choice and log in to Dropbox.com.
Step 2. Locate the PDF document you want to revert and fill the box beside it. Then, click the menu button (3 dots) > Activity > Version history.
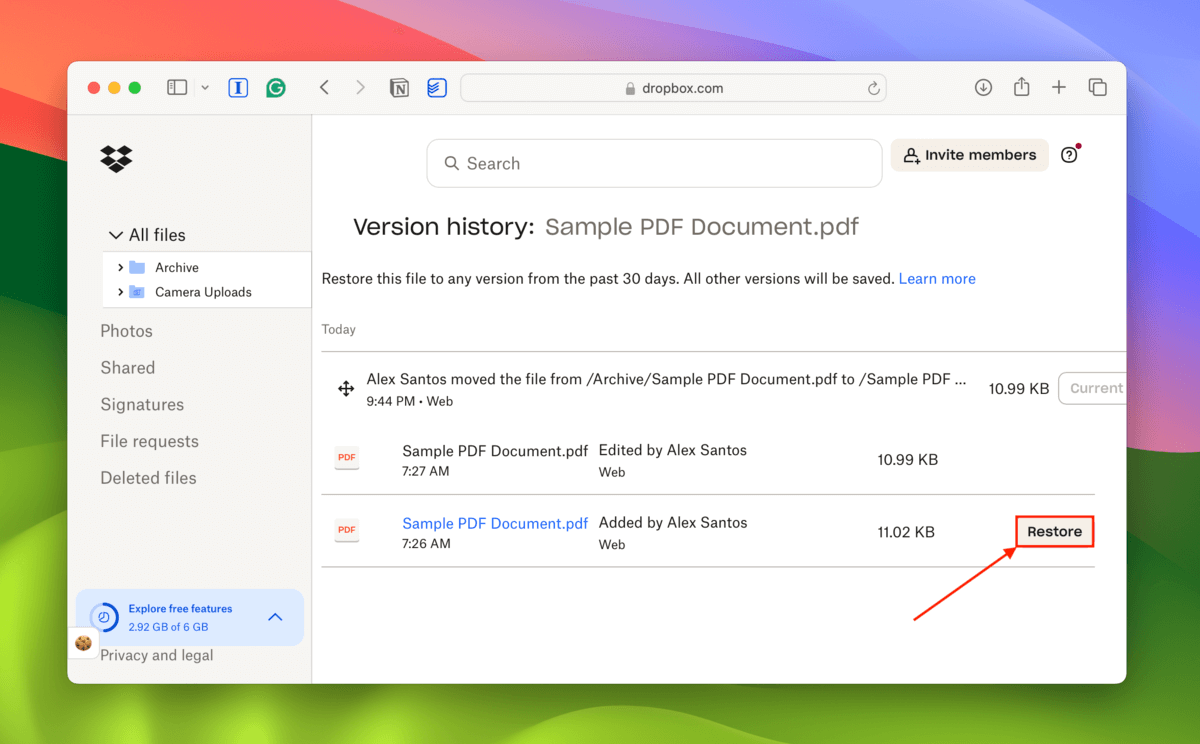
Step 3. Hover your mouse beside the document version you want to revert to. Then, click Restore.
Can’t open your restored PDF file?
If your PDF file has been corrupted or damaged and you can’t open it even after a successful recovery, there are a few things you can do.
First, try repairing your Adobe Acrobat installation (Help > Repair installation).
Second, you can try file repair sites like onlinefile.repair – it’s a paid service, but you’ll be able to preview the file for free to ensure that the app worked.
Finally, you can try converting the PDF file to another document file type, such as .docx or .pages (there are also online tools for that). This way, you can at least extract its contents.
Good luck!


