Is your DJI video corrupted? In many cases, you still have a good chance of fixing it as long as you act quickly and carefully. The problem with video corruption is that it can be caused by a variety of different issues (that sometimes occur at the same time) — and so one repair method may not be suitable for all scenarios. To help you, we compiled all known and tested fixes into this comprehensive guide on how to repair corrupted DJI files. Read on!
Table of Contents
How to Improve Your Chances of Repairing Your Corrupted Drone Video
Successfully repairing corrupted video files can sometimes come down to factors that are out of your control — especially when working with drones. However, there are a few tips you can keep in mind and preparatory steps you can take to maximize your chances of fixing your file:
- Stop recording footage. Do not record any new footage to your drone’s microSD because it might accidentally overwrite sections of the corrupted files, making them harder to repair and recover.
- Transfer footage via USB. You will be repairing your drone videos using a Mac. To copy or move them safely, we strongly recommend that you safely eject your microSD card from your DJI drone and connect it to your Mac via USB card reader. This will prevent further corruption or data loss due to an unstable network.
- Back up your drone’s microSD card. Attempting to repair your corrupted video isn’t a guaranteed success. Certain methods can further damage the file if unsuccessful and can even cause deletion. Use an app like Carbon Copy Cloner or SuperDuper! to create an image backup of your microSD card so you don’t permanently lose important footage.
- Duplicate your video before attempting repair. Aside from creating a backup, we suggest that you create a duplicate of your video file for repair purposes (right-click in Finder > Duplicate). This can help you avoid irreversible damage due to unsuccessful repair attempts.
- Don’t format your drone’s microSD card. Depending on what caused the corruption, it’s possible that your computer (or drone) will prompt you to format your microSD card once you connect it. Don’t do it! Formatting will wipe all the data from your microSD card, so only do it after backing up your microSD card and duplicating your video.
6 Ways to Repair a Corrupted DJI Drone Video
In this section, we’ll demonstrate 6 reliable methods to repair DJI video files. Each method attempts to fix different cases of corruption – from minor indexing issues to missing metadata. It’s very hard for the average user to know exactly which solution will work the first time, so we simply arranged the methods in order of difficulty.
Method 1: Power Cycle Your Drone
“Power cycling” your DJI drone simply means rebooting it. As the drone boots back up, it performs an integrity check and looks for any incomplete or corrupted data. This feature was specifically designed to protect footage in case of unexpected shutdowns in the field.
Step 1. Insert your microSD card into your drone’s memory card slot.
Step 2. Turn off your drone, then turn it back on.
Step 3. Wait for 30 seconds and try playing your video again.
Method 2: Utilize Online Video Repair Tools
If power cycling your DJI drone doesn’t work, the next easiest method to fix your corrupted footage is to use an online video repair tool. These are web apps that can repair moderate cases of video corruption without forcing the user to download, install, or learn new tools. For this article, we’ll be using a web app called Clever Online Video Repair.
It supports almost all video formats (including MOV and MP4) and the service is completely free as long as your file is 5 GB or smaller — which is a huge file size limit compared to similar tools. It also specifically provides support for DJI drones.
The app is best suited for cases where critical metadata is lost. This usually occurs when a recording suddenly ends mid-session, (e.g. drone crashes, battery fails, microSD card gets dislodged, you accidentally turned off the drone, etc.) because the video’s metadata is written to a file at the end of the recording.
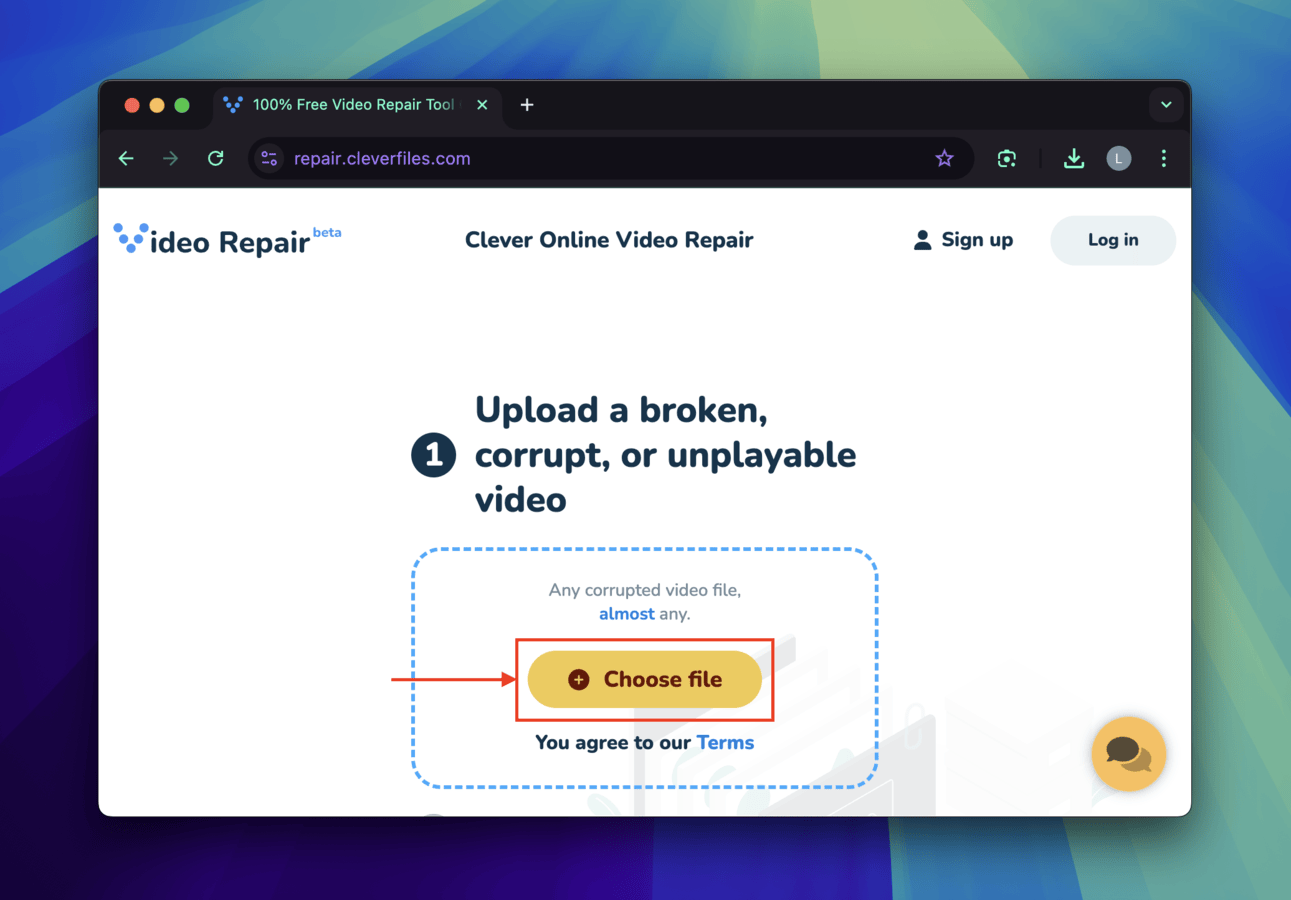
Step 1. Using any browser on your Mac, navigate to the Clever Online Video Repair website. Then, click Choose file.
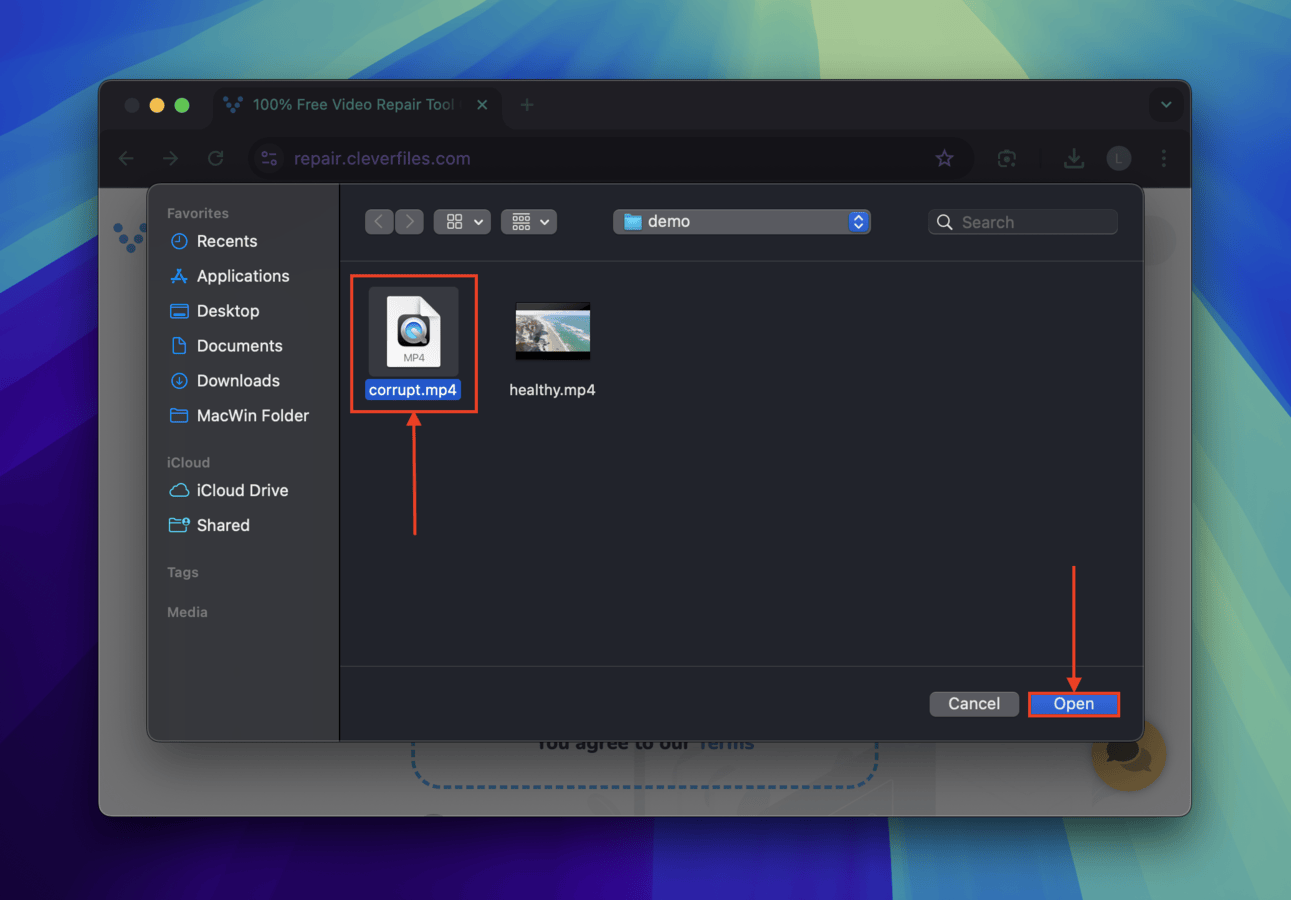
Step 2. In the Finder menu that appears, navigate to where your corrupted video is selected. Click it once, then click Open.
Step 3. Depending on the error, Clever Online Video Repair may be able to fix your video even without a healthy file sample. In this case, you’ll immediately be shown a preview of the repaired video, along with the Download button to save the repaired file (as demonstrated below). If the tool requires a file sample, a second Choose file button will appear. Use it to find and select the sample, then Clever Online Video Repair will automatically begin the operation.
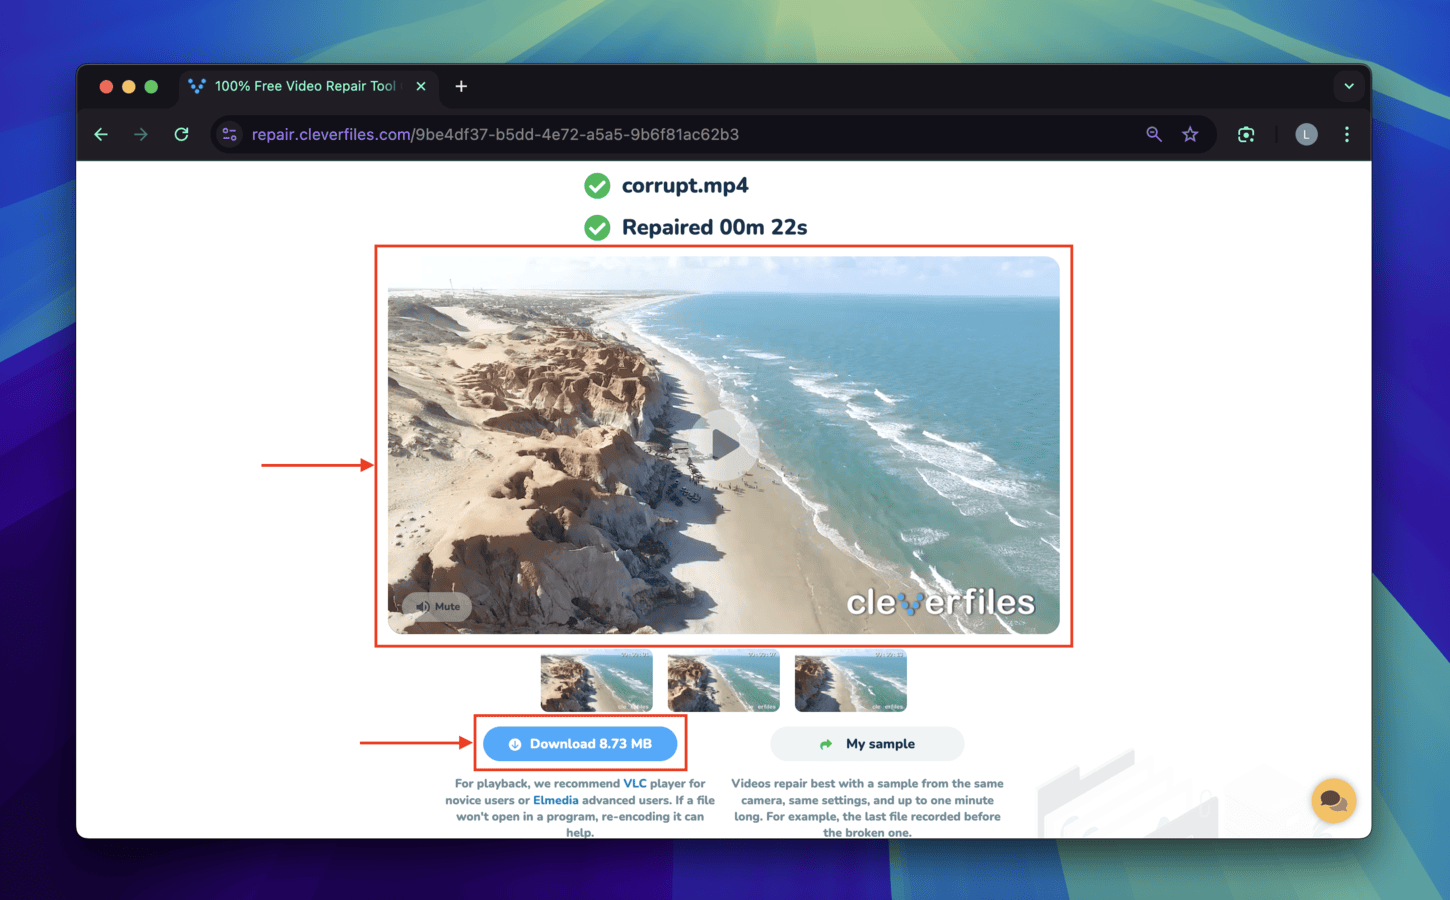
Once the download is complete, the repaired video should appear in your Mac’s Downloads folder. We recommend that you try playing it before closing your browser window (so you can download the file again in case the download itself was compromised).
Method 3: Use QuickTime’s Automatic Repair Feature (MOV Only)
QuickTime is a built-in media player on your Mac. When it encounters damaged files, it will automatically try to adjust internal settings to make them playable again. Note that QuickTime can only repair minor file system structure and indexing issues, but it’s super easy to use — just try to open your video!
Step 1. Open QuickTime Player (Finder > Applications) and locate your file in the browser.
Step 2. Select your file and click Open. 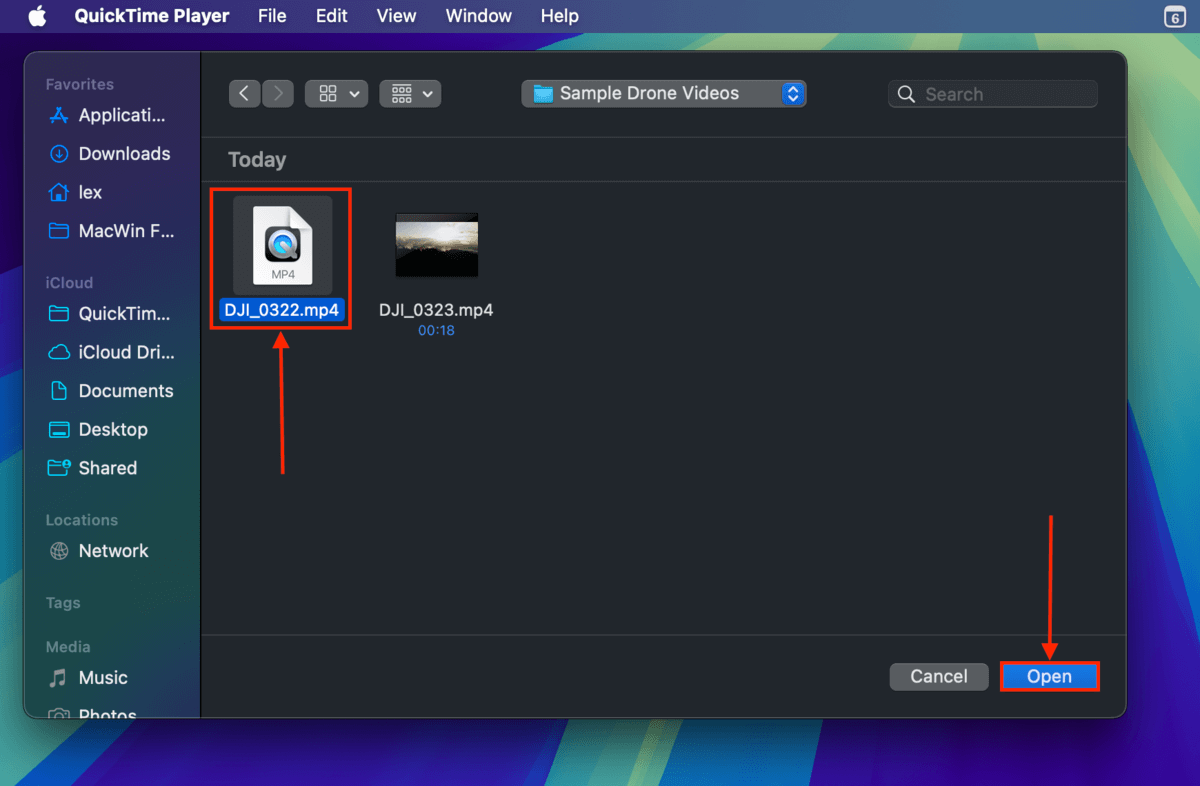
Method 4: Use VLC’s AVI File Repair Tool
VLC Media Player is a popular, free, and open-source multimedia player. It has an auto-repair tool (which needs to be enabled in the app’s settings) for AVI video files with indexing issues and other minor errors. Even though DJI drones only record video in MP4 and MOV format, you can modify your video’s file name and “trick” VLC into attempting to repair it.
Step 1. Open Finder and navigate to your file.
Step 2. Right-click your file and click Rename. 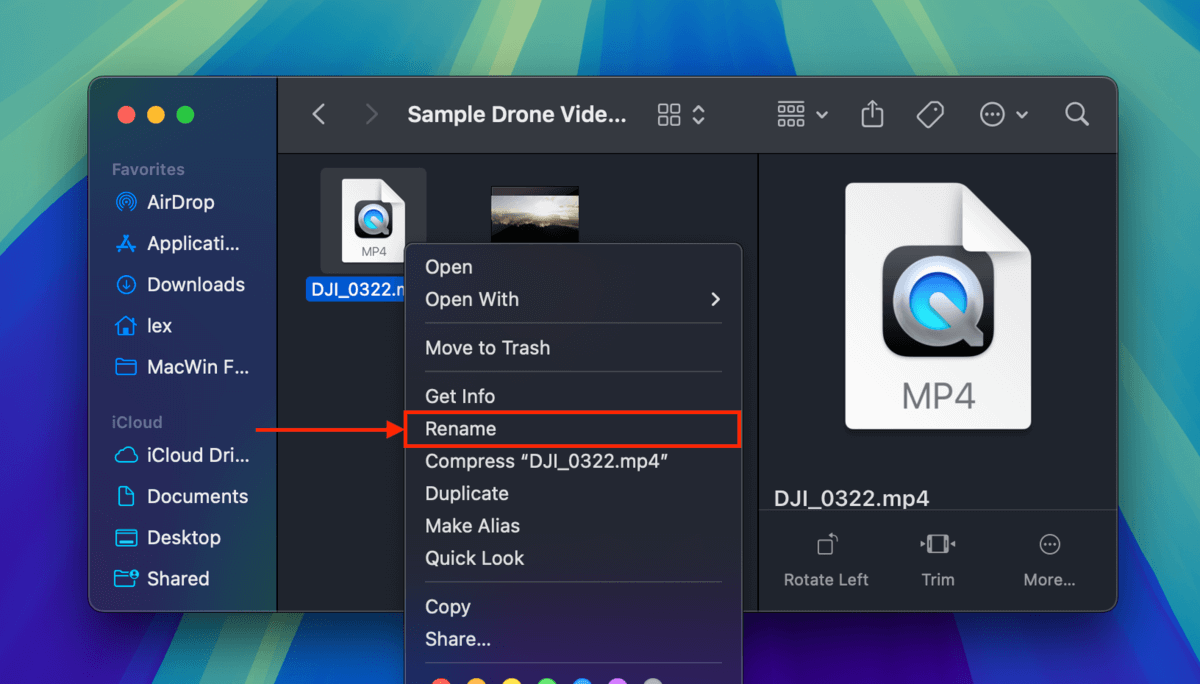
Step 3. Change your drone video’s file extension to avi and hit Return to confirm the edit. 
Step 4. Download and install VLC Media Player.
Step 5. Open VLC Media Player. On the menu bar, click VLC media player > Settings… 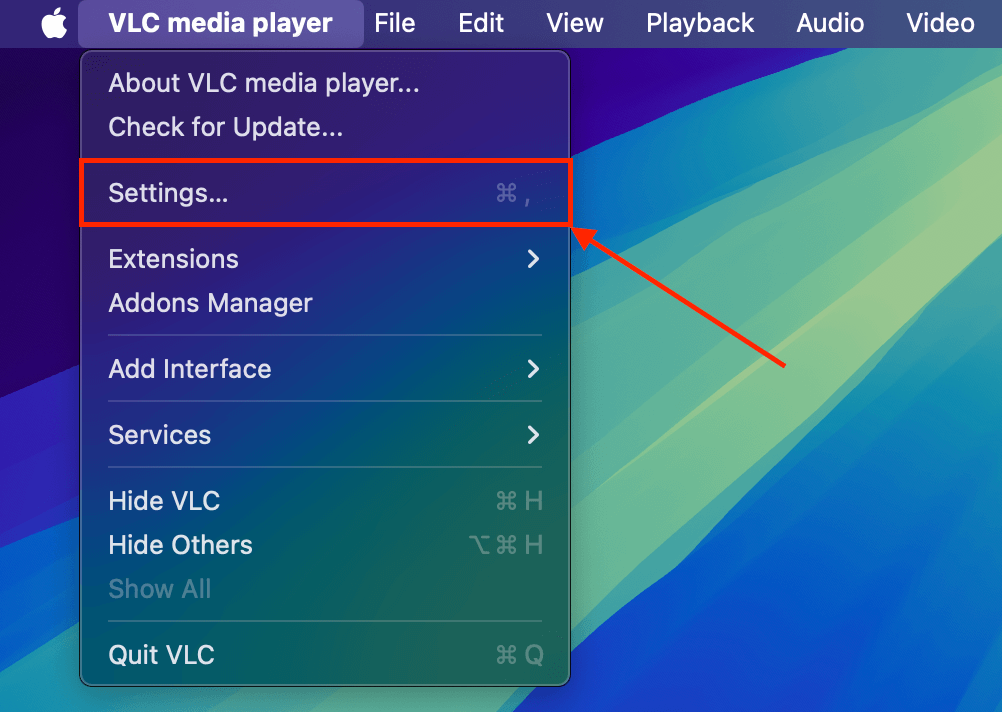
Step 6. Navigate to the Input / Codecs menu. Click the dropdown menu beside Repair AVI Files and choose Always fix. Then, click Save. 
Step 7. Try opening your video with VLC – the app will automatically try to repair it. If the repair attempt is successful, your video should play.
Method 5: Repair Your DJI Drone Video With Djifix
Djifix is a free and open-source DJI video repair tool designed specifically to fix drone footage taken by DJI drone models Phantom, Mavic, Spark, and Inspire. It can help make corrupted videos playable again by fixing moderate indexing issues and repairing damaged frames.
Aside from its limited support, djifix’s other major weakness is the lack of a GUI — you can only utilize the tool via Terminal commands. But as long as you follow the instructions below, you should be completely fine!
Step 1. Download the djifix file.
Step 2. Copy both the djifix file and your corrupted DJI drone video to your Movies folder (Finder > Go > Home). 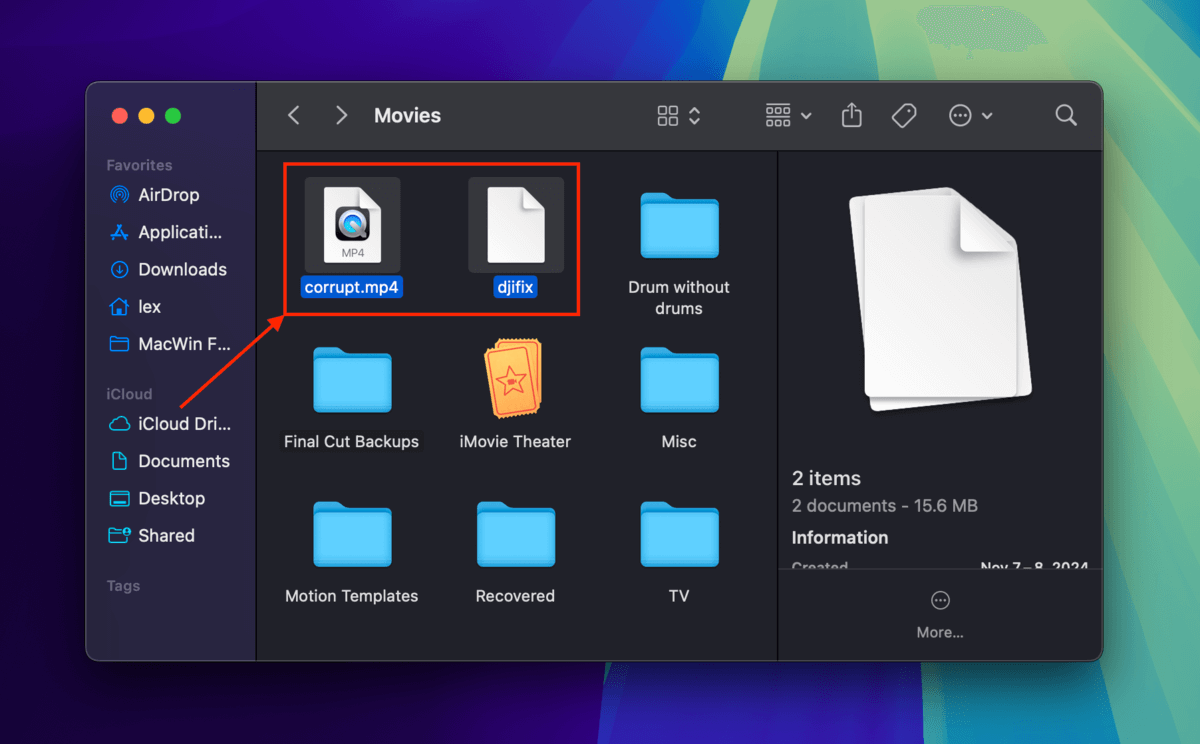
Step 3. Open the Terminal app (Finder > Applications > Utilities). Let’s point Terminal to the Movies folder using the following command:
cd Movies

Step 4. Next, modify the djifix file’s permissions and make it executable:
chmod +x djifix
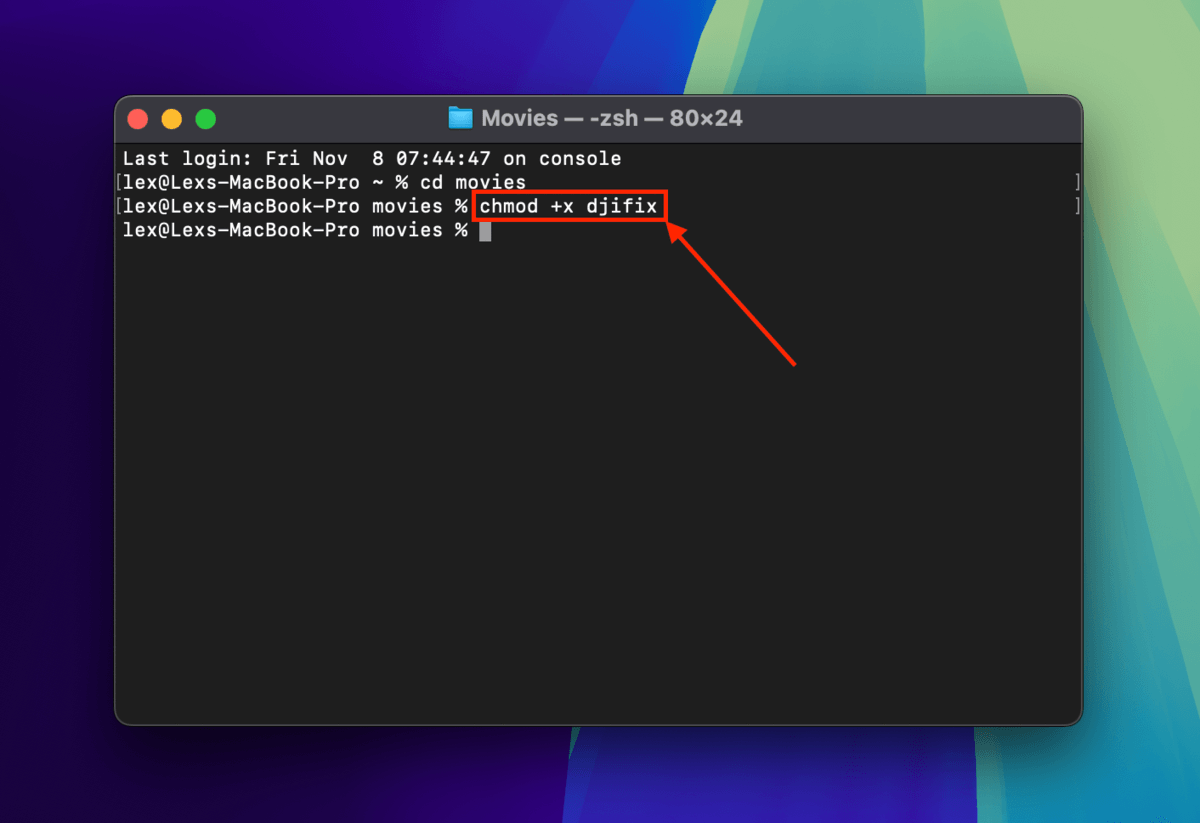
Step 5. With this command, run the djifix file and point it towards your corrupted video:
./djifix corrupt.mp4
Replace corrupt.mp4 with the file name and file extension of your own video. You may have to allow the app via System Settings > Privacy & Security (scroll down to the Security section and click Allow anyway. 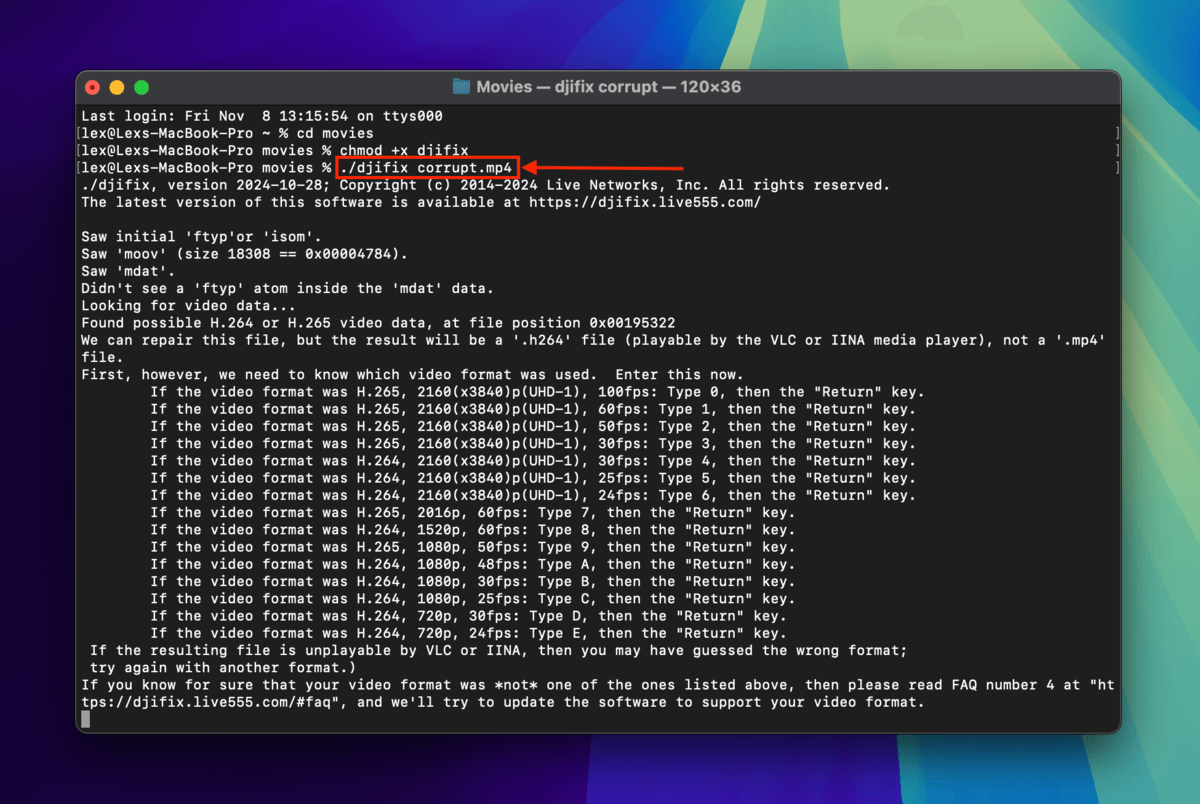
Step 6. Note your video’s format from the list that Terminal printed. Finally, press the advised number or letter key and hit Return (as you’ll see from the screenshot below, it’s the 7 key for me). Djifix will print the results of the repair attempt in the Terminal for you. 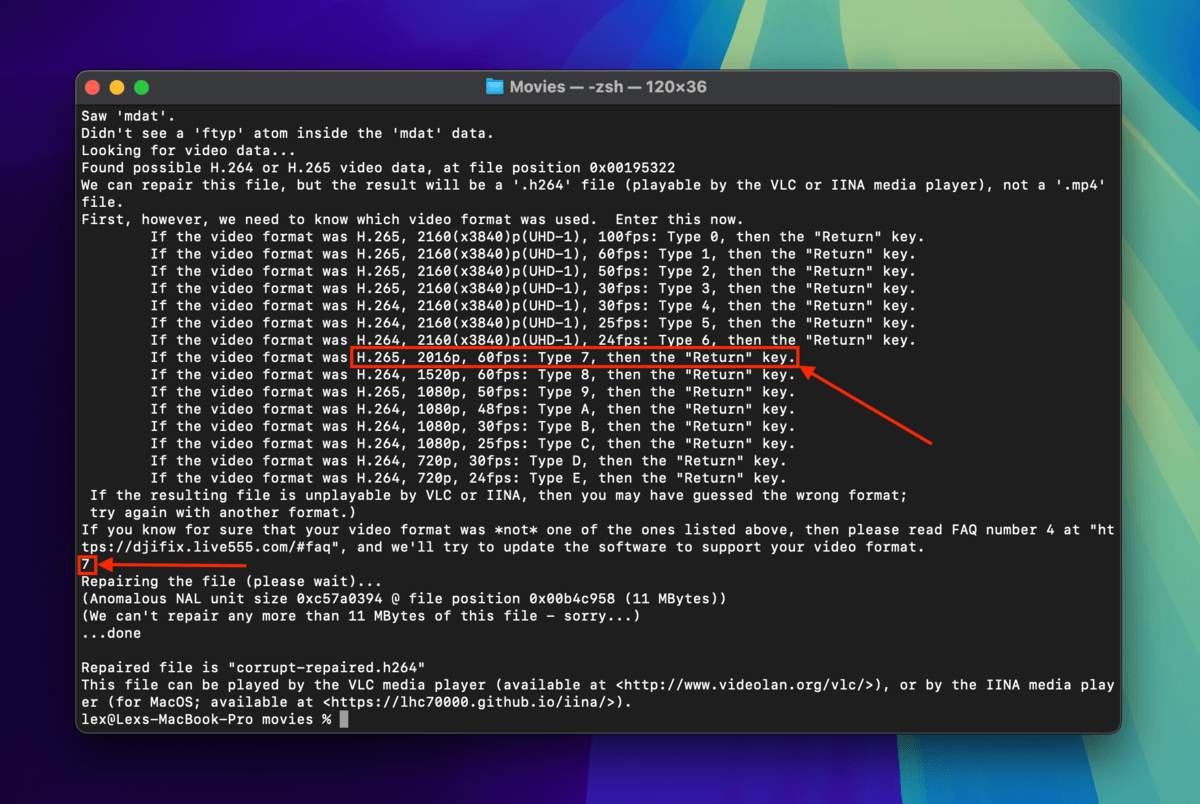
Method 6: Convert Your DJI Drone Video’s File Format
DJI drones use MOV and MP4 file formats, which are complex and high-quality multimedia containers. By converting your drone MOV or MP4 file to another format, you may be able to bypass certain error flags and make the video playable again.
Option A: Online Video Converter
The easiest way to convert a video’s file format is by using one of the many available online video converter web apps. Many of them will convert your video for free if it’s under a certain file size limit. For this demonstration, we’ll be using a web app called Zamzar, which is free for videos up to 200 MB in file size.
Step 1. Open any browser and navigate to zamzar.com.
Step 2. Click Choose Files. 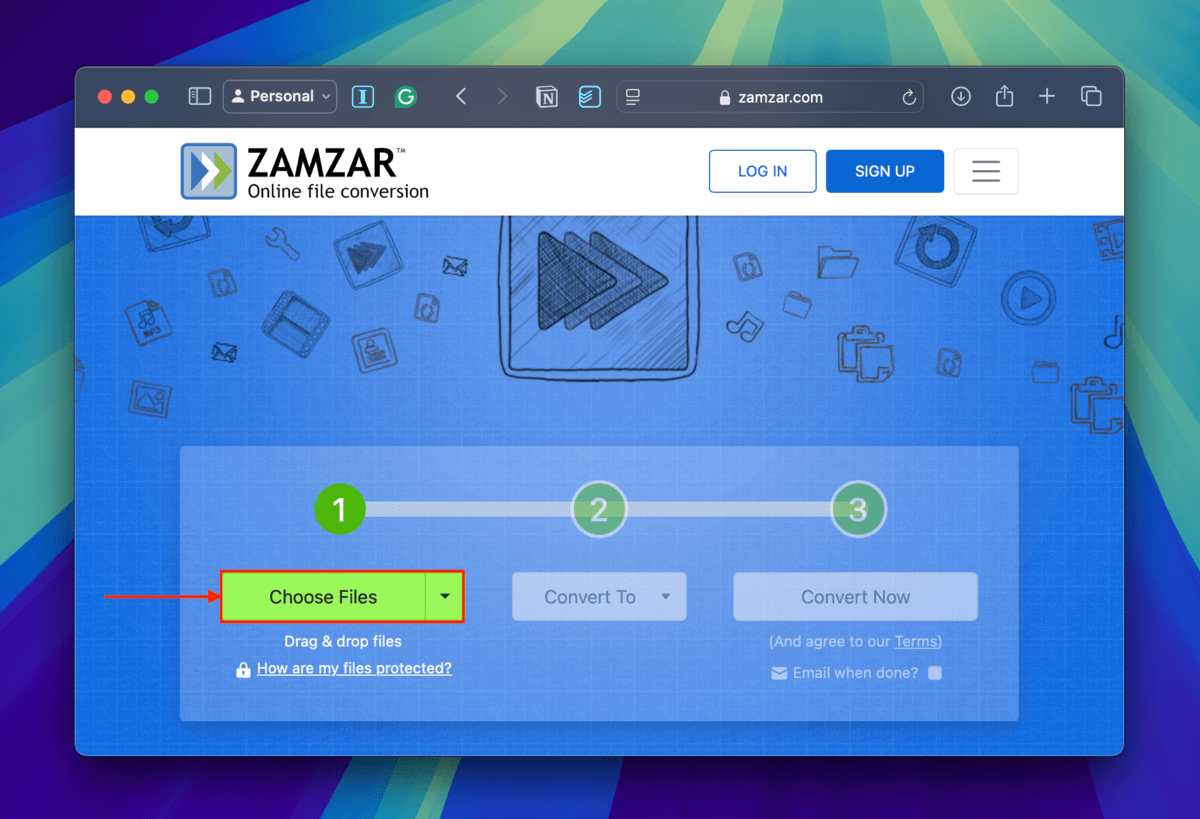
Step 3. Select your corrupted DJI drone video and click Upload. 
Step 4. Choose a new file format for your drone video and click Convert. 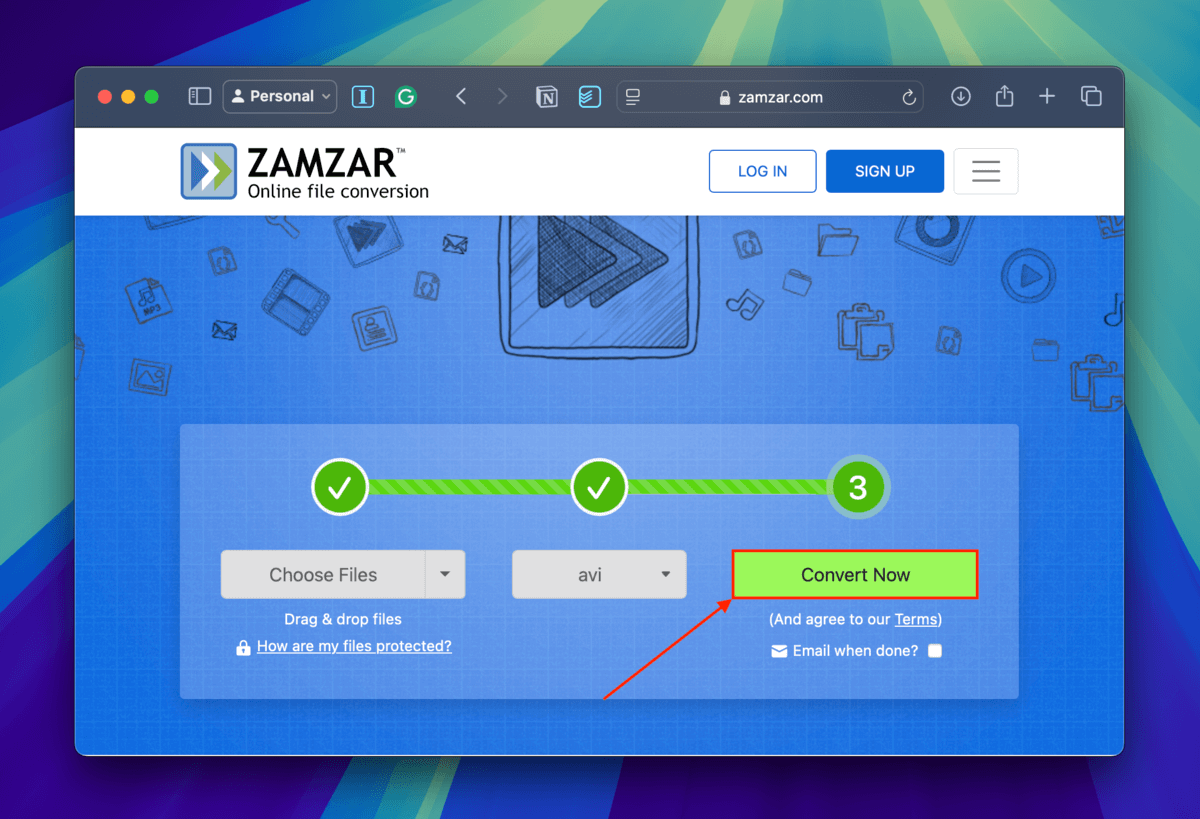
Option B: VLC Convert/Save Option
If your video’s file size is larger than the maximum limit of the online tools you want to use, you can utilize VLC Media Player’s conversion feature instead. It’s also a good alternative method if your network is too unstable for uploading a large video file uninterrupted.
Step 1. Download and install VLC Media Player.
Step 2. Open VLC Media Player. Then, in the menu bar, click File > Convert / Stream.
Step 3. Click open media…
Step 4. Click Customize…
Step 5. In the Encapsulation menu, select AVI. Then, click Apply.
Step 6. Click Save as File.
Step 7. Choose the name, tags, and save location of the converted video file. Then, click Save.
Step 8. Click Save again to start the conversion process. Once VLC successfully saves your video as an AVI file, try opening it.
Did you find multiple corrupted videos on your microSD card?
If there are multiple corrupted videos on your microSD card (especially if it happened multiple times recently), it’s likely that your memory card itself has been corrupted. We strongly recommend that you replace it ASAP to avoid compounding issues down the line.


