
Is your Samsung SSD not being recognized by your Mac? This can be a tough issue to diagnose because (1) you can’t really access your SSD at all, and (2) it can be caused by a number of different issues (ranging from mechanical malfunctions to corruption).
At this point, your data may also be at risk of permanent loss — especially if corruption is the culprit.
So we created this guide to cover it all. We’ll walk you step by step through securing your data and repairing your Samsung SSD.
Table of Contents
How to Recover Data from Samsung Portable SSD
If your Mac doesn’t detect your SSD, it won’t have access to the file system and so can’t logically find and interact with your data. In other words, you won’t be able to access your SSD files like you usually do.
Fortunately, there are tools that aren’t wholly reliant on your drive’s file system structure and instead use scanners built on complex algorithms to locate file data. These tools are called data recovery software.
We’ll demonstrate how you can use data recovery software to restore your SSD files using an app called Disk Drill. It supports almost all popular file system formats, including APFS, HFS+, ExFAT, and NTFS. Disk Drill can also create an image backup of your SSD and use that as the recovery target (which helps preserve your SSD as much as possible).
Most importantly, it can recognize storage devices that don’t show up on Mac, as long as they show up in Disk Utility.
Step 1. Connect your Samsung Portable SSD to your Mac.
Step 2. Download and install Disk Drill.
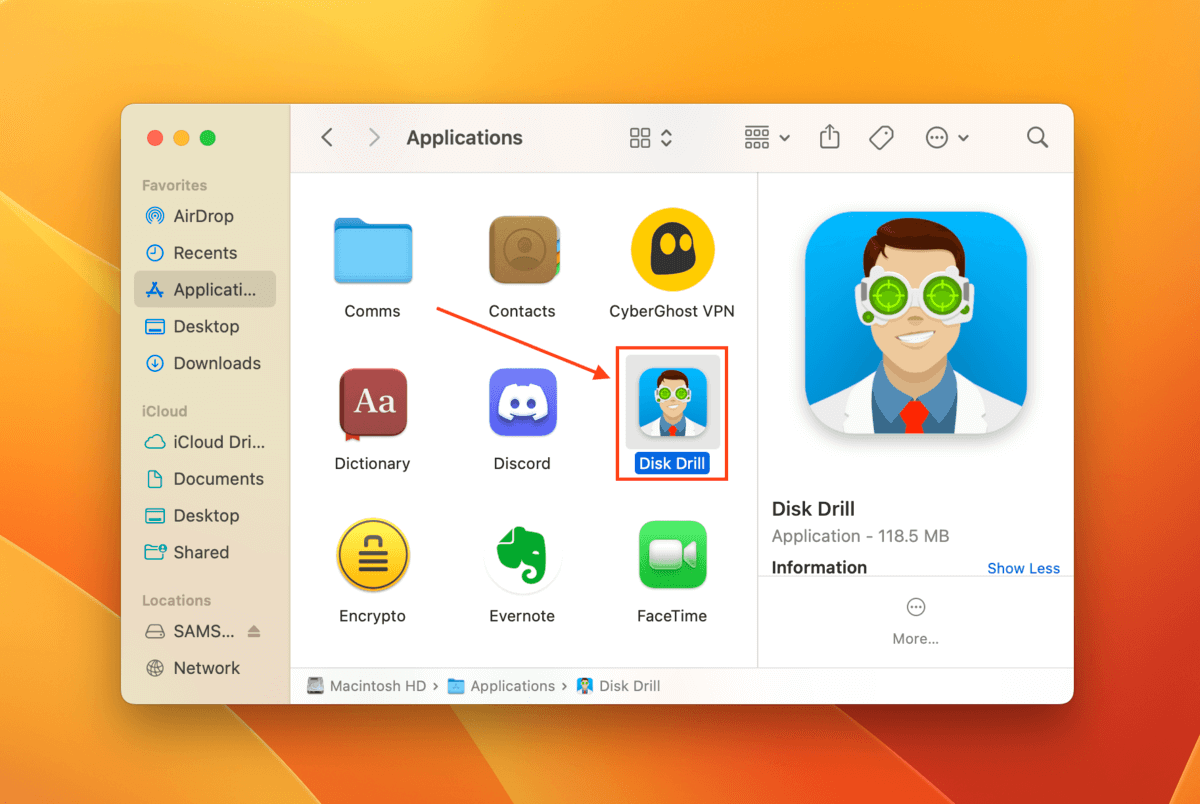
Step 3. Launch Disk Drill (Finder > Applications).
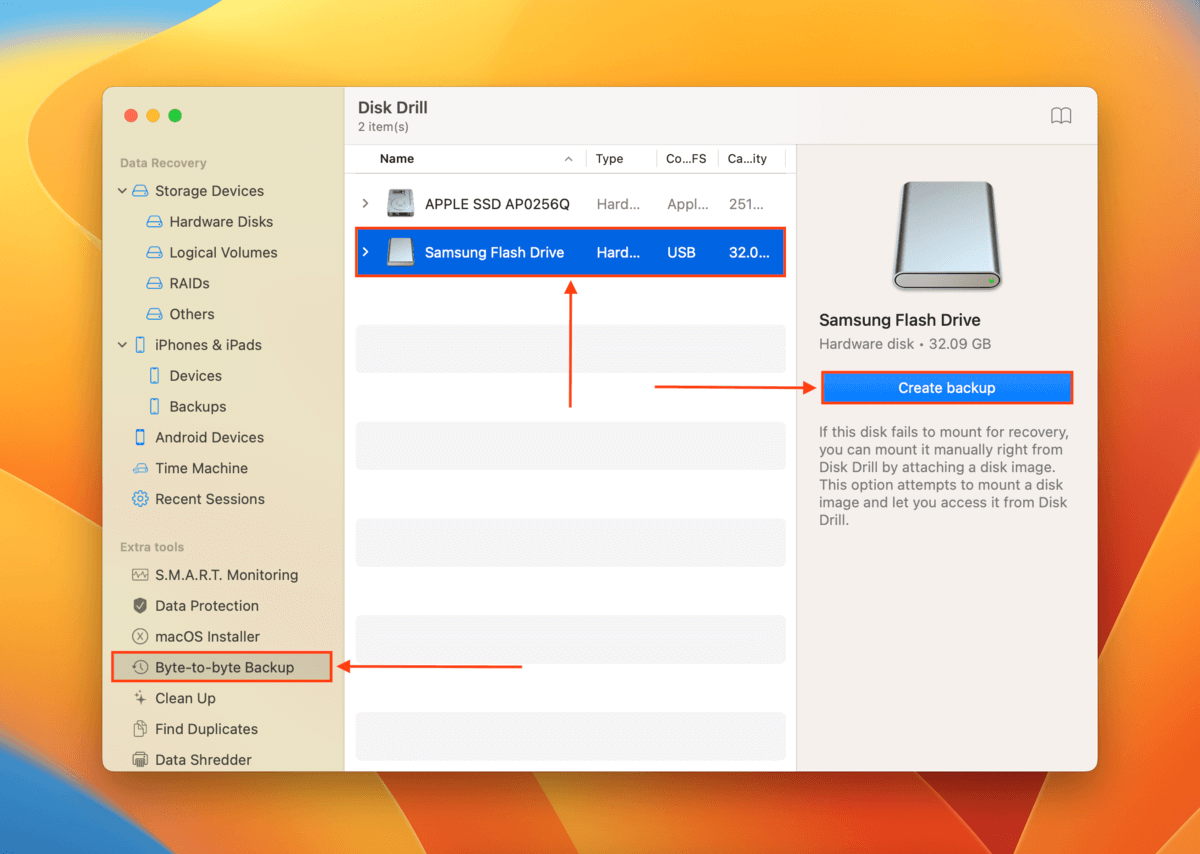
Step 4. On the left sidebar, click Byte-to-byte backup (if this is your first time using this tool, click OK let’s do it). Then, select your SSD from the list of drives and click Create Backup.
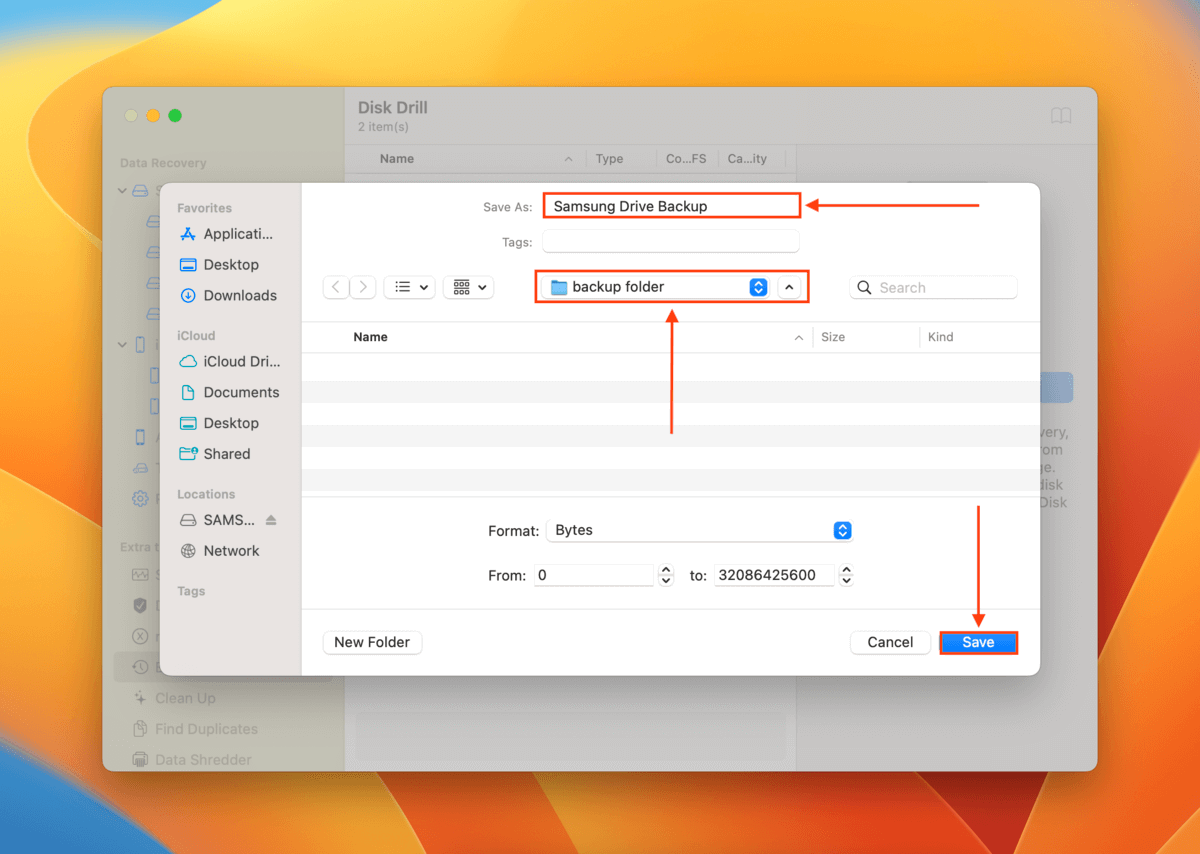
Step 5. Name your backup file and choose a location on your Mac where Disk Drill will save the recovered files. Then, click Save.
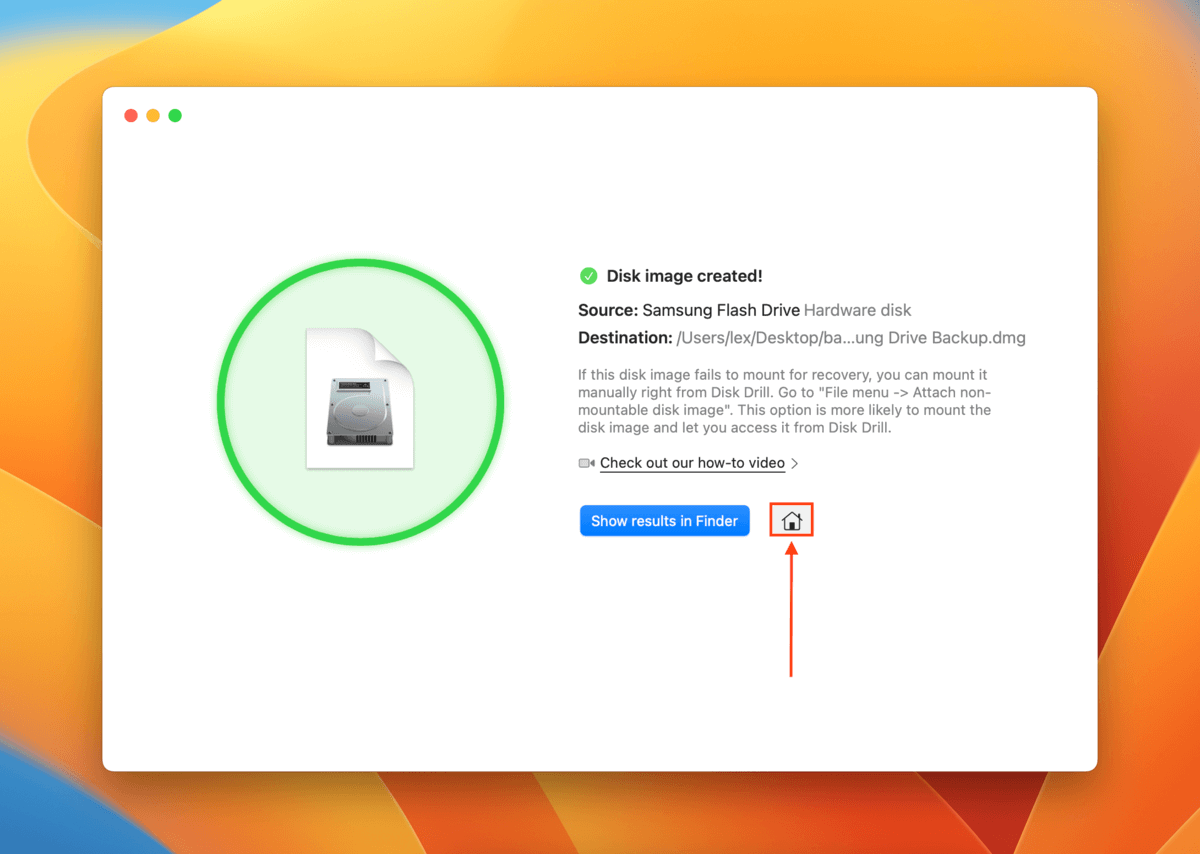
Step 6. Once the backup creation process is complete, click the home button to return to the main window.
Step 7. On the left sidebar, click Storage Devices under the Data Recovery section. Then, click Attach disk image near the bottom of the window.

Step 8. Select the backup file we created in steps 5 and 6 and click Attach.
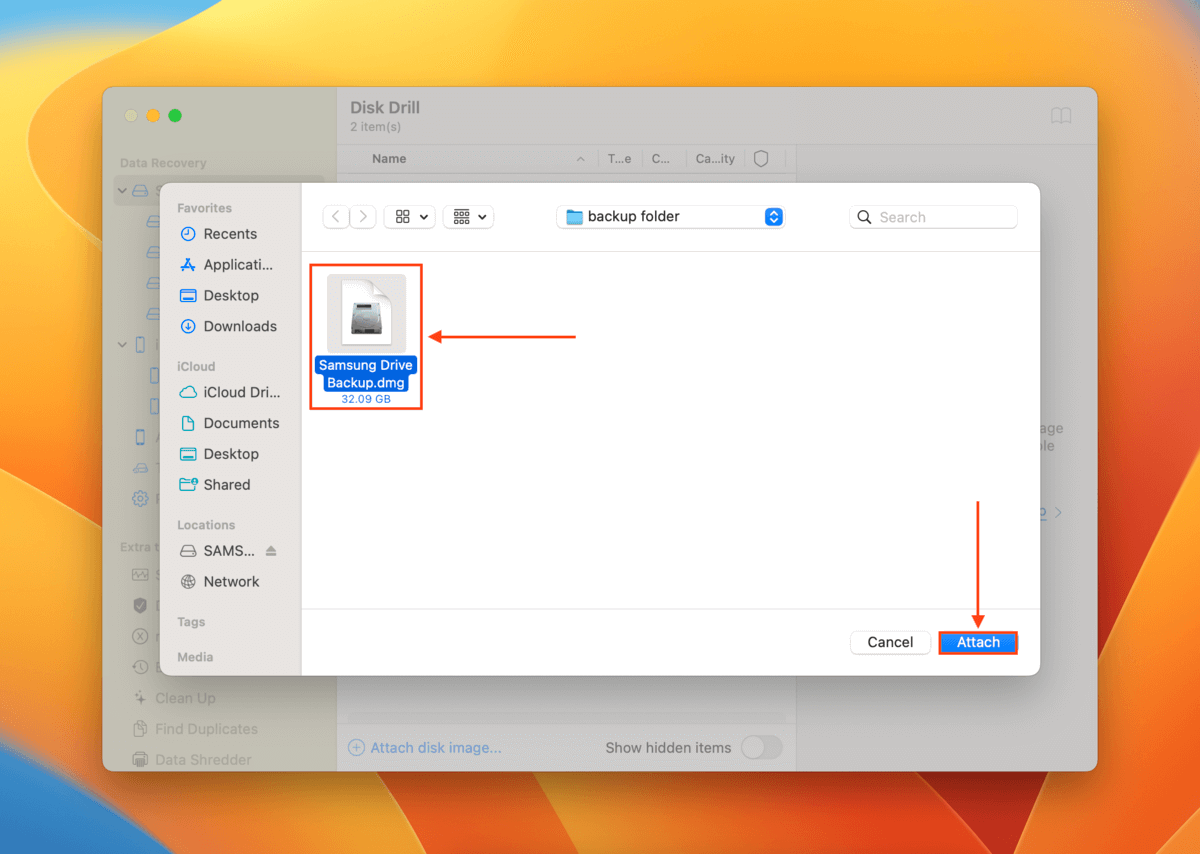
Step 9. Select the backup file we attached in step 9 and click Search for lost data.

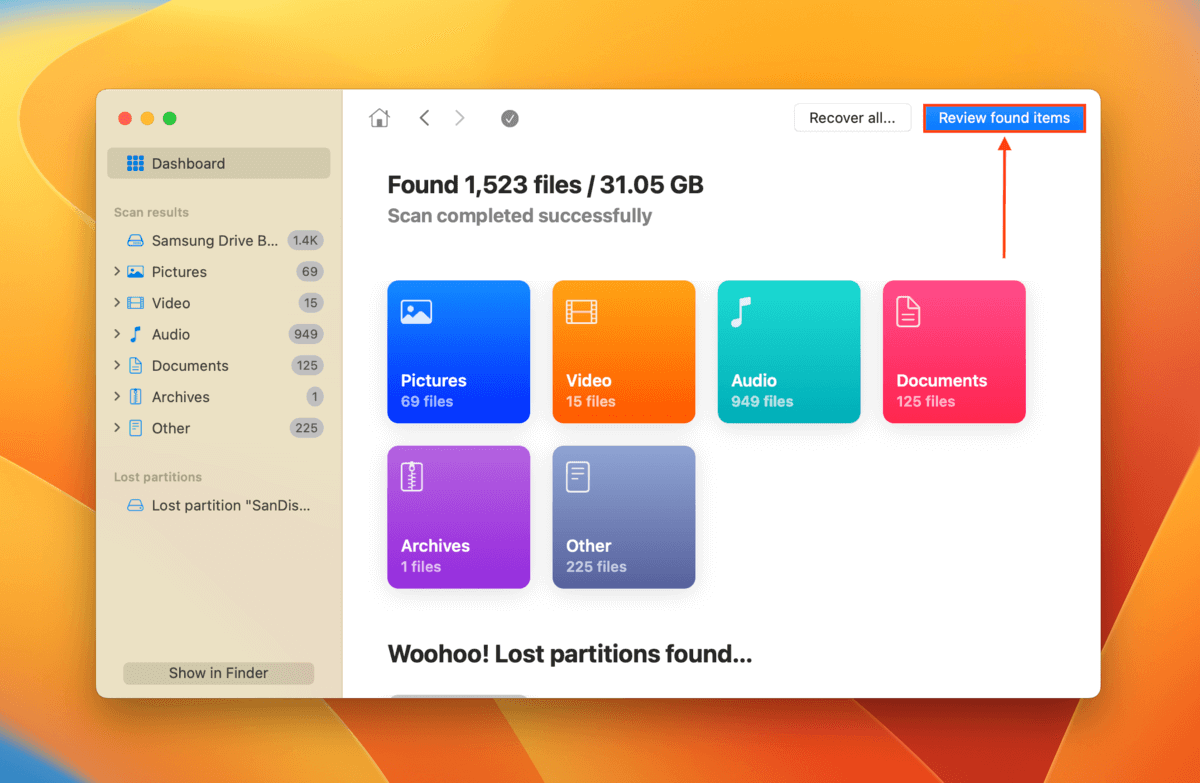
Step 10. Wait for Disk Drill to complete its scan and click Review found items.
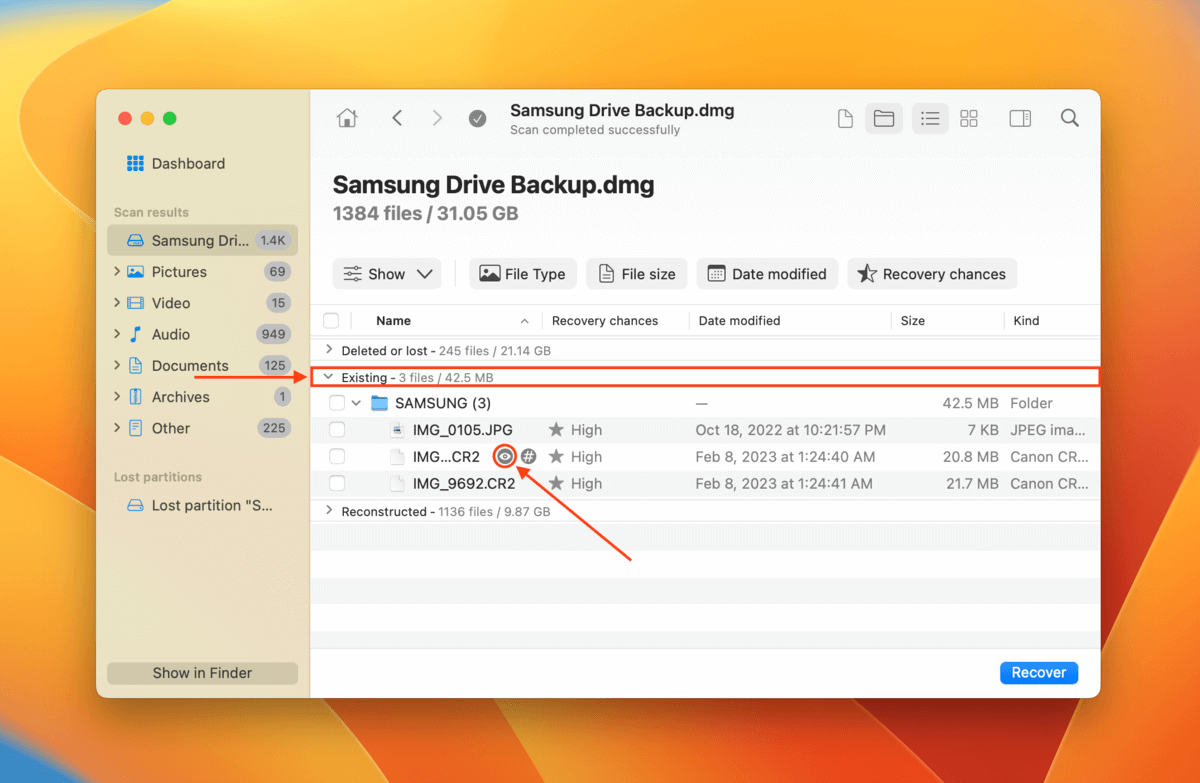
Step 11. Expand the Existing tab to view files that were present on your SSD when the backup was created. You can also check the Deleted or lost and Reconstructed tabs if you suspect some of your files have been corrupted or deleted. You can preview your files by hovering your mouse beside any file and click the eye button that appears.
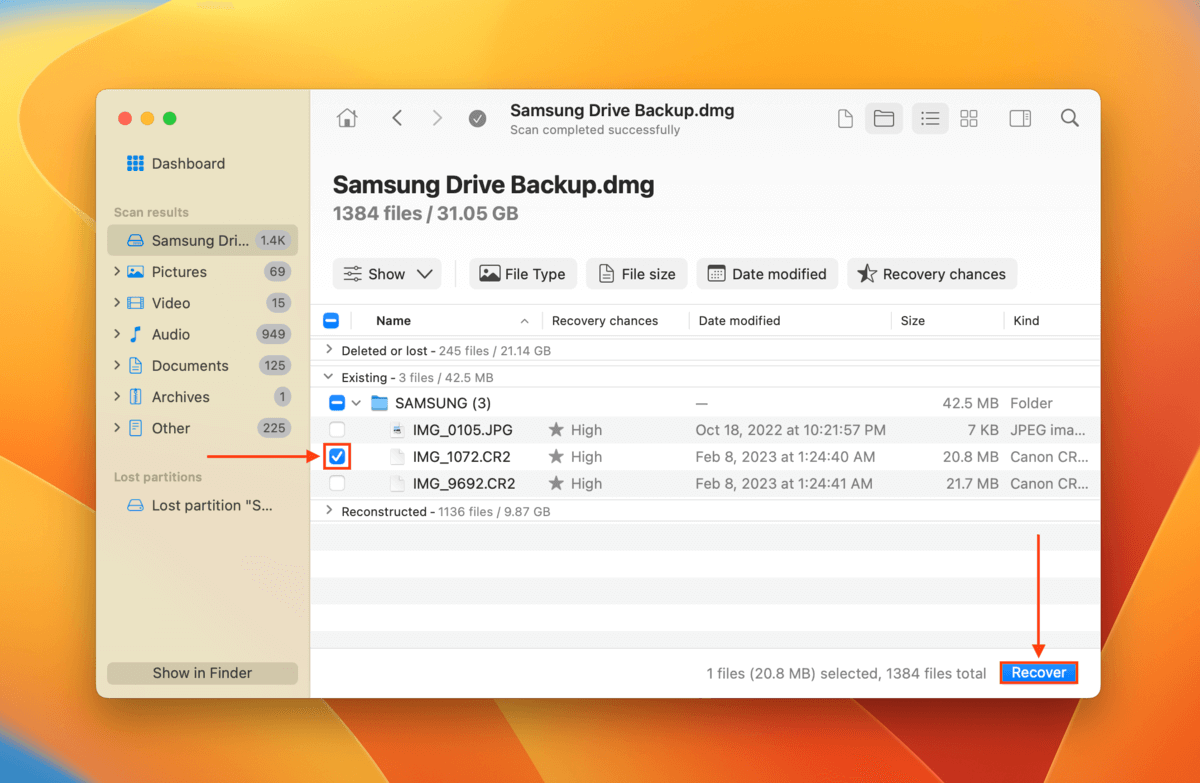
Step 12. Select the individual files or folders you want to restore or tick the box in the column header beside the Name column to select all items. Then, click Recover.
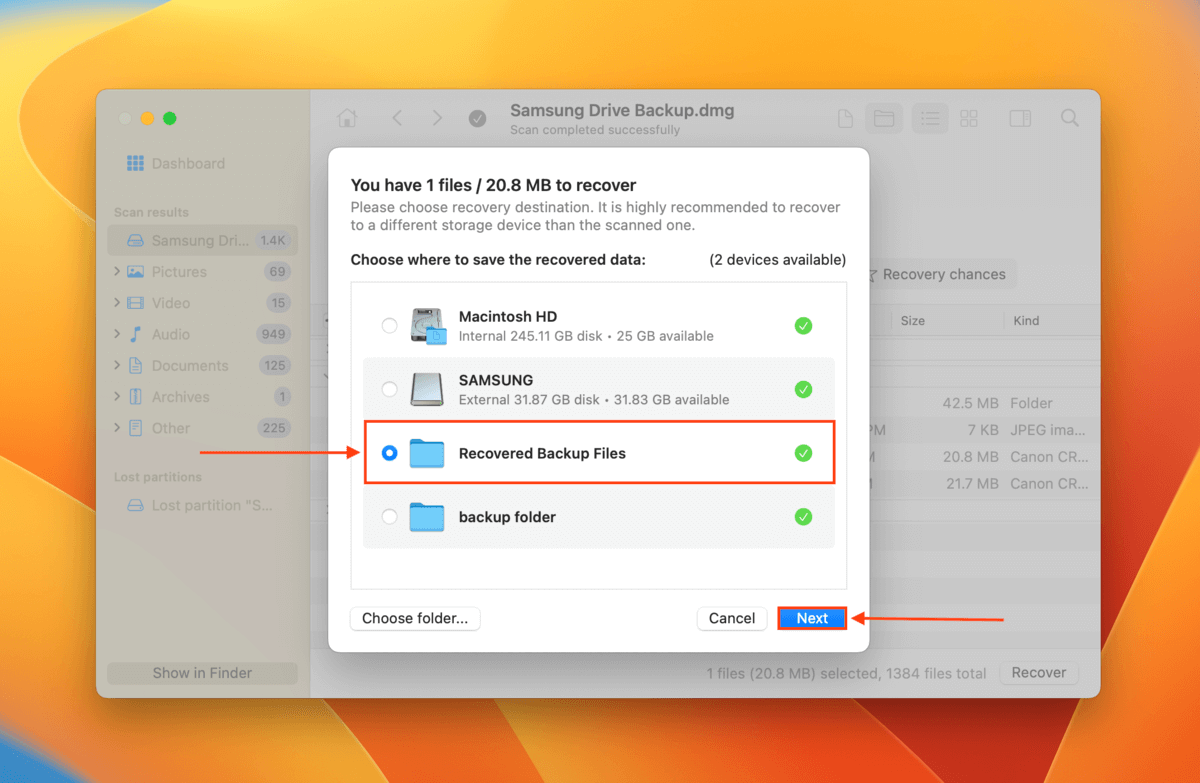
Step 13. Choose a location on your Mac where Disk Drill will save the recovered files. Then, click Next to proceed with recovery.
Why is my Samsung SSD Not Recognized on Mac?
The problem with this error is that it can be caused by a lot of different reasons — and it doesn’t leave many clues about what you need to fix. So we decided to compile that information into this handy menu.
Read about each reason and their short summaries so you can compare them with your own experiences. If you find one that resonates, we also linked the appropriate guide section so you don’t have to scroll through the article to find it.
| Cause | Summary |
| Lack of resources (RAM) | macOS needs resources in order to properly mount and communicate with external storage devices. If you have a lot of apps and background processes, macOS might struggle to find resources for your SSD. Solution: Fix 1 |
| Electrical or mechanical issues | Like all external storage devices, your Samsung SSD relies on its mechanical components and a stable power supply to connect to and communicate with your computer. These tend to work together so an issue with one or the other can prevent your drive from working altogether. Solution: Fix 2 |
| Driver or firmware incompatibility | Drivers and firmware are responsible for translating commands from your computer into instructions that your SSD understands – from establishing a connection to transferring data. Without the right drivers and firmware, your devices won’t be able to communicate properly. Solution: Fix 3 |
| Mac security settings | macOS may have blocked your Samsung SSD from establishing a connection to your computer for security purposes. There are a number of possible reasons why this would occur. But as long as you trust your SSD (that it’s not infected or compromised), you can manually permit the connection. Solution: Fix 4 |
| Drive corruption | Your Samsung SSD might be corrupted due to improper ejection, software errors, and other issues, preventing it from communicating properly with your Mac. Solution: Fix 5, Fix 6 |
| Physical damage | Your SSD might just be physically broken and is not functioning the way it should. If you notice any physical damage on your device, send it to a professional data recovery center ASAP. Once your data is secure, it’s best to invest in a new drive. |
How to Fix Samsung Portable SSD not Detected on Mac
In this section, we’ll demonstrate 6 ways to fix a Samsung Portable SSD that is not being detected on your Mac. Each fix is only meant to solve a specific problem, so read each section’s summary and evaluate which scenario best reflects your own experience.
Fix 1: Reboot Your MacBook
When you connected your Samsung Portable SSD to Mac, did you have a lot of apps open or processes running in the background? It’s possible that these took up most of your MacBook’s memory, preventing your Mac from establishing the connection.
Disconnect your SSD, close all apps and background processes, and reboot your Mac. Then, reconnect your SSD before opening anything else on your Mac so it has enough memory to establish the connection.
Fix 2: Check Your Cables, Ports, & Hubs
Your SSD and your Mac rely on several mechanical components not only to perform functions (like transferring data) but also for the essentials – like establishing a connection.
Any damage or wear and tear can interfere. Here’s a quick breakdown of what to look out for:
- Cables Check your cables for wear and tear; are there any wires exposed or signs of fraying? Does the connector at the end look worn out? Your SSD won’t work with a bad cable. And if you’re using a third-party cable with your Samsung SSD, it may not be transmitting enough power to your drive – try using a new SSD cable from Samsung or other reputable vendors.
- Ports Do the ports on your Mac feel loose (your cable doesn’t fit snuggly) when you connect and disconnect your cable? Try connecting your SSD to other ports or to a completely different computer.
- Hubs/Docking stations USB hubs and docking stations try to regulate power flow among connected devices and your Mac. Your SSD might not be getting enough juice – try disconnecting other devices from your hub or docking station or connect your SSD directly to your Mac to see if it makes a difference.
Fix 3: Update Your Device Drivers & Firmware
Drivers and firmware ensure that your Mac and your Samsung SSD can communicate with each other. These critical software components need to be kept up to date as outdated drivers and firmware can lead to conflicts and incompatibility.
We recommend updating your Mac’s own system drivers and firmware and those of your Samsung SSD.
Update macOS Drivers
Your Mac may struggle to read your SSD with outdated drivers. In fact, issues with the Samsung T7 not being recognized on Mac M1 are common for users running macOS Big Sur. Firmware updates are included in macOS updates, so you need to update macOS itself.
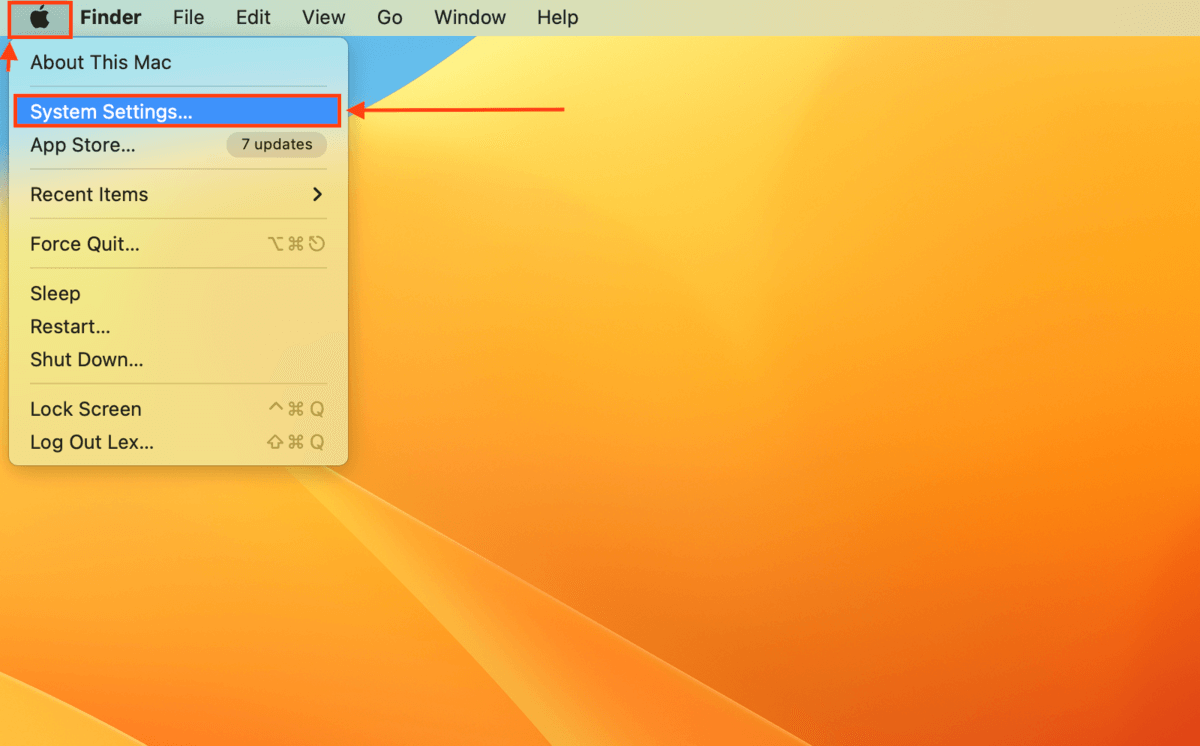
Step 1. Open the Apple menu > System Settings…
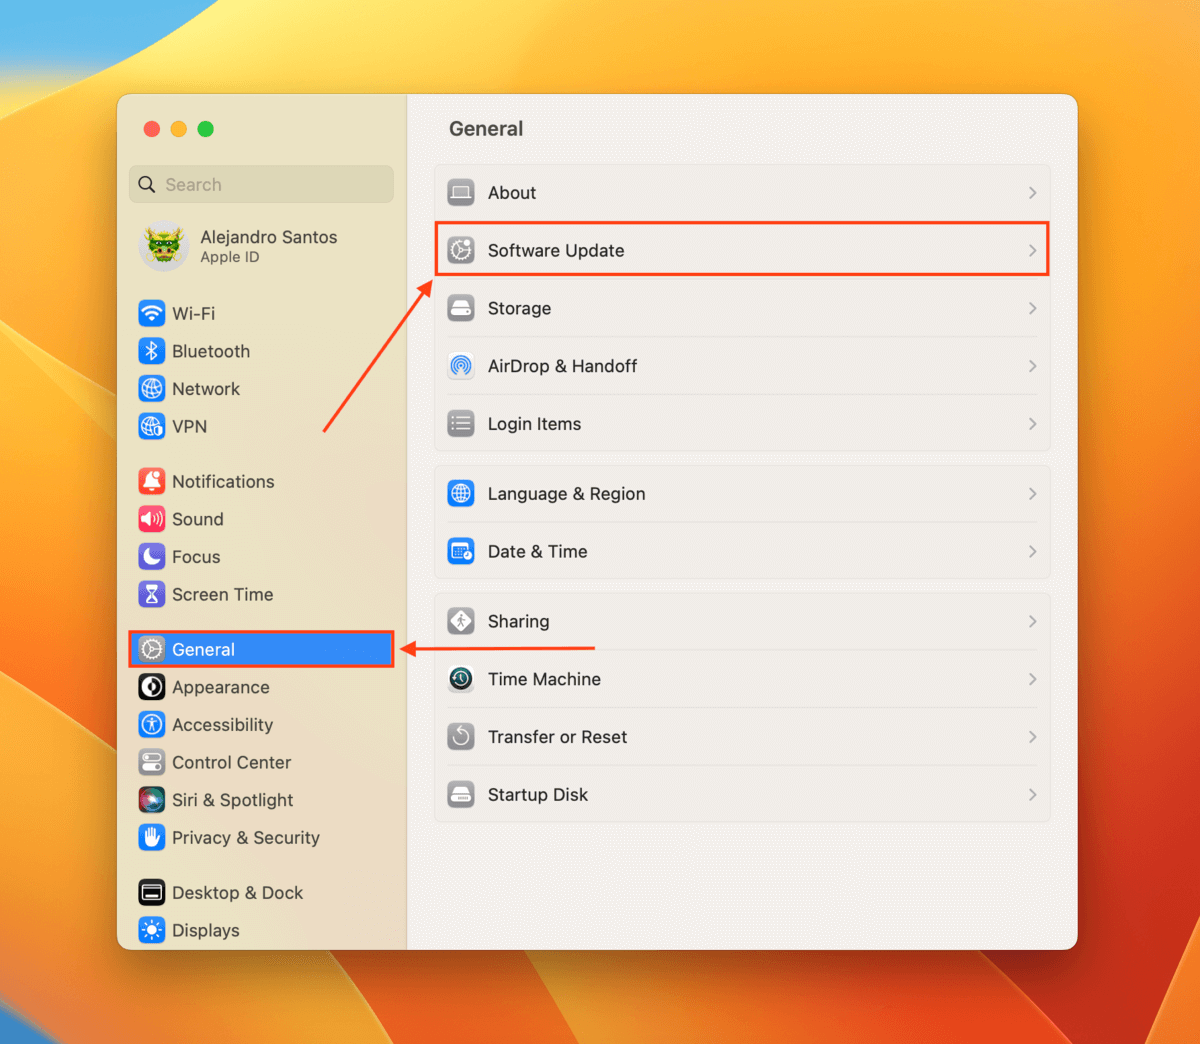
Step 2. On the left sidebar, select General and click Software Update on the right pane. Then, follow the on-screen instructions.
Update or Install Samsung Drivers & Firmware
Samsung, like many other storage device manufacturers, provides its own drivers, firmware, and tools that help keep your drive up-to-date and compatible.
You can download Samsung’s Magician Software, which was built to help you manage all of these components on all your Samsung storage devices. This way, you don’t have to hunt down these components on your own.
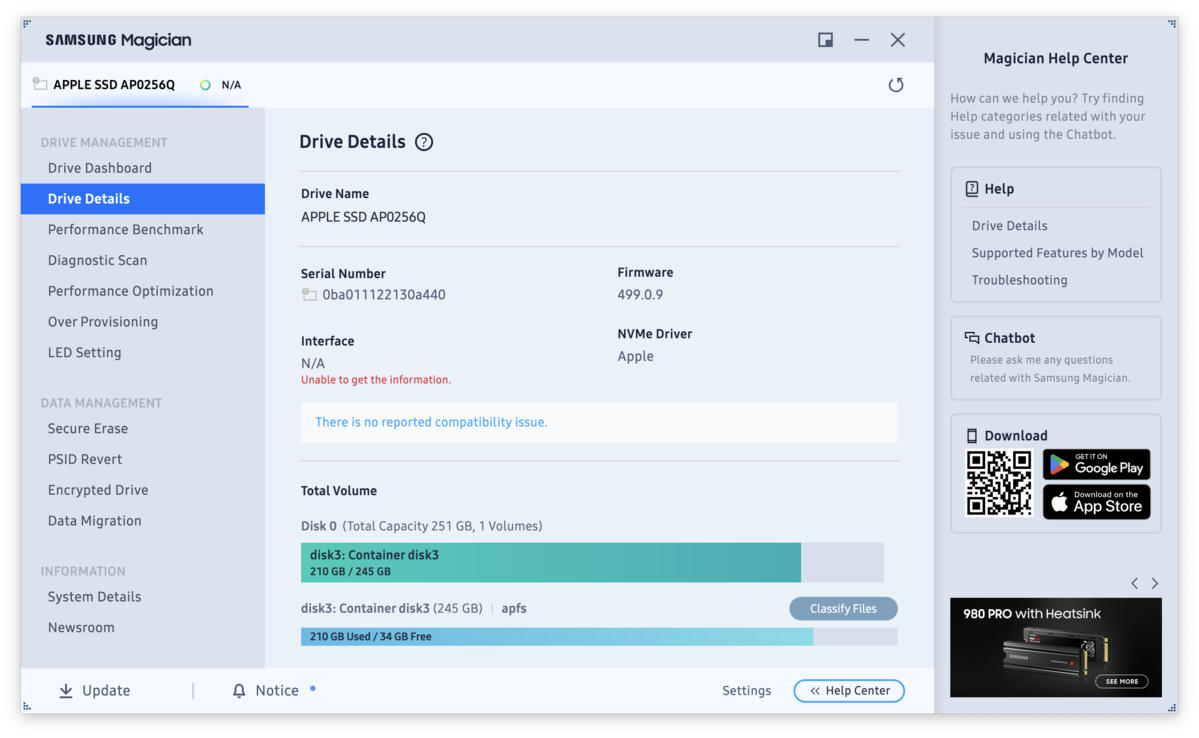
Alternatively, you can download individual Activation Software for your SSD to update its firmware patch. Here’s an easy link menu for the download pages for Samsung T-Series Portable SSD models (note that some models can only be updated via Magician Software):
| Model | USB Type | Speed | Available Sizes | Download Page |
| Samsung Portable SSD T1 | 3.0 (Type-C) | Up to 450 MB/s | 500 GB, 1 TB, 2 TB | Via Magician Software only |
| Samsung Portable SSD T3 | 3.1, 3.0 (Type-C) | Up to 450 MB/s | 250 GB, 500 GB, 1 TB, 2 TB | Via Magician Software only |
| Samsung Portable SSD T5 | 3.1, 3.0 (Type-C) | Up to 540 MB/s | 250 GB, 500 GB, 1 TB, 2 TB | T5 Activation Software download page |
| Samsung Portable SSD T7 | 3.2 Gen 2 (Type-C) | Up to 1,000 MB/s | 500 GB, 1 TB, 2 TB | T7 Activation Software download page |
Fix 4: Check Your Mac’s Security Settings
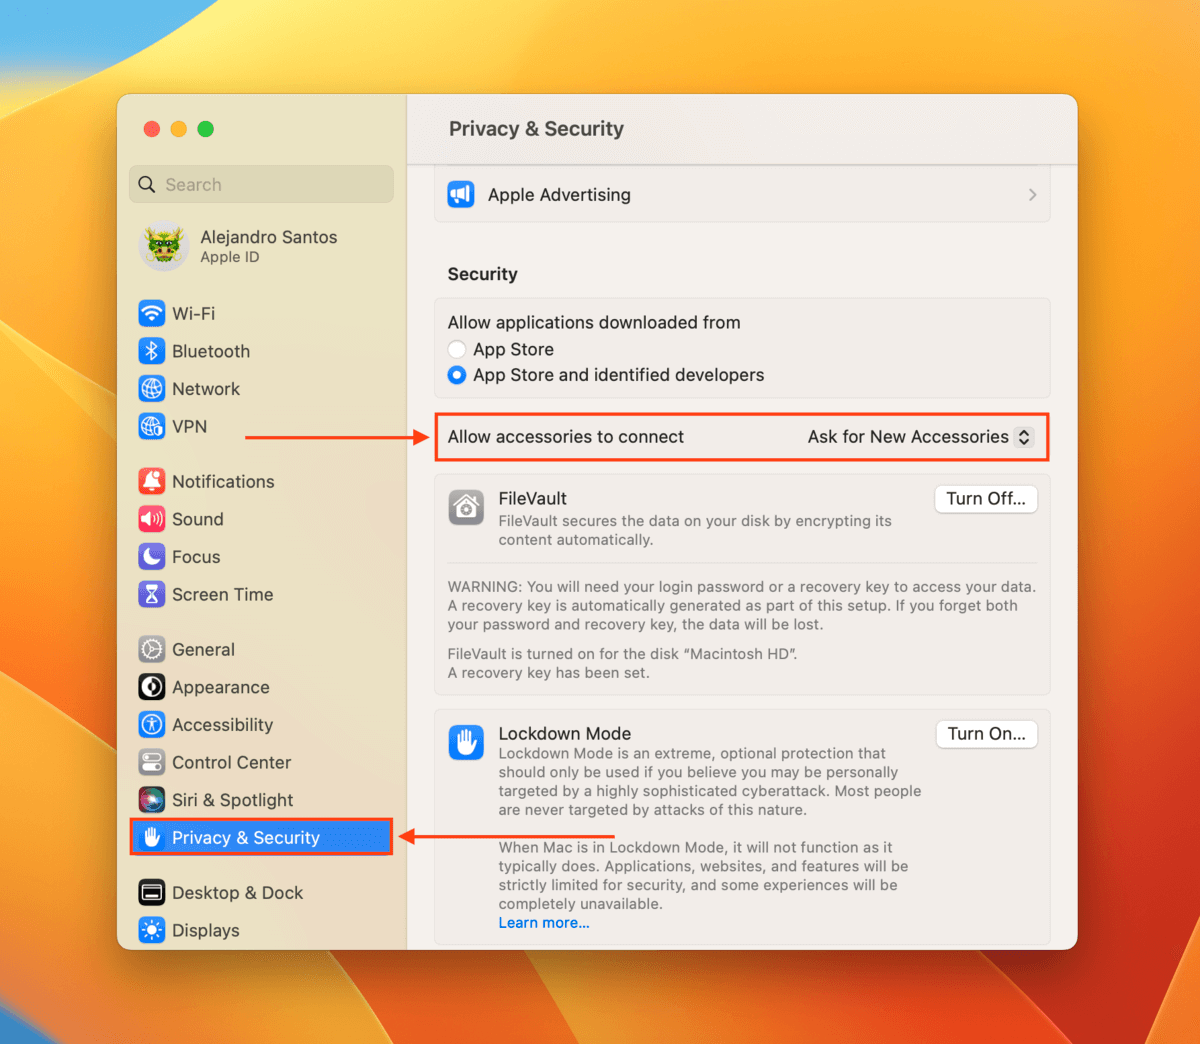
For your own safety, your Mac may restrict access to and from accessories it’s not familiar with. If this is the first time using your Samsung Portable SSD with your Mac, see if your security settings blocked the connection.
Step 1. Click the Apple button and select System Settings…

Step 2. On the left sidebar, select Privacy & Security and scroll down on the right pane until you see the Security section. The Allow accessories to connect setting will tell you macOS it blocked access to your SSD (and you can also lift the restriction from here).
Fix 5: Repair Your Drive With First Aid
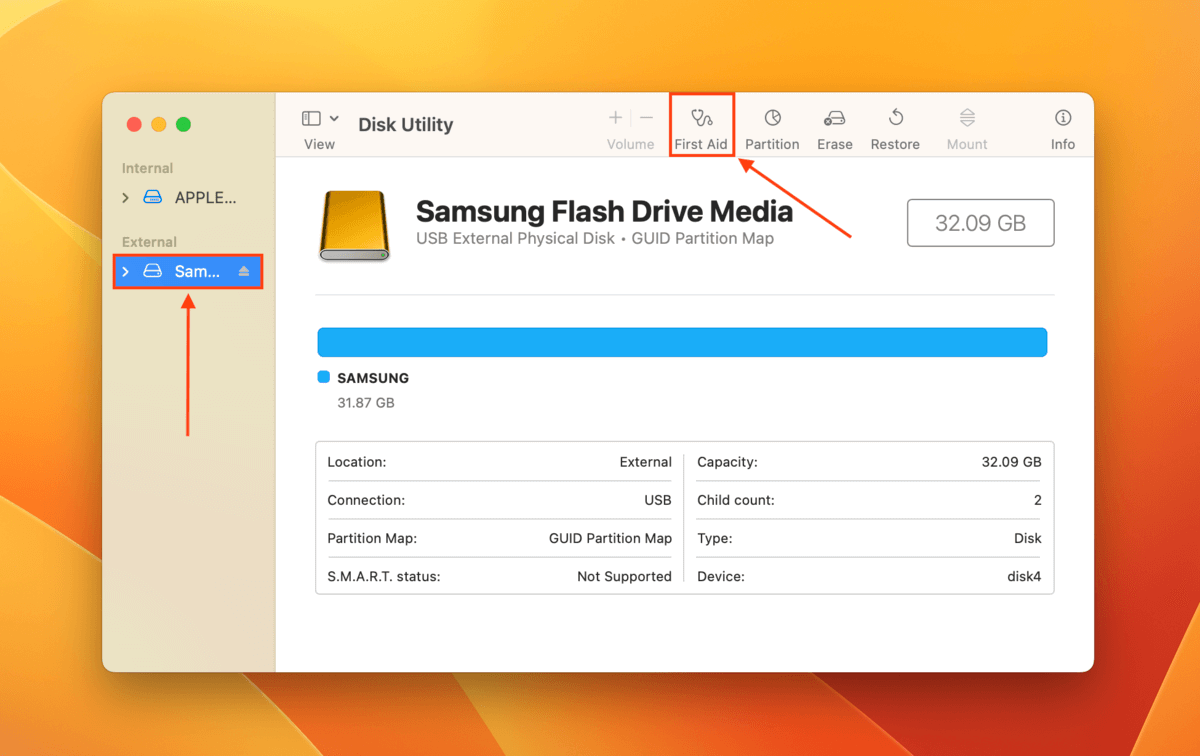
First Aid is a repair tool built into Disk Utility. Once you run the tool, it will scan your drive and automatically try to resolve minor file system-related issues that may have led to corruption.
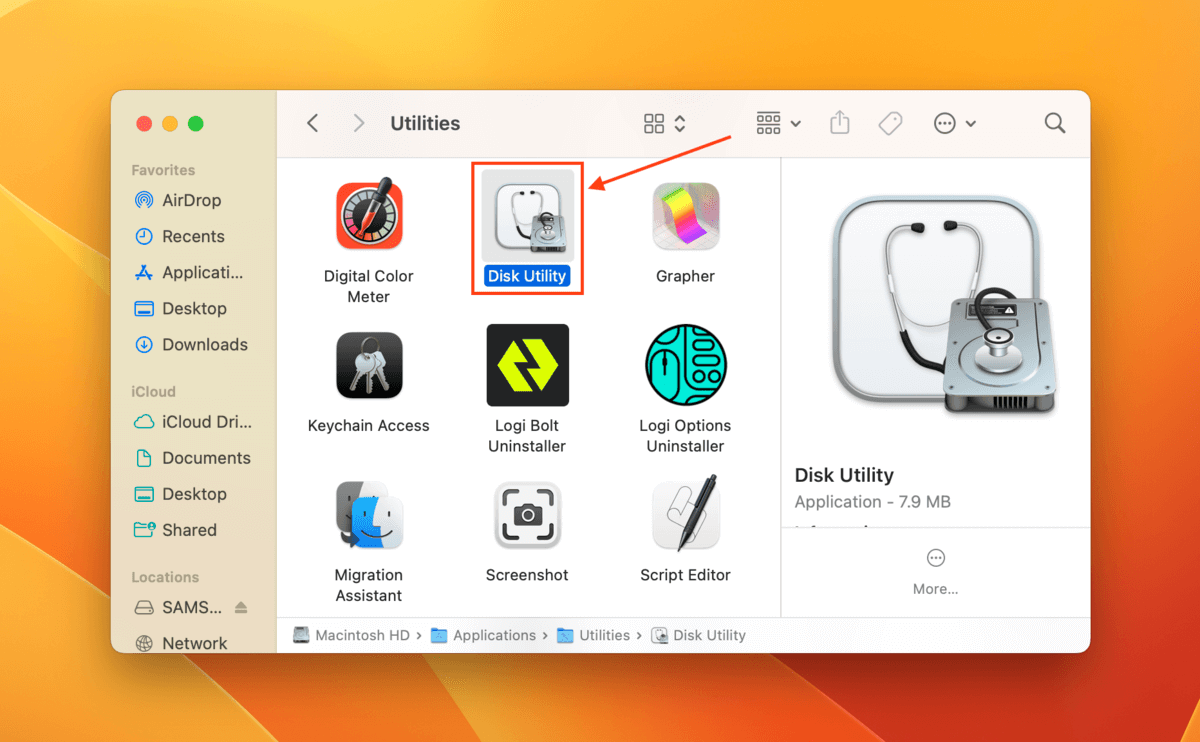
Step 1. Open Disk Utility (Finder > Applications).
Step 2. Select your SSD on the left sidebar and click First Aid. If prompted, click Run to confirm the action.
Fix 6: Repair Your SSD’s Boot Sector Using TestDisk
The boot sector resides on your SSD’s disk and contains important information about its file system and partition structure. macOS uses this information to detect and identify your drive, so a corrupted or damaged boot sector can prevent your SSD from even showing up.
You can repair your boot sector using TestDisk, a free and open-source disk repair and recovery tool. It looks intimidating at first, but you only need to run one command throughout the entire process. All other input will be using your arrow keys and Return key.
Step 1. Download TestDisk from the CGSecurity website and unzip it.
Step 2. Open the Terminal app (Finder > Applications > Utilities).
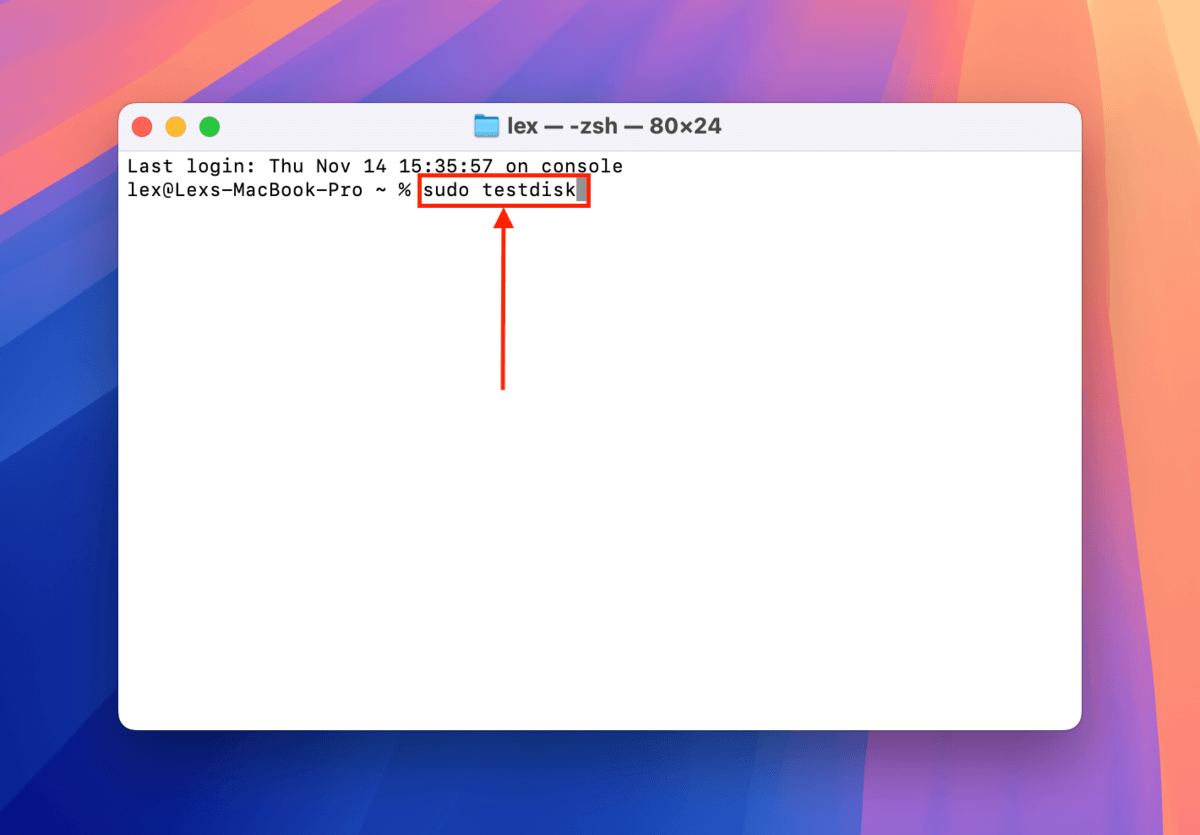
Step 3. Use the following command to open TestDisk:
sudo testdisk
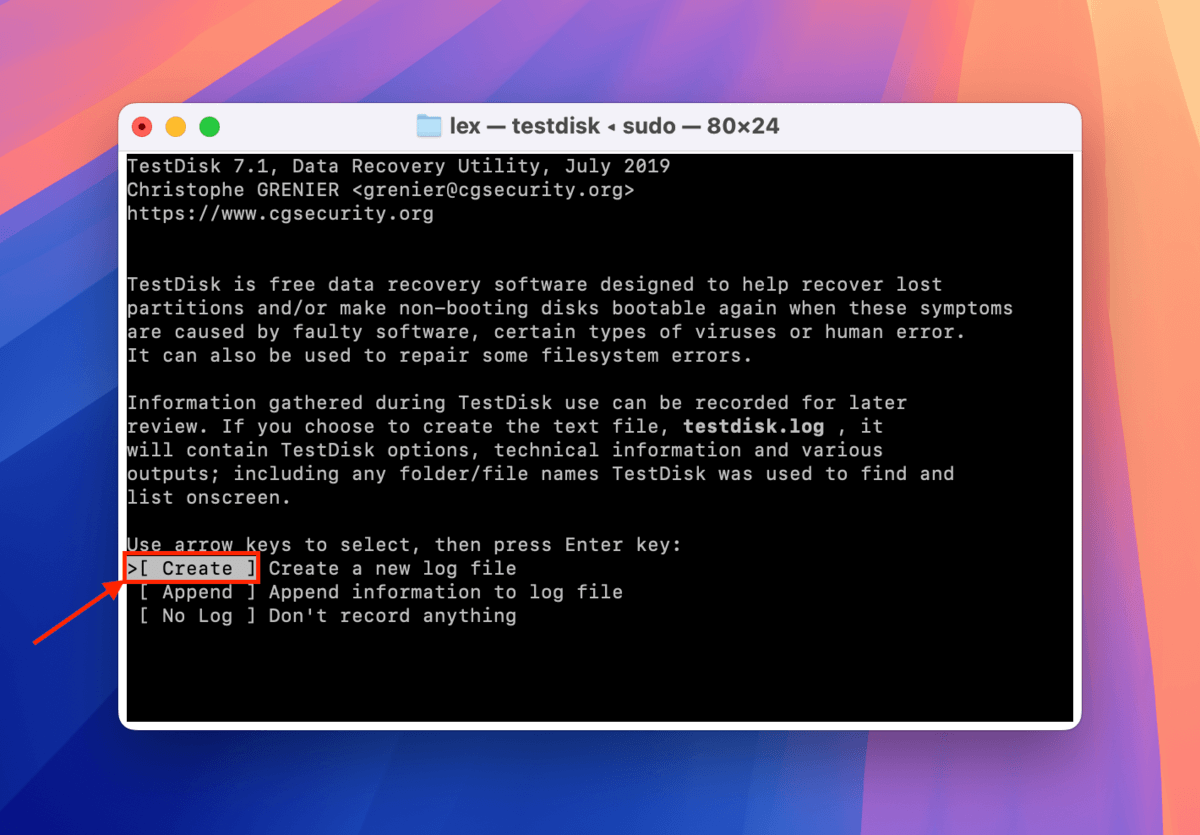
Step 4. With the Create option highlighted, hit Return.
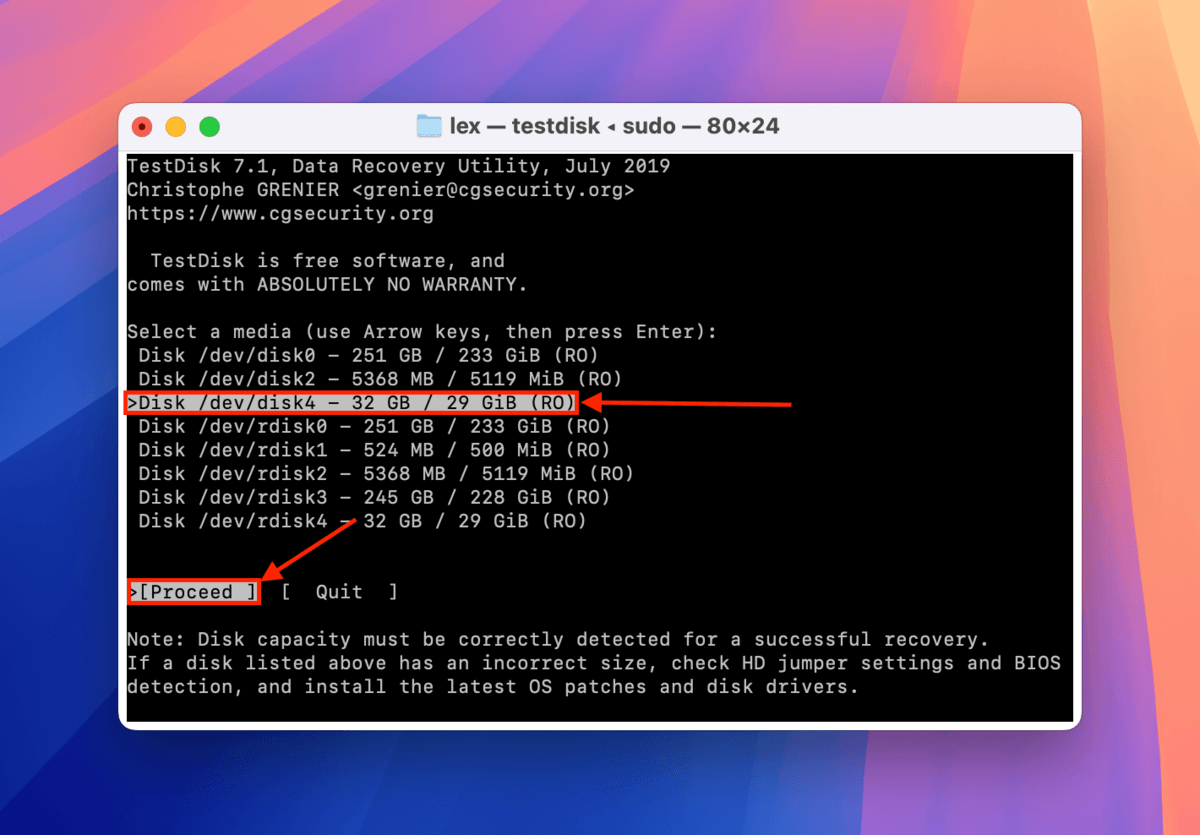
Step 5. Use your arrow keys to select your SSD. Then, select Proceed and hit Return.
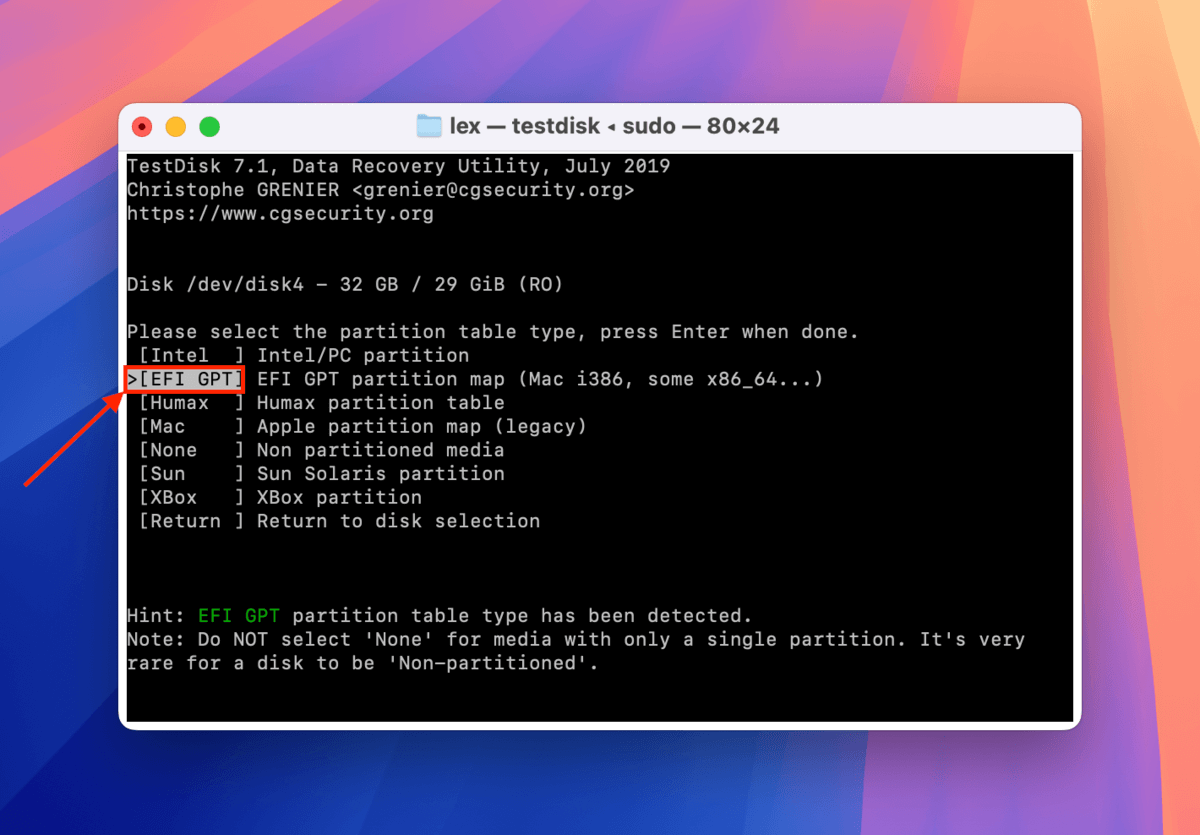
Step 6. Select your SSD’s partition table type — TestDisk will try to choose the right one automatically for you. Then, hit Return.
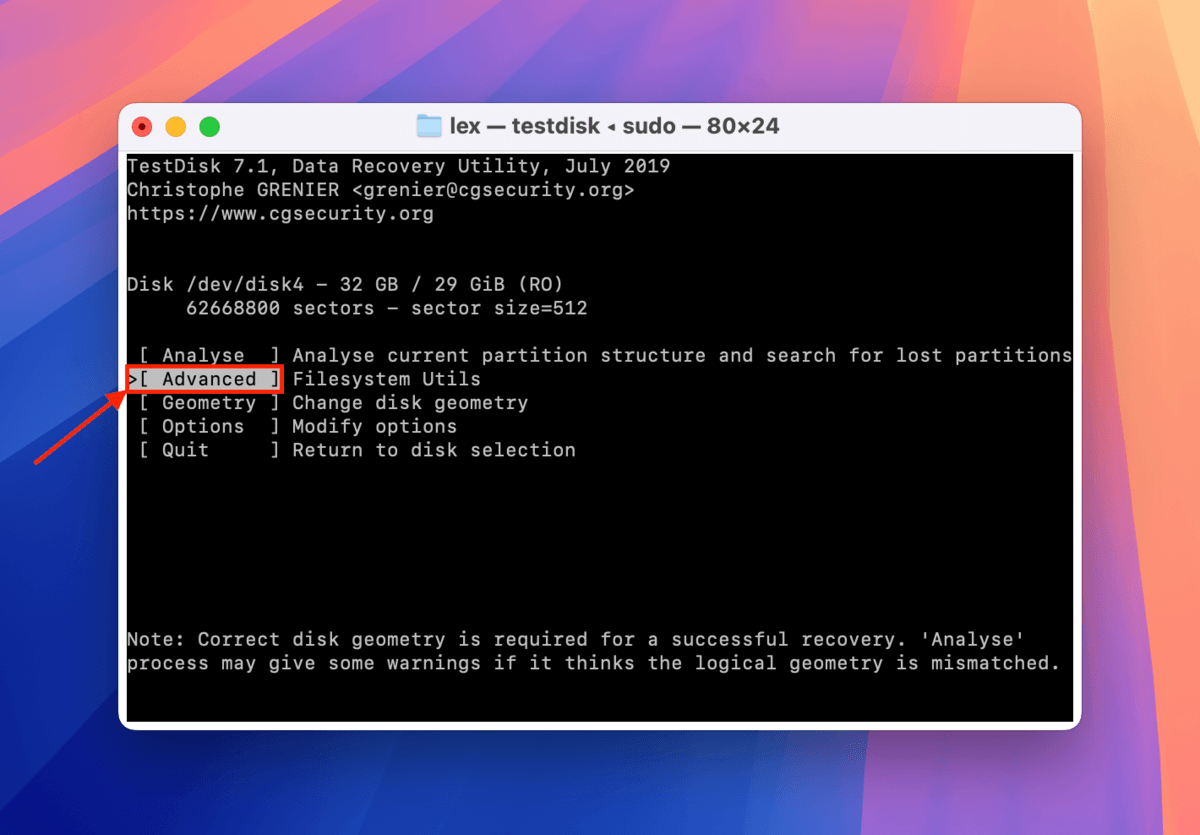
Step 7. Choose Advanced and hit Return.
Step 8. Select the partition you want to repair. Then, use your left and right arrow keys to select Boot. Hit Return.
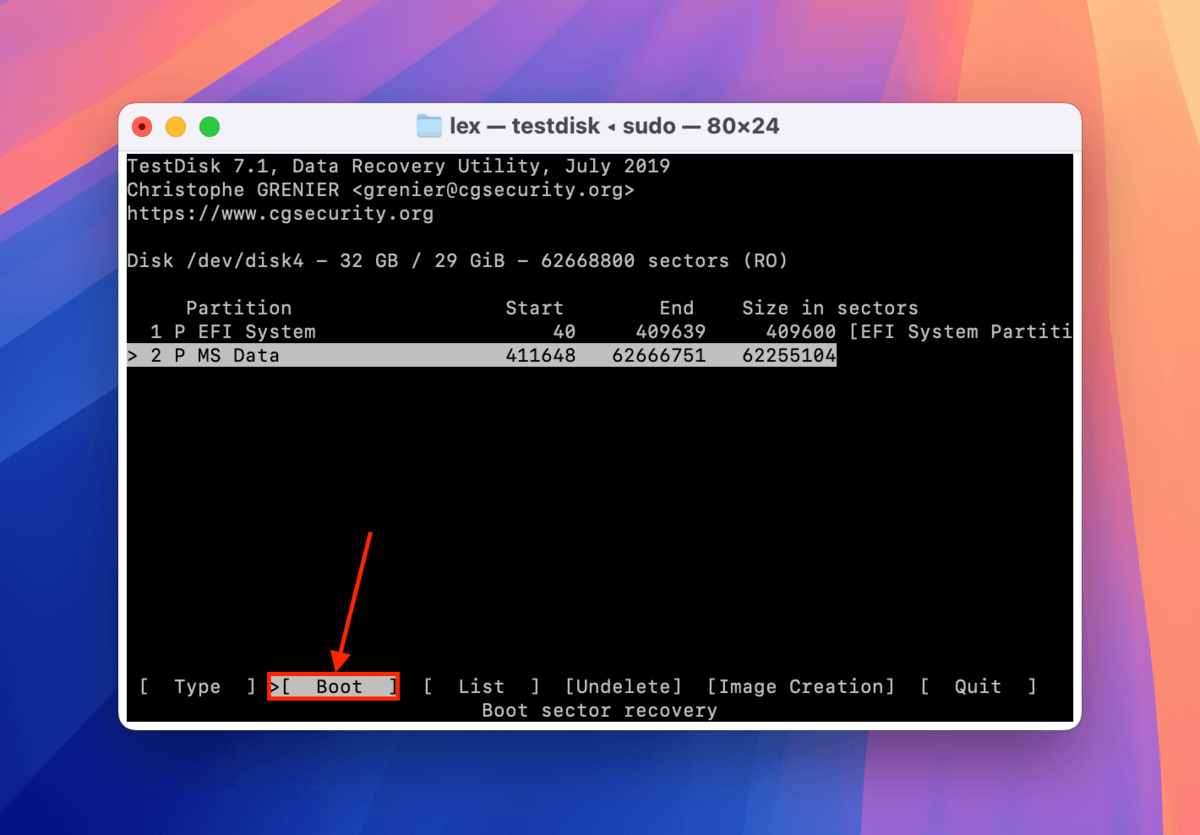
Step 9. If TestDisk says your boot sectors are OK, you can quit the app. But if it says Boot sector: Bad, select BackupBS and hit Return.
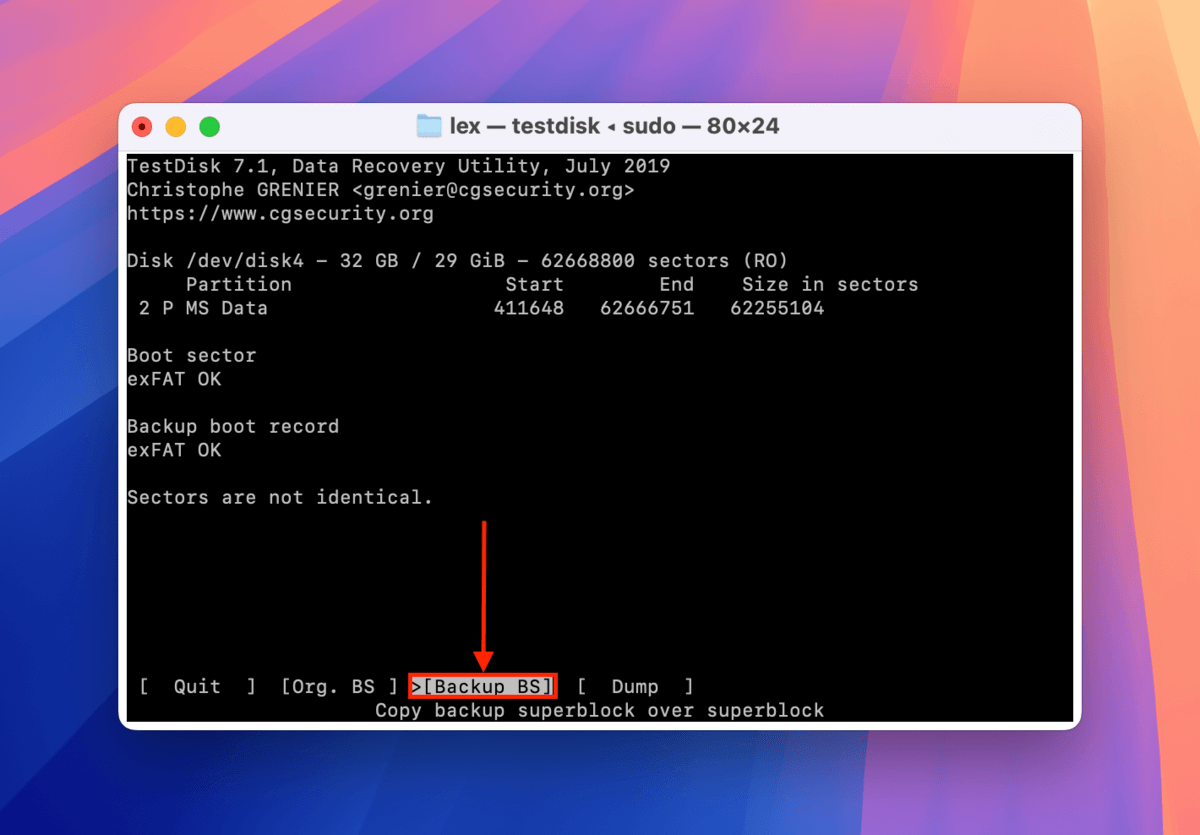
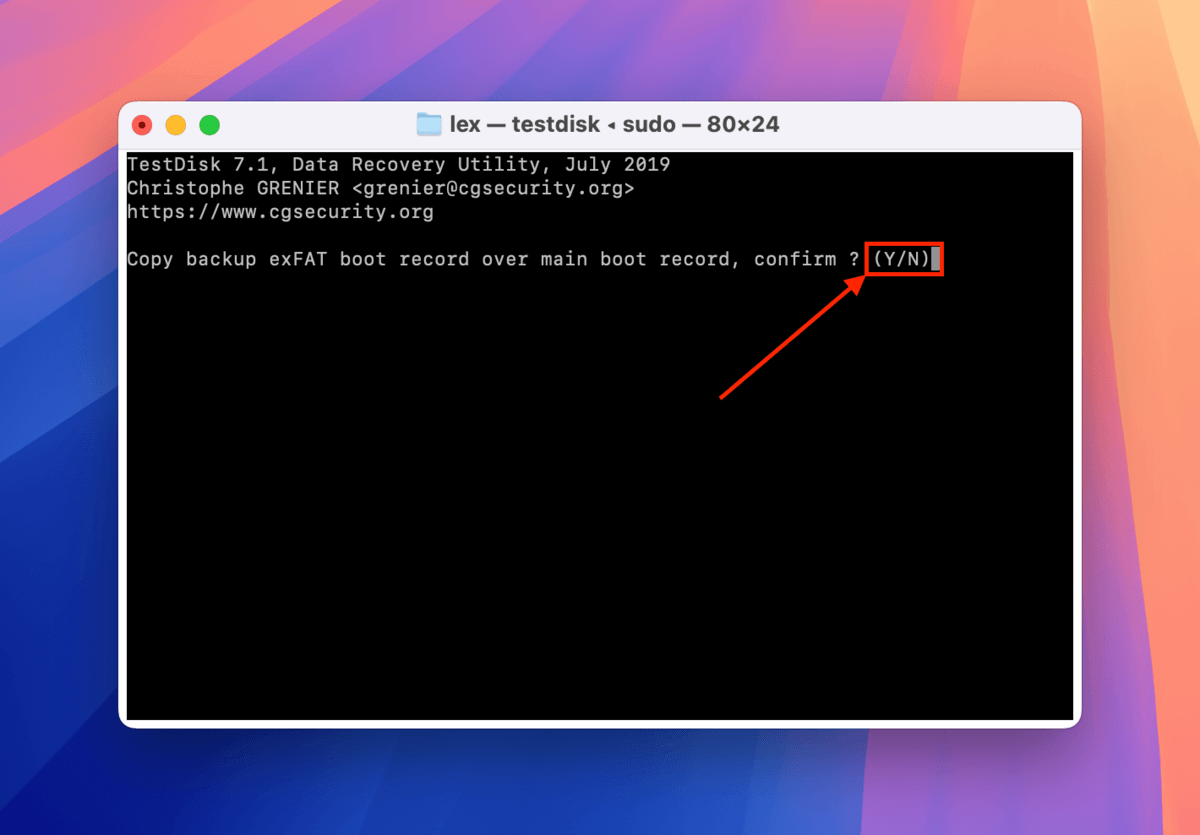
Step 10. Press Y to confirm. Once the process is complete, quit TestDisk and restart your Mac.
Want an early warning system for drive failure?
Storage device errors usually catch us completely off-guard, which is what leads to the consequence of sudden data loss. If we knew when and how our drives were going to fail, we would be better prepared to handle them.
Aside from creating backups of your SSD (or building a RAID setup), consider monitoring your drive’s wear level. In a nutshell, it’s one of many indicators of a drive’s remaining lifespan. Once your wear level crosses a certain threshold, you can expect more and more errors to occur – offload important data asap and consider investing in a new drive soon.


