
USB flash drives, often called thumb drives, are our compact companions for document transfers, photo exchanges, and small-scale backups. But their portability often leads to unforeseen mishaps: a precious project accidentally deleted before a big presentation, cherished photos lost in a data management incident, or key documents gone after a poorly thought-out formatting attempt.
However, files that have disappeared from a USB flash drive are not always gone for good. With the right tools and techniques, they can be brought back to life. This comprehensive guide will teach you how to recover deleted and disappeared data from a flash drive effectively on your Mac.
Table of Contents
When to Use This Guide for Flash Drive Recovery
There are many different potential causes for data loss on a USB flash drive. For some of those cases, recovering your data would be impossible. But in many situations, with the right information (and some luck), you can restore your files. We don’t want to waste your time, so here’s an exact list of scenarios where this guide can actually work for you:
- Accidental deletion: Deleted files are not immediately destroyed forever. They go through a series of garbage collection behaviors, like being sent to the Trash folder or being stored in the drive’s file system until it gets overwritten. Data is still recoverable during these stages, which we cover in this guide.
- Formatted USB drive: Similar to accidental deletion, files lost to formatting aren’t immediately destroyed. As long as you haven’t filled up your drive’s storage space with new data, the methods in this article are highly likely to work.
- Corrupted USB drive: Corrupted drives often don’t fully have their contents deleted. As long as Disk Utility can read your drive and detect the correct storage size, the methods in this guide can help you restore your files.
- Hidden files: Files become hidden due to malware infection, third-party programs, or simply by accident. We show you how to unhide your files in Method 4, but you may need to use other solutions in this guide in case of infection or corruption.
- Malware infection: Malware often causes data loss intentionally, or as a symptom of other forms of malicious activity, through simple deletion, formatting, or access restriction. In most of these cases, recovery through the methods in our guide can help–but make sure to eliminate the virus first with anti-malware tools.
The only scenario this guide cannot help with is if your USB flash drive is physically damaged. In that case, we strongly recommend that you send it to a professional data recovery center. They have better tools, software, and expertise to safely extract data from a damaged storage device.
How to Recover Files from a Flash Drive on Mac
Mac users have several routes they can take to recover files from a flash drive. The best method depends on how your files went missing. For instance, recently deleted files might still be in Trash, while permanently deleted or corrupted files require specialized recovery software. If you’re not sure what happened to your files then you can just work through the methods below in order.
Method 1: Check the Trash Folder
When you delete files from a USB drive on Mac, they are stored in a special .Trashes folder on that drive itself. The Trash icon in your Dock automatically displays the contents of both your Mac’s Trash and the .Trashes folders from all connected drives. This means that to see and recover files deleted from your USB drive, you must have the drive connected to your Mac when you open Trash:
Step 1. Connect your USB drive to your Mac
Step 2. Open Trash by clicking on its icon, located on the right side or bottom of the Dock.
Step 3. Go through Trash and look for the files you want to undelete. Select them by either pressing and holding the command key and then clicking the files or by holding the left mouse click and dragging the cursor around them. Then, drag the files to your Desktop or another local folder.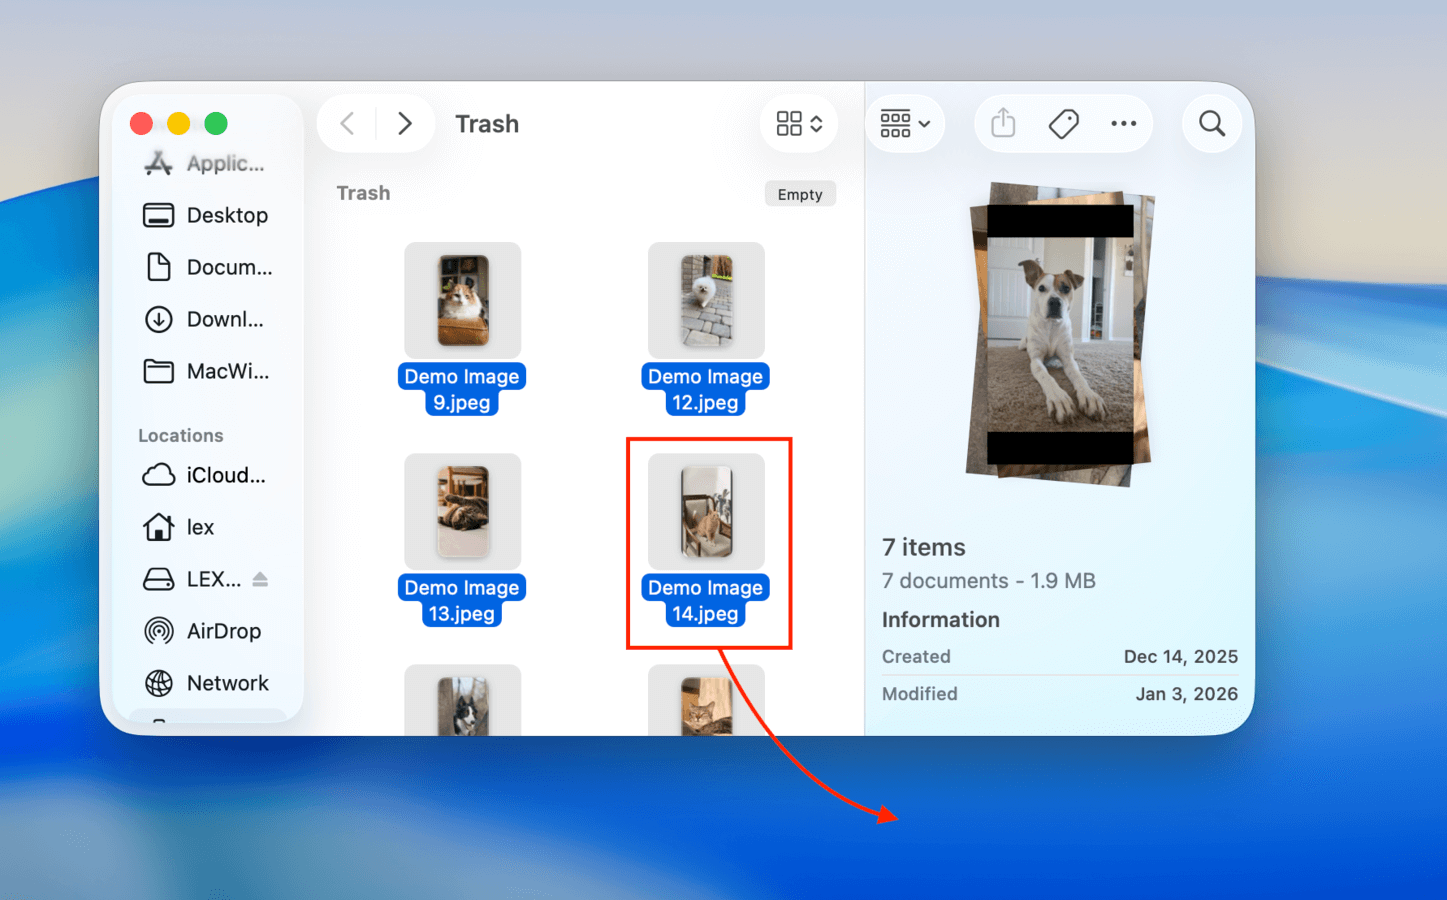
Method 2: Access .Trashes Directly Using the Terminal
There are special cases (bugs) where the files you deleted from your USB drive won’t show up in your Mac’s local Trash folder. In that situation, you’ll have to access the .Trashes folder on your USB drive directly.
The most efficient way to do this is by using the Terminal app, which grants you direct access to your USB’s file system without relying on macOS’ UI and system processes. Don’t worry! The commands are short and easy, and we’ll show you exactly what to do.
Step 1. Make sure your USB drive is securely connected to your Mac. Then, open the Terminal app (Finder > Applications > Utilities).
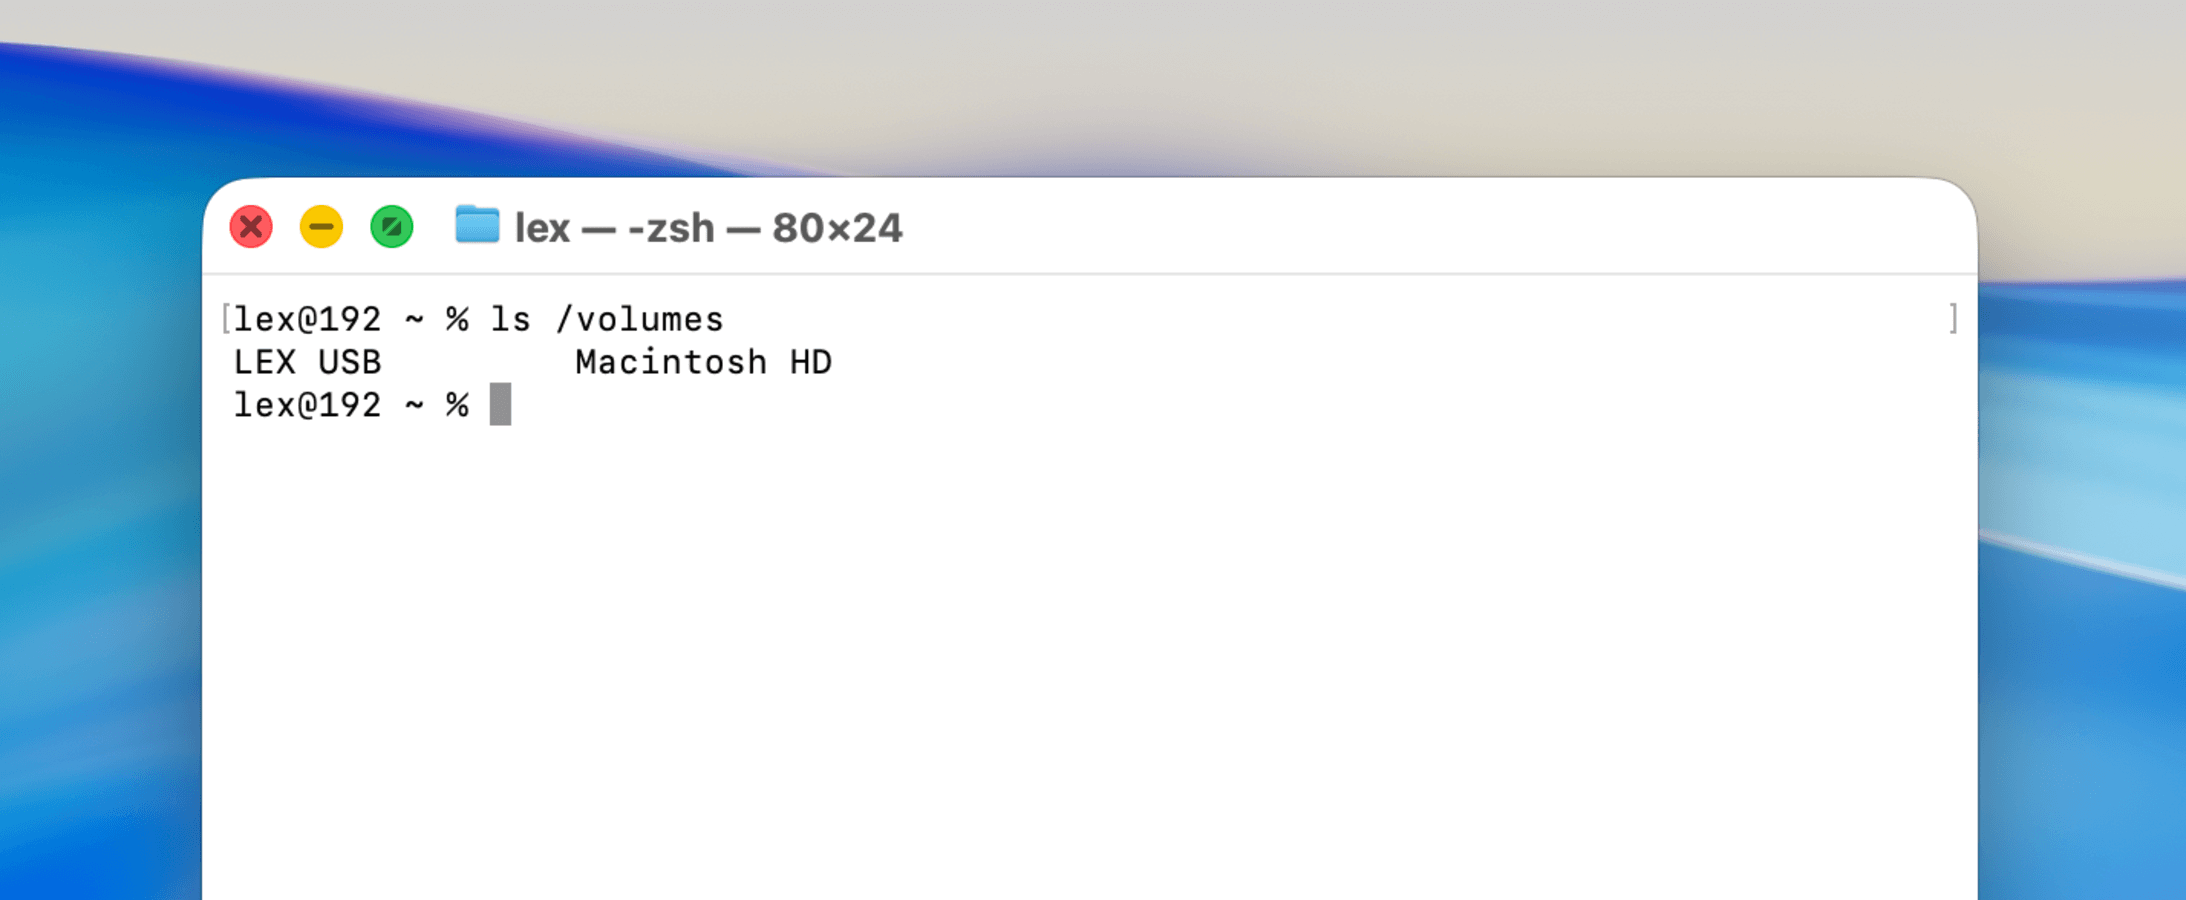
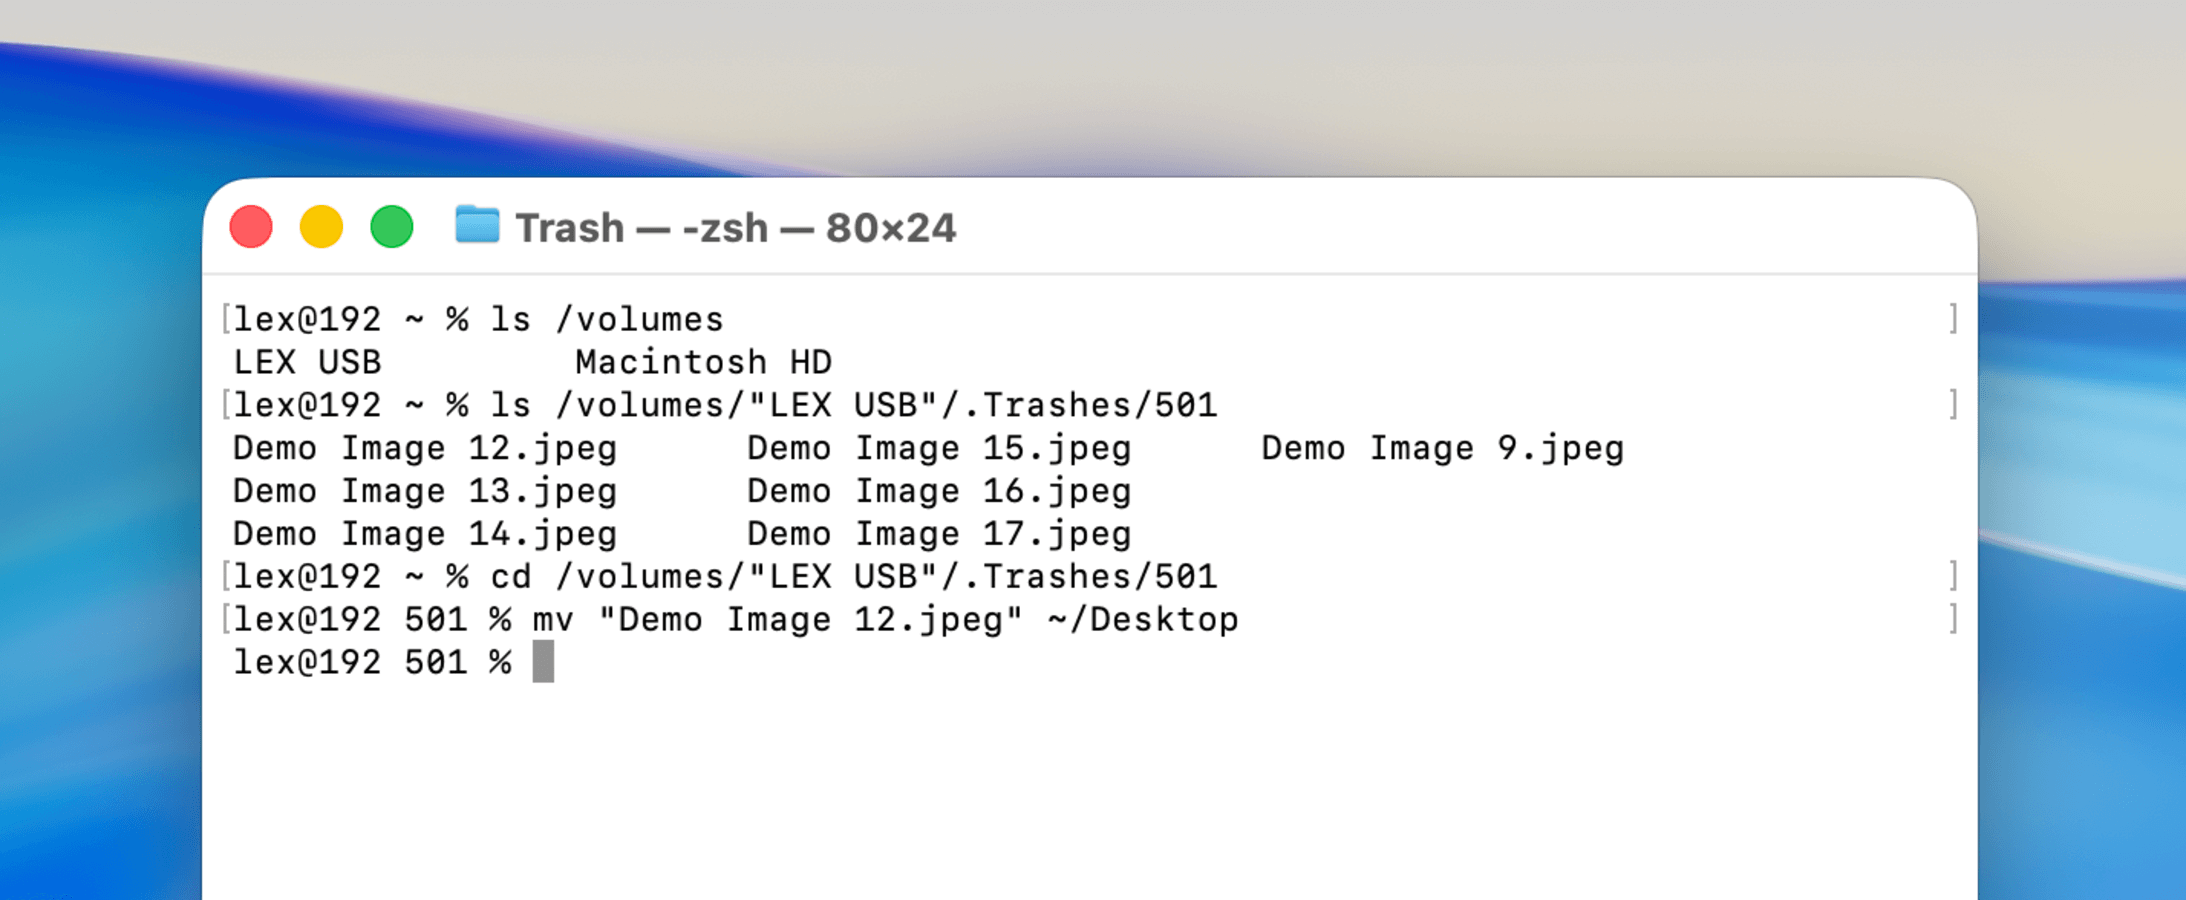
Step 2. Run the following command to make sure your USB’s volume is detected:
ls /volumes
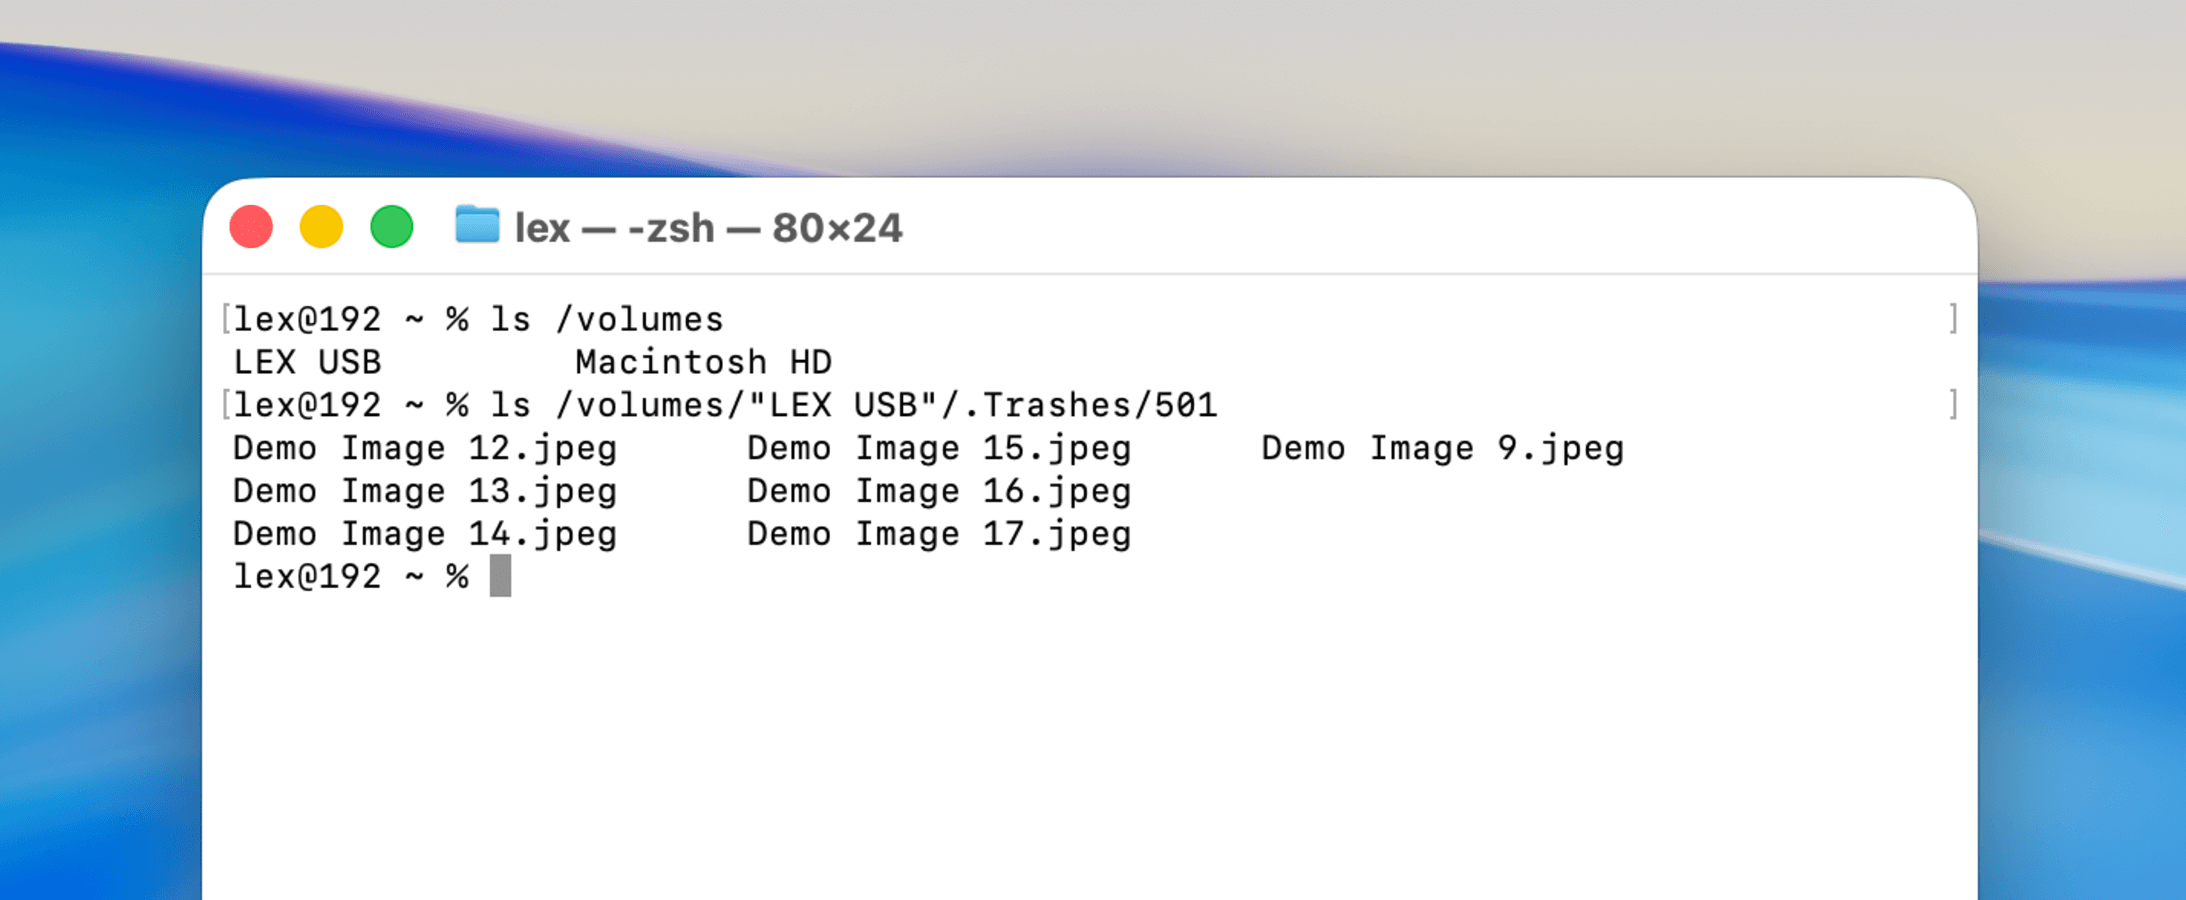
Step 3. Next, run the following command to list all the files in your USB drive’s Trash folder:
ls /Volumes/"LEX USB"/.Trashes/501
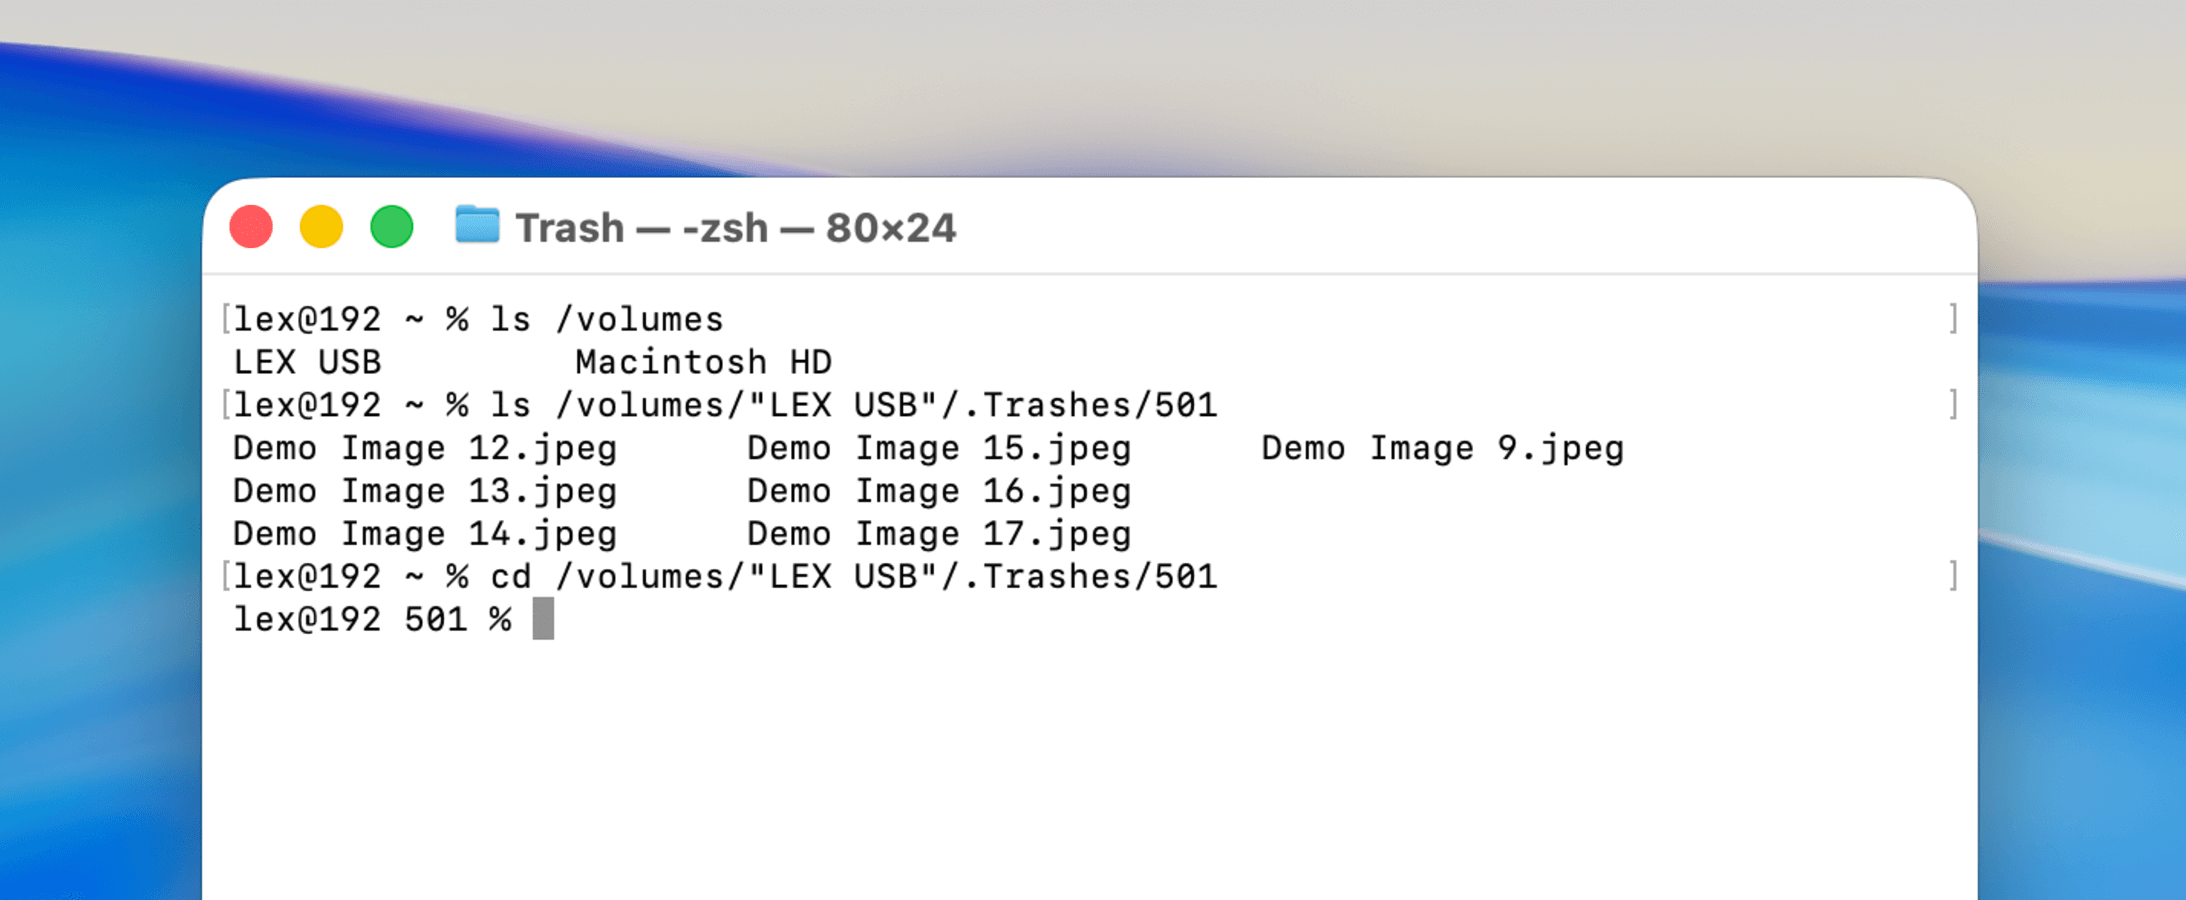
Step 4. If your files appear, switch directories to the Trash folder using this command:
cd /Volumes/”LEX USB”/.Trashes/501
Step 5. Finally, use the mv command to move files from the Trash folder to your Mac:
mv "Demo Image 12.jpeg" ~/Desktop
Replace “Demo Image 12.jpeg” with the appropriate filename and extension, and replace ~/Desktop with your desired destination folder.
Using the Terminal to restore deleted files doesn’t just help you avoid being blocked by the UI and permissions, but it also lets you utilize powerful “arguments” that make recovery more efficient (e.g., moving all files with a specific file extension, or moving only files with the word “dog” in the name). To learn how to use those arguments, check out our guide on using Terminal to recover files from the Trash folder.
Method 3: Use USB Data Recovery Software for Mac
If your USB files are no longer in the local Trash or .Trashes folders, the only way to restore them (without using any backups) is by using data recovery software. This type of software can scan storage devices for any leftover data from deleted files, then use that data to recover the files.
There are many data recovery tools for Mac that you can find online (and we’ve covered almost all of them on this site), but we’ll be using an app called Disk Drill for this task. It’s compatible with M1-M5 and T2 Macs, and it supports all common external storage devices–like USB drives, memory cards, HDDs, SSDs, and more. It can also recover data from all mainstream file system formats, including ExFAT, FAT32, APFS, and HFS+. This all means that Disk Drill has the highest chance of working the first time for a wide variety of external storage devices.
It’s also easy to use and free to download, so you can follow this guide without committing to a license. You can scan your drive and preview your files for free as well, which allows you to verify that your data is actually recoverable. However, note that you need to purchase the license to complete the recovery stage.
Step 1. Download and install Disk Drill on your Mac.
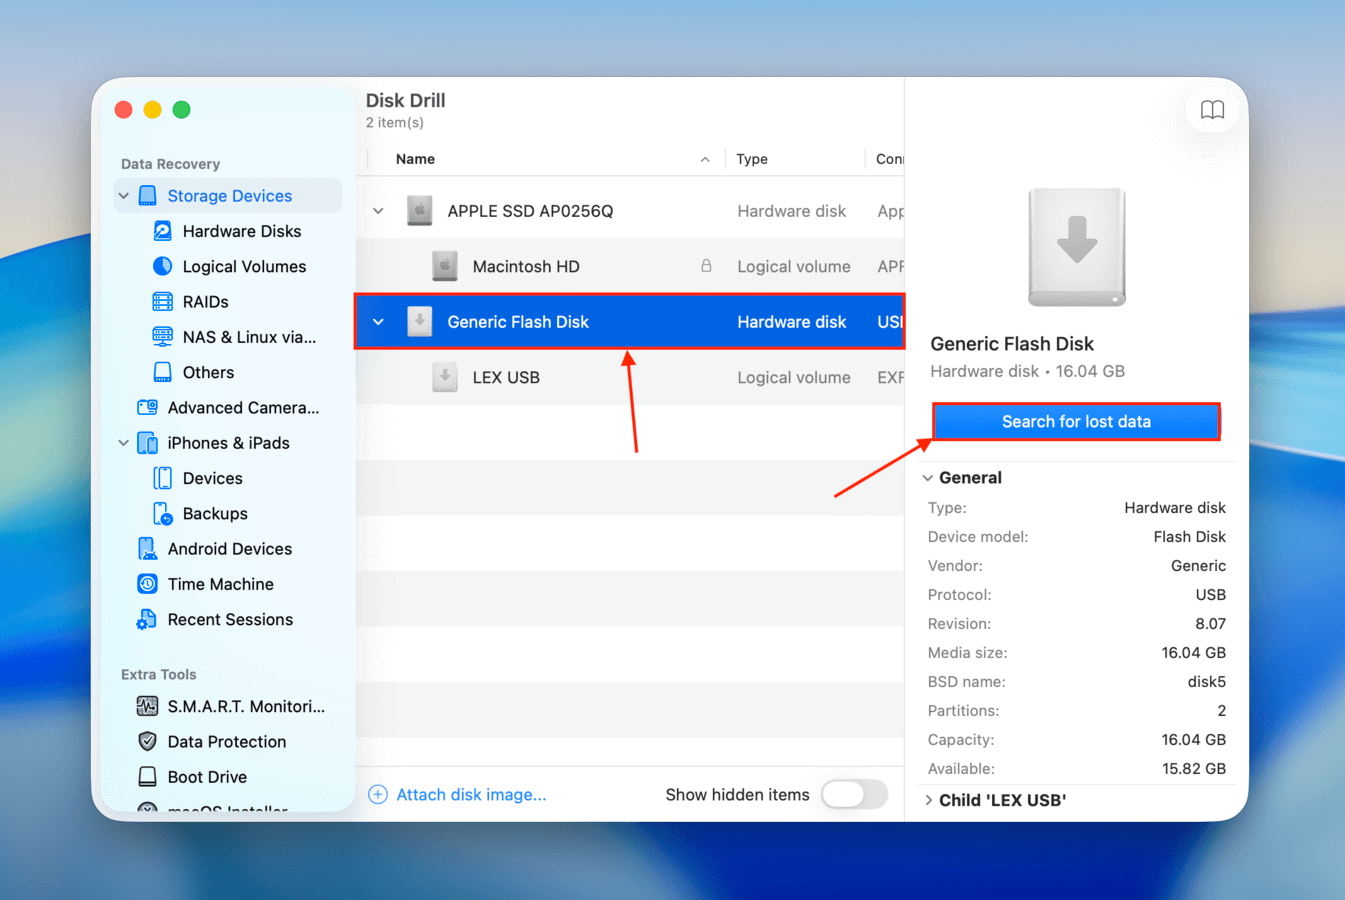
Step 2. Open Disk Drill and grant the necessary permissions. Then, select your USB drive and click Search for lost data.
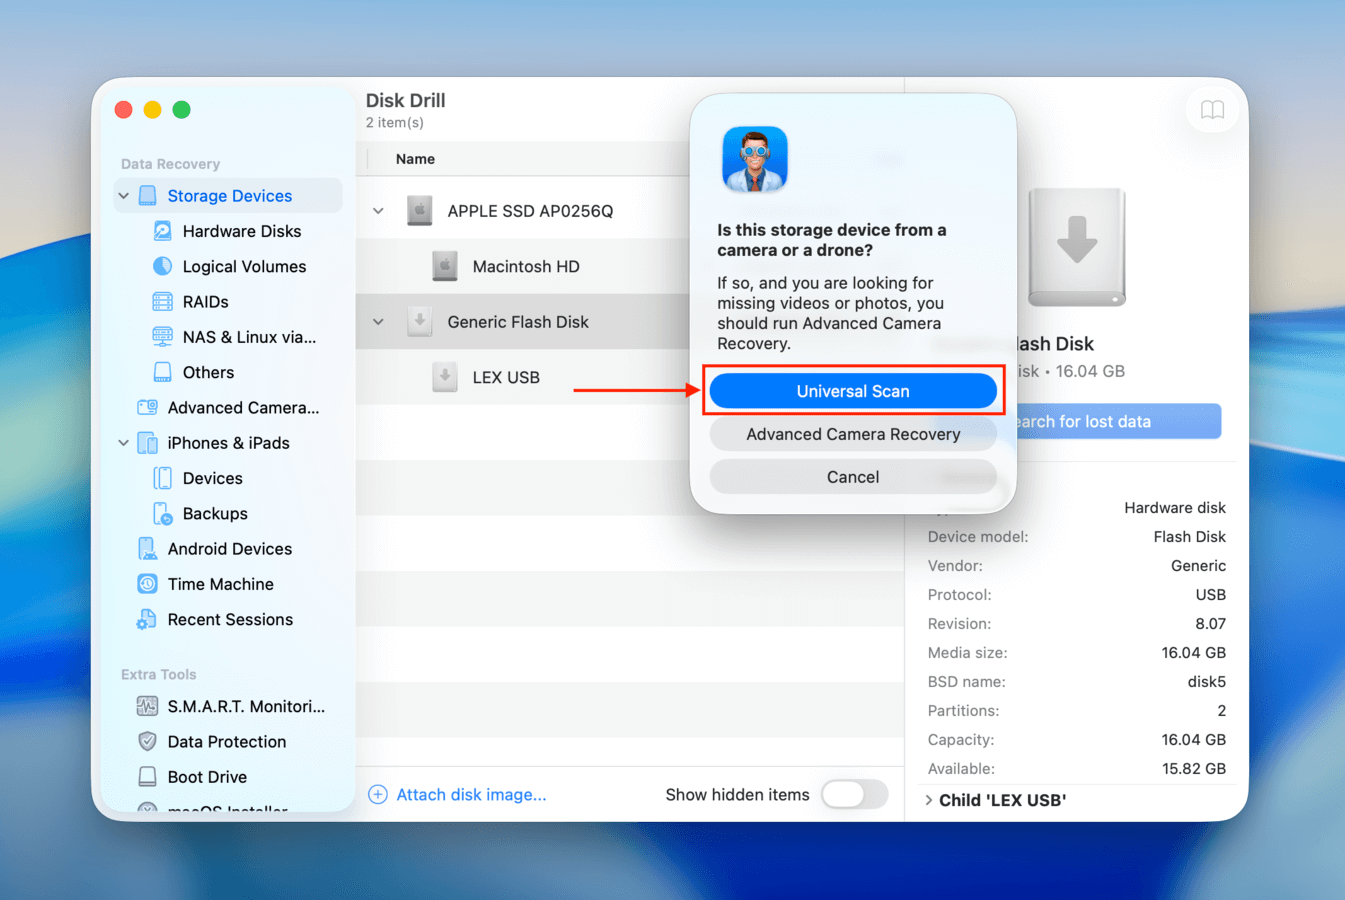
Step 3. Disk Drill may ask you to select a scan type. Choose Universal scan for now (if you attempt to restore videos and they turn out unplayable, run an Advanced camera recovery scan after).
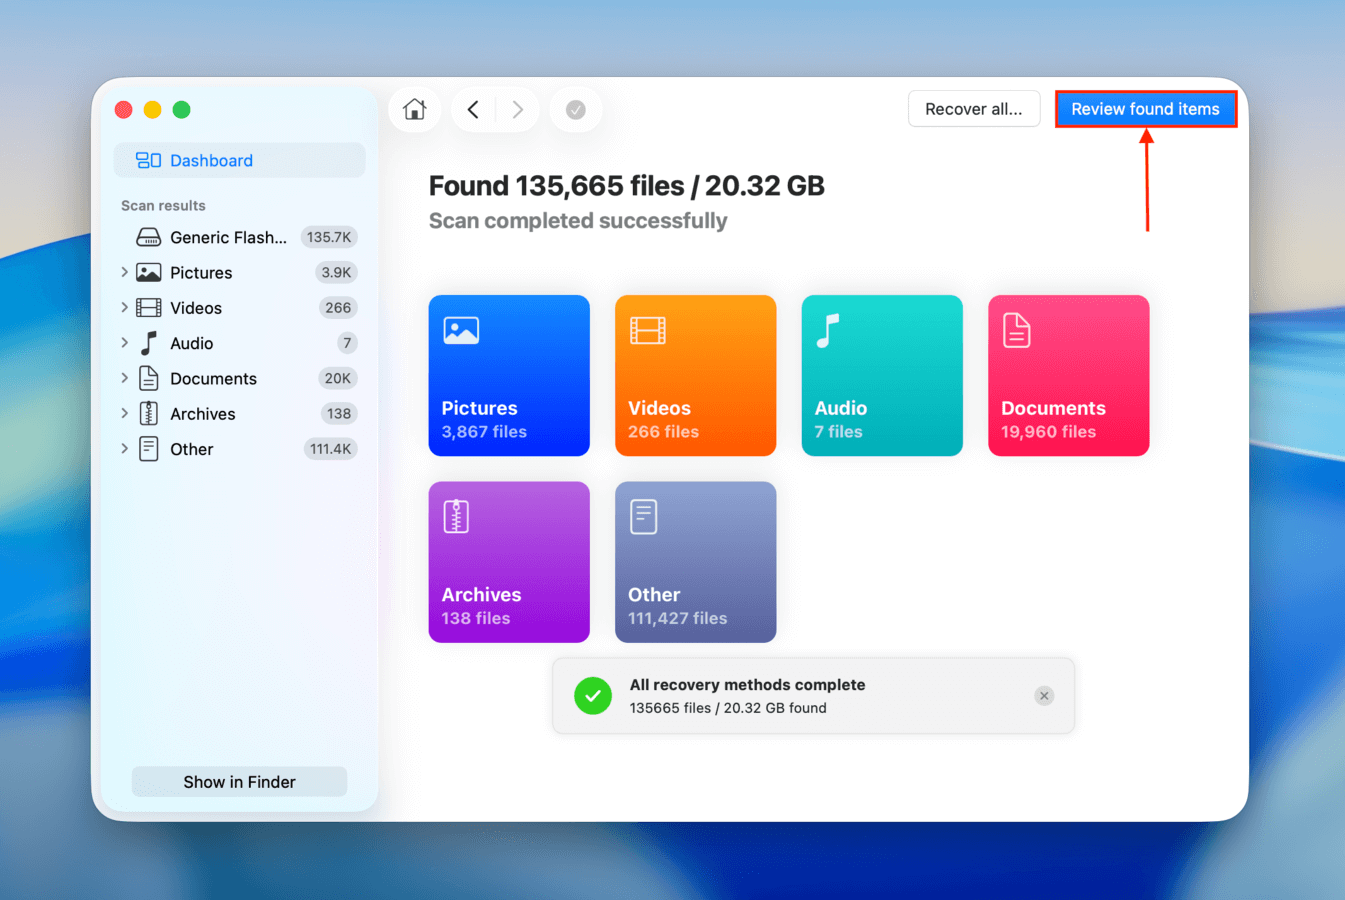
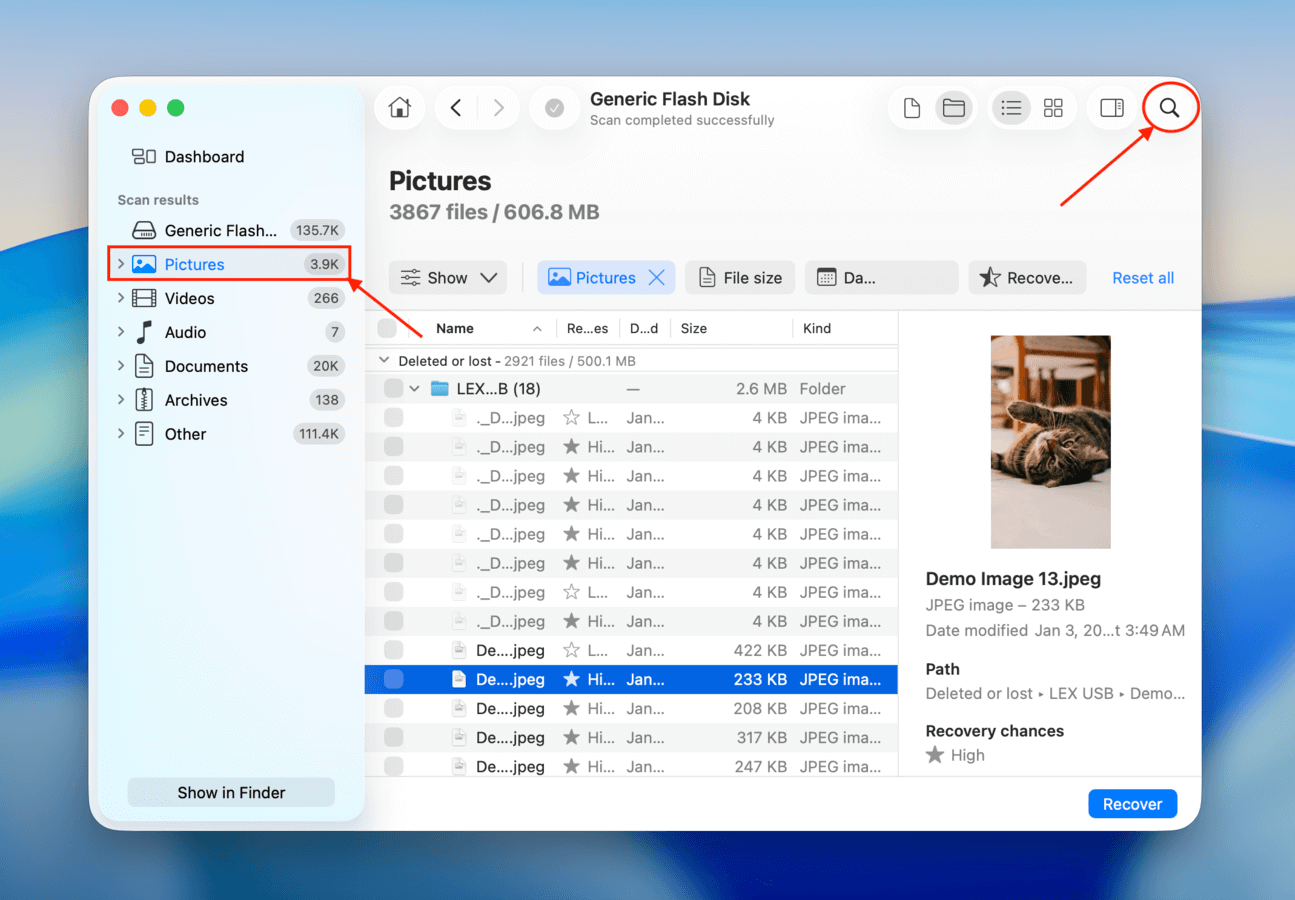
Step 4. Once Disk Drill is done scanning your USB drive, you can immediately restore all found files by clicking the Recover button. However, if you only want to restore specific file types or you want to preview your data first (recommended), click Review found items and proceed to the next step.
Step 5. Use the filters in the left sidebar, as well as the search tool in the top right corner of the window, to show scan results with a specific file type, extension, or file name. Then, click on a file to preview it on the right sidebar.
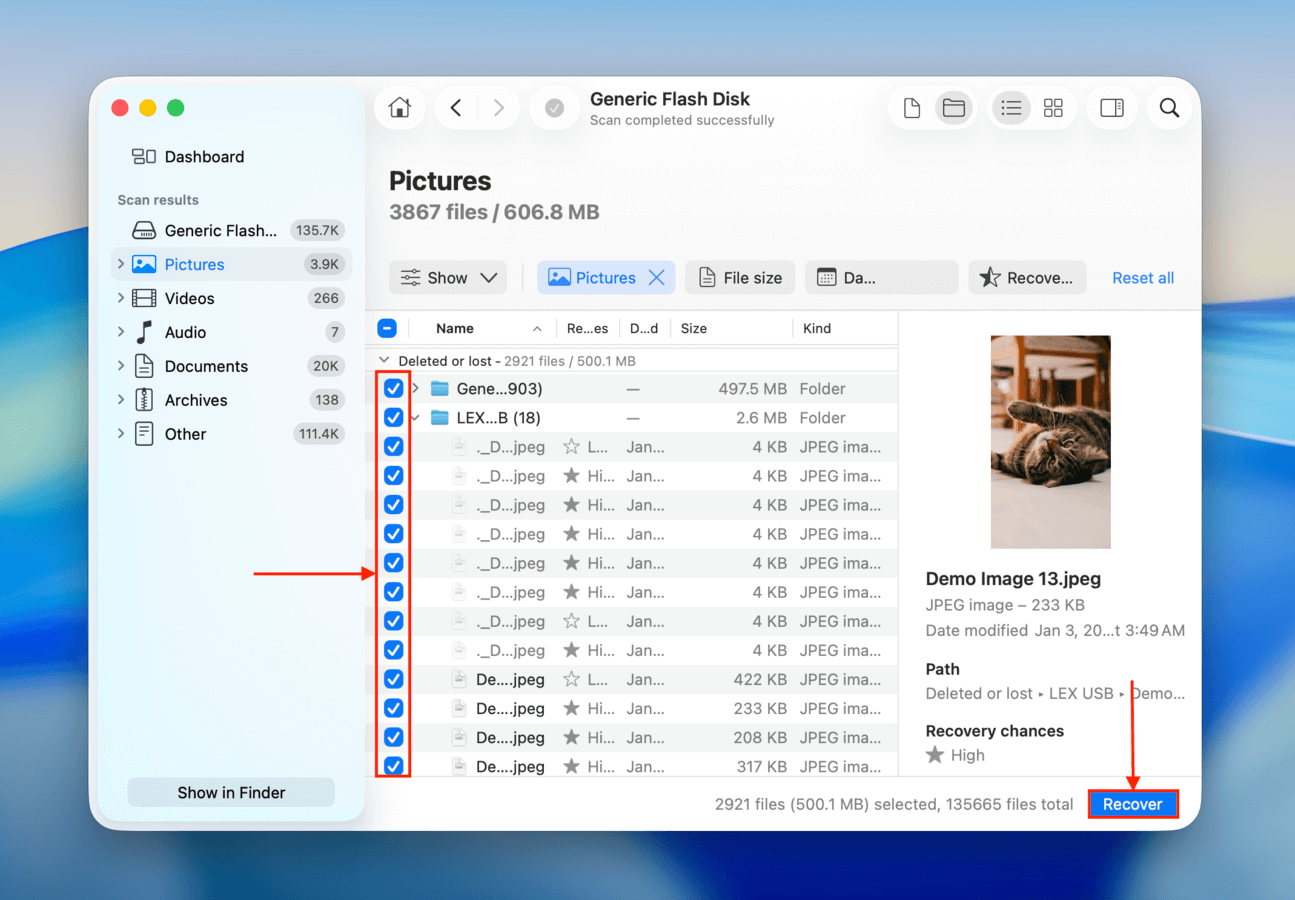
Step 6. When you find and verify the files you want to restore, select them using the boxes in the leftmost column. Then, click the Recover button.
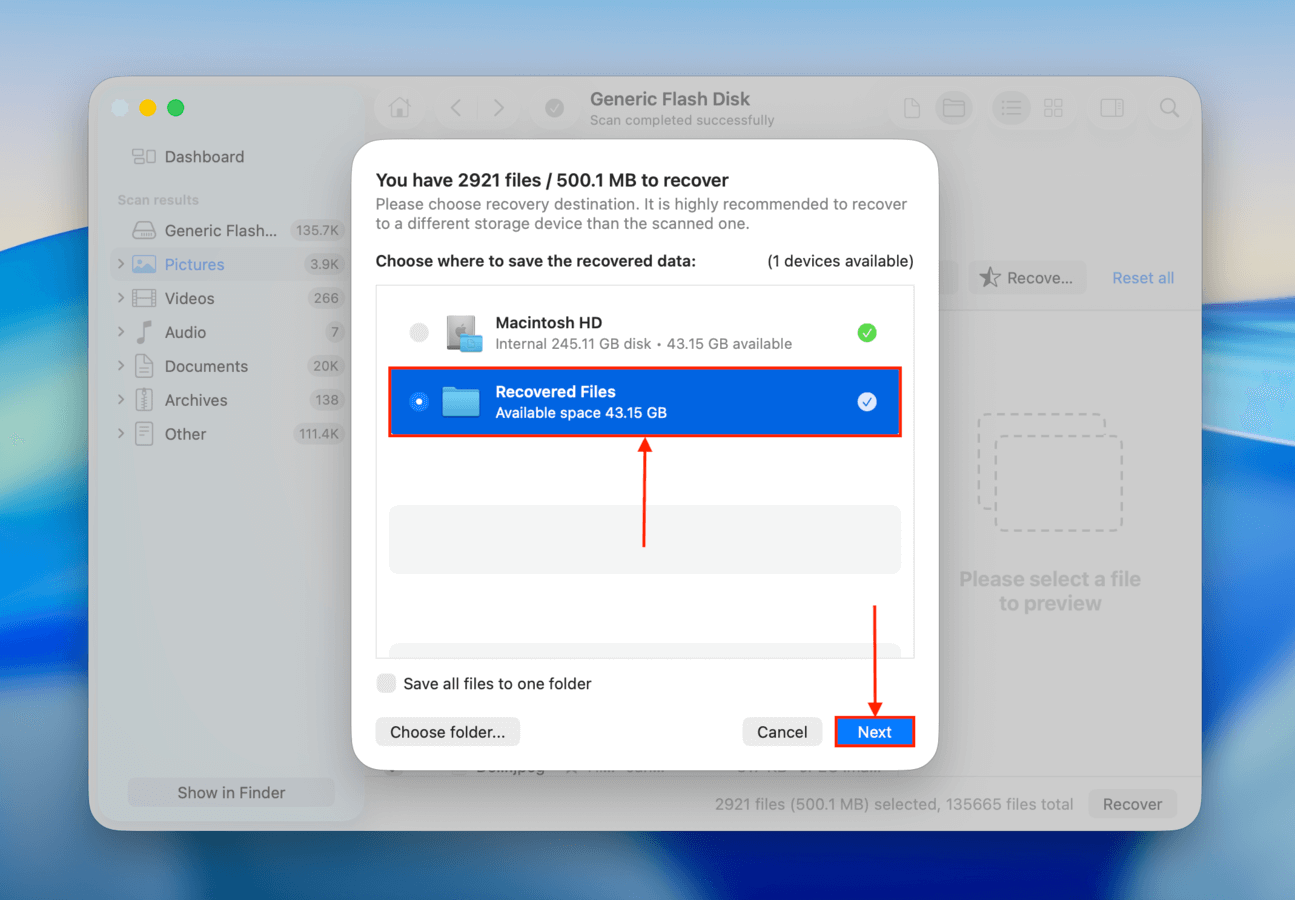
Step 7. In the window that appears, select a folder on your Mac where you want Disk Drill to save your recovered USB files. Do not choose a folder on your USB drive, as you might overwrite the data Disk Drill needs to complete the recovery. Finally, click Next.
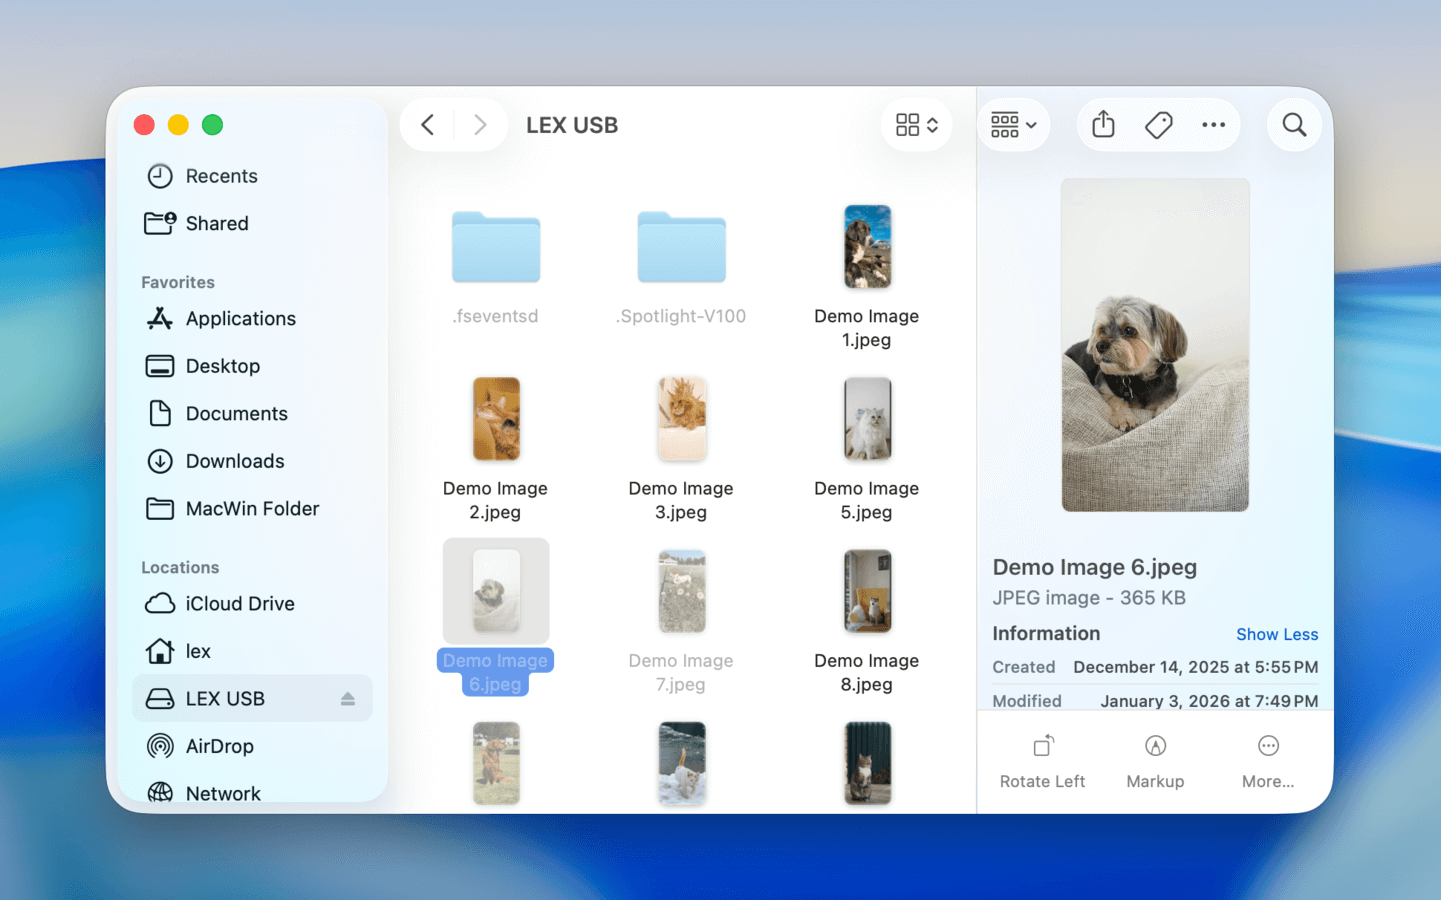
After the recovery is complete, we strongly recommend that you verify that none of your files were corrupted during the process before disconnecting your USB drive or using it for new data.
After the recovery is complete, we strongly recommend that you verify that none of your files were corrupted during the process before disconnecting your USB drive or using it for new data.
Method 4: Unhide Files on USB Drive
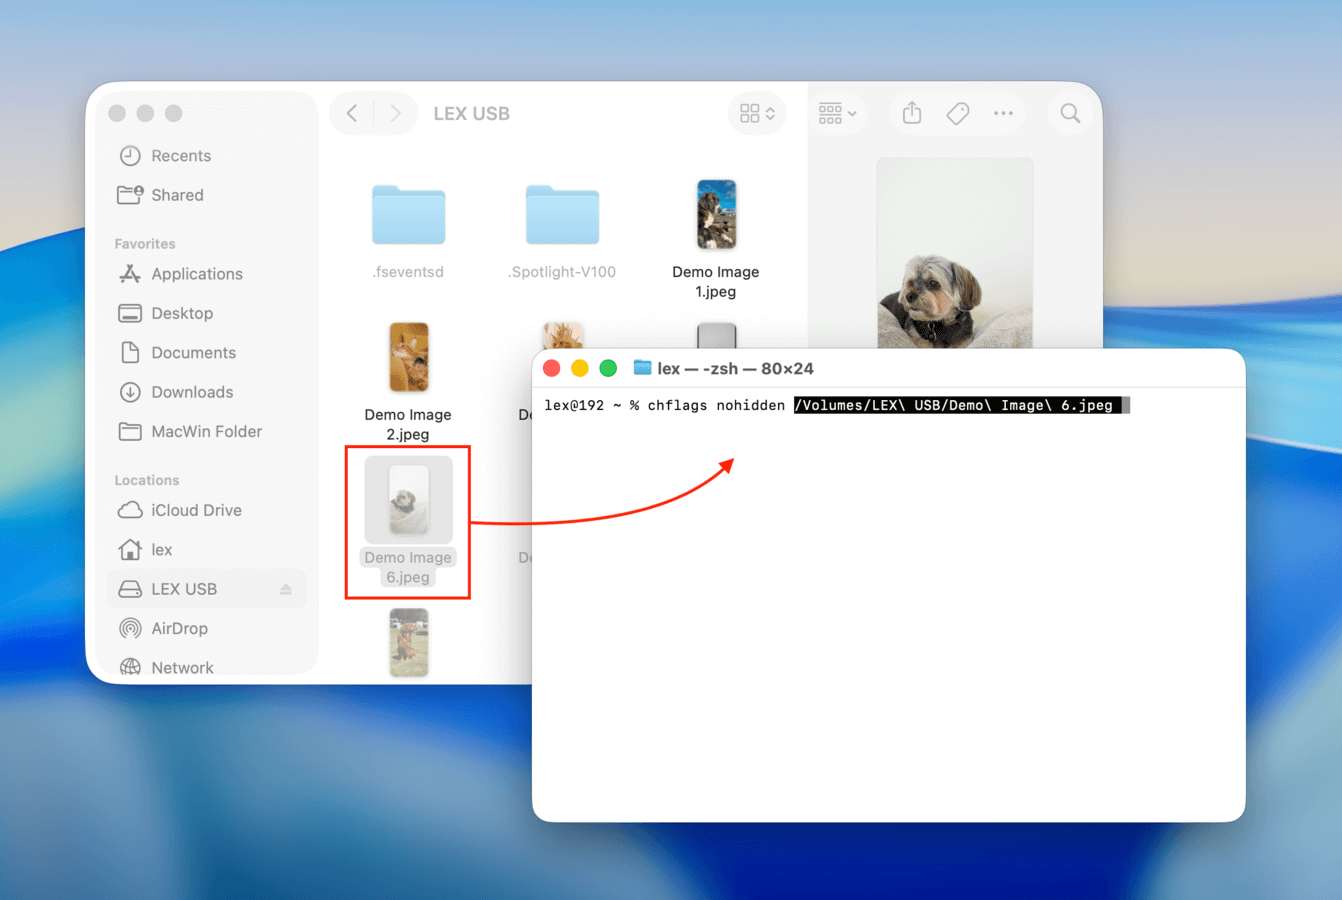
Sometimes, your files are not lost; they’re just hidden. For example, this can occur when the chflags command in Terminal has been used to set the hidden attribute on certain files or folders.
This command can be activated by user error, such as inadvertently copying and pasting commands from the internet or entering an incorrect path.
Additionally, a rogue application with access to your system could change file visibility settings without your knowledge. This attribute alteration effectively masks the files from plain sight in the Finder,
To uncover your hidden files, follow these detailed steps:
Step 1. Connect your USB flash drive to your Mac.
Step 2. Launch Finder and select your USB flash drive. Press Command + Shift + . (dot) to toggle the visibility of hidden files on your Mac. Then, check carefully if you can see any hidden files appear as slightly translucent in the Finder window. These are your hidden files, and you’ve just confirmed that they’re still present on the USB flash drive.
Step 3. Open Terminal from your Applications folder, and type the following command (don’t hit Return yet): chflags nohidden. Make sure the command is followed by a single space. Then, drag and drop the hidden file, folder, or even a group of files and folders that you want to unhide into the Terminal window–this will insert their file paths into the command automatically. Press Return to execute the full command.
After unhiding your files, you may want to toggle the hidden files view off in Finder. Press Command + Shift + . (dot) again, and the hidden files will become invisible once more.
Worth Trying: Recover Your Lost USB Drive Data from a Backup
While this isn’t a method to recover data directly from the USB drive itself, it’s still worth trying if the missing data was also saved on your Mac at some point—for example, if you created a file in Pages or Photoshop and then copied it to the USB drive before deleting it from your Mac. In such cases, there’s a good chance it was backed up by one of macOS’s built-in backup features, namely iCloud or Time Machine.
Option 1: Restore the Right Time Machine Snapshot
Time Machine is a backup tool that comes built into macOS. If you used it on your Mac at least once before deleting the file you copied from your Mac, there’s a good chance you have a snapshot of that file that you can restore.
You’ll have the best chance if you have your Time Machine drive with you, but you can still attempt this method without it. Time Machine creates incremental local backups for 24 hours, which may have successfully saved a snapshot of your file.
Step 1. If you have it, connect your Time Machine drive to your Mac using the appropriate cable and adapter.
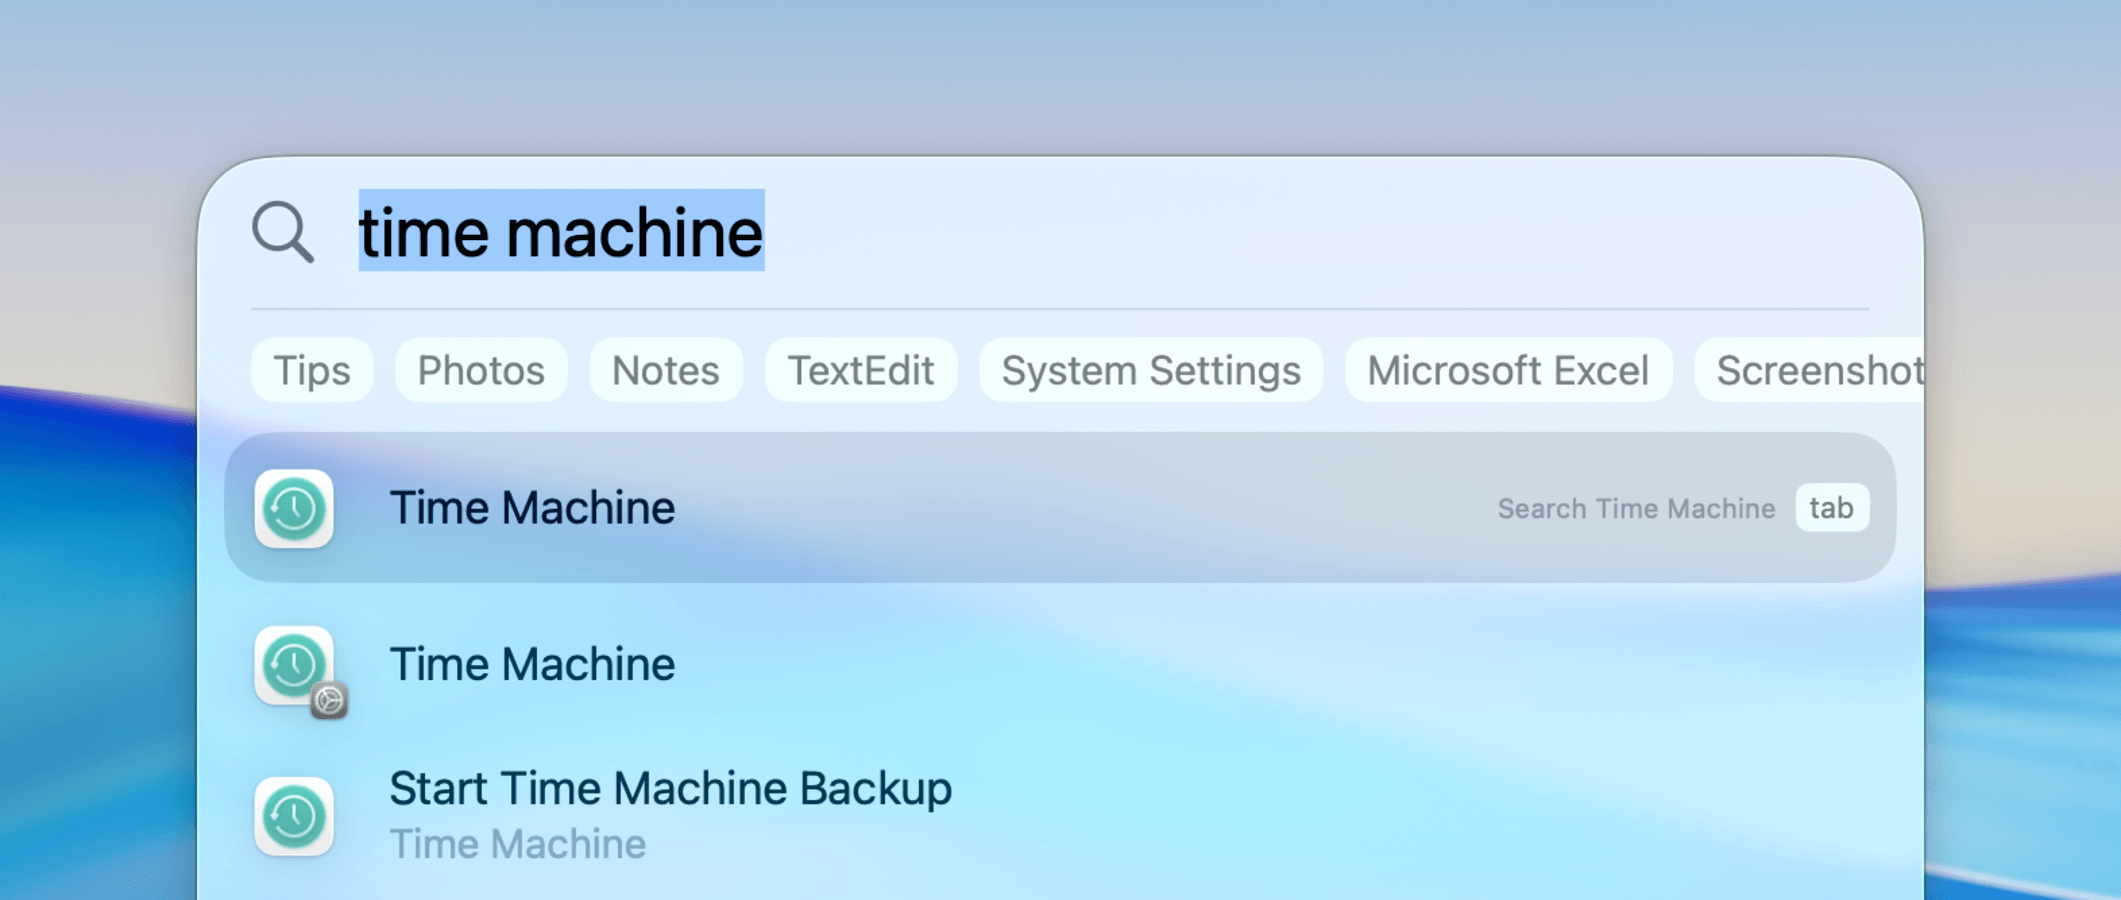
Step 2. Click the Time Machine button on your menu bar, then select Browse Time Machine Backups. Alternatively, you can use Spotlight (Command + Space) to open Time Machine.
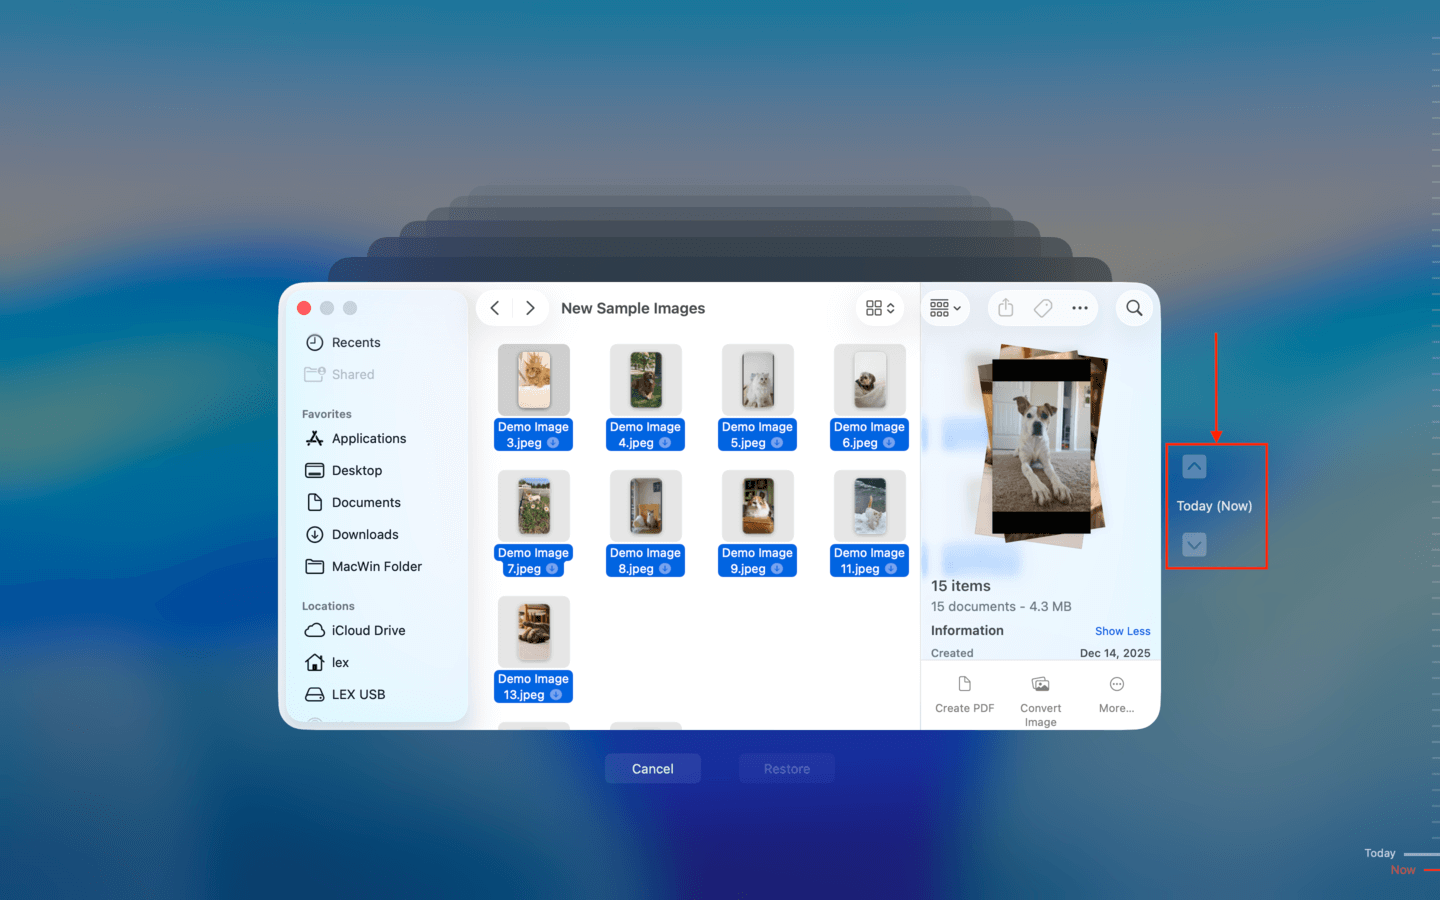
Step 3. In the Finder window, navigate to the location where your files were last stored on your Mac before they were copied to your USB and deleted. Then, use the arrow buttons to find the right snapshot. Once you locate your files, select (or multi-select) them and click Restore.
Option 2: Check iCloud’s Recently Deleted Folder
Unlike Time Machine, iCloud is a synchronization service that copies your Mac data to Apple’s servers and syncs changes you make on your device. This allows you to keep your data consistent across devices that also use iCloud.
As a relevant example, files that you deleted on your Mac are stored in the Trash folder; on iCloud, they are stored in the Recently Deleted folder. Normally, emptying the Trash folder on your Mac also empties iCloud’s Recently Deleted folder.
But while changes usually get synced quickly, it’s possible to download your file if the sync was delayed due to an unstable network or macOS prioritizing other system processes.
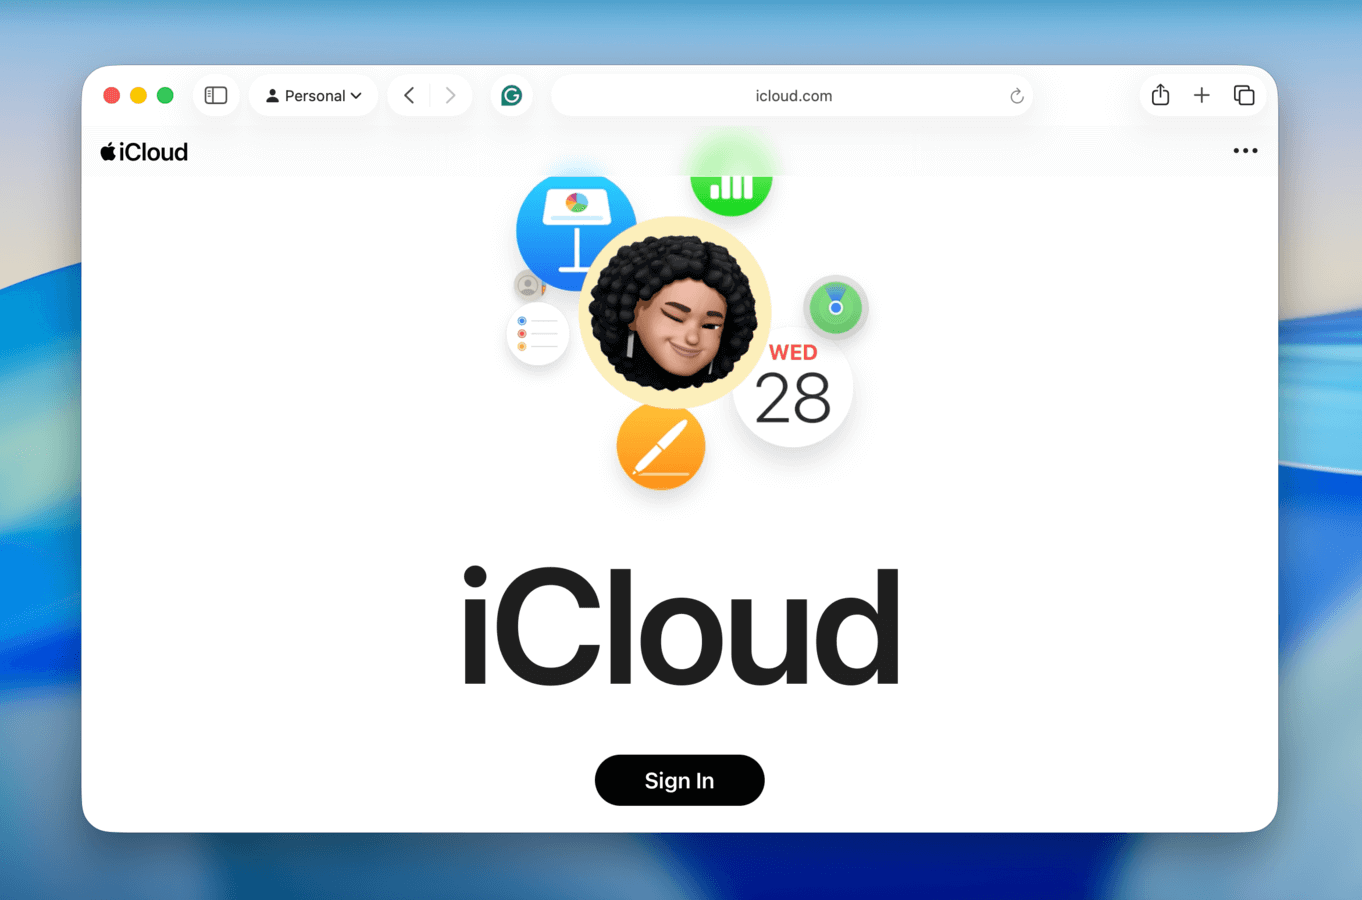
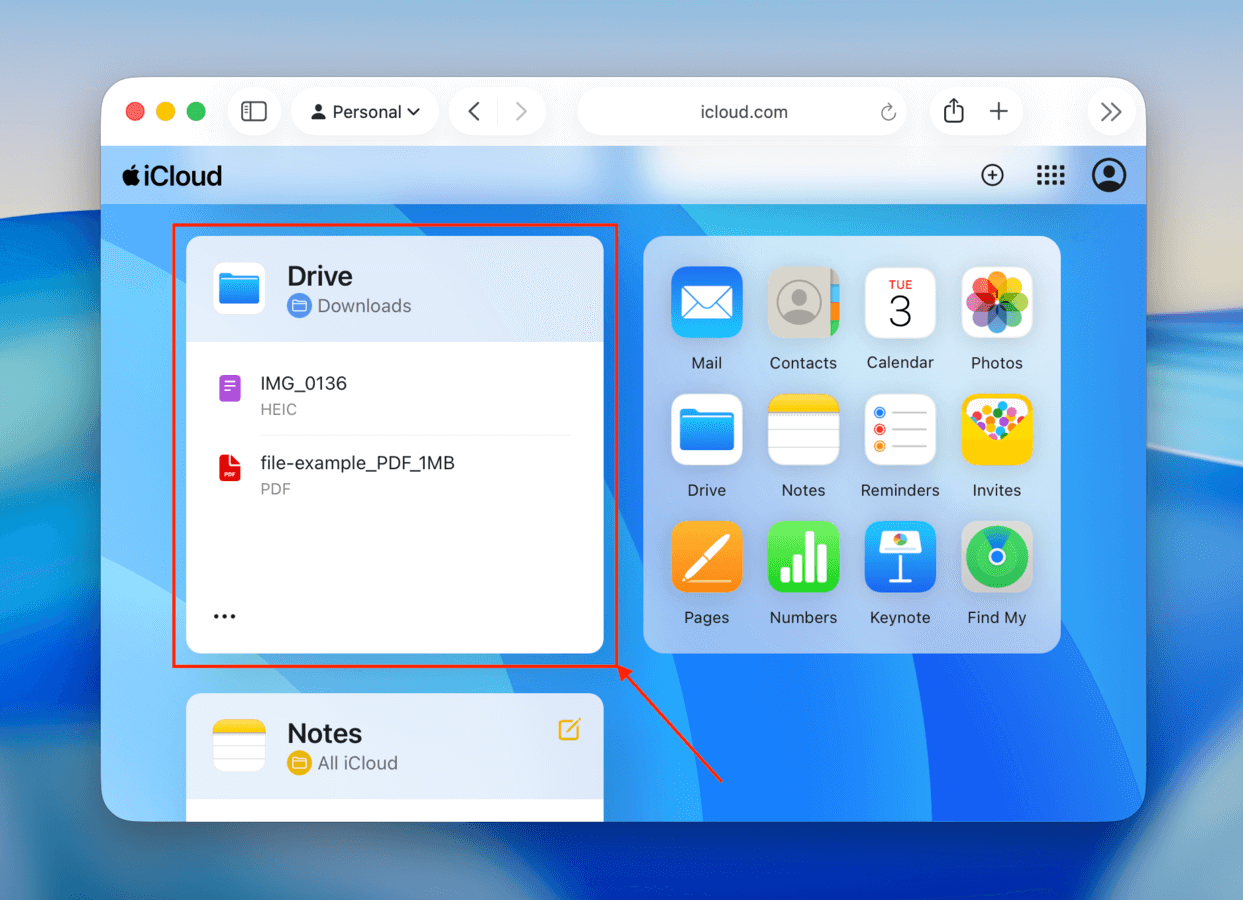
Step 1. Open a browser on any device other than your Mac. Then, navigate to iCloud.com and log in.
Step 2. Click the iCloud Drive box.
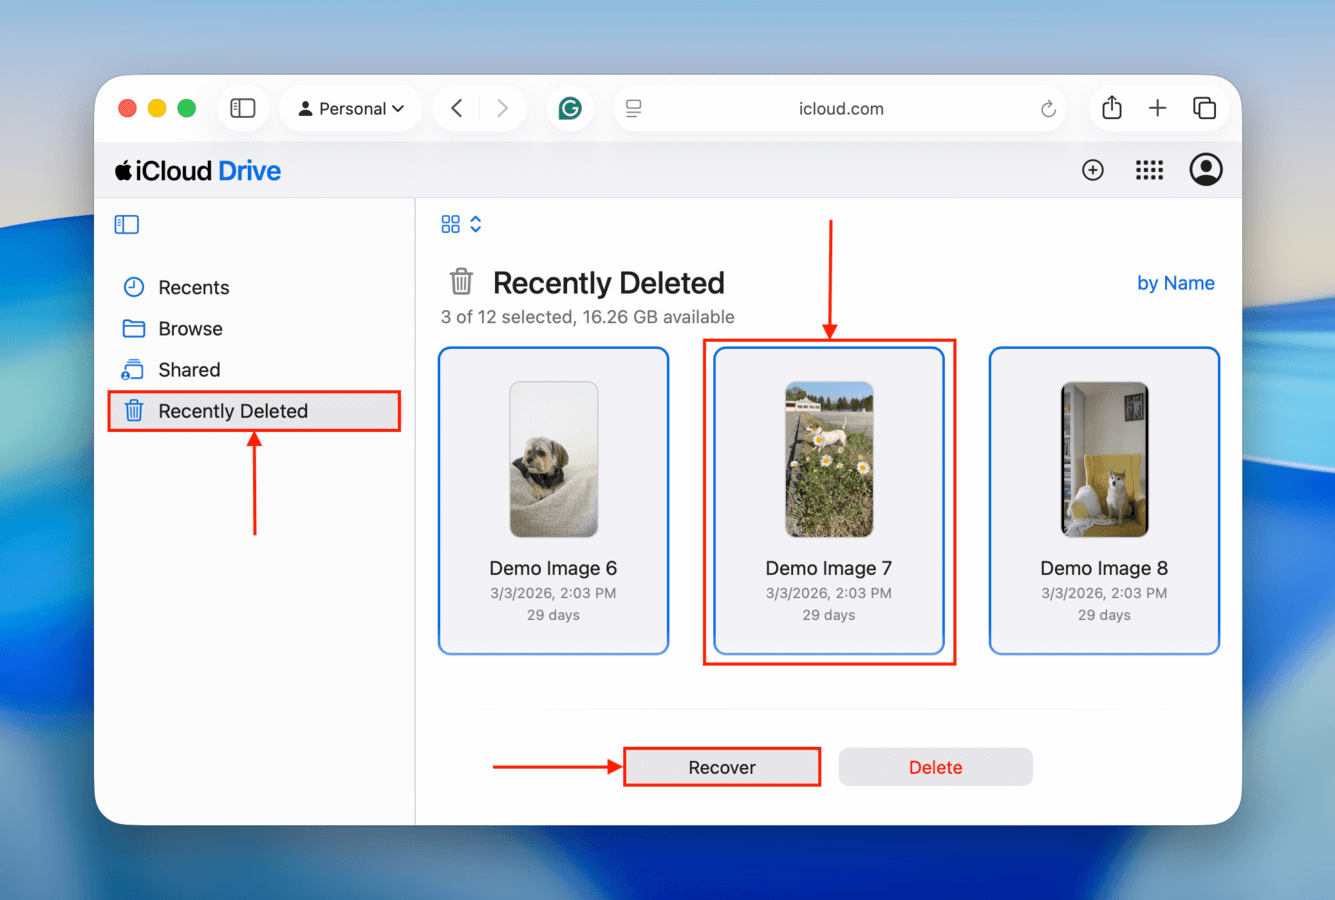
Step 3. On the left sidebar, click Recently deleted. Any files and folders deleted in the past 30 days will appear in the right pane. Click a thumbnail, then click the Restore button to move the image back to its original location (hold the Shift key while clicking to select multiple files).
Why Can’t Some Files Be Recovered?
 Unfortunately, data recovery is an unpredictable process, and you may not always be able to recover all lost files.
Generally speaking, files can be recovered until they are overwritten by new files. That can happen nearly instantly or after several months and even years—it all depends on the size of your USB drive and how much you use it. For example, if you accidentally format a 2 GB flash drive and write 2 GB of new files to it, it’s almost guaranteed that none of the original files will be recoverable.
Physical damage may also jeopardize the recovery of deleted files and even render the entire flash drive useless. Unfortunately, there’s not much regular home users can do to repair a physically damaged USB flash drive because any such repair requires specialized equipment and plenty of experience.
When dealing with a physically damaged USB flash drive, it’s almost always best to seek professional help from a data recovery service. Just know that professional data recovery is almost always far more expensive than DIY recovery performed using software like Disk Drill, so you should really consider if the data is valuable enough to justify the cost.
How to Prevent Data Loss from USB Drive?

Preventing data loss from a USB drive doesn’t require any special skills or expensive software. You just need to treat your USB drive responsibly and keep in mind the following five tips:
- Use your USB drive responsibly: If you keep important files on your USB drive, you need to use it responsibly, which means properly ejecting it before you physically remove it from your computer and taking care not to interrupt any active read/write operations before they finish.
- Keep your USB drive away from dust and moisture: Physical damage can wreck a USB drive in an instant, and it’s often impossible to repair it. To prevent it, keep your USB drive away from dust and moisture and always use the included cap to protect the USB connector.
- Back up your files from time to time: Just because most people use USB sticks as cheap and handy backup devices doesn’t mean that you shouldn’t back up your files from time to time. It’s always much better to lose a day’s or a week’s worth of work than everything.
- Defend your computer against malware: Malicious hackers love USB sticks because they make it easy for them to spread their malware from one computer to another. To prevent your USB stick from becoming a host for a virus or some other digital parasite, use a reliable anti-malware solution.
- Don’t rely too much on a single USB drive: Considering how affordable USB drives are, there’s no reason to rely on a single and risk losing gigabytes of data at once. Instead, buy multiple USB drives and use each for a different purpose. That way, even if one of them stops working, the data loss won’t be terrible.
With these five tips, you can prevent data loss from a USB drive and avoid the loss of time and valuable data associated with it. But even if you do lose important files, remember that you can always recover them using USB recovery software.
Is Your Flash Drive Not Working Properly?
If you’re unable to recover data from your flash drive due to errors, unexpected behaviors, or a poor USB connection, it may be corrupted or logically damaged in some way. You can still recover data from a corrupted flash drive, but you’ll need to repair it first.
As long as it’s not physically damaged, you can use the methods in our guide on fixing a corrupted hard drive on a Mac. The guide also applies to USB flash drives, and it mostly uses free tools already installed on your Mac.
FAQ:
Use the following procedure to open a flash drive to view its contents on a Mac.
- Connect the flash drive to your Mac’s USB port.
- Open a Finder window.
- Locate the drive in the Locations section of the left side panel.
- Click on the device name to open it.
The following procedure can be used to delete files from a flash drive on a Mac.
- Connect the drive to your Mac.
- Open the drive using Finder.
- Highlight and right-click on the items you want to delete.
Select the Move to Trash option to delete them from the flash drive.
To reset or reformat a flash drive on Mac, use the following procedure.
- Connect the drive to your Mac.
- Open the Disk Utility application.
- Select the device from the list on the left.
- Click on the Erase tab at the top of Disk Utility.
- Select the file system that will be used to format the drive.
- Click the Erase button to perform the reformat.
You have several options for recovering deleted data from a USB drive without using software on your Mac.
- If you just deleted the files, the Command-Z keystroke combination which undoes your last action may be able to recover the data.
- Look in your Mac’s Trash with the USB drive connected to your Mac. If it’s in the Trash, the file can be easily recovered.
- Use a previously created backup to restore the lost data.


