
Missing photos on your iPhone? Ironically, the iPhone’s many advanced features may be the reason why this issue is so common. Fortunately, there are also many ways to recover deleted photos from an iPhone, depending on how your device is set up.
This article covers them all. The process varies depending on your specific scenario, so we provided 4 reliable methods (along with detailed instructions) that solve the most common data loss problems on an iPhone. Read on!
| Scenario | Solution |
| When you don’t have any backups of your photos (iTunes, iCloud, Google Photos, etc.) | Method 1: Recover Photos Using iPhone Data Recovery Software |
| When you created a backup using iTunes on your Mac, which is usually only available for users with macOS Mojave and below (unless iTunes is installed via the Retroactive app or similar). | Method 2: Retrieve Photos from a Finder/iTunes App Backup |
| When you created an iCloud backup of your iPhone and you’re connected to a reliable wireless network. | Method 3: Recover Deleted Photos from an iCloud Backup |
| When you backed up your pictures to Google Photos and you’re connected to a stable network | Method 4: Restore Images From Google Photos Backup |
Table of Contents
Make Sure Your Photos Are Really Gone
Before trying the recovery methods we cover in this article, make sure that they aren’t in the Recently Deleted album! Whenever you delete photos from your iPhone, the Photos app sends them to the Recently Deleted album (Photos > Albums > Utilities).
Deleted photos are stored here for 30 days or until you decide to delete them. Any photos still in this album after 30 days since their deletion are permanently erased from your library (which is when the other methods in this article will come in handy).
If you’re wondering why your storage space won’t budge even if you’ve deleted a lot of photos and videos, this is why. So make sure to check your Recently Deleted album whenever you delete photos and ensure they’re gone for good!
Step 1. Open the Photos app on your iPhone.
Step 2. Scroll down to the very bottom of your library until you find the Utilities section. Tap Recently Deleted.
Step 3. In the top right corner of the Recently Deleted album menu, tap Select.
Step 4. Tap the photos you want to recover. Then, tap the meatball menu in the bottom right corner and choose Recover. Make sure to tap Recover Photo when prompted to confirm the action.

On the thumbnails of your photos in the Recently Deleted album, you’ll see how many days each item will remain in this album, which will depend on the date of its deletion. This is your allowance for restoring any photos you didn’t want to delete–make sure to keep it in mind!
4 Methods to Recover Deleted Photos on iPhone
Aside from the Recently Deleted album, there are other useful tools that can help you recover deleted photos. Your primary safety net is a myriad of backup types that guarantee 100% recovery, as long as they were created before the photos went missing. We’ll demonstrate how to access and restore each of them in the next section.
Even if you don’t have a backup, we provide alternative methods to restore your deleted photos directly from your iPhone’s disk. However, we can’t guarantee 100% recovery success (some files may not be recovered) but the right tools will give you the best chance. We’ll also cover them in the guides below.
Method 1: Recover Photos Using iPhone Data Recovery Software
If your photos are no longer in the Recently Deleted album and you don’t have any backups available, you can use data recovery software to restore them.
For this article, we’ll be using a tool called Disk Drill. It has a native app for macOS, which fully supports iPhone recovery, and is able to work around the device’s limitations by creating a backup of the system disk and scanning that (instead of attempting to scan the iPhone’s disk directly).
🎁 Apply a coupon “DDIPHONE” during the checkout process, and you’ll get Disk Drill PRO (Mac edition) with a 35% discount.
Step 1. Download and install Disk Drill for your computer.
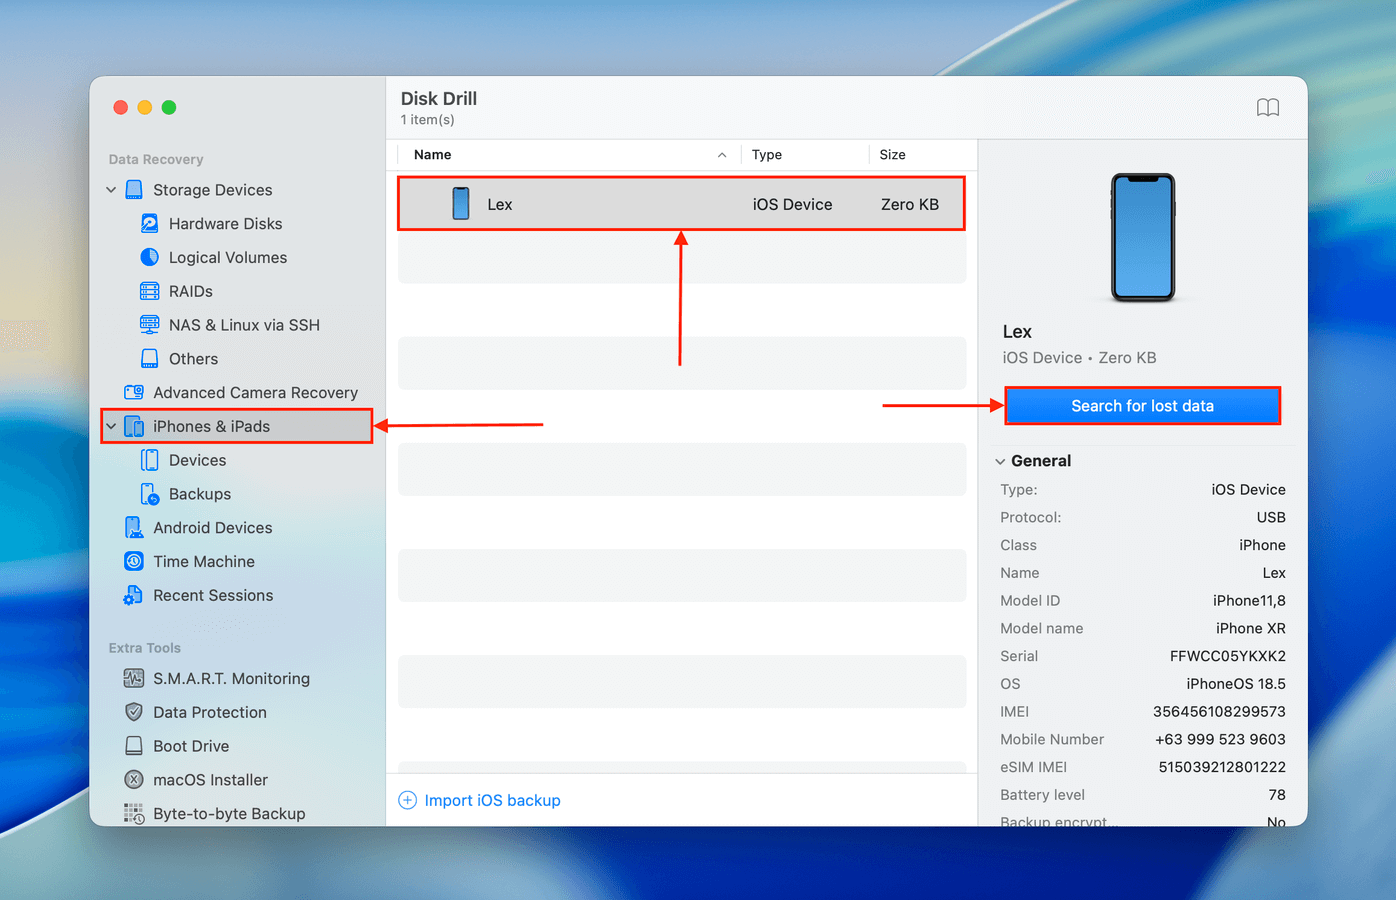
Step 2. Open Disk Drill and navigate to the Storage Devices menu under the Data Recovery section in the sidebar. Then, plug in your iPhone to your Mac. Once it shows up in the source selection menu, click it and click Search for lost data.
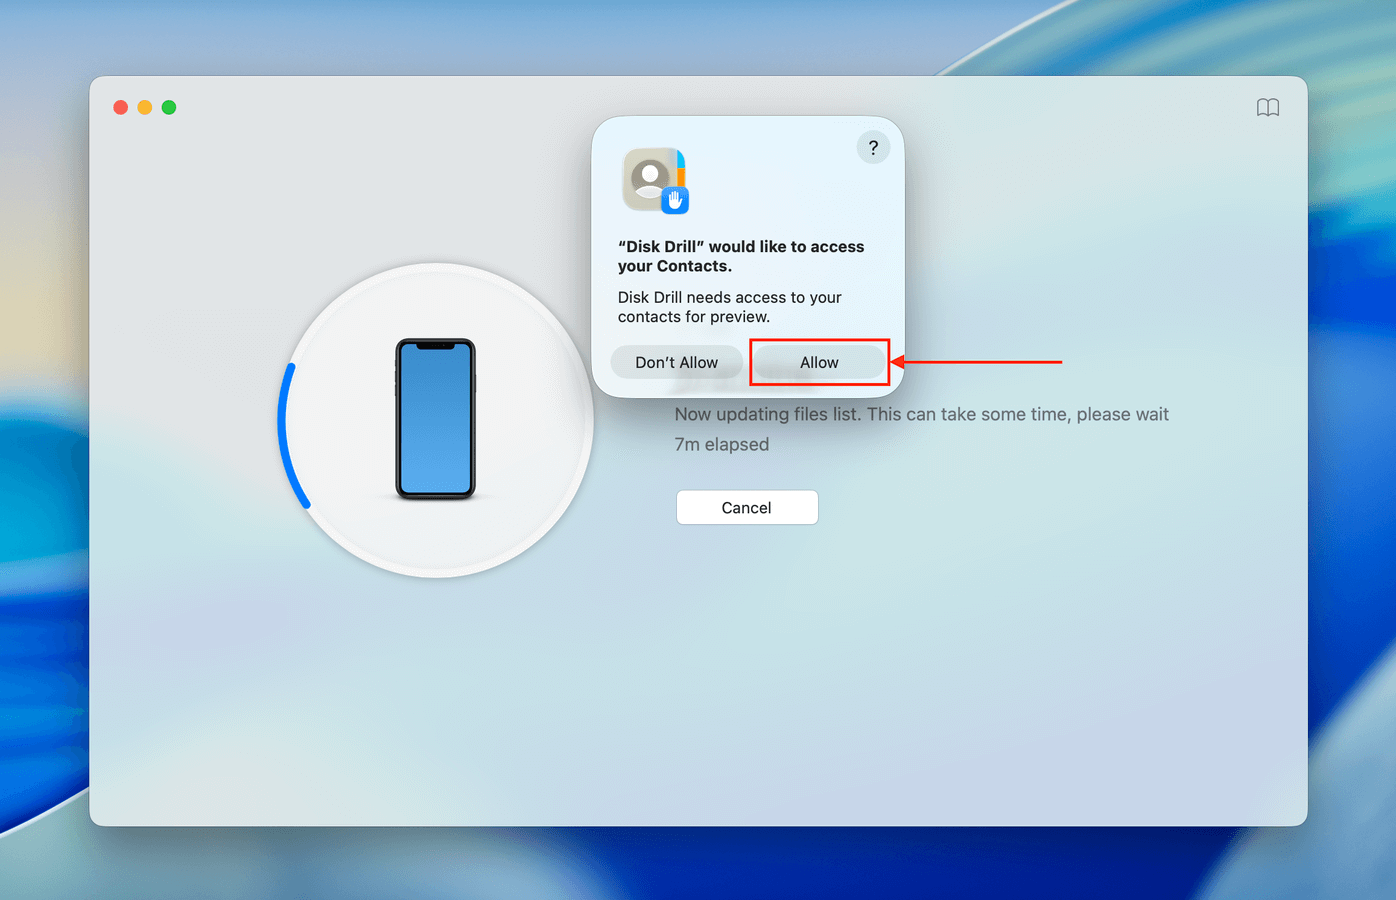
Step 3. During the scanning process, Disk Drill may ask for access permissions to your iPhone data. Click Allow when the prompt comes up and wait for Disk Drill to finish scanning your device.
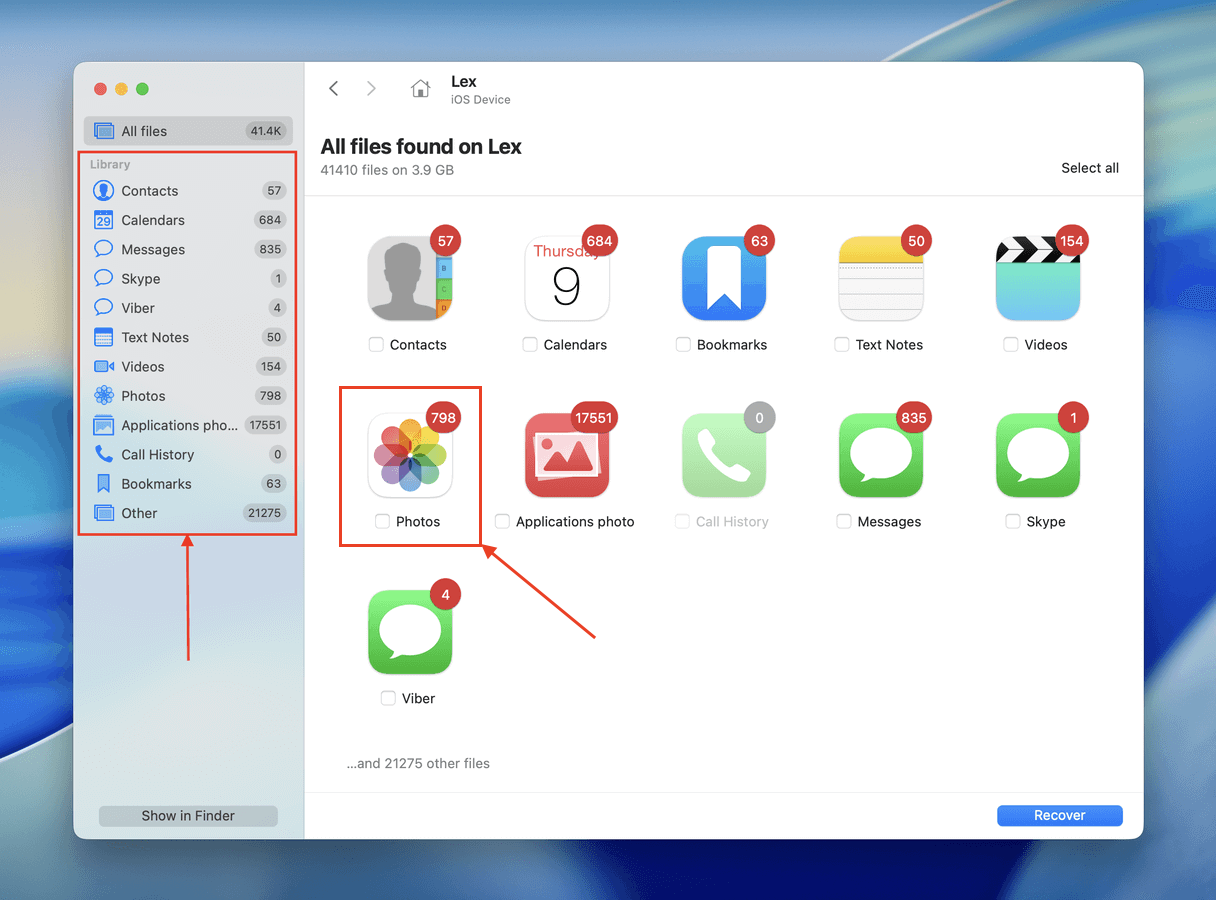
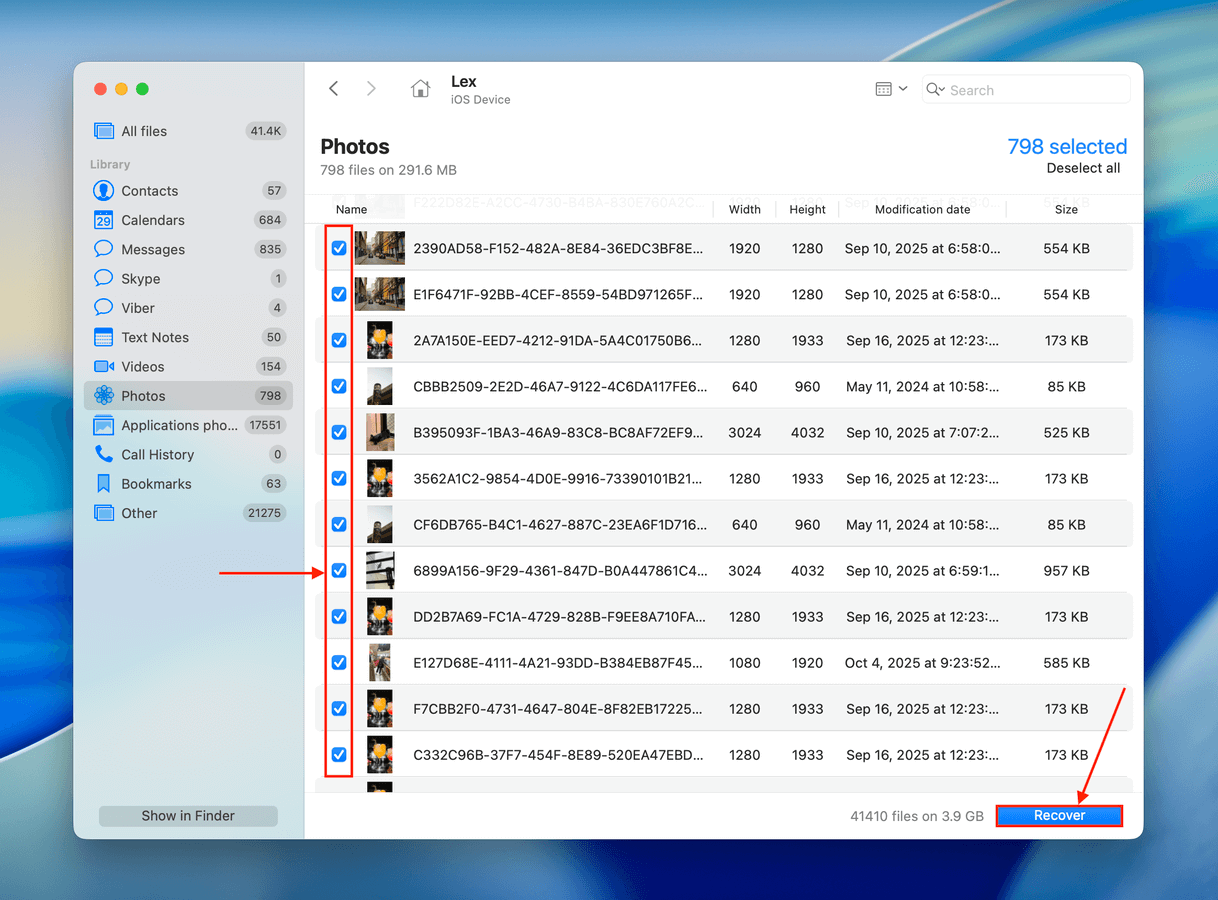
Step 4. Once the scan is complete, Disk Drill will present all the files it found. You can use the filters in the left sidebar or the buttons in the main window to browse specific file types. Open Photos.
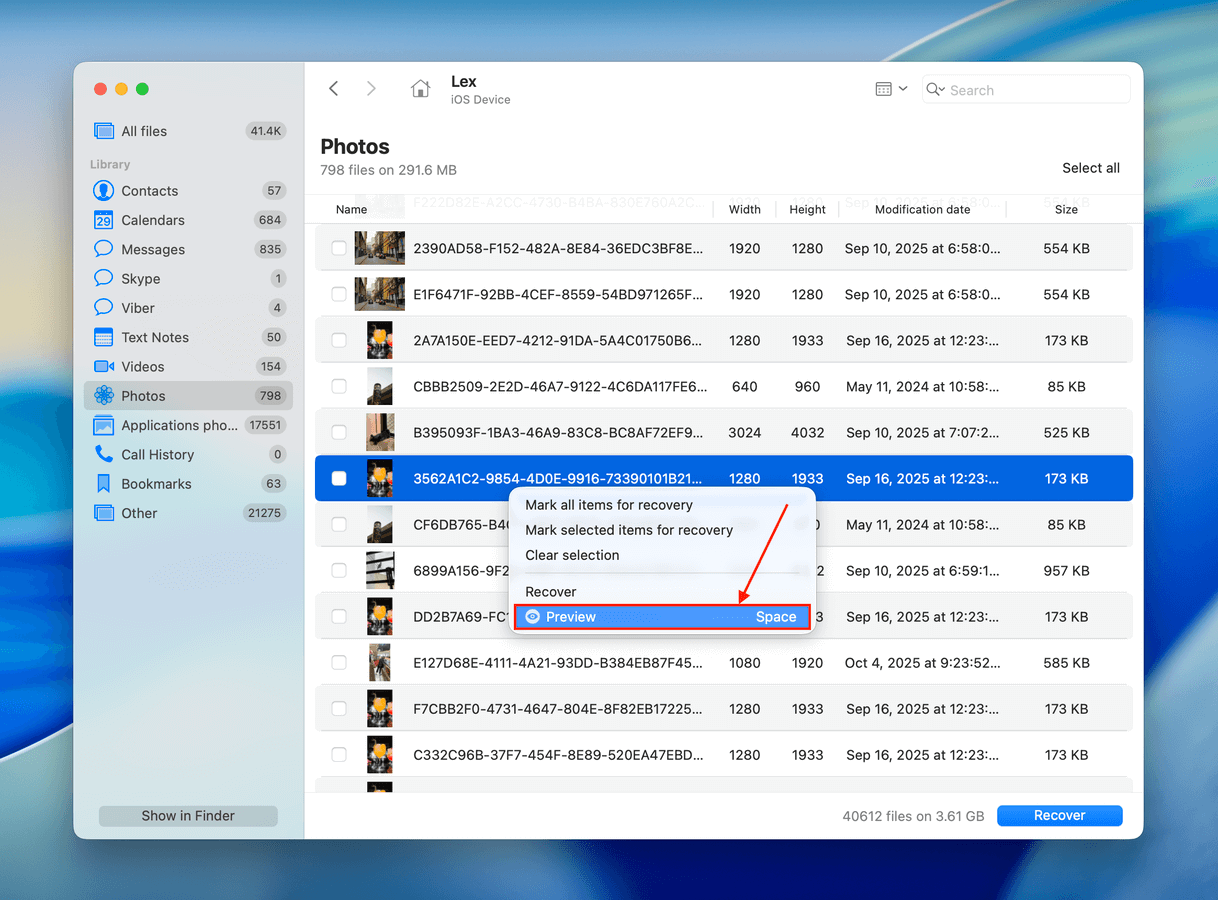
Step 5. You can click the column headers like Modification date and Size to sort your iPhone data so you can easily find the files you want to restore. Once you do, make sure to preview them via the right-click menu–this lets you confirm whether the files are recoverable.
Step 6. Select the photos that you would like to recover and then click the blue Recover button in the lower right-hand corner of the screen.
Step 7. Choose a path for Disk Drill to restore the deleted photos to and click Next.
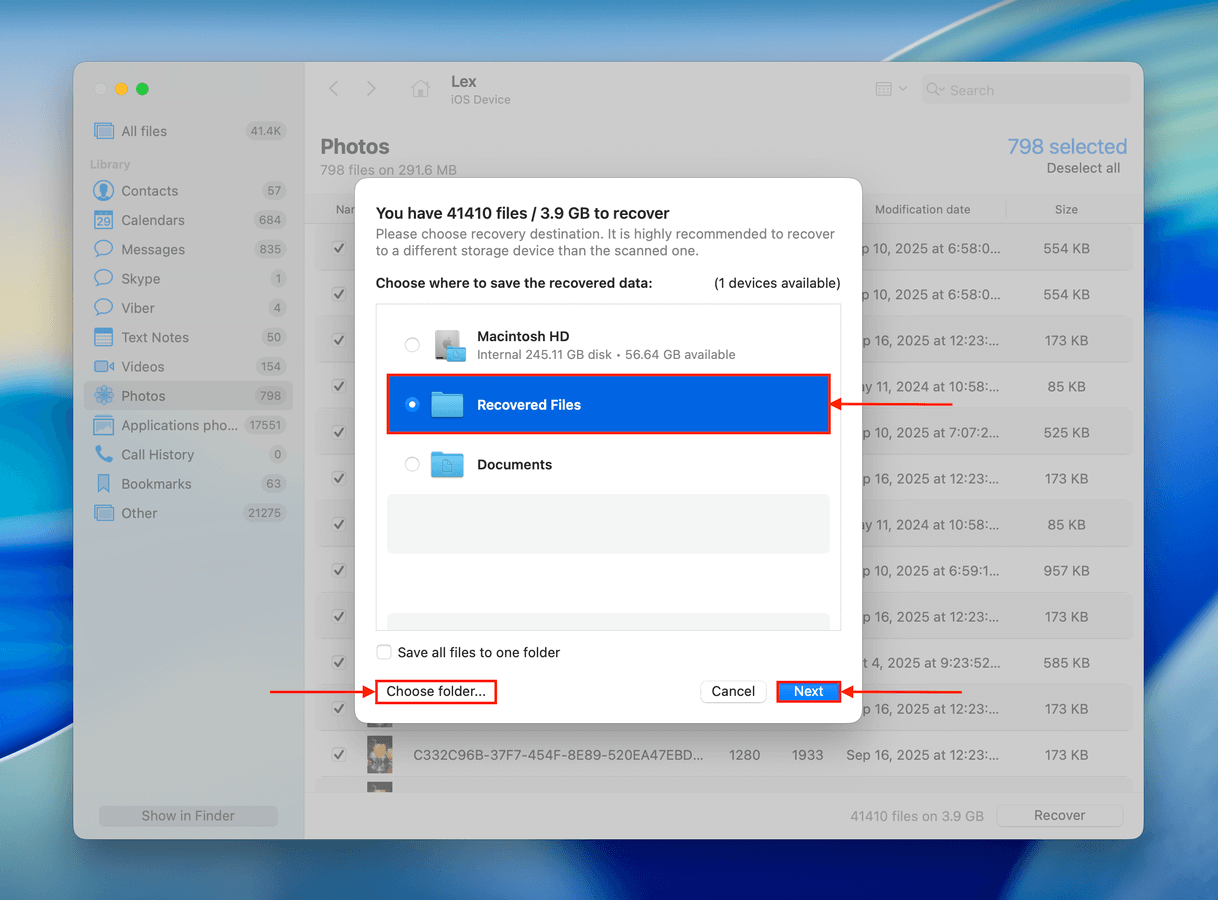
After you have successfully recovered the deleted photos, you will receive a confirmation message that the recovery is complete, and the deleted photos will be restored to the location you chose on your computer.
Method 2: Retrieve Photos from a Finder/iTunes App Backup
If you recently created a backup of your iPhone using your computer, restoring it will revert your device to the state it was in when the backup was created. If your missing photos were still in the Photos app during the backup, they should reappear.
Depending on your system, you either used iTunes or Finder, which you’ll need again for the restoration process. It’s iTunes for Windows and macOS Mojave (or earlier) users and Finder for macOS Catalina (or later) users. The process is very similar though, so the guide below is applicable to all users.
Note that the photos that get included in this backup are those that were not synchronized with iCloud. If synchronization was enabled prior to the backup, any affected photos will not be included and cannot be recovered using this method.
Step 1. Plug your iPhone into your Mac or Windows computer.
Step 2. Open Finder and select your iPhone in the left sidebar. In the General tab, scroll down to Backups and click Restore Backup…

Step 3. After clicking the Restore Backup button, you’ll be asked to select your backup file. Then, the process begins immediately; it will take some time depending on the size of the backup. Make sure to keep your iPhone connected to a power source, as this process should not be interrupted.
Method 3: Recover Deleted Photos from an iCloud Backup
When you purchase an iPhone, it asks you to set up iCloud during the initial set up so the chances are you may have enabled this without even knowing what it was as iCloud is one of the most used cloud services in the world.
iCloud will sync your data between devices but it also will make a backup of your iPhone overnight when you plug it in to charge and it’s on Wi-Fi. This is a backup of everything from text messages to contacts, and all of your pictures.
You can restore accidentally deleted photos from iCloud using one of the backups that have been created and put the data right back onto your phone.
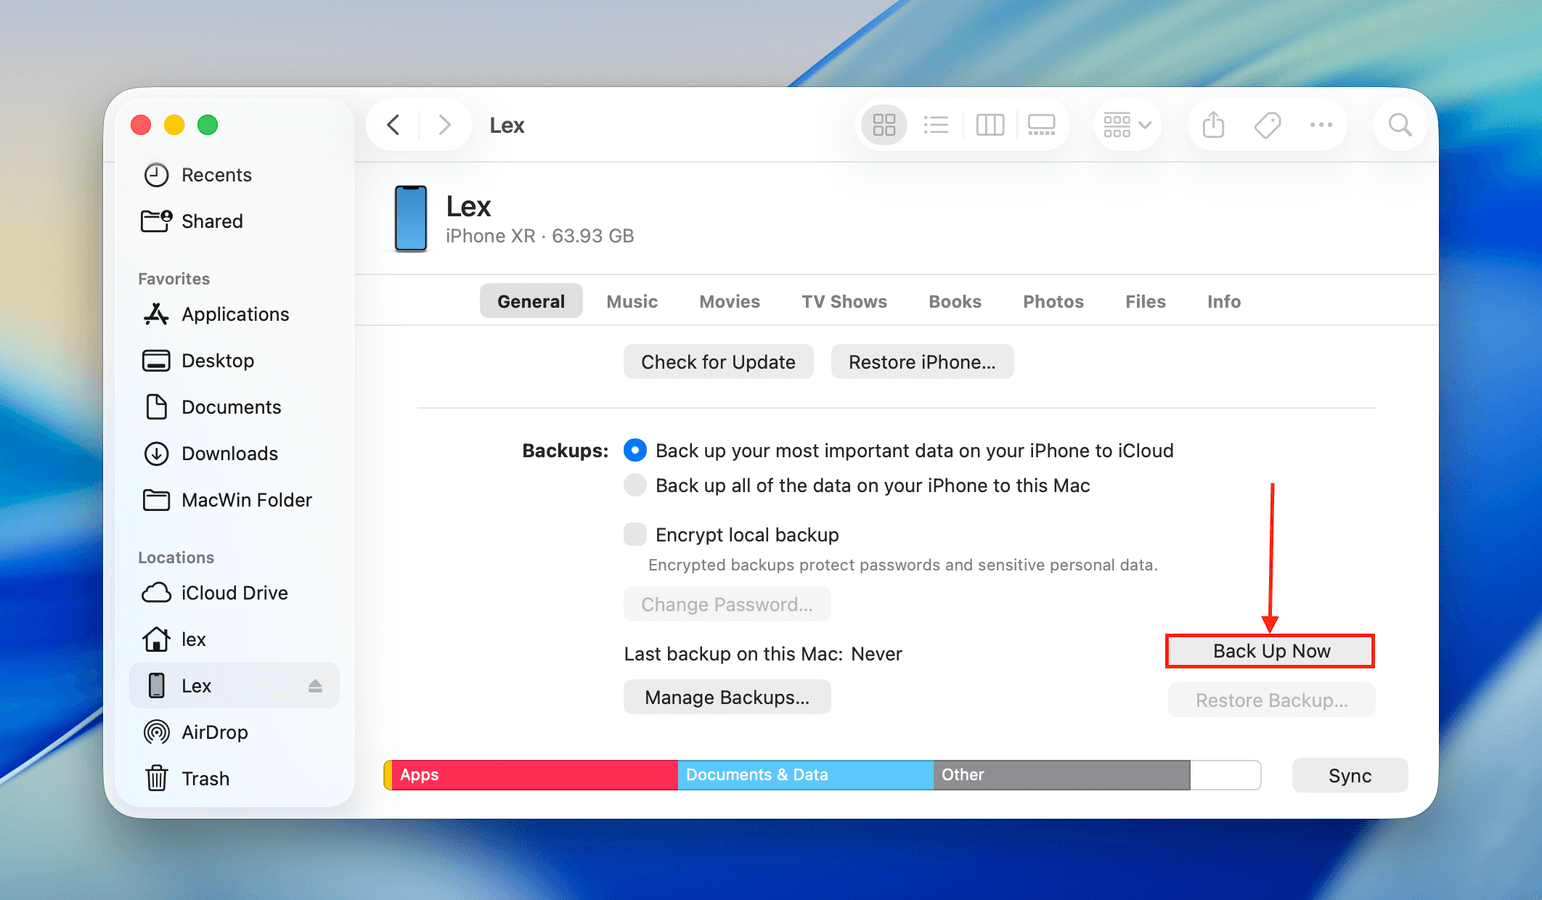
Step 1. First, we want to back up our device should anything happen to it during the restoration process. To do that, plug your iPhone into a computer and back it up to the Music app if you’re on a Mac or iTunes if you’re on Windows.
Step 2. On the left sidebar in Finder, click your iPhone. Then, open the General tab and navigate to the Backups section. Click Back Up Now and wait for the process to complete.
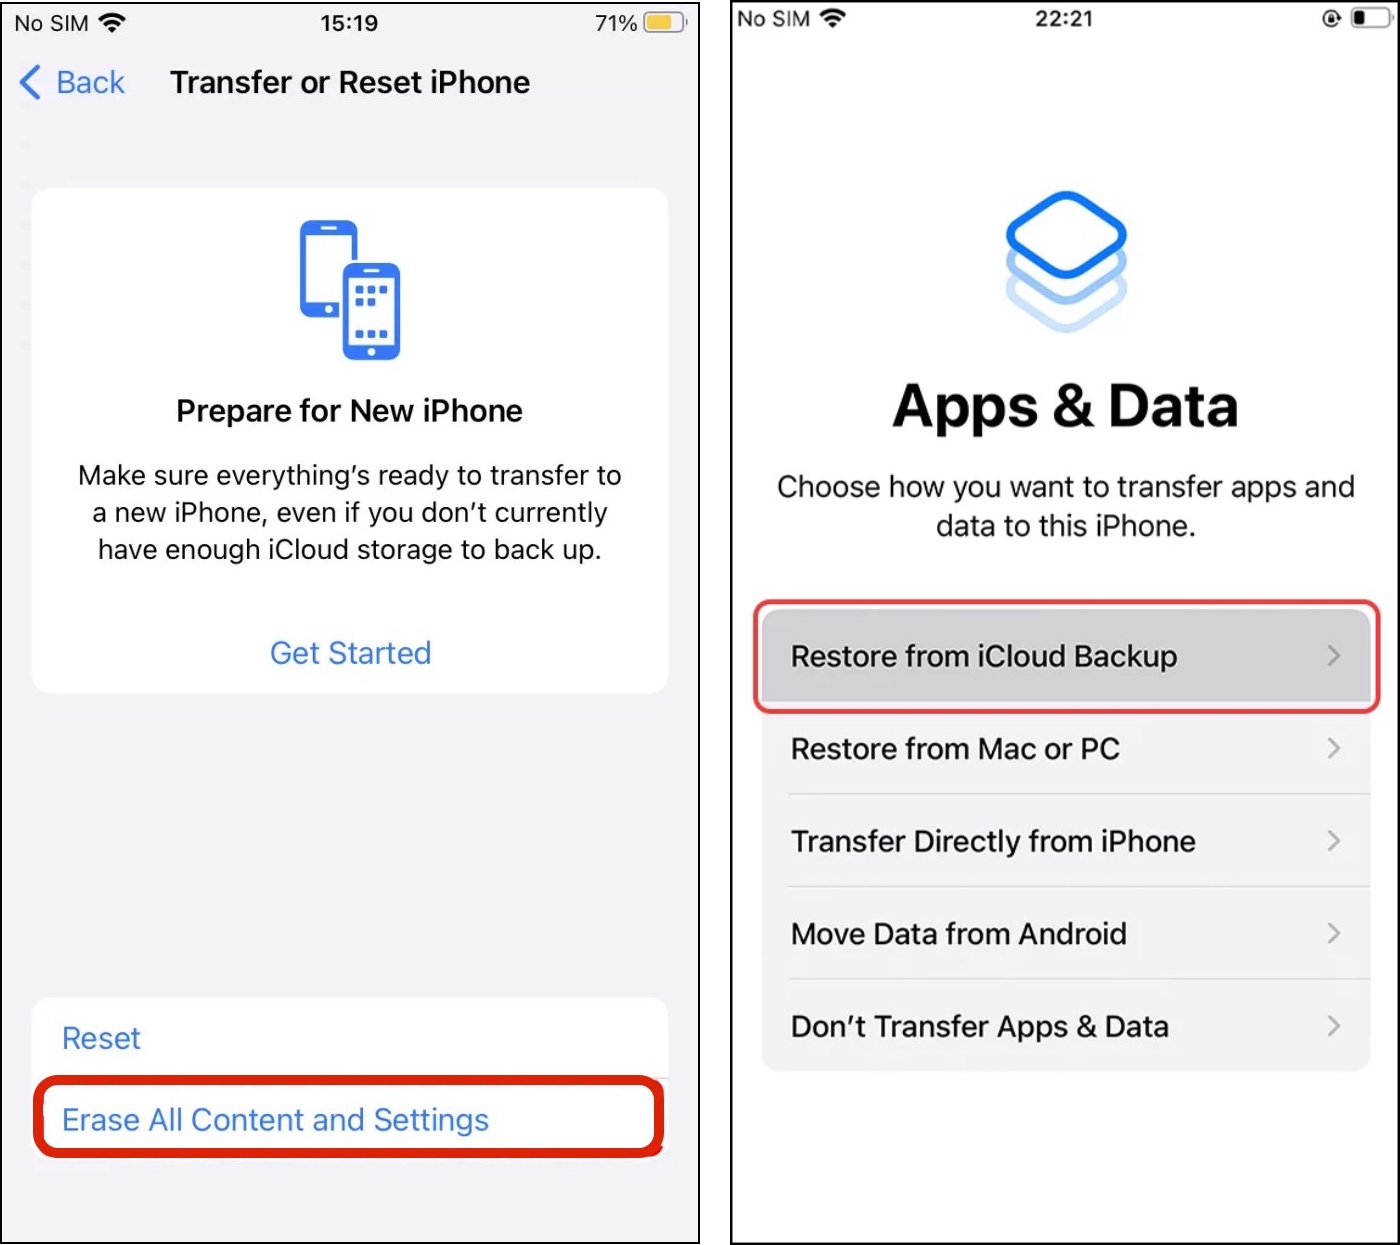
Step 3. Next, we need to perform a factory reset on our iPhone so that we can go through the setup process which allows us to recover photos from an iPhone backup. To initiate the reset, go to Settings > General > Reset > Erase All Content and Settings.
Step 4. When your iPhone restarts, go through the iPhone setup process and choose Restore from an iCloud backup and choose an older date from when you can last remember having the old photos on your iPhone. This will start the process of restoring photos from an iPhone backup.
Step 5. Wait for the restore to finish and then check your Photos app to see if the deleted photos have been recovered.
Method 4: Restore Images From Google Photos Backup
For those who backed up their data using Google Photos (for ex. users who are switching from Android to iPhone), you can download your photos directly from Google Photos. You can do this using both the web version and the app version; we’ll show you how to do it using both.
First, we’ll download a photo using a browser on a Mac. Then, we’ll download the same photo from the Google Photos app on iPhone. The only difference is that using the app on your device allows you to save photos directly to your device’s Camera Roll, which is perfect if you simply want to re-add them to your library.
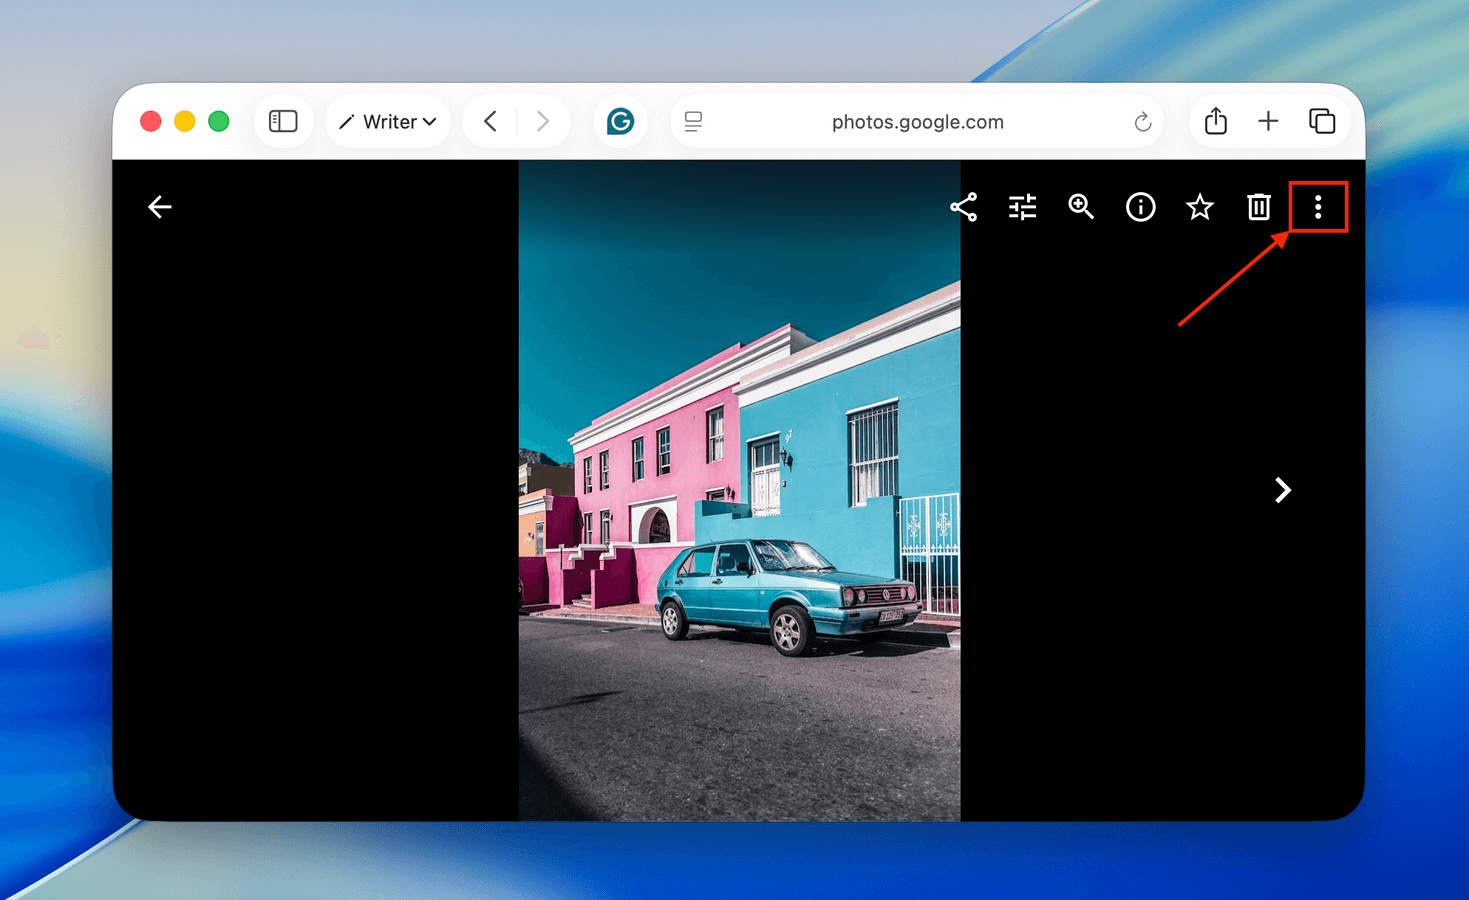
To download photos from Google Photos on a Mac:
Step 1. Log into photos.google.com and open the image you want to download. Then, click the kebab menu in the top right corner of the window.
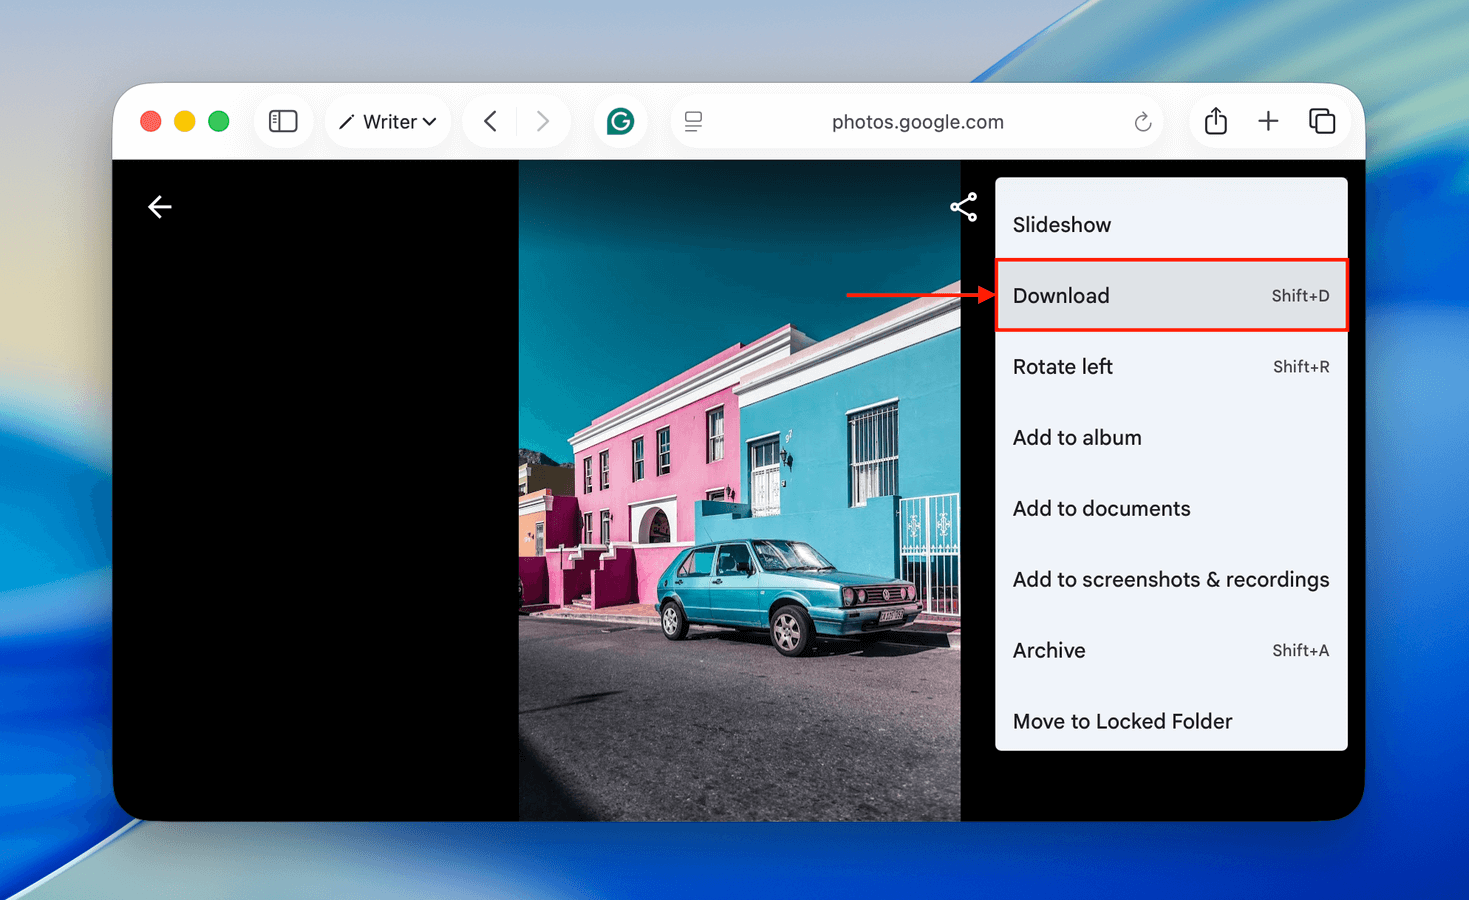
Step 2. In the pop-up menu, click Download.
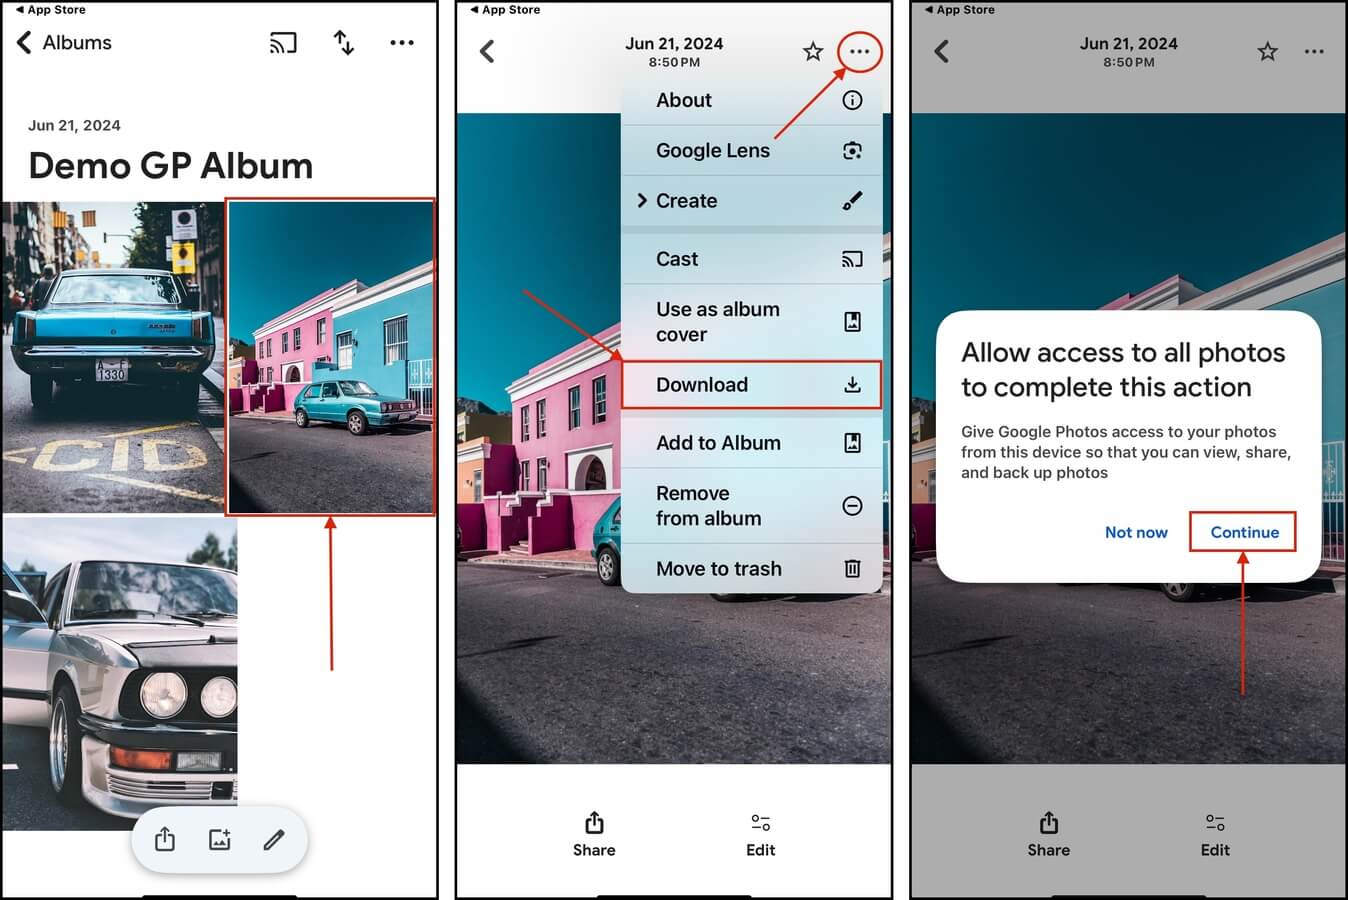
To download photos From Google Photos directly on your iPhone:
Step 1. Download Google Photos from the App Store. Then, open the photo you want to download.
Step 2. Tap the meatball menu in the top right corner of the screen and choose Download the pop-up menu.
Step 3. Finally, either iOS or Google Photos will prompt you to allow access to your iPhone library (if you haven’t already). Once you allow access, the photo will be saved to your library.
Conclusion
In summary, losing photos on your iPhone is a common problem… But there are just as many ways to restore them, even if you have never created a backup of your device. However, let this scenario be the push you need to create a habit of backing up your data – it makes data recovery so much easier!
FAQ
You can recover permanently deleted photos on iPhone 11 using data recovery software:
- Download and install a data recovery app like Disk Drill.
- Open Disk Drill and connect your iPhone to your Mac. When it appears, select your iPhone and click Search for lost data.
- Once it’s done scanning your iPhone, click Review found items to browse the scan results.
- Select the files you want to restore and click the Recover button.
- Choose a location on your Mac where you want Disk Drill to save the restored files.
There are multiple ways to retrieve pictures deleted from iPhone:
- The Recently Deleted album inside the Photos app.
- Third-party data recovery software.
- Local and cloud backups.
To restore iPhone photos from the gallery:
- Launch the Photos app.
- Go to Albums > Recently Deleted.
- Select the photos you want to recover and tap the Recover button to restore gallery photos.
We came up with 12 of our favorite apps to recover deleted photos on an iPhone. Here’s 5 of them:
- Disk Drill iPhone Data Recovery
- Dr.Fone iPhone Data Recovery
- Stellar Data Recovery for iPhone
- iMyfone D-Back
- iBeesoft iPhone Data Recovery for Mac
For a more in-depth look at each of these tools and what they have to offer, read the full article.


