
iPhone photos take up a lot of storage space on your device, especially when you use high-quality settings and special effects–just a few hundred photos can take up dozens of gigabytes on your device.
iCloud is supposed to help with that… But what if it isn’t? In this guide, we’ll show you different ways to help you troubleshoot why photos are taking up space on your iPhone, even with iCloud, as well as how to reclaim that storage space efficiently.
Table of Contents
Step 1: Troubleshoot iCloud
iOS uses dozens of system processes to initiate and run iCloud sync and storage optimization on your iPhone. It’s possible that a particular setting during initial setup, or a bug or system error during synchronization events, is preventing iCloud from freeing up storage space. We’ll cover the most likely and most impactful cases, as well as how to resolve them.
Wait for iCloud to Finish Synchronizing
Upon enabling iCloud sync on your iPhone, iOS immediately initiates a chain of processes that require time and resources to complete. This includes a cleanup process for any local data generated during the sync operation. If this chain gets interrupted, iCloud might not work as intended until iOS can complete it.
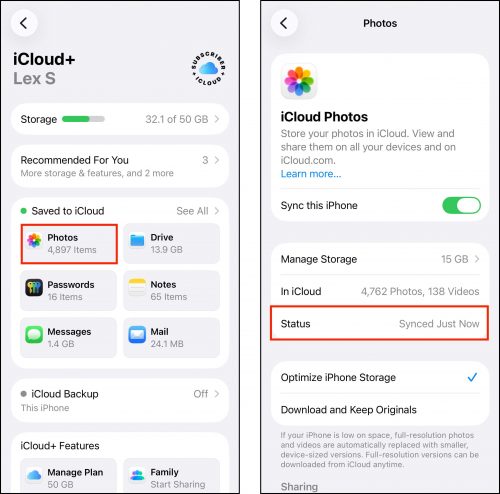
So, if you just activated iCloud sync for Photos on your device, we recommend that you stop using it for up to an hour or more—especially if you have too many photos on your iPhone. You can also check iCloud’s sync status in the Settings app: Settings > Apple Account > iCloud > Photos.
Change “Download and Keep Originals” to “Optimize iPhone Storage”
Does uploading photos to iCloud free up space? Yes, but it depends on your settings. When you first activate iCloud for Photos on your iPhone, you can choose from 2 options that inform how synchronization behaves: (1) Optimize iPhone Storage and (2) Download and Keep Originals. Here’s a brief explanation of both outcomes:
- Download and Keep Originals: When you activate iCloud with this setting, iOS will retain the full-resolution copies of your photos and videos on your device’s local storage. This means you don’t get the space-saving benefit that iCloud offers, but your library is still synced.
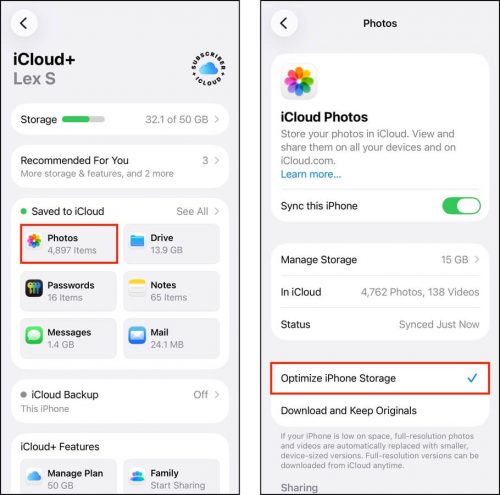
- Optimize iPhone Storage: This option uploads the full-resolution copies of your media to iCloud, and only retains lower-resolution copies (that are still high-quality) on your device’s local storage. This is the setting that allows you to upload photos to iCloud to free up storage, and it can potentially help you reclaim dozens of gigabytes if you have a big library.
You can access these options in the Settings app: Settings > Apple Account > iCloud > Photos. In the third section of the Photos page, tap Optimize iPhone Storage to select it.
Turn iCloud Photos Off and Back On Again
If you haven’t had any reason to turn off iCloud on your device for a long time (e.g., upgrading to a new iPhone), it’s possible that certain local data has simply become stuck due to bugs or interruptions during the many instances of synchronization.
A quick and easy way to ensure sync processes are “clean” is to turn off iCloud and turn it on again. This forces iOS to purge any leftovers from iCloud before starting a brand new “handshake” between your iPhone and Apple’s servers.
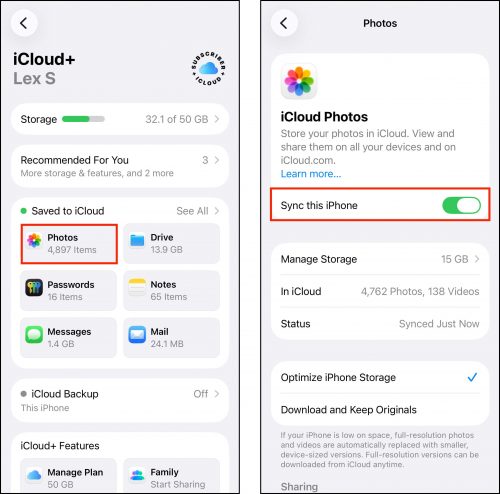
You can turn off iCloud for Photos in the Settings app: Settings > Apple Account > iCloud > Photos. Beside the Sync this iPhone option, slide the toggle switch to the OFF position (gray). Wait a few minutes, then slide it back to the ON position (green).
Step 2: Clean Up Hidden Media on Your iPhone
iCloud synchronization only directly applies to the photos in your library (in the Photo app). There are other types of media on your iPhone that iCloud can’t synchronize or optimize, and are taking up storage space on your device–they’re also pretty easy to miss. We’ll show you how to find them.
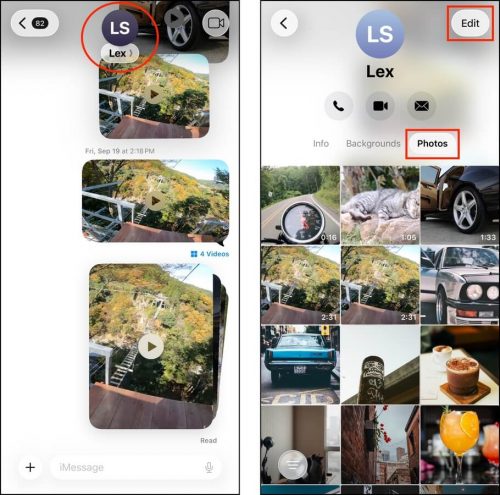
You can delete attachments directly in the Messages app, where you can view and selectively delete media from each contact or conversation. To view your attachments in the Messages app: Messages > Any conversation > Contact name > Photos. Then, tap the Edit button to start deleting media.
Leave Shared Albums
Are you a member of multiple shared albums? If so, the local data from those photos and videos is taking up storage space on your iPhone—even if the album isn’t yours. And shared albums with thousands of photos and videos can take up gigabytes of space. If you’re part of any shared albums with photos and videos you don’t want on your device, leave them.
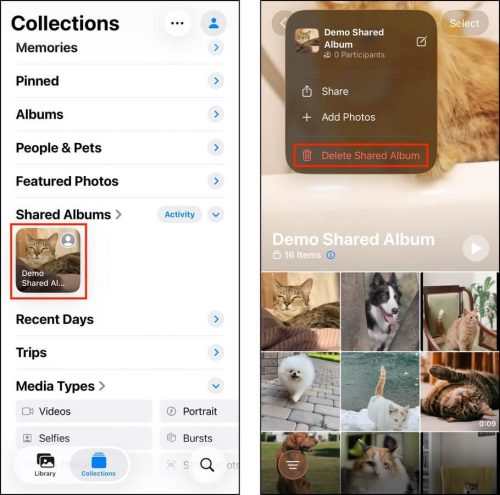
To leave shared albums on your iPhone, you can use the Photos app: Photos > Collections > Shared Albums. Then, tap an album you want to leave.
Then, tap the meatball menu in the top right corner of the screen (beside the Select button) and select Unsubscribe (if you created the album yourself, the option will appear as Delete Shared Album; be careful, as deleting an album you created removes its photos from the devices of other members).
Step 3: Add More iCloud Storage
If you’ve tried all the suggestions in this guide, then your library is simply too large for your current storage space. If you want to keep your photos and videos on your iPhone via iCloud, or add new ones, you’ll have to subscribe to iCloud+ (or upgrade your existing subscription).
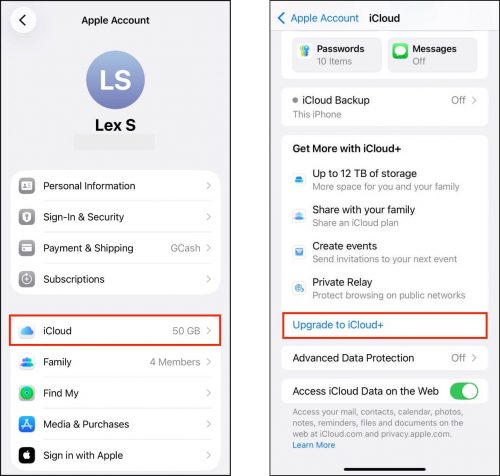
iCloud+ offers several storage plans; the more you pay, the more cloud storage you have access to. You can upgrade to iCloud+ through the Settings app: Settings > Apple Account > iCloud > Scroll to the bottom of the page. Then, tap Upgrade to iCloud+ and follow the instructions.
Need to Free Up More Storage Space?
Aside from cleaning up and optimizing your iPhone photos, there are a lot of different ways to reclaim storage space on your device. Our guides have helped users clear up dozens of gigabytes of space with simple and efficient methods that you can use anytime your iPhone gets full.
We recommend starting with our article on how to clean an iPhone with full storage space using both native and third-party tools. All methods in that guide are completely free, and they cover all the data types on your iPhone that you can safely clean up.


