
The Optimize iPhone Storage feature is a common recommendation for maximizing the storage space on your device. But what exactly does it do and how does it help you get more out of your limited iPhone storage?
In this guide, we’ll break down exactly what the Optimize iPhone Storage feature does and how to activate it on your device. We’ll also show you a list of highly effective alternative methods to optimize your storage using free and (mostly) native tools.
Table of Contents
Quickstart Guide to the Optimize iPhone Storage Setting
When you enable iCloud for Photos, you have the option to either Optimize iPhone Storage or to Download and Keep Originals. These settings tell iCloud how to manage your data between your device’s local storage and the online server.
Here are the differences in functionality you can expect between Optimize iPhone Storage vs. Download and Keep Originals when you use it to optimize photos on your iPhone:
- Optimize iPhone Storage: The high-resolution versions of your photos and videos are saved to iCloud, while lower-resolution (but still not bad) copies are saved to your device’s local storage. This is a great way to reduce photo storage on your iPhone. Besides, iCloud automatically downloads a photo or video’s high-resolution copy whenever you view it in the Photos app.
- Download and Keep originals: The original, high-resolution copies of your photos and videos are saved locally to your device, as well as the iCloud server. This setting gives you the benefit of iCloud synchronization, but it doesn’t free up any space. This might be a better option if you don’t always have a reliable internet connection.
So, is there a downside to optimizing photos on your iPhone? Yes–you will require an internet connection to view high-resolution copies of your media. The low-resolution copies are still pretty good, but we can see this being an issue for users with unreliable networks.
Does optimizing photos on an iPhone reduce quality? Only when creating local copies; the originals saved to iCloud remain untouched.
Here’s a short guide on how to enable Optimize iPhone Storage for Photos on your own device:
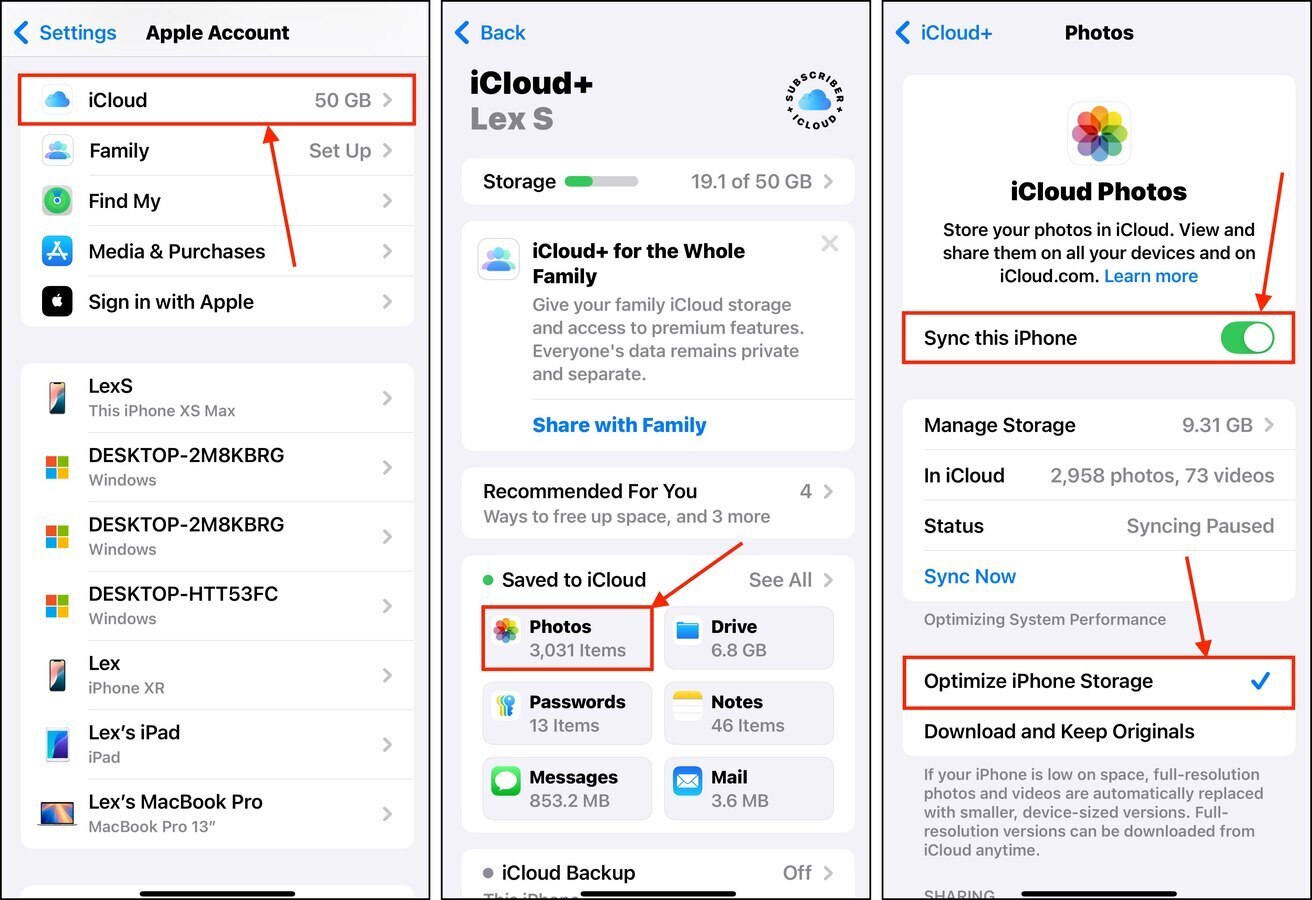
Step 1. Open the Settings app on your iPhone and tap your Apple ID at the very top of the menu.
Step 2. In the Apple Account menu, select iCloud.
Step 3. Tap Photos in the Saved in iCloud section.
Step 4. Beside Sync this iPhone, slide the toggle switch to the ON position. Then, tap Optimize iPhone Storage to enable the setting (if you want to know how to disable “optimize storage” on your iPhone, tap Download Keep Originals instead).
9 Alternative Ways to Optimize Your iPhone’s Storage Space
In this section, we cover 9 other ways to optimize your iPhone’s storage space. These solutions aim to remove redundant data or modify your device’s settings so you can get much more out of your limited storage.
1. Clear Your Device’s System Cache
iOS uses a system cache, which is a special folder for temporary data, to hold presently or recently used assets for easy and immediate access. For example, it temporarily saves your session with one app as you switch to another (which is why you can return to the same menu when you switch back).
Usually, iOS is good at managing its system cache data and performs cleanup at appropriate times. However, there are cases when that process is delayed or encounters issues. These cache files can take up gigabytes of data while being useless for the user.
Fortunately, you can manually trigger the cleanup process by initially filling up your storage with a large, ultra high quality video (that you can delete after). Once iOS notices that it needs more space for the video, it will start clearing up its system cache automatically—which can actually help prevent future build-ups.
Step 1. Use the steps in Method 8 to adjust your video settings to the highest quality.
Step 2. Open the Camera app and swipe the screen to access VIDEO capture.
Step 3. Start the video capture and go get some coffee.
While your iPhone captures the video, iOS will automatically free up resources to make space for it (you’ll see the words Freeing Resources at the top of your screen). After some time, iOS may prompt you to continue freeing up resources. We recommend that you allow it.
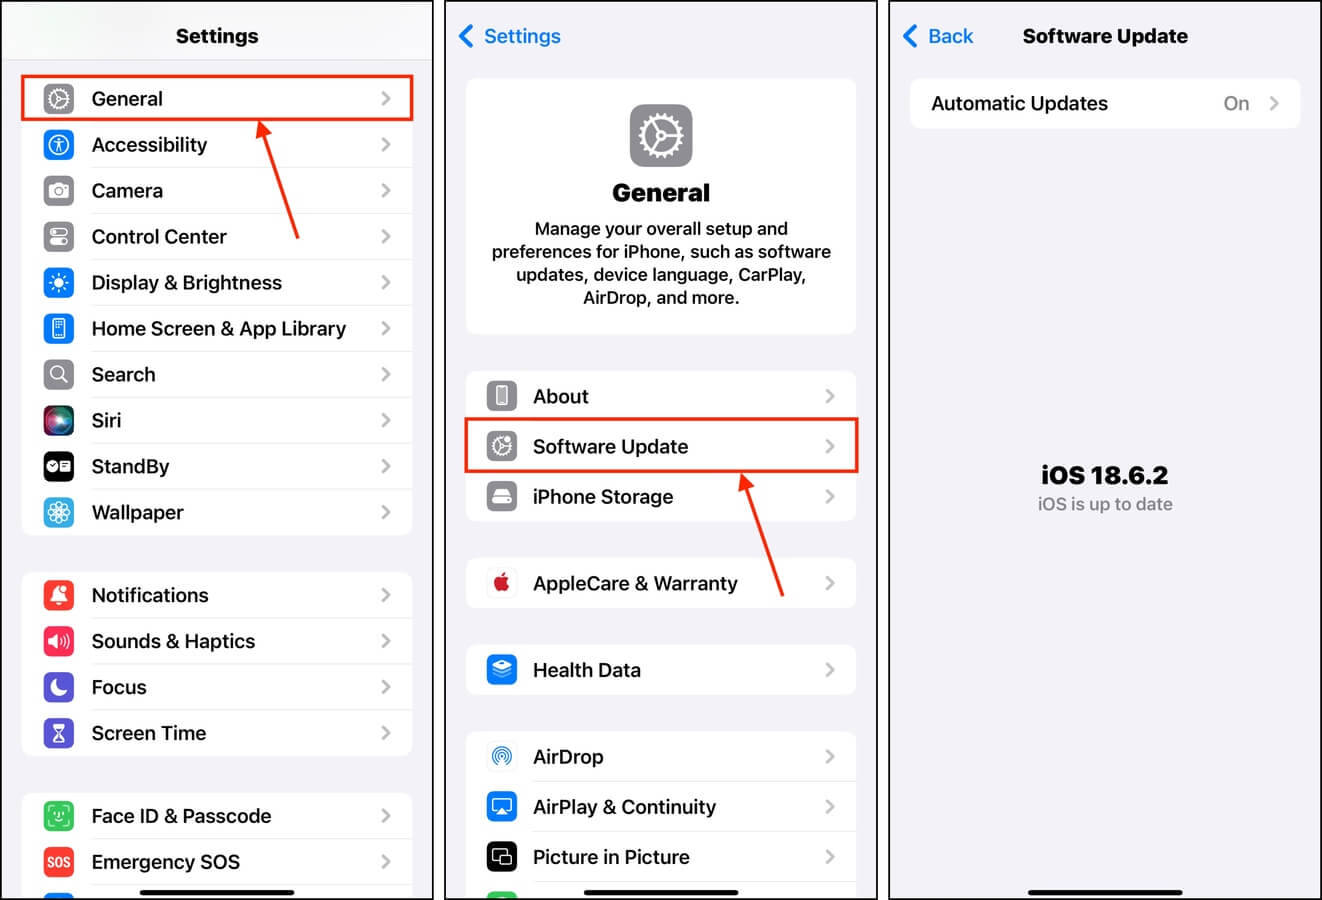
2. Update iOS
iOS updates come with various bug fixes, new features, and better security. All of these contribute to a much healthier device that can more efficiently manage its storage space. Here’s a quick guide to updating iOS:
Step 1. Open the Settings app and tap General.
Step 2. Select Software Update.
Step 3. iOS will automatically search for any available updates for your device. If it finds any, tap Update Now.
3. Purge Your Browser Caches
Similar to the system cache we mentioned in Method 1, browsers use their own caches to store internet assets temporarily. For example, Safari might save on-page images from a website you visit often to avoid having to load them every time.
Each browser handles cache management their own way, but most of them allow you to manually clear cache data. Here’s a simple guide for clearing Safari’s cache:
Step 1. Open the Settings app. Scroll down to the end and tap Apps.
Step 2. In the Apps menu, tap select Safari. You can use the search bar to find the app faster.
Step 3. Find the HISTORY AND WEBSITE DATA section and tap Clear History and Website Data.
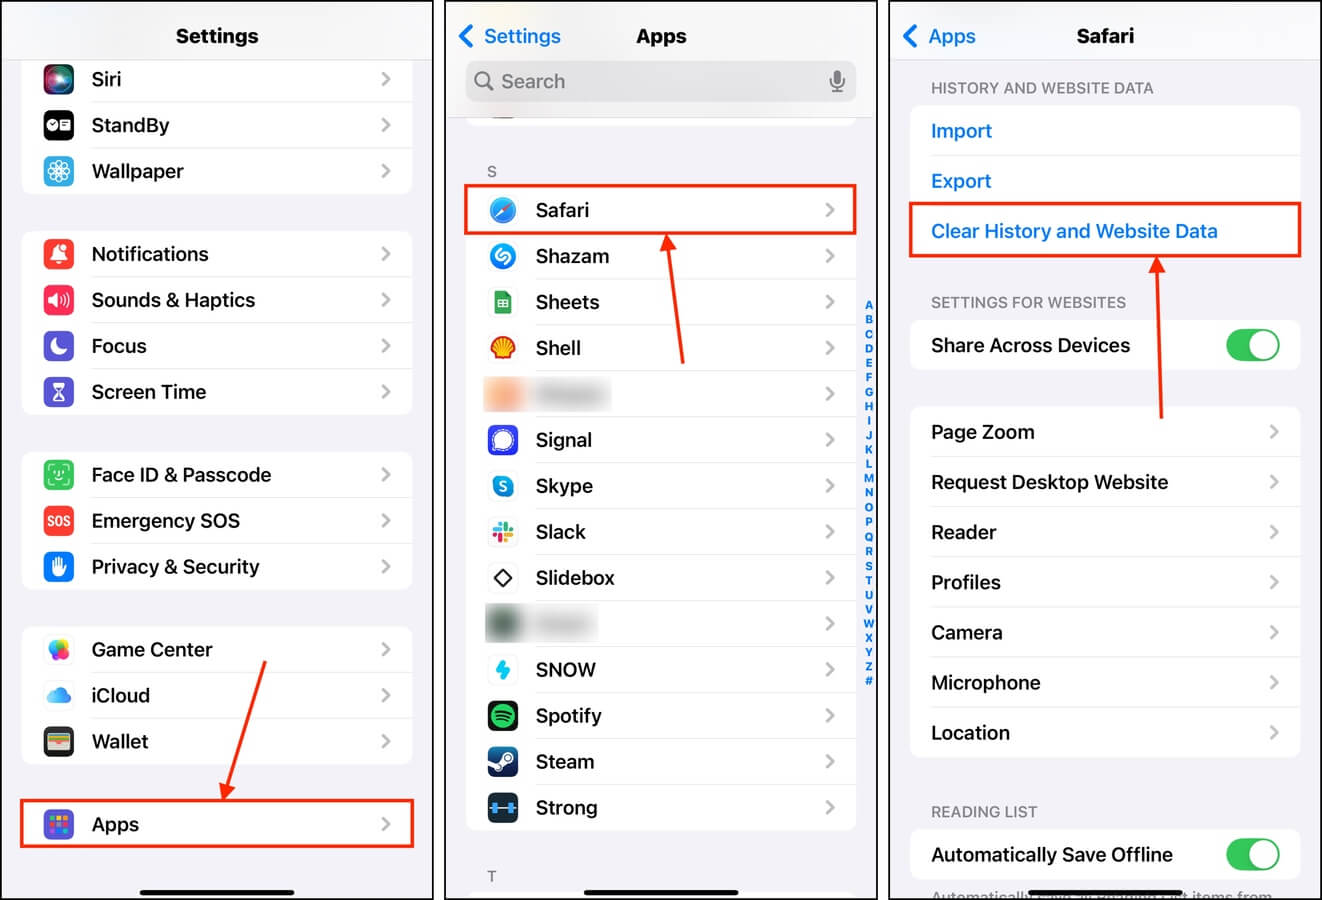
You’ll also be able to choose the timeframe and profiles you want to clear. We recommend clearing them all so you can start using the cache for assets you actually need at the present.
4. Eliminate Unwanted Media Files
A great way to optimize your iPhone’s storage is to get rid of junk media items, which take up a lot of space that your device can otherwise use for system processes.
While you can get rid of them manually, there are several lightweight third-party apps that can help you do it way more efficiently—especially if you have a lot of photos and videos piled up over time.
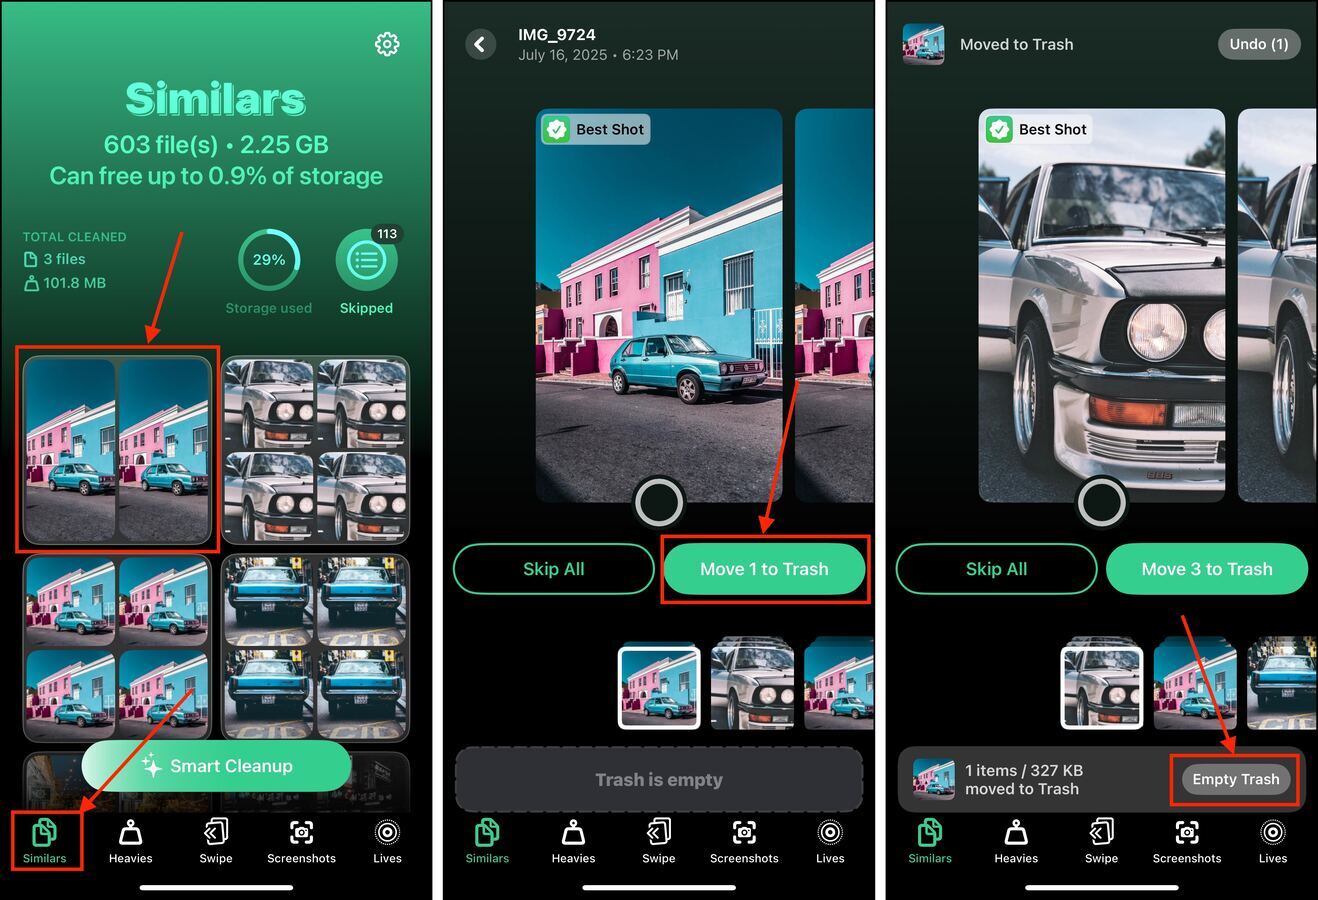
We’ll be using an app called Clever Cleaner: AI CleanUp App for this guide because it’s completely free to download and use. It also helps efficiently clean up commonly found clutter from your camera roll, like similar or duplicate photos, large video files, and more.
Step 1. Download Clever Cleaner: AI CleanUp App from the App Store. Then, open the app and select Allow Full Access when prompted.
Step 2. Select the media you want to clean up—for the purpose of this guide, we’ll select Similars. Once you’re in the appropriate section, tap the media items you want to review.
Step 3. Clever Cleaner will automatically identify the best copy and select the rest for deletion (but you can also choose what items to delete yourself). Once you’re happy with the selection, tap Move to Trash.
Step 4. To permanently erase your selection, tap the Empty Trash button that appears at the bottom of your screen. If you want to review your Trash items before permanently deleting them, tap the pop-up itself instead.
5. Utilize Storage Recommendations
If you have too much of a certain type of data (e.g., Downloaded Media, Attachments, Videos, etc.), iOS takes note of it and adds it as a “recommendation” in the iPhone Storage menu.
Recommendations are notifications that allow you to review that data and eliminate any files you no longer need. We’ll show you how it works, but note that not all users may encounter this tool (it depends on your storage make-up).
Step 1. Open the Settings app and tap General.
Step 2. In the General menu, select iPhone Storage.
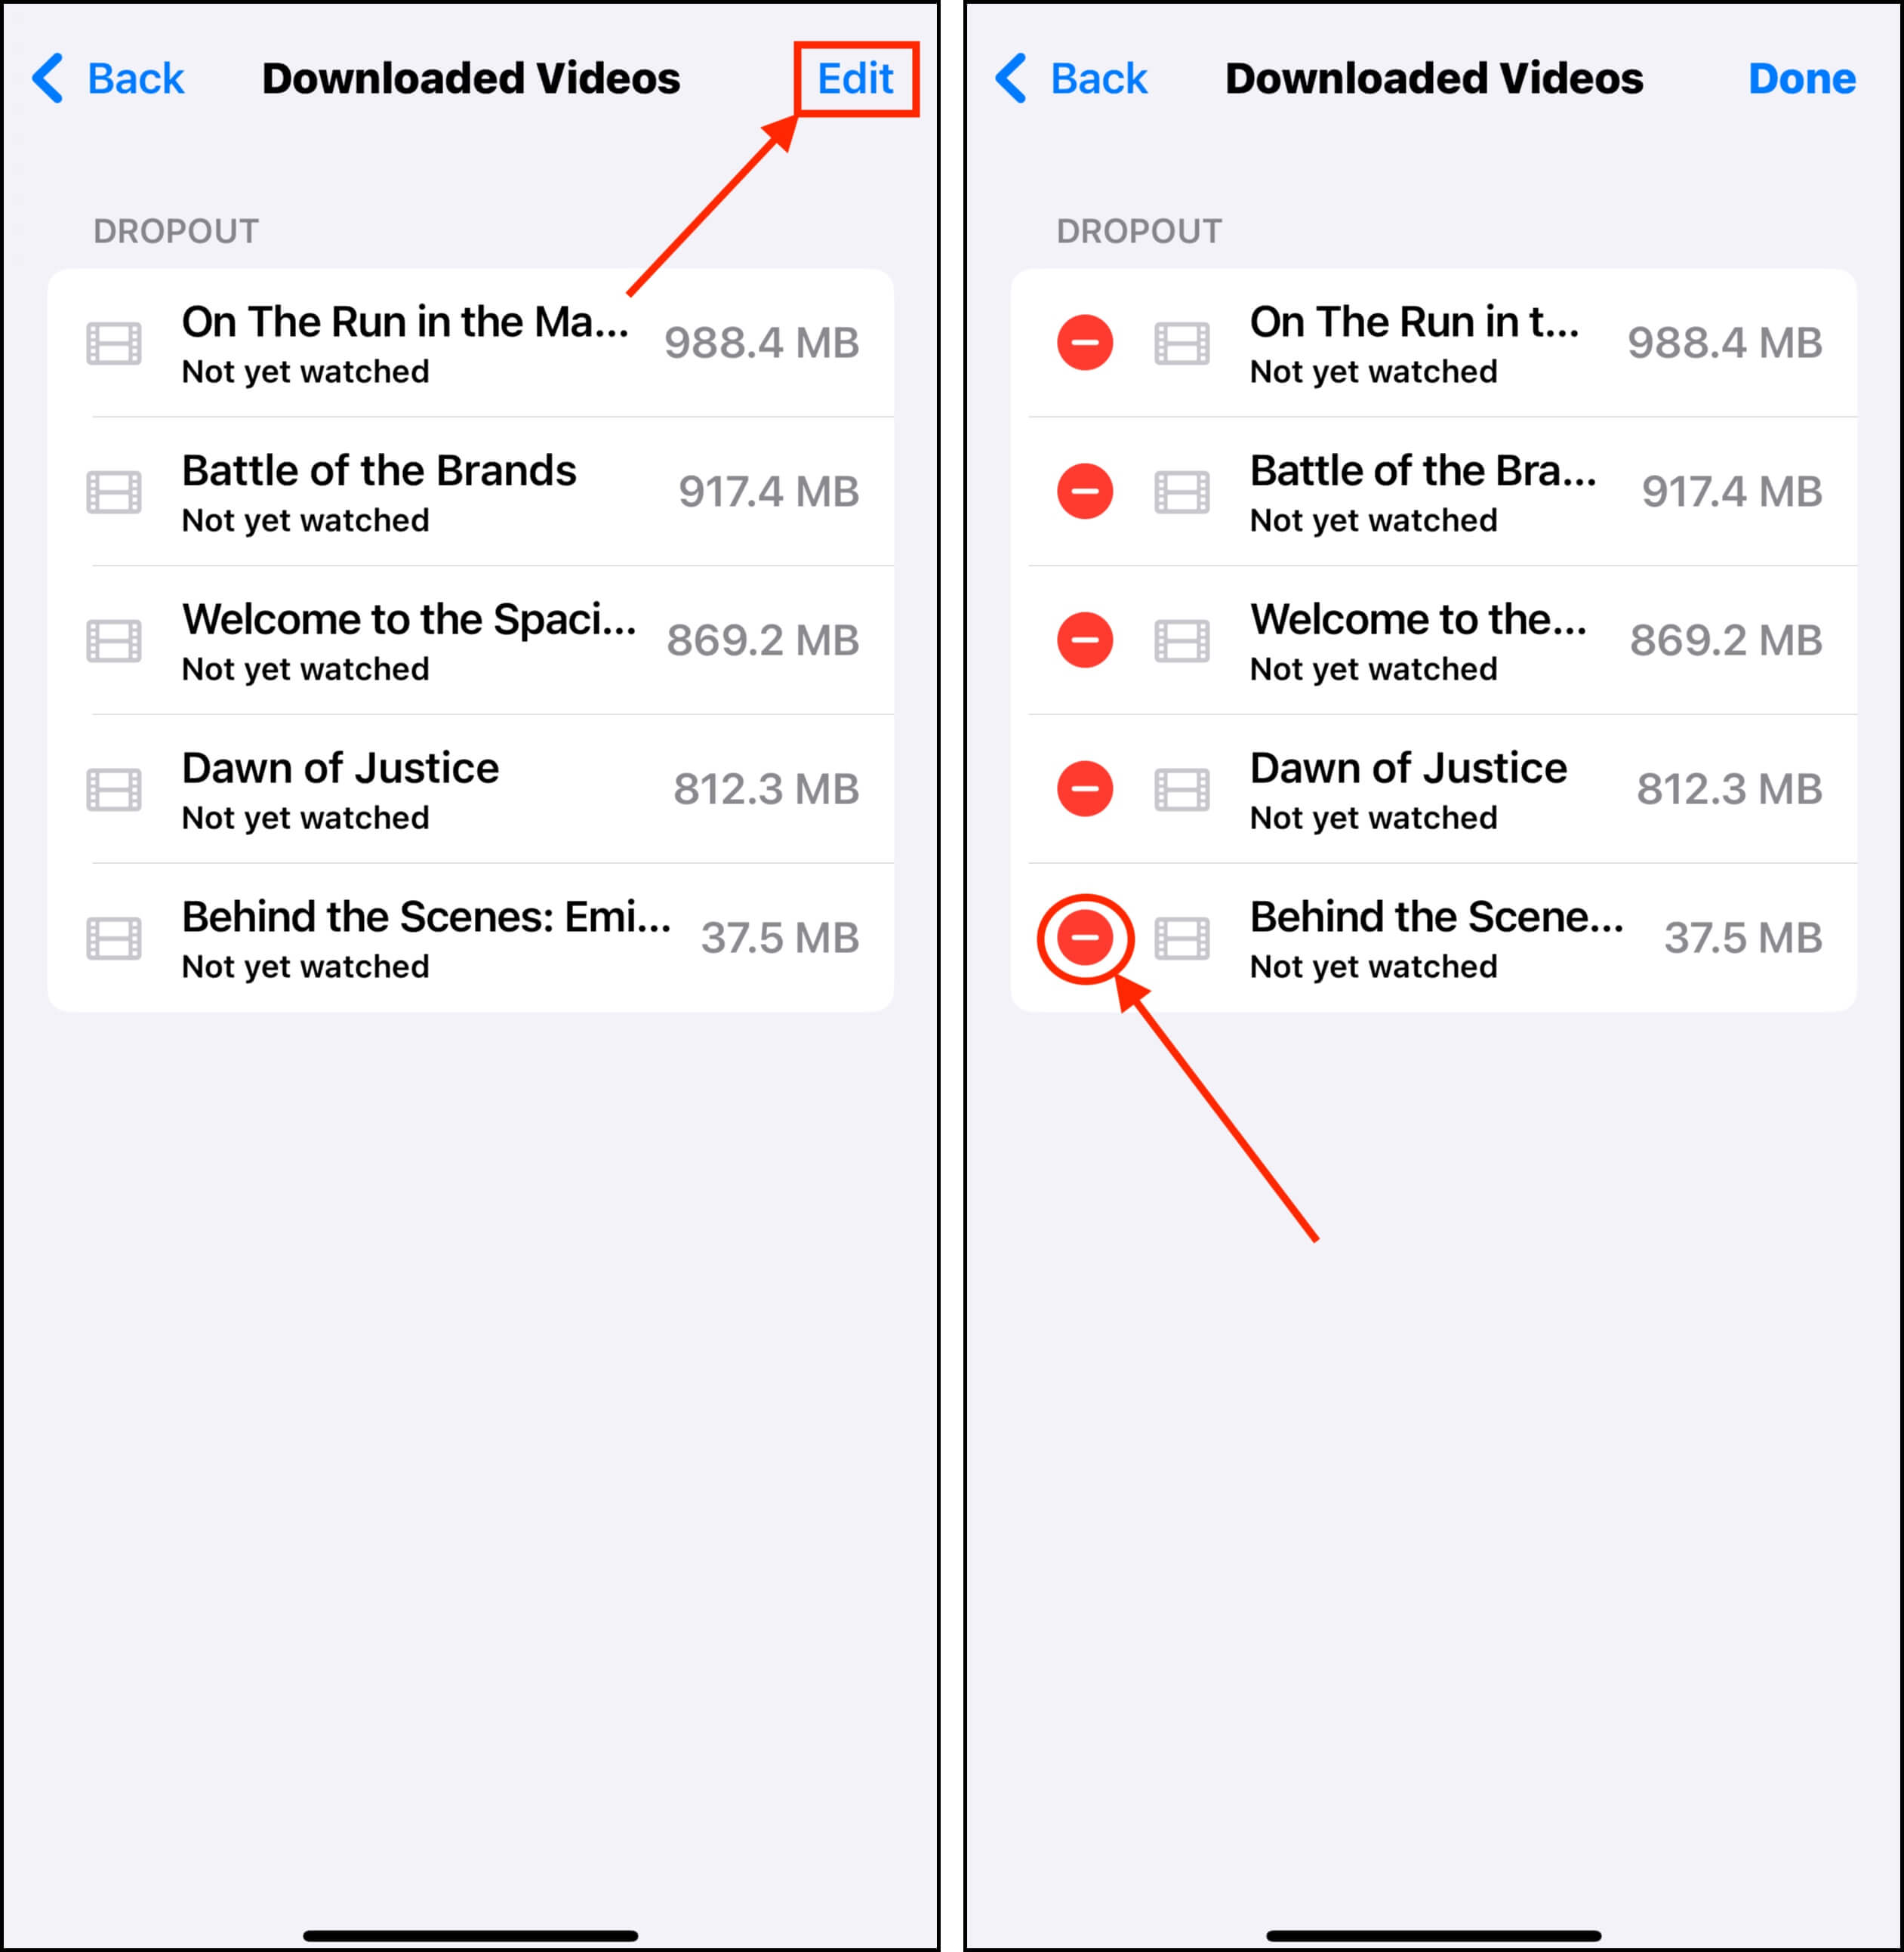
Step 3. Tap any card in the RECOMMENDATIONS section.

Step 4. In the top right corner of the menu, tap Edit.
Step 5. Tap the red (-) button beside the storage items you want to delete. Finally, tap the Delete button that appears to confirm the action.
6. Delete Incomplete Update Files
Whenever you update your version of iOS, the installation files are first downloaded from Apple’s servers. Once the new version of iOS is installed, the installation files are automatically purged from the device.
In case of a failed installation (e.g., the update files are corrupted or incomplete), it’s possible that iOS fails to initiate the purging operation automatically. As a result, gigabytes worth of leftover update files sit uselessly in your device’s storage disk. Here’s how to get rid of them:
Step 1. Open the Settings app and tap General.
Step 2. Select iPhone Storage.
Step 3. Scroll down to your app list and locate the iOS update file. Tap it.
Step 4. Tap Delete Update.
After deleting the update file, you can attempt to update iOS again. If everything goes right, you shouldn’t end up with the same problem.
7. Clear App Caches
Applications are another type of iPhone component that uses cache management for the sake of efficiency. For example, Telegram, (the messaging app) uses its cache feature to store downloaded attachments so you can view them again as you review your messages.
Some apps allow you to manually clear their cache data using an in-app menu. We’ll use Telegram again as an example for this guide:
Step 1. Open the Telegram app and tap the Settings button in the bottom menu. Then, select Data and Storage.
Step 2. Choose Storage Usage.
Step 3. In the Storage Usage menu, tap Clear Entire Cache.
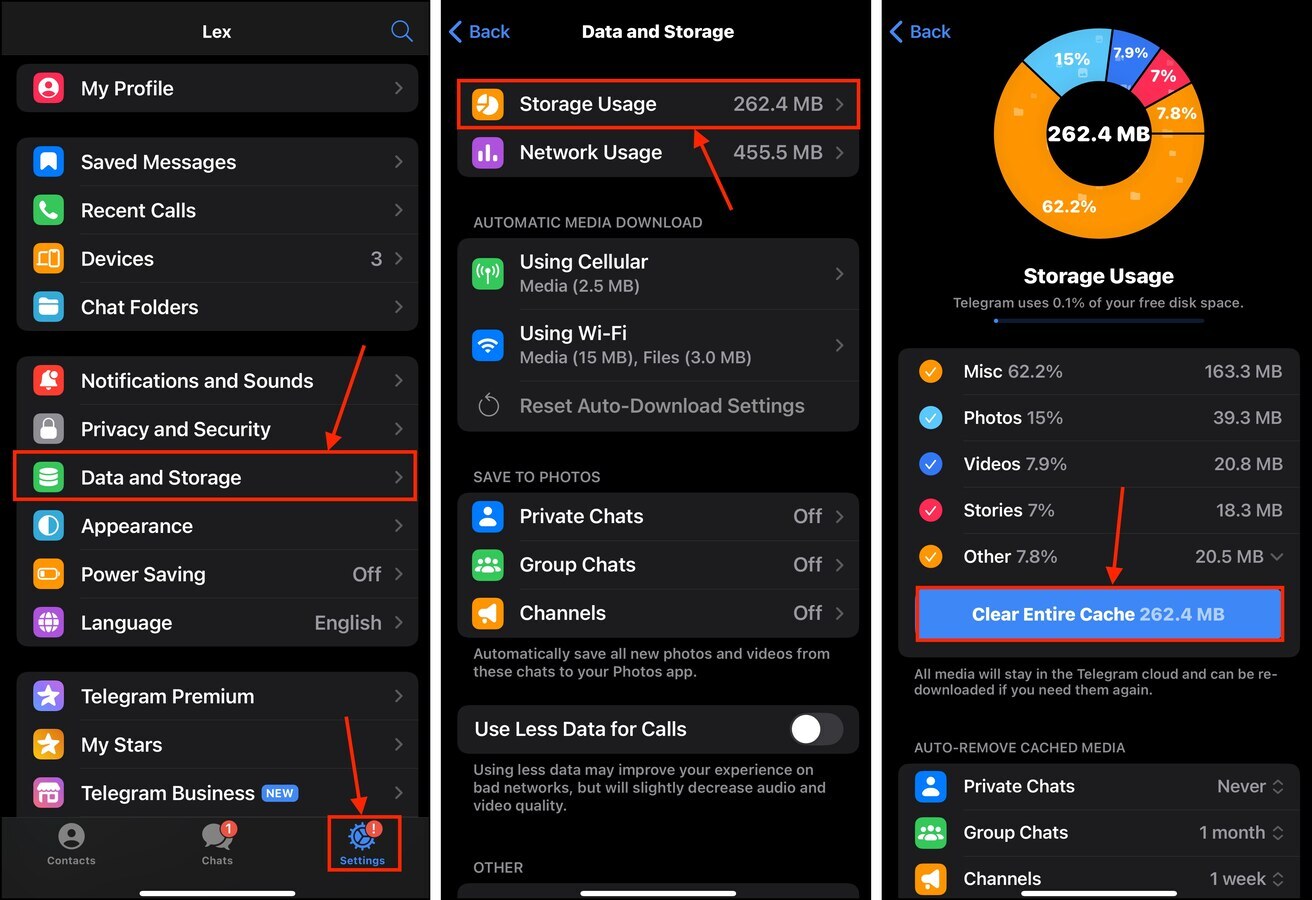
You can also view and delete specific cache files by scrolling to the bottom of the Storage Usage menu.
8. Adjust Your iPhone’s Camera Settings
If ultra high quality photos and videos are not a priority for you, lowering their quality settings can massively help with optimizing your storage consumption.
Fortunately, iOS provides several quality settings you can choose from. Here’s how to find and modify them:
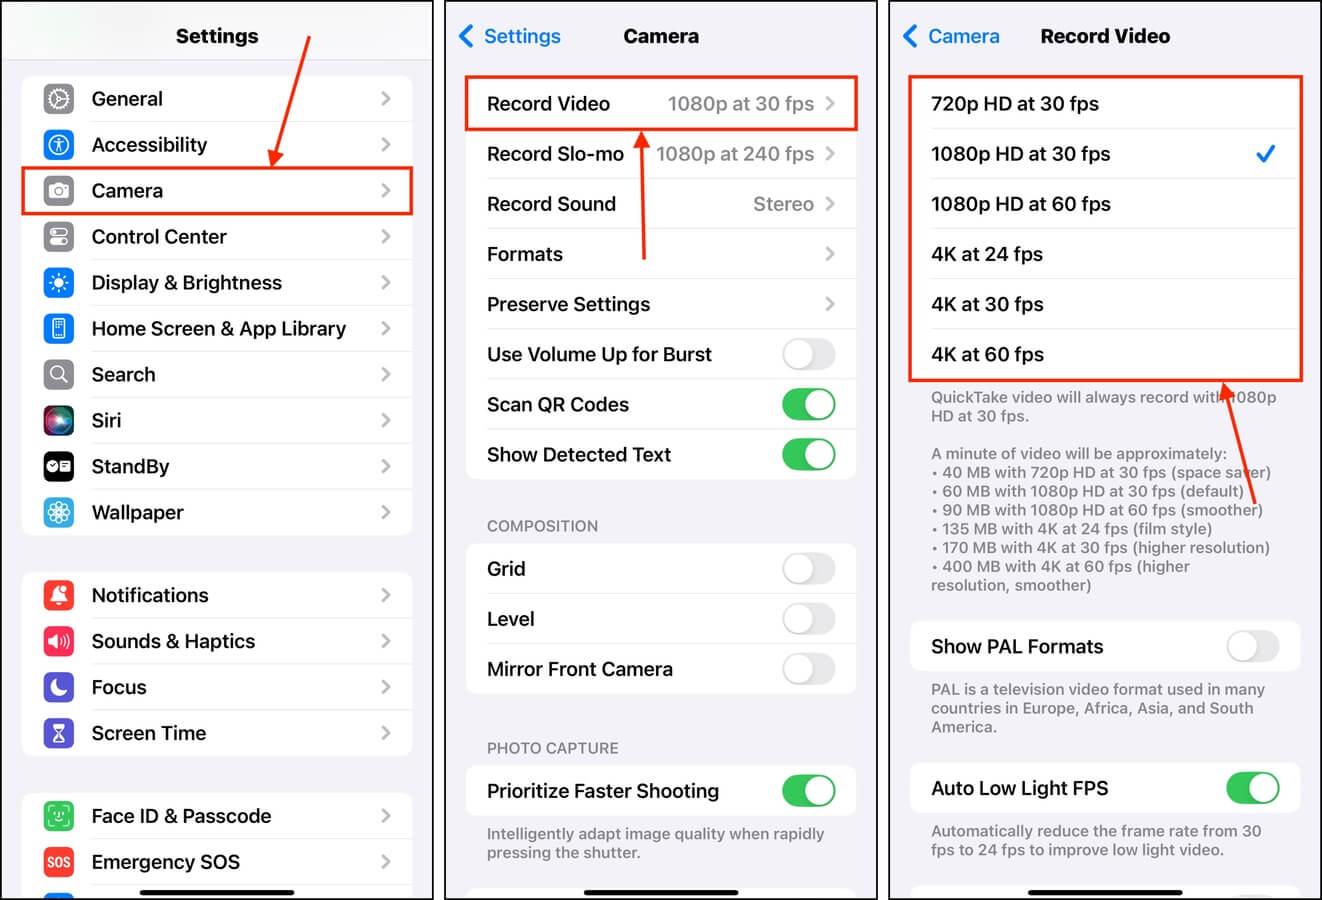
Step 1. Open the Settings app, then find and tap Camera.
Step 2. In the Camera menu, select Record Video.
Step 3. Choose the quality settings you desire—iOS even explains how much space a 1-minute video takes up depending on the quality setting. Once you’ve made your selection, go back to the main Camera menu.
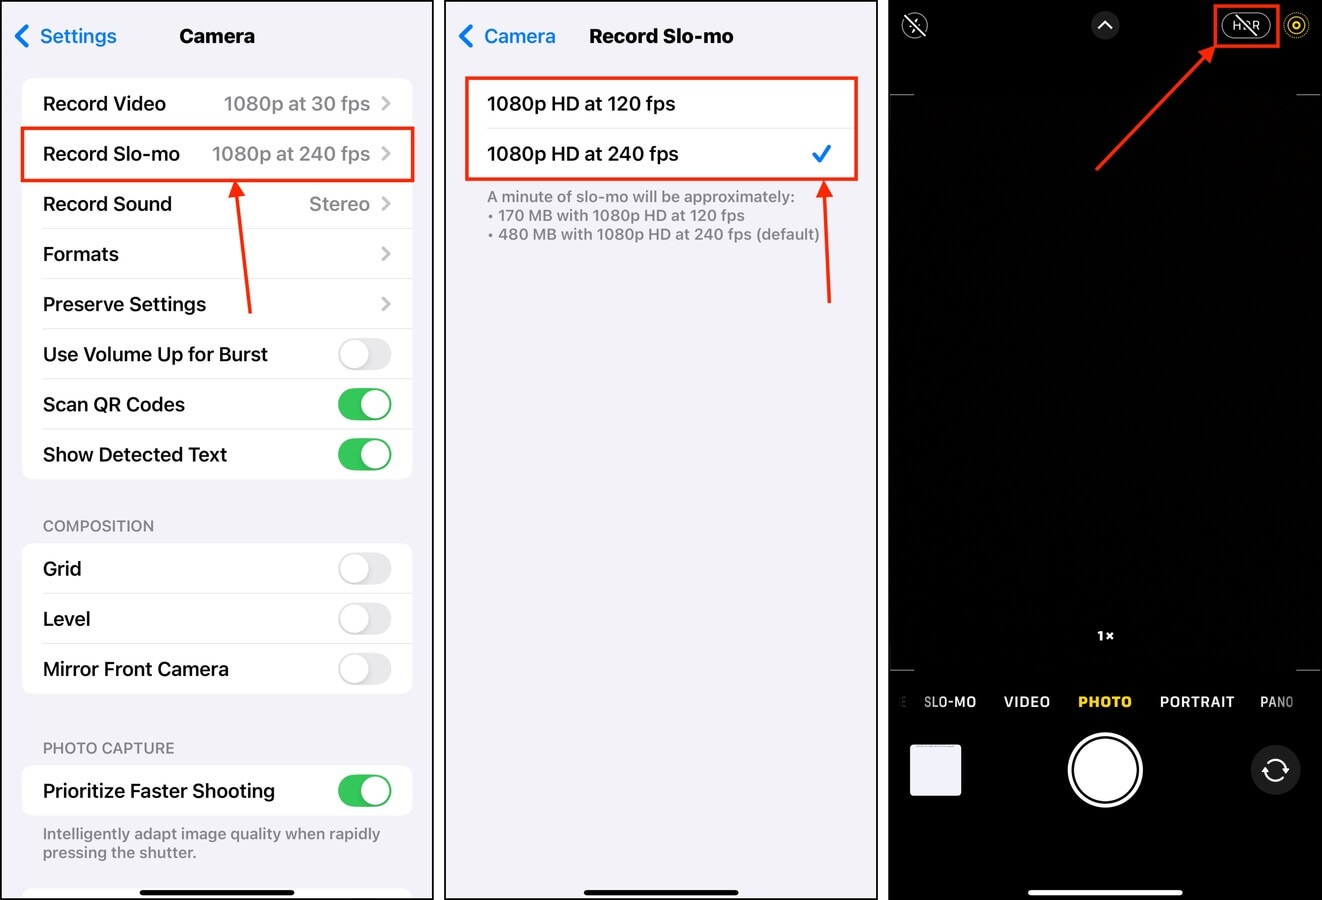
Step 4. This time, tap Record Slo-mo.
Step 5. Choose the quality setting you desire.
Step 6. Finally, to manage photo quality, open the Camera app and make sure HDR is disabled.
9. Perform a Factory Reset on Your Device
If you haven’t performed a factory reset after multiple updates and years of usage, you might have a lot of junk files in your iPhone’s storage disk. Many of them are completely obsolete and are simply taking up storage space on your device.
You can’t get rid of all that “data debris” by clearing caches or deleting user-accessible files. The only way is to perform a factory reset—this reinstalls iOS on a completely fresh disk.
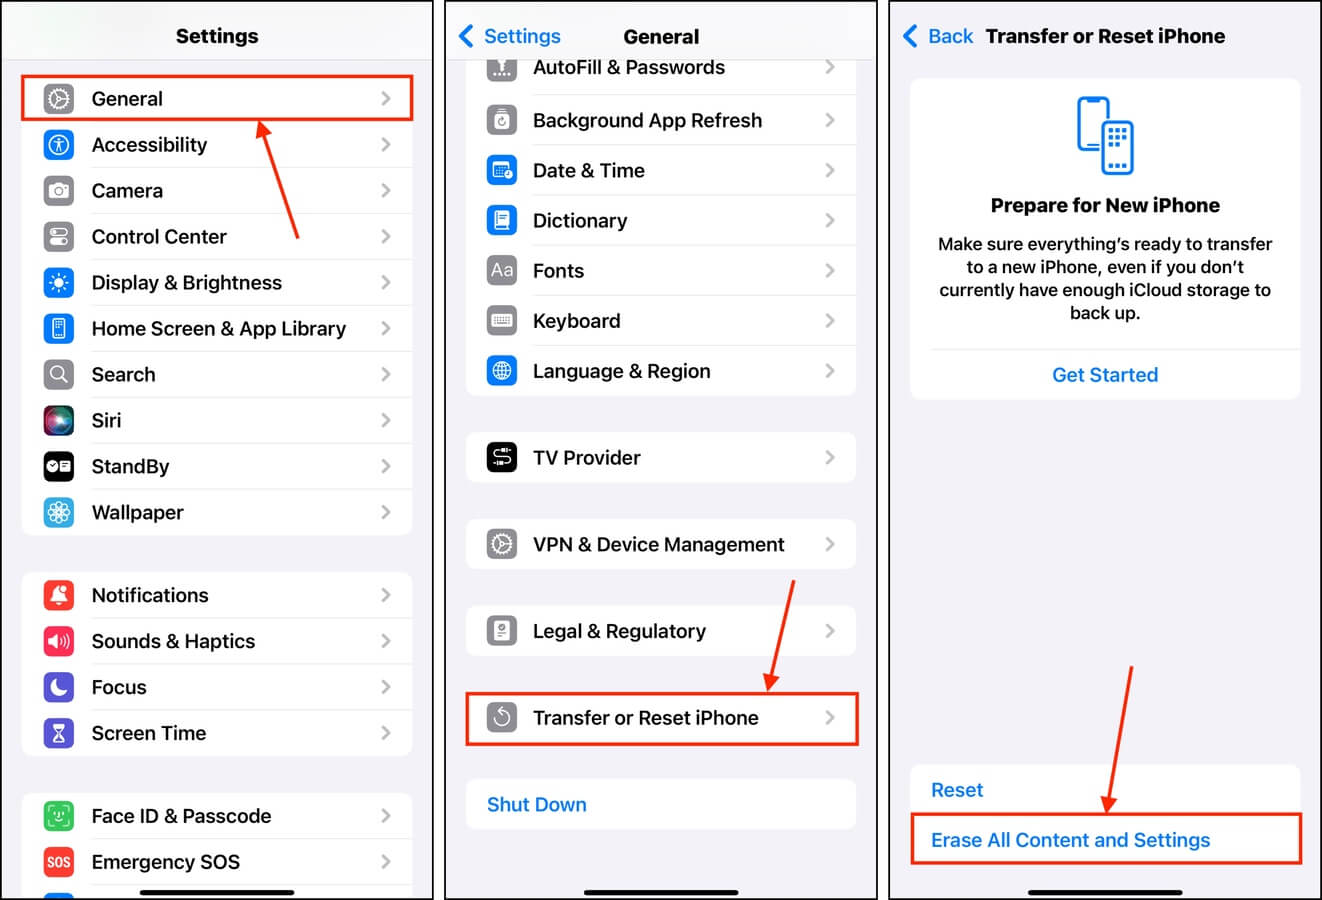
Step 1. Open the Settings app and tap General.
Step 2. Scroll down to the very bottom of the menu and select Transfer or Reset iPhone.
Step 3. Tap Erase All Content and Settings.
Follow the reset wizard until you arrive at the welcome menu.
Before You Go: 3 Tips to Prevent iPhone Storage Bloat
Due to leftover data, new updates, and app installations, it’s easy for your iPhone to be filled up with junk over time. This gives iOS less storage space to work with for its own management processes. However, there are simple habits you can adopt.
First, stick to reputable App Store applications. Third-party apps utilize their own storage management strategies and not all of them are optimized well. Second, regularly clear caches from lesser-used browser apps–they probably store assets from sites you hardly visit. Finally, keep iOS updated on your device. This is a preventative measure that ensures you have the latest functionality updates for your device.


