
Is iOS telling you that you have “insufficient space” whenever you try to update your iPhone? Unfortunately, this error won’t go away on its own–the iOS update won’t install until you’ve resolved it.
Fortunately, there are several ways to fix this error, depending on which of the known reasons caused it (in your case). To help you, we wrote a simple guide to help you figure out why you’re seeing this error and how to fix it using 6 reliable methods.
Table of Contents
Why Do I See “Insufficient Space” During iOS Updates?
There are 2 main reasons why “insufficient space” appears when you attempt to update your iPhone, which the methods in this guide are trying to resolve:
- Not enough disk space on iPhone. Whenever you attempt to update iOS, the update files first have to be downloaded and saved to your iPhone before they can be installed. Both the download and the installation processes need storage space—if there is insufficient space to download the update, you’ll get the error.
- Failed update attempts. If your iPhone says “not enough storage for update” but there is, your device might still have incomplete download files from previous failed attempts in its local storage. Not only do these take up space, but they can also cause this error due to corruption (see Method X).
6 Ways to Fix the “Insufficient Space” iOS Update Error
In this section, we’ll teach you 6 effective ways to resolve having insufficient space to download updates on your iPhone. The methods we chose focus on freeing up just enough space for an iOS update (by deleting useless data) or working around the limitation using a Mac.
Method 1: Update Your iPhone Using a Mac or PC
If you have a Mac, the best way to update an iPhone without storage is to use your Finder (Mac) or iTunes (Windows) to install the iOS update. This allows you to bypass the update’s initial storage requirements because the update files will be downloaded to your computer, instead of directly to your iPhone. As long as your iPhone has enough space for the installation itself, the update should succeed.
Step 1. Connect your iPhone to your Mac using the appropriate cable.
Step 2. Open Finder and click your iPhone in the left sidebar.
Step 3. In the General tab under the Software section, click Check for Update.
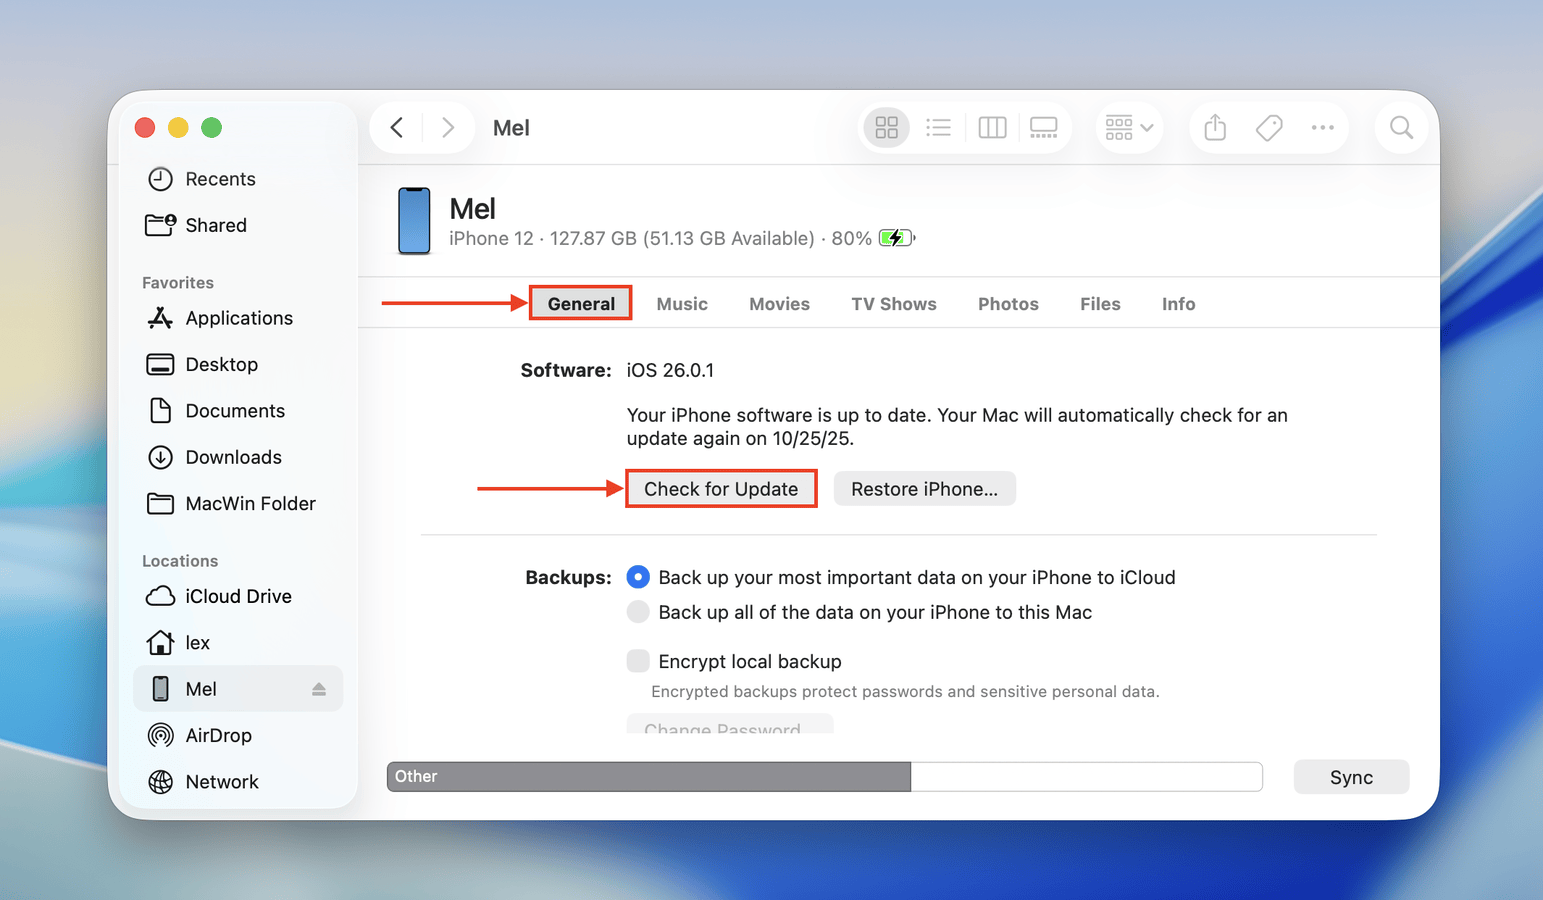
If an update is indeed available, you should be prompted to Download and Update your device. Simply follow the onscreen instructions.
Method 2: Eliminate Library Clutter
If you have a lot of photos and videos, you probably have a lot of useless library clutter as well. Consider using iPhone cleaner apps, which can help you eliminate clutter in bulk. Since they can take up gigabytes of space over time, getting rid of all the junk in your library in one go is a great way to make space for an update.
There are several apps you can choose from, but we recommend an app called Clever Cleaner: AI Cleanup App specifically for this guide. It’s completely free with no limitations, and it has several library cleanup tools you can choose from.
We’ll demonstrate how to use Clever Cleaner specifically to clean up similar photos and compress videos (which shrinks their file size), which typically would have the biggest impact on your storage space without having to delete anything.
Step 1. Open the App Store and download Clever Cleaner: AI Cleanup App. Launch Clever Cleaner and grant it Full Access to your library (don’t worry—it’s safe!).
Step 2. On the bottom menu, tap Similars. At this point, you can tap Smart Cleanup to delete all similar photos in your library (leaving one copy on your device). You can also review individual groups of similar photos for more control.
Step 3. Next, tap Heavies on the bottom menu. Choose whether you want to remove or compress videos (we’ll be choosing compression for this demo), and note that you can sort your videos by size or date. Then, tap a video you want to shrink.
Step 4. Finally, choose the level of compression you want and tap the Compress button. Once the process is complete, Clever Cleaner will ask whether you want to keep the original (uncompressed) video in your library or delete it. Delete it to make space for your iOS update.

Make sure to delete these photos and videos again, this time from the Recently Deleted folder in the Photos app. This ensures that you’ll actually free up storage space.
Method 3: Enable iCloud Synchronization for Photos
Another great way to quickly free up a lot of space in a large library is to enable iCloud synchronization for your Photos app.
This feature automatically uploads high-resolution copies of your photos and videos to Apple’s servers, while keeping lower-resolution versions in your local storage. These versions take up much less space on your iPhone, without suffering from a noticeable drop in quality.
iCloud temporarily downloads high-resolution copies of photos and videos when you’re actively viewing them. So just keep the Photos app closed when you initiate your update (and while it’s in process).
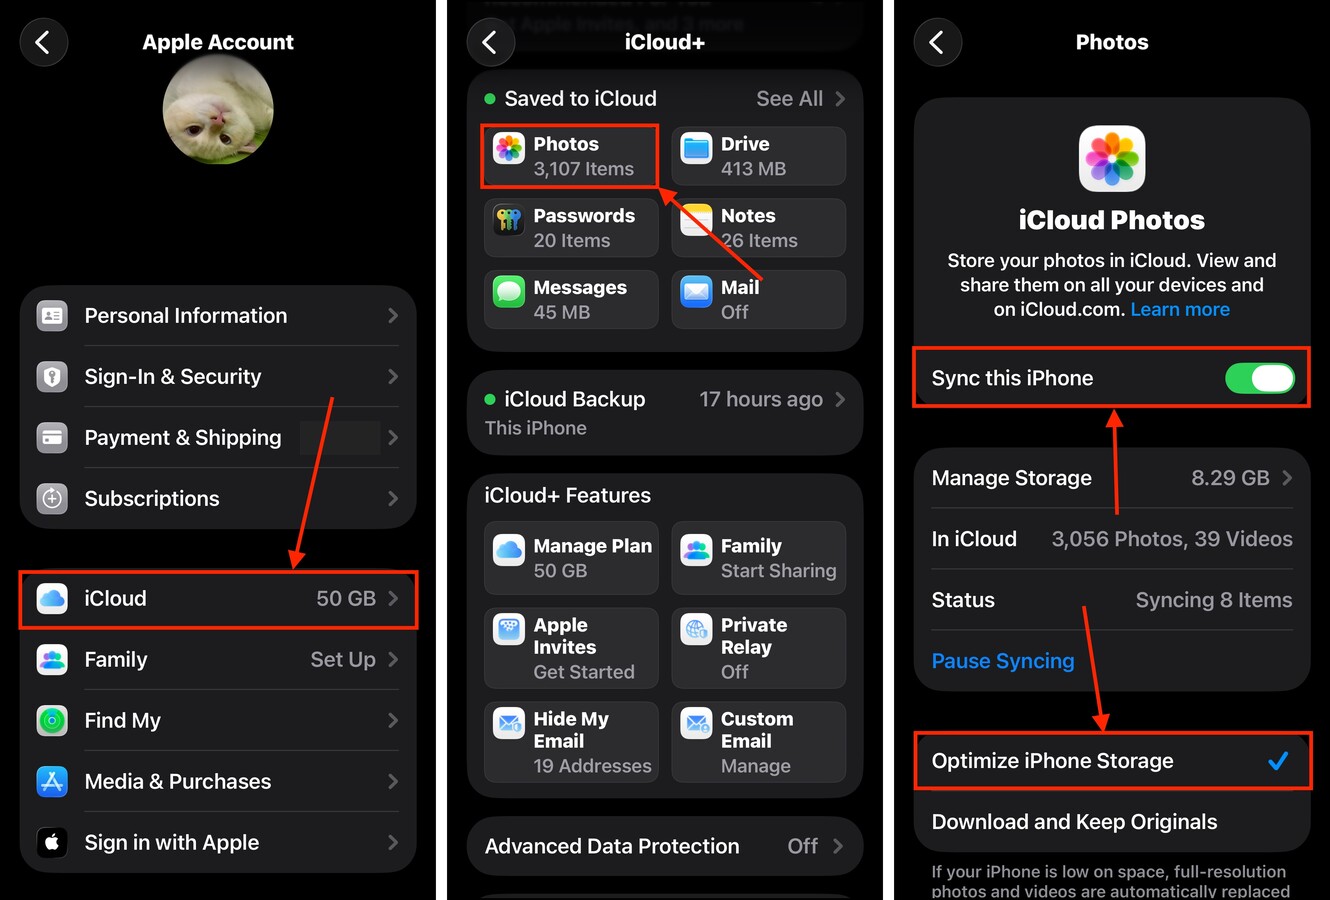
Step 1. Open the Settings app and tap your Apple Account at the very top of the menu.
Step 2. In the Apple Account menu, tap iCloud.
Step 3. Scroll down to the Saved to iCloud section. Then, tap Photos.
Step 4. Slide the toggle switch beside the Sync this iPhone setting to the ON position (green). Then, tap the Optimize iPhone Storage setting once to activate it as well (make sure it has a check mark beside it).
Aside from waiting for the update to finish, you will also want to give iCloud enough time to upload your files to Apple’s servers. The more photos and videos you have in your library, the more time it will take.
Method 4: Offload Apps You Don’t Immediately Need
Applications usually take up the largest amount of space on an iPhone. If you have apps that you don’t use as often or don’t immediately need, consider “offloading” them temporarily—at least until after you successfully complete your iOS update.
Offload is an iPhone feature that allows you to delete an application’s package files without deleting your user data (which usually takes up much less storage space compared to other app files, like graphical assets). You get to keep your custom app settings, created files or documents, saved game progress, and other personalized data related to the app you want to offload.
Offloading also makes it easier to re-download apps, which means you can immediately pick up where you left off after the update.
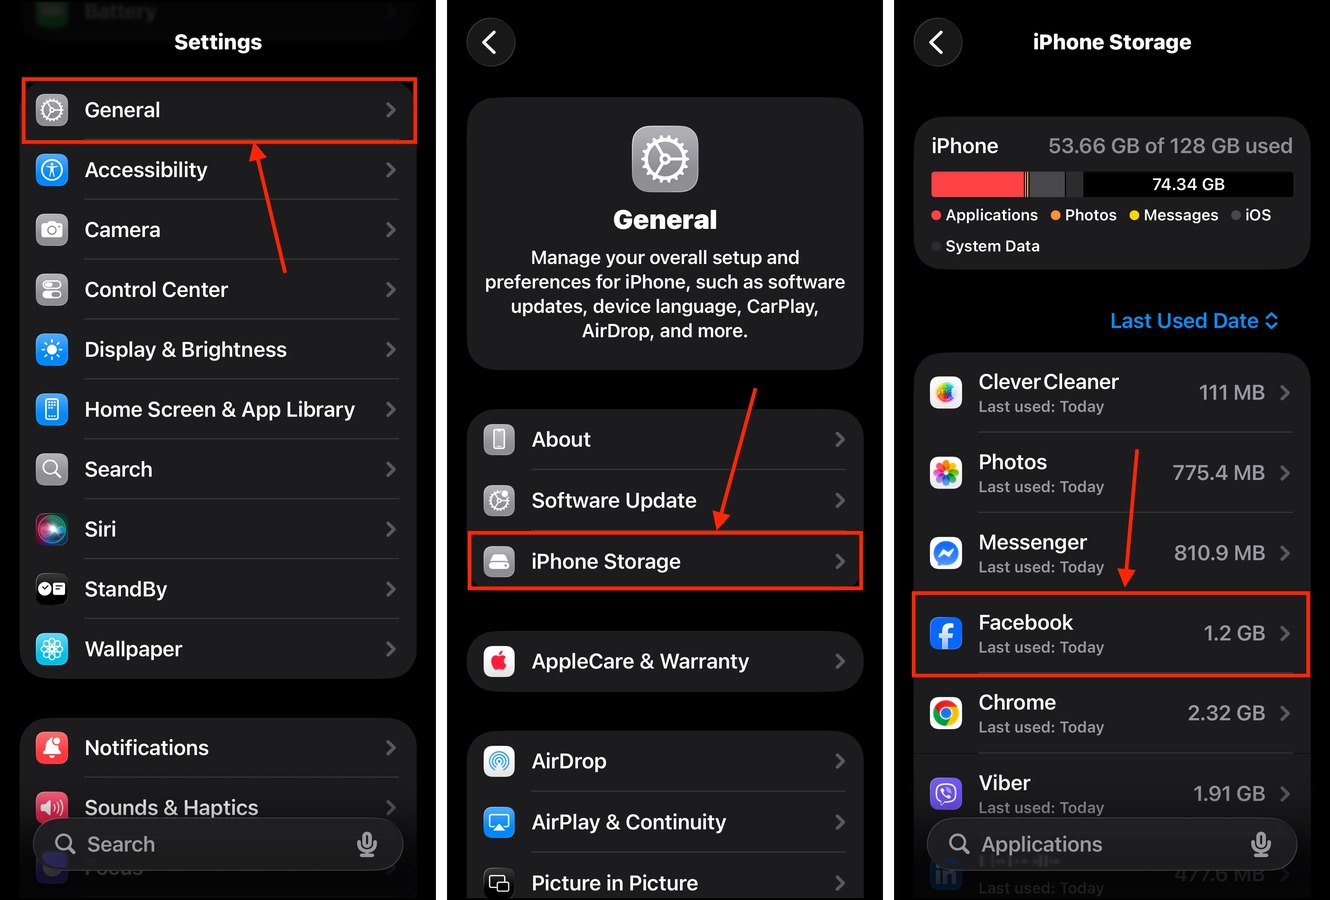
Step 1. Open the Settings app and select General.
Step 2. In the General menu, tap iPhone Storage.
Step 3. Scroll down to the list of apps and choose one you want to offload. Note that you can sort your apps based on size, name, and last used date.
Step 4. Tap the Offload App button.
Step 5. In the pop-up that appears, tap Offload App again to confirm the action.
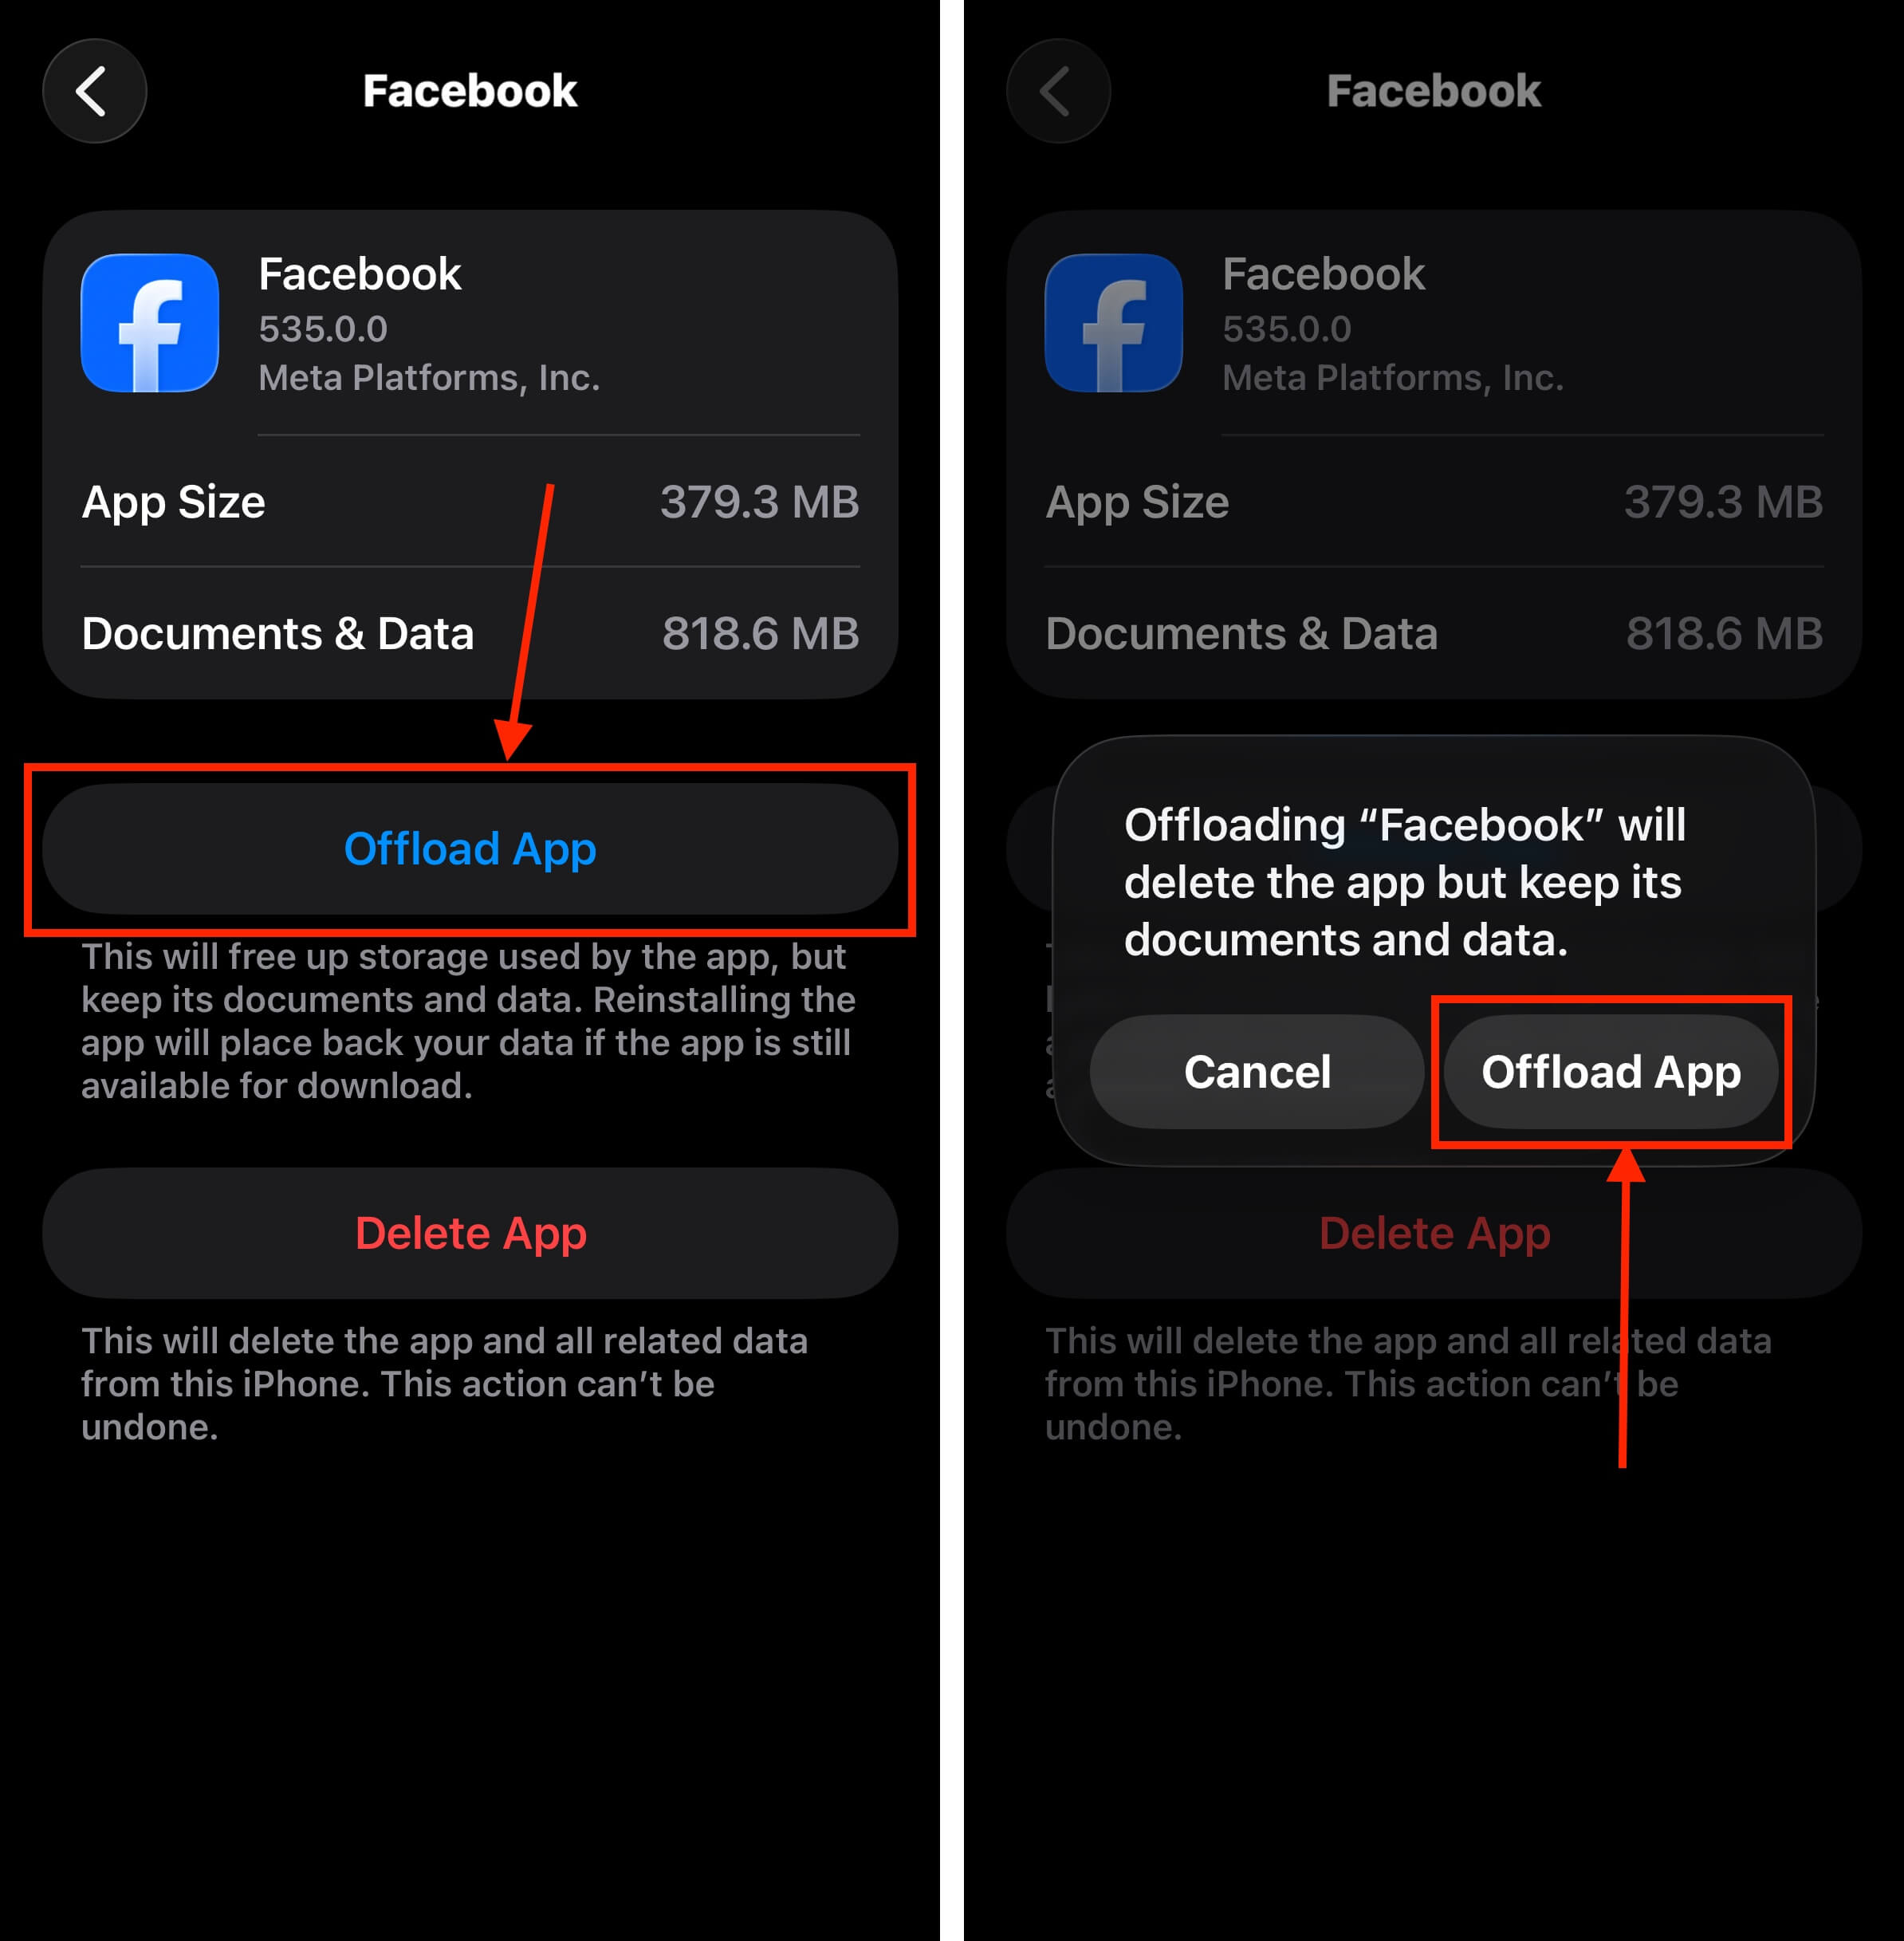
Offloaded apps remain on your home screen, but they’ll appear greyed out. They will also have a cloud icon beside their names, which you can tap to download them again after updating iOS.
Method 5: Delete Old Update Files
Failed updates can possibly result in incomplete (and unusable) update files sitting in your local storage. iOS typically gets rid of them automatically, but they can sometimes get stuck and require manual deletion.
Fortunately, iOS update files are conveniently stored as a single bundle you can easily delete from the iPhone Storage menu.
Step 1. Open the Settings app and select General.
Step 2. In the General menu, tap iPhone Storage.
Step 3. Scroll down to the bottom of the menu, below your list of apps. If you indeed have an incomplete iOS update, you’ll find it here. Tap it.
Step 4. Tap Delete Update.
Step 5. In the pop-up that appears, tap Delete Update again to confirm the action.
Once you delete this update file, your current iOS update attempt should proceed without any errors (if deleting it freed up enough storage space on your device).
Method 6: Clear Your iPhone’s System Cache
Is your System Data taking up a lot of storage space? You might have bloated caches, which are completely harmless to delete. They can also get large enough that deleting them can potentially free up enough space for your iOS update.
Unfortunately, you can’t delete System Data directly because important files are at risk. However, you can cause iOS to clear its caches automatically using your iPhone’s video camera.
When you start taking a video with your iPhone, iOS automatically starts preparing its local storage to accommodate the file. This process includes deleting cache data. We’ll show you how it works:
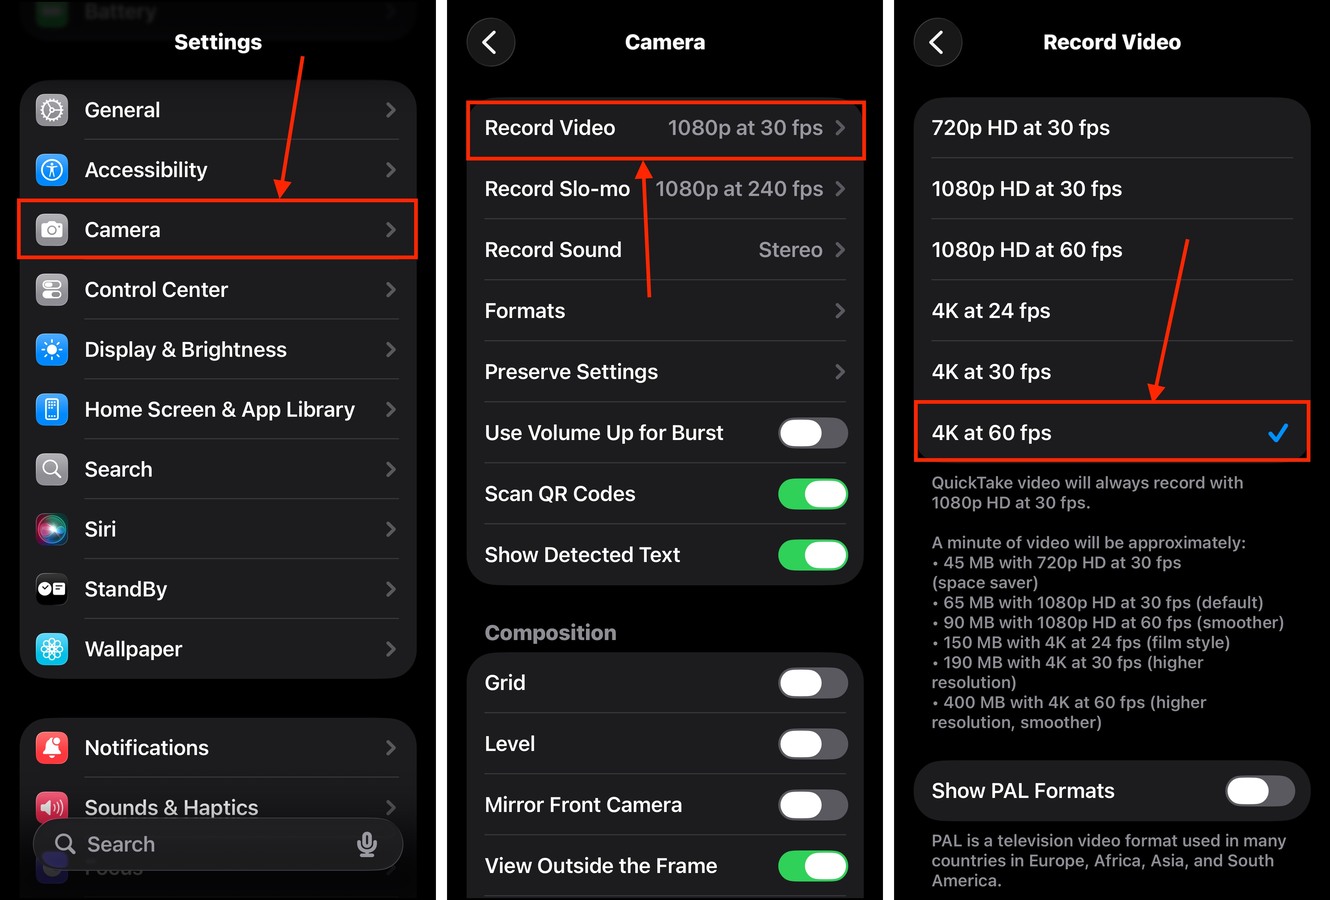
Step 1. Open the Settings app and select Camera.
Step 2. Tap Record Video.
Step 3. Choose the highest video setting available, and enable ProRes if it’s available.
Step 4. Start taking videos with your iPhone camera. Soon enough, the text Freeing Resources will appear at the top of your screen, indicating that the cache cleaning process has started.
Is Your Storage Space Still Insufficient for iOS Updates?
iOS update files can be massive, especially when you’re installing a completely new version–for example, iOS 26 requires at least 10 GB of free storage space before you can download and install it.
If you still do not have enough storage to update your iPhone, and you’ve already deleted clutter and offloaded apps, check out our guide on freeing up iPhone storage without deleting anything. We’ll show you other methods you can try to reclaim storage space when you can’t afford to delete more files.


