
As you receive new emails and answer more phone calls, you accumulate more contacts. Over time, this can cause duplicate contacts to appear on your iPhone. Duplicates can be troublesome when you want to communicate with a contact who has more than one card in your Contacts app. The best way to remedy this problem is to merge contacts on iPhone.
By combining contact cards for those who have more than one, you can clean up your list and then quickly and easily find the correct person.
Table of Contents
Linking vs. Merging
Before learning different ways to merge your contacts, it’s important to understand the difference between “Link” and “Merge.”
Both terms are sometimes used interchangeably because they solve the same problem in different ways, but they are—functionally—completely different.
Here’s a quick breakdown:
Link
When you link contacts, you keep their individual contact cards separate, but gain access to a unified view.
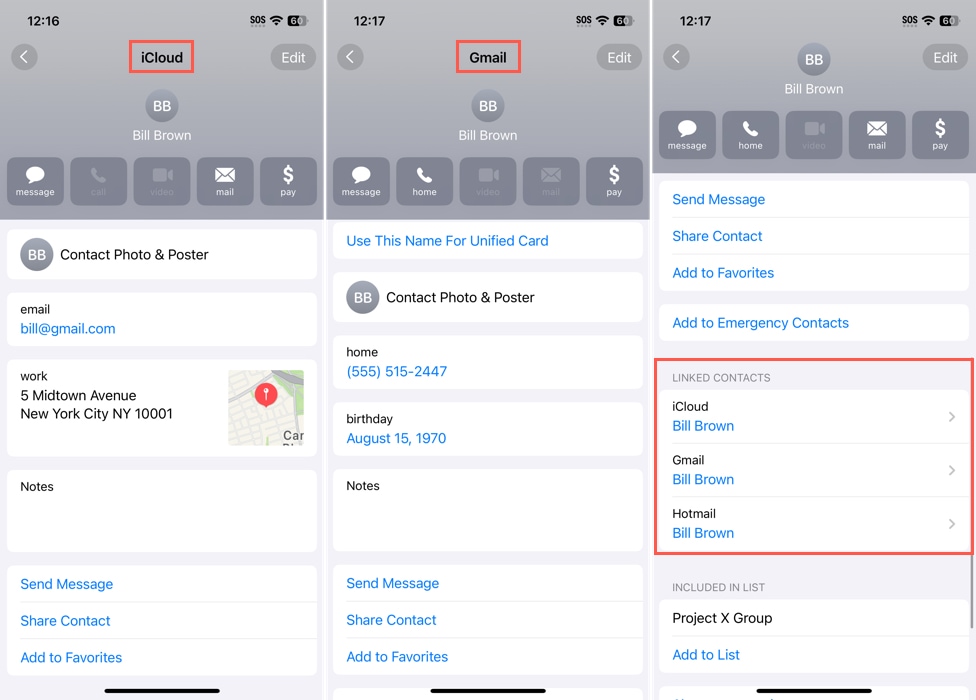
For example, let’s say you have Bill Brown’s details saved via iCloud, Gmail, and Hotmail. You can keep each account saved in those platforms individually, but you’ll only “see” one entry called Bill Brown on your device.
Merge
On the other hand, when you merge contacts, iOS combines all information into a single contact card. In other words, the “original” separate contact cards would no longer exist.
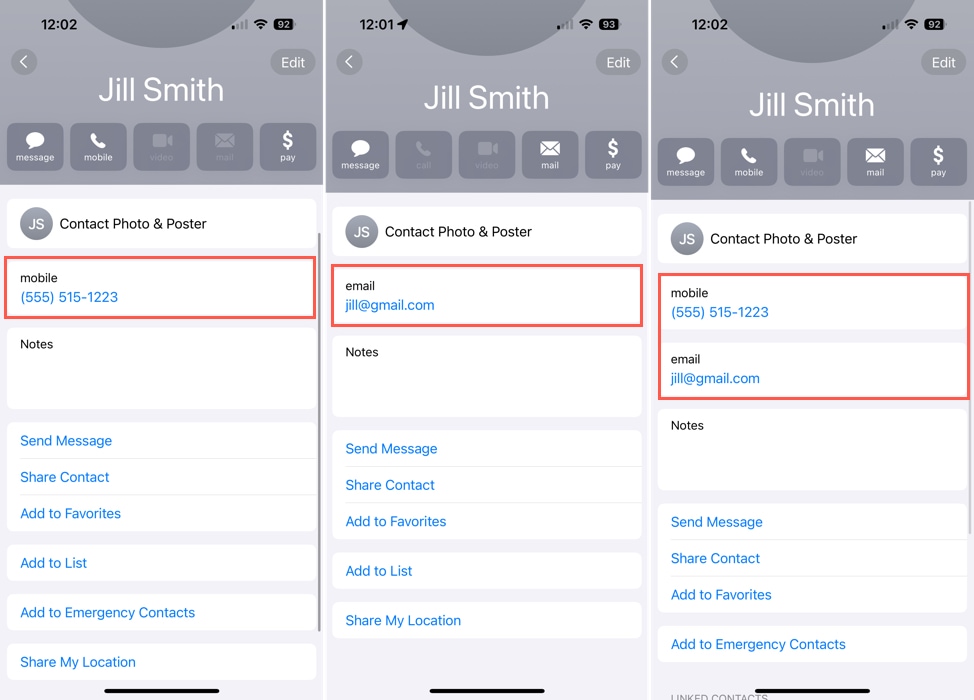
For example, if you have several entries for Jill Smith—one containing a phone number and another an email address—iOS will create a single entry for “Jill Smith” that combines both the phone number and the email address.
How to Merge Contacts on iPhone
If you’d like to go beyond linking your contacts right to merging them so that you can remove the duplicates, you have a few reliable methods you can check out. You can use the iOS Contacts app, third-party contact cleaners, and even sync your Gmail or iCloud account to merge your iPhone contacts.
Before you begin with any of the methods listed below, you should consider backing up your contacts. That way, you can easily restore your iPhone contacts in case you run into issues.
Method 1: Automatically Merge Duplicate Contacts
iOS has a built-in feature that automatically detects duplicate contacts. If it finds any, a notification will appear at the top of your contacts list in the Contacts app that says X Duplicates Found (with X as the number of duplicates).
Aside from allowing you to view the duplicates in your Contacts app, tapping this notification also opens a menu where the Merge tool becomes available.
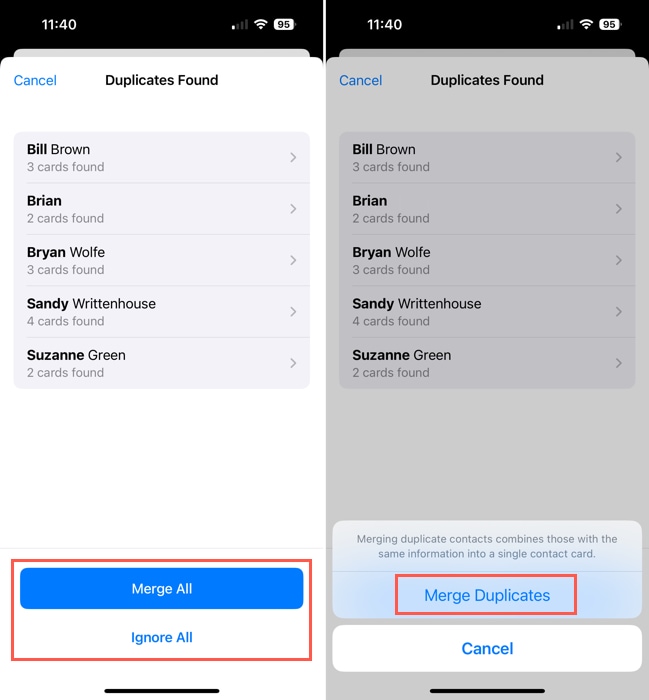
Step 1.Open the Contacts app and select All Contacts.
Step 2.When you see the notification that duplicates are found, tap View Duplicates to review them.
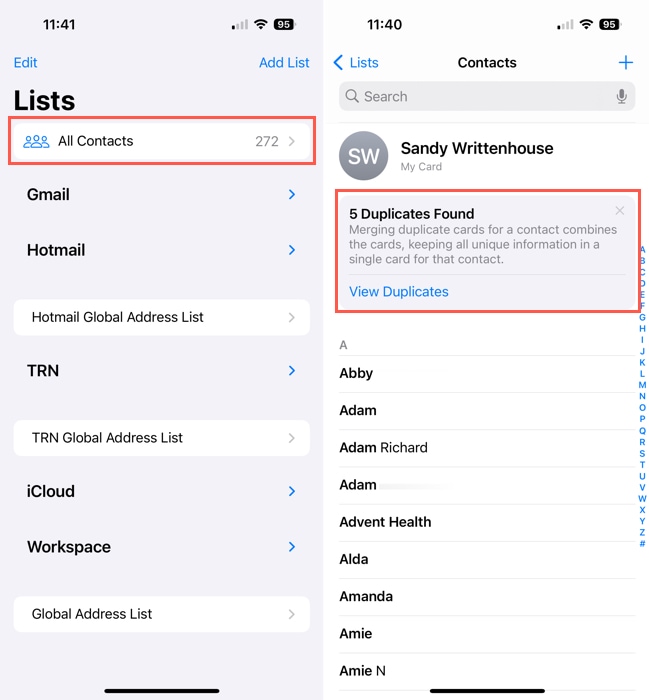
Step 3.You can then select each contact to see the cards found with details like name, phone number, email address, and physical address.
Step 4.Select Merge to combine the cards or Ignore to keep all cards for the contact.
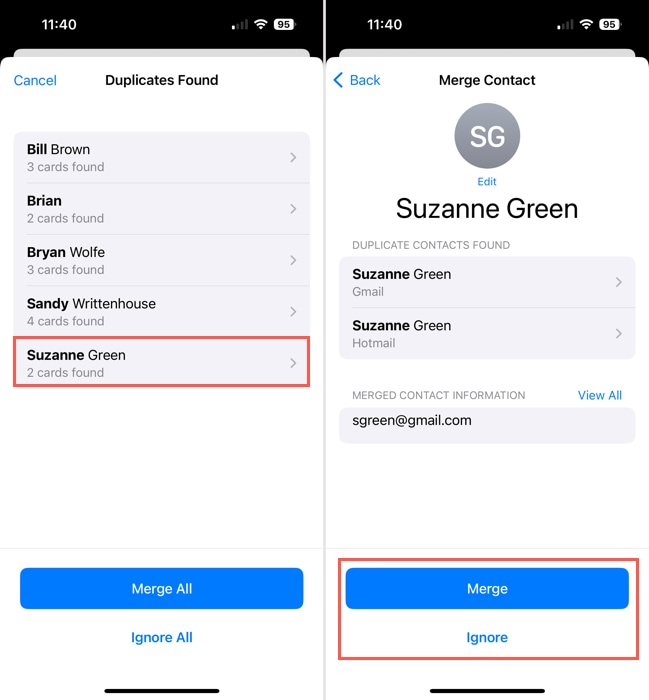
Step 5.You can also take care of all duplicate contacts in one fell swoop. On the Duplicates Found screen, select Merge All or Ignore All at the bottom per your preference.
Step 6.In both cases, you’ll be asked to confirm that you want to merge the contacts.
Method 2: Use an App to Merge Contacts
If iOS isn’t able to detect the duplicates you want to clean up or you simply want more power or features, consider using third-party apps. Third-party apps typically use their own algorithms to detect duplicates, which means their scans might yield different results from iOS’ native detection algorithm.
They are also better designed for cleanup, specifically, providing special features that make it easier, faster, and more effective to organize your contacts.
With the iPhone app, you can merge duplicates in just minutes during a commercial break for your favorite show. With the Mac app, you can manage your duplicate contacts on a nice large screen with more room to review them.
You can find many contact cleaner apps on the App Store, but here are two recommendations to get you started:
Easy Cleaner for iPhone
With Easy Cleaner for iPhone, you can back up your contacts and then merge the duplicates in just a few taps. Plus, you can review everything before you take any action and even receive reminders to merge your contacts moving forward.
Step 1.Download Easy Cleaner and grant access to your contacts.
Step 2.Go to the Merge tab to see the total number of duplicate contacts and tap Show possible merges to view them all.
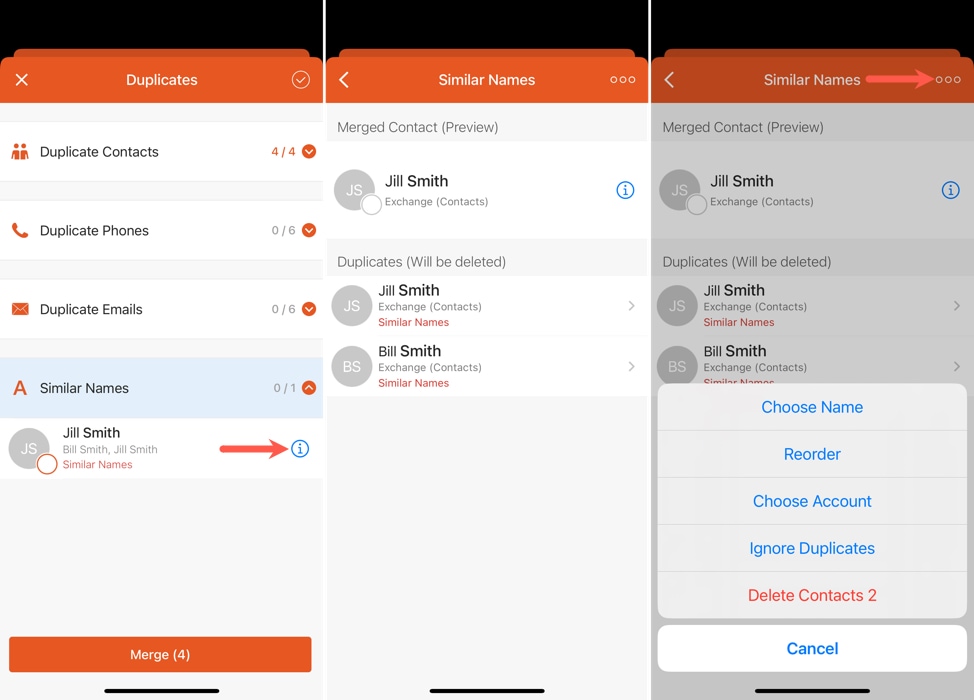
Step 3.You’ll then see your duplicates grouped by type and can expand each section to view the individual contacts. This then allows you to merge contacts with the same name (or similar names), email address, or phone number.
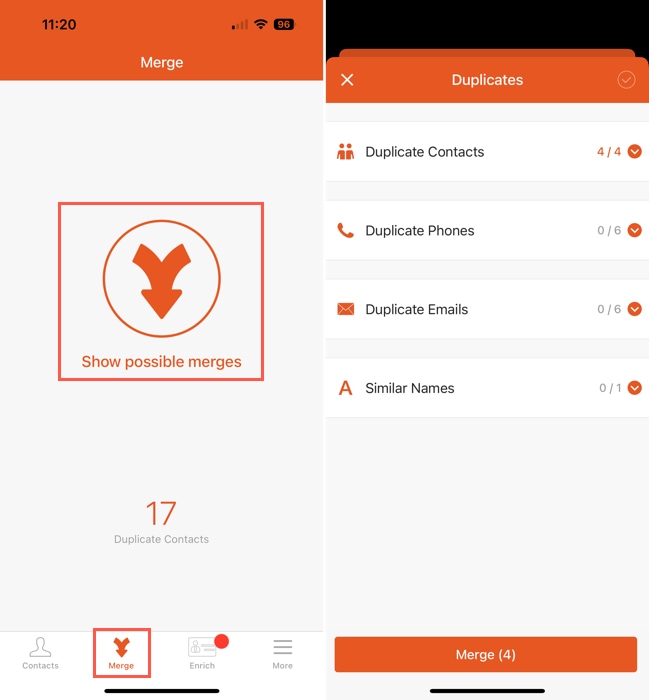
Step 4.For the Duplicate Contacts, Phones, Emails, or Similar Names, tap the Info icon (letter “i”) to see where the duplicates reside. You can then use the three dots on the top right to take a manual action if you like.
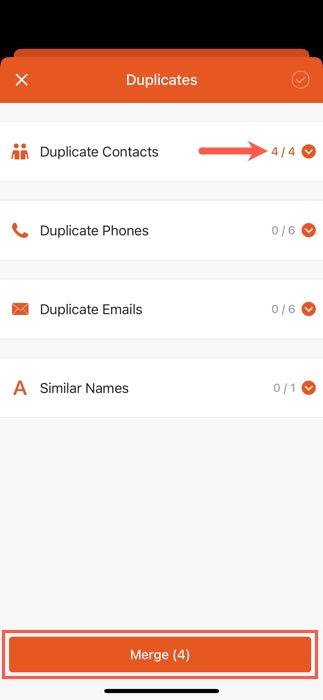
Step 5.If you want to simply merge all duplicate contacts, tap Merge at the bottom.
You can also use the Contacts tab to view the duplicates, see those with missing information, or use filters like birthdays and companies. Also, check out the Enrich tab to enhance your contact list with company names and job titles.
PhoneClean for Mac
If you own a Mac, take a look at PhoneClean. With this application, you simply connect your iPhone to your Mac and merge your contacts using the desktop app. This is ideal if you already connect your iPhone to your Mac for charging or if you would just prefer using a larger screen for this task.
With PhoneClean for macOS, you can also check out the note, calendar, media, app, and photo cleaning tools for junk files you may have in addition to consolidating contacts on iPhone.
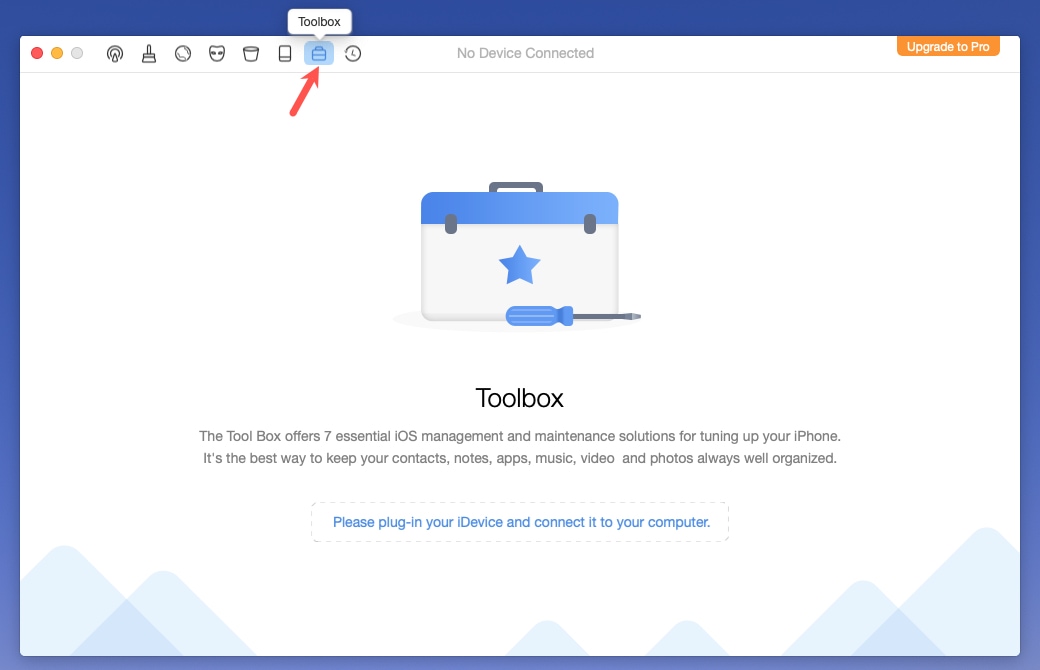
Step 1.To merge contacts, open PhoneClean and select Toolbox at the top.
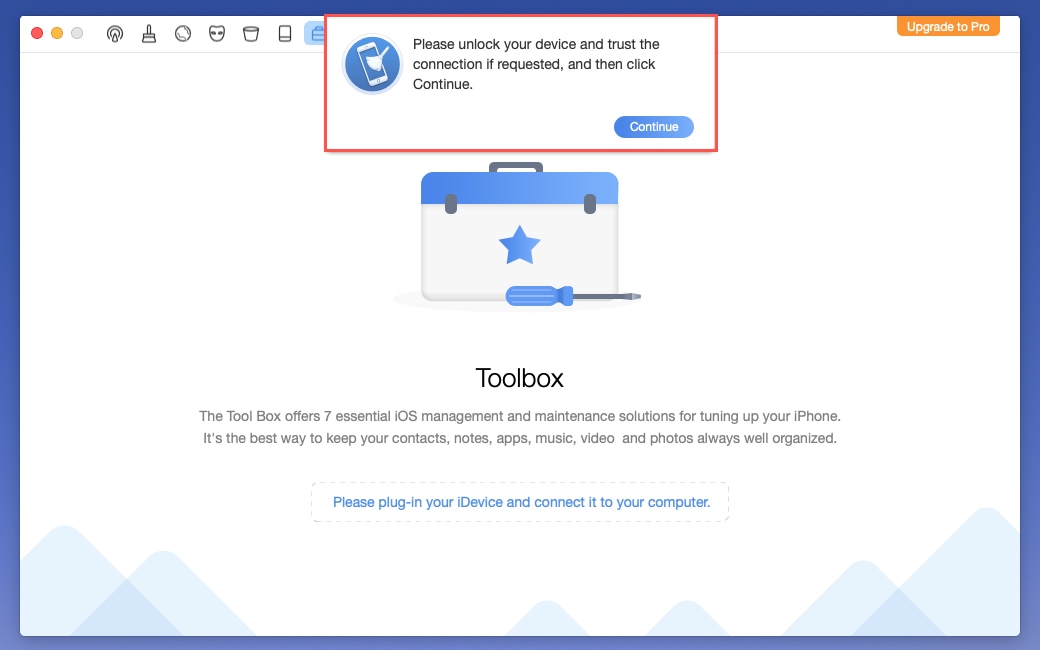
Step 2.Connect your iPhone to your Mac (using your USB cable) and the app should recognize your device automatically. You may be prompted to unlock your iPhone and trust the device.
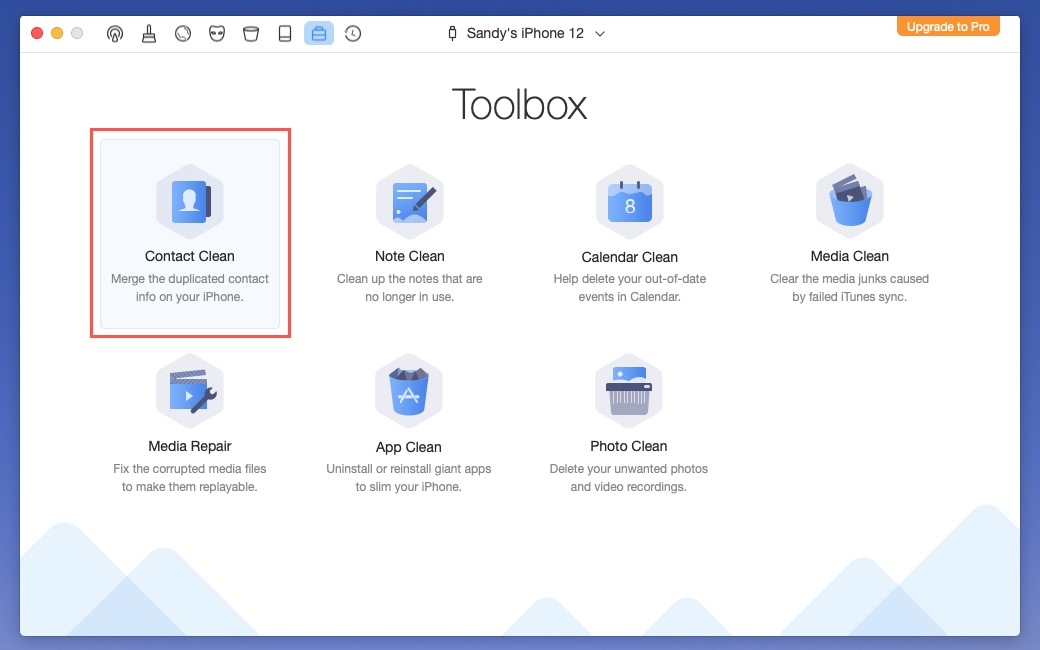
Step 3.Click the Contact Clean button and you’ll see a list of duplicate contacts that you can review.
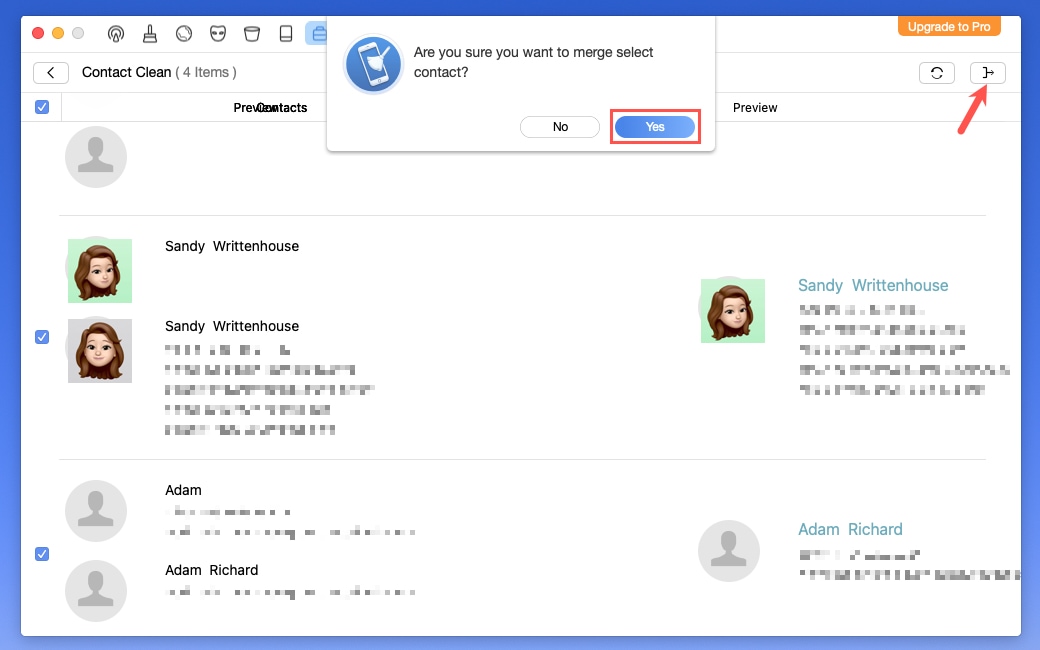
Step 4.Check the boxes for those contacts you want to merge or use the checkbox on the top left to select them all.
Step 5.Then, select the Merge button on the top right and confirm by clicking Yes.
Method 3: Merge iPhone Contacts with Gmail
If you use Gmail, you can sync your Google contacts to your iPhone for easy access to them on your mobile device. If you have duplicates, they should merge automatically without a prompt. This is a good option if you want to merge contacts from different accounts without duplicates.
You have the option to include contacts when you add your Gmail account or after you’ve added it.
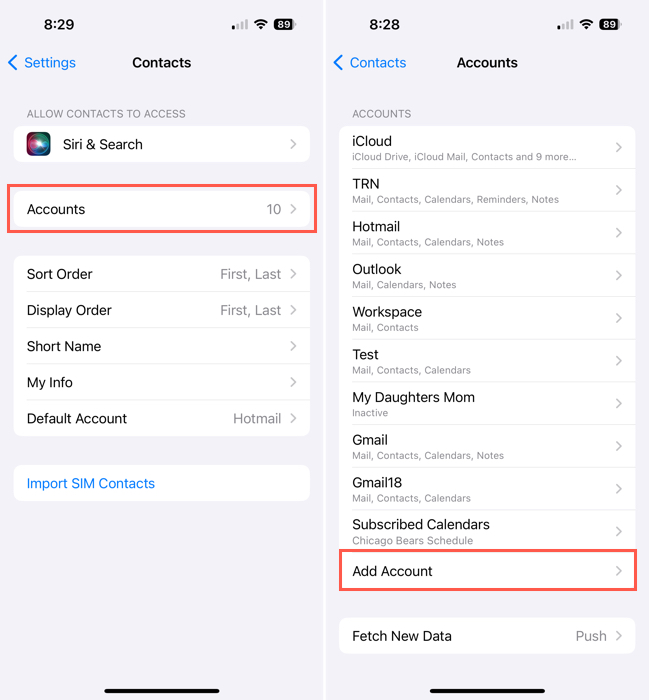
Step 1.To add your Gmail account and contacts, open Settings and select Contacts.
Step 2.Tap Accounts and pick Add Account at the bottom.
Step 3.Choose Google from the list of options and enter your Google username and password.
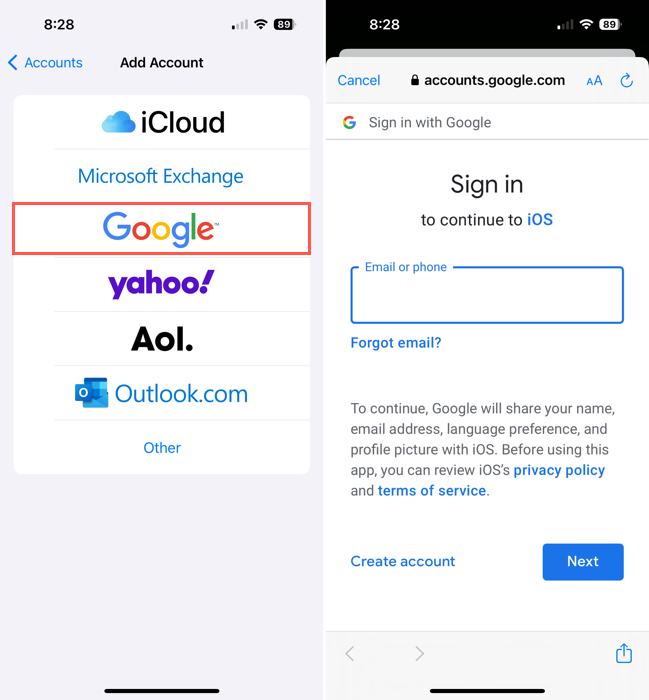
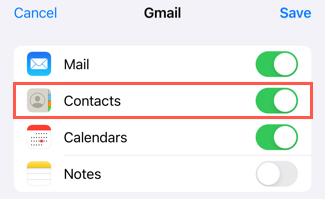
Step 4.You’ll be prompted to include Mail, Contacts, Calendars, and Notes. Make sure the Contacts toggle is turned on, along with any others you want to sync, and tap Save.
If you’ve already added your Gmail account, open Settings and select Contacts > Accounts. Choose your Gmail account and turn on the toggle for Contacts.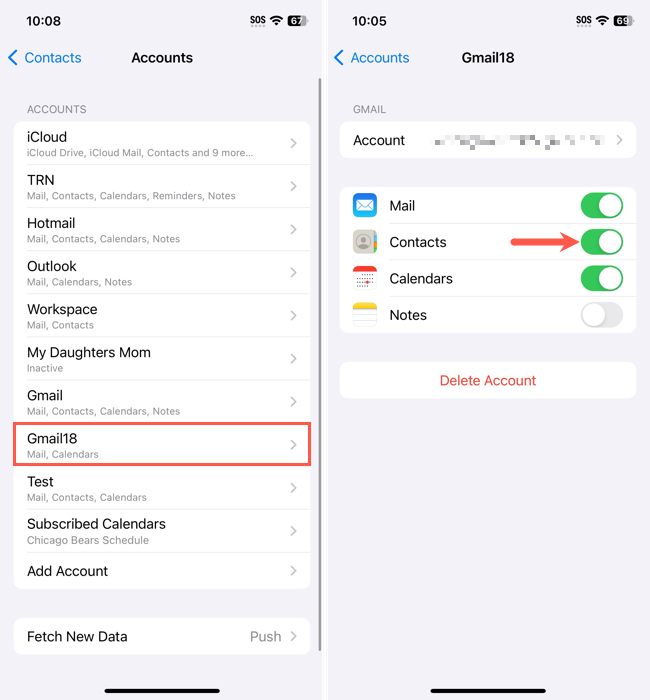
When those contacts appear in the Contacts app, you’ll see them in a separate list for your Gmail account as well as in the All Contacts list for access in two spots.
Method 4: Merge iPhone Contacts with iCloud
One of the best ways to keep your contact list up to date is to sync it with iCloud. This gives you access to your contacts from any Apple device as well as iCloud.com when you sign in with the same Apple ID. Additionally, you can choose to merge duplicate contacts when you turn on the iCloud sync to combine those in iCloud with those stored on your device.
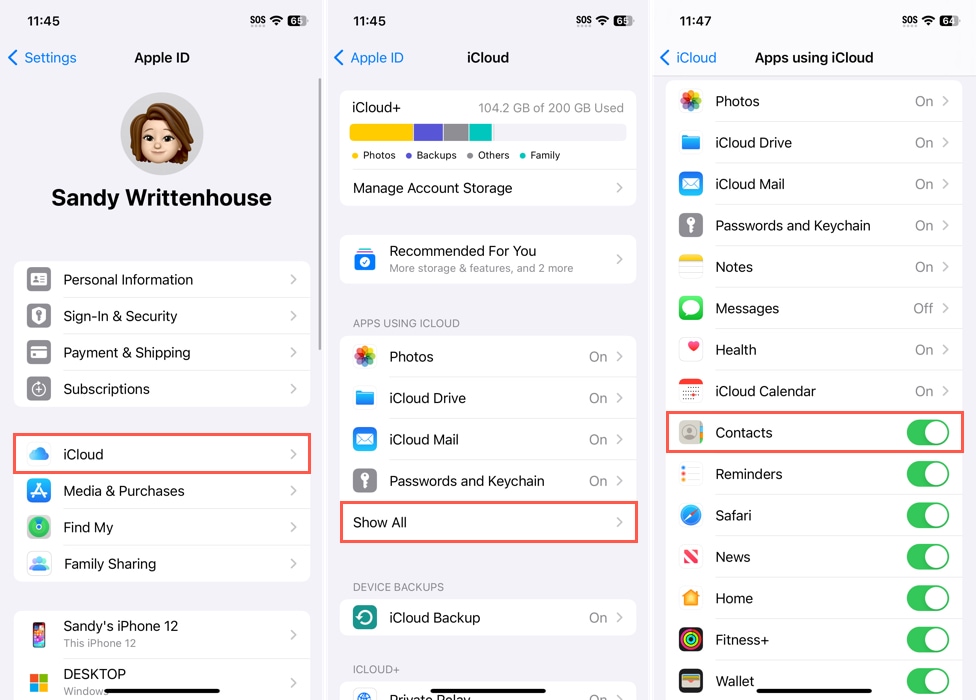
Step 1.Open Settings on your iPhone and select your Apple ID.
Step 2.Pick iCloud and turn on the toggle for Contacts below Apps Using iCloud. Note that you may have to tap Show All to see the Contacts toggle.
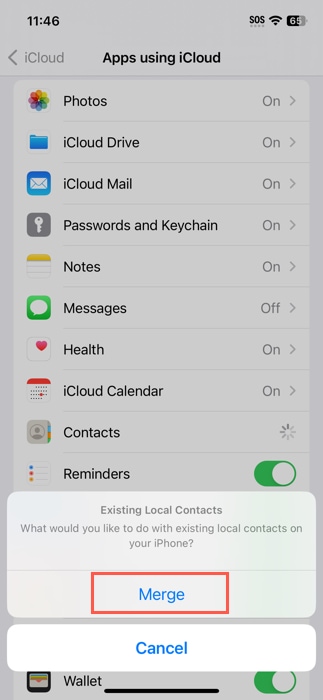
Step 3.You should be asked to merge iCloud contacts, select Merge to combine duplicate contacts or Cancel to keep duplicates separate.
You’ll see your contacts in a separate list for your iCloud account along with the All Contacts list for easy access in both places.
How to Unlink Contacts on iPhone
If after you merge or link contacts together you decide to separate them again, this is an option. As example, you may want to keep a friend’s work and personal information on separate cards. Or, maybe you want to unlink cards for a coworker in your iCloud and Gmail lists.
Step 1.Open the Contacts app, choose the list with your contact, and then tap to open their card.
Step 2.Select Edit on the top right.
Step 3.Scroll down until you see the Linked Contacts section. You’ll then see a list of merged and linked contacts. If needed, you can select one to view all details.
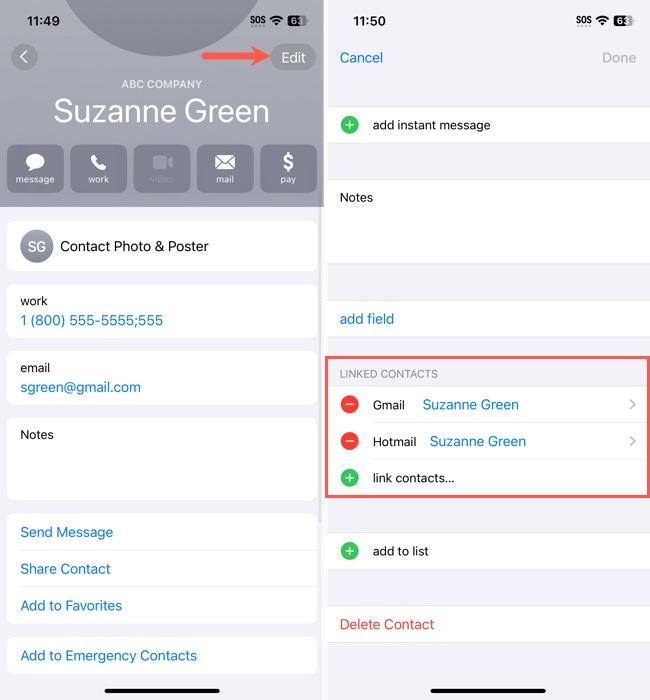
Step 4.Tap the red circle to the left and then Unlink to the right to unlink the contact.
Step 5.When you finish, tap Done on the top right.
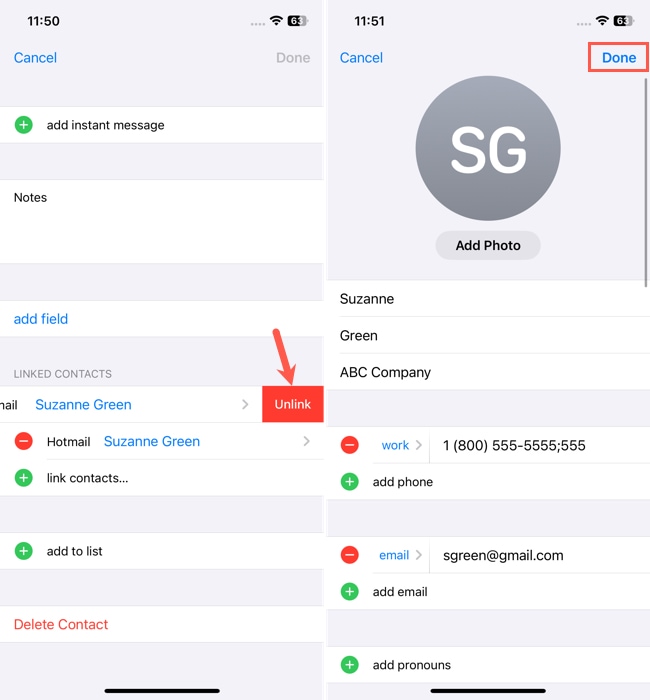
You’ll then see the contact removed from the Linked Contacts section and either a separate card for that person in your list if you merged them or no connection between the two if you linked them.
Why Won’t My iPhone Merge Contacts?
If you’re running into issues merging contacts on iPhone, there could be a few possible reasons.
iCloud interference: Do you have contacts stored in different iCloud accounts? If so, you’ll need to sync each to your device in order to see the contacts from your other iCloud accounts.
iOS bug: It happens from time to time that an iOS issue can cause a hiccup when you combine contacts on iPhone. Make sure that you’re running the latest version of iOS, restart your device and try again, or consider contacting Apple Support for further assistance.
Unmergeable contacts: When you merge duplicate contacts on iPhone, the unique information from each card is retained. But, if the contact cards contain completely different details, the above methods may not recognize them as duplicates. In this case, you can link them instead of merging them, manually update the contact cards and then try to merge them again, or simply delete the outdated card.
Full storage space: iOS requires ample free storage space for its various functions to operate smoothly—this includes duplicate detection. Try freeing up a few gigabytes of storage space, then give iOS some time to run its scan again.
Screen Time restrictions: Screen Time Restrictions allow you to limit Account Changes, which prevents modifications to your Mail, Contacts, Calendars, etc. Try disabling it via Settings > Screen Time > Content & Privacy Restrictions > Account Changes.
Unwanted Merges?
There are cases where a user might not like the results of merging contacts. For example, maybe the contacts that iOS (or third-party apps) merged only looked similar but were actually different (it happens). Or maybe you want to link your contacts instead, keeping them in separate accounts.
Unfortunately, there’s no “unmerge” button. And doing it manually can be tedious if this happened to multiple contacts. Instead, check out our guide on how to recover deleted contacts on your iPhone, where we demonstrate several proven data recovery techniques that can restore your address book to its prior state.
FAQ
If you are missing contacts, you can turn off the toggle for Contacts, choose Keep on My Device, and then turn the Contacts toggle back on again.


