
Is your iPhone slow after the iOS 26 update? iOS 26 brought a lot of new features and a massive design overhaul. Unfortunately (but predictably), the new iteration is much more demanding on your iPhone’s computer system. And it’s expected for updates to come with bugs and optimization issues, especially during the earliest versions of the OS.
To help you, we wrote this guide. It’s a massive list of different methods to speed up an iPhone after the iOS 26 update, where we covered every fixable cause of lag on your device.
Table of Contents
8 Methods to Fix iPhone Lag After Updating to iOS 26
In this section, we’ll show you 8 different ways to fix an iPhone running slow after the update. Each method solves a different potential root cause for the iOS 26 performance issues. Since it can be difficult to determine exactly what went wrong on your device, we wrote the list in order of convenience. Start with Method 1 first, then go through each method one by one.
Method 1: Make Sure Your Device Isn’t Too Hot or Cold
Your iPhone naturally slows down during situations that may affect its temperature—for example, gaming for a long time with max screen brightness or leaving your iPhone (or using it) in front of the A/C. Here’s a simplified explanation of what happens:
- Too hot: When your iPhone gets too hot, it automatically slows down its entire system to allow the device’s CPU to generate less heat. This is a safety measure to prevent heat-related damage to the iPhone (and you).
- Too cold: When your iPhone gets too cold, it literally slows down the chemical reactions in its battery that are required to power it. With less consistent power to work with, performance gets throttled.
So if your iPhone is laggy after the update but only when it’s exposed to extreme temperatures, that itself might be the likely culprit. It’s even possible that iOS is slowing down your phone because its new features are much more demanding on its system (which generates heat). Do your best to keep your device at a moderate temperature to maintain its smooth operation.
Method 2: Perform a Hard Reset of Your iPhone
A “hard reset” means forcing your iPhone to reboot using a special button combination, rather than using the “Slide to shut down” method. A hard reset forces your iPhone to boot into a completely fresh instance.
This is useful in case your iPhone is glitching after the update due to system errors or overloaded and stale RAM. It’s especially useful when your iPhone completely freezes up, as it bypasses the need for apps and processes to close normally.
Step 1. Press the physical Volume Up button on the side of your iPhone, then quickly release it.
Step 2. Immediately after, press the Volume Down button on the side of your iPhone. Release it immediately.
Step 3. Finally, press and hold the Power button. Only release it once you see the Apple logo on your device.
The button presses should take less than 5 seconds in total for it to work. Don’t worry—nothing dangerous happens if you get it wrong a few times!
Method 3: Free Up iPhone Storage
An underrated way to fix your iPhone’s lagging after an update is to free up storage space for iOS to utilize. With full storage, your system will struggle to move resources around that allow it to run more smoothly. For users who take a lot of photos, cleaning up your library clutter can make a big difference very quickly.
The most efficient way to do it is by using a third-party app that’s specifically designed for cleanup. For this guide, we’ll be using Clever Cleaner: AI Cleanup App – it’s completely free, and it doesn’t have ANY ads, so you can use it yourself to follow along with this guide.
We also chose this app because it has several library cleanup tools for different kinds of clutter, including a similar and duplicate photo cleaner, Live Photo compressor, video compressor, and more. We’ll go into more detail while demonstrating each feature in the guide below.
Step 1. Open the App Store app, then download Clever Cleaner: AI Cleanup App.
Step 2. When you open the app for the first time, it will ask you to grant the necessary permissions. Do so—don’t worry, it’s safe!
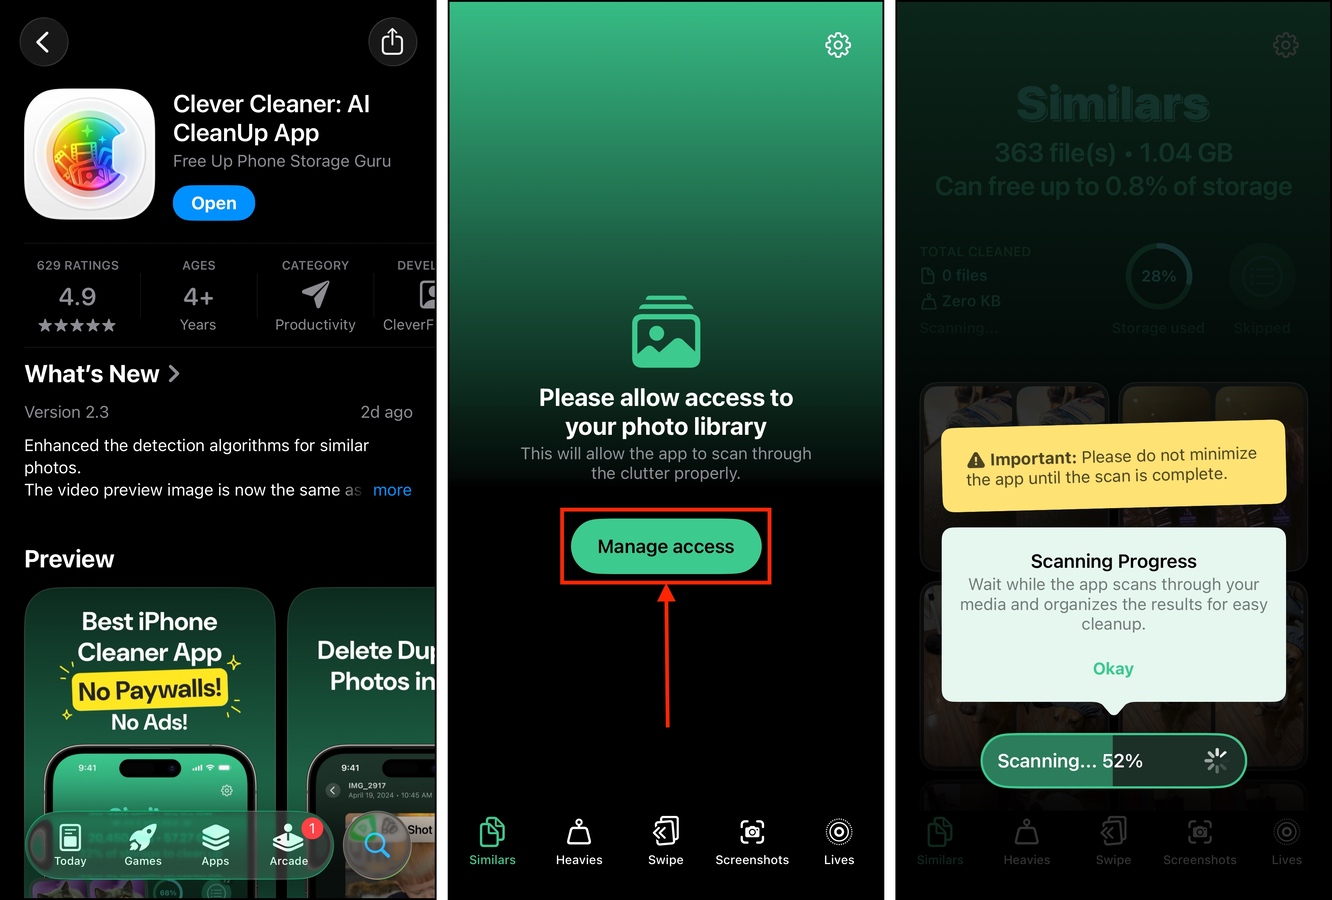
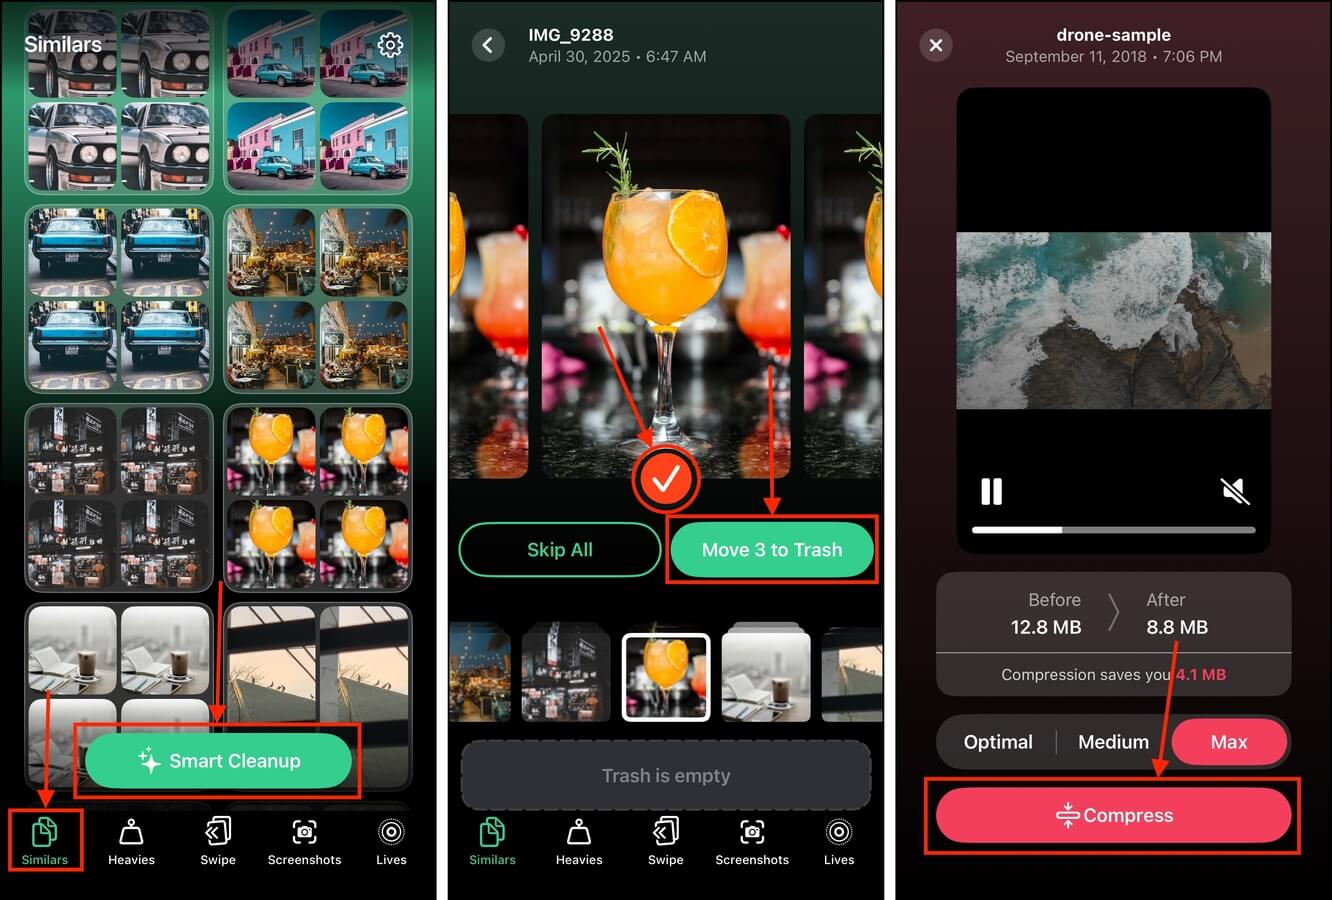
Step 3. On the bottom menu, tap Similars. Tap the Smart Cleanup button to instantly eliminate all the similar and duplicate photos in your library (only leaving the “best” one). Alternatively, you can review each group of photos one by one.
Step 4. Next, tap Heavies. Sort your videos by size and delete or compress the largest videos on your iPhone.
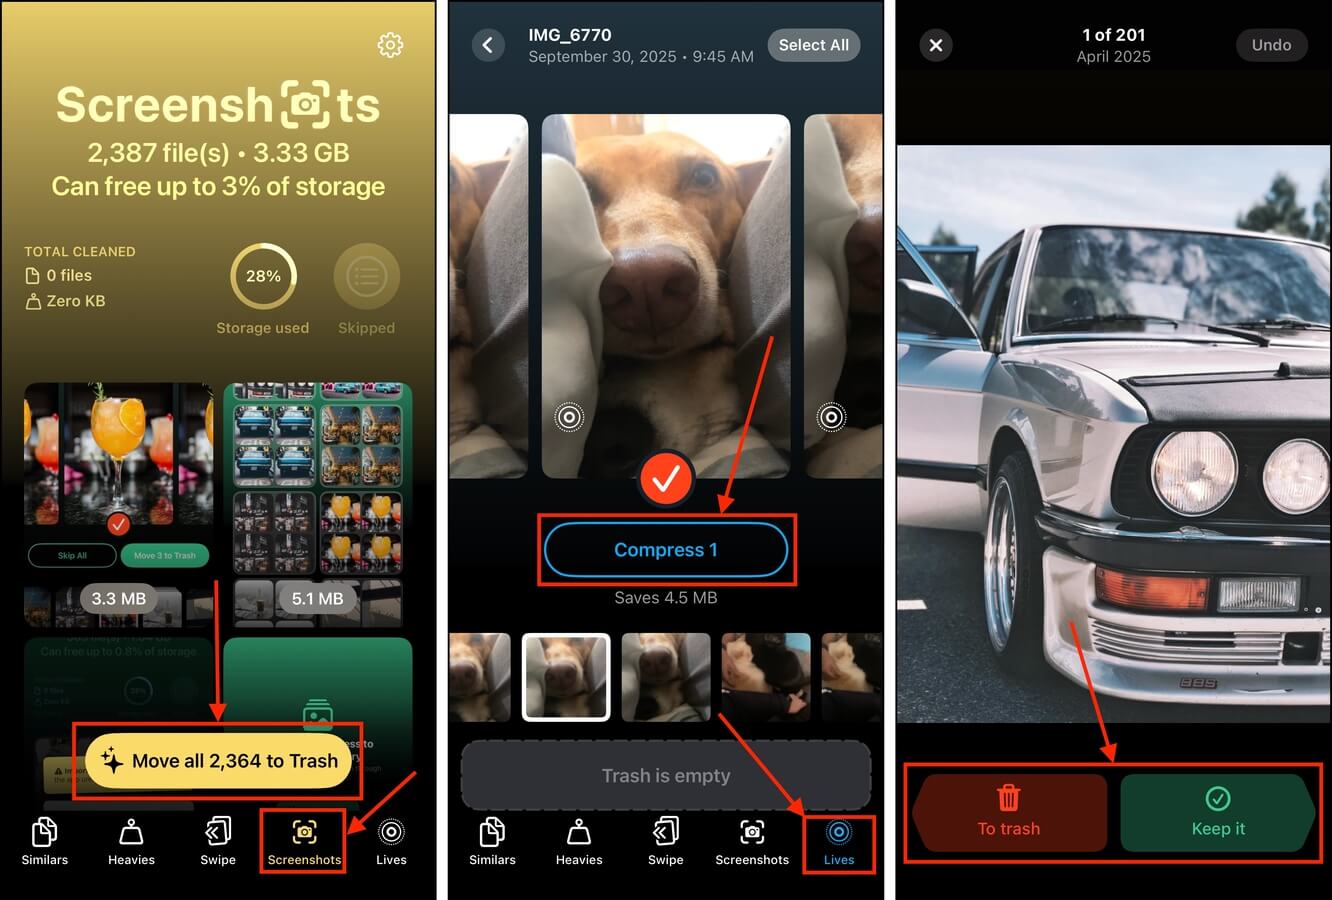
Step 5. Navigate to the Screenshots tool. If you have a lot of obsolete screenshots, you can use the Move to Trash button to delete them all at the same time.
Step 6. Then, give the Lives tool a try. It can “compress” Live Photos, which converts them to still images (by deleting the video and audio clips). You can use it for multiple photos at once.
Step 7. We recommend using the Swipe tool last. After getting rid of your clutter in bulk with the last few steps, the swipe tool lets you efficiently review individual photos and use swipe gestures to keep or delete a photo.
After using Clever Cleaner, make sure to delete your photos and videos again from the Recently Deleted folder in the Photos app. Otherwise, they will stay on your device’s storage for 30 days (then are automatically deleted).
Method 4: Deactivate Low Power Mode
Low Power Mode is a feature that purposely slows down your iPhone’s CPU for the purpose of saving battery life. It basically prevents your iPhone from running at its “maximum power”, which directly affects performance.
iOS activates Low Power Mode automatically when your battery level reaches a certain threshold—but you can also enable it (and disable it) manually.
Step 1. If you have the appropriate widget in your device’s Control Center, you can simply swipe down on your iPhone screen and disable it there. Otherwise, move on to step 2.
Step 2. Open the Settings app and tap Battery.
Step 3. Scroll down to the very bottom of the Battery menu. Beside the Low Power Mode setting, slide the toggle switch to the OFF position (it should turn gray).

Method 5: Turn On “Reduce Transparency” Setting
The transparency graphics of iOS 26’s new Liquid Glass look generates massive load on your iPhone’s system. It constantly has to do a lot of math to properly implement the visual effects, which are everywhere in the new interface (this is why your iPhone on iOS 26 gets slow when swiping down to show the new Control Center). These background processes take up resources that iOS could be using for improving performance.
The Reduce Transparency setting literally reduces these effects, which also decreases the load on your iPhone’s system—resources are released back for iOS to use for other operations. We’ll show you where to find this setting and how to turn it on.
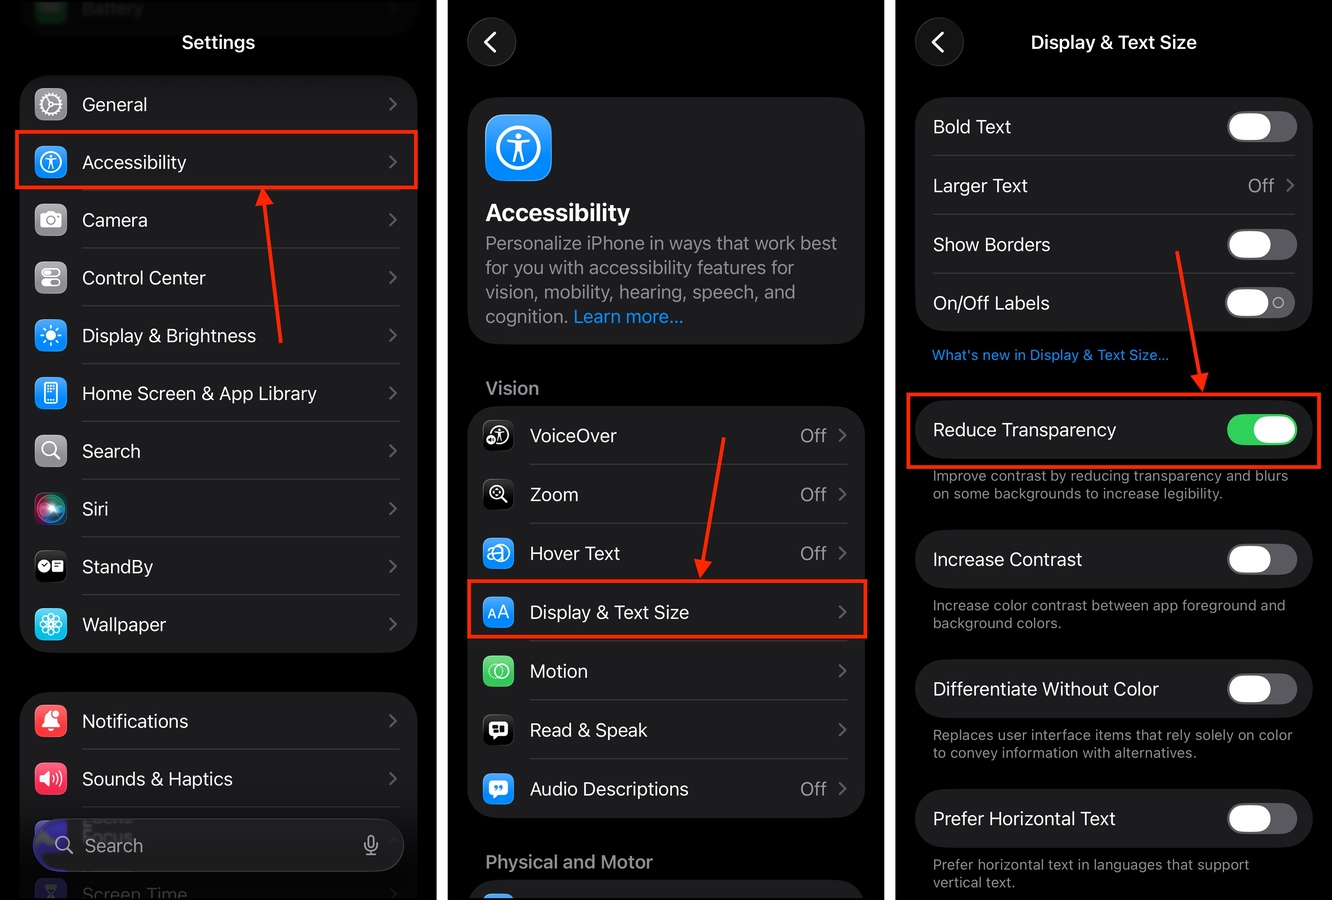
Step 1. Open the Settings app.
Step 2. Scroll down to the second section and tap Accessibility.
Step 3. In the Accessibility menu, select Display & Text Size.
Step 4. Beside the Reduce Transparency setting, slide the toggle switch to the ON position (it should turn green).
After enabling this setting, give your device a few minutes to apply the graphical changes. If you’re low on battery, this is a good time to charge your device.
Method 6: Turn Off Siri Features & Apple Intelligence
Siri is your device’s voice assistant, which can run tasks for you based on commands like opening an app, sending a message, etc. Apple Intelligence, on the other hand, is Apple’s new artificial intelligence software that now also powers Siri.
Both of these software components run in the background, constantly indexing your data to give you suggestions and answers. This uses up a lot of RAM that iOS could utilize for performance. It also generates heat, which may cause your iPhone to throttle itself.
Step 1. Open the Settings app.
Step 2. Scroll down to the third section of the main Settings menu. Then, tap Siri, Apple Intelligence & Siri, or Apple Intelligence (based on your device model).
Step 3. If you have Apple Intelligence on your device, slide the toggle switch beside it to the OFF position (it should turn gray).
Step 4. In the Siri Requests section, tap Talk to Siri.
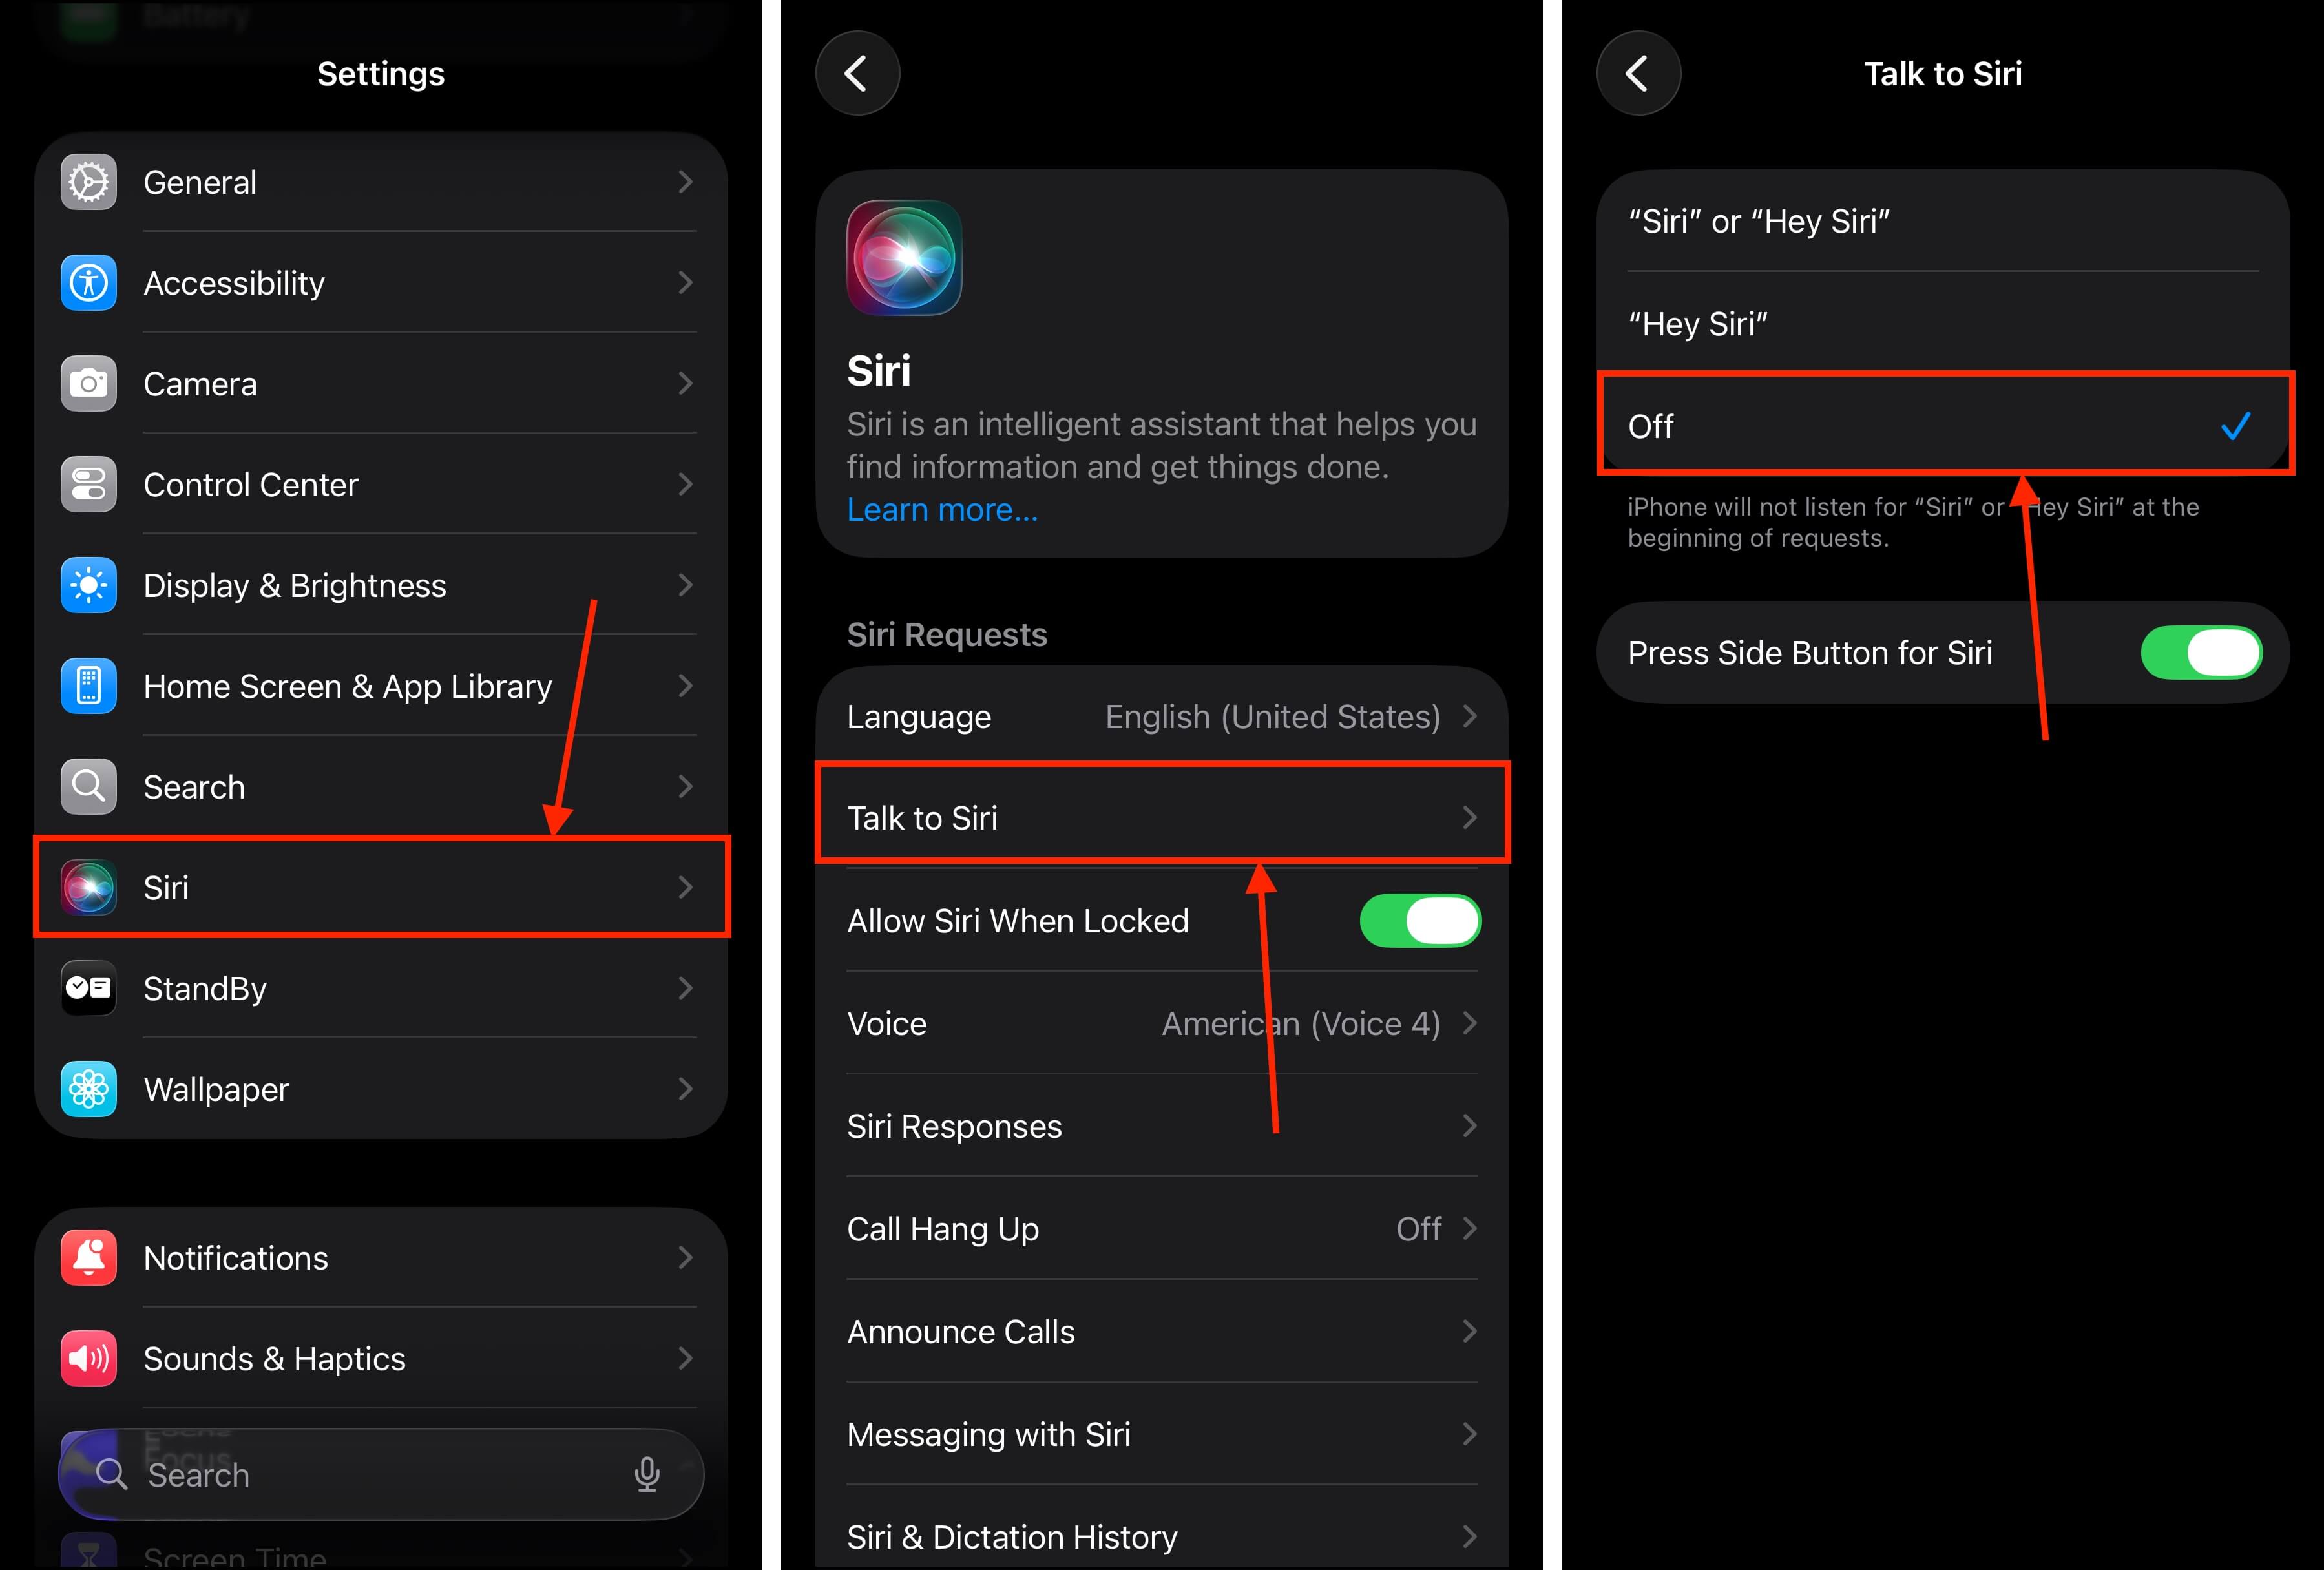
Step 5. Select the Off option, then return to the previous menu.
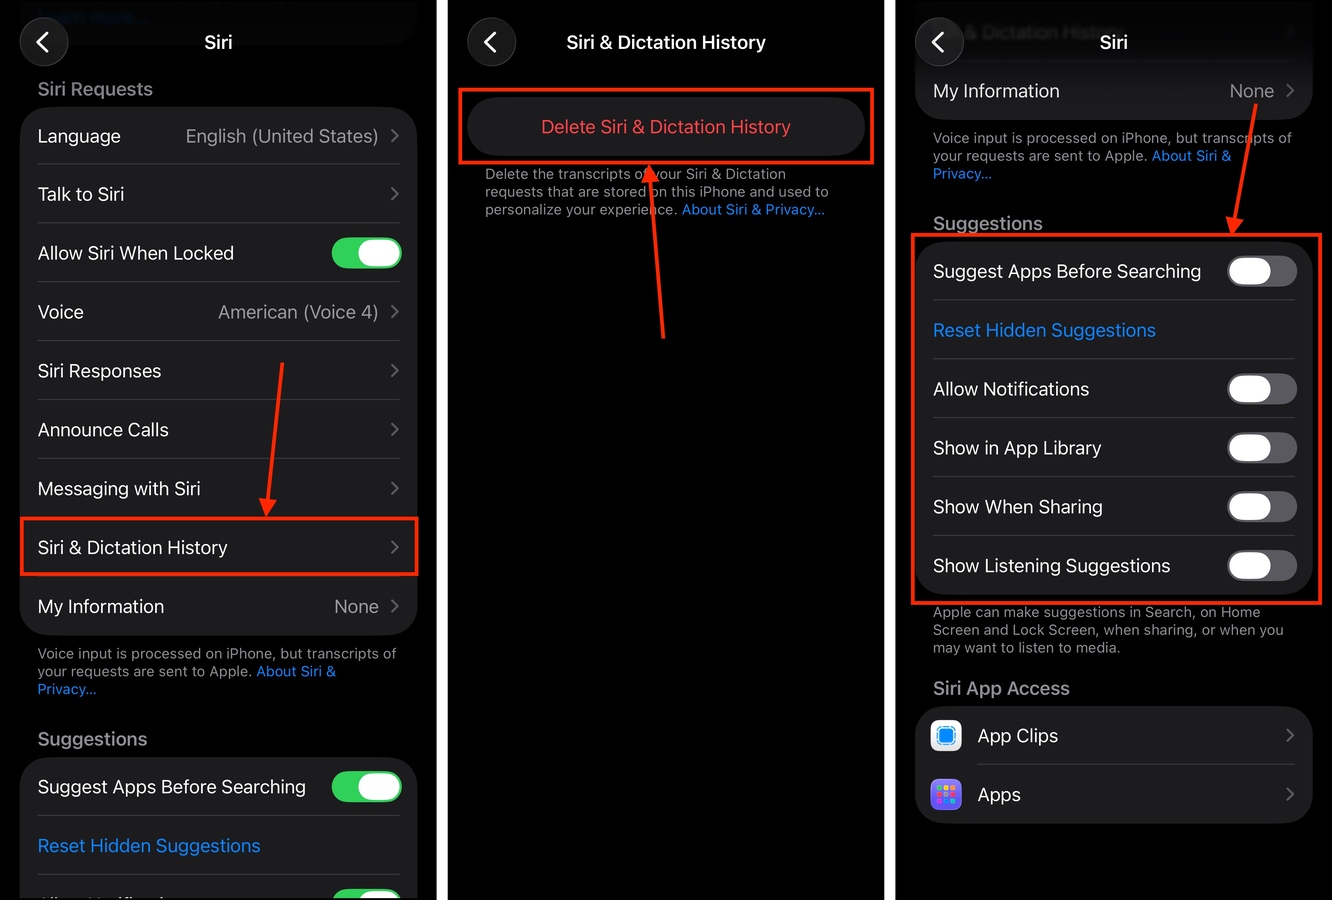
Step 6. In the same section, tap Siri & Dictation History.
Step 7. Tap Delete Siri & Dictation History.
Step 8. Finally, locate the Suggestions section and toggle OFF all the settings underneath it.
After disabling all the main Siri and Apple Intelligence features, test your iPhone for lag. If the problem is resolved, you can try turning on some of the features one by one (if you need them). If your iPhone still lags, reboot it.
Method 7: Close and Delete or Offload Unresponsive Apps
Poorly developed iPhone apps can suffer from software errors and corrupted files, which may cause them to utilize resources in a suboptimal way. This can eat up precious RAM your device’s CPU needs, leaving little for iOS to use for performance.
Closing the app kills any memory-intensive background processes that may be causing your device to slow down. Deleting an app removes all of its files from your device, including its corrupted data.
Step 1. Swipe up from the bottom of your device to access the App Switcher. Then, swipe up on every app to close them.
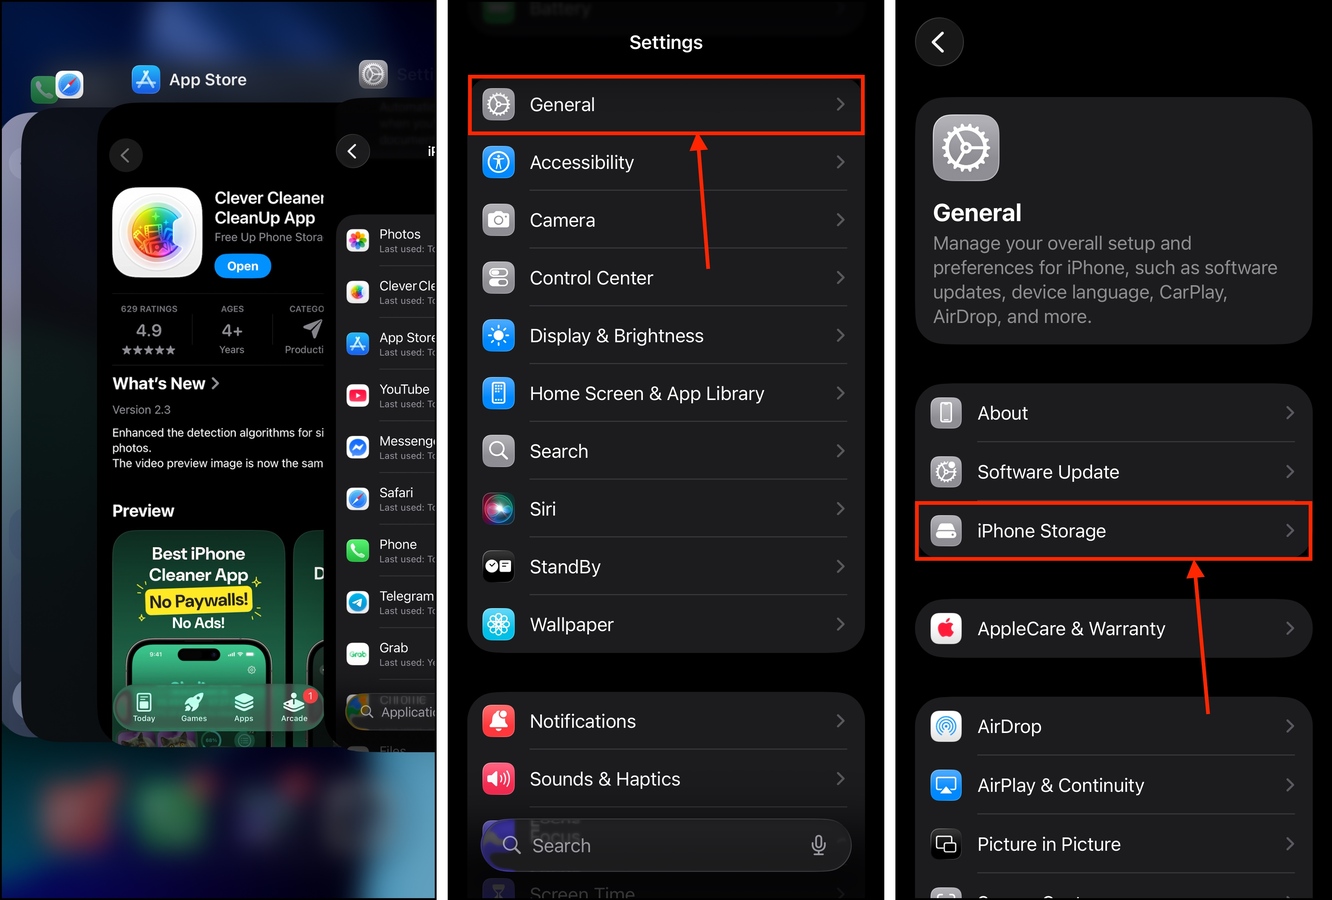
Step 2. Open the Settings app and tap General.
Step 3. In the General menu, tap iPhone Storage.
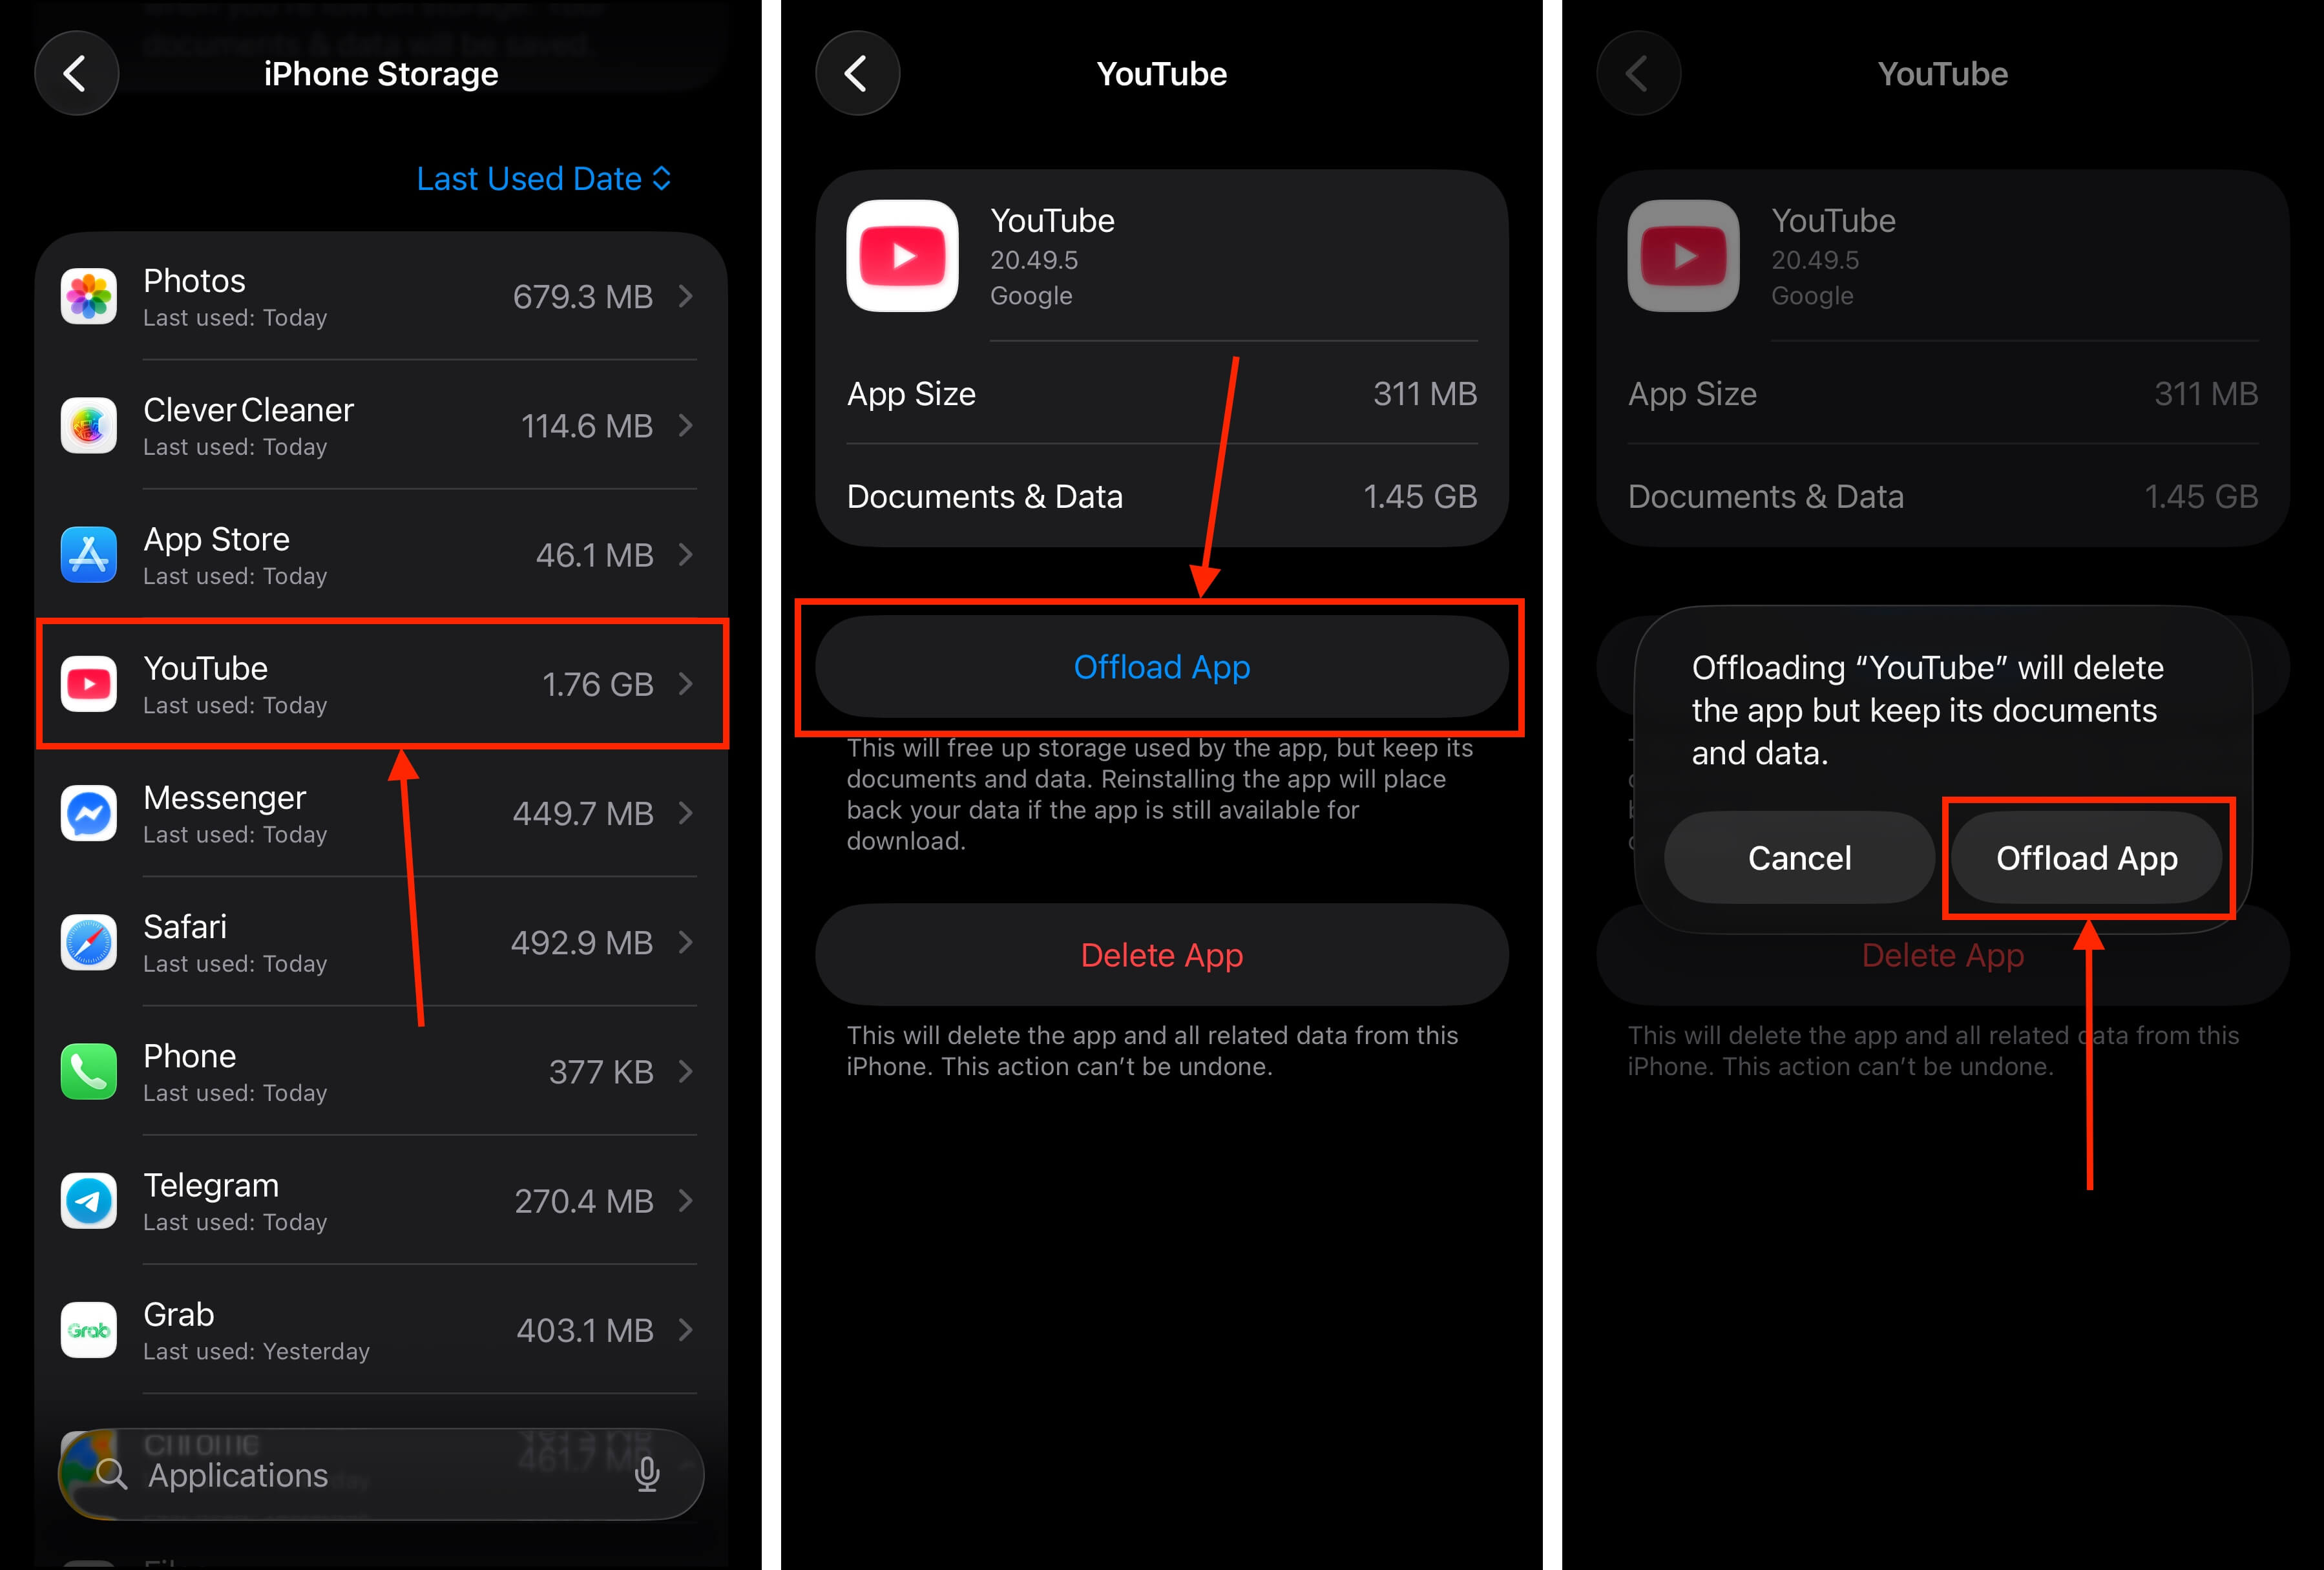
Step 4. Scroll down to the apps section and locate the glitching app. Tap it.
Step 5. Tap Offload App or Delete App, depending on whether or not you want to keep your personal data (and plan to download the app again after).
Step 6. When prompted, tap Offload App or Delete App again to confirm the action.
After offloading or deleting the app, we recommend restarting your iPhone. This will clear any leftover data from your device’s caches, ensuring that none of the problematic files remain.
Method 8: Disable VPN Apps and Delete Your VPN Profile
VPNs provide you with extra security by encrypting your data and tunneling it to their servers. They constantly run in the background, facilitating your data’s safe travels. If the VPN you’re using is poorly optimized, it could be taking up a lot of resources iOS 26 needs to perform at its best.
Deleting your VPN profile (which is different from uninstalling your VPN) is also crucial for ensuring that your iPhone’s system isn’t constantly trying to connect to a VPN; this is another potential source of lag.
Step 1. Make sure your VPN app is turned off, then open the Settings app.
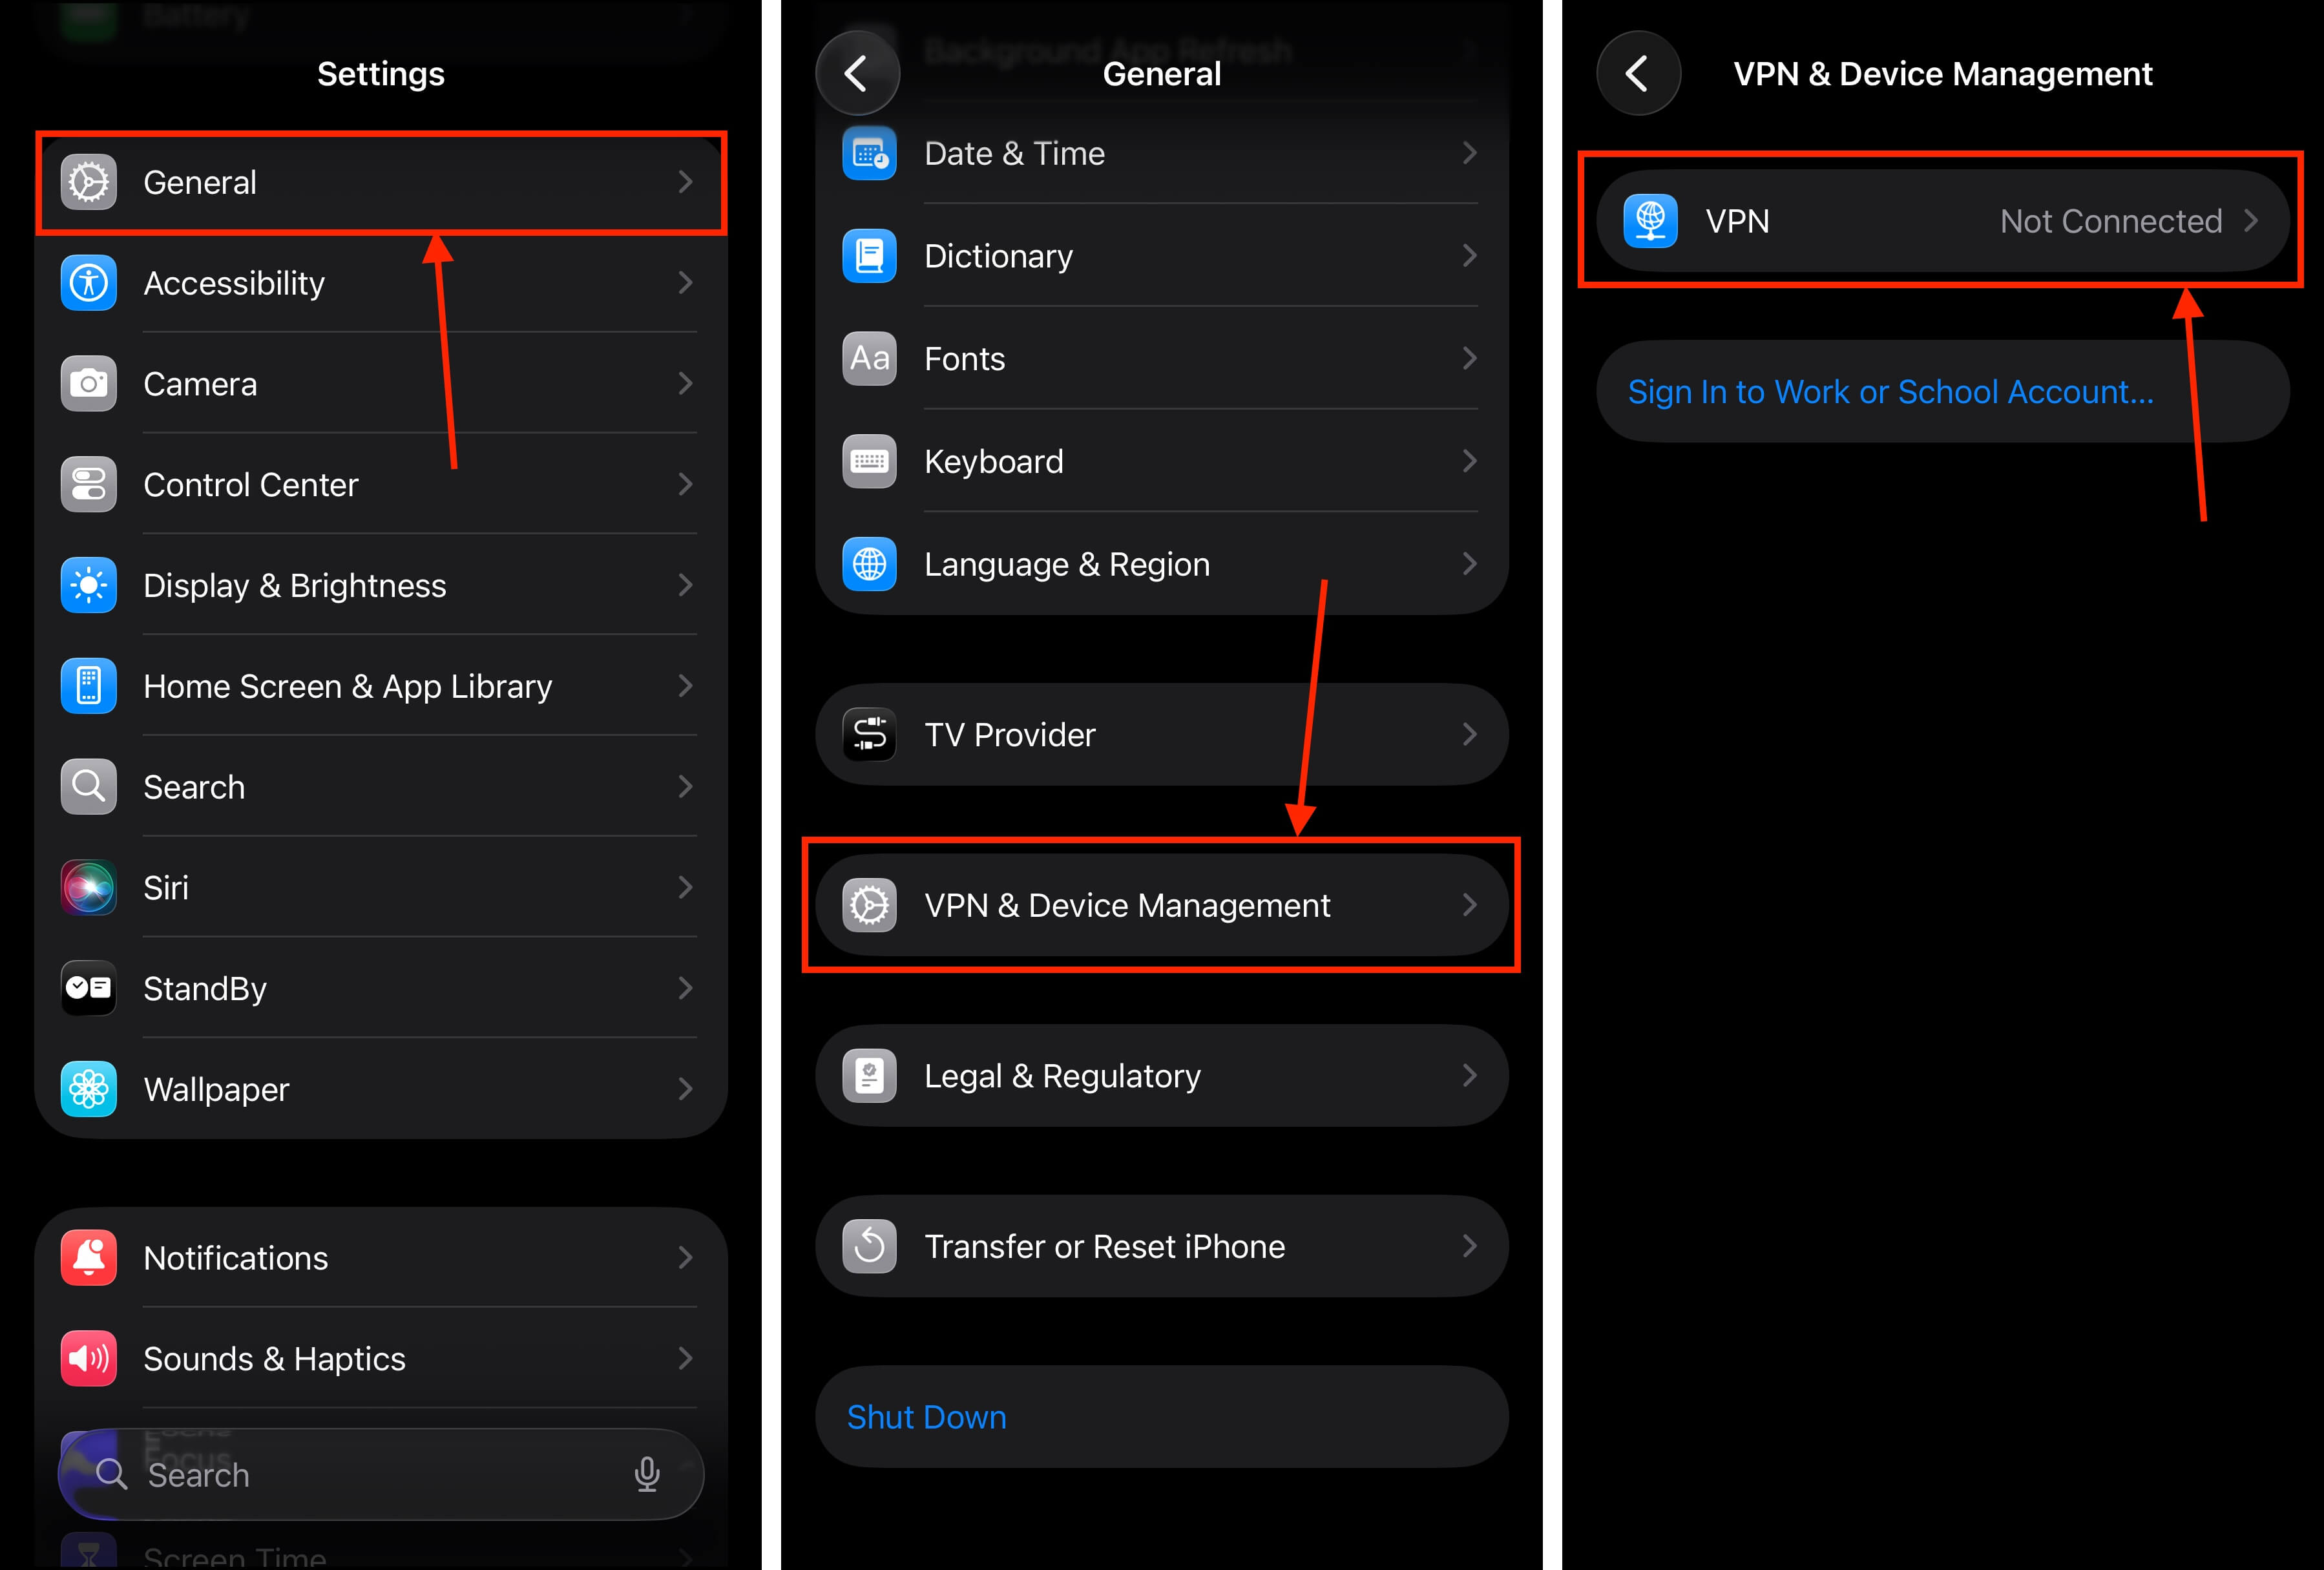
Step 2. Tap General.
Step 3. In the General menu, scroll down to the bottom and tap VPN & Device Management.
Step 4. Tap VPN.
Step 5. Beside the VPN profile you want to delete, tap the i button.
Step 6. Tap Delete VPN.
Step 7. Finally, in the pop-up that appears, tap Delete to confirm the action.

Once your VPN profile has been deleted, uninstall the VPN app itself from your device. Then, restart your iPhone to clear any VPN-related cache data.
Final Tips
Before you go, we want to share a few behavior-related tips to help keep your iPhone running smoothly, regardless of what iOS you’re running. First, always keep a storage buffer with 10-15% of your total storage capacity to give iOS enough elbow room to operate at its best.
Second, restart your iPhone at least once a week–this clears out any leftover cache data, letting you run iOS fresh. Finally, take care of your battery! Your iPhone slows down to accommodate less power, so keeping your battery in top shape. Always keep it charged, never allow your battery to reach 0%, and avoid overheating your device.


